If you have a slow or clogged sink, shower, tub, or other household drain, a drain auger can help you reach a blockage that is too deep to remove from the drain opening by hand.
The important part is not simply getting the cable into the pipe. You need to use the right auger, choose the right access point, keep the cable under control, recognize what resistance means, and know when continuing could do more harm than good.
Insert the correct auger cable into the drain or an appropriate access point, feed it forward gradually, and rotate the cable as needed while keeping only a short, controlled section exposed. When you meet resistance, do not force the cable. Work it gently to determine whether you are passing a pipe bend or contacting the clog. Once the obstruction breaks up or hooks onto the cable, retract the auger slowly, remove debris, and test the drain with water. Stop if the cable repeatedly kinks, becomes stuck, the blockage will not clear, or several fixtures are backing up at once.
Before You Start: Make Sure an Auger Is the Right Next Step
A drain snake is useful for many localized clogs, but not every drainage problem should immediately be attacked with a cable.
- Only one fixture is slow or clogged.
- The visible stopper, strainer, or easy-to-reach hair has already been checked.
- A plunger or basic cleaning did not solve the problem.
- You have an auger designed for that type and size of drain.
- You can safely access the drain without forcing or dismantling unfamiliar plumbing.
- Several drains are backing up or draining slowly at the same time.
- Sewage is coming back through a tub, shower, toilet, or floor drain.
- The same clog keeps returning.
- You suspect a main sewer line or root problem.
- The cable repeatedly binds, twists, or becomes stuck.
- There is drain-cleaning chemical still sitting in the pipe.
A problem affecting one fixture is more likely to be located near that fixture or its branch piping. When several fixtures are affected together, the obstruction may be farther downstream in shared drainage piping. If you want to understand why that distinction matters, see our guide to how a home drainage system works.
If a chemical drain opener has already been poured into a clogged drain, do not immediately put your hands, tools, or auger cable into that chemical-filled water. Splashing can expose your skin and eyes to a corrosive product.
Follow the chemical product’s safety instructions and the auger manufacturer’s instructions before proceeding. Wear appropriate eye protection and suitable gloves for the tool you are using.
Drain Snake vs. Drain Auger: Is There a Difference?
In everyday plumbing language, drain snake, plumbing snake, and drain auger are often used interchangeably. All describe tools that send a flexible cable into drainage piping to reach and work through an obstruction.
What matters more than the name is the tool’s design. A small manual drum auger meant for a sink or tub is not the same tool as a toilet auger or a larger drain-cleaning machine designed for bigger lines.
Choose the Right Auger for the Drain
Before snaking a pipe, match the tool to the fixture and access point. Using a bigger or more aggressive machine is not automatically better.
A small hand or drum auger is commonly suited to localized sink-drain clogs when the cable and drain size match the tool instructions.
A small drain auger may be appropriate. On some tubs, the overflow opening provides better access than forcing a cable through the drain assembly.
Use a toilet or closet auger designed to travel through the toilet trapway while reducing the chance of scratching the bowl.
Larger piping may require a longer, heavier cable or different equipment. Follow the tool’s rated applications rather than guessing by cable length alone.
A small household auger is not a substitute for professional main-line equipment. Multiple backups, sewage, or suspected roots deserve a different level of diagnosis.
What You’ll Need
- The correct drain auger or plumbing snake for the fixture
- Eye protection
- Appropriate gloves
- A bucket
- Old towels or absorbent rags
- A flashlight
- Basic tools for removing a stopper, overflow plate, or P-trap if appropriate
- Cleaning supplies for the tool and work area afterward
Before using any powered or auto-feed auger, read that model’s operator instructions. Cable direction, controls, safe working distance, accessories, and personal protective equipment can differ between machines.
How to Use a Drain Auger Step by Step
1. Identify Where the Clog Is Likely to Be
Start by checking how many fixtures are affected.
- One slow sink or tub: the clog may be near the stopper, trap, or branch drain serving that fixture.
- Several nearby fixtures: the obstruction may be in shared downstream piping.
- Multiple fixtures throughout the home: consider the possibility of a larger building drain or sewer-line problem instead of repeatedly snaking individual fixtures.
Also check the easy-to-reach area first. Hair and debris immediately beneath a stopper or strainer may be removable without sending a long metal cable into the plumbing.
2. Choose the Best Access Point
Remove the drain stopper, strainer, or other removable obstruction if necessary and if you understand how it is assembled.
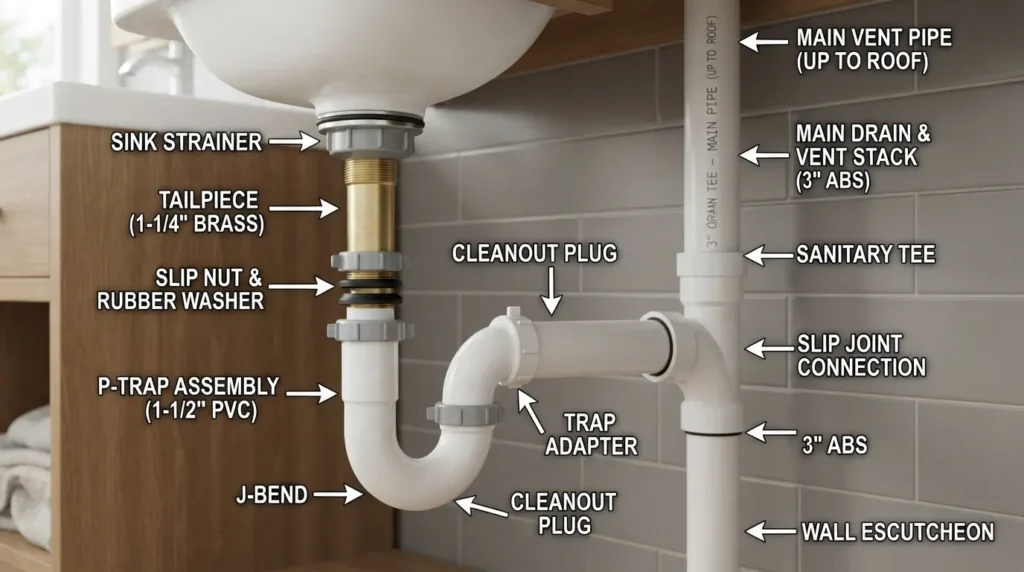
For a sink clog beyond the P-trap, removing the trap can sometimes provide a straighter path into the wall drain. Put a bucket underneath before loosening the trap because it normally contains water.
If you remove a P-trap, remember what it does: it holds a water seal that separates the room from sewer gases. Reinstall it correctly and check for leaks before considering the job finished.
For a bathtub, an overflow opening may provide a better cable path on some installations than trying to force the auger through the tub drain.
3. Feed the Cable Into the Drain Slowly
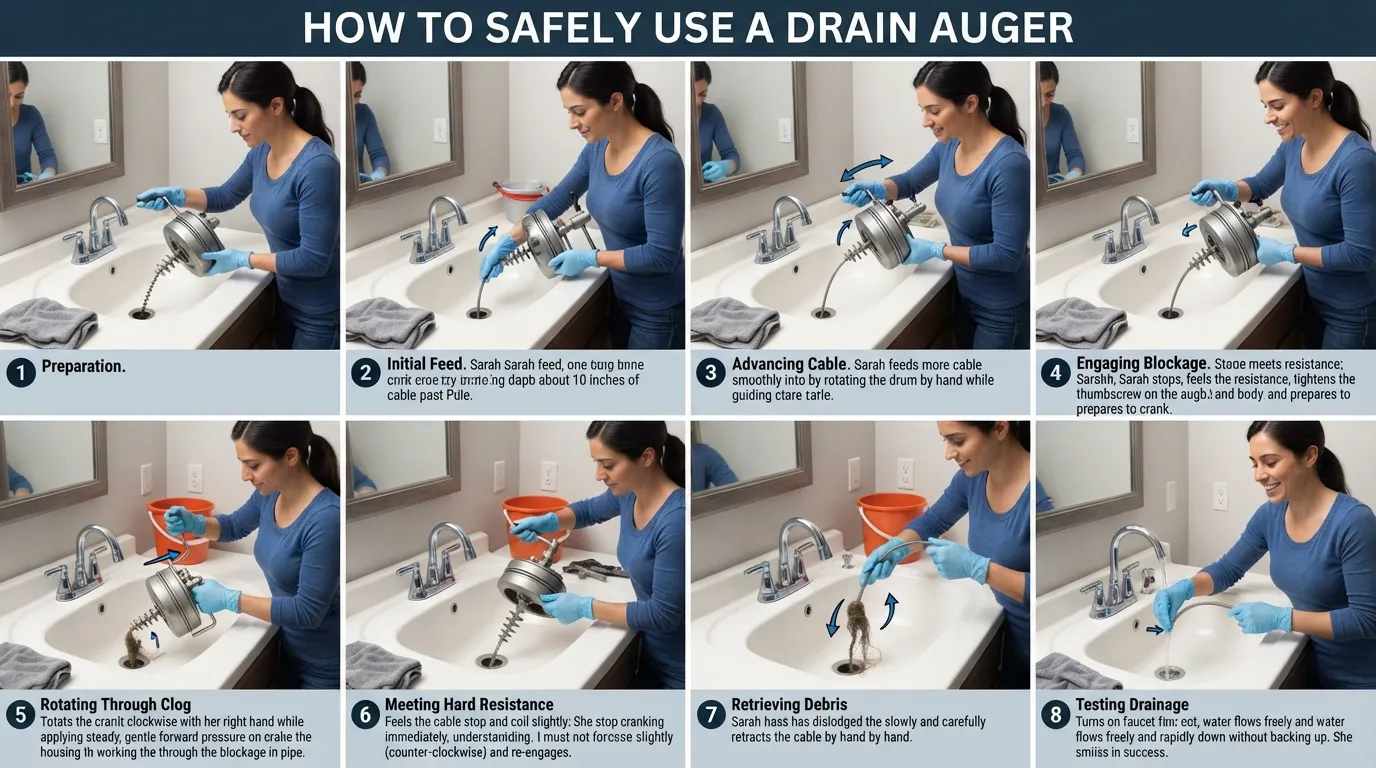
Insert the cable tip into the drain opening or appropriate access point. Feed it forward gradually rather than pulling a long section out of the drum and trying to push it all at once.
On a typical hand auger, keeping only a short section of exposed cable between the auger body and the pipe opening gives you better control. Some common guidance uses roughly 6 to 12 inches during working strokes, but your tool manufacturer’s instructions should take priority.
The more loose cable you leave between the auger and the drain opening, the easier it is for the cable to whip, bow, twist, or kink. Keep the working section short and controlled.
4. Rotate and Advance the Auger
Once the cable reaches resistance, secure or control the cable according to your auger’s mechanism and rotate it in the operating direction specified by the manufacturer while applying gentle forward pressure.
Do not treat the cable like a rigid rod. The goal is to let the rotating flexible cable negotiate the pipe and work the obstruction—not to ram it forward.
Feed additional cable in small increments as you make progress.
5. Learn What the Resistance Is Telling You
This is where many first-time users get into trouble. Feeling resistance does not automatically mean you have found the clog. A plumbing snake also has to negotiate bends and fittings.
The cable is probably traveling through relatively open pipe. Continue feeding it under control.
You may be moving through a bend or fitting. Continue carefully instead of assuming every restriction is debris.
You may have reached an obstruction. Rotate gently and make short forward-and-back movements rather than forcing the cable.
Stop. Do not keep adding torque. Reduce the exposed cable and follow the tool instructions for safely relieving the twist.
Do not simply push harder. Retract and reassess your access point, tool choice, and whether the blockage is appropriate for DIY augering.
6. Work the Clog Without Forcing the Cable
When you believe you have reached the actual obstruction, rotate and advance the auger in small, controlled movements.
Depending on the obstruction and cable head, the auger may:
- break soft material apart,
- make an opening through buildup,
- hook hair or fibrous debris, or
- bring part of the obstruction back with the cable.
If you stop making progress, pull the cable back instead of repeatedly applying more force. Inspecting what comes out can help you decide what to do next.
7. Retract the Cable Slowly
Pull the auger back under control. Continue managing the cable so it does not whip around the room or spread drain debris onto nearby surfaces.
If material is wrapped around the auger head, remove it carefully while wearing appropriate protection. You may need to repeat the process if only part of the blockage came out.
8. Test the Drain
Once you believe the obstruction has been cleared, test the fixture with water.
Do not judge success only because a small amount of water disappears. You want the drain to accept a normal flow without quickly backing up again.
- Water drains at its normal speed.
- Water does not immediately rise back into the fixture.
- The same fixture remains clear after another test.
- Any P-trap or fitting you removed stays dry at the connections.
- Other fixtures are not showing new backup symptoms.
9. Reassemble and Clean Up
Reinstall any stopper, overflow plate, P-trap, or other component you removed. Run water and inspect all disturbed connections for leaks.
Clean the auger cable and work area according to the tool manufacturer’s maintenance instructions. Drain cables can come back coated with dirty wastewater, grease, hair, sludge, and other material, so cleanup is part of the job—not an optional final step.
How to Tell a Clog From a Pipe Bend
You cannot identify every obstruction by feel alone, but the way the cable behaves can give you clues.
A normal bend may create resistance and then allow the cable to continue as you rotate gently. A clog is more likely to create persistent resistance in the same area, especially if working the cable produces debris or changes how the drain flows.
A sudden hard stop that never gives way is not a reason to apply maximum force. The cable could be meeting a tight fitting, incorrect access path, damaged piping, a solid object, or a blockage your tool is not designed to handle.
When in doubt, retract the auger and reassess. Controlled troubleshooting is safer than trying to overpower the pipe.
How to Use a Drain Auger on Different Fixtures
Kitchen Sink
Start by checking the strainer and accessible trap area. If the clog lies beyond the P-trap, removing the trap can sometimes provide more direct access to the wall drain.
Place a bucket underneath before removing a trap. If the sink has additional equipment such as a garbage disposal, do not blindly feed an auger through unfamiliar components. Use a proper downstream access point and follow the appliance’s safety instructions.
Bathroom Sink
Hair, soap residue, and sludge can collect around a pop-up stopper before a deeper drain snake is necessary. Remove and clean easily accessible debris first.
If the clog is beyond the trap, a small sink auger can be fed into the downstream drain line through an appropriate access point.
Bathtub
A tub auger may sometimes be routed through the overflow opening rather than pushed directly through the drain. This can provide a more practical path past the tub’s drain assembly.
Do not force the cable through hardware it is not meant to pass through.
Shower
Remove accessible hair and debris from the drain opening first. If the clog is deeper, use a correctly sized auger and feed it gradually through a suitable drain access point.
Toilet
A toilet deserves its own tool. Use a toilet or closet auger rather than treating the fixture exactly like a sink drain. Toilet augers are designed to guide the cable through the toilet trapway while providing better control around the porcelain fixture.
Outside Cleanout or Main Drain
An exterior cleanout can provide access to larger drainage piping, but that does not mean a small hand auger is the right machine for the job.
If you have backups in several fixtures, sewage coming through a low drain, or a blockage that appears to be deep in a main line, stop treating it as a simple sink clog. Larger drain machines require the correct cable, cutter, setup, and operating technique.
What the Debris on Your Auger Can Tell You
What comes back on the cable can provide useful clues, although it should not be treated as a definitive pipe diagnosis.
- Hair and soft sludge: often points toward a localized bathroom drain buildup.
- Greasy or sticky buildup: can be consistent with material accumulating in a kitchen drain.
- Foreign material: may explain why normal flow suddenly stopped.
- Root-like material: should raise concern about a larger underground drainage or sewer-line issue rather than encouraging you to keep pushing a small household auger farther.
- Almost nothing on the cable: does not prove the line is clear. The cable may have passed through a soft blockage, followed the wrong path, or failed to reach the actual obstruction.
The best evidence is the combination of what comes back, how the cable behaved, and whether normal drainage returns afterward.
Drain Auger Not Working? Use This Troubleshooting Guide
The Cable Will Not Go Farther
Do not assume you need more force. You may be at a bend, tight fitting, obstruction, or unsuitable access point. Rotate gently while keeping the working section short. If there is still no safe progress, retract the cable and reassess.
The Cable Keeps Coiling or Kinking
Stop rotating. Too much exposed cable or continued torque can allow the cable to twist instead of moving forward. Reduce the amount of exposed cable and follow your auger’s instructions for safely releasing the twist before continuing.
The Auger Goes in Many Feet, but the Drain Is Still Slow
More cable does not automatically mean better cleaning. You may have passed through part of the blockage without removing it, the clog may be located somewhere else, or the drainage problem may involve a larger shared line.
Retract the cable, inspect it, test the fixture, and reconsider the diagnosis instead of repeatedly feeding the entire cable into the pipe.
The Drain Clears but Clogs Again Soon
A recurring clog can indicate that only part of the buildup was removed or that an underlying problem remains. Repeatedly making a temporary hole through the same obstruction is not the same as restoring the pipe properly.
Several Drains Are Still Slow
Stop focusing on one fixture. Several affected drains can indicate a blockage farther downstream in shared drainage piping and may require professional diagnostic and cleaning equipment.
Common Drain Auger Mistakes to Avoid
- Using the wrong auger for the fixture. A toilet, small sink line, and main sewer line are not the same job.
- Forcing the cable through resistance. More force can create a cable-control problem without solving the clog.
- Leaving too much cable exposed. A long unsupported section is harder to control and more likely to twist or kink.
- Continuing when the cable is winding around itself. Stop and correct the cable before proceeding.
- Assuming every resistance point is the clog. Drain piping contains bends and fittings.
- Ignoring chemical drain cleaner already in the pipe. Splash exposure is a serious safety concern.
- Snaking a fixture without first checking accessible debris. Sometimes the blockage is sitting directly beneath a stopper or strainer.
- Judging success too quickly. Test normal water flow after clearing the obstruction.
- Repeatedly snaking a recurring or multi-fixture backup. The problem may require a different diagnosis.
Can a Drain Auger Damage PVC Pipe?
Yes, a drain auger can potentially damage plumbing if it is used incorrectly, but the answer is more nuanced than saying that augers are inherently unsafe for PVC.
Risk increases when you use an unsuitable cable or machine, aggressively force the cable, continue after it kinks or binds, or use powerful equipment in piping it was not intended to clean. Existing pipe damage can also make a drainage system more vulnerable.
Use the tool rated for the pipe and fixture, keep the cable controlled, and stop when something does not feel right. With powered drain-cleaning equipment, the manufacturer’s operating instructions are especially important.
Should You Run Water While Using a Drain Snake?
Do not treat “always run the water” as a universal rule.
During active augering, your priority is safe cable control and following the instructions for your specific tool and fixture. If a sink is already holding water or the drain is nearly completely blocked, adding more water can create unnecessary overflow and splashing.
Once you believe the clog has broken up, running water is useful for testing whether the drain is actually open and for carrying loosened material downstream when the fixture can accept the flow safely.
See a Drum Auger Used on Common Household Drains
If you learn better by watching the cable movement and setup, this demonstration covers the use of a drum-style auger on several common household drain types.
When to Stop Snaking the Drain and Call a Plumber
A drain auger is a useful DIY tool, but knowing when to stop is part of using it correctly.
- Several fixtures are backing up together.
- You see or smell sewage backing up indoors.
- The blockage repeatedly returns.
- The auger stops at the same place and cannot safely advance.
- The cable becomes stuck or repeatedly kinks.
- You suspect roots, a damaged sewer line, or another structural problem.
- You need equipment beyond a small household drain auger.
If you are in Miami and a clog has moved beyond a straightforward DIY fix, our professional drain cleaning service can address the blockage with equipment matched to the actual drainage problem.
How to Prevent the Next Drain Clog
Once the drain is clear, prevention is easier than repeatedly snaking the same pipe.
- Keep hair out of bathroom drains with an appropriate strainer or catcher.
- Do not intentionally send grease and oil down kitchen drains.
- Remove visible drain buildup before it becomes a complete blockage.
- Pay attention when a drain begins slowing instead of waiting for standing water.
- Do not flush items that your plumbing system is not designed to carry.
- Investigate recurring clogs instead of treating every recurrence as an isolated event.
Frequently Asked Questions
What is the best way to use a drain auger?
Use an auger sized for the fixture, choose a suitable access point, feed the cable slowly, keep the exposed section short, and rotate without forcing it. Work resistance in small movements, retract the cable if progress stops, remove debris, and test normal water flow afterward.
How does a plumbing snake work?
A plumbing snake sends a flexible cable through a drain pipe until it reaches an obstruction. Rotation helps the cable move through bends and can allow its tip to break into, hook, or disturb clog material so it can be removed or flushed away.
What are the most common mistakes when using a drain snake?
Common mistakes include using the wrong auger, forcing the cable, exposing too much cable at once, continuing after the cable starts twisting, assuming every pipe bend is the clog, and continuing DIY work even when several drains are backing up.
What’s the difference between a drain snake and an auger?
The terms are frequently used interchangeably. In practice, the more useful distinction is between tool designs: small hand snakes, drum augers, toilet augers, powered sink machines, and larger drain-cleaning equipment serve different applications.
Can a drain auger damage PVC pipes?
It can if the wrong tool is used or the cable is forced, kinked, or operated too aggressively. Match the auger to the drain and follow its instructions rather than assuming that more power or more cable is safer.
Should you run water while using a drain snake?
Not necessarily during the entire process. Work the auger according to its instructions and avoid creating an overflow. Once you believe the clog has cleared, use water to test normal drainage and help carry loosened debris away when it is safe to do so.
What do plumbers recommend for unclogging drains?
The appropriate method depends on where the blockage is and what is causing it. Accessible debris may only need manual removal, some localized clogs respond to plunging or a properly sized auger, while recurring, main-line, root-related, or multi-fixture problems may require professional drain-cleaning and diagnostic equipment.
Does Dawn dish soap unclog a drain?
Dish soap is not a dependable solution for a deep or compacted mechanical blockage. It may help loosen some greasy residue in limited situations, but hair, foreign objects, heavy buildup, roots, or a blocked downstream line require the cause of the obstruction to be addressed.
Why shouldn’t you rely on baking soda and vinegar for a clogged drain?
The visible fizz does not prove that a compacted obstruction deeper in the pipe has been removed. For a mechanical clog such as hair, a foreign object, heavy buildup, or roots, identifying and physically addressing the obstruction is more useful than assuming a foaming reaction has cleared the line.
How much does a plumber charge to auger a drain?
There is no single price that applies to every drain. Cost can vary with the location and severity of the clog, access to the line, the equipment required, and whether additional diagnosis or repair is needed. Ask for the price or estimate for your specific drainage problem rather than relying on a generic national figure.
Using a drain auger successfully is less about feeding the maximum amount of cable into a pipe and more about maintaining control.
Choose the correct auger, identify the best access point, feed the cable in short increments, pay attention to resistance, and never confuse force with progress. Once you think the clog is clear, retract the cable carefully, inspect what you removed, restore any plumbing you disassembled, and test the fixture under normal flow.
If the problem affects multiple drains, repeatedly returns, or the cable will not safely move through the line, that is useful diagnostic information—not a reason to keep forcing the auger.
If DIY augering has not restored normal drainage, you do not have to keep guessing at what is inside the pipe. The Miami plumbing team at EZ Plumbing Repair Services can help you determine the right next step.