Winterizing a Home when Away or is Sitting Vacant: The Complete Checklist
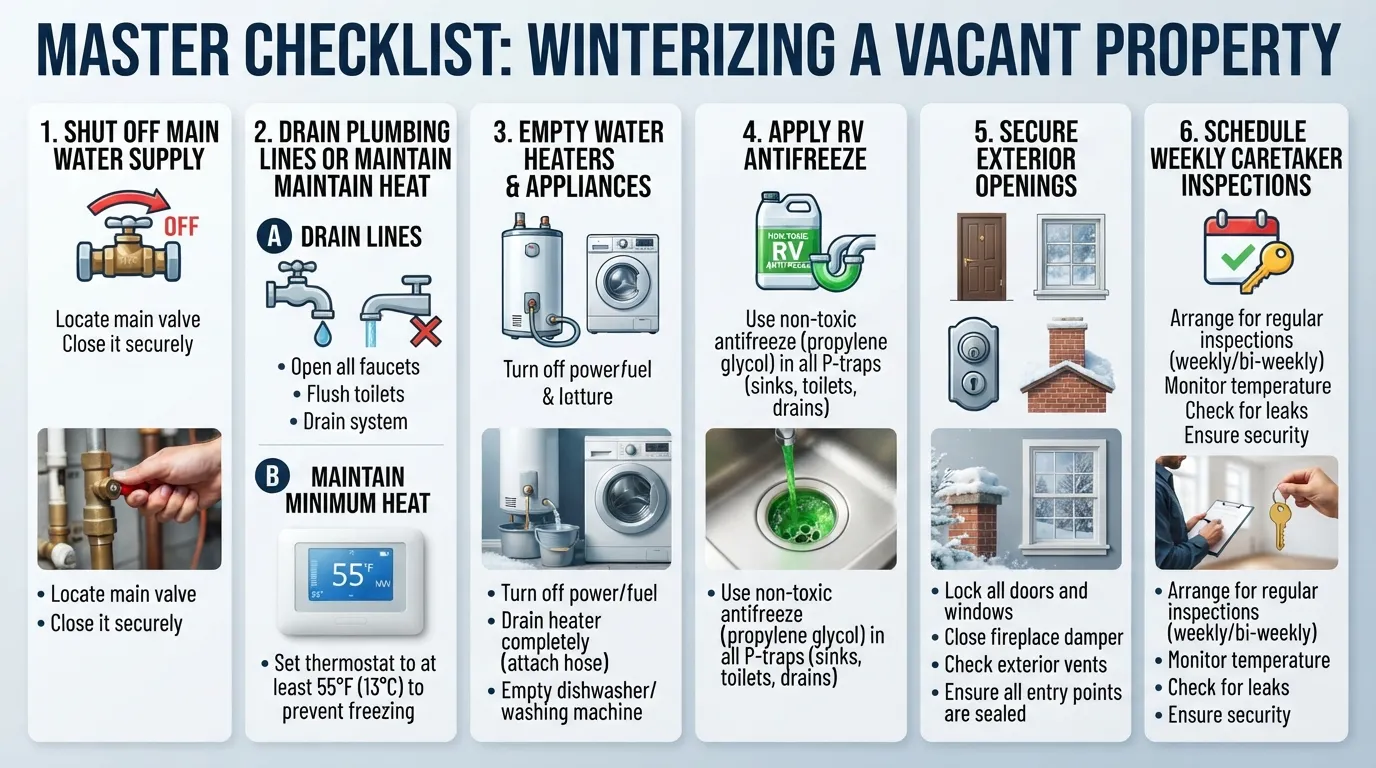
How to Winterize a Vacant Home: Quick Answer and Checklist
Winterizing an unoccupied house requires a systematic approach to protect your property from catastrophic frozen pipes and costly water damage. If you are preparing an investment property, seasonal residence, or estate for the cold months, consulting a licensed plumber ensures your main water shut-off and plumbing infrastructure are properly secured against freezing temperatures.
The 10-Step Quick Checklist
Shut off the main water supply
Drain pipes and fixtures
Drain the water heater
Blow out remaining water (if heat stays off)
Add non-toxic RV antifreeze to traps and toilets
Disconnect and drain hoses and outdoor spigots
Set thermostat to 55°F (13°C) if heat stays on
Install a freeze or leak alarm
Secure doors and windows, and hold mail
Arrange regular inspections
Why Vacant Homes Are at Higher Risk
Vacant homes lack daily human presence, meaning minor plumbing failures can quickly escalate into major structural disasters before anyone notices. A single burst pipe can release hundreds of gallons of water per hour, resulting in severe mold growth and thousands of dollars in property damage.
Which Plan Fits Your Situation?
Review Section 2 to determine whether maintaining partial heat or completely winterizing the plumbing system is best for your property timeline.
Video Overview: Winterizing Your Vacant Property
For a visual walkthrough of the purging and antifreeze process, watch the following guide:
Heat On or Heat Off? Choose the Right Plan by Vacancy Length
Choosing between maintaining heat or completely draining your plumbing depends entirely on your vacancy timeline and local climate severity. Short-term absences can safely rely on a low thermostat setting, while long-term or multi-month winter departures require a complete system shutdown to eliminate the risk of catastrophic burst pipes during unexpected power failures.
Decision Table: Vacancy Length × Heat Status
| Duration | Heat On? | Heat Off? | Recommended Action |
| 2 Weeks | Yes (55°F) | No | Leave heat active, shut off main water valve, and leave interior doors open. |
| 3 Months | Optional | Recommended | If power is unreliable, drain all lines and add non-toxic RV antifreeze. |
| 6 Months | No | Yes | Full winterization: blow out lines, drain water heater, and winterize P-traps. |
| 1 Year | No | Yes | Comprehensive dry shutdown with professional inspection scheduling. |
What to Do When Leaving the House for 2 Weeks
Short-term vacancies up to fourteen days do not require a full plumbing blowout if your local climate allows basic temperature maintenance.
Set your interior thermostat to a minimum setting of 55°F (13°C) to keep interior wall cavities warm.
Locate and close your main water shut-off valve, then drain low-level fixtures to relieve pressure.
Keep all interior doors and cabinet doors open to allow warm air to circulate around plumbing pipes.
What to Do When Leaving for 3 Months
A seasonal absence spanning a quarter of a year increases your exposure to severe winter storms and extended grid instability. Snowbirds and seasonal homeowners must balance energy costs against freeze risks.
Assess local utility reliability; if winter storms frequently knock out power, leaning toward a heat-off plan is much safer.
If keeping heat on, ensure your heating system has backup battery power or schedule a neighbor to check the property weekly.
Alternatively, perform a partial drain of the system while maintaining a low ambient temperature to reduce utility consumption.
What to Do When Leaving for 6 Months
Leaving an unoccupied house for half a year or an entire winter season requires a complete heat-off and dry system approach. Relying solely on a thermostat for six months invites total disaster if your furnace fails mid-season.
Shut off the main water supply completely and drain every fixture, line, and appliance from top to bottom.
Empty the water heater entirely and disconnect its power source or gas pilot light.
Pour non-toxic RV antifreeze into all P-traps and toilet bowls to prevent stagnant water from freezing and cracking porcelain or seals.
What Happens If You Leave a House Empty for a Year?
A multi-year or full-year vacancy demands rigorous structural and mechanical preservation beyond basic plumbing winterization. Stagnant water and dry indoor air create compounding maintenance hazards.
Every gasket, washer, and toilet flapper will dry out and crack over twelve unmaintained months, leading to massive leaks upon reactivation.
Mold and mildew can take over damp areas if humidity is left uncontrolled in unheated, sealed environments.
Arrange for monthly professional property inspections to satisfy homeowner insurance requirements and catch slow leaks early.
Is It Okay to Leave a House Unheated in Winter?
Leaving a home completely unheated in freezing temperatures is only safe if every drop of water has been purged from the structure. If any moisture remains trapped in P-traps, supply lines, or appliance hoses, freezing temperatures will cause severe structural damage.
Plumber’s Rule of Thumb: “Relying purely on a thermostat-controlled heating plan is a gamble during severe winter storms. If a major ice storm knocks out your power grid for 48 hours, a heated home drops to freezing temperatures rapidly, and frozen supply lines hidden inside exterior wall cavities will burst before power is restored.”
Your Pre-Departure Timeline
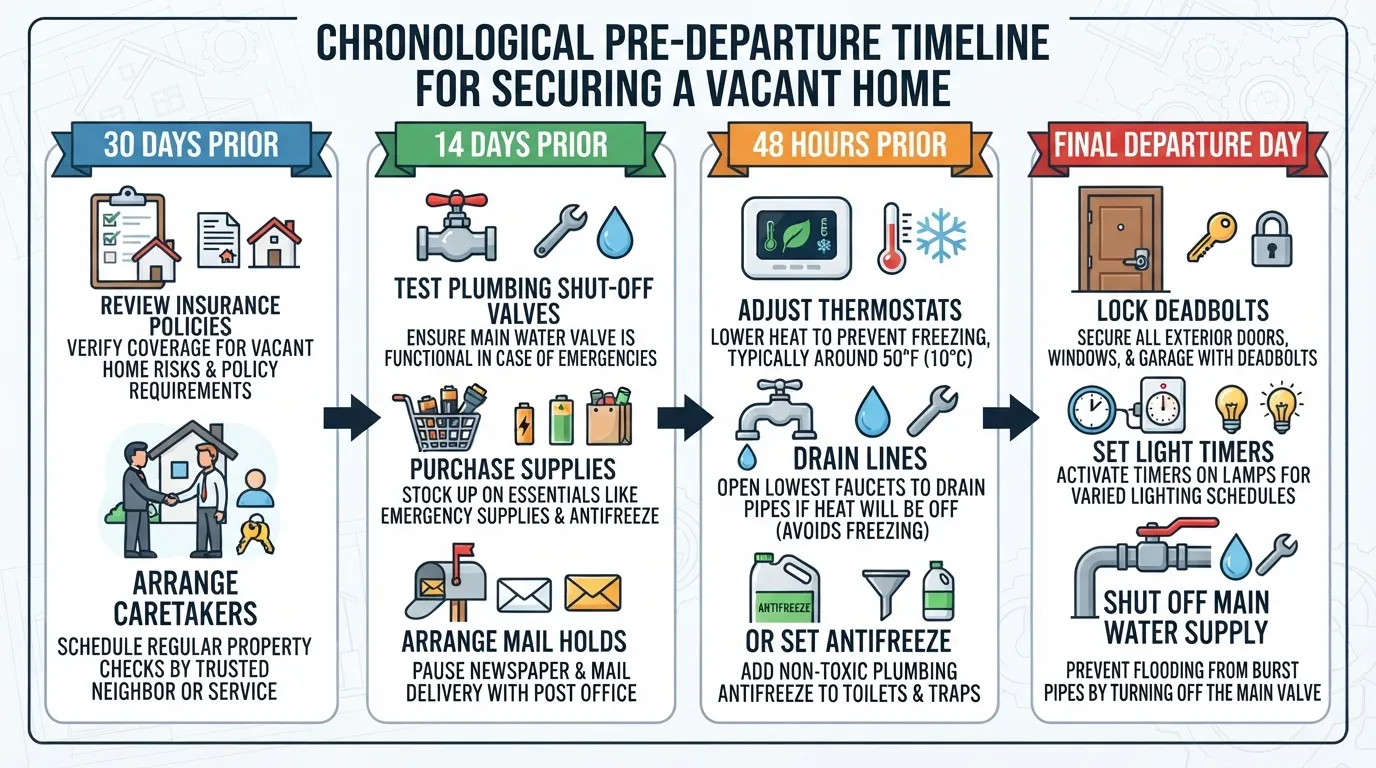
A structured pre-departure timeline prevents rushed mistakes and ensures no critical winterization step is overlooked before an extended absence. Breaking your preparation into distinct weekly phases protects your property and satisfies the strict compliance terms of most homeowner insurance policies.
2 to 4 Weeks Before You Leave
Early planning gives you sufficient lead time to coordinate with service professionals and secure dependable local supervision for your property.
Book a comprehensive home inspection to catch minor roof leaks, window drafts, or electrical hazards before cold weather sets in.
Contact your homeowner’s insurance provider to review vacancy clauses, policy duration limits, and required supervision intervals.
Hire a local caretaker or property manager, providing them with emergency contact numbers and spare keys.
Schedule a professional heating system service to inspect your furnace, replace filters, and test ignition controls.
1 Week Before You Leave
As departure approaches, focus on securing essential services, clearing perishable goods, and verifying that remote monitoring hardware functions correctly.
Clean out refrigerators and pantries completely to deter pests, and leave refrigerator doors propped open.
Test your thermostat settings, low-temperature alerts, and smart leak sensors to ensure real-time alerts reach your phone.
Schedule reliable snow removal and lawn maintenance services to maintain an occupied appearance and prevent liability issues.
Departure Day Checklist
Your final day on-site requires a methodical walkthrough to confirm all mechanical shutdowns are complete and the building is secured.
Turn off the main water supply valve and open lowest-level fixtures to relieve system pressure.
Perform a final walk-through check of all windows, exterior doors, and appliance power switches.
Lock all entry points securely and set your security alarm system.
Plumber’s Rule of Thumb: “Photograph every room, valuable item, and closed shut-off valve before leaving. Detailed photo documentation provides undeniable proof of the home’s pre-departure condition if you need to file an insurance claim or verify leak origins upon your return.”
Plan A: Leaving the Heat On
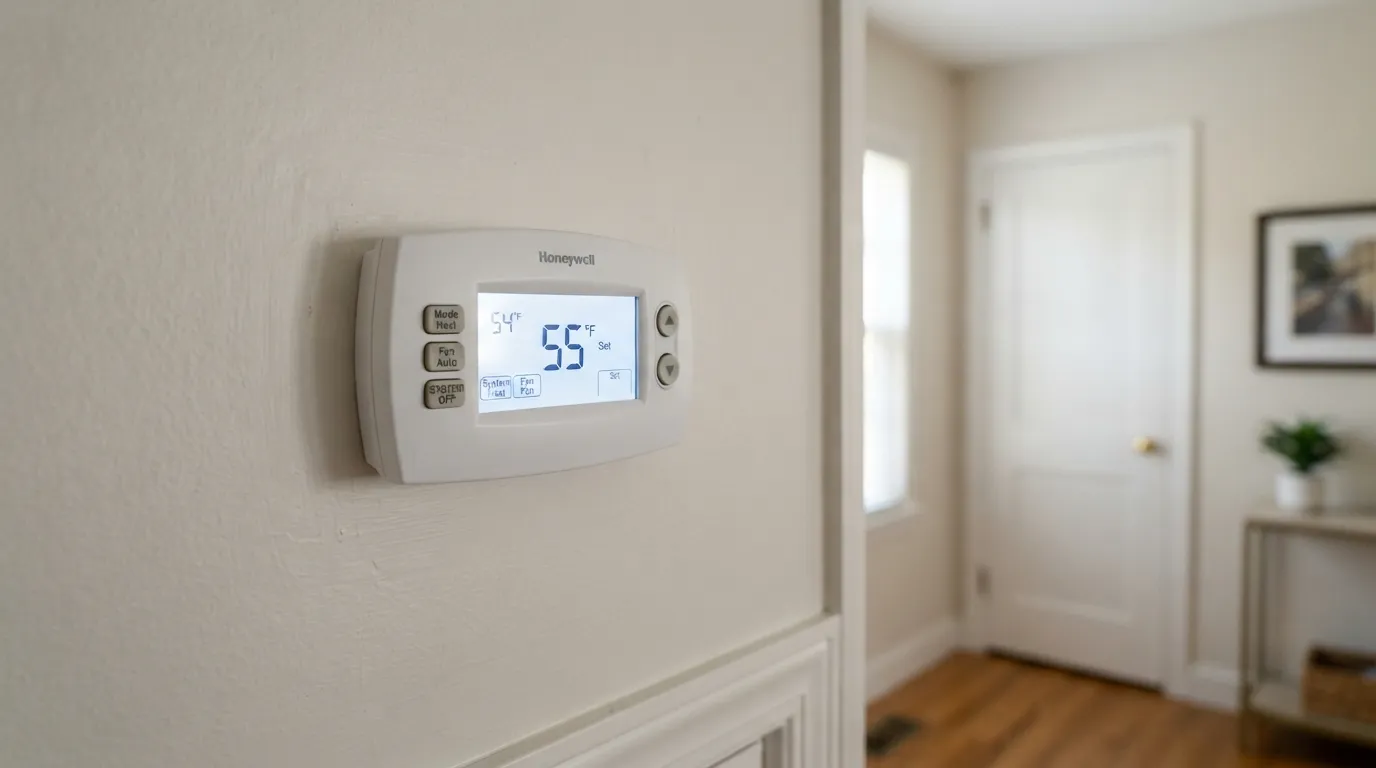
Maintaining active heating during a vacancy keeps indoor temperatures stable and prevents water lines from freezing without requiring a full plumbing drain. Choosing this method requires balancing energy efficiency with active mechanical safeguards to protect your property against unexpected equipment failures.
What Temperature Should You Keep an Unoccupied House in Winter?
Set your interior thermostat to a minimum of 55°F (13°C) to keep interior wall cavities warm enough to prevent supply lines from freezing.
In regions experiencing sub-zero winter extremes, increase your thermostat setting to 58°F or 60°F to account for cold spots near poorly insulated exterior walls.
Avoid setting your thermostat below 55°F, as ambient room sensors often read warmer than unheated crawl spaces and exterior-facing utility chases.
Utilize a programmable smart thermostat to remotely monitor home temperatures and adjust schedules if a sudden cold snap hits your area.
Open Cabinet Doors and Protect Exterior-Wall Pipes
Interior air circulation is essential for preventing localized freezing in bathrooms and kitchens situated along exterior walls.
Leave all under-sink cabinet doors open wide to allow ambient warm room air to reach supply lines and P-traps.
Wrap vulnerable water supply lines running through uninsulated crawl spaces or exterior walls with specialized foam pipe insulation or electric heat tape.
Keep interior doors fully ajar throughout the house so heat distributes evenly across every room without creating trapped cold pockets.
Install a Low-Temperature Alarm (Alert Below 45°F)
Relying solely on your furnace without a monitoring backup leaves your home vulnerable to undetected heating malfunctions.
Install a dedicated Wi-Fi freeze alarm or smart temperature sensor that triggers an immediate push notification or text message if indoor temperatures drop below 45°F.
Place sensors near exterior-facing walls and lowest-level bathrooms where freezing temperatures strike first.
Test your monitoring devices and Wi-Fi connection right before departure to ensure uninterrupted alert transmission.
Why Heat Alone Isn’t a Guarantee (Power Outage, Furnace Failure)
Even a properly calibrated heating system can fail due to mechanical breakdowns or severe weather events completely outside your control.
A major ice storm or wind event can knock out the local power grid for days, causing indoor temperatures to plummet rapidly below freezing.
Mechanical components like pilot lights, igniters, and blower motors can malfunction mid-season, shutting down your furnace without warning.
Combining your heat-on strategy with a main water shut-off minimizes disaster potential by ensuring zero pressurized water remains in the lines if heat fails.
Who Will Check the House, and How Often?
Automated sensors cannot fix a tripped circuit breaker or clean up a slow leak, making human oversight indispensable.
Arrange for a trusted neighbor, family member, or professional caretaker to inspect the interior and exterior of your home at least once a week.
Provide your designated checker with a detailed checklist covering visual checks of ceilings, floors, windows, and the thermostat display panel.
Share emergency contact numbers and local contractor details so your caretaker can act instantly if an automated freeze alarm goes off.
Plan B: How to Fully Winterize Plumbing in a Vacant House Without Heat
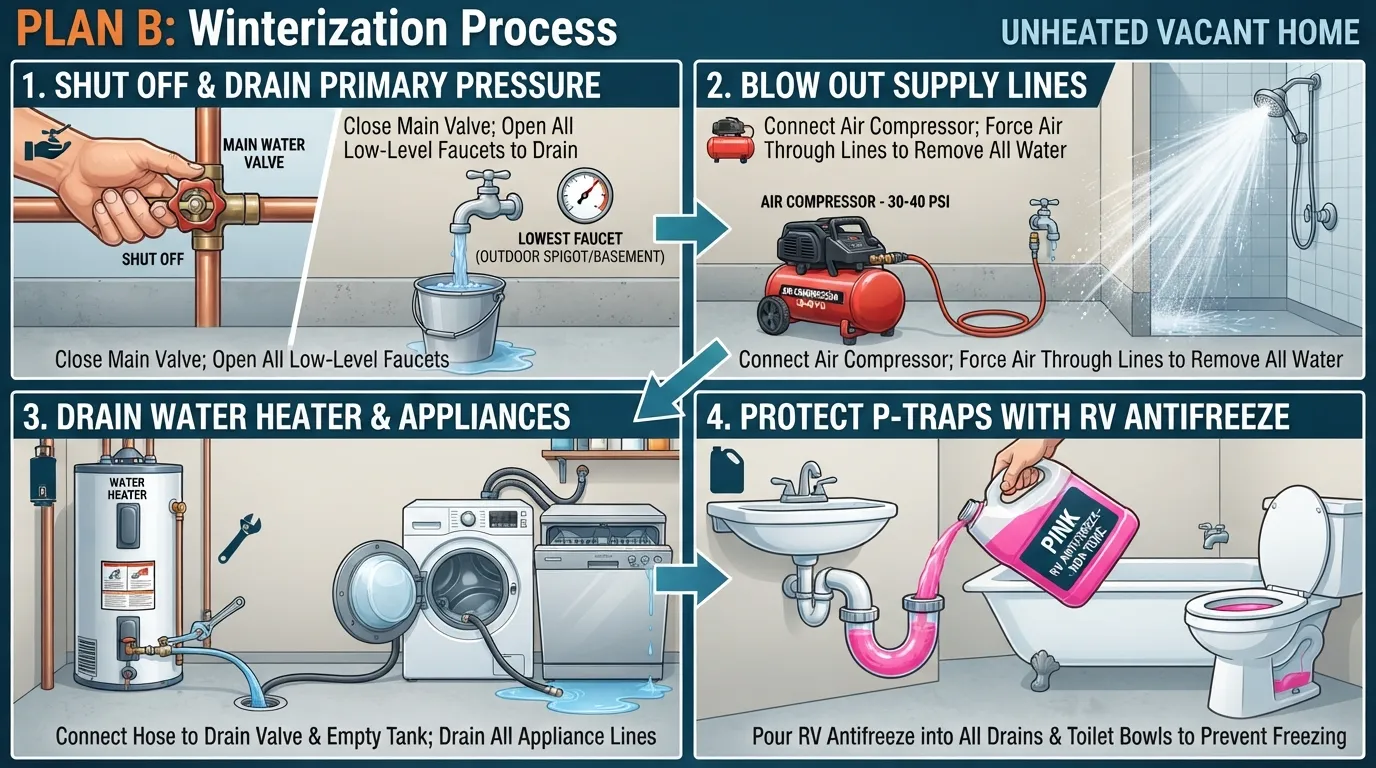
Completely shutting down and winterizing your plumbing system without maintaining heat eliminates the threat of frozen pipes during extended absences or unheated property sales. This exhaustive, step-by-step mechanical purge requires meticulous execution to remove every drop of trapped moisture from your supply lines and fixtures.
Step 1: Shut Off the Main Water Supply
Stopping incoming water at the source is the absolute foundation of any successful winterization project.
Locate your main shut-off valve, which is typically found where the municipal or well supply line enters your home’s foundation, near the water meter, or in an outdoor utility box.
Turn the valve completely clockwise until it is tightly sealed, stopping all water inflow to the house.
Test the shut-off effectiveness by opening a nearby interior sink faucet to confirm water pressure drops to zero and flow stops completely.
Step 2: Open All Faucets and Drain the Lines
Gravity is your first line of defense for purging standing water from elevated domestic supply lines.
Walk through your entire home opening every hot and cold water faucet, shower valve, and bathtub handle completely.
Open fixtures starting from the highest floor of your home and work your way down to the basement or lowest level to maximize gravity drainage.
Leave every faucet handle wide open in the neutral position so air can circulate and prevent a vacuum seal from holding water in the pipes.
Video Overview: Complete Plumbing Winterization Demo
For a detailed visual demonstration of the entire system draining and blowout sequence, watch the walkthrough below:
(Source: Complete Plumbing Winterization Demo on YouTube)
Step 3: Blow Out Remaining Water with an Air Compressor
Gravity alone leaves trapped pockets of water in low horizontal plumbing runs, requiring compressed air for complete removal.
Connect an air compressor equipped with a regulated pressure nozzle to an outdoor spigot, washing machine supply line, or specialized blowout adapter.
Set your compressor regulator strictly to a safe pressure level of 50 to 70 PSI maximum; higher pressures can rupture older soldered copper or plastic PEX fittings.
Systematically open and close each faucet, starting from the closest fixture to the compressor and moving to the furthest, until only dry air sprays out of each valve.
Step 4: Add Non-Toxic RV Antifreeze to Drains and Toilets
Standing water trapped inside fixture traps and porcelain bowls will freeze, expand, and crack infrastructure if left untreated.
Pour propylene glycol-based, non-toxic RV antifreeze directly into all sink and bathtub P-traps, floor drains, and laundry standpipes until colored fluid appears.
Fill each toilet tank and bowl with antifreeze to displace residual water and protect the internal trap seals.
Critical Warning: Never use toxic automotive ethylene glycol antifreeze, as it poses a severe poisoning hazard to wildlife, pets, and groundwater systems. If you notice clogged or slow drains during your pre-purge check, clear them immediately so antifreeze distributes evenly.
Quick Tip: Antifreeze and Drain Protection
Watch this short video demonstration for a quick visual guide on protecting your home’s traps and bowls:
(Source: Quick Antifreeze Drain Tip on YouTube)
Step 5: Flush and Drain Toilets and Tanks
Eliminating water from porcelain holding vessels prevents cracks that cause catastrophic interior flooding upon system reactivation.
Flush each toilet multiple times after shutting off the water supply to drain the storage tank and bowl completely.
Sponge out any remaining puddles of standing water at the bottom of the porcelain toilet tank.
Inspect components for wear, and note whether any toilet repair work is necessary before turning the water back on in the spring.
Common Mistakes That Lead to Burst Pipes
Forgetting Hidden Fixtures: Homeowners frequently overlook ice makers, refrigerator water supply lines, water softeners, and outdoor hose bibs.
Exceeding Safe Air Pressure: Pumping 100+ PSI of compressed air into old residential plumbing lines frequently damages soldered joints and threaded adapters.
Skipping P-Trap Protection: Leaving untreated water in sink traps or toilet bowls causes porcelain cracking when temperatures drop below freezing.
When to Call a Professional Plumber Instead
Complex Plumbing Infrastructure: Multi-story homes with complex manifold systems, tankless water heaters, or radiant floor heating loops require specialized blowout equipment.
Lack of Specialized Tools: If you do not own an air compressor, pressure regulators, or proper blow-out adapters, DIY execution risks incomplete water evacuation.
First-Hand Technician Tip: “Homeowners almost always forget to drain the washing machine cold inlet hose and the built-in vacuum breaker on outdoor hose spigots. If you are unsure about your home’s layout, hiring a professional eliminates costly guesswork.”
Water Heater, Appliances, and Special Systems
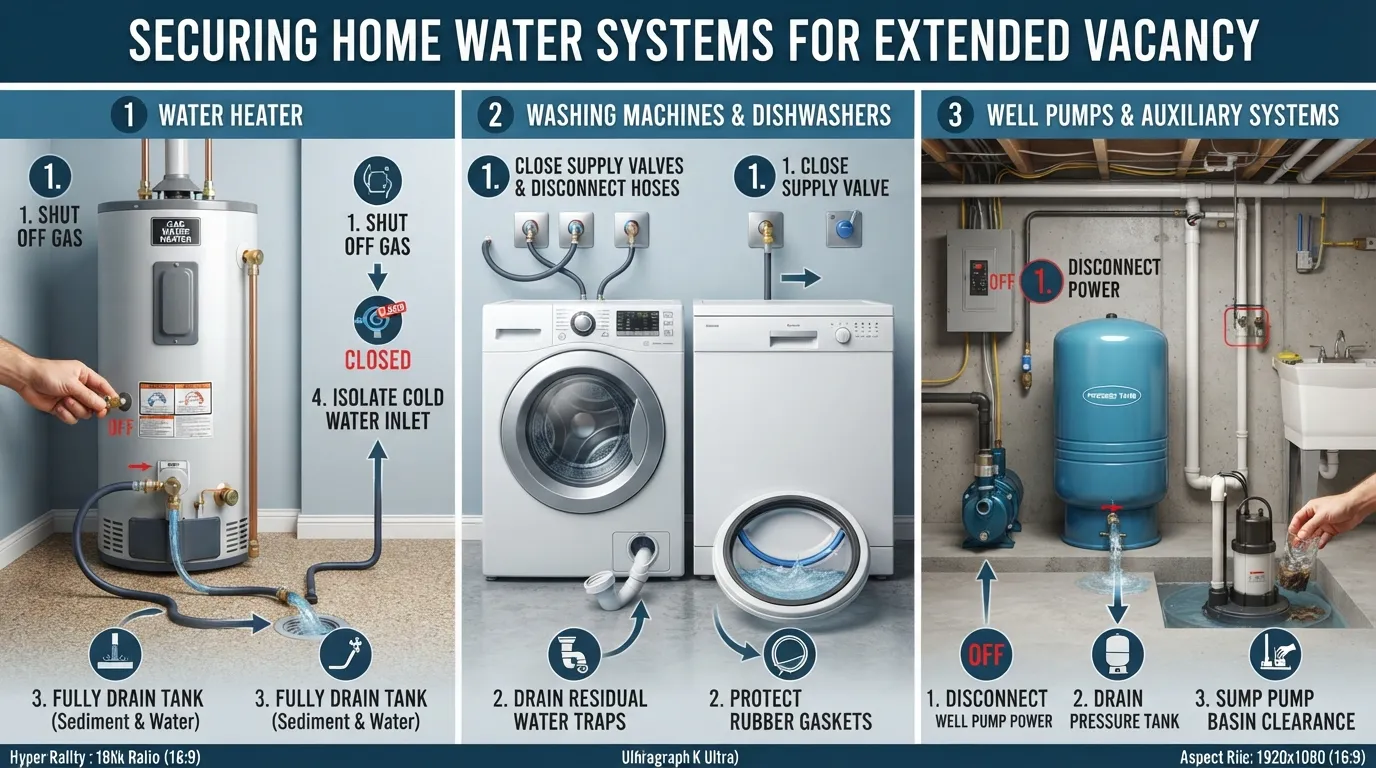
Securing your home’s main plumbing lines is only half the battle when preparing an unoccupied property for winter. Protecting complex appliances, secondary water systems, and outdoor infrastructure prevents hidden leaks and catastrophic mechanical failures from ruining your property while you are away.
How to Drain and Shut Down a Water Heater
Tank and tankless water heaters require specific shutdown procedures to protect heating elements and heat exchangers from freeze damage. Scheduling a professional water heater service before departure ensures your system is properly isolated.
Turn off the electricity at the breaker panel for electric units or switch the gas valve to the “Pilot” or “Off” position for gas water heaters.
Connect a garden hose to the tank drain valve at the bottom, run the other end to a safe floor drain or outside, and open the valve to empty the tank completely.
For tankless water heaters, isolate the service valves, remove the inlet strainer filters, and open the cold and hot service ports to drain residual water.
Washing Machine, Dishwasher, and Refrigerator Ice Maker
Appliances containing internal water reservoirs or active supply hoses are frequent sources of unchecked flooding in vacant homes.
Disconnect washing machine supply hoses from the wall faucets and drain any trapped water into a bucket before wiping down the rubber gaskets.
Run your dishwasher through a brief drain cycle, then sponge out any standing water remaining in the bottom sump basin.
Shut off the supply valve to your refrigerator ice maker, disconnect the feed line behind the unit, and trip the ice maker arm to clear internal mold-forming moisture.
Boilers, Radiators, and Hydronic Heating
Hydronic heating systems and standalone boilers operate on entirely different mechanical principles than standard domestic water lines.
Never attempt a DIY blowout on a closed hydronic heating loop, as these systems rely on specialized pressure fills, expansion tanks, and specific chemical corrosion inhibitors.
Hire a certified heating technician to properly service, winterize, or safely maintain antifreeze levels in your boiler and radiator loops.
Sump Pump: Keep It Working While You’re Away
Even during freezing weather, melting snow or rising ground water can flood a basement if your drainage equipment fails. For professional assistance with this crucial equipment, consider scheduling sump pump installation and repair.
Test your sump pump by pouring a bucket of water into the basin to verify the float switch engages smoothly and pumps water away from the foundation.
Install a battery-backed backup sump pump system to protect against basement flooding during extended power outages.
Insulate discharge pipes running outdoors so expelled water does not freeze immediately at the outlet and create a dangerous blockage.
Water Softeners, Filters, and Fire Sprinkler Systems
Auxiliary water treatment units and specialized safety systems require targeted isolation to prevent freezing and mechanical degradation.
Put your water softener into bypass mode, disconnect the brine tank, and drain all internal resin vessel water.
Remove whole-house cartridge water filters, empty the plastic filter housings, and store the filter media dry.
Consult a certified fire sprinkler contractor before shutting off any valves connected to residential fire suppression systems to maintain compliance and freeze safety.
Pools, Hot Tubs, and Irrigation Lines
External water features and irrigation networks are fully exposed to ambient sub-zero temperatures and require complete seasonal draining.
Blow out all underground lawn sprinkler zones using compressed air to eliminate standing water from manifold valves and sprinkler heads.
Lower pool water levels below the skimmer line, blow out return lines, add winterizing chemicals, and secure a heavy-duty safety cover.
Drain, clean, and cover hot tubs completely, or maintain a safe low-heat setting paired with insulated cover straps if left operational.
Winterizing a House With a Well or Septic System
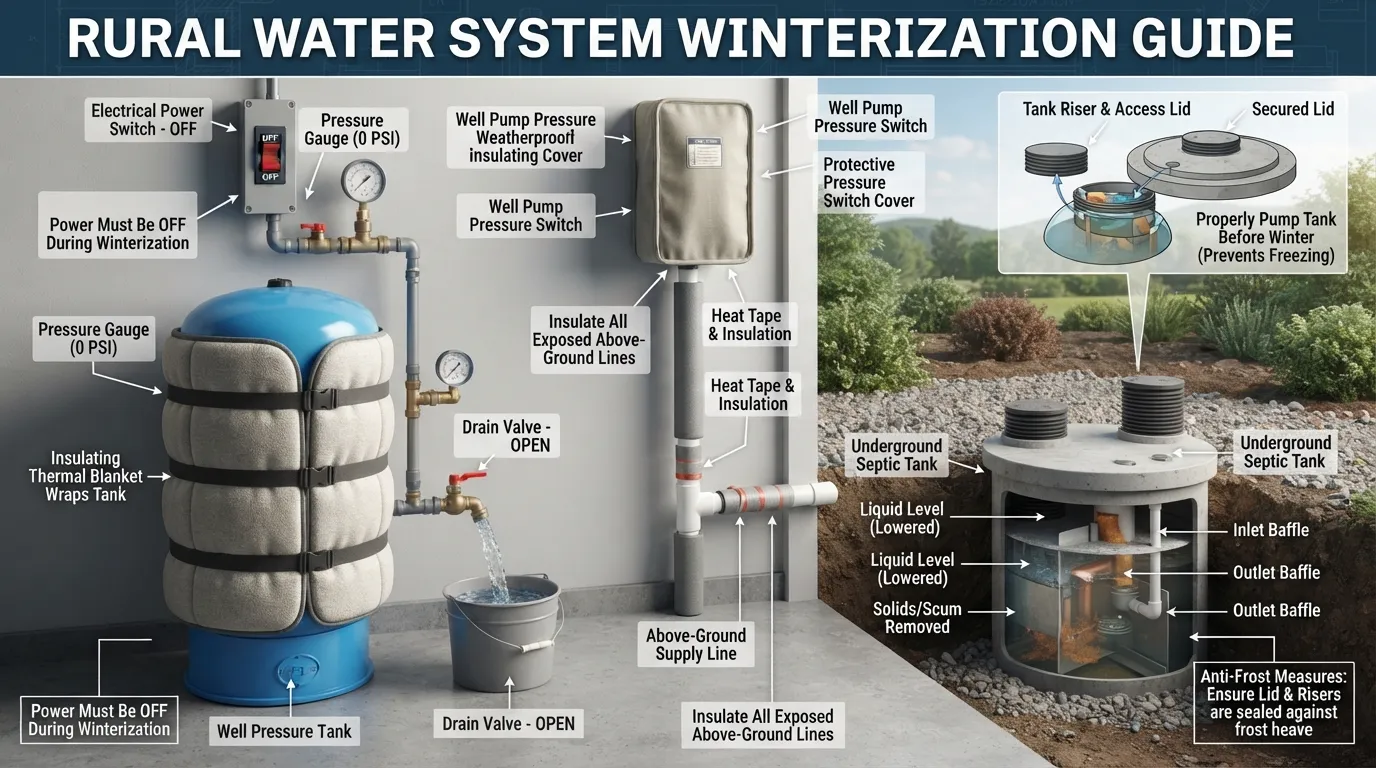
Properties utilizing private wells and septic systems require specialized winterization protocols that standard municipal properties can bypass. Because private well pumps, pressure tanks, and underground lines sit directly in unheated spaces or shallow frost zones, failing to protect them results in severe utility failure upon your return.
How to Protect a Well Pump and Pressure Tank
Your well pump and pressure tank maintain your home’s entire water delivery network and are highly vulnerable to freezing temperatures when the surrounding structure is unoccupied.
Turn off the electrical power breaker supplying the well pump to prevent the motor from running dry or cycling against closed valves while the house is winterized.
Drain the pressure tank completely by opening a nearby drain spigot or hose bib until the internal bladder releases all water and pressure reads zero.
Wrap the pressure switch and exposed tank fittings with thermal insulation blankets or heavy-duty foam covers to prevent localized freezing.
Exposed Lines, Well House, and Heat Tape
Wellheads and above-ground plumbing lines running from the ground into your home require active or passive thermal protection.
Insulate any exposed water supply pipes running between the well casing and your foundation using heavy foam pipe sleeves.
If your well pump is housed in an outdoor well house, install a thermostatically controlled space heater or heat tape wrap designed specifically for freezing environments.
Verify that your wellhead pitless adapter and underground supply pipe sit safely below your local regional frost line depth.
Septic Tank and Drain Field Considerations in Winter
While underground septic tanks rarely freeze due to natural microbial heat generation, vacant systems face unique biological and structural challenges during freezing weather.
Have your septic tank professionally pumped before an extended winter vacancy to prevent heavy sludge accumulation from compacting or freezing.
Keep snow cover over your septic tank and drain field intact, as deep snow acts as a natural insulating blanket preventing frost from penetrating deep into the soil.
Avoid driving heavy vehicles or snowmobiles over your septic drain field in winter, as compacted frozen soil crushes underlying distribution pipes and stops wastewater absorption.
When to Call a Well or Septic Specialist
Complex Submersible Pumps: If your well system uses a deep-well submersible pump wired to complex control boxes, consult a licensed well technician for proper electrical isolation.
Persistent Drainage Backups: If you experience slow drains or notice sewer line problems during your pre-departure inspection, address them immediately before leaving the system unattended.
Unfamiliar Equipment Layouts: When dealing with commercial-grade well setups, variable-frequency drives (VFD), or specialized filtration equipment, professional intervention eliminates the risk of costly equipment damage.
Exterior, Security, and Mail: Make the House Look Lived In
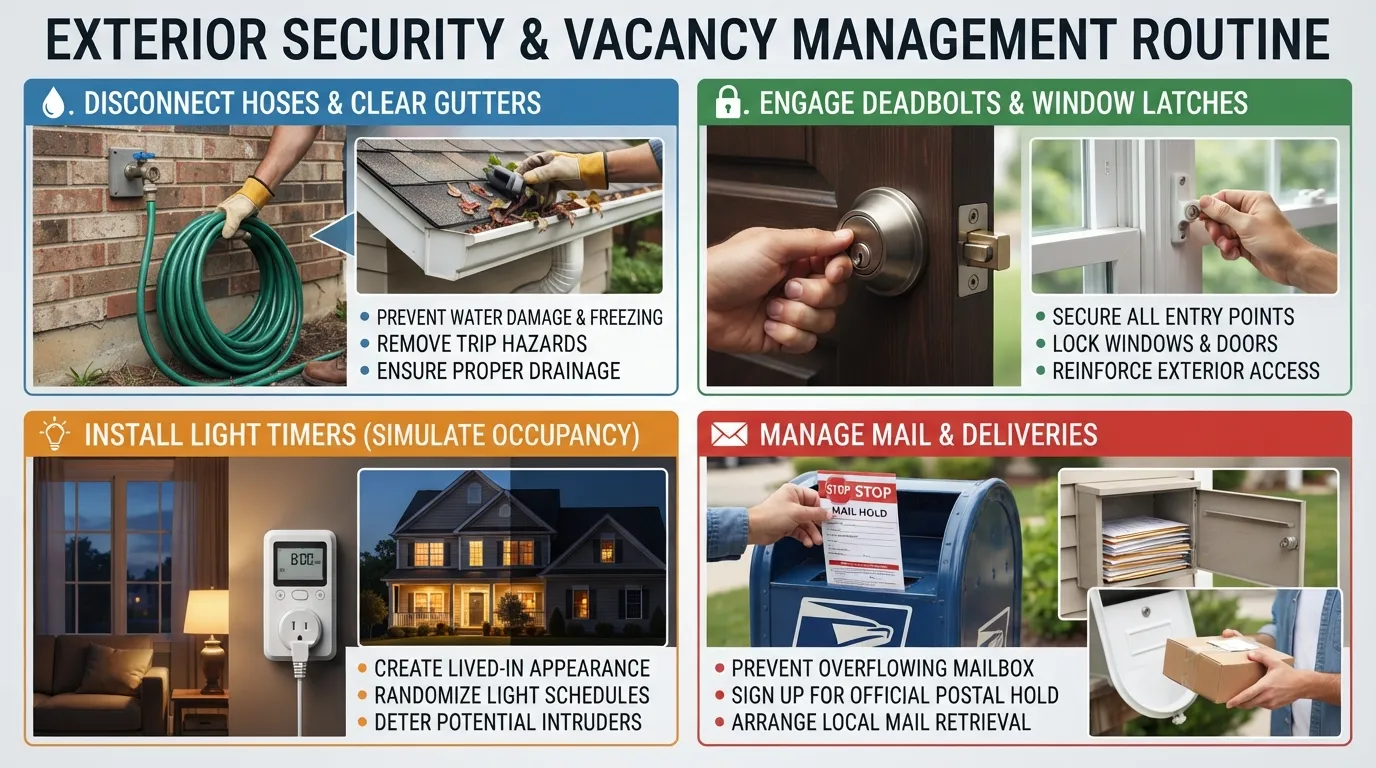
Securing the exterior and managing the outward appearance of an unoccupied house is vital for deterring intruders and protecting your structure from weather damage. A well-maintained perimeter signals active occupancy, minimizing your property’s vulnerability while you are away.
Disconnect Garden Hoses and Shut Off Outdoor Spigots
Exterior water sources are among the most common points of freeze failure during winter months.
Disconnect all garden hoses from exterior spigots, drain any residual water from the hoses, and store them indoors.
Locate interior isolation valves for your outdoor spigots, shut them off, and open the exterior frost-free hose bibs to drain trapped water.
Install insulated protective covers over exterior faucets to shield them from biting winds and freezing temperatures.
Clean Gutters and Prevent Ice Dams
Clogged roof drainage channels can cause melting snow to back up beneath roof shingles and flood your exterior walls.
Clear all leaves, twigs, and debris from your roof gutters and downspouts before freezing weather arrives.
Verify that downspout extensions direct rainwater and snowmelt at least three to four feet away from your home’s foundation.
Inspect flashing and roof valleys to ensure proper drainage and prevent destructive ice dam formation.
Arrange Snow Removal and Driveway Access
An unplowed driveway piled high with untouched snow signals an abandoned property instantly.
Contract a reliable local snow removal service or neighbor to clear your driveway and front walkway after every major snowfall.
Keep pathways clear to ensure emergency responder access and maintain a lived-in appearance.
Leave a designated vehicle parked in the driveway if possible, or have your snow removal provider vary tire tracks periodically.
Seal Gaps to Keep Pests and Cold Air Out
Unoccupied homes frequently attract mice, squirrels, and insects seeking shelter from winter elements.
Inspect your foundation, dryer vents, and utility penetrations, sealing any gaps or cracks with expanding foam and steel wool.
Check that attic and crawl space mesh vent screens are secure and undamaged.
Remove all potential nesting materials and keep firewood stacked well away from your exterior walls.
Lock Down the House: Deadbolts, Windows, and Security System
Physical security must be airtight before leaving any residential property vacant for an extended period.
Engage all deadbolts, secure secondary window locks, and verify that sliding glass doors have security bars installed.
Test your comprehensive security system, ensuring motion sensors, glass-break detectors, and door contacts are fully functional.
Verify that your security cameras have an active power source, stable Wi-Fi connection, and clear motion-triggered recording storage.
Make It Look Occupied: Light Timers and Mail Hold
Creating the illusion of daily activity prevents opportunistic burglaries.
Plug interior lamps into programmable digital timers or smart plugs to cycle lights on and off at natural evening hours.
Prevent overflowing mailboxes by utilizing the official USPS Hold Mail service to safely pause and store your deliveries at the local post office until you return.
Ask a trusted neighbor to retrieve stray flyers, packages, or door hangers left by delivery services.
Remove Perishable Food and Take Out the Trash
Leaving organic waste behind creates severe pest infestations and foul odors while you are away.
Empty all kitchen trash cans, clean out food disposal units, and wipe down counters to eliminate crumbs.
Consume, donate, or throw away all perishable refrigerator and pantry items.
Leave refrigerator and freezer doors propped slightly open after cleaning to prevent mold and mildew growth.
Vacant Home Insurance: What Your Policy May Require
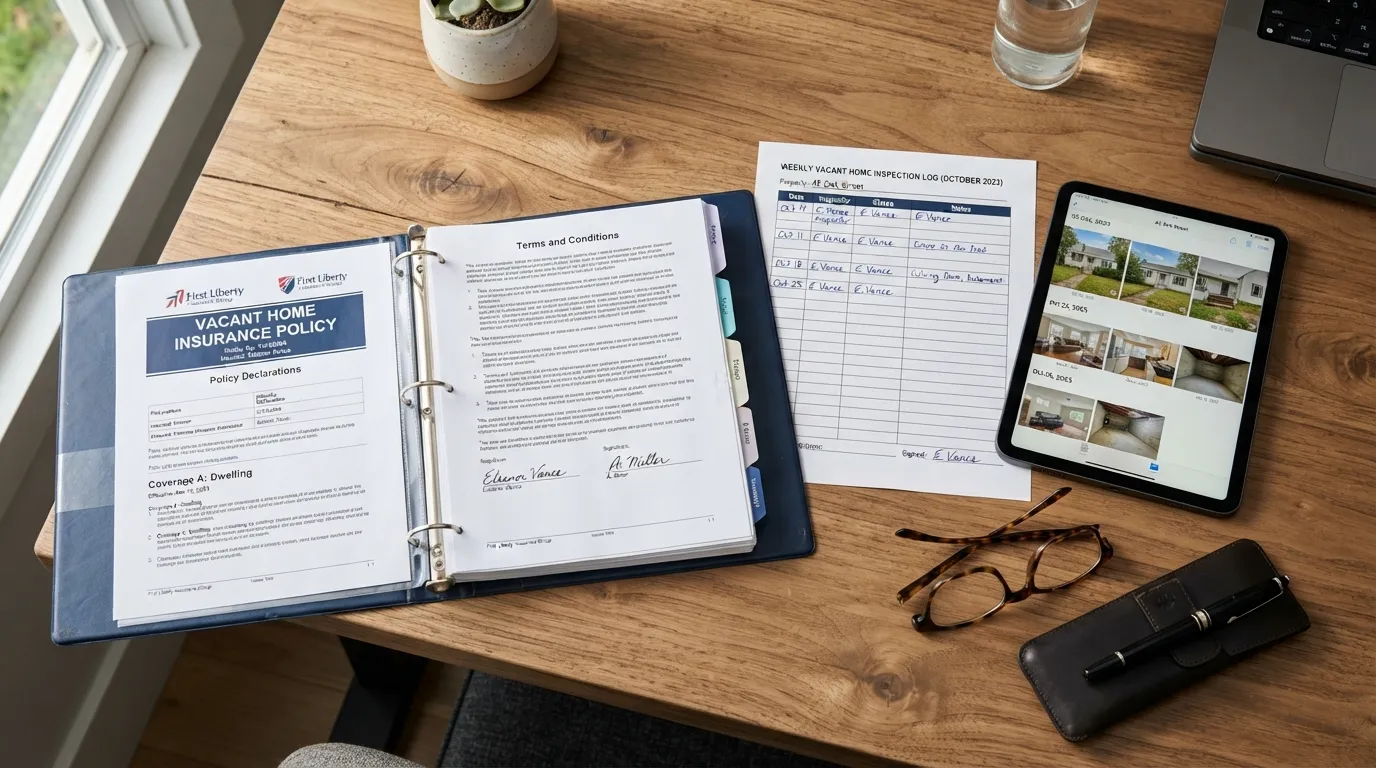
Navigating property insurance requirements before leaving a home unoccupied is just as important as turning off the water supply. Homeowners frequently discover too late that standard homeowner policies exclude coverage for water damage or vandalism after a property sits empty beyond a specific timeframe, making proper policy review essential.
Vacant vs. Unoccupied: Why the Difference Matters to Insurers
Insurance providers draw a strict legal and financial distinction between a home that is vacant versus one that is merely unoccupied.
Unoccupied Home: A furnished residence where the occupants are temporarily away on vacation, traveling for business, or staying elsewhere seasonally, but intend to return.
Vacant Home: A property stripped of furniture, personal belongings, and daily human activity, with no immediate intent to occupy, which carries vastly higher risk multipliers for insurers.
Standard policies often downgrade or completely void coverage if a home transitions from unoccupied to legally vacant without an explicit endorsement.
Common Vacancy Clauses and Time Limits
Most standard homeowner insurance contracts include a strict vacancy clause that limits coverage duration when a property is left empty.
Standard policies typically limit vacancy or unoccupancy coverage windows to 30 to 60 consecutive days before key perils are excluded.
If a burst pipe causes flooding on day 45 of an unmonitored absence, an insurer may deny the water damage claim entirely if the standard 30-day vacancy limit was breached.
Always review your specific policy wording or consult your insurance provider to purchase a vacant home rider if your absence exceeds standard time limits.
Why Insurers Recommend Regular Inspections
Insurance underwriters mandate regular property monitoring because minor maintenance issues transform into catastrophic claims when left unattended.
A slow valve leak discovered during a weekly check can be wiped up with a towel, whereas the same leak left unchecked for a month destroys flooring, drywall, and subframes.
Regular physical inspections satisfy the “due diligence” clause required by underwriters to maintain active liability and property coverage.
Maintaining a documented inspection schedule proves to adjusters that you took reasonable precautions to protect the property against foreseeable winter risks.
Documents to Keep: Photos, Inspection Logs, Plumber Receipts
In the unfortunate event that you must file an insurance claim, comprehensive record-keeping expedites approvals and prevents payout disputes.
Maintain a detailed digital or physical inspection log signed and dated by your local caretaker or property manager during every walkthrough.
Save all receipts and service records from licensed professionals who performed heating tune-ups, plumbing winterization, or backflow testing.
Store pre-departure date-stamped photographs of closed shut-off valves, drained appliances, and secured rooms in a secure cloud folder.
What to Ask Your Insurance Agent Before You Leave
Before locking your doors for an extended absence, schedule a quick call with your insurance agent and run through these core questions:
“Does my current policy have a 30-day or 60-day vacancy restriction clause?”
“Am I required to maintain active heat at a specific minimum temperature to keep freeze coverage valid?”
“Do I need to purchase a specialized vacant home rider or endorsement for this extended absence?”
“What specific documentation or inspection frequencies does my policy require to keep water damage claims fully covered?”
Disclaimer: Insurance policies, endorsement terms, and state regulations vary significantly by provider and region. Always consult your licensed insurance agent or review your specific policy documents to confirm your exact coverage terms before leaving your property vacant.
Long-Term Vacancy, Homes for Sale, and Rental Properties
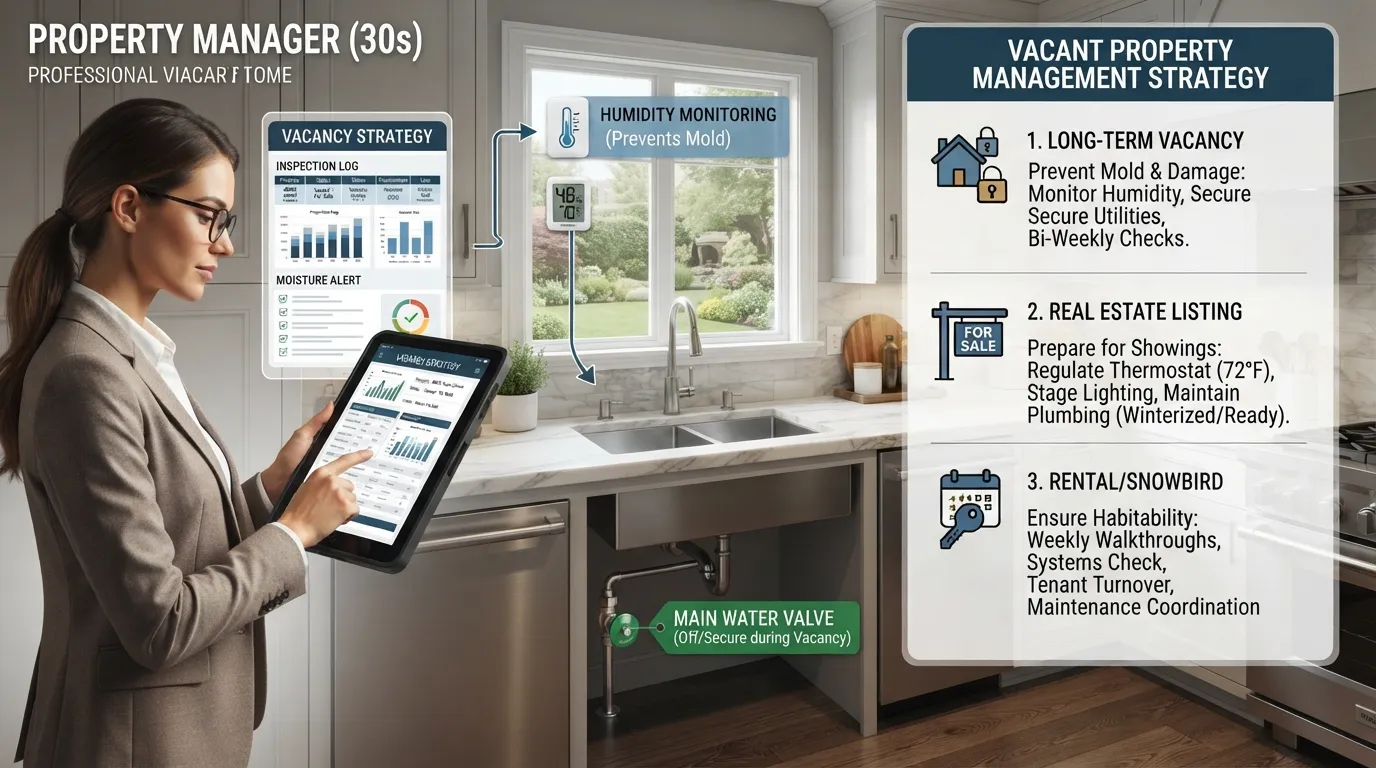
Managing properties that remain unoccupied for extended multi-month cycles, real estate market listings, or commercial investments requires a specialized approach beyond standard seasonal winterization. Addressing the unique mechanical and environmental stressors of long-term emptiness prevents structural decay and preserves asset valuation.
What Happens to a House Vacant for a Year or More?
Properties left unmaintained and vacant for twelve months or longer face severe environmental degradation from unmonitored humidity and stagnant air.
Uncontrolled indoor humidity allows mold and mildew to colonize drywall, carpeting, and wooden subframes rapidly.
Standing water inside hidden P-traps evaporates completely over several months, opening a direct sewer gas pathway into the living space.
Rubber seals, plumbing gaskets, and wax toilet rings dry out and crack, guaranteeing catastrophic leaks the moment water pressure is restored.
Winterizing a House That’s Listed for Sale
Preparing a home for the real estate market during winter requires balancing aggressive freeze protection with buyer accessibility during showings.
Coordinate closely with your realtor to establish clear protocols on whether utilities should remain active or if the plumbing must stay winterized.
If keeping the heat on for showings, set thermostats to a comfortable 58°F to 60°F and leave a prominent laminated instruction sheet on plumbing shut-offs for visiting agents.
If the home is fully winterized, instruct your agent to provide bottled water or clearly mark that restrooms are out of service during walkthroughs.
Vacant Rental Units and Commercial Properties
Landlords and commercial property owners face heightened liability risks and strict regulatory compliance standards when managing empty buildings.
Landlords must perform regular inspections between tenant leases to prevent undetected frost damage from voiding tenant security deposit agreements or insurance policies.
Commercial spaces require specialized monitoring of fire sprinkler risers, backflow preventers, and industrial HVAC systems to prevent massive warehouse flooding.
For complex business facilities, partnering with professionals who handle commercial plumbing services ensures regulatory compliance and comprehensive system shutdown.
Who Winterizes Homes? Plumbers, Property Managers, and DIY
Choosing who executes your winterization strategy depends on your technical comfort level, budget, and liability insurance mandates.
Licensed Plumbers: Best for complex homes, multi-story buildings, radiant heat loops, or homeowners lacking air compressors and specialized blow-out adapters.
Property Managers / Caretakers: Ideal for managing recurring weekly walkthroughs, coordinating snow removal, and documenting required inspection logs.
DIY Homeowners: Suitable for straightforward single-family homes equipped with easily accessible main shut-off valves and air compressor connections.
Snowbird Checklist: Leaving for the Season
Seasonal travelers returning south for the winter can streamline their annual departure by following a dependable, repeatable master routine.
Complete your plumbing shut-off and system drain or temperature stabilization plan at least 48 hours before final departure.
Lock down exterior security, set automated lighting timers, and verify that your USPS Mail Hold request is fully processed.
Confirm that your local caretaker or property manager has your emergency contact details, spare keys, and signed inspection schedule before you walk out the door.
Winterizing in Florida and Mild-Climate Regions: Different Risks
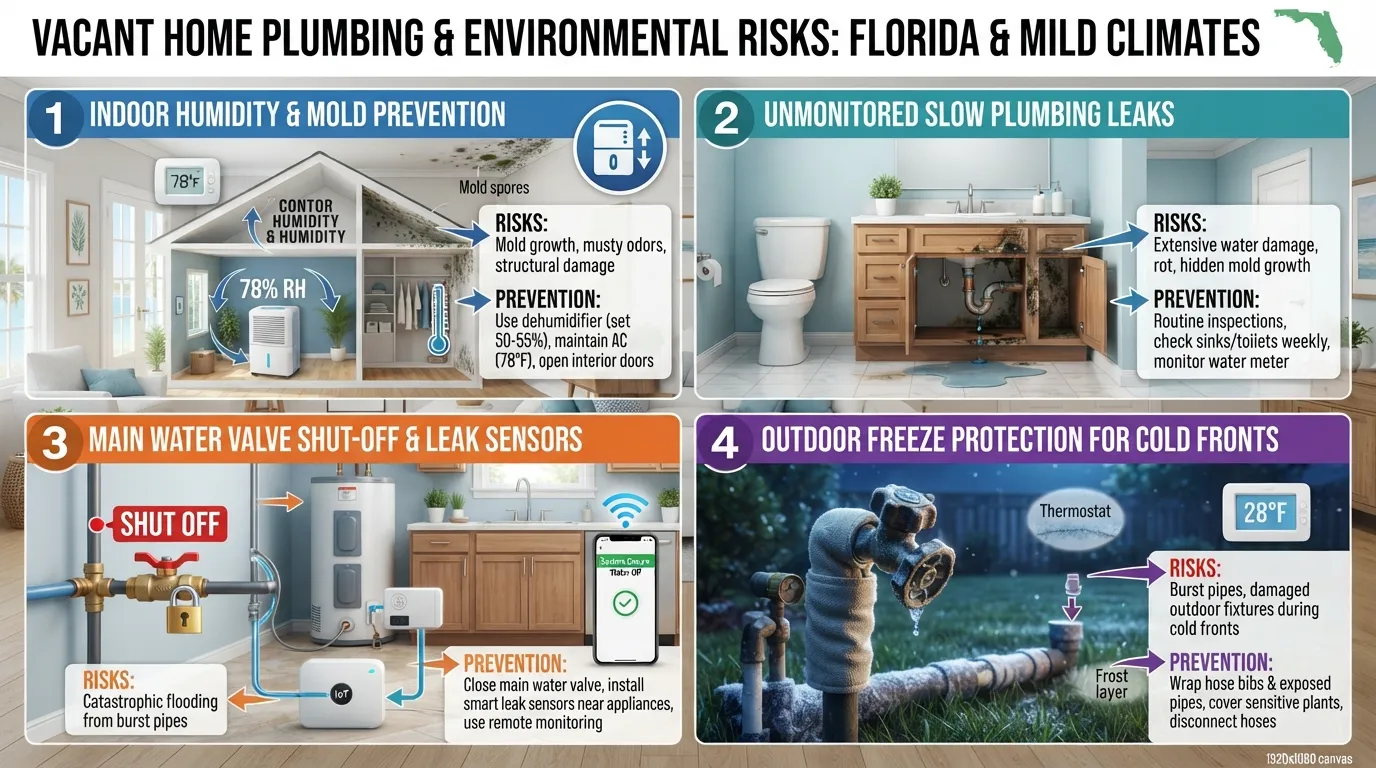
While sub-zero temperatures and frozen pipe bursts dominate traditional winterization guides, vacant homes in mild climates like Florida face a completely different set of mechanical and environmental hazards. Part-year residents and seasonal vacation property owners must shift their focus toward continuous leak monitoring, severe humidity control, and rapid-response preparation for rare freeze warnings.
Do You Need to Winterize a Vacant Home in Florida?
Traditional plumbing blowouts and heavy insulation are rarely necessary for homes situated across southern Florida, but leaving a property completely unmonitored invites severe property damage.
Extended seasonal vacancies in warm climates do not require draining water lines for freezing weather, but they demand rigorous active protection against silent plumbing leaks.
Leaving pressurized water lines active in an empty house for months without oversight turns minor pinhole leaks into catastrophic indoor floods.
Implementing a modified seasonal shutdown protocol focused on water isolation and humidity management protects your investment while you are away.
Top Plumbing Risks in a Vacant Warm-Climate Home
Warm-weather vacancies introduce unique degradation vectors that can destroy a home’s interior just as quickly as a burst pipe.
Undetected Slow Leaks: A failing toilet flapper or pinhole supply line leak will run continuously for months, driving up utility bills and destroying flooring and cabinetry.
Dry P-Traps and Sewer Gas: Unused sink and shower traps lose their water seals through evaporation, allowing toxic sewer gases and foul odors to permeate the living space.
Water Heater Failure: Stagnant water and internal sediment buildup inside unmonitored water heaters accelerate tank corrosion and sudden bottom-seam ruptures.
High Indoor Humidity: Sealing a Florida home tight without air conditioning or proper ventilation creates a stagnant microclimate where mold and mildew thrive.
Leak Prevention Steps Before You Leave
Mitigating water damage risks in mild climates requires isolating your indoor plumbing while keeping essential monitoring systems online.
Close your main water shut-off valve before departure, or invest in professional leak detection and repair diagnostics to inspect vulnerability points.
Install an automatic water shut-off valve equipped with smart flow sensors that instantly cut off your home’s water supply if abnormal continuous flow is detected.
Place battery-operated smart leak sensors beneath every toilet, sink, washing machine, and water heater to push instant alerts to your smartphone.
Occasional Freeze Events: Quick Protective Steps
Even in tropical and subtropical regions, rare winter cold fronts and overnight freezes can sweep through the state unexpectedly.
Monitor local weather reports during winter months and disconnect garden hoses if a hard freeze advisory is issued for your area.
Open under-sink cabinet doors and allow faucets to drip slightly if temperatures drop below freezing for extended overnight hours.
Ensure outdoor backflow preventers and exposed pipe risers are wrapped with insulating foam covers during sudden cold snaps.
Hurricane Season and Seasonal Absence Checklist
Because Florida’s seasonal vacancy windows often overlap with peak tropical storm activity, storm preparation is a crucial aspect of property management.
Turn off the main water supply and trip the electrical breakers for major appliances like your water heater and air handler before departing ahead of a storm threat.
Secure all outdoor furniture, shutters, and loose items that could become airborne projectiles during high winds.
Keep emergency contact details for a reliable local emergency plumber on hand so your caretaker can respond instantly if storm damage or sudden pipe failures occur.
How Much Does It Cost to Winterize a House? DIY vs. Professional
Understanding the financial investment required to winterize a vacant property helps you weigh the savings of a do-it-yourself weekend project against the comprehensive protection and liability coverage provided by licensed experts. While upfront costs vary based on your home’s square footage and regional climate, proper winterization is a modest investment compared to catastrophic structural repair bills.
DIY Costs: Antifreeze, Compressor Rental, Sensors
Tackling a basic plumbing and property winterization project yourself primarily requires investing in consumable materials and equipment rentals.
| Material / Equipment Item | Estimated Cost Range | Purpose |
| Non-Toxic RV Antifreeze | $30 – $60 (Gallons) | Protects sink traps, toilet bowls, and P-traps from splitting. |
| Air Compressor Rental | $40 – $90 (Daily Rate) | Provides regulated pressure to blow residual water out of supply lines. |
| Pipe Insulation & Tape | $25 – $100 | Secures vulnerable exterior-wall runs and hose bibs. |
| Smart Freeze Sensors | $30 – $120 | Monitors indoor temperatures to trigger real-time mobile alerts. |
Professional Winterization: What’s Typically Included
Hiring a qualified team ensures your entire property layout is meticulously evaluated, pressurized, and shut down without missing hidden system branches.
Professional winterization service calls typically range from $150 to $500, depending on your home’s square footage, number of bathrooms, and specialized heating loops.
Comprehensive packages usually cover main water valve isolation, complete air compressor line blowouts, water heater draining, and precise P-trap antifreeze treatment.
Engaging certified professionals also minimizes your liability risks, ensuring that complex auxiliary systems like fire suppression lines or tankless water heaters are secured safely.
Cost of Not Winterizing: Burst Pipe Repair and Water Damage
Skipping proper winterization to save a few hundred dollars exposes your property to severe financial risk if sub-zero temperatures or prolonged vacancies cause a failure.
Repairing a single burst copper or PEX water supply line typically ranges from $500 to $1,500 for basic wall repairs and pipe splicing.
Comprehensive water damage restoration—including drywall extraction, mold remediation, and flooring replacement—frequently exceeds $5,000 to $15,000+ depending on the extent of indoor flooding.
Insurance claim denials due to unaddressed vacancy clauses or lack of documented property inspections can leave you paying 100% of these repair bills out of pocket.
When Hiring a Plumber Is the Smarter Choice
Complex Plumbing Layouts: Multi-story homes, properties with complex manifold systems, and radiant floor heating networks require specialized technical expertise.
Lack of Equipment: If you do not own or want to rent commercial-grade compressors, regulators, and specialized blowout adapters, hiring a professional eliminates the risk of human error.
Peace of Mind: For snowbirds and absentee property owners who want a guaranteed, insurance-compliant shutdown, professional intervention provides unmatched security.
How Much Does It Cost to Winterize a House? DIY vs. Professional
Evaluating winterization expenses requires weighing initial material or service investments against the significant cost of repairing unmonitored property damage. Understanding typical price ranges for do-it-yourself supplies versus hiring licensed professionals helps you budget effectively while safeguarding your vacant property.
DIY Costs: Antifreeze, Compressor Rental, and Sensors
Tackling basic winterization tasks yourself keeps labor costs low, though you will need to invest in specific materials and equipment rentals.
| Winterization Expense | Estimated Cost Range | What It Covers |
| RV Antifreeze | $5 to $15 per gallon | Non-toxic propylene glycol for P-traps and toilet bowls (typically 3 to 5 gallons needed). |
| Air Compressor Rental | $30 to $75 per day | Standard pneumatic compressor to blow out residential supply lines. |
| Pipe Insulation & Tape | $50 to $200 | Foam sleeves and heating tape for vulnerable water lines in unheated areas. |
| Smart Leak Sensors | $30 to $100 each | Wi-Fi connected moisture detectors for high-risk appliances and bathrooms. |
Professional Winterization: What’s Typically Included
Hiring licensed professionals ensures your plumbing, heating, and auxiliary systems are shut down correctly without risking mechanical damage.
Standard professional winterization and plumbing blowout services typically range between $150 and $500, depending on your home’s square footage and plumbing layout.
Comprehensive service packages generally cover main valve isolation, compressed air line purging, water heater draining, and P-trap antifreeze treatment.
Bundling additional services—such as heating tune-ups, boiler flushing, or backflow testing—may increase total service costs but provides complete system protection.
Cost of Not Winterizing: Burst Pipe Repair and Water Damage
Skipping proper winterization to save a few hundred dollars often results in compounding financial losses when sub-zero temperatures or undetected leaks strike.
Repairing a single burst pipe hidden behind a wall or beneath a floor slab frequently ranges from $1,000 to $4,000+ in plumbing labor and drywall restoration.
Comprehensive water damage restoration, mold remediation, and flooring replacement for an unmonitored indoor flood routinely exceed $10,000 to $25,000.
Investing in proactive winterization or professional plumbing oversight is a minor fraction of emergency repair expenses, preserving both your equity and peace of mind.
When Hiring a Plumber Is the Smarter Choice
Lack of Specialized Equipment: If you do not own or have access to an air compressor, pressure regulators, and proper blowout fittings, attempting a DIY line purge risks leaving trapped water behind.
Complex Multi-Story Layouts: Homes featuring manifold distribution systems, tankless water heaters, or radiant floor heating require expert technical execution.
Maximizing Insurance Compliance: Hiring licensed plumbing services guarantees your winterization work meets industry standards, supporting seamless claims processing if weather emergencies occur.
Coming Home: How to De-Winterize and Check for Damage
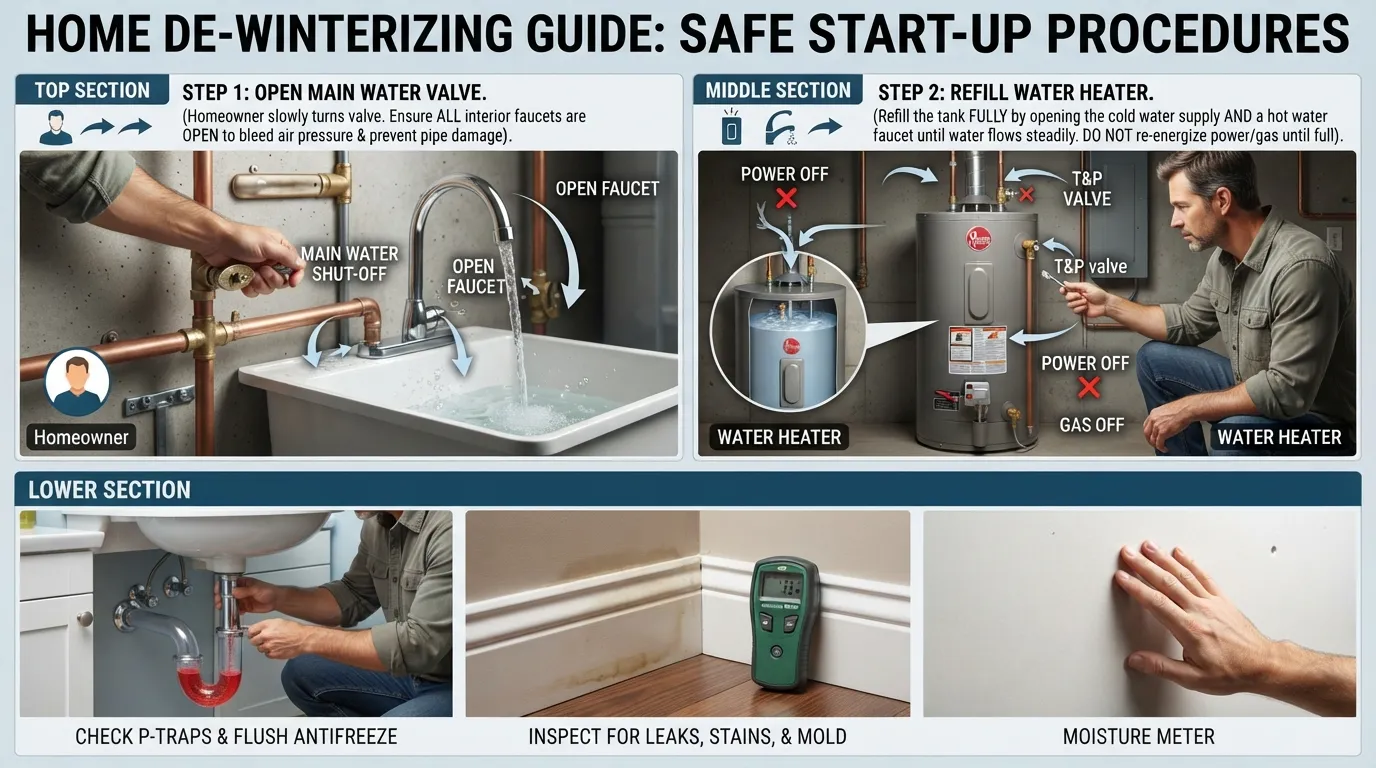
Returning to a vacant home requires a methodical de-winterization process to restore your plumbing and electrical systems safely. Rushing water back into an uninspected network risks hidden pipe failures, unexpected indoor flooding, and severe appliance damage.
Step-by-Step: Turning the Water Back On Safely
Restoring water pressure after an extended absence must be done gradually to prevent water hammer and stress fractures in cold-hardened fittings.
Ensure every interior faucet, shower valve, and outdoor spigot remains wide open before reopening the main water supply.
Open your main water shut-off valve very slowly, allowing lines to pressurize with air escaping freely through the open fixtures.
Close each faucet one by one, starting from the lowest level of your home and moving upward, once a steady, non-sputtering stream of water flows out.
Flush Antifreeze from Drains and Toilets
Clearing out winterizing additives prepares your fixtures for normal daily use and eliminates lingering chemical residues.
Run every sink and bathtub faucet for several minutes until the colored RV antifreeze is completely flushed out of the P-traps and down the drain.
Flush each toilet multiple times to clear antifreeze from the bowl and tank seals before normal use resumes.
Clean and sanitize sink basins and toilet bowls to wash away any stagnant buildup that accumulated during your absence.
Restart the Water Heater (Refill Before Turning Power On)
Energizing a water heater while the tank is empty will instantly burn out upper and lower electric heating elements or destroy a gas heat exchanger.
Fill the water heater tank completely by keeping the cold water supply valve open and running a nearby hot water faucet until water flows steadily without air spurts.
Verify the tank is completely full and pressurized before turning the electrical breaker back on or igniting the gas burner pilot light.
Test the temperature-pressure relief (TPR) valve briefly to ensure proper mechanical function.
Inspect for Leaks, Stains, and Mold
Quiet pinhole leaks and condensation can cause extensive damage while a home sits unoccupied, making a thorough post-return inspection essential.
Inspect all exposed supply lines, under-sink connections, and appliance hookups for hidden leaks or slow weeping joints.
Check ceilings, baseboards, and window sills closely for damp water stains, peeling paint, or musty mold odors.
Run major appliances through brief test cycles while monitoring for abnormal vibrations, pooling water, or drainage backups.
What to Do If You Find a Burst Pipe
Discovering a split pipe or active leak during de-winterization requires immediate action to mitigate structural water damage.
Shut off your main water supply valve immediately to stop incoming water pressure and prevent further flooding.
Take clear photographs and video documentation of the damaged pipe, surrounding drywall, and ruined personal property for your insurance claim.
Turn off electrical circuits feeding the affected area if water is near outlets, and call an emergency plumber to perform professional pipe repairs.
Frequently Asked Questions
What should you do when leaving a house unoccupied in winter?
Shut off your main water supply and drain all plumbing lines, or maintain active heat at a minimum of 55°F. Unplug major appliances, discard perishable food, secure all exterior windows and deadbolts, arrange for mail and snow management, and schedule a trusted local caretaker for weekly property inspections.
What temperature should you keep an unoccupied house in winter?
Keep your thermostat set to a minimum of 55°F (13°C) to prevent freezing temperatures from reaching interior wall cavities and exterior water lines. Ensure all interior doors remain open so warm air circulates evenly throughout every room and plumbing chase.
How do you winterize a vacant house without heat?
Turn off the main water supply valve, drain all pipes using compressed air, and completely empty water heaters, toilets, and appliance supply hoses. Pour non-toxic RV antifreeze into all sink, shower, and floor drain P-traps to prevent trapped water from evaporating or freezing.
What happens if you leave a house empty for a year?
Leaving a property vacant for twelve months causes unchecked indoor humidity that rapidly breeds mold, mildew, and wood rot. P-trap water seals evaporate completely, allowing toxic sewer gases inside, while rubber plumbing gaskets dry out and crack, guaranteeing severe leaks when water pressure returns.
What should you do when you leave your house for 2 weeks?
For a short two-week absence, turn off your main water supply valve and depressurize faucets. Adjust your thermostat down to a safe energy-saving level, unplug sensitive electronics, throw away perishable refrigerator items, lock all deadbolts, and set interior light timers to create a lived-in appearance.
What do you do when you leave your house for 6 months?
A six-month vacancy requires a complete plumbing blow-out with compressed air and RV antifreeze if heat is disabled. Stop utility deliveries, submit a USPS Hold Mail request, arrange professional lawn or snow maintenance, and hire a local caretaker to perform documented weekly inspection walkthroughs.
Is it okay to leave a house unheated in winter?
Leaving a home completely unheated in winter is only acceptable if you have fully drained the plumbing system and protected all fixtures with RV antifreeze. Otherwise, sub-zero outdoor temperatures will freeze standing water in pipes, resulting in catastrophic pressure splits and major indoor flooding.
What is the average cost to winterize a house?
DIY winterization typically costs between $50 and $150 for RV antifreeze, pipe insulation, and optional air compressor rentals. Hiring a licensed professional plumbing service generally ranges from $150 to $500 depending on home size, complexity, and whether specialized boiler or manifold draining is required.
Who winterizes homes?
Homeowners comfortable with basic plumbing tasks can winterize straightforward properties using an air compressor and antifreeze. For complex radiant heating systems, multi-story layouts, or complete liability protection, hiring a licensed plumber or professional property manager is the safest and most reliable choice.
Why do insurance companies recommend checking vacant homes?
Insurers require regular physical inspections because standard homeowner policies often exclude water damage or vandalism claims if properties remain unmonitored beyond 30 to 60 days. Frequent walkthroughs catch slow leaks and maintenance issues immediately before minor problems escalate into massive, denied insurance claims.
How often should someone check on a vacant house?
A trusted neighbor, family member, or professional property manager should conduct a thorough interior and exterior walkthrough of a vacant house at least once every seven days. Weekly checks ensure heating systems remain functional, severe weather damage is caught early, and insurance compliance logs stay accurate.
Conclusion and Call to Action
Successfully winterizing a vacant home protects your property against catastrophic water damage, high utility bills, and unexpected insurance denials. Whether you choose to maintain active heat or completely drain your plumbing system, a proactive approach ensures total peace of mind while you are away.
Key Takeaways
Match Your Strategy to Vacancy Length: Short absences benefit from simple main water shut-offs and thermostat setbacks, whereas long-term vacancies require complete line blowouts or maintained heat.
Prioritize Insurance Compliance: Review your policy’s vacancy clause and schedule weekly property walkthroughs to keep water damage and liability coverage fully active.
Address Regional Risks: Mild climates like Florida demand rigorous humidity control, automatic leak detection, and continuous valve isolation rather than heavy freezing insulation.
Know When to Call Professionals: Partnering with licensed experts prevents costly oversight and ensures your property is safeguarded according to strict industry standards.
Need Help Protecting Your Property?
Winterizing a vacant home or managing complex plumbing systems doesn’t have to be overwhelming. Whether you need expert winterization guidance, routine leak prevention, or rapid assistance from an emergency plumbing specialist, our licensed team is here to help protect your investment year-round.
Main Services
Related Posts
Need a Plumber in Miami?
Schedule service online or speak directly with the EZ Plumbing team.
Owner-Led Local Service
Know who is behind the business before you request service. The owners, contact line and Miami service pages are published clearly.
- Named business owners
- Direct phone and social channels
- Local Miami service information
Clear Help Before You Book
Review the relevant service page, contact the team directly and use the booking page when you are ready—without relying on vague claims.
- Service-specific information
- Direct questions before scheduling
- Clear online booking route