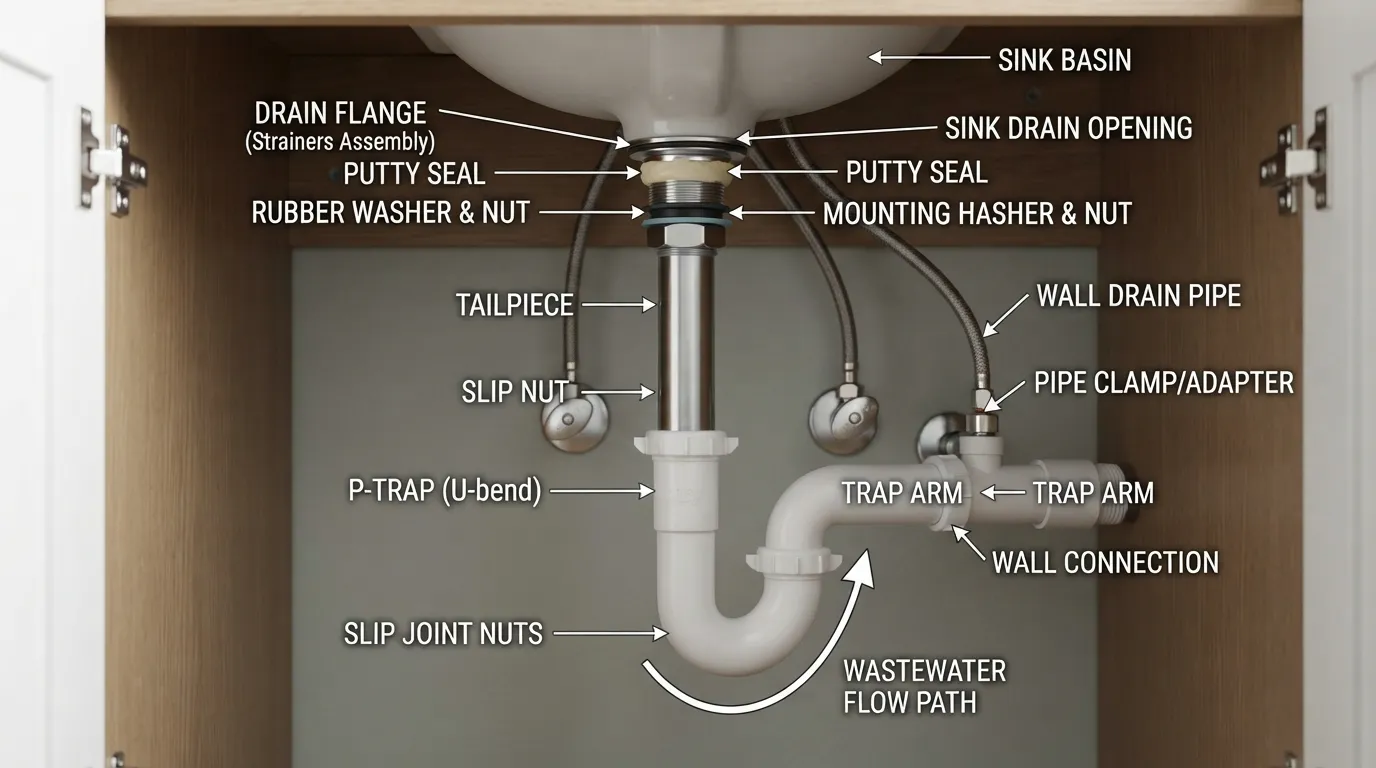
Installing a new sink drain is mostly about getting four things right: the drain assembly must seal correctly at the sink, the tailpiece must line up with the trap, the P-trap must connect without being forced out of alignment, and every joint must use the correct sealing method.
For a typical new sink drain installation, you install and seal the drain flange or strainer at the sink, secure the drain body from below, attach the tailpiece, connect the P-trap, join the trap arm to the wall drain, and then test every connection for leaks. The important detail is that not every drain connection is glued: tubular slip-joint connections normally seal with nuts and washers, while compatible rigid PVC or ABS socket fittings may use the appropriate solvent-weld system.
This guide focuses primarily on bathroom and kitchen sink drains. If by “new drain” you mean installing a new branch line inside a wall or floor, moving a fixture drain, replacing a sanitary line, or installing an outdoor drainage system, the scope is different and may involve plumbing-code, venting, sizing, access, and permit requirements.
First, Identify What Type of Drain You Are Installing
“New drain installation” can describe several very different projects. Before buying fittings or applying any sealant, identify which job you actually have.
New bathroom sink drain
Usually involves a drain body or pop-up assembly, tailpiece, P-trap, and connection to the existing wall drain.
New kitchen sink drain
Usually starts with a basket strainer or disposal outlet before connecting to the trap and wall drain.
Replacing an old drain
Includes removal and cleanup before the new assembly can be installed.
New drain line in a wall or floor
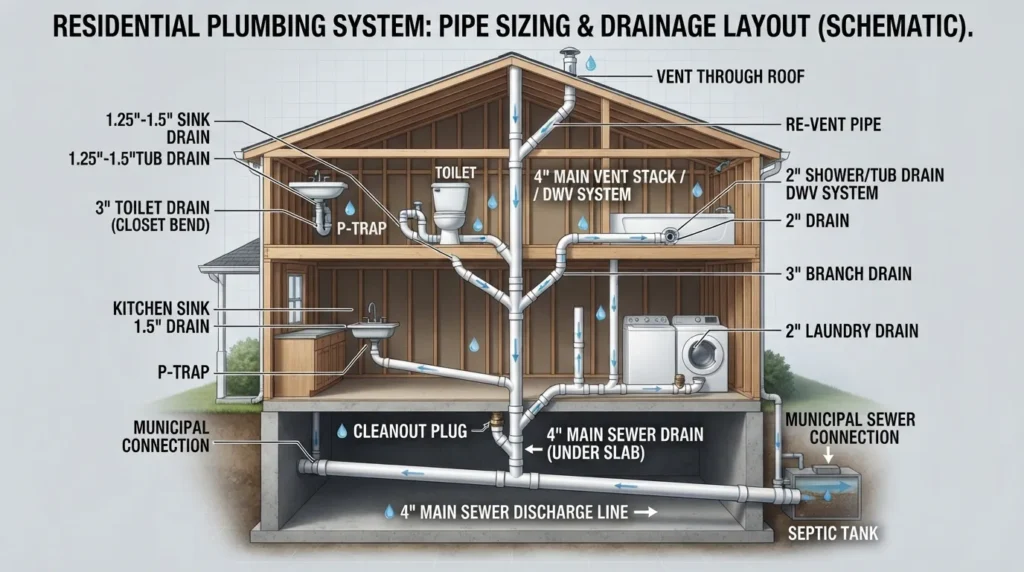
This goes beyond a simple sink assembly and may affect pipe sizing, slope, venting, structural access, and local requirements.
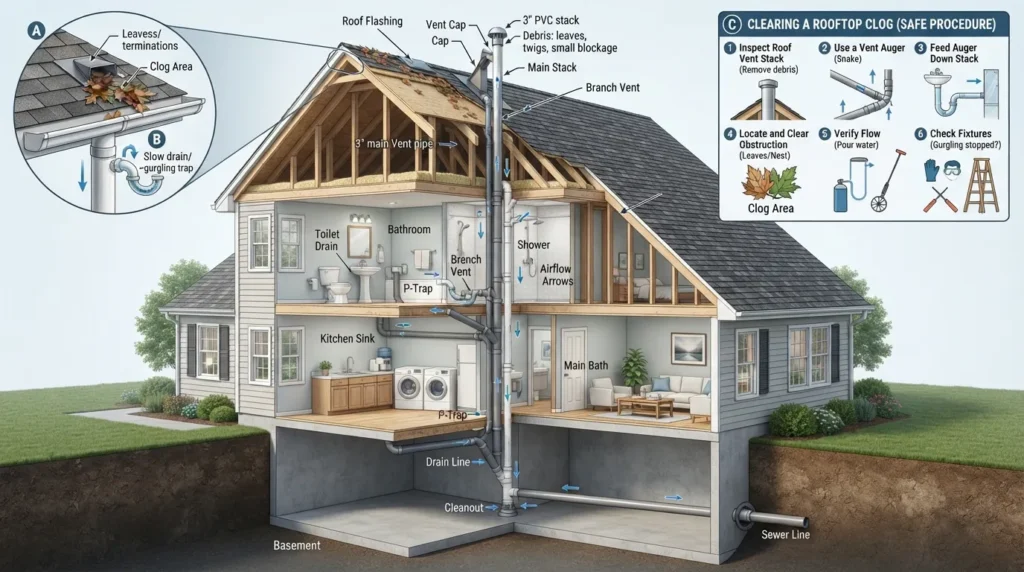
If you want to understand where a fixture drain, trap, branch line, stack, building drain, and sewer connection fit into the bigger picture, see our guide to how a home drainage system works.
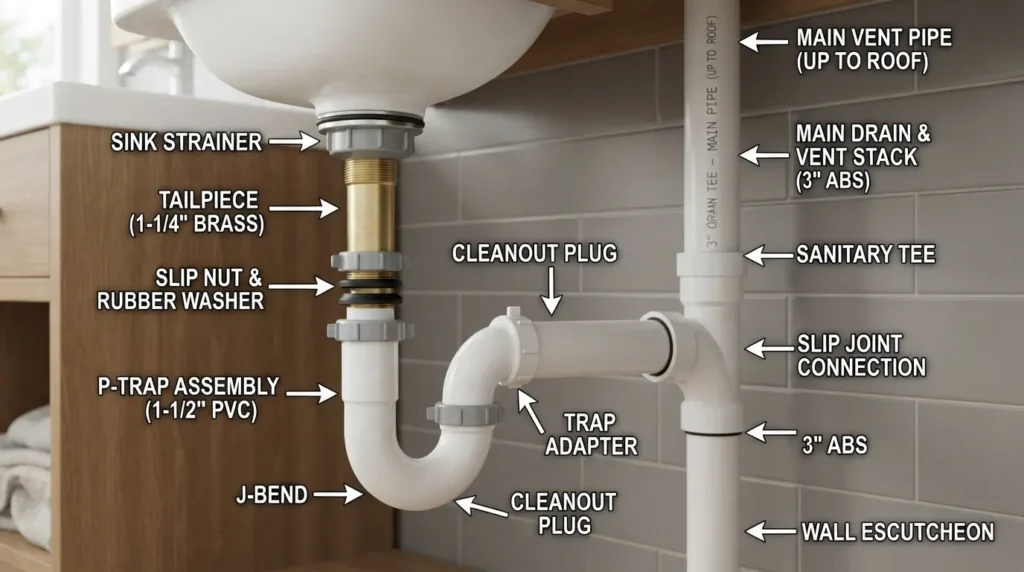
How a Sink Drain Connects From the Basin to the Wall
It is much easier to install a drain correctly when you understand the path the wastewater follows.
Drain flange / strainer
Drain body
Tailpiece
P-trap
Trap arm / wall tube
Wall drain
One common DIY mistake is focusing only on the drain flange at the bottom of the sink. The job is not complete until the drain assembly connects naturally to the P-trap and wall connection without crooked joints, excessive tension, or an improvised collection of fittings.
Parts and Tools You May Need
Your exact list depends on whether you are installing a bathroom pop-up drain, kitchen basket strainer, disposal connection, or a different assembly. Check the instructions supplied with your drain before purchasing additional fittings.
Typical drain parts
- Drain flange, pop-up assembly, or basket strainer
- Manufacturer-supplied gaskets and washers
- Locknut
- Tailpiece
- P-trap or J-bend
- Trap arm or wall tube
- Slip nuts and tapered slip-joint washers
- Trap adapter, if required at the wall connection
- Correctly sized transition or reducing washer, if the approved connection requires one
Common tools and materials
- Adjustable pliers or channel-type pliers
- Adjustable wrench
- Bucket or shallow pan
- Clean rags
- Tape measure
- Suitable pipe-cutting tool if a tailpiece or pipe must be shortened
- Deburring tool or file when cutting compatible rigid plastic pipe
- Plumber’s putty or silicone only when approved for the fixture and drain materials
- Correct primer and solvent cement if you are making a connection specifically designed to be solvent-welded
Before You Apply Anything
Do not assume every drain flange needs plumber’s putty, every plastic pipe needs glue, or every threaded-looking nut needs thread tape. The correct sealing method depends on the component, material, connection design, and manufacturer’s instructions.
New Drain Installation: Step-by-Step
1. Confirm the Drain Type and Connection Size
Before taking the assembly apart, compare the new drain with the sink opening and the existing plumbing below. Check the drain style, tailpiece, trap arrangement, wall connection, and pipe material.
For a bathroom sink, also determine whether you are installing a pop-up stopper assembly. For a kitchen sink, identify whether the drain connects through a basket strainer or a garbage disposal.
Do not force mismatched parts together simply because two pieces appear close in size.
2. Prepare the Sink Opening
If this is a replacement, place a container below the trap, disconnect the old assembly, and remove the existing drain. Clean old sealant, putty, residue, and debris from the sink opening without damaging the sink finish.
If this is a completely new sink, make sure the drain opening and mating surfaces are clean and ready for the new assembly.
3. Dry-Fit the Drain Path Before Final Assembly
This step can prevent a lot of frustration later.
Temporarily position the drain body, tailpiece, P-trap, and wall tube so you can see whether everything will line up. The trap should meet the tailpiece and wall connection without needing to be twisted aggressively or pulled sideways.
If a component needs cutting, measure carefully before shortening it. For rigid plastic pipe that will be solvent-welded, cuts should be square and the cut end should be properly deburred and prepared rather than left rough. Manufacturer guidance for solvent welding also recommends deburring and chamfering compatible pipe ends before assembly.
4. Seal and Install the Drain Flange or Strainer
The flange is the visible part of the drain at the sink opening. Depending on the specific sink and drain assembly, the manufacturer may call for plumber’s putty, a supplied gasket, silicone, or another approved sealing method.
Do not automatically use standard plumber’s putty on every material. Some plastic and porous surfaces can be incompatible with conventional putty, so check both the sink and drain manufacturer’s instructions first.
Apply the approved sealing material as directed, place the drain into the opening, and keep the flange centered while the lower components are installed.
5. Install the Gasket, Washer, and Locknut From Below
From beneath the sink, assemble the supplied gasket, washer, and retaining nut in the order specified by the drain manufacturer.
Tighten the assembly enough to create the intended seal while keeping the drain aligned. Avoid treating “tighter” as automatically “better”; excessive force can distort washers, stress plastic components, or make alignment worse.
Remove any excess putty or sealant that squeezes out around the flange.
6. Attach the Tailpiece
The tailpiece carries water vertically from the sink drain toward the P-trap. Install it according to the drain assembly design and make sure it points straight toward the trap connection.
If the tailpiece is too long, measure before cutting. If it is too short to reach the intended trap configuration safely, use the appropriate compatible part rather than stretching or misaligning the trap.
7. Connect the P-Trap
A common tubular sink P-trap uses slip-joint nuts and tapered washers at its removable connections. The washer—not thread tape on the slip nut—is what creates the seal in a standard slip-joint connection.
- Slide the slip nut onto the tailpiece in the correct orientation.
- Install the appropriate tapered washer.
- Position the trap bend below the tailpiece.
- Connect the outlet side of the trap to the wall tube or trap arm.
- Align everything before final tightening.
- Hand-tighten first, then follow the fitting manufacturer’s tightening instructions.
The P-trap should not be installed backward or forced into a strained position. Its inlet connects toward the fixture, while its outlet continues toward the wall drain.
8. Connect the Trap Arm to the Wall Drain
The final visible connection under a typical sink is between the P-trap and the existing wall drain or trap adapter.
This is where you need to identify the connection type instead of guessing. A tubular slip-joint connection uses the appropriate nut and washer. A rigid socket fitting designed for solvent welding follows a completely different process.
If the wall connection is damaged, badly corroded, improperly positioned, inaccessible, or requires changing the building’s branch drainage piping, stop treating the project as a simple sink-drain assembly.
9. Solvent-Weld Only the Connections Designed for It
If your project includes compatible rigid PVC or ABS DWV fittings that are specifically designed to be solvent-welded, follow the pipe, fitting, primer, and cement manufacturer’s procedure.
For compatible PVC solvent-weld joints, proper preparation generally includes cutting square, deburring and chamfering, cleaning as required, using the specified primer when applicable, applying the correct cement, assembling promptly, and allowing the required set/cure period.
Do Not Glue a Tubular Slip-Joint P-Trap
Common polypropylene tubular trap components are designed to assemble with slip nuts and washers rather than solvent cement. If you are unsure what material or connection you have, identify it before applying cement.
10. Test the Complete Drain for Leaks
Once the installation is complete and any required sealant or solvent-welded joints have reached the manufacturer’s required ready-for-service time, test the drain methodically.
- Dry all visible joints so a new drip is easy to identify.
- Run a small amount of water first.
- Inspect the drain flange from below.
- Check the tailpiece connection.
- Inspect both sides of the P-trap.
- Check the wall connection.
- Fill the sink with water, then release it to place a larger drainage load on the assembly.
- Watch each connection again while the sink empties.
A dry first test does not mean you should ignore the installation. Check the area again after normal use, especially when new washers or fittings have just been assembled.
Which Drain Connections Get Glue, Washers, Putty, Silicone, or Tape?
This is one of the most useful distinctions to understand before installing a new drain.
Sink flange / strainer
Use the sealing method specified for the particular sink and drain assembly. Depending on materials and design, that may be approved putty, silicone, or supplied seals.
Tubular slip-joint fitting
Typically seals with the correct slip nut and tapered washer. Do not substitute thread tape for a missing or damaged washer.
Threaded pipe joint
Some true threaded pipe connections use a compatible thread-sealing product. Thread tape is intended for appropriate threaded joints, not ordinary slip-joint trap nuts.
PVC socket fitting
Use the compatible PVC solvent-welding products and procedure required for that pipe, fitting, application, and local requirements.
ABS socket fitting
Use the approved ABS joining system for the actual pipe and fitting. Do not assume PVC and ABS procedures or products are interchangeable.
Plumber’s Putty or Silicone: Which Should You Use?
Plumber’s putty is commonly used to create a water-resistant seal between suitable rigid fixture surfaces, including many sink strainers and drain components. However, it is not universally compatible with every sink or drain material.
For example, manufacturer guidance warns against conventional plumber’s putty on certain plastics and porous surfaces and recommends checking material compatibility before use.
The safest rule is simple:
Follow the sink and drain manufacturer’s sealing instructions instead of choosing putty or silicone by habit.
Bathroom Sink vs. Kitchen Sink Drain Installation
The basic drainage path is similar, but the fixture hardware can be different.
Bathroom Sink
- Frequently uses a smaller drain assembly.
- May include a pop-up stopper and linkage.
- The drain body’s orientation may matter for the pop-up mechanism.
- The tailpiece normally connects to a P-trap beneath the vanity.
Kitchen Sink
- Commonly uses a basket strainer when no disposal occupies the drain opening.
- A garbage disposal changes the outlet configuration.
- Double-bowl sinks may require additional waste fittings before the trap.
- A dishwasher connection may be part of the disposal or approved drain configuration.
The key is to follow the drainage path rather than trying to make a bathroom diagram fit a kitchen installation—or vice versa.
New Drain Installation vs. Drain Replacement
These jobs overlap, but they are not identical.
A new installation may begin with a clean sink opening and no old fixture drain to remove. Your main concerns are compatibility, sealing, alignment, and connection to the existing drainage system.
A replacement adds another stage: removing the old P-trap or drain assembly, cleaning the opening, evaluating existing components, and deciding which old parts should or should not be reused.
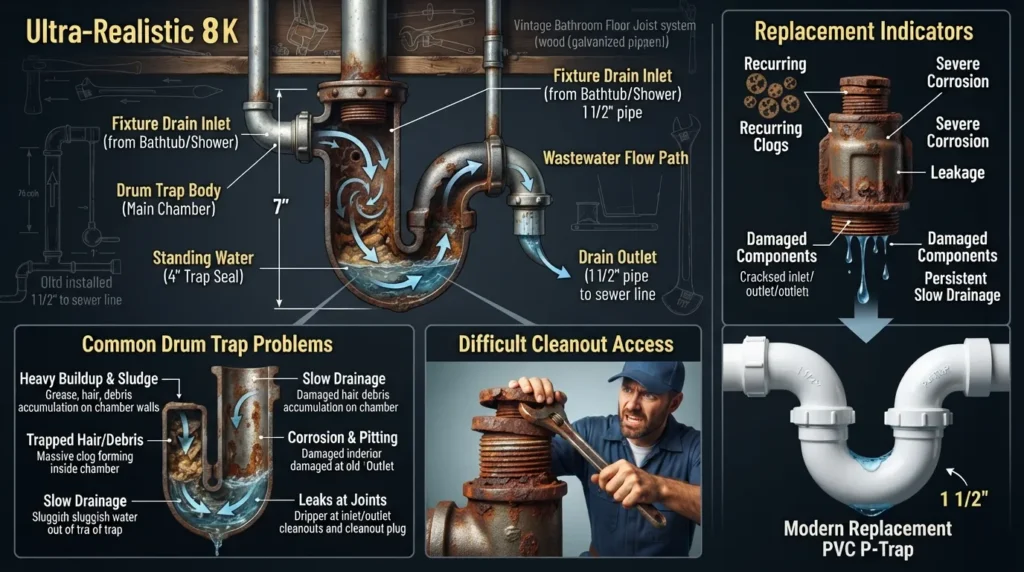
If you find heavy corrosion, damaged threads, brittle fittings, a deteriorated wall connection, or an installation that was previously forced together incorrectly, do not automatically reproduce the old arrangement with new parts.
How Long After Gluing PVC Drain Pipe Can You Use It?
There is no responsible universal wait time that applies to every PVC cement, pipe size, temperature, humidity level, and application.
Solvent-cement manufacturers publish product-specific set and cure guidance, and those times can change with pipe diameter and environmental conditions. Oatey’s published guidance, for example, uses tables based on pipe size, temperature, and application conditions rather than a single universal number.
Use the set/cure instructions printed for the exact primer and cement you used. Do not decide that a joint is ready simply because the outside feels dry.
Do You Need to Sand PVC Pipe Before Gluing It?
Do not treat aggressive sanding as a substitute for proper pipe preparation.
For a compatible solvent-welded PVC connection, the important preparation steps are to make a square cut, remove burrs, chamfer the outside edge where required, and clean the mating surfaces appropriately before priming and cementing. A file or fine abrasive may be useful for smoothing an irregular cut edge, but the goal is a properly prepared fitting surface—not randomly roughened pipe.
Common New Drain Installation Mistakes
Using glue on a slip-joint trap
A removable tubular P-trap connection normally relies on its nut and washer. Cementing parts that were designed to remain removable can create a problem instead of solving one.
Using thread tape on every nut you see
Slip-joint nuts are not the same thing as threaded pipe joints. If the joint is designed to seal with a tapered washer, install the correct washer in the correct orientation.
Skipping the dry fit
If the tailpiece, trap, and wall tube do not line up before final assembly, sealant will not fix the geometry.
Forcing the P-trap into position
A trap under constant sideways tension is more likely to leak or loosen. Correct the alignment instead of using the slip nuts to pull badly positioned parts together.
Using the wrong sealant for the sink material
Check compatibility before putting conventional plumber’s putty on plastic, acrylic, stone, or another surface for which the manufacturer recommends a different product.
Testing only with a trickle of water
A connection may stay dry under light flow and leak when a full sink empties. Test progressively and inspect every joint.
Treating branch-drain work like a sink-kit installation
Once the project requires changing concealed drainage piping, moving a fixture connection, altering venting, or replacing a sanitary line, you are dealing with a broader plumbing project.
Where Is the Leak? Use the Location to Narrow Down the Problem
Water around the underside of the sink opening
Inspect the flange seal, gasket placement, drain-body alignment, and locknut assembly.
Water at the tailpiece
Check the specific tailpiece connection, gasket or washer, alignment, and assembly instructions.
Water at a P-trap slip nut
Inspect washer presence, orientation, seating, alignment, and nut tightness.
Water near the wall
Inspect the trap-arm connection and wall adapter rather than repeatedly tightening unrelated joints.
Drain is slow immediately after installation
Recheck alignment, trap configuration, accidental debris, and whether an existing blockage is restricting flow.
Gurgling or recurring sewer odor
The issue may extend beyond the new fixture assembly and can require evaluation of the drainage and venting system.
Do You Actually Need a New Drain?
A slow sink does not automatically mean the drain piping needs to be replaced.
If the assembly is intact but water is draining slowly because of buildup or a blockage, cleaning the existing line may be more appropriate than replacing it. Learn more about professional drain cleaning before assuming that a completely new drain is the solution.
Replacement becomes a different conversation when components are damaged, leaking, severely deteriorated, incorrectly configured, or the plumbing needs to be relocated for a remodel or new fixture.
How Much Does a New Drain Installation Cost?
The phrase “new drain installation” is too broad for one honest price.
A sink drain assembly installed into an existing, correctly positioned connection is a very different project from opening a wall, replacing a branch drain, correcting venting, working on deteriorated piping, or installing a new sanitary connection.
The main cost factors include:
- Bathroom sink, kitchen sink, shower, floor drain, or another fixture
- New installation versus removal and replacement
- Drain assembly and pipe materials
- Accessibility below the fixture and inside walls or cabinets
- Condition and location of the existing wall connection
- Whether a garbage disposal or multiple sink bowls are involved
- Whether existing piping must be cut, relocated, or replaced
- Whether code or permit-related work is part of the project
For that reason, compare quotes only after the scope is clearly defined. A quote for “installing a sink drain kit” and a quote for “installing a new drain line” may describe entirely different jobs.
When a DIY Drain Installation Should Become a Professional Plumbing Job
A straightforward fixture-level drain assembly can be manageable for an experienced DIY homeowner. The risk increases when the project moves beyond replaceable under-sink components.
Consider professional help when:
- The wall drain is damaged, corroded, loose, or in the wrong location.
- The new sink cannot connect without significantly reworking the existing drainage.
- You need to add, move, or alter piping inside a wall or floor.
- Venting or branch-drain configuration needs to change.
- You discover deteriorated cast iron or another failing drainage material.
- The drain repeatedly backs up even though the visible fixture assembly is clear.
- You cannot identify whether a connection is slip-joint, threaded, solvent-welded, or another type.
- A newly installed assembly continues to leak after the correct components have been rechecked.
Need Help With a Drain in Miami?
If the project is more involved than replacing a sink drain assembly, our Miami plumbing team can help you determine what the drain actually needs before unnecessary work is done.
A Note About Drain-Line Work in Miami-Dade
Replacing a sink’s removable drain assembly is not the same scope as replacing or altering a building sanitary line.
Miami-Dade County maintains plumbing permitting and inspection guidance and specifically lists a permitting process for sanitary-line replacement. If your project extends into concealed drainage piping or sanitary-line work, verify the requirements that apply to the property and project before work begins.
Video: See a Sink Drain Assembly in Context
If you learn better by seeing the components come apart and go back together, this bathroom sink drain video can help you visualize the drain body, connections, and under-sink assembly. Use it as a visual supplement; always follow the instructions for your actual fixture and fittings.
New Drain Installation FAQs
Final New Drain Installation Checklist
- Confirm whether this is a new installation or replacement.
- Identify bathroom, kitchen, or another fixture type.
- Confirm the drain assembly fits the sink and existing plumbing.
- Identify every connection before choosing a sealing method.
- Dry-fit the tailpiece, P-trap, and wall connection.
- Use only fixture-compatible putty, silicone, gaskets, or other seals.
- Use slip-joint washers on connections designed for them.
- Do not glue removable tubular trap parts.
- Follow the exact solvent-cement instructions for any compatible welded joint.
- Do not force misaligned drain components together.
- Test first with light flow, then with a full-basin discharge.
- Inspect every joint individually if a leak appears.
- Get professional help when the work extends into concealed branch drains, venting, sanitary lines, or damaged building piping.
A successful new drain installation is not about using the most sealant or tightening every fitting as hard as possible. It is about understanding what each component does, matching the right parts, using the correct seal at each connection, maintaining proper alignment, and testing the completed drainage path before calling the job finished.