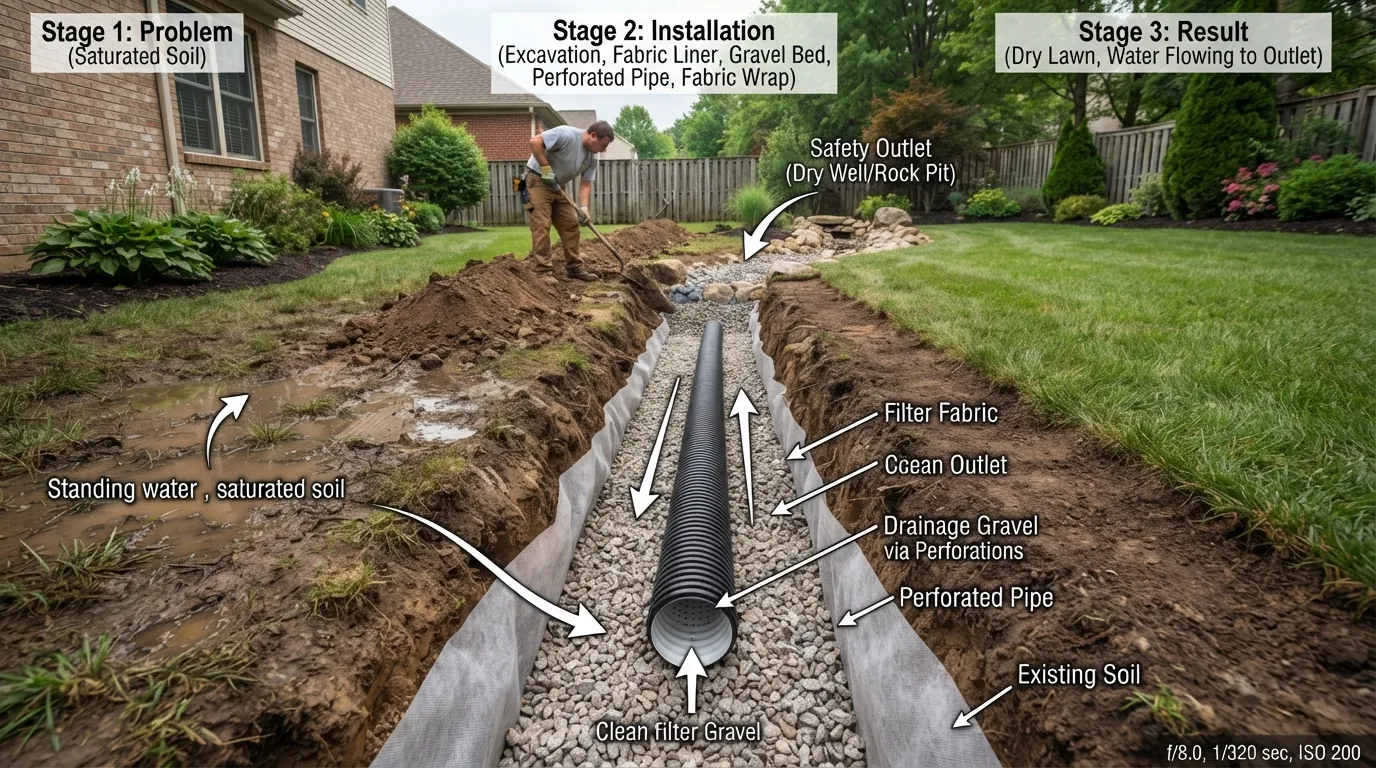
If water keeps pooling in your yard, leaving the lawn soggy, moving toward your foundation, or sitting in the same low area after rain, a French drain may help. But installing one correctly involves more than digging a trench and dropping in a perforated pipe.
To install a French drain, first identify where the unwanted water is coming from and choose a safe discharge point. Mark a continuously draining route, check for underground utilities, excavate the trench, line it with geotextile fabric, add clean drainage stone, install perforated drain pipe at a consistent fall toward the outlet, surround it with more stone, wrap the fabric over the stone, test the system, and restore the surface. The most important part is not the trench itself—it is making sure the water has somewhere suitable to go.
This guide walks you through the entire decision, not just the digging. I’ll show you how to decide whether a French drain is the right solution, how to plan the route, what materials you need, how to avoid common installation mistakes, and what changes when you are dealing with flat or wet South Florida properties.
Before You Dig: Make Sure a French Drain Is the Right Solution
The first mistake many homeowners make happens before installation begins: they assume every standing-water problem needs a French drain.
A French drain is designed to intercept and redirect water moving through saturated soil. It can work well when groundwater or subsurface water repeatedly collects along a yard, slope, retaining area, or other problem zone.
It may not be the best first solution when the actual problem is roof runoff, a single clogged surface drain, poor grading, a plumbing backup, or water that has no realistic gravity outlet.
A French Drain May Fit
- Soggy soil that remains saturated after rain
- Groundwater moving through a section of yard
- Recurring water along the uphill side of a slope
- Subsurface moisture that needs interception and redirection
- A yard drainage problem with a workable outlet
Another Solution May Fit Better
- Water coming directly from a downspout
- A single low spot collecting surface runoff
- A yard that slopes toward the house
- A blocked plumbing or storm drain
- A site with no safe place to discharge water
If you are dealing with several drainage problems at once, it helps to understand how the French drain fits into the larger home drainage system before choosing a fix.
How a French Drain Works
A French drain creates a path of lower resistance for water moving through saturated soil. Instead of remaining trapped in the ground, water enters the stone-filled trench, reaches the perforated pipe, and is carried toward an approved discharge area.
French Drain Anatomy
The outlet is what makes the system useful. A beautifully constructed trench that ends in another saturated low spot may simply move the problem rather than solve it.
Plan the French Drain Before You Install It
1. Identify Where the Water Is Coming From
Walk the property during or shortly after a heavy rain if it is safe to do so. Look for the point where water first appears, not just where it eventually collects.
Ask:
- Is water flowing downhill across the surface?
- Is it rising through saturated soil?
- Is a downspout dumping water into the area?
- Does water collect because the yard has a low spot?
- Is moisture appearing near the foundation?
- Could a clogged drain or plumbing problem be involved?
This diagnosis determines whether you need to intercept groundwater, move roof runoff, improve grading, clear an existing drain, or combine more than one drainage method.
2. Choose the Outlet Before Choosing the Trench
Decide where the collected water can safely go before you begin excavation.
Depending on the property and local requirements, the final destination may involve an approved daylight outlet, drainage area, dry well, stormwater feature, or another properly designed discharge method.
Important: Do not assume you can connect a French drain to a sanitary sewer line. Stormwater, groundwater, and sanitary plumbing are different systems. Verify local requirements before making any connection or sending runoff beyond your property.
3. Map a Route With Continuous Fall
The pipe needs a continuous path toward the outlet without humps or reverse slopes that can hold water.
You can establish the grade with a string line, builder’s level, laser level, or another reliable leveling method. Exact dimensions and slope should be chosen for your site rather than copied blindly from a generic diagram.
4. Check Underground Utilities
Never start trenching simply because the route looks clear from the surface. Have underground utility lines located before digging and follow local excavation requirements.
This becomes especially important if you plan to use a trencher or excavator instead of digging by hand.
How Deep Should a French Drain Be?
Many residential yard French drains are installed in the general range of about 18 to 24 inches deep, but there is no single correct depth for every property.
The right depth depends on:
- what water you are trying to intercept;
- the elevation of the outlet;
- the pipe diameter and stone envelope;
- existing soil and groundwater conditions;
- whether the drain is in an open yard, near a structure, or on a slope; and
- local site constraints.
Going deeper is not automatically better. If digging deeper puts the pipe below the available outlet elevation, you can create a trench that holds water instead of draining it.
How Wide Should the Trench Be?
The trench needs enough width to surround the perforated pipe with drainage stone rather than placing the pipe directly against native soil.
A typical residential trench may be roughly a foot wide, but width should be adjusted for the pipe, stone envelope, excavation method, soil stability, and expected water volume.
The key principle is simple: give water enough clean aggregate area to reach the pipe while keeping surrounding soil from contaminating the stone.
What You Need to Install a French Drain
Materials
- Perforated drainage pipe
- Clean washed drainage stone or gravel without excessive fines
- Water-permeable geotextile/filter fabric
- Pipe fittings as required
- Outlet components
- Optional catch basin where the design calls for surface-water collection
- Sod, soil, or decorative stone for surface restoration
Tools
- Shovel or trenching shovel
- Mattock or digging bar for difficult ground
- Wheelbarrow
- Tape measure
- String line and stakes
- Level or laser level
- Utility knife or scissors for fabric
- Rake
- Pipe-cutting tool appropriate for your pipe
- Compaction or restoration tools as needed
Which French Drain Pipe Should You Use?
You will commonly see perforated rigid pipe and flexible corrugated drainage pipe used in French drain systems.
Rigid Perforated Pipe
Can make it easier to maintain a consistent line and grade. Smooth-wall systems may also be easier to inspect or clean when access is designed into the installation.
Flexible Corrugated Pipe
Can be convenient around curves and uneven routes, but the trench bottom still needs careful preparation so the pipe does not develop sags that trap water.
If you are using a packaged French drain kit, do not assume the kit automatically solves the design. You still need the correct route, outlet, grade, trench dimensions, aggregate, and soil separation for your property.
How to Install a French Drain Step by Step
Step 1: Mark the Start, Route, and Outlet
Mark the area where water needs to be intercepted and the entire route to the discharge point.
Avoid unnecessary turns. Every bend adds complexity, and every elevation change needs to preserve positive drainage toward the outlet.
Step 2: Confirm the Grade
Set stakes and a string line or use a laser level to verify that the route can maintain continuous fall.
Do not rely entirely on how the yard looks. A route that appears to slope downward can contain subtle high spots that prevent drainage.
Step 3: Dig the Trench
Excavate along the marked route to the planned depth and width. Keep checking the bottom elevation as you dig.
If you are digging a French drain by hand, a trenching shovel can make narrow excavation easier, while a mattock can help with roots or compacted ground. Hand digging is practical for some shorter, accessible runs; longer or deeper trenches can quickly become a substantial excavation project.
Place excavated soil where it will not wash back into the trench.
Step 4: Shape and Check the Trench Bottom
Remove loose soil, roots, and high spots. The bottom should support the intended drainage path continuously.
Check the grade again before adding fabric or stone. Fixing the trench now is far easier than discovering a drainage problem after backfilling.
Step 5: Line the Trench With Geotextile Fabric
Place water-permeable filter fabric along the trench with enough extra material on both sides to fold over the top of the finished stone envelope.
The fabric helps keep surrounding soil from migrating into the drainage aggregate and reducing the open space water uses to reach the pipe.
Step 6: Add a Base Layer of Clean Drainage Stone
Spread clean washed drainage stone over the bottom of the fabric-lined trench.
Avoid aggregate containing large amounts of fine material that can fill drainage spaces over time.
Recheck the grade of the stone bed before placing the pipe.
Step 7: Install the Perforated Pipe
Place the perforated drainage pipe on the prepared stone bed and connect sections and fittings securely.
Pipe perforation orientation can depend on the pipe design, so follow the manufacturer’s instructions. In many traditional French drain configurations, perforations are positioned low in the trench so rising water can enter the pipe and move toward the outlet.
Confirm again that the pipe does not contain a reverse slope or sag.
Do not guess at pipe orientation. Different drainage products can be designed differently. Check the manufacturer’s installation instructions for the exact pipe you are using.
Step 8: Connect the Drain to the Planned Outlet
Complete the downstream connection so collected water can leave the French drain without backing up into the trench.
The outlet should remain accessible enough to inspect where practical. A blocked or submerged outlet can reduce the performance of the entire system.
Step 9: Test Before You Cover It
Do not bury the system immediately.
Introduce water at the upstream section and observe whether it travels toward the outlet. Look for:
- areas where water stops moving;
- leaking or disconnected fittings;
- pipe movement;
- low spots in the trench;
- an outlet that backs up; and
- water appearing somewhere you did not expect.
If the test exposes a problem, correct it while the pipe is still accessible.
High-value installation rule: Test the drainage path before backfilling. A ten-minute correction while the trench is open can prevent having to excavate the same area again later.
Step 10: Surround the Pipe With Drainage Stone
Add clean drainage stone around and above the pipe without disturbing its grade.
The stone is not just filler. It creates the permeable zone that allows subsurface water to move quickly toward the pipe.
Step 11: Wrap the Fabric Over the Stone
Fold the extra geotextile over the top of the stone envelope to reduce soil migration into the aggregate.
Keep the drainage system separated from fine native soil as much as the design allows.
Step 12: Restore the Surface
Finish the trench with the surface treatment appropriate for the area, such as soil and sod or decorative drainage stone.
Do not create a new surface depression directly above the drain unless that is part of the drainage design. A low trench line can unintentionally collect more surface runoff than intended.
Optional Visual Walkthrough
If you prefer to see the installation sequence as well as read it, this video walkthrough can help you visualize the trench, pipe, aggregate, and drainage process. Always adapt any video method to your own site conditions and local requirements.
Where Should You Not Put a French Drain?
A French drain should not be installed simply wherever water happens to be visible.
Do Not Start Installation Until You Can Answer These Questions
- Where is the water actually coming from?
- Where will the drain discharge?
- Can the route maintain positive drainage?
- Have underground utilities been located?
- Will the discharge remain on an approved route?
- Could the excavation affect a foundation, retaining wall, or other structure?
- Are you trying to solve a plumbing problem rather than a groundwater problem?
Avoid routing collected water toward a neighboring property or creating an outlet that simply floods another part of your own yard.
If the project requires excavation close to a foundation or footing, treat it as a more complex drainage problem rather than assuming a standard yard French drain detail applies.
How to Install a French Drain Around a House
A French drain around a house needs more planning than a simple drain across an open lawn.
First determine what moisture problem you are addressing. Water collecting several feet away from the building is different from water entering a basement, crawlspace, slab edge, or foundation wall.
Before excavation near the structure, consider:
- foundation depth and type;
- existing footing drains or waterproofing;
- utility lines entering the building;
- soil stability;
- the final discharge elevation; and
- whether surface grading should be corrected first.
Around-house drainage work can affect much more than the lawn. If the project requires deep excavation beside the foundation, professional evaluation may be the safer approach.
How to Install a French Drain on a Hill
On a slope, a French drain is often most useful when it intercepts subsurface water before that water reaches the area you want to protect.
That may mean running the drain generally across the direction of groundwater movement rather than simply installing a pipe straight down the hill.
The drain still needs a controlled outlet. Do not allow the system to discharge at a point where concentrated flow can erode soil or create a new drainage problem farther downhill.
Should You Use a French Drain for Gutters?
Not automatically.
A gutter downspout carries concentrated roof runoff. In many cases, a solid drainage pipe that carries water directly from the downspout to an approved discharge point makes more sense than intentionally releasing that water into a perforated French drain.
A French drain can still be part of a larger drainage design, but do not treat a perforated groundwater drain and a downspout conveyance pipe as if they perform the same job.
Think in terms of the water source: use a system designed to capture subsurface water for groundwater problems and a system designed to convey concentrated runoff for roof-water problems.
What Is Better Than a French Drain?
No drainage method is universally better. The best solution depends on why the water is there.
Subsurface water moving through soil
A French drain may be a strong option if a suitable outlet exists.
One surface low spot
A catch basin and solid drain may make more sense.
Yard slopes toward the house
Regrading or a swale may address the source more directly.
Downspout runoff
A properly routed solid conveyance pipe may be preferable.
No workable gravity outlet
A dry well, pump, or engineered drainage solution may need evaluation.
Water caused by a clogged drain
The correct first step may be clearing or repairing the existing drain instead of installing a French drain.
Common French Drain Mistakes
No Real Outlet
A French drain cannot reliably solve a drainage problem if the collected water has nowhere appropriate to go.
Installing It for the Wrong Water Source
A trench will not fix every drainage issue. Diagnose groundwater, roof runoff, grading, plumbing backups, and surface drainage separately.
Inconsistent Pipe Grade
High spots and sags can trap water and sediment. Check the trench and pipe elevation repeatedly during installation.
Using Dirty Aggregate
Stone containing excessive fines can reduce drainage space and contribute to clogging.
Skipping Filter Fabric
Without proper soil separation, fine material can migrate into the stone envelope.
Using the Wrong Pipe Orientation
Do not rely on a generic rule for every pipe product. Follow the instructions for the specific perforated pipe you install.
Backfilling Before Testing
Always verify drainage while the system is accessible.
Ignoring Surface Grading
If the ground still directs large amounts of runoff toward the same problem area, the French drain may be forced to handle water that should have been diverted at the surface.
Installing a French Drain in Miami: What Changes?
South Florida properties can make drainage design more challenging because many sites have limited natural elevation, periods of heavy rainfall, highly permeable ground conditions, and relatively shallow groundwater.
That makes one question especially important:
After the French drain collects the water, where can that water actually go?
On a property with generous elevation, a gravity outlet may be straightforward. On a flat Miami-area lot, you may have much less vertical fall available between the wet area and the discharge point.
A deeper trench does not solve that limitation. If the outlet is not lower than the water you are collecting, gravity cannot do the job you are expecting.
Before installing a French drain on a South Florida property, pay special attention to:
- the elevation difference between the wet area and outlet;
- how the yard behaves during intense rain;
- nearby foundations and structures;
- existing stormwater or drainage features;
- high groundwater conditions;
- where runoff will leave the system; and
- local drainage and discharge requirements.
This is one reason site-specific planning can matter more than simply copying a trench depth or pipe layout from a national DIY guide.
Can You Install a French Drain Yourself?
Yes, some homeowners can successfully install a straightforward French drain themselves.
A DIY project is more realistic when:
- the trench is accessible and reasonably shallow;
- the water source is clearly understood;
- you have a safe gravity outlet;
- utilities have been located;
- the route is away from structural complications; and
- you can accurately establish and maintain the required grade.
Professional evaluation becomes more valuable when:
- water is entering or threatening the foundation;
- the property is extremely flat;
- groundwater is high;
- you cannot identify a suitable outlet;
- deep excavation is required;
- the problem may involve an existing plumbing drain;
- the drainage route crosses utilities or hardscape; or
- previous drainage work has already failed.
How Much Does a 100-Foot French Drain Cost?
There is no responsible single price that applies to every 100-foot French drain. Material prices, excavation difficulty, access, depth, soil conditions, restoration, outlet design, and labor can change the total substantially.
For a useful estimate, build the project from its actual components:
- 100 feet of the selected drainage pipe plus fittings and waste allowance
- the required quantity of clean drainage stone
- geotextile fabric
- catch basins, cleanouts, or outlet fittings if included
- hand excavation or equipment rental
- soil removal or disposal
- sod, landscaping, concrete, or hardscape restoration
- professional design or installation where needed
A simple open-yard trench and a 100-foot system routed around structures, utilities, pavement, or a difficult outlet are not comparable projects even though their pipe lengths are identical.
What Are the Downsides of a French Drain?
A French drain can be very useful when it matches the problem, but it has limitations.
- Installation requires excavation.
- The system still needs a suitable outlet.
- Stone and pipe can become restricted if soil separation is poor.
- Roots and sediment may create maintenance problems.
- A badly graded pipe can hold water.
- It may not solve surface-grading or roof-runoff problems.
- Flat sites can limit gravity drainage.
- Incorrect installation can move water toward another problem area.
The biggest downside is spending time and money on a French drain when the original water problem needed a different solution.
How Do You Maintain or Fix a French Drain?
A properly installed French drain should not need constant attention, but periodic checks can help you catch problems early.
- Keep the outlet clear of leaves, soil, roots, and landscaping.
- Watch the problem area after major rain events.
- Look for new depressions along the trench.
- Check accessible basins or cleanouts for sediment.
- Make sure landscaping has not blocked the outlet.
- Investigate if standing water suddenly returns after the system previously worked.
If the drain stops performing, the problem may be a blocked outlet, collapsed or sagging pipe, sediment intrusion, roots, or simply a change in the amount or source of water reaching the area.
If the standing water is actually related to a clogged plumbing line rather than a yard groundwater problem, professional drain cleaning service may be the more appropriate solution.
French Drain Installation Checklist
- Identify the actual source of the water.
- Confirm that a French drain fits the problem.
- Choose the outlet before digging.
- Check local drainage requirements.
- Have underground utilities located.
- Measure the required route and elevation change.
- Excavate the trench with continuous fall.
- Line the trench with permeable geotextile fabric.
- Add clean drainage stone.
- Install the perforated pipe according to the product instructions.
- Connect the pipe to the planned outlet.
- Test the system before covering it.
- Add stone around and above the pipe.
- Wrap the fabric over the stone envelope.
- Restore the surface without creating a new drainage problem.
- Inspect the outlet after major rain.
Frequently Asked Questions
Can you install a French drain yourself?
Yes. A homeowner can install a simple French drain when the water source, route, grade, utilities, and outlet are clearly understood. Projects near foundations, deep excavation, high groundwater, difficult outlets, or complex drainage conditions are better candidates for professional evaluation.
How deep does a French drain need to be dug?
Many yard installations fall around 18 to 24 inches deep, but there is no universal depth. The correct depth depends on the water being intercepted, outlet elevation, pipe and stone configuration, soil conditions, and the location of the drain.
What are the downsides of a French drain?
French drains require excavation, a workable outlet, correct grading, soil separation, and periodic outlet inspection. They can fail when installed for the wrong water problem or when sediment, roots, poor slope, or a blocked discharge point restrict the system.
Can I tie my French drain into my sewer line?
Do not assume a French drain can connect to a sanitary sewer. Groundwater and stormwater drainage are different from sanitary wastewater systems. Verify the approved discharge method for your property and jurisdiction before making any connection.
Where should you not put a French drain?
Avoid locations where the trench conflicts with underground utilities, threatens a foundation or structure, drains toward neighboring property, or lacks a suitable downstream outlet. You also should not use a French drain to mask a plumbing backup or another problem that requires a different repair.
What is the average cost for a 100-foot French drain?
The cost can vary too much by location and site conditions for one figure to be reliable. Pipe, aggregate, fabric, excavation, disposal, access, outlet complexity, restoration, and labor should all be priced for the actual property.
What are the most common French drain mistakes?
Common mistakes include choosing the wrong drainage solution, failing to plan an outlet, creating an inconsistent slope, using unsuitable aggregate, skipping soil-separation fabric, installing the pipe incorrectly, and covering the system before testing it.
What is better than a French drain?
It depends on the water source. Regrading or a swale may be better for surface runoff, a solid downspout drain may be better for roof water, a catch basin may work better for an isolated low spot, and a pump or engineered drainage system may be necessary when a gravity outlet is unavailable.
The Most Important Part of French Drain Installation
The trench is not the first thing I would focus on. The first priority is understanding the water.
If you know where the water comes from, where it needs to be intercepted, and where it can safely discharge, the construction steps become much easier to plan. If those questions are unanswered, adding more gravel or digging a deeper trench will not compensate for the design problem.
That is especially important on flat South Florida properties, where available elevation and groundwater conditions can determine whether a gravity drainage system is practical.
Not Sure Whether You Need a French Drain?
If you are dealing with recurring yard drainage, standing water, or a problem that may be connected to your plumbing system, getting the problem identified correctly before excavation can save a lot of unnecessary work.
You can learn more about our local plumbing team at Miami Florida Plumbing, or speak with a local plumber if you need help deciding the right next step.