To install a standard sink drain trap, place a bucket underneath, remove the old trap, confirm
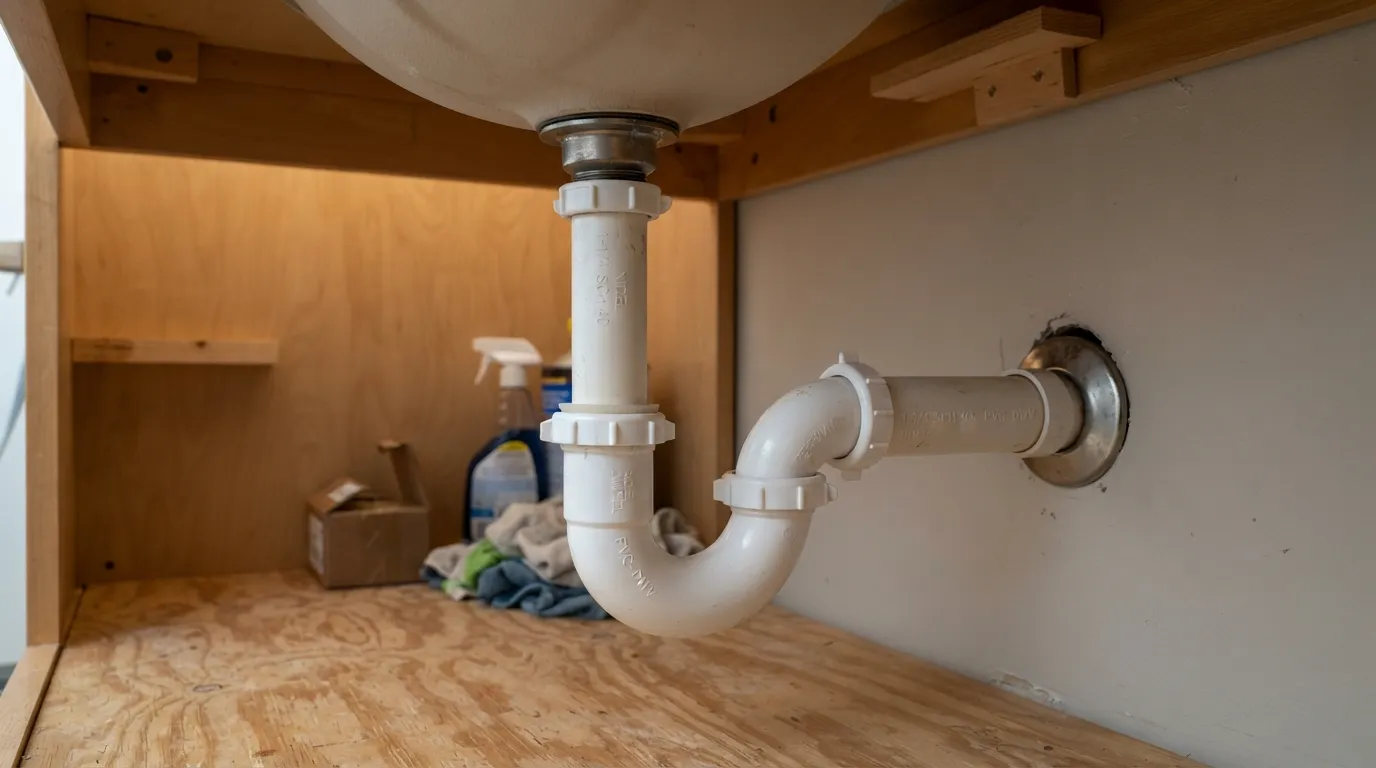
the new P-trap size, dry-fit the parts, and slide the slip nuts and washers onto the tubes. On common tapered slip-joint washers, the tapered side faces the fitting. Connect the J-bend to the sink tailpiece, connect the trap arm to the wall drain, align everything without forcing it, hand-tighten the slip nuts, and then run water to check every joint for leaks. Standard tubular slip-joint connections normally seal with their washers, so they usually do not need PVC cement, plumber’s putty, PTFE/Teflon tape, or silicone.
A drain trap installation is not difficult when the existing sink plumbing lines up properly, but small mistakes matter. A washer facing the wrong direction, a trap arm cut too short, a fitting pulled sideways, or an overtightened plastic nut can turn a simple P-trap install into a persistent leak.
In this guide, I’ll walk you through the complete process from choosing the right trap to testing the finished installation. I’ll also show you what to do when the pipes do not line up, which sealants belong on which connections, how to troubleshoot a leak by its location, and when it makes more sense to stop the DIY repair and call a plumber.
What Is a Drain Trap and Why Does Your Sink Need One?
The drain trap is the curved section of piping between your sink drain and the drain line entering the wall. Under most modern sinks, this is a P-trap.
The bend retains water after the sink drains. That standing water creates a trap seal between the room and the drainage system, helping prevent sewer gases and odors from traveling back through the sink opening.
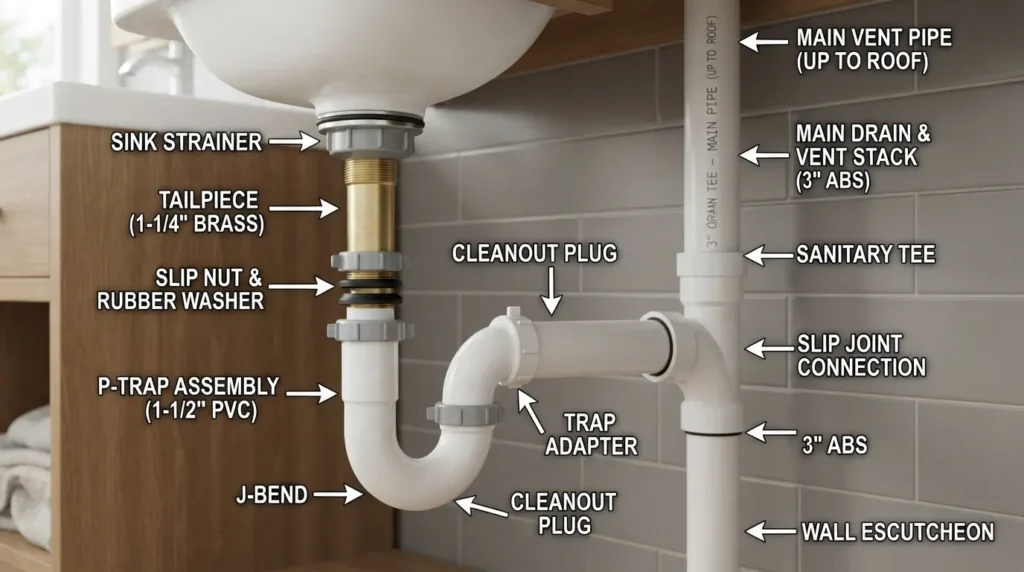
A sink P-trap assembly commonly includes:
- Tailpiece: the vertical tube extending down from the sink drain.
- J-bend or trap bend: the curved portion that holds the water seal.
- Trap arm or wall tube: the section that runs from the trap toward the wall.
- Trap adapter or waste connector: the fitting where the tubular trap connects to the drainage piping.
- Slip nuts: threaded nuts that compress the joints together.
- Slip-joint washers: the sealing components inside standard tubular connections.
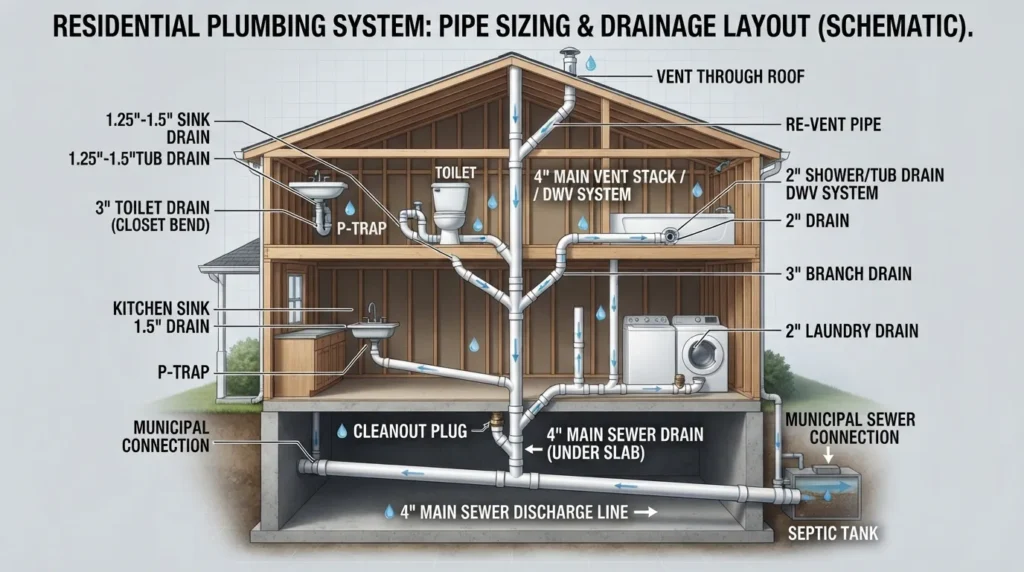
The trap is only one part of a larger system. If you want to understand what happens after wastewater passes through the P-trap, see our guide to how a home drainage system works.
P-Trap Installation Diagram: Know the Parts Before You Start
Sink Drain
Tailpiece
Slip Joint
J-Bend
Trap Arm
Wall Connection
Washer orientation: With a common beveled slip-joint washer, the flat side sits toward the nut and the tapered side faces into the fitting it seals against. If your trap kit uses a different washer design, follow its manufacturer’s instructions.
Before You Buy a P-Trap: Check These Three Things
Many installation problems actually begin at the store. Before buying a replacement trap, inspect the existing plumbing instead of assuming every sink uses the same assembly.
1. Check the pipe diameter
Most bathroom sink traps use 1-1/4-inch tubular piping, while many kitchen sinks use 1-1/2-inch piping. Those sizes are common rather than universal, so measure your existing trap or verify the drain and adapter before buying parts.
2. Identify the existing material and connection type
Under-sink traps may be tubular plastic, PVC, ABS, brass, or chrome-plated metal. More important than appearance is how the joints connect.
A removable tubular P-trap commonly uses slip nuts and compression washers. A permanent DWV fitting may use solvent-welded connections instead. Do not assume that instructions for one connection type apply to another.
3. Check alignment before cutting anything
Look at the relationship between the sink tailpiece and the drain opening in the wall. A standard trap should fit without forcing the tubes sideways or twisting the fittings under tension.
If the new sink, vanity, or drain position has changed substantially, you may need an extension, an appropriate offset arrangement, a different trap configuration, or modification of the drainage piping rather than simply pulling the P-trap into place.
Do not solve major misalignment by force.
If a connection only meets when you bend, twist, or push the trap sideways, stop and correct the layout. Stress at a slip joint can prevent the washer from seating evenly and may lead to leaks later.
Tools and Materials You May Need
- Correct-size P-trap kit
- Bucket or shallow container
- Old towels or paper towels
- Slip-joint pliers or adjustable pliers
- Tape measure
- Marker
- Pipe cutter or hacksaw if trimming is necessary
- Replacement slip-joint washers if they are not included
- Deburring tool or fine abrasive material for smoothing a freshly cut tube
You do not automatically need plumber’s putty, Teflon tape, silicone, or PVC cement just because you are working on a drain. Whether any sealing product is appropriate depends on the exact joint being assembled. I’ll cover that distinction below.
How to Install a P-Trap Under a Kitchen or Bathroom Sink
Step 1: Clear the cabinet and place a bucket under the trap
Remove everything from under the sink so you can see and reach the fittings. Place a bucket directly beneath the J-bend because a used P-trap normally contains water.
For a simple drain-trap replacement, the sink’s water supply is not part of the drain connection itself. However, closing the fixture shutoff valves can prevent someone from accidentally running the faucet while the trap is disconnected.
Step 2: Remove the old P-trap
Loosen the slip nuts at the tailpiece and wall-side connection. Many plastic nuts can be loosened by hand, although pliers may be needed if they are tight.
Support the trap as you loosen it, lower it into the bucket, and allow the trapped water to drain. Remove old washers that will not be reused.
If you encounter badly corroded metal, cracked plastic, damaged threads, or a fitting that will not release without excessive force, replacing more of the assembly may be safer than trying to preserve a failing part.
Step 3: Clean and inspect the connection points
Wipe the sink tailpiece and wall connection clean. Look for cracks, corrosion, burrs, damaged threads, old debris, or pieces of a previous washer.
A new washer cannot create a reliable seal against a damaged or badly contaminated surface.
Step 4: Dry-fit the new P-trap
Before tightening anything, temporarily position the J-bend under the tailpiece and swing the trap arm toward the wall connection.
You want the pieces to meet naturally. Check:
- Whether the trap is the correct size.
- Whether the tailpiece reaches far enough into the J-bend.
- Whether the trap arm reaches the wall adapter.
- Whether the trap can sit without sideways strain.
- Whether a tube needs to be shortened rather than forced deeper into a fitting.
Step 5: Measure and trim the trap arm if necessary
If the wall tube is too long, mark the required length carefully. Remove it and make a straight cut with an appropriate cutter or hacksaw.
Smooth the cut edge before assembly. A rough or angled edge can interfere with proper fit and may damage a washer.
Measure before you cut.
You can shorten an overlong tube. You cannot put material back after cutting it too short. Leave enough insertion depth for the connection to remain secure.
Step 6: Install the slip nuts and washers
On a typical tubular P-trap, slide the slip nut onto the tube first and then install the washer.
For a common tapered washer:
- The nut goes on first.
- The flat side of the washer faces the nut.
- The tapered side points toward the fitting.
As the nut tightens, it compresses the washer into the receiving fitting. The washer—not the threads of the slip nut—is what creates the seal.
Step 7: Connect the J-bend to the sink tailpiece
Raise the J-bend into position beneath the sink tailpiece. Seat the washer properly and thread the slip nut onto the fitting by hand.
Do not fully tighten it yet. Keeping the joints slightly loose allows you to align the complete trap assembly before locking everything in place.
Step 8: Connect the trap arm to the wall drain
Position the trap arm between the J-bend and the wall connection. Insert it far enough to create a secure connection without forcing the assembly.
Install and seat the appropriate washer, then thread the slip nut by hand.
Step 9: Align the complete assembly before final tightening
This is one of the most important steps.
Look at the complete path from the tailpiece through the J-bend and into the wall. The trap should sit naturally rather than being twisted into position.
Make sure:
- The J-bend is oriented correctly.
- Washers are centered rather than pinched.
- Nuts are threaded straight rather than cross-threaded.
- The tubes are not under noticeable sideways tension.
- The wall-side connection is fully engaged.
Step 10: Hand-tighten the slip nuts
Tighten each plastic slip nut firmly by hand. If a joint needs a little more compression, use pliers carefully for a small additional turn.
Do not keep tightening simply because a tool allows you to. Overtightening can deform washers, strip threads, or crack plastic fittings.
Step 11: Test the installation for leaks
Dry the underside of every connection first so new moisture is easy to detect.
- Run the faucet and watch each joint.
- Let water flow through the trap continuously for a short period.
- Fill the sink partially and release the water to create a larger drain flow.
- Wipe each joint with a dry paper towel.
- Check again for moisture or drips.
If a connection leaks, do not immediately crank down harder on the nut. First confirm the washer is facing the correct direction, seated evenly, undamaged, and aligned with the fitting.
P-Trap Joint Guide: Putty, Teflon Tape, PVC Cement, or No Sealant?
This is where many drain-trap instructions become confusing. Different plumbing products solve different sealing problems, and using more sealant does not automatically create a better joint.
Slip-Joint Washer
Standard under-sink P-trap: Usually yes.
The washer is normally the actual seal in a tubular slip-joint connection.
PTFE / Teflon Tape
Slip nuts: Usually no.
PTFE tape is intended for appropriate threaded pipe joints. A standard slip nut compresses a washer; its threads are not normally the sealing surface.
Plumber’s Putty
P-trap slip joint: Usually no.
Putty may be used with certain sink strainers or drain-flange installations when the fixture manufacturer’s instructions call for it, but that is a different joint from the P-trap slip connection.
PVC Cement
Tubular slip-joint P-trap: No.
PVC primer/cement belongs on compatible solvent-weld PVC sockets when the piping system is designed for that connection. Do not glue a removable slip-joint connection.
Silicone Sealant
Standard slip joint: Normally unnecessary.
If a correctly assembled joint only stops leaking after being coated in silicone, the underlying washer, fitting, alignment, or connection should be checked.
Correct P-Trap Installation vs. Common Mistakes
Good Installation
- Parts line up naturally.
- Correct-size components are used.
- Washers are properly oriented.
- Nuts thread on straight.
- Slip joints seal without unnecessary products.
- Plastic nuts are snug, not crushed by overtightening.
- All joints pass a water test.
Problem Installation
- Trap is pulled sideways to reach the wall.
- Washer is reversed, pinched, or missing.
- Nut is cross-threaded.
- Plastic fittings are overtightened.
- Slip joints are covered with tape or glue instead of fixing the seal.
- Improper trap geometry is created to compensate for misalignment.
- Leaks are hidden instead of diagnosed.
Does a P-Trap Have to Be Directly Under the Drain?
It does not have to be perfectly centered directly beneath the sink drain in every installation. What matters is that the tailpiece, trap bend, trap arm, wall connection, and vented drainage system are configured correctly and connect without creating an improper trap arrangement.
A small horizontal relationship between the sink outlet and wall drain can often be handled with the correct tubular components. A major offset is different. If the only way to connect the trap is to force the assembly, create awkward bends, or turn the piping into an S-trap-like configuration, the drainage layout should be corrected instead.
New vanity or sink changed the drain location?
This is where a simple P-trap replacement can become a plumbing-layout job. Moving the wall connection, changing drainage geometry, or correcting venting is a good point to involve a plumber rather than improvising with a poor-fitting assembly.
Florida P-Trap Code Note for Miami Homeowners
Code check — August 2026: Florida’s 8th Edition (2023) Florida Building Code is currently in effect. The state’s 9th Edition (2026) is scheduled to become effective on December 31, 2026.
Under Section 1002.4 of the 2023 Florida Building Code, Plumbing, a fixture trap generally must maintain a liquid seal of at least 2 inches and not more than 4 inches, except where special designs are permitted.
A code-compliant drainage installation involves more than simply having a curved pipe under the sink. Trap configuration, venting, connection methods, fixture requirements, and local amendments can all matter. Check the requirements applicable to your project before changing permanent drain or vent piping.
How to Fix a P-Trap Leak Based on Where the Water Appears
Instead of tightening every nut randomly, identify exactly where the first drop forms.
Leak at the tailpiece-to-J-bend connection
Check: washer direction, washer condition, insertion depth, alignment, and whether the nut is cross-threaded.
Fix: disassemble the joint, reseat or replace the washer, realign the parts, and tighten again without excessive force.
Leak between the J-bend and trap arm
Check: whether the two parts meet squarely and whether the washer or mating surface is damaged.
Fix: release sideways tension before reseating the connection.
Leak where the trap arm enters the wall adapter
Check: washer size, insertion, adapter condition, and the exact connection type.
Fix: make sure you are using the sealing method intended for that fitting rather than assuming every wall connection is identical.
No visible leak, but the drain smells
Check: whether water remains in the trap, whether a joint is actually open, and whether the issue could involve venting or another part of the drainage system.
Fix: do not assume the trap itself needs replacement solely because of odor.
Trap is leak-free but the sink still drains slowly
Check: the trap for debris and consider whether the blockage may be farther into the branch drain.
If clearing the removable trap does not restore normal flow, the problem may require professional drain cleaning rather than another P-trap replacement.
Should You Replace the P-Trap or Just Clean It?
A slow sink does not automatically mean you need a new trap.
Consider cleaning and reinstalling the existing trap when it is structurally sound and the issue is simply removable buildup or debris.
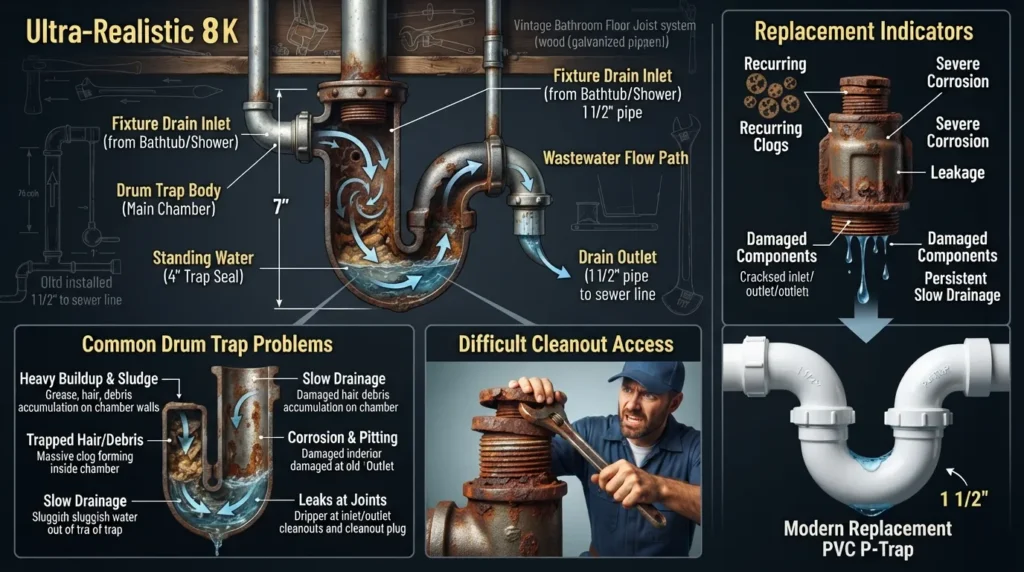
Replacement makes more sense when you find:
- Cracked plastic
- Severe corrosion
- Damaged threads
- Deformed fittings
- Missing or incompatible components
- A trap that does not fit the current sink layout properly
- Persistent leakage caused by damaged mating surfaces rather than a simple washer problem
Kitchen Sink vs. Bathroom Sink P-Trap Installation
The basic slip-joint installation process is similar for both fixtures, but there are a few practical differences.
Bathroom Sink
- Common tubular size is often 1-1/4 inches.
- Vanity replacements frequently change vertical or horizontal alignment.
- Pop-up drain assemblies can add another connection above the trap.
- Cabinet space may be tight around drawers or shelving.
Kitchen Sink
- Common tubular size is often 1-1/2 inches.
- Garbage disposals, dishwashers, and double-bowl sinks can make the drainage layout more complex.
- There may be additional waste fittings before wastewater reaches the trap.
- Changing sink depth can alter the available vertical space.
What About Shower Drain Trap Installation?
A shower also requires a trap, but a shower P-trap is a different project from replacing a removable tubular trap beneath a sink.
Shower traps are commonly located below the floor and may be connected as part of permanent DWV piping. That can involve solvent-welded fittings, rough-in measurements, drainage slope, trap and vent requirements, access limitations, and inspection requirements.
In other words, do not apply the instruction “never glue a P-trap” universally. A standard under-sink tubular slip-joint trap and a solvent-welded shower drainage assembly are different systems.
Prefer to See a P-Trap Installation?
This bathroom-sink installation video provides a useful visual reference for identifying the parts and seeing how an under-sink P-trap comes together. Use it as a supplement to the instructions for your specific trap kit and the plumbing requirements that apply to your project.
Does a Toilet Need a Separate P-Trap?
No sink-style P-trap should be added beneath a standard toilet. A toilet is designed with its trapway built into the fixture itself and connects to the drainage system through the toilet outlet and flange.
If your search for P-trap installation is actually related to a toilet that gurgles, drains slowly, smells, or flushes poorly, diagnose the toilet and drainage system rather than trying to install an additional under-fixture trap.
When a DIY Drain Trap Installation Should Stop
A straightforward like-for-like replacement is one thing. Changing permanent drainage piping is another.
Consider calling a plumber when:
- The wall drain and sink tailpiece cannot be aligned with appropriate standard components.
- The drain connection inside the wall needs to be moved.
- You discover badly corroded or damaged permanent piping.
- A properly assembled new trap continues to leak.
- You suspect an improper trap or vent configuration.
- The sink repeatedly backs up after the removable trap has been cleaned.
- The project requires cutting or rebuilding permanent DWV piping and you are unsure of the applicable requirements.
If you are in the Miami area and the job has moved beyond a simple trap swap, you can learn more about our local Miami plumbing team and the plumbing services available for home drainage problems.
Frequently Asked Questions About Drain Trap Installation
How much does a plumber charge to replace a P-trap?
There is no single reliable price for every P-trap replacement. The final cost depends on your location, trap material, accessibility, whether the existing connections can be reused, and whether the job is a simple replacement or requires drainage modifications. For an accurate figure, ask for a quote based on the actual installation instead of relying on a generic national price.
Does a P-trap have to be directly under the drain?
Not necessarily perfectly centered beneath it. The trap and tailpiece can accommodate some layout differences when proper fittings are used, but the completed assembly must have correct trap geometry, connect properly to the drainage system, and avoid being forced sideways or turned into an improper configuration.
Can I replace a waste trap myself?
A like-for-like tubular sink P-trap replacement is manageable for many homeowners when the existing piping is in good condition and aligns correctly. If permanent drain piping must be modified, the wall connection is damaged, or you encounter a venting or code issue, professional help is a safer choice.
Do I need plumber’s putty for a P-trap?
Normally not for standard P-trap slip joints. Those joints are sealed by their washers. Plumber’s putty may be appropriate for some sink drain or strainer installations when specified by the manufacturer, but that is a separate connection above the P-trap.
Should you use PVC cement on a P-trap?
Do not use PVC cement on a standard removable tubular slip-joint P-trap. Its joints are designed around nuts and washers. PVC primer and cement are used only on compatible solvent-weld PVC connections designed to be permanently bonded.
Do you use Teflon tape on a P-trap?
Usually not on tubular P-trap slip nuts. The washer creates the seal, not the slip-nut threads. PTFE/Teflon tape may be appropriate on certain threaded pipe connections, so identify the fitting type instead of applying tape to every threaded-looking joint.
Are P-traps supposed to be glued?
Some P-trap assemblies are solvent-welded as part of permanent DWV piping, while common under-sink tubular P-traps use removable slip joints and are not glued. Identify the type of trap and fittings you have before choosing a connection method.
Does a P-trap need sealant?
A correctly assembled tubular slip-joint P-trap normally does not need added sealant. Properly sized, correctly oriented washers should make the seal. If the connection leaks, check alignment, washer condition, fitting condition, and tightening before covering the joint with sealant.
Final P-Trap Installation Checklist
- You confirmed the correct trap diameter and connection type.
- The tailpiece, J-bend, and trap arm line up without being forced.
- Every required slip-joint washer is installed and properly oriented.
- No slip nut is cross-threaded.
- Standard slip joints were not unnecessarily glued, taped, or coated with sealant.
- Plastic nuts are snug without being overtightened.
- The trap holds its proper shape and connects cleanly to the wall drain.
- You ran a normal-flow and higher-flow leak test.
- Every connection remained dry after the test.
If every item above checks out, you have done more than simply connect a few pieces of pipe—you have verified that the trap fits, seals, drains, and can still be serviced later.
Still Dealing With a Leak, Clog, or Drain Alignment Problem?
A P-trap should not require endless tightening or improvised fittings to stay dry. If the new trap will not align correctly, the drain keeps backing up, or the problem appears to extend into the wall, the next step is to diagnose the drainage system rather than keep replacing parts.
Related Technical Resources
If you want to compare this guide with manufacturer instructions or verify Florida plumbing requirements, these resources are useful starting points: