A sink drain that “isn’t working” can mean several different things. Water may drain slowly, the sink may be completely blocked, the stopper may refuse to open or close, or water may be leaking from the drain assembly underneath the sink.
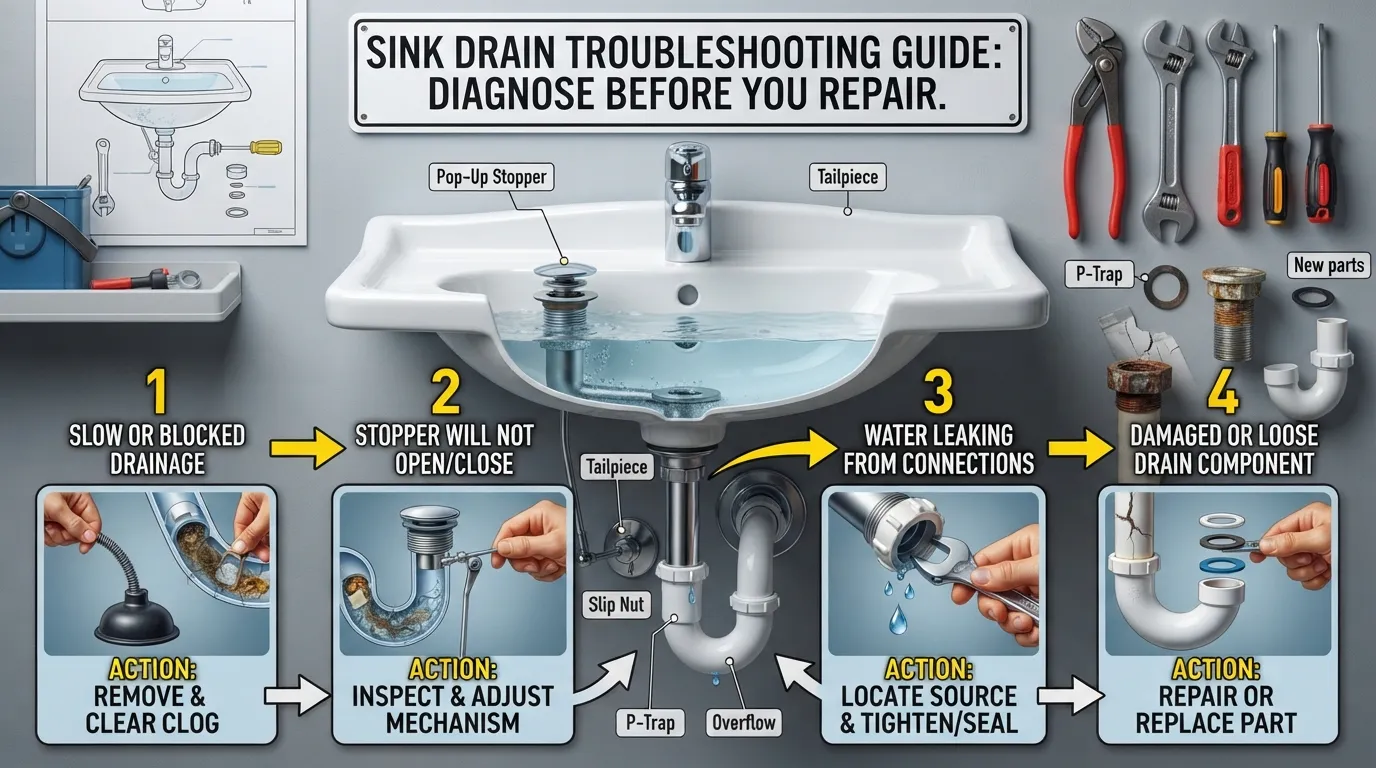
That is why I would not start by pouring something down the drain or taking pipes apart. First identify what is actually wrong. Once you know whether you have a flow problem, a stopper problem, or a leaking or damaged drain assembly, the repair becomes much easier to choose.
To fix a sink drain, first check whether the problem is a clog, a stuck or disconnected stopper, a leaking connection, or a damaged drain assembly. Clear visible debris first, then inspect the stopper or strainer, P-trap, and accessible connections. Repair or replace damaged parts instead of treating every sink problem as a clog.
Identify Your Sink Drain Problem in 60 Seconds
Use the symptom you can actually see. This prevents you from wasting time on the wrong repair.
Water drains slowly
Start with debris around the stopper or strainer, then move to the P-trap and accessible drain line if needed.
Water will not drain at all
Treat it as a likely blockage, but work from the easiest accessible location toward the deeper drain rather than immediately using chemicals.
Stopper will not open or close
Inspect the stopper mechanism. Bathroom pop-up drains often use a lift rod, clevis, pivot rod, and retaining nut.
Water leaks below the sink
Find the exact leak point before tightening anything. The drain seal, tailpiece, slip-joint washer, P-trap, or kitchen strainer assembly may be involved.
Drain plug will not come out
Identify the stopper type first. A traditional pop-up stopper and a push-button stopper are removed differently.
Several fixtures are slow
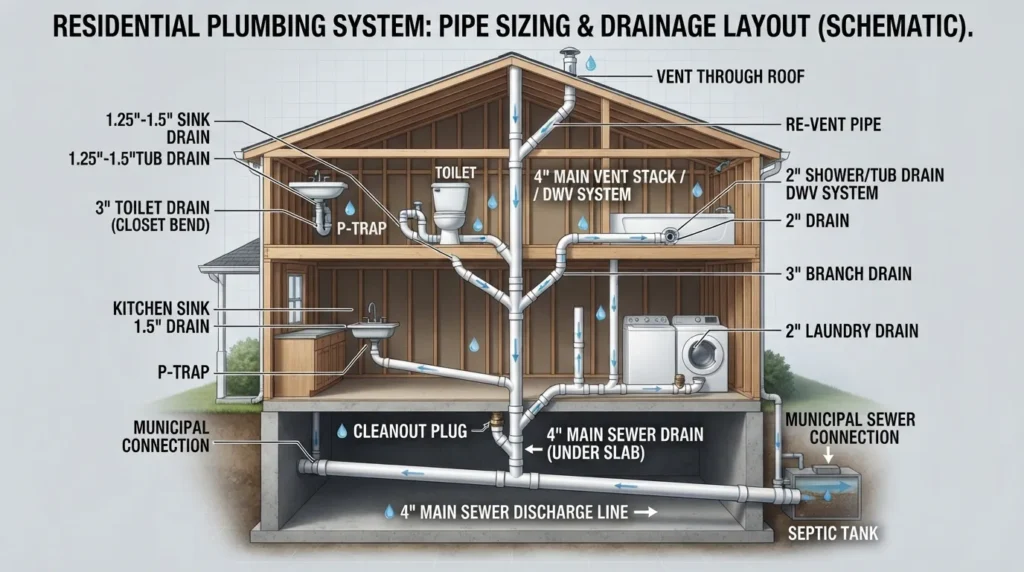
The problem may be beyond the individual sink. A shared branch or larger drainage issue deserves a broader diagnosis.
Before You Start: A Few Important Safety Checks
Sink-drain repairs are often manageable for a homeowner, but you should know what has already been put into the drain before opening pipes.
Important if drain cleaner has already been used
Do not mix drain-cleaning chemicals with other cleaners. Follow the product label carefully, protect your skin and eyes, and be cautious about opening a P-trap that may still contain treated water. If you are unsure what was poured into the sink, professional help may be the safer option.
- Remove items from underneath the sink before working.
- Put a bucket or shallow container beneath the P-trap before loosening any connection.
- Wear gloves and eye protection when working around dirty drain water.
- Do not force corroded plastic or metal fittings until you know which part is supposed to turn.
- Use hot tap water rather than automatically pouring boiling water into an unknown drain system.
Tools You May Need
You will not need every tool for every repair. Gather only what fits the symptom you identified.
- Bucket or shallow pan
- Rubber gloves
- Eye protection
- Flashlight
- Old towels or rags
- Sink plunger
- Screwdriver
- Adjustable pliers or wrench
- Small drain-cleaning tool
- Hand drain snake or auger
- Replacement washers or stopper parts if damaged
- Plumber’s putty when required for the drain assembly you are installing
How to Fix a Sink Drain That Is Slow or Clogged
If water is draining slowly or sitting in the basin, begin with the easiest and least invasive causes. Do not jump straight to removing the entire drain assembly.
1. Remove visible debris from the stopper or strainer
Bathroom sinks often collect hair and soap residue around the stopper. Kitchen sink strainers can collect food particles and greasy debris near the opening.
- Remove anything visible from the drain opening.
- If the stopper can be lifted out easily, remove and clean it.
- Clean around the drain opening without pushing debris farther into the pipe.
- Run water and see whether drainage improves.
If the sink now drains normally, the obstruction was probably close to the drain opening. If it remains slow, continue deeper.
2. Use a plunger correctly
A plunger can help move a localized blockage, but it needs a good seal to work.
- Add enough water to cover the bottom edge of the plunger cup.
- For a bathroom sink with an overflow opening, cover the overflow with a damp cloth so pressure is not immediately lost.
- Center the plunger over the drain.
- Use several controlled plunges while maintaining the seal.
- Remove the plunger and check whether the water drains more freely.
If you recently used a chemical drain opener, do not plunge treated standing water unless the product directions specifically allow it.
3. Check the P-trap
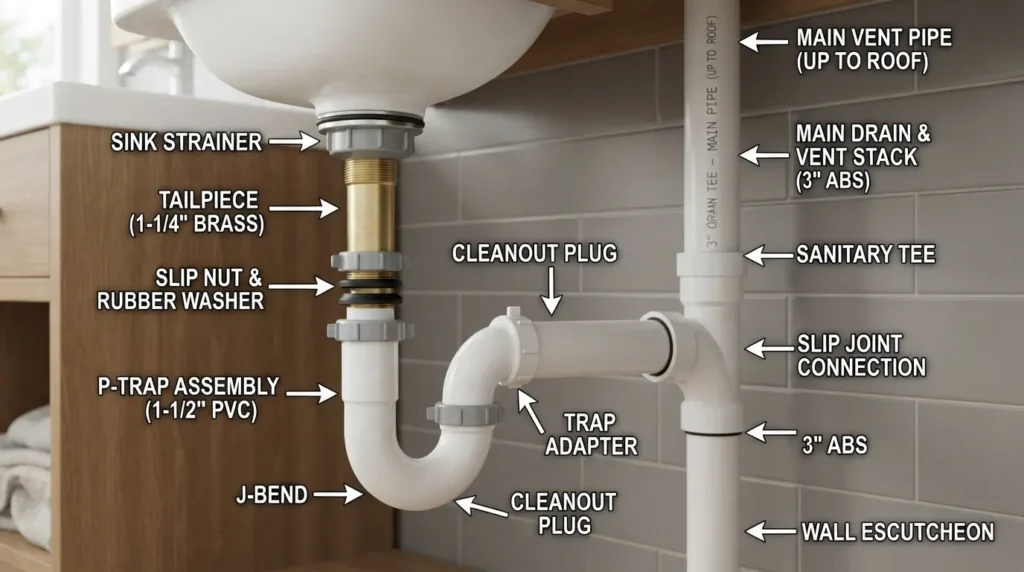
The P-trap is the curved section of pipe directly below many sinks. It holds water as part of the drainage system, but it can also collect debris.
- Place a bucket underneath the P-trap.
- Take a quick photo of the pipe arrangement before disassembly so you know how it fits back together.
- Loosen the slip-joint nuts if your trap is designed to be removed this way.
- Lower the trap carefully because it will contain water.
- Inspect it for hair, food, grease, sludge, or foreign objects.
- Clean the trap thoroughly.
- Inspect the washers while the trap is apart.
- Reassemble the trap without cross-threading the fittings.
- Run water and check both drainage and leaks.
Useful diagnostic clue
If the P-trap is clear but the sink still will not drain, the blockage may be farther along the trap arm or branch drain. That is a different problem from a dirty stopper or clogged trap.
4. Clear an accessible deeper blockage
If the trap is clear and the drain remains blocked, an accessible drain snake may help reach debris farther inside the drain line.
- With the P-trap removed, carefully feed the snake into the drain line leading toward the wall.
- Advance it gradually instead of forcing it.
- Rotate or operate the tool according to its design.
- Withdraw it periodically and remove any debris.
- Reassemble the drain and test with water.
If you cannot advance the tool, the clog quickly returns, or several fixtures are affected, stop treating the problem as a simple sink clog.
Bathroom vs. Kitchen Sink Drain Problems
Bathroom and kitchen sinks share some drainage components, but the parts near the drain opening are often different. Treating them as identical can lead to the wrong repair.
Bathroom Sink
- Hair and soap residue are common near the stopper.
- Many sinks use a pop-up stopper mechanism.
- The lift rod, clevis strap, pivot rod, and stopper may require adjustment or cleaning.
- Some newer drains use push-button or click-style stoppers instead.
Kitchen Sink
- Food debris and grease may contribute to flow problems.
- The drain often uses a basket strainer assembly rather than a bathroom-style pop-up stopper.
- The strainer, gasket, locknut, tailpiece, and P-trap can all be potential leak points.
- A damaged or loose strainer may require resealing or replacement.
How to Fix a Bathroom Sink Pop-Up Stopper
If water drains normally when the stopper is open but the stopper itself will not move correctly, you probably have a mechanical problem rather than a clog.
A traditional pop-up bathroom sink commonly uses a lift rod above the sink connected underneath to a clevis strap. A horizontal pivot rod connects that mechanism to the stopper.
If the stopper will not pop up
- Look underneath the sink while moving the lift rod.
- Check whether the lift rod is still connected to the clevis strap.
- Check whether the pivot rod remains attached to the stopper mechanism.
- Look for a loose clevis connection or misaligned linkage.
- Adjust the linkage so the lift rod moves the stopper through its full range.
- Test several times before putting everything back under the sink.
If the stopper will not stay down
The linkage may be adjusted too tightly, installed in the wrong clevis hole, or failing to move the stopper far enough to seal. Inspect the connection underneath and adjust it in small increments rather than forcing the stopper from above.
If the stopper moves but drains slowly
Remove the stopper if the assembly allows it and clean the hair and residue collected around its lower section and drain opening. This is common because the stopper sits directly in the path of debris.
How to Fix a Push-Pop Sink Drain Stopper
A push-pop stopper works differently from a traditional lift-rod assembly. You press the stopper to close it and press again to open it.
If it becomes stuck:
- Press it once firmly but gently to confirm it is not simply between positions.
- Check for visible soap residue, hair, or debris around the stopper edge.
- If the top is designed to unscrew, hold the lower portion steady and remove it according to the stopper design.
- Clean the stopper and the accessible drain opening.
- Inspect for a broken, loose, or worn internal mechanism.
- Reinstall it and test the open and closed positions.
Do not force a stuck stopper
Push-pop stoppers are not all removed the same way. If the cap or body will not turn with reasonable hand pressure, identify the stopper design before using tools. Excess force can turn a small stopper problem into a damaged drain assembly.
Why Won’t My Sink Drain Unscrew?
A sink drain may appear as though it should simply unscrew from above, but many drain assemblies are secured from underneath the sink.
Common reasons a drain assembly will not come out include:
- A retaining or locknut is still attached underneath.
- The stopper mechanism has not been disconnected.
- Old plumber’s putty or sealant is holding the flange in place.
- Corrosion or mineral buildup has made the assembly difficult to loosen.
- You are turning the visible top portion even though another part must be held from below.
- The drain design uses a different removal method than expected.
Before applying more force, inspect both the top and underside of the sink. Identify the flange, drain body, tailpiece, retaining hardware, and any stopper mechanism first.
How to Remove a Stuck Sink Drain Assembly
If you need to remove a leaking or damaged drain assembly, work methodically.
- Place a bucket underneath the sink.
- Disconnect the P-trap or tailpiece connection as required for access.
- Disconnect a bathroom pop-up pivot rod if it passes through the drain body.
- Locate the nut or retaining hardware securing the drain from underneath.
- Support the drain body so you are not twisting connected plumbing.
- Loosen the retaining hardware using the correct tool for the fitting.
- Once the lower hardware is free, carefully break the old seal around the drain flange.
- Lift or push the drain body out according to its design.
If metal parts are heavily corroded, plastic fittings begin to crack, or the assembly refuses to move with reasonable force, replacing adjacent damaged parts may become necessary.
How to Fix a Sink Drain Leak
Do not automatically tighten every nut when you see water underneath the sink. First determine where the leak actually begins.
Leak around the drain opening
If water appears directly below the drain flange or basket strainer while the sink is holding or draining water, the seal around the drain assembly may have failed.
Depending on the sink and drain design, repair can involve:
- Removing the drain assembly
- Cleaning away old sealing material
- Inspecting the drain body and flange for damage
- Replacing a damaged gasket
- Applying plumber’s putty or the sealing material specified for that drain and sink material
- Reinstalling and tightening the assembly evenly
Leak at a slip-joint connection
If the leak forms around a nut at the tailpiece or P-trap, check alignment before tightening.
- Dry the connection completely.
- Run water to confirm the exact leak point.
- Check that the pipe sections are properly aligned.
- Inspect the slip-joint washer for damage or incorrect positioning.
- Reassemble the connection correctly.
- Tighten it enough to seal without overtightening plastic fittings.
Leak from the P-trap itself
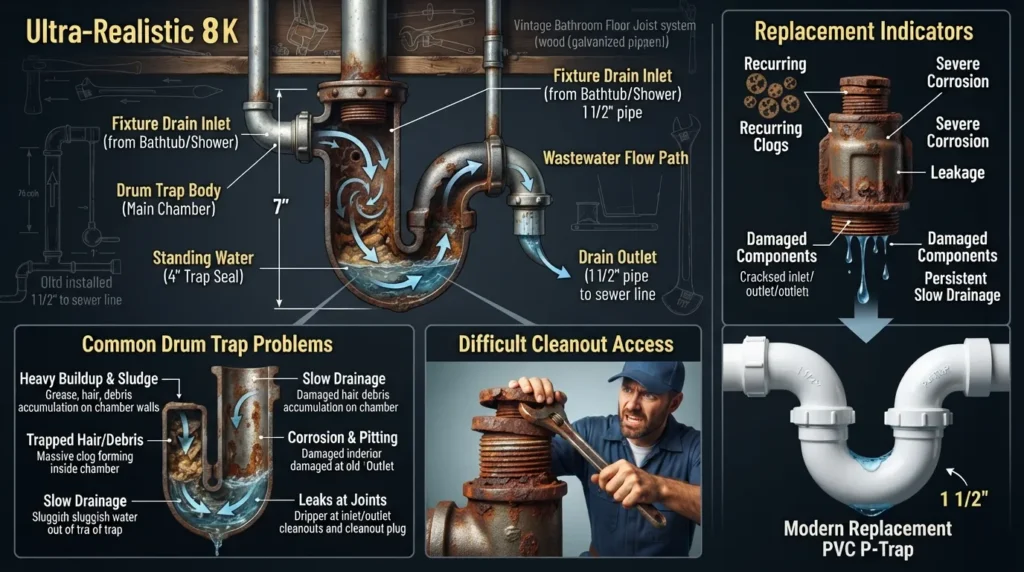
A cracked, damaged, or severely deteriorated trap should normally be replaced rather than repeatedly tightened or patched.
Repair or Replace? Use This Decision Guide
Not every bad sink drain needs a complete replacement. Use the condition of the actual part to decide.
Clean it
Choose cleaning when hair, soap residue, food debris, or buildup is preventing normal movement or drainage and the parts themselves are still in good condition.
Adjust it
Choose adjustment when a pop-up stopper linkage is intact but the stopper does not open, close, or seal correctly.
Reseal it
Choose resealing when the drain assembly is sound but water is escaping around a failed flange or strainer seal.
Replace the part
Replace a cracked washer, broken stopper component, damaged pivot rod, deteriorated trap, or another individual part that can no longer do its job reliably.
Replace the assembly
Consider full replacement when the drain body, strainer, flange, or connected assembly is badly damaged, corroded, cracked, or no longer seals correctly.
Call a plumber
Get professional help when the problem is deeper than the accessible sink components, keeps returning, affects multiple fixtures, or cannot be repaired safely.
How to Tell Whether the Problem Is Bigger Than the Sink
A useful troubleshooting rule is to compare the affected sink with the rest of the home.
If only one sink is slow, the restriction may be near that fixture: the stopper or strainer, P-trap, trap arm, or nearby drain connection.
If several fixtures are draining slowly, backing up, or behaving unusually at the same time, the issue may involve a shared part of the drainage system rather than the sink alone.
If you want to understand how the sink connects to traps, branch drains, and the rest of the plumbing, see our guide to the home drainage system.
Test the Repair Before You Put Everything Away
A repair is not finished until the sink passes both a drainage test and a leak test.
- Dry all accessible pipes and fittings underneath the sink.
- Run a small amount of water first.
- Watch every connection you touched.
- Increase the water flow gradually.
- Fill the basin partially and then release the water to test a larger drain load.
- Operate the stopper several times if you repaired it.
- Check underneath the sink again with a dry hand or paper towel around accessible joints.
If the drain works but a connection now leaks, correct the alignment or seal before using the sink normally.
Common Sink Drain Repair Mistakes to Avoid
- Treating every problem as a clog. A broken stopper or leaking drain assembly will not be fixed by clearing the pipe.
- Using more chemicals after the first attempt fails. Repeated chemical use does not identify a mechanical problem and can make later hands-on work more difficult.
- Forcing a stopper or drain flange. First identify how the assembly is secured.
- Overtightening plastic drain fittings. Proper alignment and washer position matter as much as tightness.
- Replacing parts before finding the leak. Dry the plumbing and trace the first point where water appears.
- Ignoring recurring clogs. A sink that repeatedly blocks after being cleared may have a deeper cause.
- Ignoring other fixtures. Multiple slow drains can indicate a problem beyond the individual sink.
When Should You Stop DIY Sink Drain Repair?
A basic stopper adjustment, accessible P-trap cleaning, or simple washer replacement can often be handled without turning the job into a major plumbing project. But there is a point where continuing to dismantle the sink stops being useful.
Consider professional diagnosis when:
- The clog returns soon after you clear it.
- The P-trap is clear but the drain still will not flow.
- Several fixtures are slow or backing up.
- You cannot safely access or remove the drain assembly.
- A fitting is heavily corroded or begins to break during removal.
- The leak appears to come from inside the wall or cabinet structure rather than an exposed joint.
- You have already used a chemical drain cleaner and are not comfortable opening the plumbing.
- A hand snake cannot reach or clear the blockage.
For a persistent sink blockage or a restriction farther down the line, professional drain cleaning service may be more appropriate than repeatedly treating the sink opening.
Video: See a Sink Stopper Repair Up Close
If your problem is a bathroom sink stopper that will not work properly, a visual demonstration can make the under-sink linkage easier to understand.
Frequently Asked Questions
The Best Fix Starts With the Right Diagnosis
The fastest way to fix a sink drain is not to try every drain-cleaning trick you can find. It is to identify which part of the sink is actually failing.
If water does not move, follow the flow path: stopper or strainer, P-trap, then the accessible drain line. If the water moves but the stopper does not, follow the mechanical path: stopper, pivot rod or push mechanism, and linkage. If water leaks, follow the water itself until you find the first failed seal, washer, fitting, or drain component.
Still Have a Sink Drain Problem?
If the sink keeps clogging, the blockage appears deeper than the P-trap, or you would rather not dismantle the drain assembly yourself, Miami Florida Plumbing can help you determine the next step.