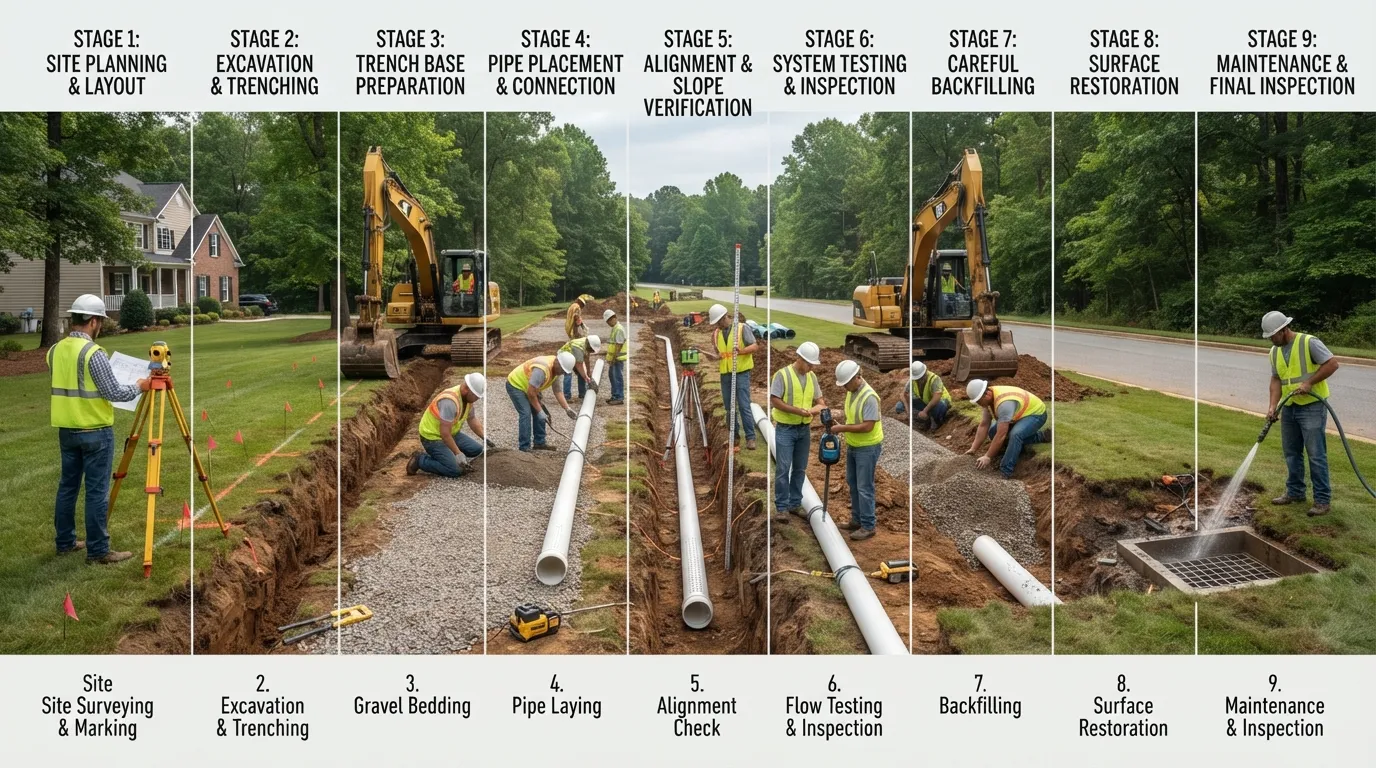
Drainage construction is more than digging a trench and putting a pipe in the ground. A reliable system starts by identifying where the water comes from, deciding where it should go, choosing the right type of drainage, setting the correct route and grade, installing the system properly, and checking it before anything is buried.
In this guide, I’ll walk you through that complete process so you can understand not only how drainage construction works, but also whether new construction is actually the right solution for your property.
What Is Drainage Construction?
Drainage construction is the process of designing and building a system that collects, carries, controls, or disposes of unwanted water or wastewater. Depending on the property, that may involve trenches, sloped pipes, drains, channels, catch basins, cleanouts, inspection chambers, foundation drains, or connections to an approved discharge point.
This article focuses mainly on building and property drainage. Road, highway, and large civil drainage projects use many of the same principles, but their engineering, design loads, hydrology, structures, and approval requirements can be very different.
What Is the Purpose of Drainage in Construction?
The purpose is simple: move water where it belongs before it creates a problem where it does not belong.
A properly planned drainage system may be designed to:
- Carry wastewater away from plumbing fixtures.
- Collect rainwater from roofs, paved areas, or other surfaces.
- Reduce standing water and localized flooding.
- Control water around foundations and below-grade areas.
- Direct runoff toward an approved outlet or drainage facility.
- Reduce erosion caused by uncontrolled water flow.
- Provide access for future inspection and maintenance.
The important point is that different water problems require different drainage systems. A backed-up bathroom drain, rainwater pooling beside a driveway, and groundwater around a foundation should not automatically receive the same solution.
Which Drainage System Do You Actually Need?
Before discussing excavation or pipe installation, I would first identify the source of the water. This is one of the most important decisions in drainage construction because a perfectly installed system can still fail to solve the problem if the wrong type of drainage was chosen.
Key point: Not every drainage problem requires new drainage construction. Diagnosing the cause first can prevent unnecessary excavation, replacement, and disruption.
What Are the Four Types of Drainage?
There is no single universal list of exactly four drainage types that applies to every branch of construction. Civil engineering, agriculture, landscaping, road construction, and building plumbing can classify drainage differently.
For homes and buildings, however, a practical way to understand the topic is through these four categories:
1. Sanitary Drainage
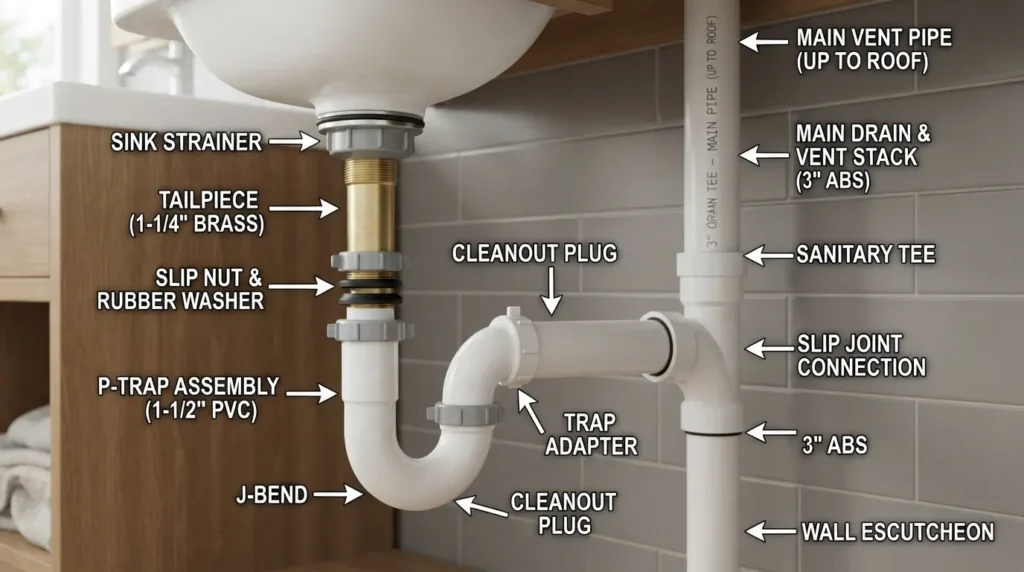
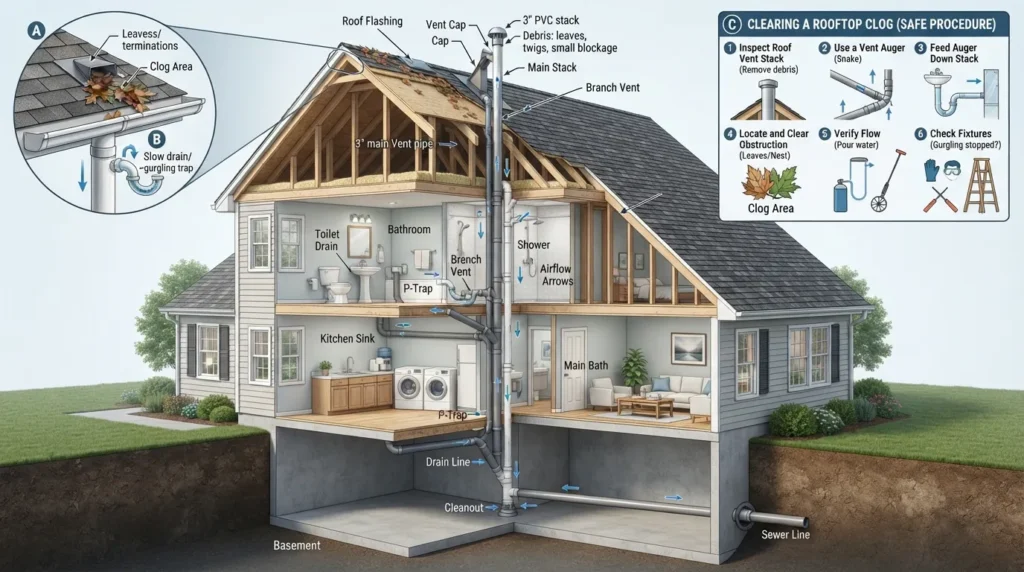
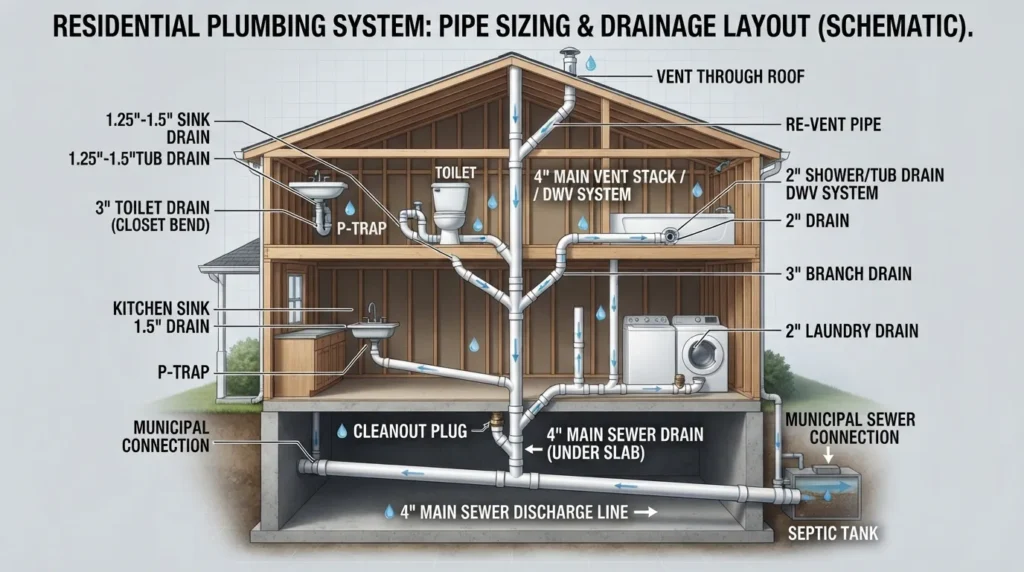
Carries wastewater from toilets, sinks, showers, tubs, and other plumbing fixtures toward an approved sewer or onsite wastewater system. Building drainage may also rely on traps, vents, branches, stacks, cleanouts, and properly graded drain lines.
2. Stormwater and Surface Drainage
Collects runoff from rain and directs it away from roofs, pavement, yards, streets, or other surfaces through grading, inlets, catch basins, swales, channels, trench drains, or storm piping.
3. Subsurface or Foundation Drainage
Manages water below the surface or around foundations. Depending on the design, it may use perforated pipe, aggregate, filter material, collection points, or another approved means of discharge.
4. Onsite Wastewater Drainage
Properties without a conventional municipal sewer connection may use an approved onsite wastewater or septic system. Its construction and regulation are different from a simple yard or stormwater drain.
If you want to understand how the pipes, vents, fixture drains, stormwater components, and other parts fit together around a residence, see our complete guide to the home drainage system.
Before You Dig: What Must Be Decided First?
Good drainage construction begins above ground. Before a trench is opened, the design should answer several questions that directly affect whether the finished system will actually work.
Where Is the Water Coming From?
You need to identify whether you are dealing with wastewater, roof runoff, surface runoff, groundwater, a plumbing leak, an existing blockage, or a combination of conditions. Treating the symptom without identifying the source can simply move the problem somewhere else.
Where Will the Water Go?
A drain needs more than an inlet. It needs an appropriate destination. Depending on the system, that could be an approved sewer connection, stormwater facility, onsite wastewater system, collection structure, discharge point, or another design-specific destination.
Planning the outlet early is critical. A pipe that collects water efficiently but has nowhere suitable to discharge it is not a complete drainage solution.
Can Gravity Move the Water?
Many drainage systems rely on gravity. That means elevations, pipe grade, channel slope, inlet heights, and the outlet elevation all matter. The required slope is not a number you should guess: it depends on the type of system, pipe size, design, site conditions, and applicable requirements.
How Much Water Must the System Handle?
For stormwater work, designers may need to consider factors such as rainfall, runoff, contributing area, impervious surfaces, soil conditions, existing grades, and the capacity of pipes, channels, or outlets. Larger civil drainage projects may require formal hydrologic and hydraulic analysis.
Can the System Be Maintained Later?
A drainage layout should also consider access. Cleanouts, inspection chambers, catch basins, manholes, removable grates, and reachable outlets can make future inspection and maintenance far easier than a completely buried system with no practical access points.
Pre-Construction Checklist
- Identify the source of the water or wastewater.
- Confirm the intended drainage system type.
- Determine the route and approved destination.
- Review site elevations and required grade.
- Consider soil and groundwater conditions.
- Determine required pipe, channel, inlet, or structure capacity.
- Plan cleanouts and inspection access.
- Identify existing utilities and buried obstacles before excavation.
- Check applicable permit, inspection, and environmental requirements.
- Plan how the installed system will be tested before it is covered.
How to Construct a Drainage System Step by Step
The exact construction sequence changes with the project, but most drainage construction follows the same basic logic: assess, design, excavate, support, install, verify, test, and backfill.
Step 1: Assess the Site and Diagnose the Water Problem
Start by examining where water appears, how it moves across or through the property, and what happens during normal use or rainfall. Depending on the project, the assessment may include soil condition, topography, existing drainage, runoff paths, low areas, plumbing connections, structures, pavement, and nearby utilities.
This first step determines whether the answer is a new drainage system, alteration of an existing system, a repair, better surface grading, or something simpler.
Step 2: Select the Correct Drainage Method
Once the problem is understood, choose a system that matches it. Examples may include:
- Gravity sanitary piping.
- Stormwater piping and catch basins.
- Trench or channel drains.
- Swales and surface grading.
- Foundation or subsurface drainage.
- Perforated drainage pipe with aggregate and filter material.
- Inspection chambers or manholes for larger underground systems.
The important principle is to match the drainage method to the water source, expected flow, site conditions, and acceptable discharge point.
Step 3: Create the Layout, Levels, and Connection Plan
The planned route should show where the drain starts, where pipes or channels run, where they change direction, where inspection access is provided, and where the system terminates.
At this stage, the design should establish appropriate elevations and grade instead of trying to create the slope by eye after excavation.
Step 4: Check Utilities, Permits, and Site Constraints
Excavation can intersect water lines, electrical services, gas lines, communications, irrigation, structural elements, landscaping, or existing drains. Buried utilities should be identified before digging, and required approvals should be confirmed before work begins.
Trench safety also deserves serious attention. Excavated soil can shift and trench walls can collapse, so deeper or unstable excavations should never be treated as a casual DIY task.
Step 5: Mark the Route and Excavate
The drainage route is marked according to the plan, including significant changes in direction, structures, connections, and the outlet.
Excavation then follows the planned alignment and depth. The goal is not simply to create enough space for the pipe. The trench also needs to allow for the designed grade, appropriate bedding or base, safe working conditions, connections, and any structures included in the system.
Step 6: Prepare the Base or Bedding
The pipe or drainage structure needs stable, appropriate support. Depending on the system and design, that could involve prepared soil, aggregate bedding, a concrete base, or another specified foundation.
Poor support can allow a drain line or structure to move after burial, changing its alignment or grade and creating problems that are difficult to correct later.
Step 7: Install Pipes, Channels, Inlets, and Access Points
Components are placed according to the layout. Depending on the project, these may include:
- Solid drainage pipe.
- Perforated subsurface pipe.
- Fittings and transitions.
- Floor, fixture, or area drains.
- Trench drains and channels.
- Catch basins and inlets.
- Cleanouts.
- Inspection chambers or manholes.
- Foundation drainage components.
- Outlet or outfall connections.
Joints and connections should use the method required for the specific material and system rather than a generic sealing method.
Step 8: Verify Alignment and Grade as Installation Progresses
Do not wait until the entire line is installed to discover that the levels are wrong. Alignment and grade should be checked as work progresses.
Where a gravity system is intended, inconsistent fall can leave low points that retain water or prevent the system from flowing as designed.
Step 9: Connect the System to Its Intended Destination
The outlet is just as important as the inlet. The finished drainage system should connect or discharge only as permitted by its design and applicable requirements.
This is also where erosion protection may become important. Concentrating runoff into a pipe or channel can increase flow at the discharge point, so uncontrolled release onto soil can create a new erosion or flooding problem downstream.
Step 10: Inspect and Test Before Backfilling
This is one of the easiest opportunities to prevent an expensive mistake.
Once the trench is filled, correcting a poor joint, incorrect grade, damaged component, inaccessible cleanout, or bad connection may require digging the system back up. Verify the installation while it is still visible.
Before Backfilling, Check These Items
- Does the route match the approved or intended layout?
- Has the grade or slope been verified?
- Is the pipe or channel adequately supported?
- Are connections and transitions complete?
- Are cleanouts and other access points reachable?
- Are catch basins or inlets set at the intended elevation?
- Is the outlet connected correctly?
- Has required testing been completed?
- Has any required inspection or approval occurred before covering?
- Would photos or an as-built record help locate the system in the future?
Step 11: Backfill, Compact, and Finish the Surface
After the installation has passed the necessary checks, backfill is placed in a way that protects the system instead of shifting or damaging it. Required compaction, restoration, pavement repair, slab repair, landscaping, or surface grading depends on the location and project.
Cleanouts, grates, access covers, and other service points should remain accessible after the area is restored.
Step 12: Confirm Final Drainage and Plan Maintenance
The project is not complete simply because the trench disappeared. The final system should be checked for the expected flow path and obvious problems at inlets, connections, and the outlet.
Owners should also know which parts require routine cleaning or inspection so leaves, sediment, grease, roots, debris, or other obstructions do not gradually reduce drainage performance.
Watch a Drainage Construction Process
If you learn better visually, this drainage construction video can help you see how trench work and drainage components come together on an active project. Use it as a visual reference rather than a substitute for the design, safety, permit, and code requirements that apply to your own site.
What Materials Are Commonly Used in Drainage Construction?
There is no single best drainage material for every installation. Material selection should match the type of water being carried, underground conditions, structural loads, pipe size, installation method, maintenance needs, and local requirements.
PVC and Other Approved Plastic DWV Pipe
Common in many building drainage applications because it is relatively light and straightforward to install. The exact material and installation method must be appropriate for the application and permitted locally.
Cast Iron
Used in certain building drainage applications and existing plumbing systems. Connections, support, cutting, and replacement methods differ significantly from plastic pipe.
HDPE and Other Underground Pipe
May be selected for particular underground, site, or stormwater applications based on system design, joining method, soil, loading, and project specifications.
Concrete and Reinforced Concrete
Often associated with channels, structures, culverts, manholes, or larger drainage work where structural strength and load conditions require it.
Aggregate and Gravel
Frequently used as bedding, drainage media, or part of a subsurface drainage assembly, depending on the design.
Geotextile or Filter Material
Certain subsurface systems use filter material to separate soil from drainage aggregate and help limit migration of fine soil particles into the drainage layer.
A useful material specification should answer where the material will be used, what it must carry, how it will be joined, how it will be supported, and what conditions surround it rather than simply listing pipe types.
How Construction Changes by Drain Type
Sanitary Building Drainage
Sanitary drainage needs to move wastewater from fixtures toward an approved sewer or onsite wastewater system while also maintaining the other parts of a functional drainage, waste, and vent arrangement. That means construction can involve fixture drains, traps, venting, branch lines, stacks, building drains, cleanouts, fittings, and connections—not simply an underground pipe.
Stormwater Drainage
Stormwater drainage begins with runoff. The design may need to collect water from roofs, paved surfaces, landscaped areas, or low points using gutters, downspouts, swales, area drains, catch basins, trench channels, or underground piping.
Capacity and the discharge route matter because concentrating rainwater in one location can create flooding or erosion somewhere else.
Foundation and Subsurface Drainage
Subsurface drainage is intended to control water in or below the soil rather than simply collecting water from the surface. A typical concept may involve perforated drainage pipe, washed aggregate, filter material, and a route toward an approved collection or discharge location, but the correct assembly depends on the foundation, soil, groundwater, waterproofing, and site design.
Trench and Channel Drainage
Linear trench drains collect surface water along a defined line. The channel, surrounding construction, grate type, loading, outlet size, and finished elevations all need to suit the location. A driveway application and a lightly used pedestrian area, for example, may have very different structural demands.
Why Drainage Construction Fails
Drainage failures are often caused by decisions made before or during installation rather than by the idea of drainage itself.
Common Drainage Construction Mistakes
- Solving the wrong problem: constructing a new drain when the actual issue is a blockage, leak, grading problem, or damaged existing line.
- No proper outlet: collecting water successfully but failing to provide an appropriate destination.
- Incorrect or inconsistent grade: allowing water to remain in low sections or limiting gravity flow.
- Poor bedding or support: allowing pipe or structures to settle or move after installation.
- Wrong material for the application: selecting components without considering load, soil, water type, joining method, or applicable requirements.
- Poor connections: creating leakage, separation, restrictions, or weak transitions.
- No maintenance access: burying the system without practical cleanouts, chambers, or reachable collection points where they are needed.
- Covering work too early: backfilling before grade, joints, testing, or required inspections are verified.
- Ignoring the discharge area: allowing concentrated water to cause erosion, flooding, or another downstream problem.
- Skipping maintenance planning: allowing sediment, leaves, waste, roots, or debris to reduce system capacity over time.
Drainage Construction vs. Drain Repair vs. Drain Cleaning
These three services solve different problems, and understanding the difference can save you from starting with the most disruptive option.
New Construction
Makes sense when a drainage system does not exist, a new building or addition needs drainage, site conditions require a new water-management route, or the existing layout requires substantial redesign.
Drain Repair
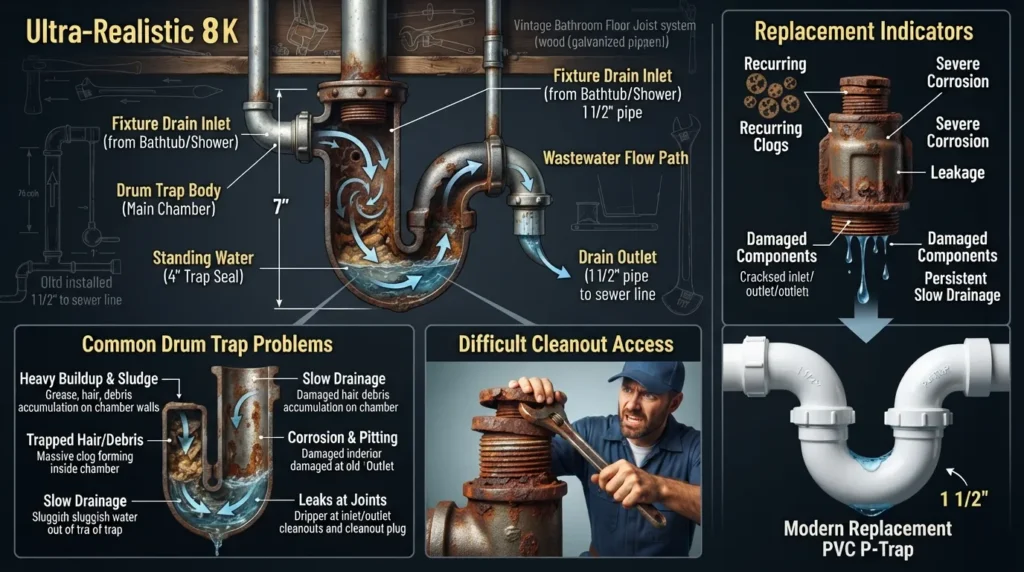
May be appropriate when the existing system is generally suitable but part of it is broken, leaking, displaced, deteriorated, or otherwise defective.
Drain Cleaning
May be the better first step when the pipe itself is usable but grease, hair, waste, scale, roots, or another obstruction is restricting flow.
This is why diagnosis should come before excavation. If your existing drains recently became slow or started backing up, determining whether the problem is an obstruction or structural failure is more useful than assuming the entire drainage system needs to be rebuilt.
Drainage Construction in Miami-Dade: Permits and Local Planning
Local requirements matter because drainage work can overlap plumbing, building, stormwater, environmental, sewer, or excavation rules depending on the project.
Miami-Dade County directs plumbing applicants to verify whether their work requires a plumbing permit and provides separate permit and inspection guidance. The County also has a specific sanitary-line replacement permitting process; its published requirements include a special inspector form for trench backfill and concrete-slab repair.
Stormwater work can involve a different approval path. Miami-Dade maintains Stormwater (Drainage) and Dewatering permit applications under Chapter 24 for certain drainage systems, outfalls or overflow systems, work involving County-controlled water areas, drainage on certain contaminated sites, and dewatering activities.
Miami-Dade also identifies impervious surfaces such as rooftops and paved areas as an important part of stormwater runoff management because these surfaces limit how much rainwater can soak into the ground.
Useful Miami-Dade Resources
Because permit requirements depend on the exact work and jurisdiction, verify the requirements for your property before excavation or replacement begins rather than assuming a small-looking drainage project is automatically exempt.
How Do You Maintain a Newly Constructed Drainage System?
Construction creates the drainage path; maintenance keeps it available.
A practical maintenance plan can include:
- Keeping grates, catch basins, and surface inlets clear.
- Removing leaves, sediment, and debris before they restrict flow.
- Watching for standing water that was not present when the system was new.
- Keeping cleanouts and access covers reachable.
- Checking discharge areas for erosion or obstruction.
- Investigating recurring backups instead of repeatedly treating only the symptom.
- Inspecting drainage after site changes such as new paving, landscaping, additions, or grading.
Changes elsewhere on a property can alter how water reaches the drainage system, so a previously adequate system can develop problems when runoff patterns or usage change.
When Should Drainage Construction Be Left to a Professional?
A small surface-water improvement and a buried sanitary drainage replacement are not the same level of project.
Professional design or installation becomes especially important when the work involves:
- Sanitary sewer or building drain connections.
- Excavation around foundations or structural elements.
- Deep or unstable trenches.
- Unknown buried utilities.
- Major stormwater runoff.
- Concrete slab cutting or restoration.
- Changes to an existing plumbing drainage layout.
- Permits or inspections.
- Groundwater or dewatering.
- Repeated drainage failure where the cause is unclear.
If you are dealing with a drainage or plumbing problem in South Florida and need help determining whether the right solution is cleaning, repair, replacement, or new construction, you can explore our plumbing help for Miami-area properties.
Frequently Asked Questions About Drainage Construction
Final Takeaway
The best drainage construction projects do not begin with a shovel. They begin with a clear understanding of what water needs to be controlled, where it should go, and which drainage system is appropriate for the problem.
From there, successful drainage construction follows a logical sequence: plan the route, establish elevations, choose suitable components, excavate carefully, provide proper support, install the system, verify grade and connections, test before covering, and preserve access for future maintenance.
Just as importantly, new construction is not always the answer. An existing drainage system may need cleaning or a targeted repair instead of complete replacement. Correct diagnosis is what separates useful drainage work from unnecessary excavation.
Not Sure Whether You Need Drain Construction, Repair, or Cleaning?
Start with the cause of the problem. A professional evaluation can help determine whether you need a new drainage route, a damaged section repaired, or an existing drain cleared before unnecessary construction begins.