If you are looking under a sink and wondering what a pipe, washer, stopper, or curved fitting is called, you are in the right place. A sink drain system is made from several connected parts that move wastewater from the basin into the home’s drain piping while helping prevent leaks and sewer gases from entering the room.
In this guide, I’ll help you identify the main sink drain parts, understand what each one does, recognize common failure symptoms, and figure out what you should check before buying a replacement. I’ll also explain the important differences between kitchen and bathroom sink plumbing so you do not accidentally buy the wrong component.
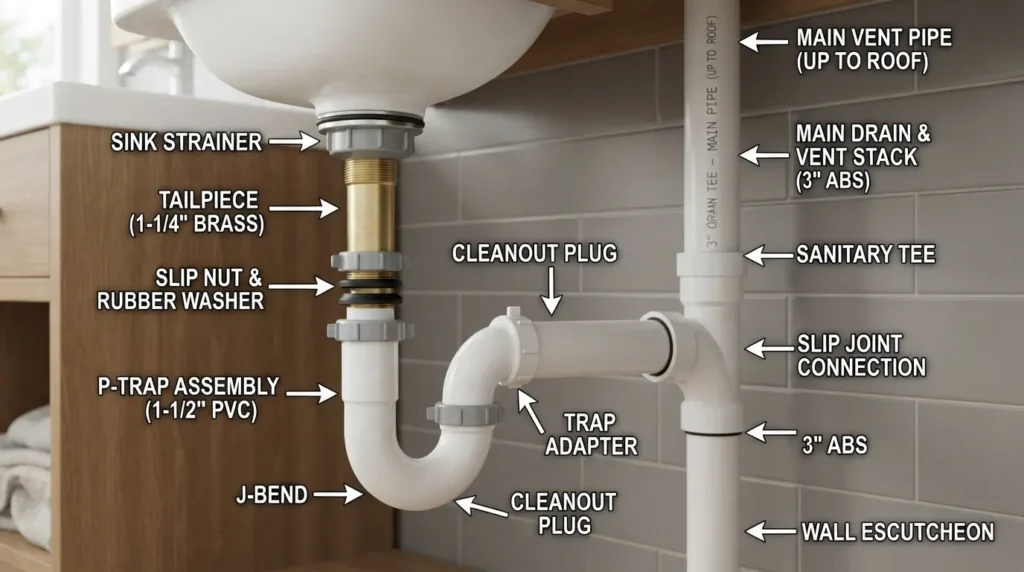
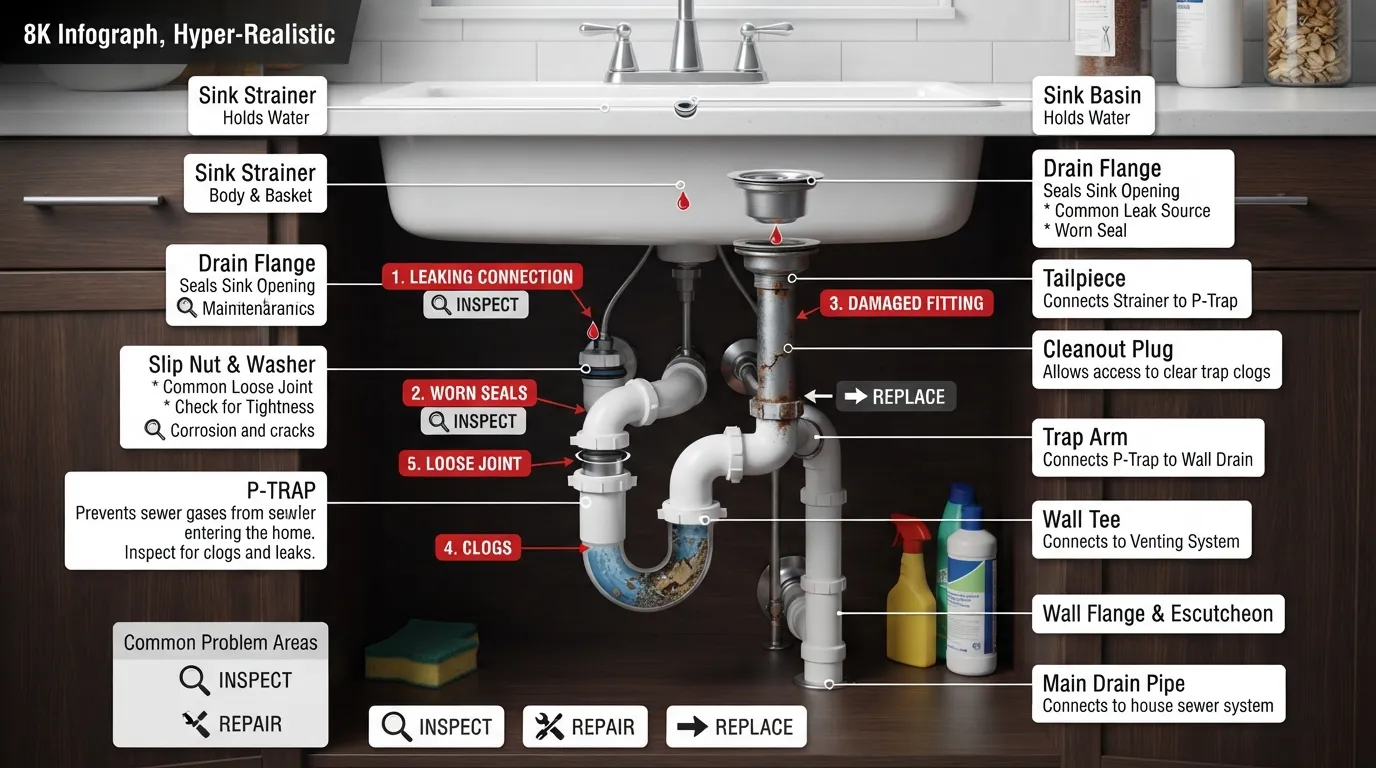
The most common sink drain components are the drain flange or strainer, drain body, gasket, locknut, tailpiece, slip-joint nuts and washers, P-trap, trap arm, and trap adapter. Bathroom sinks may also include a pop-up stopper, lift rod, pivot rod, and overflow-compatible drain, while kitchen sinks may include a basket strainer, garbage disposal connection, dishwasher inlet, or double-bowl waste fittings.
How Sink Drain Parts Work Together
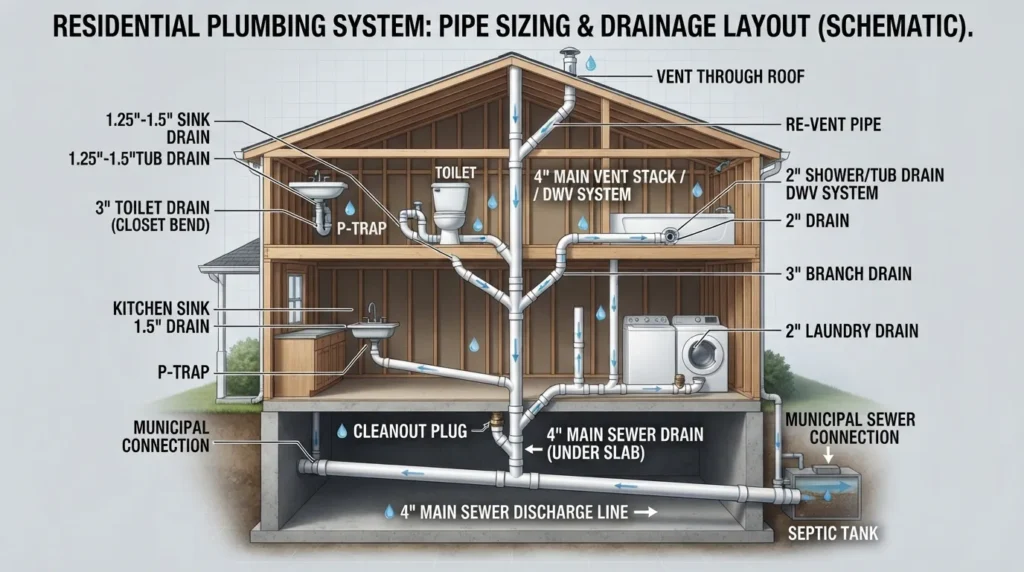
The easiest way to understand sink plumbing is to follow the water. Water leaves the basin through the drain opening, passes through the drain assembly and tailpiece, enters the P-trap, then travels through the trap arm toward the drain pipe in the wall.
It also helps to separate the drainage side from the water-supply side. Faucet supply hoses and shutoff valves bring clean water to the faucet. The parts covered in this article are primarily responsible for carrying wastewater away from the sink.
If you want a broader overview that includes other fixture and drainage components, see our guide to plumbing drain parts and how they fit together.
Sink Drain Parts: What Each Component Does
1. Drain Flange
The drain flange is the visible rim around the drain opening at the bottom of the sink. It helps secure the drain assembly to the basin and forms part of the seal that prevents water from leaking around the drain opening.
Look here first if: water appears directly beneath the drain opening while the sink is holding or draining water.
2. Basket Strainer
A basket strainer is common in kitchen sinks. It lets water pass while catching larger food particles before they enter the drainage piping. The strainer assembly normally connects to the plumbing below the sink through a drain body and tailpiece or directly to a compatible disposal configuration.
If your kitchen sink has a removable metal basket that you can lift out to empty debris, you are usually looking at a basket-strainer style drain.
3. Drain Body
The drain body sits below the visible flange and passes through the sink opening. It provides the connection between the sink itself and the plumbing underneath. Bathroom drain bodies may also interact with a stopper mechanism or the sink’s overflow passage.
4. Gasket and Sealing Washers
Rubber gaskets and other sealing washers help create watertight joints. They are small parts, but a damaged, hardened, incorrectly positioned, or mismatched washer can cause a persistent drip even when the larger pipe or fitting is still usable.
5. Locknut
The locknut helps secure the drain or strainer assembly against the underside of the sink. Depending on the drain design, it works with washers or gaskets to hold the assembly firmly in place.
6. Tailpiece
The tailpiece is the straight section of pipe that extends downward from the sink drain or strainer. It carries water toward the P-trap. Tailpieces may differ in length, material, diameter, and connection configuration.
Check the tailpiece if: you see a crack, corrosion, a leaking connection, or a height/alignment problem between the sink drain and trap.
7. Extension Tube
An extension tube may be used when the tailpiece needs additional length to reach the trap correctly. It is especially important not to treat an extension as a universal part: length, diameter, and connection compatibility matter.
8. Slip-Joint Nut
A slip-joint nut is commonly used on removable tubular drain connections under a sink. It tightens around a washer to create a seal while still allowing the drain assembly to be disconnected for cleaning, adjustment, or replacement.
9. Slip-Joint or Cone Washer
The washer inside a slip joint seals the space between connected pieces of pipe. Its orientation matters. A washer that is damaged, installed backward, or incompatible with the pipe can allow water to escape from the joint.
10. P-Trap
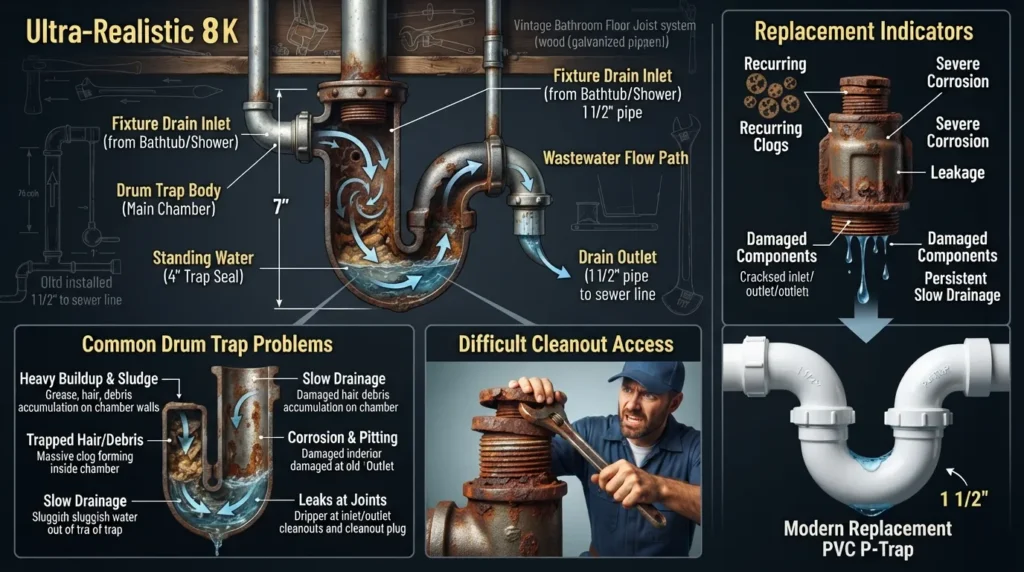
The P-trap is the curved section of drain pipe underneath the sink. It holds a small amount of water after the sink drains. That water seal helps prevent sewer gases from moving backward through the drain opening.
Because of its shape and location, the P-trap is also one of the first places many homeowners inspect when a sink is draining slowly or when an object has accidentally fallen into the drain.
11. Trap Arm
The trap arm, sometimes called a waste arm in everyday conversation, is the section that continues from the P-trap toward the wall. It connects the visible under-sink drainage assembly to the building’s drainage system.
12. Trap Adapter
A trap adapter provides the transition between removable tubular sink plumbing and the permanent drain piping at the wall. The exact fitting and connection method vary according to the existing plumbing system.
Quick Sink Drain Parts Identification Guide
| Part | Where It Is | What It Does | Common Clue |
|---|---|---|---|
| Flange | At the sink opening | Secures/seals the drain opening | Leak directly below drain opening |
| Tailpiece | Vertical pipe below drain | Moves water toward trap | Crack, corrosion, or misalignment |
| Slip nut/washer | At removable pipe joints | Creates a removable watertight connection | Drip at a joint |
| P-trap | Curved pipe under sink | Maintains a water seal and carries drainage | Clog, leak, or odor concern |
| Trap arm | Trap to wall | Carries water into wall drain | Leak or connection/alignment problem |
| Stopper | Inside bathroom drain opening | Opens or closes drain | Will not open, close, or hold water |
Kitchen Sink Drain Parts vs. Bathroom Sink Drain Parts
Kitchen and bathroom sinks share several core drainage components, but the assemblies are not identical. Knowing the difference can save you from buying a part that looks right but is designed for a different application.
- Basket strainer
- Strainer body and locknut
- Tailpiece
- P-trap and trap arm
- Garbage disposal connection, when installed
- Dishwasher drain connection, when applicable
- Double-bowl waste fittings on multi-basin sinks
- Drain flange
- Drain body
- Pop-up or other stopper
- Overflow-compatible drain when required
- Tailpiece
- P-trap and trap arm
- Lift-rod and pivot-linkage parts on some pop-up drains
Kitchen-Specific Drain Components
Kitchen sink plumbing can become more complex when a garbage disposal, dishwasher, or second sink bowl is connected. In those setups, identifying the part correctly matters because the drainage path may include tees, branch pieces, disposal fittings, or dishwasher connections that are not normally present on a simple bathroom sink.
Bathroom-Specific Drain Components
Bathroom sinks commonly use a stopper system that lets you hold water in the basin. Some sinks also have an overflow opening near the upper portion of the basin. If your sink has an overflow, you generally need a drain assembly designed to work with that configuration rather than choosing a drain only by appearance.
Sink Drain Stopper Parts and How They Work
The stopper is one of the sink drain components homeowners most often need help identifying because several mechanisms look similar from above but work differently underneath.
Traditional Pop-Up Stopper
A traditional bathroom pop-up assembly may include a stopper, lift rod, clevis or linkage, pivot rod, retaining nut, and drain body. Moving the lift rod raises or lowers the stopper through the linkage underneath the sink.
Push-to-Open or Clicker Stopper
A push-to-open stopper operates by pressing the stopper itself. One press closes it and another releases it. These designs reduce the amount of external linkage under the sink, but the internal mechanism can wear, stick, or stop clicking properly.
Push-Pull Stopper
A push-pull stopper is opened and closed by physically pushing or pulling the stopper. Before replacing one, identify how it attaches to the drain body because removal methods differ among designs.
- The stopper will not stay closed.
- The stopper will not release or open.
- The drain no longer holds water.
- Hair, soap residue, or debris is restricting movement.
- The linkage underneath a traditional pop-up has become disconnected or misaligned.
- A removable stopper or internal mechanism is worn or damaged.
Which Sink Drain Part Is Causing the Problem?
You usually do not need to replace every drain part just because the sink leaks or drains slowly. Start with the symptom, then narrow down the section of the drainage assembly most likely involved.
| What You Notice | Area to Inspect First | What to Check |
|---|---|---|
| Water directly beneath the sink drain opening | Flange, gasket, drain body, locknut | Seal condition, looseness, visible damage |
| Drip where two tubular pipes connect | Slip-joint nut and washer | Washer orientation, damage, pipe alignment |
| Leak around the curved pipe | P-trap and trap joints | Cracks, joint seals, alignment |
| Sink drains slowly | Stopper, tailpiece, P-trap, downstream drain | Hair, debris, grease, buildup, deeper blockage |
| Stopper does not open or close properly | Stopper mechanism and linkage | Debris, disconnected linkage, worn mechanism |
| Persistent unpleasant drain odor | P-trap and broader drainage system | Trap water seal, buildup, drainage or venting issue |
A Slow Sink Does Not Always Mean the P-Trap Is the Problem
A clog can occur at the stopper, inside the tailpiece, inside the trap, or farther downstream. If cleaning an accessible stopper or trap does not restore normal drainage, repeatedly replacing visible sink parts may not solve the actual problem.
When the blockage appears to be farther into the drainage system, professional drain cleaning service may be more appropriate than replacing another under-sink fitting.
What to Check Before Buying Replacement Sink Drain Parts
One of the easiest mistakes is buying a drain component because it looks similar to the old one. Visual similarity is not enough. Before ordering a sink drain pipe kit, stopper, trap, tailpiece, washer, or drain assembly, verify the details that determine whether the part will actually fit.
- Identify the sink type. Is it a kitchen sink, bathroom sink, vessel sink, single bowl, or double bowl?
- Identify the exact component. Do not confuse the tailpiece with the trap arm or the drain body with the stopper.
- Measure the relevant pipe or opening. Do not assume every sink uses the same dimensions.
- Check connection type. Threaded, slip-joint, disposal-related, and other connections are not automatically interchangeable.
- Check drain configuration. Bathroom drains may need to match an overflow or non-overflow sink.
- Check stopper mechanism. Pop-up, clicker, removable, and push-pull stoppers operate differently.
- Check material and condition of adjoining parts. Replacing one fitting may expose corrosion, cracking, or misalignment elsewhere.
- Compare the old part before disposal. Keeping the existing part available while shopping makes matching dimensions and connections easier.
Two products can both be called a “sink drain,” “P-trap,” or “pop-up drain” while having different sizes, materials, stopper mechanisms, overflow compatibility, or connection requirements. Identify and measure first.
Do You Need One Part or a Complete Sink Drain Kit?
The answer depends on what has failed.
- A single washer may be enough when the pipe and fitting are undamaged and the leak is clearly isolated to a removable joint.
- A stopper component may be enough when the drain body is sound but the stopper mechanism is damaged or disconnected.
- A tailpiece may be replaced separately if it is cracked, corroded, or the wrong length and the surrounding connections remain usable.
- A complete drain assembly may make more sense when several connected pieces are deteriorated, incompatible, or part of the same damaged assembly.
The key is to diagnose the failure before replacing parts. Changing several components without knowing where the water is escaping can create extra work while leaving the original leak unresolved.
How to Identify a Leak Before Taking the Drain Apart
A simple inspection can often narrow the problem down before you remove anything.
- Dry the plumbing under the sink completely.
- Place a dry towel or paper beneath the drain assembly.
- Run a small amount of water and watch the connections.
- Then fill the basin enough to test the drain opening and stopper area if appropriate.
- Release the water and observe where the first moisture appears.
- Trace the highest wet point instead of assuming the lowest drip is the source.
Water can run down the outside of a pipe before dripping from a lower fitting, so the visible drip point is not always the actual failure point.
How to Fix a Push Pop-Up Sink Drain Stopper
If a push-style pop-up stopper is sticking, start with the simplest possibilities. Remove accessible hair, soap residue, and debris around the stopper. Depending on the design, the stopper or upper mechanism may unscrew or release for cleaning.
If cleaning does not restore normal operation, identify the exact mechanism before replacing it. Some push-to-open drains allow the internal stopper mechanism to be replaced separately, while others are better handled as a complete compatible drain assembly.
How to Fix a Push-Pull Drain Stopper
For a push-pull stopper, first confirm whether the problem is debris, a loose connection, or a worn stopper mechanism. Clean the accessible drain opening and inspect how the stopper attaches before forcing it out.
Because stopper designs vary, avoid assuming that removal instructions for one model apply to every sink. If you have the manufacturer or model information, use the corresponding installation or service instructions.
Can You Replace a Pop-Up Sink Plug?
Yes, many pop-up sink stoppers can be replaced. The important question is whether you need only the visible stopper, part of the linkage or clicker mechanism, or the entire drain assembly.
Before buying a replacement, compare the existing drain type, attachment method, dimensions, and—on bathroom sinks—whether the drain needs to work with an overflow.
When a Sink Drain Problem Is More Than a Parts Problem
Visible sink drain components are only the beginning of the drainage system. If the trap and accessible fittings are clear but water still drains slowly or backs up, the obstruction may be deeper in the branch drain or elsewhere in the system.
Other warning signs that deserve more investigation include repeated clogs, water backing up in another nearby fixture, drainage problems that return quickly after cleaning, or leaks entering a wall or cabinet where the source cannot be seen.
Cleaning an accessible stopper, tightening an obviously loose removable joint, or replacing a clearly identified compatible component may be manageable for some homeowners.
If the leak location is unclear, the drain continues backing up, multiple fittings are damaged, the wall connection is involved, or you are unsure about compatibility, it is safer to get the system properly diagnosed. You can speak with a local plumbing professional before turning a small sink problem into a larger repair.
Video: Understanding and Replacing Bathroom Sink Drain Parts
If you prefer to see how the pieces fit together, the following bathroom sink drain video can help you visualize the relationship between the drain assembly, stopper, tailpiece, and plumbing below the sink.
Frequently Asked Questions About Sink Drain Parts
What are the parts of a sink drain system?
A typical sink drain system can include a drain flange or basket strainer, drain body, gasket, locknut, tailpiece, extension tube, slip-joint nuts and washers, P-trap, trap arm, and trap adapter. Bathroom sinks may also have stopper and linkage parts, while kitchens may include disposal, dishwasher, or double-bowl connections.
What are the parts of a drain called?
Common names include flange, strainer, drain body, tailpiece, slip-joint nut, washer, P-trap, trap arm, and trap adapter. The exact set of parts depends on the fixture and drain configuration.
What is the thing that drains the sink called?
The visible opening is commonly called the sink drain. Depending on the sink, the component may be a drain flange, pop-up drain, or basket strainer connected to a drain body below.
What are the parts of a sink drain stopper?
A traditional pop-up system may include the stopper, drain body, lift rod, clevis or linkage, pivot rod, and retaining hardware. Push-to-open and push-pull designs use different internal mechanisms and may not include the same linkage.
What are common problems with sink drain stoppers?
Common problems include debris buildup, a stopper that will not stay open or closed, disconnected or misaligned linkage, and worn internal mechanisms. The correct repair depends on the stopper design.
Is a P-trap part of the sink drain?
Yes. The P-trap is a key part of the under-sink drainage assembly. It carries wastewater while retaining a water seal that helps block sewer gases from moving back through the sink drain.
Can I replace only one sink drain part?
Often, yes. Washers, nuts, tailpieces, stoppers, and some other components can be replaced individually when the remaining assembly is compatible and in good condition. If several pieces are deteriorated or mismatched, a larger assembly replacement may make more sense.
Related Sink Drain Parts and Buying Resources
If you have already identified the component you need and want to compare available drain assemblies, traps, strainers, stoppers, washers, or replacement fittings, these major plumbing retailers and suppliers can be useful reference points. Always verify measurements and compatibility before purchasing.
- Home Depot drain parts
- Lowe’s sink parts and repair components
- Grainger sink drains, strainers, and traps
- Amazon sink drain parts
Final Takeaway: Identify the Part Before You Replace It
A sink drain is a connected system, so the part that is dripping is not always the part that failed. Start by identifying where the water or drainage problem begins, learn the name and function of that component, then check its size, connection type, condition, and compatibility before buying anything.
For a basic leak, the solution may be as small as a washer or correctly aligned joint. For a failed stopper, you may need only the stopper mechanism. But when a sink continues to drain slowly, repeatedly clogs, leaks inside a wall connection, or has several damaged components, the problem may require more than a replacement part.
If identifying the correct component does not solve the issue, you can learn more about professional plumbing help from Miami Florida Plumbing and choose the right next step for your drain problem.