
Bathroom Plumbing Maintenance Tips: A Licensed Plumber's Complete Checklist
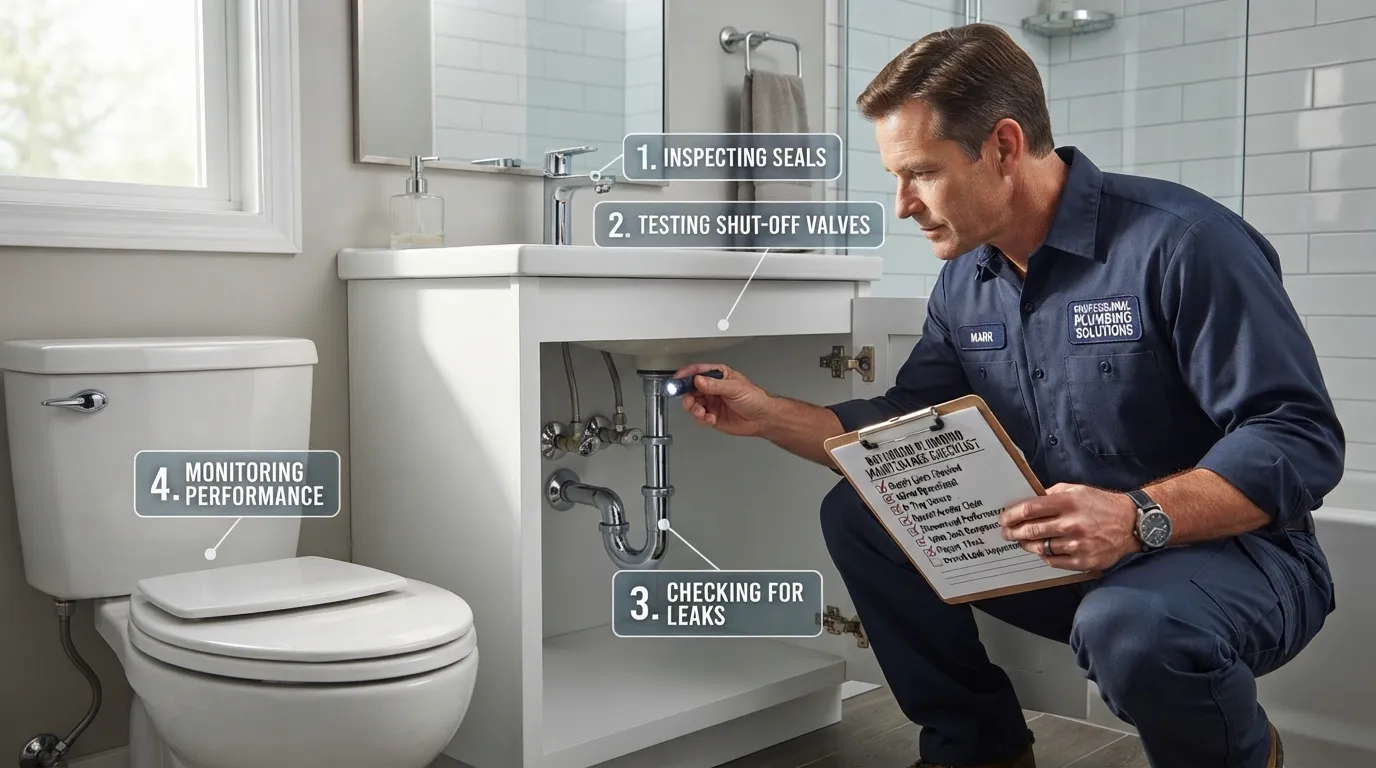
Bathroom Plumbing Maintenance Tips at a Glance
Proactive upkeep is the single most effective way to prevent catastrophic water damage and expensive emergency repairs. Whether you are managing a single-family home or a multi-unit property, routine checks protect your property value and keep utility bills under control. If a task goes beyond basic DIY, professional intervention via licensed plumbing services ensures structural integrity and code compliance.
What Is Bathroom Plumbing Maintenance?
Bathroom plumbing maintenance involves routine inspections and minor upkeep of toilets, drains, faucets, showers, supply valves, and waterproof seals. Catching minor wear and tear early stops slow leaks and stubborn clogs before they escalate into structural damage. Consistency is key to extending the lifespan of your fixtures.
The 7 Most Important Bathroom Plumbing Maintenance Tips
Flush only human waste and toilet paper to prevent severe main-line clogs.
Install mesh drain strainers in sinks, showers, and tubs to catch hair and soap scum.
Perform a food-coloring dye test in the tank to check for silent toilet flapper leaks.
Soak faucet aerators and showerheads in vinegar annually to remove mineral buildup.
Exercise individual shut-off valves twice a year so they never seize up.
Inspect and renew tile and tub caulk regularly to prevent moisture intrusion.
Monitor your water meter periodically while all fixtures are off to catch hidden leaks.
Why Small Bathroom Plumbing Problems Become Expensive
Unaddressed plumbing issues rarely resolve themselves; instead, they compound into costly structural failures. Minor pinhole leaks behind walls or under sinks quietly foster wood rot, compromised subfloors, and hazardous mold growth. Furthermore, a constantly running toilet or dripping faucet can inflate monthly utility bills significantly before you even notice the waste.
This preventative guide is designed for homeowners, property managers, and renters alike. For condo owners, routine maintenance is especially critical because a neglected bathroom leak can easily seep through walls or ceilings and damage the units below.
As noted by veteran service professionals, worn-out flappers and neglected supply line seals remain the single most common call-out reason for emergency residential plumbing visits.
Bathroom Plumbing Maintenance Schedule: What to Do and When
A structured plumbing maintenance schedule prevents sudden catastrophic failures by catching component wear before it turns into a costly emergency. Unlike generic whole-house lists, a bathroom-specific schedule targets high-moisture fixtures, heavy mineral buildup zones, and high-frequency mechanical parts.
Weekly Tasks
Running hot water down all bathroom drains for one minute clears minor soap residue before it binds hair into clogs. Concurrently, perform a 60-second visual check under sinks to spot fresh moisture or damp cabinet bases early.
Run hot water down sink, shower, and tub drains weekly.
Perform a quick visual check under vanities for moisture or puddles.
Wipe down fixtures and check for slow leaks or steady drips.
Monthly Tasks
Monthly upkeep prevents organic buildup inside drain traps and catches silent tank leaks before they inflate utility bills. While some DIY guides recommend harsh chemical cleaners weekly, we recommend a monthly natural baking soda and vinegar flush to protect PVC and metal pipe integrity from corrosive chemical damage.
Pour baking soda and vinegar down drains, let sit, then flush with hot water.
Remove and clean hair or debris from all mesh drain strainers.
Inspect the toilet for ghost flushing or continuous running sounds.
Every 6 Months
Semi-annual checkups focus on structural stability and the integrity of water supply shut-off mechanisms. Inspecting the toilet base and supply connections safeguards against hidden floor rot and sudden supply line blowouts.
Inspect the toilet base and floor for looseness, moisture, or rocking.
Exercise individual supply shut-off valves to keep stems from seizing.
Check tile and tub seals for hairline cracks or gaps.
Once a Year
Annual maintenance is the cornerstone of a reliable preventative plumbing strategy. Performing a comprehensive evaluation safeguards your home’s major infrastructure and ensures safety controls function properly.
Conduct a food-coloring dye test in the toilet tank to detect silent flapper leaks.
Fully exercise and lubricate every sink and toilet shut-off valve.
Test your home water pressure with a gauge to ensure it stays below 80 PSI.
Recaulk bathtub and shower seams wherever cracking or peeling appears.
Every 5 Years
Mechanical components made of rubber and braided metal degrade over time, regardless of how clean your water is. Proactively replacing these high-stress components eliminates the risk of catastrophic supply line ruptures.
Replace the rubber toilet flapper before it warps or degrades.
Inspect and replace braided stainless steel supply lines under vanities.
Comprehensive Plumbing Maintenance Schedule Reference
| Task & Description | Frequency | Time Needed | DIY or Pro |
| Run hot water down drains / check under sinks | Weekly | 5 mins | DIY |
| Baking soda & vinegar flush / clean strainers | Monthly | 15 mins | DIY |
| Check toilet base, seals & shut-off valves | Every 6 Months | 10 mins | DIY |
| Dye test tank, exercise valves, test water pressure | Once a Year | 30 mins | DIY / Pro |
| Replace toilet flapper & braided supply lines | Every 5 Years | 20 mins | DIY / Pro |
Why Frequencies Differ Across Sources
You will often notice conflicting advice online regarding drain maintenance frequency, with some sources recommending chemical drain treatments weekly. The schedule our technicians give customers prioritizes a monthly natural baking soda and vinegar flush instead. Weekly chemical treatments can corrode pipe seals and degrade PVC primer over time, whereas a monthly natural scrub safely neutralizes organic grease and soap scum without harming your plumbing infrastructure.
How to Maintain Your Toilet and Stop Hidden Leaks
Toilets account for the majority of indoor water waste, often due to silent internal leaks that go unnoticed for months. Proper upkeep prevents sudden overflows, structural floor rot, and unnecessarily high utility bills.
What You Should (and Should Never) Flush
Protecting your main sewer line requires strict adherence to what enters your porcelain fixtures. Even products marketed as flushable fail to break down quickly enough in residential piping systems.
Flush only human waste and standard toilet paper.
Never flush wet wipes, baby wipes, or disinfecting cleaning wipes.
Avoid flushing cotton balls, makeup removal pads, paper towels, and feminine hygiene products.
How to Do the Toilet Dye Test (Step by Step)
A food-coloring dye test is the fastest, most reliable method for detecting silent flapper leaks without dismantling your toilet.
Remove the toilet tank lid and drop 5 to 8 drops of concentrated food coloring or a specialized blue dye tablet into the water.
Do not flush the toilet for the duration of the test.
Wait 10 to 15 minutes to allow the dye to trace any escaping water.
Check the water inside the toilet bowl; if tinted water appears without flushing, your flapper is leaking.
Flush the bowl immediately after the test concludes to prevent permanent staining of the porcelain.
Reference video: Real Plumber Ultimate Plumbing Maintenance Guide.
Fixing a Running Toilet: Flapper, Fill Valve and Overflow Tube
When your toilet runs continuously or cycles on intermittently, the internal components need adjustment or replacement. The water level inside the tank should always sit roughly 1 inch below the top rim of the overflow tube.
Inspect the chain connected to the flush valve lever; ensure it has just a slight amount of slack when the flapper is closed.
Adjust the fill valve float clip if water is spilling directly into the overflow tube.
For persistent leaks or complex component failures, expert professional toilet repair ensures proper water seal calibration.
How Often to Replace a Toilet Flapper
Rubber flappers harden, warp, and lose their flexibility over time due to mineral exposure and chemical water treatments. Technicians recommend replacing your toilet flapper every 5 years as routine preventative maintenance to guarantee a tight seal.
Check the Toilet Base and Shut-Off Valve
Routine inspections of the exterior toilet components prevent hidden floor damage and ensure emergency readiness. A rocking toilet breaks the wax ring seal beneath it, allowing sewer gases to escape and wastewater to seep into your subfloor.
Check the toilet base for any side-to-side wobble or moisture pooling around the floor tiles.
Inspect the braided stainless steel supply line and angle stop shut-off valve for green corrosion or weeping drips.
How to Stop an Overflowing Toilet Fast
When a toilet threatens to overflow, acting within seconds prevents thousands of gallons of wastewater from ruining your bathroom floor.
Remove the tank lid immediately and set it aside on a secure surface.
Reach inside and push the flapper or flush valve down firmly to stop more water from entering the bowl.
Lift the float ball or cup upward to shut off the fill valve flow.
Turn the wall-mounted shut-off valve clockwise until fully closed to isolate the fixture.
How to Keep Bathroom Sink, Tub and Shower Drains Clear
Maintaining clear bathroom drains requires a combination of physical filters, consistent hot water flushing, and disciplined waste disposal. Preventing hair and soap scum from bonding inside the P-trap eliminates the need for aggressive chemical clearers later.
Install Mesh Drain Strainers
Hair and soap residue are the primary culprits behind stubborn bathroom clogs. Installing stainless steel or silicone mesh drain strainers catches these materials right at the surface before they enter your plumbing lines.
Place a snug mesh strainer over every sink, shower, and tub drain.
Empty the captured hair and soap chips directly into the trash bin weekly.
Rinse the strainer clean to ensure uninterrupted water flow.
Flush Drains With Hot Water Weekly
Routine thermal flushing prevents organic buildup from solidifying along the interior pipe walls. Running hot tap water down every bathroom drain for one minute once a week melts away residual soap film and toothpaste sludge.
Does Baking Soda and Vinegar Really Clean Drains?
Baking soda and vinegar provide safe, effective maintenance for light grease, soap scum, and minor odors, but they will not dissolve a solid hair clog.
Pour half a cup of baking soda down the slow drain.
Follow it immediately with one cup of white vinegar, which will trigger a natural fizzing reaction.
Plug the drain or let the mixture sit undisturbed for 15 to 30 minutes.
Flush the pipe thoroughly with boiling or hot tap water to clear the loosened residue.
Repeat this natural maintenance routine once a month to keep lines fresh.
Reference video: 15 Plumbing SECRETS Every Homeowner Should Know.
Why You Should Avoid Chemical Drain Cleaners
Commercial chemical liquid drain openers rely on harsh acids or lye that generate intense heat to dissolve clogs. This thermal spike can warp PVC pipes, degrade rubber seals, and corrode metal joints. Furthermore, mixing chemical cleaners with residual bleach or other products creates toxic fumes.
What Should Never Down a Bathroom Drain
Your bathroom plumbing is engineered exclusively for gray water, human waste, and toilet paper. Introducing foreign substances compromises pipe integrity and accelerates clogs.
Never pour cooking oils, facial creams, or heavy lotions down sink drains.
Avoid flushing wet wipes, cotton balls, dental floss, and makeup removal pads.
Keep thick toothpaste buildup cleared by rinsing basins thoroughly after brushing.
Warning Signs of a Deeper Clog
When simple maintenance no longer restores fast drainage, the issue usually lies further down the main branch line. Recognizing these early red flags prevents sudden raw sewage backups in your home.
Slow drainage occurring simultaneously across multiple fixtures (e.g., sink and tub).
Gurgling sounds bubbling up from the toilet or shower drain when the sink runs.
Standing water pooling around your ankles during a standard shower.
For stubborn or recurring blockages, expert professional drain cleaning clears the entire line safely without pipe damage.
Faucet, Aerator and Showerhead Maintenance Including Hard Water Buildup
Low water flow, spraying sideways, and persistent drips are rarely caused by failing pipes. Instead, they are usually the direct result of mineral scale accumulating inside your fixtures over time.
Why Faucets and Showerheads Clog
Municipal water supplies contain dissolved minerals like calcium and magnesium. When water evaporates at the tip of a faucet aerator or showerhead nozzle, these minerals crystallize into a hard, chalky crust known as limescale. This buildup chokes the internal pathways, causing erratic spray patterns and restrictive low flow.
How to Clean a Faucet Aerator
Restoring a sputtering or weak faucet takes only a few minutes with basic household tools.
Unscrew the aerator housing at the tip of the faucet counterclockwise by hand.
If it is stuck, wrap painter’s tape or a cloth around the metal jaws of your pliers to protect the chrome finish before gently gripping the ring.
Disassemble the internal screens, rubber washer, and mixing core.
Scrub away loose debris with a soft-bristled brush dipped in white vinegar.
Reassemble the clean components and screw them back onto the spout hand-tight.
Reference video: 15 Plumbing SECRETS That Will Save You THOUSANDS![cite: 2].
How to Descale a Showerhead
Showerheads collect heavy mineral crust that narrows spray holes and reduces pressure.
For detachable showerheads, submerge the head in a bowl of warm white vinegar for one to two hours.
For fixed showerheads, fill a plastic bag with vinegar, secure it around the fixture with a rubber band so the nozzle is fully submerged, and let it soak overnight.
Rinse thoroughly and gently massage rubber nozzles with your thumb to dislodge softened mineral deposits.
How to Fix a Dripping Faucet
A persistent drip wastes hundreds of gallons of water and stains your fixtures. The underlying culprit depends on the faucet design.
Compression Faucets: Replace the worn rubber washer and O-ring inside the stem assembly.
Single-Handle Faucets: Swap out the internal plastic or ceramic mixing cartridge when seals degrade.
Replacement Threshold: If a fixture is heavily corroded, leaks from the body casing, or is more than 15 years old, replacing the entire faucet is often more cost-effective than rebuilding it.
Hard Water in South Florida: What It Does to Your Fixtures
Local water reports confirm that South Florida municipal supplies carry exceptionally high mineral concentrations, often exceeding 150 to 200 mg/L of calcium carbonate (classified as very hard water). Service technicians in the Miami-Dade area note that hard water scale is the single leading cause of premature aerator clogs, crusty showerheads, and shortened water heater lifespans. Installing a whole-home water softening or filtration system is the most effective way to protect your bathroom fixtures from relentless mineral damage.
Shut-Off Valves, Supply Lines and Caulk: The Parts Everyone Forgets
Homeowners frequently overlook the smaller hardware components in a bathroom until a sudden rupture or leak causes extensive damage. Routine inspections of your angle stops, supply lines, and waterproof seals ensure your home remains protected against hidden water intrusion and emergency failures.
How to Exercise Your Bathroom Shut-Off Valves
Angle stop shut-off valves sitting underneath sinks and behind toilets control the water supply to individual fixtures. When left untouched for years, mineral deposits and corrosion cause the internal stems to seize completely.
Turn every bathroom shut-off valve completely clockwise to shut off water, then counterclockwise to reopen it once a year.
If a valve feels stiff, never force it with heavy wrenches, as snapping the stem will cause an immediate indoor flood.
If a valve leaks around the packing nut or refuses to budge, shut off your main home water supply and replace the angle stop immediately.
Where Is Your Main Water Shut-Off Valve?
Locating your main water shut-off valve before an emergency strikes is critical to mitigating catastrophic water damage. In warm-weather climates like Florida, the main valve is typically located outside near the front perimeter wall, inside an in-ground utility box near the street, or adjacent to the water meter.
Emergency Preparedness: Test your main valve annually to ensure it operates smoothly.
Hurricane Season Protocol: For Florida homeowners, knowing how to quickly shut off your main water line prior to severe tropical storms or hurricanes prevents secondary interior flooding if roof leaks or structural breaches occur.
Inspect Supply Lines
Flexible supply lines bridge the gap between your wall-mounted angle stops and your plumbing fixtures. Because they operate under constant water pressure, they degrade steadily over time.
Inspect braided stainless steel supply lines semi-annually for outer fraying, rust spots, or localized bulges.
Replace any flexible supply lines showing signs of corrosion or aging immediately to prevent sudden rubber blowouts.
When and How to Recaulk Your Tub, Sink and Toilet Base
Silicone caulk forms a waterproof barrier that prevents moisture from seeping into vulnerable wood framing and subfloors. When caulk shrinks, cracks, or peels away, water migrates freely into hidden gaps during every shower.
Scrape away old, moldy caulk completely using a plastic utility scraper and clean the joint thoroughly with rubbing alcohol.
Apply a continuous, smooth bead of 100% silicone sealant along the seam between your tub, sink basin, or toilet base and the adjacent walls or flooring.
Smooth the bead with a gloved finger and allow it to cure fully for 24 hours before exposing it to water.
Bathroom Fan and Humidity: The Plumbing–Mold Connection
Excessive indoor humidity and poor ventilation accelerate mold and mildew growth around your bathroom plumbing fixtures. When warm shower steam condenses on cold water supply pipes and poorly sealed baseboards, it creates a breeding ground for toxic mold spores. Running your bathroom exhaust fan during every shower—and leaving it on for 20 minutes afterward—controls ambient moisture levels and protects your home’s structural framing.
Service technicians note that in humid regional climates, seized shut-off valves and neglected supply line connections are among the leading catalysts for emergency plumbing call-outs.
How to Find Hidden Bathroom Leaks Before They Do Damage
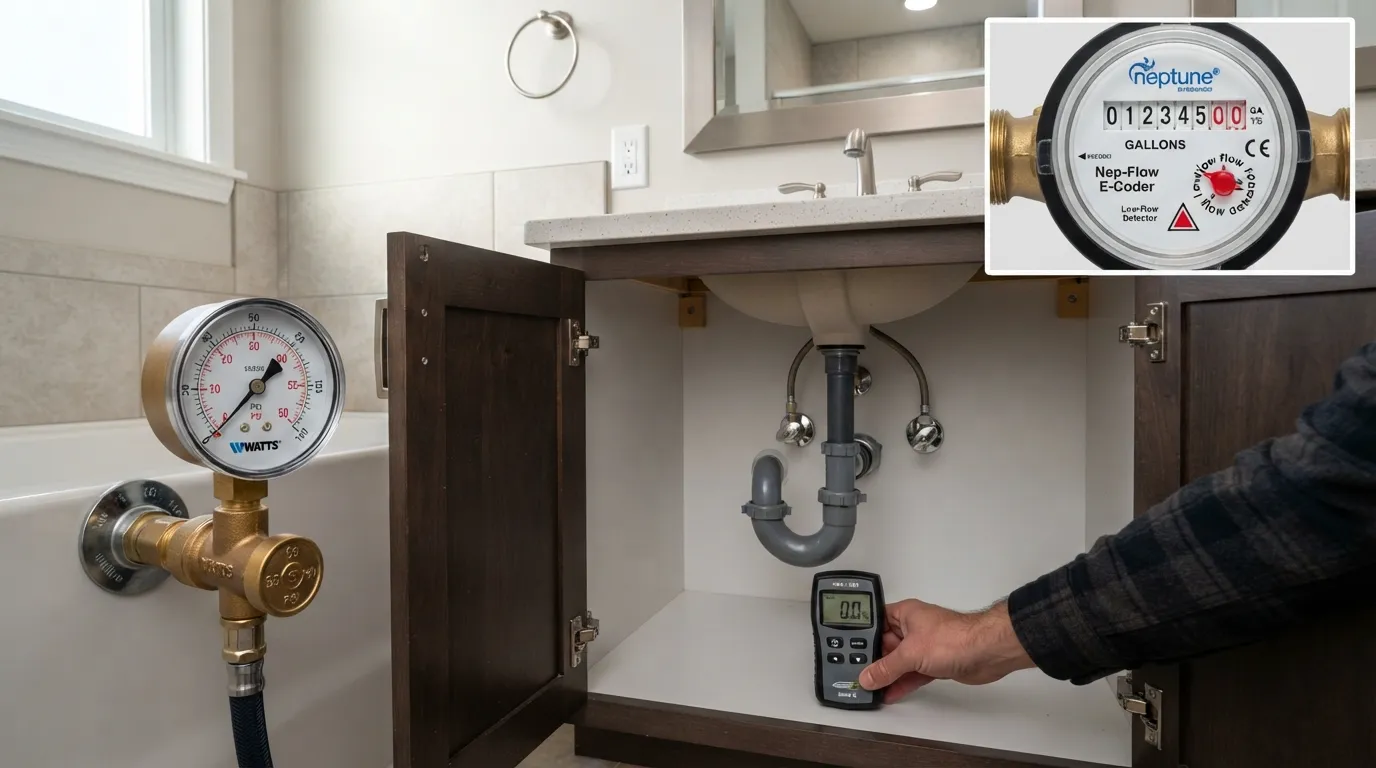
Hidden leaks behind walls, under vanities, and inside toilet tanks can silently waste thousands of gallons of water and cause severe structural rot before they become visible. Catching these leaks early protects your home from expensive remediation.
Warning Signs of a Hidden Leak
Recognizing the subtle red flags of water intrusion allows you to address plumbing failures before drywall collapses or subfloors weaken.
Unexplained spikes in your monthly water bill despite normal usage habits.
Persistent musty odors or dampness in bathroom closets or vanity cabinets.
Discolored water stains or peeling paint on ceilings directly beneath upstairs bathrooms.
Soft, spongy flooring or warped baseboards surrounding the tub, shower, or toilet base.
A low-flow indicator dial on your water meter that spins while every fixture in the home is completely turned off.
The Water Meter Test
The water meter test is a foolproof diagnostic method recommended by the EPA WaterSense home maintenance guidance to confirm whether your home has a hidden leak.
Ensure every indoor and outdoor faucet, appliance, and toilet is completely shut off.
Locate your main water meter, note the exact numerical reading, and check the low-flow indicator triangle or sweep hand.
Leave the entire plumbing system undisturbed for approximately two hours without running any water.
Return to the meter and check the reading; if the numbers have advanced or the indicator dial moved, water is escaping somewhere in your system.
Compare Your Water Bill to the Same Month Last Year
Utility bills provide a reliable historical baseline for tracking water waste. Compare your current monthly bill to the exact same billing cycle from the previous year. If your water consumption has increased significantly without any change in household size or lifestyle habits, a silent plumbing leak is almost certainly to blame.
The Under-Sink “Dry Hand” Check
Cabinet floors beneath bathroom sinks often hide early-stage leaks because stored items conceal slow drips from P-traps and supply connections. Once a month, wipe your hand along the underside of pipe joints, shut-off valves, and basin connections to feel for subtle dampness before mold or wood warping sets in.
Smart Leak Detectors and Auto Shut-Off Devices
Modern smart home technology offers continuous automated protection against catastrophic plumbing failures. Battery-operated wireless leak sensors placed beneath sinks and near toilets sound an audible alarm the moment moisture touches the floor. Advanced smart water shut-off valves can even detect abnormal continuous flow patterns and automatically cut off the main water supply to your home before a major flood occurs.
How Much Water Does a Small Drip Waste?
A seemingly minor plumbing leak can rack up astonishing waste over a 12-month period. A single faucet drip running at a rate of one drip per second wastes about 3,000 gallons of water a year—enough water to fill over 180 showers.
For complex leaks behind walls or beneath concrete slabs, scheduling professional EPA WaterSense home maintenance guidance ensures the exact source is located without unnecessary demolition.
Water Pressure and Water Heater Care for Your Bathroom
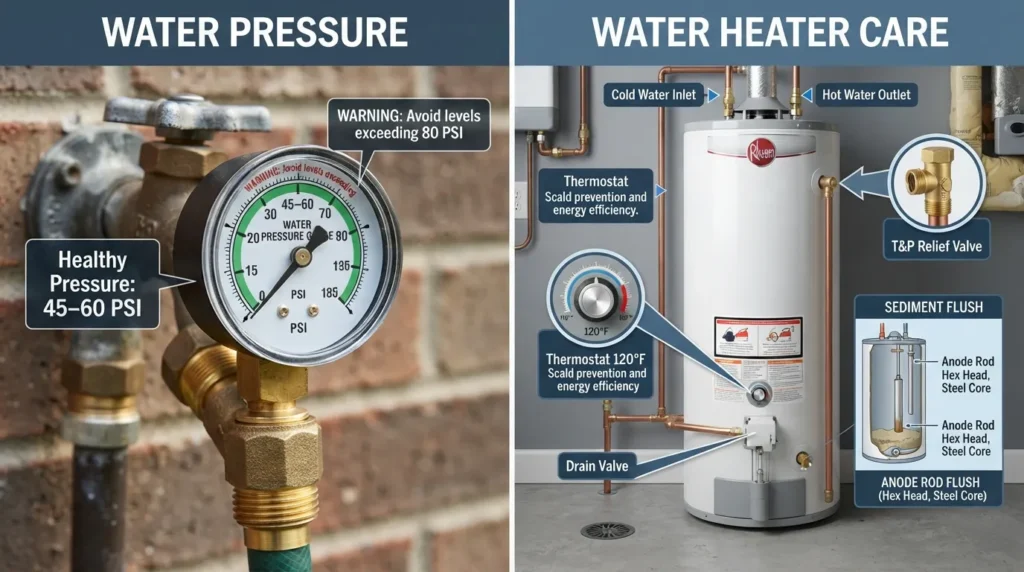
Maintaining balanced water pressure and proper water heater performance is essential for a reliable, comfortable shower experience. Unchecked pressure surges and neglected tank sediment shorten the lifespan of every bathroom fixture in your home.
What Is a Healthy Water Pressure for Your Home?
Ideal residential water pressure typically ranges between 45 and 60 pounds per square inch (PSI). When water pressure persistently exceeds 80 PSI, it places extreme, continuous stress on supply lines, faucet cartridges, and toilet valves, dramatically increasing the risk of sudden leaks or blown fittings.
How to Test Your Water Pressure
Diagnosing your home’s water pressure takes only a few minutes with an inexpensive gauge from a local hardware store.
Ensure every indoor and outdoor faucet, appliance, and toilet is completely turned off.
Thread a standard hose bib pressure gauge directly onto an outdoor spigot or your washing machine supply tap.
Open the spigot fully and read the needle on the dial to check your current operating PSI.
Pressure Regulator (PRV): When It Fails
A pressure-reducing valve (PRV) controls and stabilizes the high-pressure water entering your home from municipal mains. When a PRV fails, pressure spikes abruptly across all bathroom fixtures.
Signs of Failure: Banging pipes when faucets shut off, rapidly fluctuating flow rates, or pressure gauges registering above 80 PSI.
The Fix: Have a licensed professional replace a failed PRV immediately to protect your home’s plumbing infrastructure.
Water Heater Basics for a Better Shower
Consistent hot water relies on proper thermal settings and routine tank upkeep. Set your water heater thermostat to 120°F to prevent accidental scalding while optimizing energy efficiency.
Follow your manufacturer’s manual for maintenance intervals, as recommended flush and inspection schedules vary between six months and annually depending on your model.
Inspect the temperature and pressure (T&P) relief valve and check the sacrificial anode rod to prevent premature tank corrosion.
For comprehensive upkeep or professional flush procedures, expert water heater service ensures optimal performance and safety.
Signs Your Water Heater Needs Attention
Recognizing early warning signs prevents unexpected cold showers and catastrophic tank ruptures.
Rumbling, popping, or banging noises coming from the tank during heating cycles, which indicate heavy bottom sediment buildup.
Discolored, rusty hot water flowing from your bathroom faucets and showerheads.
Inconsistent water temperatures or a sudden drop in hot water capacity during normal use.
Local service technicians note that in municipalities with high water pressure, homes lacking a functioning PRV frequently experience premature failure in shower mixing valves and supply connections.
Bathroom Plumbing Problems and Fixes at a Glance Troubleshooting Table
When bathroom plumbing issues strike, diagnosing the root cause quickly prevents minor inconveniences from turning into costly emergencies. The troubleshooting matrix below outlines common symptoms, likely culprits, safe DIY solutions, and the exact threshold for calling a professional.
| Problem | Likely Cause | Safe DIY Step | Call a Plumber If… |
| Slow Drain | Hair, soap scum, or grease buildup in the P-trap | Clear the strainer, use a plastic zip tool, or flush with hot water | Backups affect multiple fixtures or persist after snaking |
| Running Toilet | Worn flapper, improper chain slack, or stuck fill valve | Adjust chain slack or replace the flapper (every 5 years) | The fill valve body cracks or tank continues cycling |
| Weak Shower Pressure | Clogged aerator, scaled showerhead, or high pressure issues | Descale the showerhead in white vinegar or clean aerator screens | Pressure remains restricted after deep descaling |
| Gurgling Drain or Toilet | Blocked plumbing vent or main line restriction | Check roof vents for leaves or animal nests | Gurgling occurs across multiple drains simultaneously; expert sewer line services are required |
| Sewer Smell From a Drain | Evaporated P-trap water or a cracked vent pipe | Pour a gallon of water down infrequently used floor drains | The odor lingers persistently; expert sewer line services are needed |
| Banging Pipes | Water hammer from fast-closing valves or loose straps | Secure loose supply pipes with cushioned brackets | Installing water hammer arrestors fails to stop the shock |
| Dripping Faucet | Worn O-rings, degraded washers, or a faulty cartridge | Disassemble the handle and replace worn washers or cartridges | The faucet body is cracked or severely corroded |
Slow Drain
A slow-draining sink or tub usually starts when hair and body oils bind with soap scum along the interior pipe walls. Technicians on site frequently find that a simple mesh strainer would have intercepted 90% of these blockages before they ever reached the P-trap.
Running Toilet
A toilet that cycles on intermittently wastes hundreds of gallons daily and drives up utility bills. When inspecting running toilets, our service teams routinely discover warped rubber flappers that fail to form a tight seal against the flush valve opening.
Weak Shower Pressure
When your shower spray loses its vigor, mineral deposits are almost always the culprit. Local plumbing inspections show that hard water minerals crystallize inside showerhead nozzles within months if fixtures are left untreated.
Gurgling Drain or Toilet
Gurgling sounds happen when trapped air escapes through your plumbing fixtures because the roof vent is blocked or the main drainage line is compromised. If multiple fixtures gurgle when you flush or drain water, it points directly to a primary ventilation or main line restriction.
Sewer Smell From a Drain
A dry P-trap allows noxious sewer gases to vent directly into your bathroom. Pouring water into rarely used floor or tub drains usually resolves the issue instantly by re-establishing the liquid seal.
Banging Pipes
Water hammer occurs when a fast-closing valve halts moving water abruptly, sending a violent shockwave through your rigid copper or PEX piping. Installing water hammer arrestors near quick-acting valves cushions the hydraulic shock and protects pipe joints.
Dripping Faucet
Constant drips waste valuable water and stain porcelain fixtures. Whether your fixture uses a traditional compression washer or a modern ceramic cartridge, swapping out the worn internal seal restores a watertight closure in minutes.
Common Bathroom Plumbing Mistakes and What Plumbers Wish You Knew
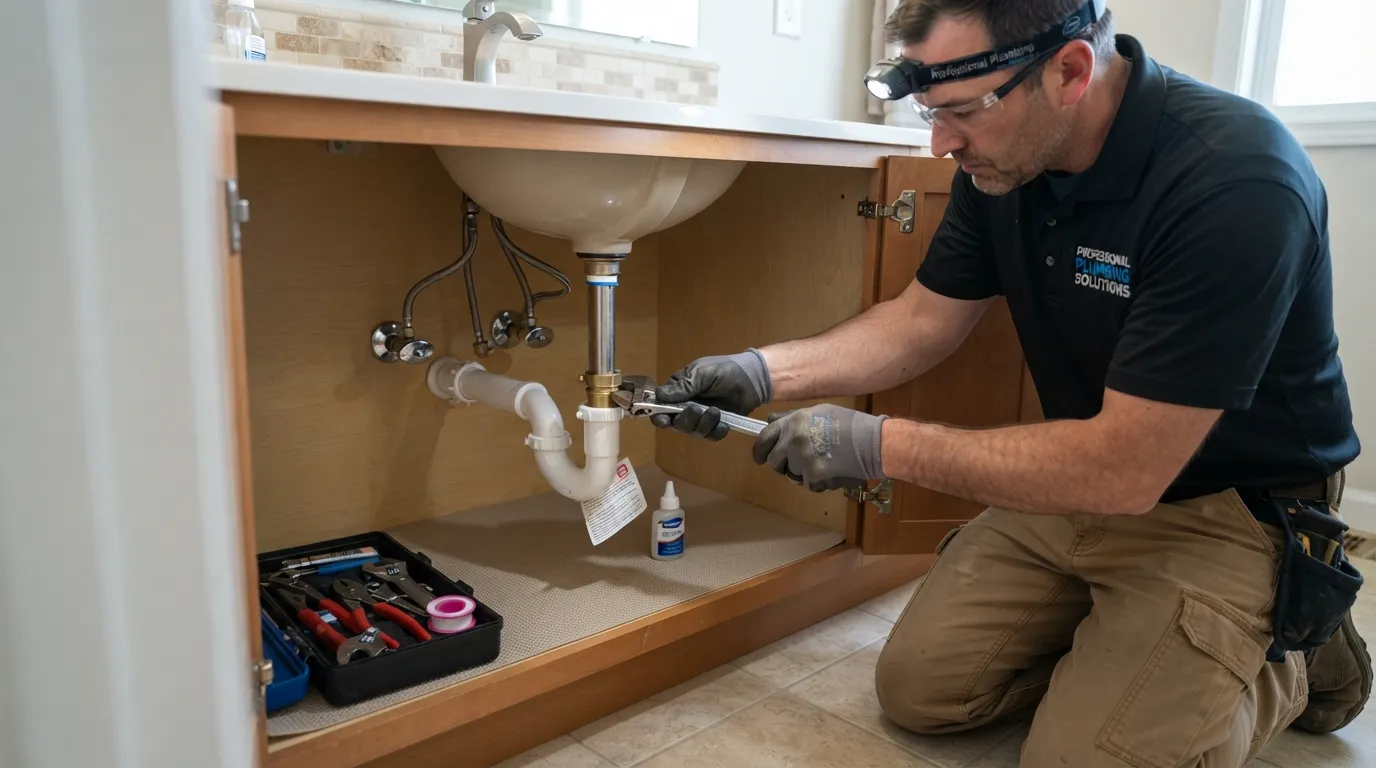
Even well-intentioned homeowners can accidentally turn a minor fix into an expensive repair by relying on unverified internet hacks or outdated methods. Understanding the most common pitfalls prevents avoidable damage and extends the lifespan of your bathroom fixtures.
8 Bathroom Plumbing Mistakes That Lead to Expensive Repairs
Flushing “Flushable” Wipes: Even products labeled safe for plumbing fail to disintegrate quickly in residential pipes, leading to severe main-line blockages.
Ignoring a Small Drip: A persistent drip wastes thousands of gallons annually and quietly rots surrounding cabinetry or subflooring.
Using Chemical Drain Openers: Corrosive liquid cleaners generate extreme heat that can warp PVC pipes and destroy rubber seals.
Mixing Cleaning Products: Combining bleach with commercial cleaners or vinegar creates lethal toxic vapors.
Overtightening Fittings: Cranking down hard on supply lines or plastic nuts causes hairline cracks that inevitably fail weeks later.
Not Knowing the Shut-Off Valve Location: Wasting precious minutes searching for water shut-offs while a pipe bursts turns a minor mop-up into a major flood claim.
Ignoring a Slow Drain: Waiting until a drain is completely blocked turns a simple clearing job into a complex mechanical snaking emergency.
Skipping Caulk Repairs: Allowing waterproof sealant to peel away permits moisture to seep directly into vulnerable wood framing.
What Plumbers Wish Homeowners Knew
Experienced service technicians who work on residential systems every day share a few fundamental truths they wish every homeowner understood:
“Tight is not always right.” — Carlos Mendez, Master Plumber. Most residential fittings only require a hand-tight turn plus a quarter-turn with a wrench to achieve a permanent, leak-free seal. Overtightening strips threads and cracks components.
“Your water meter is your best friend.” — Dave Higgins, Senior Repair Tech. Checking your meter’s low-flow indicator once a month takes thirty seconds and catches silent toilet or underground leaks before they turn into thousands of dollars in water damage.
“Chemical drain cleaners are a plumber’s best marketing tool.” — Mike Lawson, Service Supervisor. Pouring harsh acids down a slow drain rarely solves the root hair clog; instead, it eats away at older pipe walls and creates hazardous splash-back risks.
“Always locate your main shut-off valve before you touch a single wrench.” — Sarah Jenkins, Lead Field Technician. Knowing exactly where your emergency water shut-off is located and ensuring it actually turns is the single greatest defense against catastrophic indoor flooding.
Quick Fixes That Are Not Worth the Risk
Certain shortcuts pose safety hazards or guarantee structural damage that far outweighs any short-term savings. Never use an open flame or a propane torch to thaw frozen bathroom pipes behind walls, as this is a leading cause of residential house fires. Similarly, never attempt to clear a main sewer line blockage using makeshift coat-hanger wires or unrated chemical reactions, and always call a licensed professional when dealing with active pipe bursts or sewage backups.
DIY or Call a Plumber? Clear Red Flags
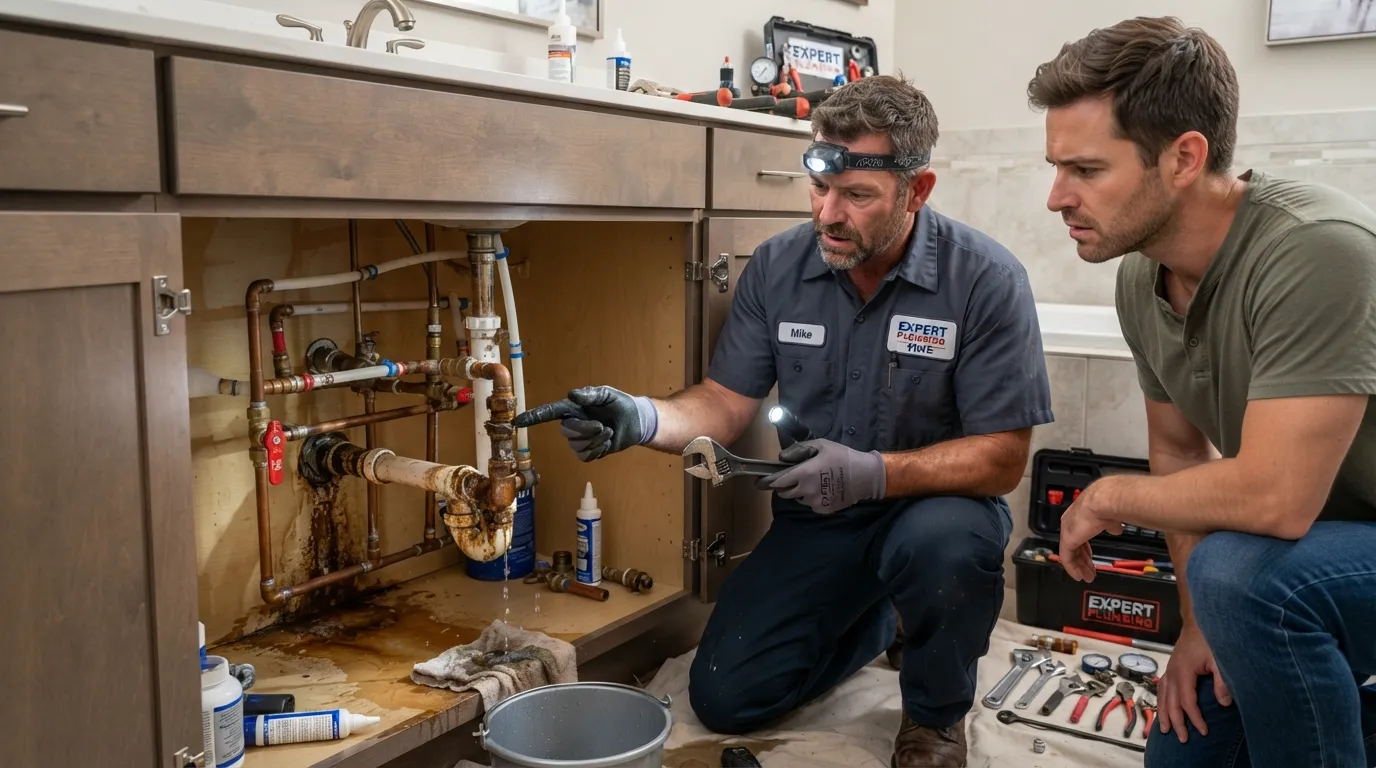
Knowing when to roll up your sleeves for a weekend fix and when to call in professional reinforcement is the ultimate dividing line between a successful home repair and an expensive indoor flood. Understanding your limits protects your property, your budget, and your safety.
Bathroom Plumbing Tasks You Can Safely Do Yourself
Certain low-risk maintenance tasks are well-suited for handy homeowners equipped with basic tools and a bit of patience.
Replacing a worn toilet flapper or adjusting chain tension.
Cleaning mineral scale off faucet aerators and showerheads with white vinegar.
Snaking a localized hair clog from a bathroom sink or tub P-trap using a plastic zip tool.
Reapplying fresh silicone caulk around your tub rim, sink basin, or toilet base.
Swapping out flexible supply lines using standard hand-tight plus quarter-turn guidelines.
Red Flags That Mean You Should Call a Licensed Plumber
Attempting advanced repairs without professional training or specialized diagnostic equipment often leads to compounded disasters. Reach for the phone and hire a emergency plumber immediately if you encounter any of the following warning signs:
Unexplained water stains or peeling paint on ceilings directly beneath upstairs bathrooms.
Multiple plumbing fixtures backing up simultaneously, indicating a main sewer line blockage.
Persistent, unidentifiable sewer gas odors lingering in the bathroom.
Complete loss of hot water or erratic temperature fluctuations.
Loud hissing sounds behind walls or violent pipe-hammer shocks.
Sudden, severe water pressure loss across the entire bathroom.
Extensive mold growth on walls or baseboards pointing to hidden moisture intrusion.
A main water shut-off or angle stop valve that refuses to close or begins leaking from the stem.
The Cost of an Overconfident DIY: Field technicians frequently share stories of homeowners who tried to force a seized angle stop with a heavy pipe wrench, snapping the brass stem flush against the wall. By the time the main water line was finally located, thousands of gallons had flooded the vanity, warped the hardwood flooring, and leaked through the ceiling into the downstairs living room. Knowing when to stop saves you from a catastrophic repair bill.
Plumbing Emergencies: What to Do While You Wait
When a sudden plumbing failure strikes, acting quickly and methodically minimizes water damage before professional help arrives.
Shut Off the Water: Immediately close the fixture’s local angle stop valve, or turn off your home’s main water shut-off valve.
Protect Electrics: If water is pooling near electrical outlets, light switches, or power strips, safely shut off the main circuit breaker to prevent electrocution hazards.
Document the Damage: Take clear photos and videos of the affected areas from multiple angles before cleanup begins, as these records are invaluable for home insurance claims.
How Often Should a Professional Inspect Your Plumbing?
Preventive maintenance is the single most effective way to avoid emergency repair bills. Industry standards recommend scheduling a comprehensive plumbing inspection every two years for newer homes, and annually for older properties with aging infrastructure.
Note for property managers and commercial facilities: Commercial restrooms endure heavy, multi-user traffic that accelerates wear on flush valves, seals, and drainage lines. Implementing a structured maintenance routine through specialized commercial plumbing partners prevents unexpected downtime and tenant complaints.
When you encounter complex issues that require expert intervention, book a plumber to ensure the job is diagnosed, repaired, and guaranteed to code.
What Neglect Costs: Maintenance vs Repair
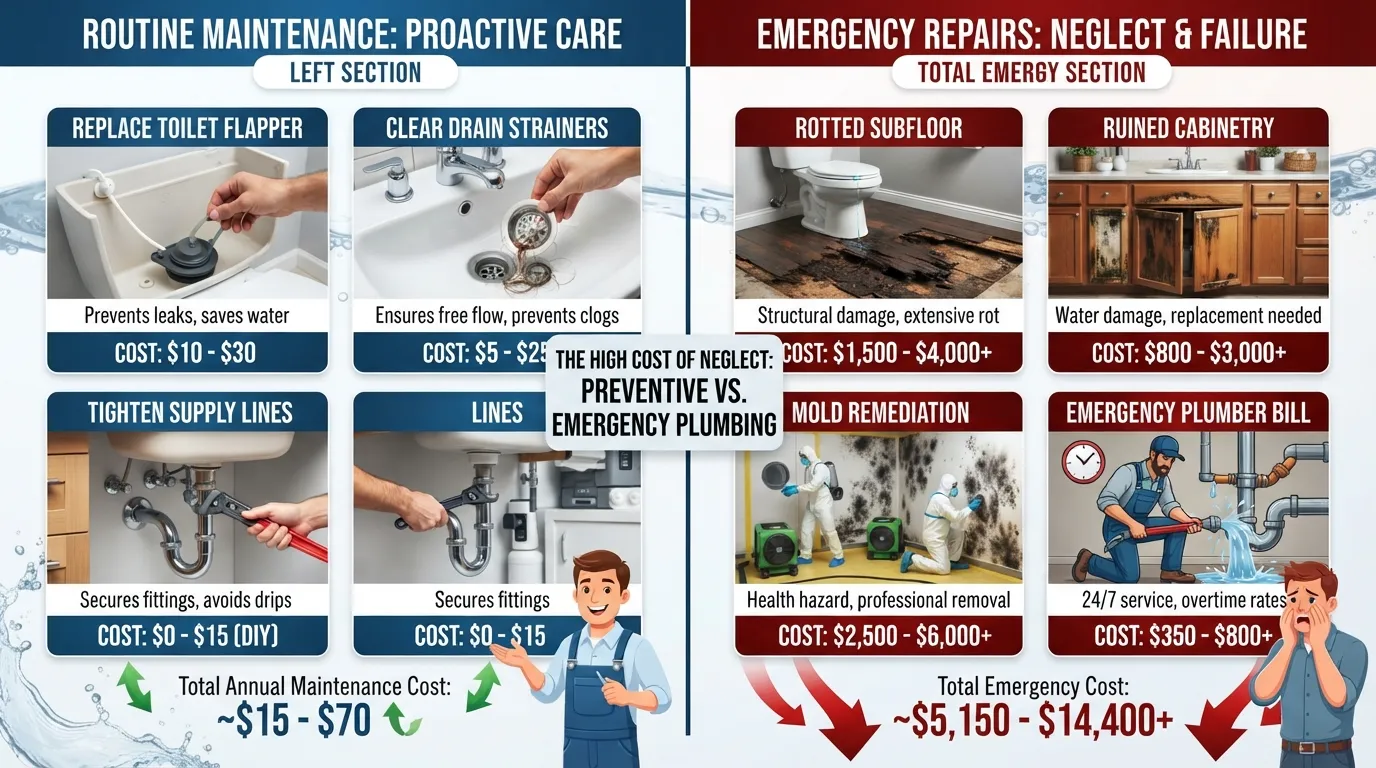
Understanding the financial reality of property upkeep reveals why proactive maintenance is always cheaper than emergency restoration. Neglecting minor plumbing issues shifts expenses from affordable preventive care to major structural renovations.
How Small Leaks Turn Into Big Bills
What begins as an inexpensive fix often compounds into multi-thousand-dollar damage when left unaddressed. A slow under-sink leak or hairline pipe crack allows moisture to accumulate steadily within enclosed spaces. Over time, constant dampness warps wooden vanity cabinets, rots subfloor framing, and triggers toxic mold growth that requires costly professional remediation.
Maintenance Cost vs Emergency Repair Cost
Investing in routine plumbing upkeep requires minimal upfront expense compared to the staggering cost of emergency intervention. Replacing a worn toilet flapper, clearing a slow drain, or installing a braided supply line typically costs between $5 and $50 in parts. By contrast, emergency plumbing repairs, water extraction, and structural restoration frequently run into thousands of dollars for a single incident.
Does Homeowners Insurance Cover Plumbing Leaks?
Home insurance policies generally cover sudden and accidental water damage—such as a burst supply line or a failed water heater tank that floods a room. However, standard policies consistently exclude damage caused by gradual wear and tear, lack of maintenance, or neglected slow leaks. Homeowners should review their specific policy wording, understand their deductible, and maintain thorough records of routine plumbing maintenance to support potential claims.
Bathroom Plumbing Maintenance FAQs
Quickly answering the most common questions about bathroom upkeep helps you resolve minor concerns before they escalate into costly repairs. Each answer provides a direct solution followed by a practical tip.
What do plumbers recommend to keep drains clean?
Plumbers recommend installing fine mesh hair strainers and flushing drains weekly with boiling water to dissolve minor soap accumulation. Always avoid pouring grease or heavy oils down any bathroom sink or tub drain.
How often should you do bathroom plumbing maintenance?
Homeowners should perform a quick visual and tactile inspection of all fixtures, supply lines, and shut-off valves every month. Schedule a comprehensive professional plumbing evaluation every two years for newer homes and annually for older properties.
What do plumbers say about baking soda and vinegar?
Plumbers view a half-cup of baking soda followed by warm vinegar as a safe, natural way to freshen drains and break down light organic buildup. Never rely on this fizzy mixture to clear severe hair clogs or hardened pipe blockages.
What are the most common plumbing mistakes to avoid?
The most frequent and damaging mistake is flushing wet wipes—even those labeled flushable—which quickly cause major main-line blockages. Always stick to human waste and toilet paper exclusively.
How can homeowners prevent plumbing emergencies with regular maintenance?
Homeowners can prevent emergencies by testing their water meter monthly for silent leaks, replacing flexible supply lines every five years, and knowing how to shut off the main water valve. Keeping your system monitored eliminates surprise indoor floods.
How do I know if my toilet is leaking?
You can easily check for a silent toilet leak by placing a few drops of dark food coloring inside the tank and waiting ten minutes without flushing. If colored water seeps into the bowl, your flapper is leaking and needs immediate replacement.
Can I use drain cleaner in my bathroom sink?
Plumbers strongly advise against using harsh chemical liquid drain openers because they generate intense heat that cracks PVC pipes and ruins rubber seals. Always opt for mechanical snaking or natural enzyme cleaners instead.
How long does bathroom plumbing last?
Standard copper and high-grade PEX supply lines typically last between 40 and 50 years, while brass fixtures and toilet internal components usually require replacement every 5 to 10 years. Routine inspections help catch failing components long before they burst.
Keep Your Bathroom Plumbing Trouble-Free
Staying proactive with regular upkeep is the most effective way to protect your home from unexpected leaks, water damage, and costly emergency repairs. Implementing these bathroom plumbing maintenance tips ensures your fixtures operate efficiently for years to come.
Consistent preventive maintenance forms the backbone of a healthy home plumbing system. Review your shut-offvalves and supply lines monthly, check your water meter regularly for silent leaks, and address slow drains or dripping faucets immediately before minor issues escalate into major structural problems.
Need Help? Our Licensed Plumbers Can Inspect Your Bathroom Plumbing
If a plumbing challenge proves too complex or you simply prefer professional peace of mind, our experienced service team is ready to assist. Schedule a thorough professional plumbing inspection today to catch hidden vulnerabilities early.
Ready to get started? Book your plumbing service to secure expert care backed by decades of hands-on local experience.
Main Services
Related Posts
Need a Plumber in Miami?
Schedule service online or speak directly with the EZ Plumbing team.
Owner-Led Local Service
Know who is behind the business before you request service. The owners, contact line and Miami service pages are published clearly.
- Named business owners
- Direct phone and social channels
- Local Miami service information
Clear Help Before You Book
Review the relevant service page, contact the team directly and use the booking page when you are ready—without relying on vague claims.
- Service-specific information
- Direct questions before scheduling
- Clear online booking route