
Bathtub Plumbing: What Every Homeowner Should Know
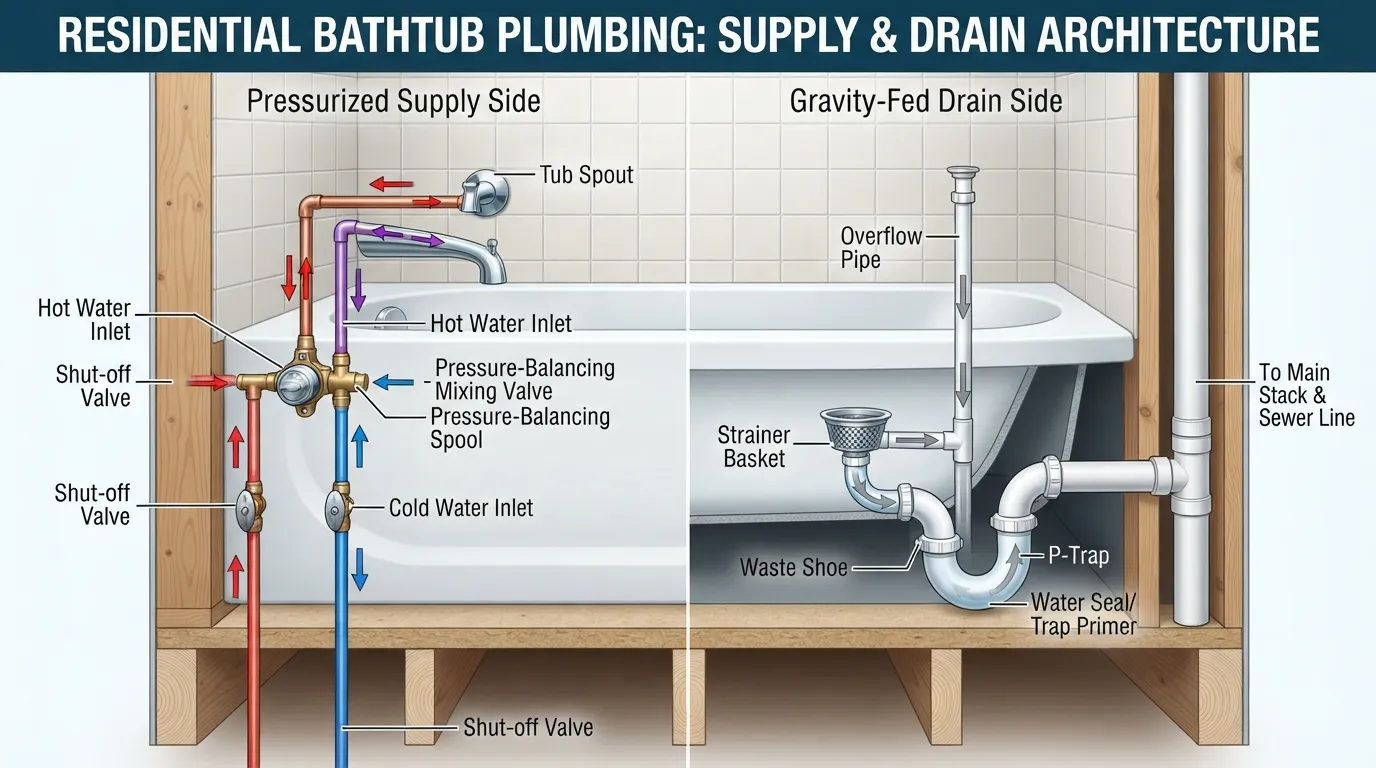
Bathtub Plumbing at a Glance: The Complete Overview
Bathtub plumbing is a dual-system mechanical network comprising a supply side that delivers pressurized hot and cold water through a mixing valve and spout, and a drain side that safely removes wastewater using gravity via a strainer, overflow pipe, and P-trap.
In This Guide You Will Learn
How the bathtub supply and drainage systems work together seamlessly.
The primary structural components, including mixing valves, P-traps, and vent pipes.
Common bathtub plumbing failures, such as slow drains, hidden leaks, and valve cartridge wear.
Routine maintenance checklists to prevent costly water damage.
Clear criteria for deciding when a DIY repair is safe versus when to call a licensed plumber.
Key Takeaways
What to check yearly: Inspect caulking around the tub rim, test the overflow gasket seal, and check the shutoff valves for corrosion.
Top 3 causes of leaks: Worn-out cartridge mixing valves, degraded PVC/ABS drain gaskets, and loose overflow faceplates.
When to call a professional: For behind-the-wall supply line bursts, structural subfloor water damage, or complex main stack venting issues.
Author: Marcus Vance, Master Plumber & Lead Technical Editor
Reviewed by: Sarah Jenkins, C.E.T., Senior Building Inspector
Last Updated: October 2026
How Bathtub Plumbing Works: From Supply Line to Sewer
Bathtub plumbing operates through a continuous two-way mechanical cycle. Clean, pressurized water flows from the municipal source or well pump into the water heater and up through the main water line to fill the tub. Simultaneously, used wastewater relies on gravity drainage to drop from the tub basin through the drain, overflow, and P-trap, exiting safely into the home’s branch drain, main drain stack, and sewer system.
The Supply Side: How Hot and Cold Water Reach Your Tub
Hot and cold water lines branch off the home’s main pressurized plumbing system, controlled upstream by local shut-off valves for maintenance safety.
When a homeowner opens the handle, pressurized water flows directly into the mixing valve hidden behind the wall.
The mixing valve blends the hot and cold streams to reach the desired temperature before routing the water outward.
Water travels upward or downward through internal pipes to exit the spout or divert into a showerhead.
The Drain Side: How Wastewater Leaves the Tub
Unlike the pressurized supply side, bathtub drainage is entirely non-pressurized and depends strictly on gravity and proper pipe sloping.
Water exits the tub floor through the strainer and enters the shoe and waste tee assembly.
The overflow drain acts as a critical safety backup, capturing water that reaches the upper rim and redirecting it downward into the waste line.
All wastewater drops through a water-sealed P-trap, which holds standing water to block hazardous sewer gases from entering the living space.
Why Venting Matters
Every bathtub drain system requires a dedicated vertical vent connected downstream of the P-trap to introduce atmospheric air into the pipes. Without proper venting, rushing wastewater creates negative vacuum pressure that can siphon water out of the P-trap, allowing foul odors and sewer gases to escape into the home.
Bathtub Plumbing System Architecture
1. Supply Side (Pressurized Clean Water)
[MUNICIPAL / WELL WATER]
│
▼
[Main Water Line] ──> [Shut-Off Valves] ──> [Water Heater] (Hot Side)
│
▼
[Mixing Valve] (Blends Temp)
│
▼
[Tub Spout]
2. Drain Side (Gravity-Fed Wastewater)
[Bathtub Basin] ──> [Drain / Strainer] ──> [Waste & Overflow Tee]
│ │
│ (Overflow Backup) ▼
└──────────────────────────────────> [P-Trap (Water Seal)]
│
▼
[Branch Drain]
│
▼
[Main Drain Stack & Vent] ──> [Sewer / Septic]
The Supply Side: Faucet, Valve, Spout and Diverter Explained
The bathtub supply network delivers pressurized clean water into the bathroom, regulating temperature and directing flow between the tub spout and showerhead. Every component works under continuous pressure, making proper material selection and periodic maintenance essential to prevent leaks behind finished walls.
Hot and Cold Supply Lines
Hot and cold lines deliver pressurized clean water from your home’s main supply and water heater directly to the tub valve. These lines are typically constructed from copper, PEX, or CPVC piping. If you experience sudden temperature inconsistencies or total loss of hot water, a failing component in your water heater service system is often the underlying root cause.
Hot water line: Connects the water heater outlet to the left port of the mixing valve, delivering heated water up to 120°F or higher.
Cold water line: Routes fresh water straight from the main supply or water meter to the right port of the mixing valve.
Stub-outs: Short pipe sections that connect the concealed supply lines directly to the visible trim and spout fittings.
Mixing Valve and Faucet Cartridge
The mixing valve serves as the hydraulic heart of the bathtub, blending incoming hot and cold streams to achieve your desired water temperature. Inside this brass body sits a replaceable faucet cartridge that regulates water volume and mix ratio. Over time, hard water mineral deposits and constant friction wear down the internal rubber O-rings, leading to stubborn dripping or temperature calibration failure.
Pressure-balancing capability: Modern mixing valves automatically adjust to pressure drops (like when a toilet flushes) to prevent scalding.
Cartridge wear signs: Persistent leaks from the spout, handles that feel stiff or loose, and inability to lock in a stable water temperature.
Replacement ease: Most modern single-handle cartridges can be easily extracted using a cartridge puller tool after shutting off the water supply.
Tub Spout and Diverter
The tub spout projects water into the basin during standard filling, but integrated diverters allow users to redirect that stream upward. When you pull up a knob or flip a lever on the spout, a small internal gate blocks the forward exit, forcing pressurized water up through the vertical shower arm and out of the showerhead.
Standard spout: Mounts directly onto a copper stub-out pipe via a set screw or threaded connection.
Diverter mechanism: Common types include pull-up gates, push-buttons, and rotating diverter levers located on the faceplate or spout.
Failure indicator: Water leaking simultaneously from both the spout and showerhead usually indicates a worn-out or mineral-clogged diverter valve.
Shut-Off Valves
Local shut-off valves allow you to isolate the bathtub plumbing for repairs without turning off water to the entire house. While some modern custom installations feature dedicated access panels with integral service stops behind the tub wall, many older homes require shutting off the main water supply valve in the basement or utility room.
Location: Look for access panels behind the tub wall, in the basement ceiling underneath the bathroom, or near the main water meter.
Homeowner importance: Knowing how to quickly shut off water supply prevents minor cartridge leaks from escalating into catastrophic structural flooding.
Maintenance: Test shut-off valves annually by turning them completely off and on to prevent mineral seizure.
Quick Reference Table: Bathtub Supply Components
| Part Name | What It Does | Common Failure Sign |
| Hot/Cold Supply Lines | Transports pressurized clean water to the valve | Pipe corrosion, joint leaks, or mineral blockage |
| Mixing Valve & Cartridge | Regulates flow rate and blends water temperatures | Continuous dripping, handle stiffness, or fluctuating temps |
| Tub Spout & Diverter | Directs water into the tub or up to the showerhead | Water leaking out of the spout while showering |
| Shut-Off Valves | Isolates water flow for maintenance and emergencies | Valve stuck in place or weeping around the packing nut |
The Drain Side: Strainer, Overflow, P-Trap and Vent
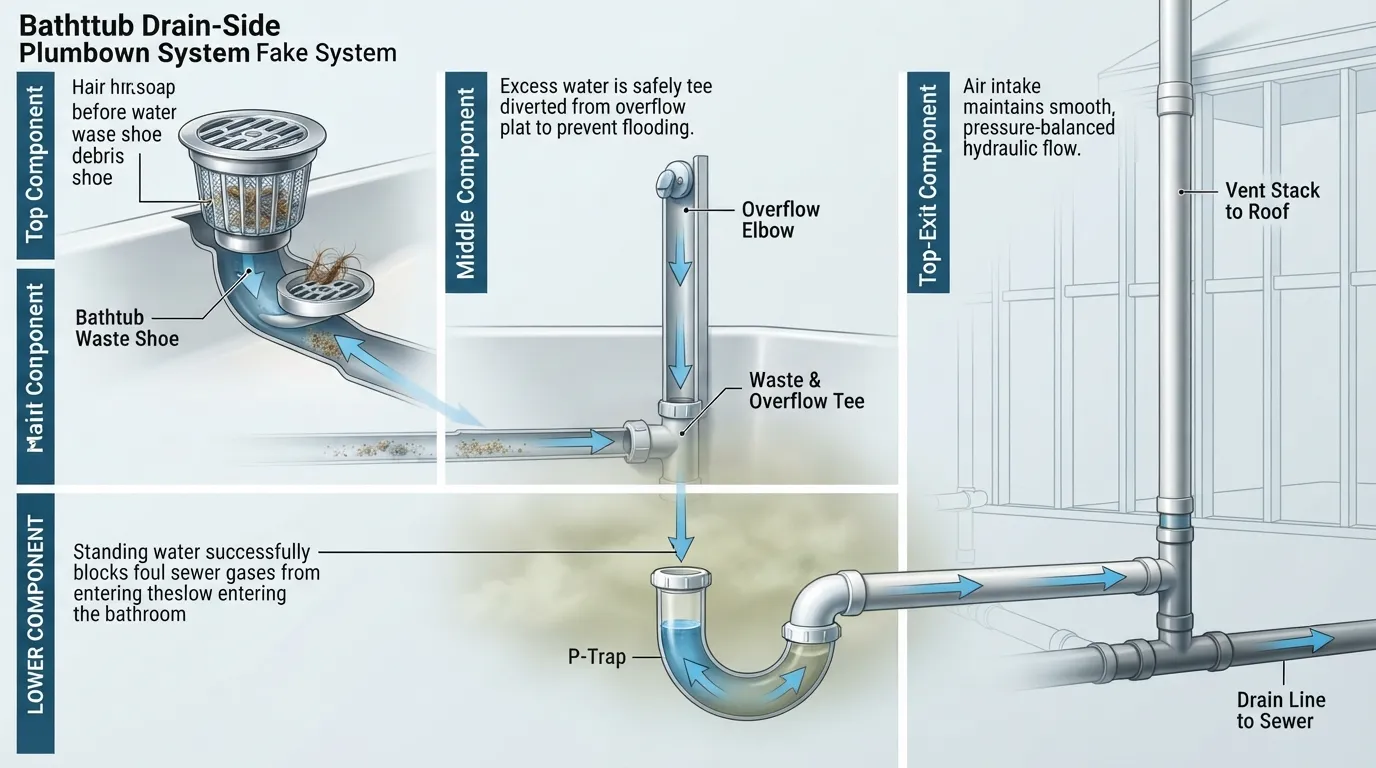
The bathtub drainage system relies entirely on gravity and precise hydraulic venting to remove wastewater quickly while safely sealing out hazardous sewer gases. Unlike pressurized supply lines, drain components operate at atmospheric pressure, making proper pipe slope and air balance essential for smooth performance.
Drain Assembly and Strainer
The drain assembly begins at the bottom of the tub basin with a metal or PVC strainer that blocks hair and large debris from entering the plumbing. Below the strainer sits the tub shoe, an elbow fitting that connects the tub floor directly to the horizontal and vertical drain pipes via a tailpiece and the waste and overflow kit.
Strainer role: Filters out solid debris while allowing wastewater to flow freely into the drain opening.
Tub shoe & tailpiece: The primary transition fitting and vertical pipe section channeling water downward toward the P-trap.
Maintenance tip: Regularly unscrew the strainer basket to clear accumulated hair clogs that cause slow draining.
Overflow Pipe: The Flood-Prevention Safety Feature
The overflow pipe serves as a critical safety feature positioned near the top rim of the bathtub. If a homeowner leaves the water running unattended or fills the tub past capacity, excess water spills through the decorative overflow faceplate and drops directly into the waste tee, bypassing the tub floor drain.
Flood prevention: Prevents catastrophic bathroom overflows by diverting excess water down the drainage stack.
Connection integrity: Connects via a hidden PVC or brass tube behind the wall down to the main waste tee fitting.
Gasket check: A deteriorated rubber gasket behind the overflow faceplate is a common hidden source of slow water damage during baths.
P-Trap: Why It Holds Water and Blocks Sewer Gas
The P-trap is a U-shaped bend located underneath or immediately below the bathtub floor. By design, this trap constantly retains a small volume of standing water (known as the trap seal) after every use, creating an airtight liquid barrier that prevents toxic sewer gas and foul odors from venting up into the bathroom.
Trap seal function: Blocks methane, hydrogen sulfide, and sewer odors from entering the living space.
Debris catch: Heavy objects like wedding rings or coins that slip down the drain often get trapped at the bottom curve of the P-trap.
Gurgling symptoms: A gurgling sound coming from the drain usually indicates improper air pressure or a partially blocked vent pulling water out of the trap seal.
Vent Pipe: Why Your Tub Needs Air to Drain Properly
Every bathtub drain requires a dedicated vertical vent stack that extends upward through the roof of the home. This vent introduces atmospheric air into the drainage system behind the P-trap, equalizing air pressure as heavy slugs of water rush downward. Without this air supply, rushing water creates a vacuum that causes violent siphoning, sucking the water right out of the P-trap and letting sewer gases flood the room.
Air pressure balance: Ensures smooth, rapid gravity drainage without choking or air-locking the pipes.
Preventing siphoning: Maintains the protective P-trap water barrier during heavy multi-fixture household usage.
Multi-fixture warnings: If a single tub drain gurgles when you flush a toilet or run another fixture, or if multiple fixtures begin backing up simultaneously, it can indicate a vent blockage or a severe sewer line problem requiring immediate professional attention.
Waste and Overflow Kit, Gaskets and Tub Shoe
Behind the bathtub wall lies the interconnected plumbing skeleton known as the waste and overflow kit. This assembly is built from schedule 40 PVC, ABS, or soldered brass pipes held together with compression fittings and rubber gaskets.
Kit components: Includes the overflow tube, waste tee, shoe elbow, and connecting slip-joint or glued pipes.
Gasket failure: Neoprene and rubber gaskets compress and dry out over a 10-to-15-year lifespan, resulting in hidden leaks underneath the tub.
Alignment precision: Components must be aligned with exact vertical and horizontal slopes to prevent standing water pooling inside the waste line.
Access Panel: Where to Look Behind the Tub
An access panel is a small removable door or hatch—typically located in a hallway closet, adjacent bedroom wall, or directly behind the tub faucet wall—that grants entry to the hidden mixing valve and drain connections.
Diagnostic value: Allows plumbers and homeowners to inspect valve cartridges, supply lines, and waste tees without cutting into drywall or tile.
Retrofit options: If your home lacks an access panel behind the tub, installing one during a remodel drastically simplifies future leak repairs.
Immediate check: Always inspect the access panel area first for water stains or damp subflooring when investigating unexplained bathroom water damage.
What Is the Best Type of Bathtub Drain?
Choosing the right bathtub drain and stopper mechanism depends on your preference for ease of cleaning, mechanical reliability, and bathroom aesthetics. Understanding the functional differences between available tub drain types helps homeowners select the most durable and user-friendly option for their household.
Lift-And-Turn Drain
The lift-and-turn drain stopper is operated manually by lifting the knob and rotating it a quarter or half turn to lock it in the open position. To close it, you twist it back and push down.
How it works: A threaded post screws directly into the center of the drain crossbar, holding the cap in place while allowing vertical movement.
Pros: Exceptionally simple mechanical design with no hidden linkages or springs to break.
Cons: The small set screw or threaded post can loosen over time, causing the stopper to detach or spin freely without sealing.
Clog tendency: Low-to-moderate; hair wraps easily around the exposed post beneath the cap.
Push-Pull (Toe-Touch) Drain
The push-pull or toe-touch drain is activated simply by pressing down with your toe or hand to snap it closed, and pushing it again to pop it back open.
How it works: An internal spring-loaded brass or plastic cartridge locks into position when depressed and releases upon a second downward push.
Pros: Highly convenient for hands-free operation while bathing or showering.
Cons: The internal spring mechanism can wear out, clog with soap scum, or lose tension after several years of heavy use.
Clog tendency: Moderate; the stopper mechanism sits directly in the drainage path, catching hair and debris around the stem.
Trip-Lever Drain
The trip-lever drain operates via a control handle mounted on the overflow plate on the wall of the tub rather than inside the drain itself.
How it works: Moving the lever up or down activates a gravity linkage wire or rocker arm hidden inside the overflow pipe, raising or lowering a brass plunger or weighted stopper.
Pros: Keeps the bottom drain completely open and unobstructed, eliminating a common hair-catching snag point.
Cons: The internal linkage inside the wall can slip, rust, or detach, requiring periodic manual adjustment through the overflow opening.
Clog tendency: Low at the drain basket, but hair can collect around the internal overflow plunger over time.
Plunger-Style Drain
Similar to the trip-lever system, the plunger-style drain uses a weighted cylindrical brass or rubber plunger that moves vertically inside the waste tee.
How it works: When the overflow lever is tripped, the internal plunger drops to block the path of wastewater, forcing water to stay in the tub basin.
Pros: Extremely durable construction often found in older, high-end homes with heavy cast-iron plumbing.
Cons: The plunger assembly can collect significant hair and soap buildup inside the tee, eventually blocking normal drainage.
Clog tendency: Moderate-to-high; the internal moving cylinder acts as a trap for debris inside the waste pipe.
Comparison Table: Bathtub Drain Stopper Types
| Type | How It Works | Pros | Cons | Clog Tendency |
| Lift-and-Turn | Twist and pull up to open; push down and twist to close | Simple, reliable, easy to replace DIY | Post can loosen; annoying to clean hair off post | Moderate |
| Push-Pull (Toe-Touch) | Tap with toe to toggle open or closed | Hands-free operation; very convenient | Spring mechanism can fail or collect soap scum | Moderate |
| Trip-Lever | Lever on overflow plate moves internal linkage | Unobstructed drain opening; classic look | Linkage can slip or require adjustment | Low at drain |
| Plunger-Style | Overflow lever drops a weighted cylinder inside tee | Heavy-duty brass build; long-lasting | Traps hair and debris inside the waste tee | Moderate-to-High |
Which One Should You Choose?
Choose a push-pull (toe-touch) drain if you prioritize effortless, hands-free operation and want a modern look.
Choose a lift-and-turn drain if you want maximum mechanical reliability with zero springs or hidden linkages to fail.
Choose a trip-lever system if you prefer an unobstructed bottom drain hole that makes cleaning hair out of the strainer basket as easy as possible.
Pipe Materials, Drain Size and Code Basics
Navigating the technical standards of bathtub plumbing requires understanding material compatibility, regulatory sizing constraints, and aging infrastructure requirements. Whether you are remodeling a vintage bathroom or troubleshooting slow drainage, adherence to established codes ensures long-term safety and structural protection.
Common Pipe Materials: PVC, ABS, Cast Iron, Copper, PEX, Galvanized
Plumbing networks utilize a variety of piping materials depending on the installation era, local codes, and whether the line carries pressurized supply or gravity drainage.
| Material | Used For | Typical Lifespan | Known Issues |
| PVC | Drain, waste, and vent (DWV) lines | 25–40+ years | Degraded by certain solvents; becomes brittle under prolonged direct UV exposure |
| ABS | Drain, waste, and vent (DWV) lines | 25–40+ years | Can warp under excessive sustained heat; prohibited in some commercial codes |
| Cast Iron | Main stacks and old-home drain lines | 50–100 years | Prone to interior rust scaling, root intrusion, and structural cracking over time |
| Copper | Supply lines and high-end drain runs | 50–70+ years | Susceptible to pinhole leaks from aggressive acidic water or high-velocity erosion |
| PEX | Hot and cold pressurized supply lines | 40–50+ years | Vulnerable to UV degradation if stored outdoors; requires brass/poly alloy fitting care |
| Galvanized Pipe | Older supply and main drain lines | 30–50 years | Severe internal mineral buildup (tuberculation), restricted flow, and sudden rust bursts |
Tub Drain Size and Slope Basics
According to the Florida Building Code (Plumbing), standard bathtub fixture drains must maintain a minimum diameter of 1.5 inches to handle the required drainage fixture unit (DFU) load. Furthermore, horizontal drainage piping must be installed with a uniform minimum slope of 1/4 inch per foot (a 2% grade) to ensure wastewater flows smoothly without leaving solid debris behind.
Drain diameter: 1.5 inches is the mandatory minimum size for standard residential bathtubs.
Drainage slope: A 1/4-inch drop per horizontal foot prevents standing water and minimizes sludge buildup.
Trap arm distance: The distance from the fixture trap weir to the vent opening must comply with maximum length limits to maintain hydraulic balance.
Why Every Drain Needs a Trap and Vent
Plumbing codes universally mandate that every individual plumbing fixture must feature a functional P-trap and an approved atmospheric vent connection. Without these paired elements, sewer gases enter the living area freely, and improper air pressure causes unstable drainage behavior.
Trap requirement: Retains a continuous water seal to block toxic sewer gases and pests.
Vent requirement: Introduces air behind the fixture to prevent negative pressure siphoning during heavy drainage cycles.
Code enforcement: Skipping or modifying trap-to-vent distances during DIY remodels violates building codes and risks health hazards.
Permits and When You Need Them
Minor cosmetic updates—such as replacing a tub spout trim or swapping a drain stopper—do not require local municipal permits. However, opening walls to alter supply lines, modifying the waste and overflow stack, or relocating the bathtub drain layout almost universally triggers mandatory local permits and inspections.
When required: Any structural alteration to water supply piping, main drain stacks, or trap installations.
Why it matters: Protects property resale value, ensures compliance with local building codes, and guarantees safe backflow prevention.
How to check: Always verify permit requirements with your local building department or authority having jurisdiction (AHJ) before commencing major plumbing overhauls.
Older Homes: Signs Your Pipes May Need Replacing
Homes built before the 1980s often contain aging infrastructure like galvanized steel supply lines or degrading cast-iron drain stacks that are reaching the end of their operational lifespans.
Low water pressure: Often caused by heavy mineral scaling (tuberculation) choking the interior diameter of galvanized pipes.
Frequent backing up: Chronic slow drainage or recurring toilet and tub backups point to cracked, sagging, or root-damaged cast-iron waste lines.
Discolored water: Brown or reddish tint when turning on hot water typically signals corroding interior pipe walls or a failing water heater tank.
Common Bathtub Plumbing Problems and How to Fix Them
Troubleshooting bathtub plumbing issues requires identifying specific symptoms to diagnose underlying hydraulic or mechanical failures. Addressing these common problems early prevents minor inconveniences from turning into expensive structural repairs behind your bathroom walls.
Symptom → Cause → Fix Table
| Symptom | Root Cause | Recommended Fix |
| Slow drain | Hair, grease, and soap scum buildup in the trap or shoe | Remove stopper, clear hair with a plastic zip-tool, or use professional drain cleaning services |
| Standing water | Complete hair or foreign object clog in the waste line | Plunge using an overflow-sealed plunger or snake the line via the overflow |
| Gurgling sounds | Blocked vent pipe creating negative air pressure | Inspect roof vent stack for bird nests, leaves, or obstructions |
| Sewer smell | Evaporated P-trap water seal or cracked vent pipe | Run water to refill the P-trap or inspect vent integrity |
| Low water pressure | Mineral scaling inside galvanized lines or a clogged aerator | Clean cartridge filters or replace degraded supply lines |
| No hot water | Failing water heater thermostat or mixing valve limit stop | Reset or service the water heater and inspect mixing valve settings |
| Dripping spout | Worn-out O-rings, seals, or degraded faucet cartridge | Turn off water supply and replace the worn valve cartridge |
| Water won’t switch to shower | Mineral-clogged or broken tub spout diverter gate | Clean vinegar scale from spout or replace the faulty diverter assembly |
Slow Drains and Clogs: Hair, Soap Scum and What Actually Works
Bathtub drains routinely collect a dense mesh of human hair, body oils, and sticky soap scum over months of daily use. While chemical drain cleaners promise quick fixes, harsh caustic chemicals can damage PVC pipes and corrode metal strainers over time.
Physical removal: Unscrew or pop out the drain stopper and use a flexible plastic barbed hair-snaking tool to pull out deep clumps.
Plunging technique: Fill the tub with two inches of water, cover the overflow plate tightly with a wet rag, and plunge vigorously to dislodge blockages.
When to call for help: If home snaking fails to restore normal flow or if multiple fixtures back up simultaneously, opt for professional drain cleaning to safely clear stubborn mainline restrictions.
Dripping Spout or Faucet: Worn Cartridge or Washer
A continuously dripping faucet wastes thousands of gallons of water annually and steadily stains porcelain basins. In modern single-handle fixtures, this is almost always caused by a worn plastic cartridge, while older two-handle faucets usually feature a degraded rubber washer.
Diagnostic check: Identify whether the drip occurs on the hot or cold side to determine which valve stem requires attention.
Replacement steps: Shut off the local water supply, remove the handle screw and trim, extract the old cartridge with a puller tool, and insert an exact OEM replacement.
Verification: Turn the water supply back on slowly and check for leaks while cycling the handle between full hot and full cold.
Sewer Smell From the Tub: Dry Trap vs Venting Issue
Catching a whiff of foul sewer gas near your bathtub usually means the P-trap’s protective water barrier has been compromised.
Dry P-trap cause: If a guest bathroom goes unused for weeks, the standing water inside the U-bend evaporates, allowing sewer gas to rise unchecked.
Fixing a dry trap: Simply run the bathtub faucet for 60 seconds to replenish the liquid water seal in the P-trap.
Venting issue cause: If the smell persists despite a full trap, a cracked vent pipe or negative air pressure siphoning water out during nearby flushes is likely to blame.
Gurgling Sounds: What They Mean
A gurgling bathtub drain is a classic warning sign of trapped air trying to escape through the plumbing system. When a slug of water rushes down a main stack without proper venting, it pulls air through the closest fixture trap, creating bubbling noises.
Minor restriction: A localized partial clog in the branch drain can trap air pockets that bubble up as the water drains.
Vent blockage: Leaves, ice, or debris lodged in the exterior roof vent stack choke off essential atmospheric airflow.
Verification: Pour a bucket of water directly into the tub; if it drains sluggishly and gurgles loudly, inspect the roof vent stack for clear airflow.
Low Water Pressure or Temperature Swings
Inconsistent water flow or sudden scalding surges during a shower point directly to supply-side bottlenecks or failing pressure-balancing valves.
Mineral scaling: Hard water calcium deposits build up inside supply pipes and showerheads over time, restricting volume.
Pressure-balancing spool: Modern mixing valves feature a spool that slides to balance hot and cold pressure; if it jams with debris, temperature control fails.
Verification: Remove the showerhead and run water to see if flow improves, indicating a clogged faceplate rather than a supply-line restriction.
How to Spot Hidden Bathtub Leaks Before They Cause Damage
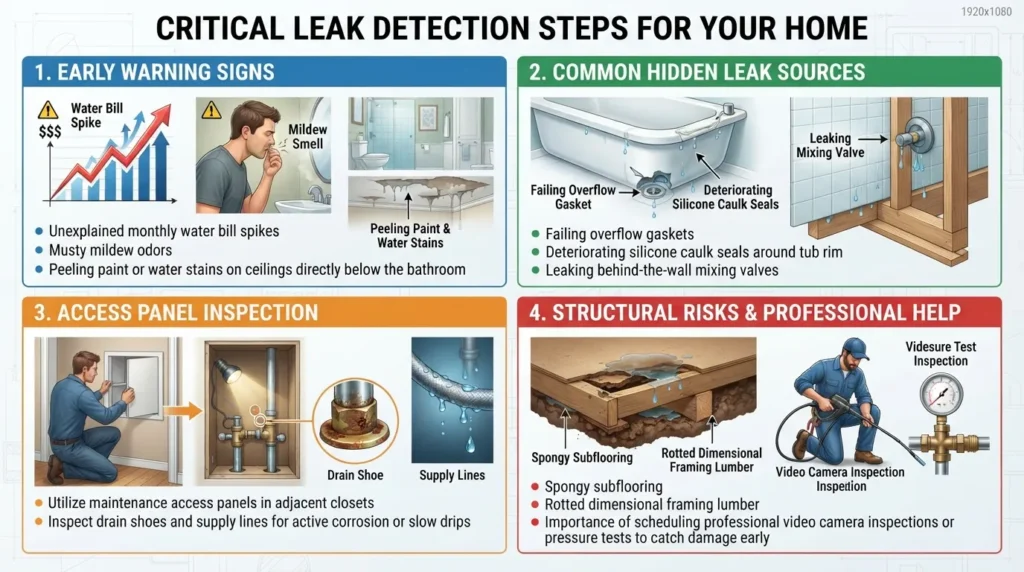
Bathtub leaks often develop slowly behind walls and underneath subfloors, remaining invisible until significant structural damage has occurred. Detecting these failures early preserves your home’s integrity and prevents expensive remediation projects. If you suspect a hidden leak? Ensure you invest in professional leak detection and repair services before rot compromises your framing.
Early Warning Signs
Subtle indicators in your home often point to a chronic water leak long before a puddle appears on the bathroom floor. Staying vigilant to these early symptoms saves thousands in structural repairs.
Water bill spike: An unexplained increase in your monthly water bill without a change in household usage often indicates a concealed pipe leak.
Ceiling stains below: Yellowish rings or peeling paint on the ceiling directly underneath a second-floor bathroom signal a waste gasket or supply leak.
Soft flooring: Spongy or yielding subflooring around the perimeter of the tub indicates prolonged moisture exposure.
Musty smells and mold: Persistent damp odors or black mold growth along baseboards and adjacent drywall point to trapped chronic humidity.
Loose or cracked tiles: Grout breakdown and loose tiles around the tub rim happen when water infiltrates the wall backing board.
Where Bathtub Leaks Usually Start
Understanding the most vulnerable junctures in your bathtub plumbing allows you to target your inspections effectively.
Failed caulk and grout: Deteriorated silicone seals allow shower spray to seep directly into framing studs behind the tile.
Worn drain gasket: The neoprene rubber gasket behind the overflow faceplate shrinks and cracks over time, leaking every time the tub is filled.
Loose supply connections: Threaded fittings and soldered joints behind the mixing valve can weep slowly under constant line pressure.
Tub shoe assembly: The slip-joint washer beneath the tub drain can loosen due to thermal expansion and contraction.
How to Check the Access Panel Safely
An access panel is your best tool for inspecting hidden plumbing without tearing out drywall.
Locate the panel: Check closets, hallways, or adjacent rooms sharing a wall with your bathtub mixing valve.
Visual inspection: Shine a high-powered flashlight inside to examine the mixing valve, supply lines, and waste tee for mineral crust or active dripping.
Moisture verification: Use a digital pinless moisture meter on the surrounding drywall to detect hidden dampness behind the partition.
Simple Overflow and Drain Leak Test
Testing your tub’s drainage integrity takes only a few minutes and can catch failing gaskets before they flood your subfloor.
Plug and fill: Insert the bathtub stopper and fill the basin past the overflow plate level, then inspect the access panel for leaks.
Overflow gasket check: If water drips from the waste tee only when the water level reaches the overflow opening, replace the overflow gasket immediately.
Verification: Dry all components thoroughly, run water for two minutes, and verify that all joints remain completely bone dry.
Why Small Leaks Become Expensive
Even a minor drip that releases just a few ounces of water a day creates a micro-environment for destruction.
Subfloor rot: Continuous moisture softens plywood and dimensional lumber, compromising the structural load-bearing capacity of the bathroom floor.
Toxic mold growth: Organic materials like drywall paper and wood framing foster hazardous mold colonies within 24 to 48 hours of wetting.
Pest attraction: Damp wood and moist environments attract termites, carpenter ants, and wood-boring beetles, compounding property damage.
Bathtub Plumbing Maintenance Checklist for Homeowners
Proactive preventive plumbing care prevents unexpected leaks, foul odors, and slow drains. Implementing a structured maintenance schedule protects your fixtures and extends the lifespan of your entire bathroom drainage and supply network.
Monthly Checks
Performing quick monthly checks catches developing hair clogs, slow drainage, and minor valve leaks before they turn into costly household emergencies.
Strainer cleaning: Remove the drain stopper and clear accumulated hair and soap scum from the hair catcher or strainer basket.
Drain speed test: Fill the tub basin and observe how rapidly the water drains once the plug is pulled to spot early restrictions.
Visual drip inspection: Check the visible spout, handles, and adjacent floor area for any sign of moisture or mineral weeping.
Yearly Checks
An annual inspection of caulking, hidden access points, and shut-off valves ensures your bathroom infrastructure remains watertight and reliable.
Caulk and grout inspection: Examine the silicone seal around the tub rim and tile line; reapply caulk immediately if cracking or separation appears.
Access panel review: Open the service panel and inspect the waste tee, overflow gasket, and mixing valve connections for dampness or crust.
Shut-off valve test: Turn the hot and cold water supply shut-off valves off and on once a year to prevent them from seizing up over time.
Can You Pour Boiling Water Down a Tub Drain?
No, you should never pour boiling water down a bathtub drain if your home has PVC pipes or older plastic plumbing. While boiling water can safely melt grease in metal kitchen pipes, pouring water at or near $100\text{°C}$ ($212\text{°F}$) into a bathtub drain can warp or soften Schedule 40 PVC pipes, compromise solvent-welded joints, and crack older porcelain or acrylic tub basins. Instead of boiling water, use a mechanical hair snake, a wet-dry vacuum, or a silicone plunger to clear clogs safely.
Why Mild or Enzyme Cleaners Beat Harsh Chemical Openers
Commercial liquid drain cleaners promise instant results, but their heavy acid or lye formulas cause severe long-term damage to residential plumbing systems.
Material protection: Harsh chemicals generate extreme exothermic heat that can melt plastic pipes and corrode metal strainers or P-traps.
Biological action: Enzyme-based cleaners use safe, natural bacteria cultures to actively digest organic hair, oils, and soap scum without damaging pipe walls.
Safety benefits: Choosing enzyme cleaners eliminates the risk of toxic chemical splashes or dangerous reactions if you later need to use a drain snake.
Printable Maintenance Checklist Table
| Maintenance Task | How Often | Time Needed |
| Clean hair catcher & strainer | Monthly | 5 minutes |
| Test drain speed & water flow | Monthly | 2 minutes |
| Inspect caulk and tile grout | Yearly | 15 minutes |
| Check access panel / connections | Yearly | 10 minutes |
| Exercise water shut-off valves | Yearly | 5 minutes |
DIY or Call a Plumber? A Practical Decision Guide
Knowing when to tackle a bathroom fix yourself and when to call a professional is essential for preventing accidental property damage and costly plumbing mistakes. While simple cosmetic adjustments are ideal for weekend DIYers, deep structural, waste-stack, and pressurized supply failures require the expertise of a licensed plumber.
Safe DIY Tasks
Homeowners can safely perform routine maintenance and minor part replacements without special trade licenses, provided they take proper precautions and shut off local water lines when necessary.
Cleaning the strainer: Removing hair, soap scum, and debris from the drain basket monthly.
Re-caulking the tub rim: Scraping away old, moldy silicone and applying a fresh waterproof bead around the tub edge.
Replacing a drain stopper: Swapping out a worn lift-and-turn or toe-touch stopper assembly.
Using a drain snake: Clearing localized hair clogs within the immediate P-trap using a flexible plastic zip-tool or hand crank.
Jobs to Leave to a Licensed Plumber
Attempting advanced plumbing repairs without professional tools or training often leads to cracked pipes, hidden water damage, and code violations. Leave these tasks to the experts:
Hidden leaks: Investigating wall moisture, unexplained water bill spikes, or subfloor rot.
Valve and cartridge replacement: Soldering copper lines or replacing deep wall-mounted mixing valves.
Drain stack replacement: Modifying or repairing main waste and overflow lines made of cast iron or PVC.
Vent stack problems: Fixing roof vent blockages or rerouting plumbing vent runs.
Repeated clogs: Resolving chronic main line blockages that resist standard plunging and snaking.
Persistent sewer gas smells: Diagnosing cracked vent pipes or compromised trap seals behind walls.
Decision Table: Problem | DIY Possible? | Why / Risks
| Problem | DIY Possible? | Why / Risks |
| Clogged drain strainer | Yes | Simple physical removal; no pipe disassembly required. |
| Cracked/peeling caulk | Yes | Surface-level cosmetic fix with minimal risk of water damage. |
| Stuck drain stopper | Yes | Most stoppers unscrew or unclip easily by hand. |
| Leaking overflow gasket | Moderate | Accessible via the access panel, but improper alignment causes hidden leaks. |
| Dripping faucet cartridge | Moderate | Requires shutting off water and matching exact OEM parts. |
| Behind-the-wall leak | No | Requires cutting drywall, pipe cutting, and professional soldering. |
| Sewer gas smell | No | Involves structural vent stack testing or main line inspection. |
| Mainline backup | No | Requires heavy motorized augers and camera inspection equipment. |
When It’s an Emergency
Certain plumbing failures require immediate, emergency intervention to prevent severe structural destruction, electrical hazards, or hazardous health conditions in your home. If you encounter an active crisis, shut off your main home water supply immediately and contact an emergency plumber right away.
Unstoppable water flow: A broken supply line or valve that cannot be closed manually.
Sudden ceiling collapse or heavy staining: Active water saturation pouring through a ceiling directly below the bathroom.
Sewage backup: Wastewater or raw sewage backing up into bathtubs, showers, or floor drains.
Broken shut-off valves: Main water valves that spin freely, leak profusely, or fail to stop incoming water pressure.
Ready to secure expert assistance for your bathroom project? Explore our plumbing services to learn more about our comprehensive diagnostic and repair capabilities, or book a plumbing appointment online today for fast, reliable professional service.
How Much Does Bathtub Plumbing Repair Cost?
Understanding expected plumbing costs helps homeowners budget effectively and evaluate professional quotes with confidence. While minor cosmetic fixes cost very little in parts, professional service fees reflect specialized labor, diagnostic expertise, and code-compliant installation standards.
Typical Cost Ranges Table
| Service / Repair Type | Typical Price Range | What’s Usually Included |
| Tub drain replacement | $200 – $700 | Removing old waste-and-overflow assembly, installing new drain shoe and stopper |
| Faucet cartridge replacement | $100 – $350 | Shutting off water, extracting worn valve cartridge, installing OEM replacement part |
| Leak repair (accessible) | $150 – $600 | Locating and repairing visible slip joints, supply lines, or loose gaskets |
| Drain cleaning (snaking) | $150 – $400 | Clearing stubborn hair and soap scum blockages via the drain or overflow |
| Valve replacement (behind wall) | $450 – $1,200+ | Opening drywall access, cutting/soldering old pipes, installing a new pressure-balancing valve |
What Affects the Price
Several variables influence total project quotes when hiring a professional plumber for bathtub repairs:
Access behind the wall: If a mixing valve or main drain line needs replacement without an existing access panel, cutting and patching drywall adds to the labor cost.
Pipe material: Older homes with cast-iron stacks or corroded galvanized steel require specialized cutting and transition couplings, increasing labor time compared to PVC or PEX.
Tub type: Standard alcove tubs offer straightforward access, whereas freestanding tubs or custom jetted whirlpool tubs often demand complex floor or platform modifications.
Labor rates: Regional differences in cost-of-living and licensing requirements dictate professional service call fees and hourly rates.
Permits: Major plumbing overhauls—such as relocating waste lines or installing new pressure-balancing valves—may require local municipal permits and inspection fees.
Repair vs Replace: How to Decide
Deciding whether to repair an aging component or replace the entire fixture depends on the age, condition, and long-term reliability of the system.
Repair when: The fixture is under 10 years old, parts are easily sourced from the manufacturer, and the failure is isolated to a single replaceable part like a cartridge or gasket.
Replace when: Multiple components show advanced corrosion, matching replacement parts are discontinued, or recurring leaks threaten your subfloor and structural framing.
Why Early Repairs Cost Less
Delaying minor bathtub repairs almost always turns an inexpensive service call into a major renovation expense. A $200 drain gasket replacement or a $150 cartridge swap takes a professional less than an hour. Left unaddressed, that same slow leak will saturate subfloor plywood, rot dimensional lumber framing, foster toxic mold colonies, and trigger thousands of dollars in structural restoration.
Bathtub Plumbing in Miami and Florida Homes: What Local Homeowners Should Know
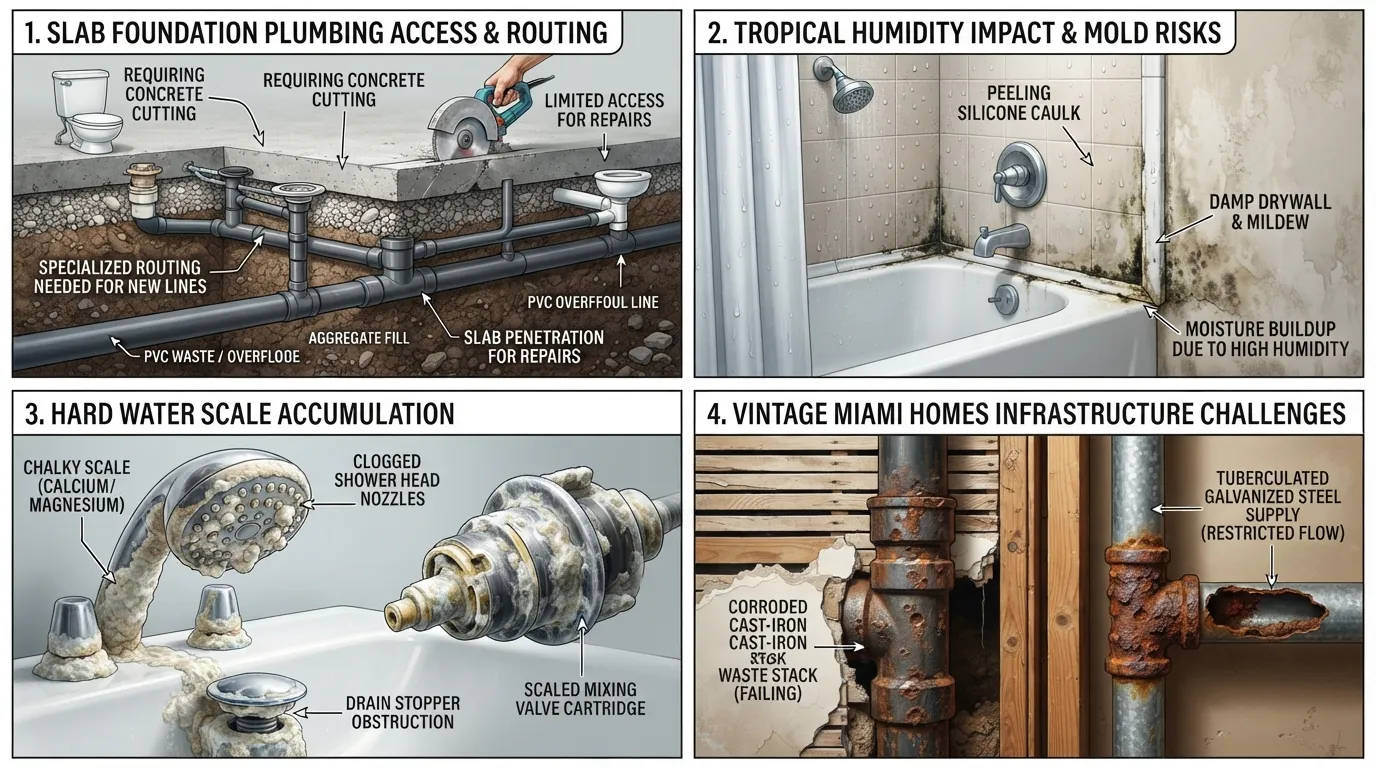
Plumbing in South Florida presents unique engineering and environmental challenges that standard national guides often overlook. From high local humidity and aggressive hard water to slab-on-grade construction, understanding how regional factors impact your bathtub plumbing helps you protect your home against premature wear, structural moisture, and unexpected repairs.
Slab Foundations and Access: Why Tub Plumbing Can Be Harder to Reach
Unlike homes with raised crawlspaces or basements, a vast majority of homes across Miami and South Florida are built directly on concrete slab foundations.
Buried drain lines: Because the waste and overflow lines run directly underneath or embedded within the concrete slab, accessing or replacing a broken drain tee requires concrete cutting rather than simple crawlspace work.
Limited access panels: Slab homes frequently lack rear wall access panels for tub mixing valves, making behind-the-wall cartridge or valve replacements more technically demanding.
Professional necessity: Working with slab-embedded plumbing requires specialized acoustic leak detection equipment and experienced technicians to minimize disruption to tile and flooring.
Humidity, Mold and Caulk Failure in Florida Bathrooms
South Florida’s tropical climate—characterized by high year-round humidity and heavy seasonal rainfall—creates an ideal environment for moisture-related problems in residential bathrooms.
Accelerated caulk degradation: Continuous indoor humidity causes silicone caulk and grout lines around the tub rim to break down, peel, and harbor black mold much faster than in drier climates.
Ventilation demands: Bathrooms require high-CFM exhaust fans running during and after showers to evacuate heavy steam before it condenses on drywall and framing.
Vapor barrier risks: Trapped moisture behind tile backer boards can quietly rot structural wood framing within months if waterproof membranes and caulk lines are compromised.
Hard Water and Mineral Buildup on Drains and Fixtures
The regional water supply in Miami-Dade and surrounding counties contains high concentrations of dissolved calcium and magnesium carbonates, commonly known as hard water.
Scale accumulation: Hard water leaves chalky white mineral crusts (limescale) around bathtub spouts, drain stoppers, and internal cartridge valves.
Seized mechanisms: Mineral scale builds up inside push-pull stoppers and mixing valve spools, causing them to stick, jam, or lose smooth operation.
Preventive care: Regular cleaning with mild vinegar solutions or installing a whole-home water softening system dramatically extends the lifespan of your fixtures.
Older Miami Homes: Common Pipe Issues
Historic and mid-century neighborhoods across Miami—such as Coral Gables, Coconut Grove, and Miami Shores—feature aging infrastructure that requires specialized plumbing attention.
Deteriorating cast iron: Vintage homes often rely on aging cast-iron waste stacks that corrode from the inside out, leading to rough interior surfaces that trap hair and cause chronic clogs.
Galvanized steel supply lines: Decades of hard water flow through older galvanized steel pipes result in severe interior scaling (tuberculation), choked water volume, and reduced pressure.
Transition challenges: Remodeling older bathrooms often requires bridging legacy metal pipes with modern PVC or PEX lines using specialized transition couplings to prevent leaks.
What Our Technicians See Most
In our daily field service across Miami and South Florida, our licensed plumbers find that over 70% of chronic bathtub drainage clogs are caused by a combination of mineral scale and hair trapped around hidden overflow linkages or corroded drain shoes. Furthermore, neglected overflow gasket leaks on second-floor installations account for a high volume of emergency subfloor rot repairs. If your tub is draining slowly or you notice musty odors near the base of the wall, scheduling a professional camera inspection can catch failing waste lines before they cause structural damage.
Common Bathtub Plumbing Mistakes Homeowners Make
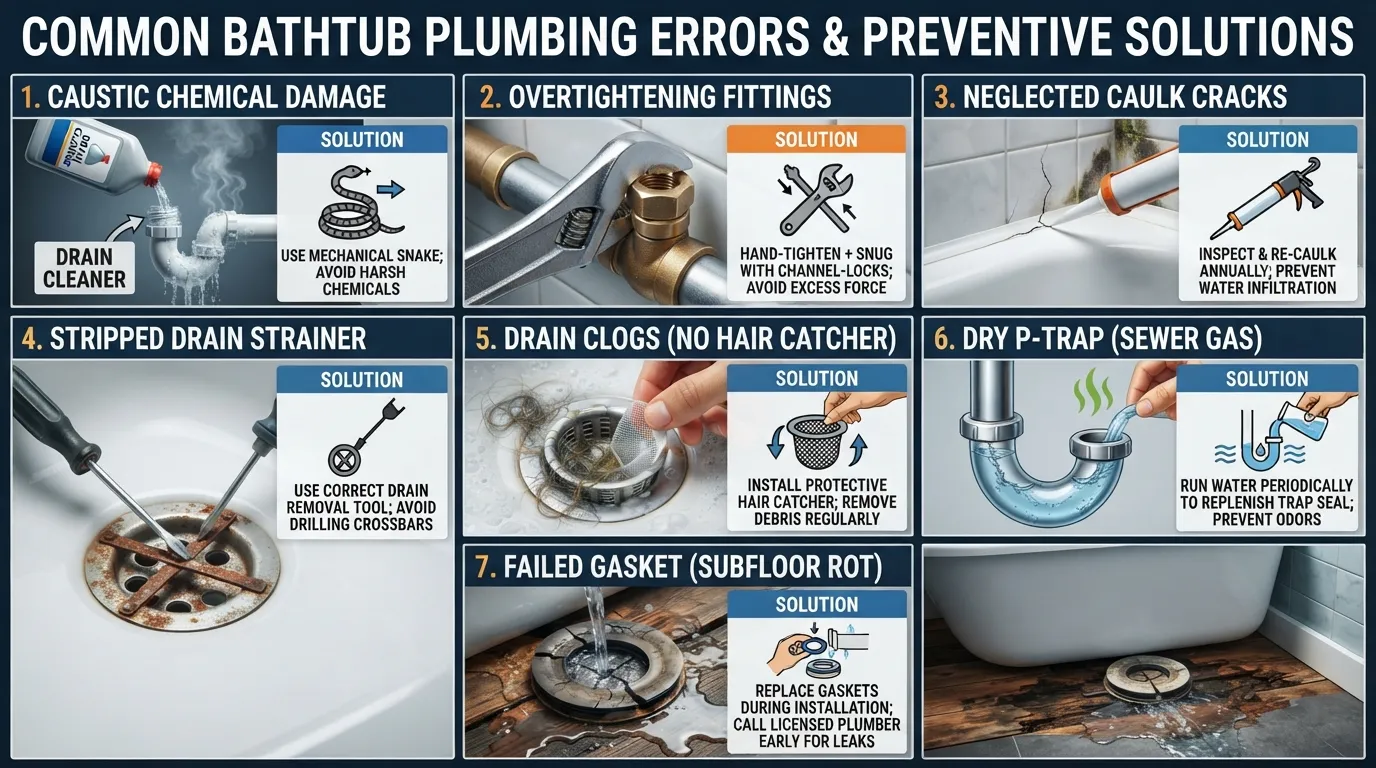
Even well-intentioned DIY home maintenance can lead to costly plumbing repairs when certain common mistakes are made. Avoiding these frequent pitfalls protects your piping network, prevents water damage, and saves you from preventable emergency service calls.
Using Harsh Chemical Drain Openers Repeatedly
Many homeowners default to pouring caustic liquid drain cleaners down the tub whenever a slow drain appears. Repeated use of harsh chemical openers generates extreme heat that softens PVC pipes, weakens solvent-welded joints, and corrodes metal drain strainers and waste shoes. Instead of caustic chemicals, rely on mechanical drain snakes, enzyme cleaners, or professional drain cleaning when clogs persist.
Ignoring Small Drips and Cracked Caulk
A minor faucet drip or a hairline crack in your bathtub’s silicone caulk might seem like a harmless aesthetic nuisance, but ignoring it allows hundreds of gallons of water to seep behind walls and into subfloors over time. This continuous moisture breeds black mold and rots dimensional lumber framing before any visible puddles form on the bathroom floor.
Overtightening Fittings or Using the Wrong Tools
Applying excessive torque with adjustable wrenches to brass slip-joints, PVC trap adapters, or supply connections frequently strips threads, cracks plastic nuts, and ruins rubber washers. Always hand-tighten plastic fittings and give them no more than an additional quarter-turn with the proper channel-lock pliers to create a secure, leak-free seal.
Removing a Drain Without the Right Wrench or Drain Key
Trying to unscrew an old, corroded bathtub strainer cross or waste shoe with standard pliers or screwdrivers often shears out the metal crossbars. Once those crossbars break off, removing the drain requires difficult chiseling or specialized internal expanding drain wrenches, turning a simple 10-minute task into a major extraction project.
Flushing Hair Down the Drain Instead of Catching It
Treating the bathtub drain as an open disposal for loose hair and soap sludge guarantees a stubborn clog within months. Installing a silicone hair catcher or a fine mesh strainer over the drain basket captures debris before it enters the shoe and P-trap, eliminating the root cause of 70% of bathroom drainage failures.
Ignoring a Dry P-Trap in Unused Bathrooms
Guest bathrooms and secondary tubs that go unused for weeks or months are prone to evaporated P-trap water seals. When the standing water in the U-bend dries up, foul and hazardous sewer gases flow directly into your home unchecked. Simply running water in unused tubs for one minute every few weeks keeps the vapor barrier fully intact.
Waiting Too Long to Call a Plumber
Hoping that a major leak, gurgling waste line, or persistent sewer smell will resolve itself is a costly mistake. Delaying professional intervention allows minor component failures to snowball into structural subfloor rot, toxic mold remediation, and expensive drywall demolition. Calling a licensed plumber early ensures fast, targeted repairs at a fraction of the cost of a full bathroom remodel.
Bathtub Plumbing Checklist for Buying or Selling a Home
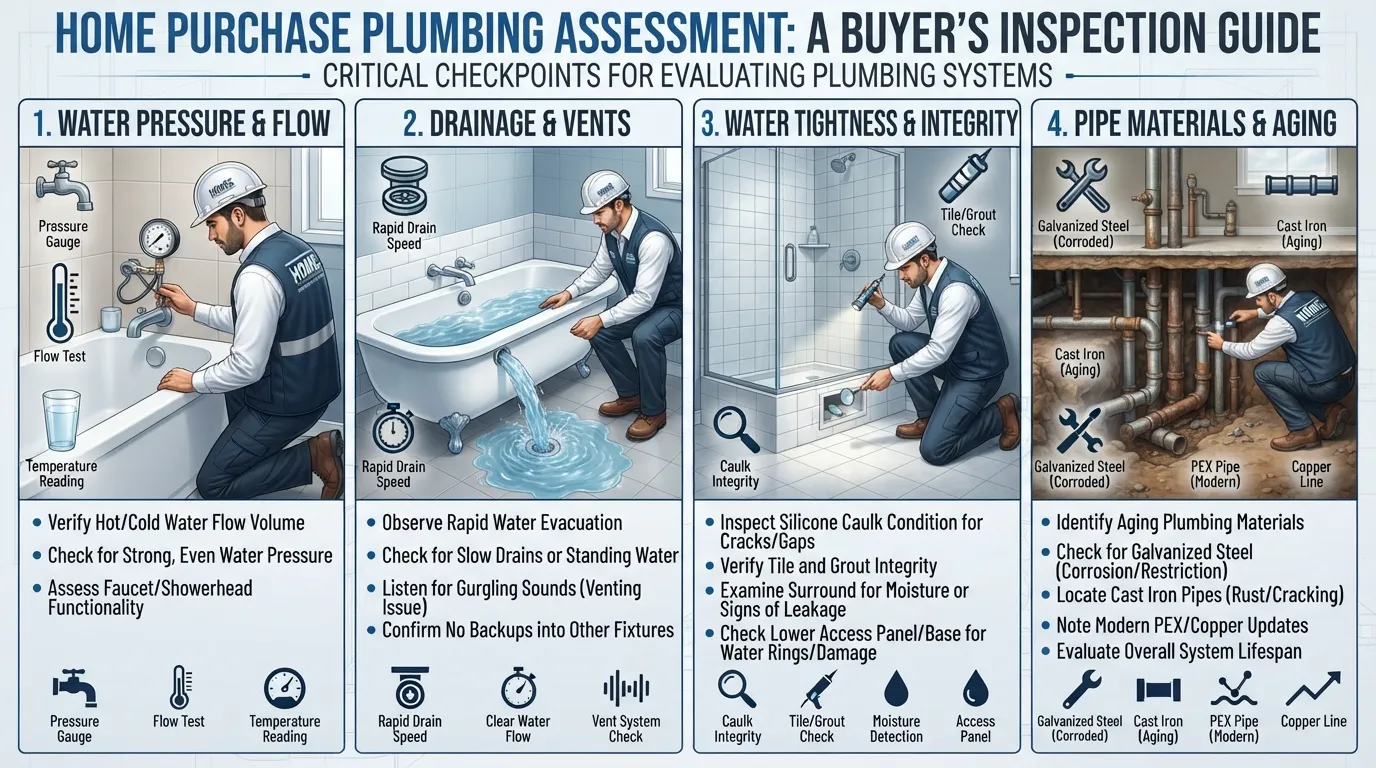
Navigating bathtub plumbing during a real estate transaction requires careful inspection to avoid inheriting costly hidden defects. Whether you are preparing a home for the market or evaluating a potential purchase, a thorough plumbing review protects your financial investment and ensures structural peace of mind.
What to Check Before You Buy
Before finalizing a real estate purchase, inspect the bathrooms thoroughly to identify any subtle signs of deferred maintenance or failing plumbing infrastructure.
Water pressure and flow: Turn on the bathtub handles simultaneously and test both hot and cold volume, listening for unusual banging or sputtering.
Drain speed: Fill the basin halfway and pull the stopper to verify that water empties rapidly without gurgling or backing up.
Caulk and tile condition: Check the perimeter of the tub for peeling silicone, soft grout, or flexible wall tiles that indicate water infiltration.
Access panel review: Locate the service panel in an adjacent closet or hallway to inspect the mixing valve and waste-and-overflow assembly for crust or active leaks.
Ceiling stains below: Inspect the ceilings and walls on the floor directly beneath second-story bathrooms for fresh or painted-over water rings.
Pipe material identification: Note whether visible supply and drain lines consist of modern PVC and copper or aging galvanized steel and cast iron.
Warning Signs of Old or Failing Pipes
Historic and mid-century homes often feature legacy plumbing materials that are nearing the end of their functional lifespan. Look out for these critical red flags:
Discolored water: Rust-tinted water coming from the faucet indicates heavy interior corrosion inside galvanized steel supply pipes.
Slow, chronic drainage: Cast-iron waste stacks that have rusted shut from the inside out resist standard snaking and require replacement.
Low hot water volume: Mineralized or restricted mixing valves that fail to maintain a steady, comfortable shower temperature.
Persistent musty odors: Mold growth behind bathroom walls pointing to chronic, unaddressed seepage from old waste fittings.
Questions to Ask the Seller or Inspector
Directly addressing plumbing history with sellers or reviewing your home inspector’s notes clarifies what maintenance or upgrades lie ahead.
How old is the current bathtub valve and waste assembly?
Has the bathroom ever experienced subfloor leaks, mold remediation, or major plumbing repairs?
Are the supply lines original to the home, or have they been repiped with copper or PEX?
Did the home inspector note any slow drains or venting issues during the walkthrough?
Why a Professional Plumbing Inspection Is Worth It
A standard general home inspector provides a broad visual overview of a property, but they rarely perform invasive checks or internal pipe evaluations. Hiring a licensed plumber to conduct a targeted video camera inspection of your main drain lines and a pressure test on supply fixtures uncovers hidden defects before you close the deal, helping you negotiate necessary repairs or budget for future updates with complete confidence.
Bathtub Plumbing FAQs
What is the 135 rule in plumbing?
The 135-degree rule refers to the maximum allowable cumulative change in horizontal direction for a drainage pipe before additional cleanout access or venting adjustments are required. For example, combining one 90-degree turn with a 45-degree bend equals 135 degrees. Staying within this threshold ensures smooth wastewater flow and prevents recurring clogs.
Can a shower and toilet share the same drain?
Yes, a shower and toilet can share a main branch drain, provided the pipe sizing, slope, and venting comply with local plumbing codes. Typically, a toilet requires a 3-inch line, while a shower uses a 1.5-inch or 2-inch line. If you are experiencing drainage backups involving multiple fixtures, professional toilet repair and drain clearing services can resolve underlying stack restrictions.
What are the common problems with bathtub drains?
The most frequent bathtub drain problems include slow-draining water caused by hair and soap scum buildup, complete clogs in the waste shoe, stuck stoppers, leaking overflow gaskets, and gurgling sounds resulting from blocked roof vent stacks.
Can you explain how a bathtub drain works?
A bathtub drain relies on gravity to move water down through a strainer basket and drain shoe into a downward-sloping waste pipe. The water passes through a U-shaped P-trap that retains a small amount of water to block sewer gases before flowing into the home’s main sanitary sewer stack.
What is the best type of bathtub drain?
Lift-and-turn and push-pull drains are generally considered the best options because they feature fewer moving parts, simple mechanical designs, and easy user operation compared to older, failure-prone trip-lever linkages hidden behind the overflow wall.
Can I pour boiling water down my tub drain?
No, you should never pour boiling water down a bathtub drain if your home has PVC pipes or older plastic plumbing. Water at or near boiling point can soften Schedule 40 PVC, warp solvent-welded pipe joints, and crack acrylic or fiberglass tub basins.
How much would a plumber charge to replace a tub drain?
A professional plumber typically charges between $200 and $700 to replace a bathtub drain and waste-and-overflow assembly. Total pricing depends on whether an accessible service panel exists and the amount of labor required to remove old, corroded brass or cast-iron fittings.
What are the common problems with shower drains?
Common shower drain problems include hair clogs trapped beneath the strainer crossbars, cracked or missing rubber weep-hole washers in tile shower pans, slow-draining branch lines, and foul odors caused by dry P-traps or blocked roof vents.
How do I know if my bathtub has a hidden leak?
Key warning signs of a hidden bathtub leak include an unexplained spike in your monthly water bill, ceiling stains or peeling paint on the floor directly below, spongy subflooring, musty odors, and loose or cracking tile grout around the tub rim.
Why does my bathtub smell like sewage?
A sewage smell near your bathtub is usually caused by an evaporated P-trap water seal due to infrequent use, a cracked plumbing vent pipe that fails to vent sewer gases safely above the roofline, or a degraded wax ring and seal connection.
Final Thoughts and Next Steps
Main Services
Related Posts
Need a Plumber in Miami?
Schedule service online or speak directly with the EZ Plumbing team.
Owner-Led Local Service
Know who is behind the business before you request service. The owners, contact line and Miami service pages are published clearly.
- Named business owners
- Direct phone and social channels
- Local Miami service information
Clear Help Before You Book
Review the relevant service page, contact the team directly and use the booking page when you are ready—without relying on vague claims.
- Service-specific information
- Direct questions before scheduling
- Clear online booking route