
7 Summer Plumbing Tips Every Homeowner Should Know in Miami
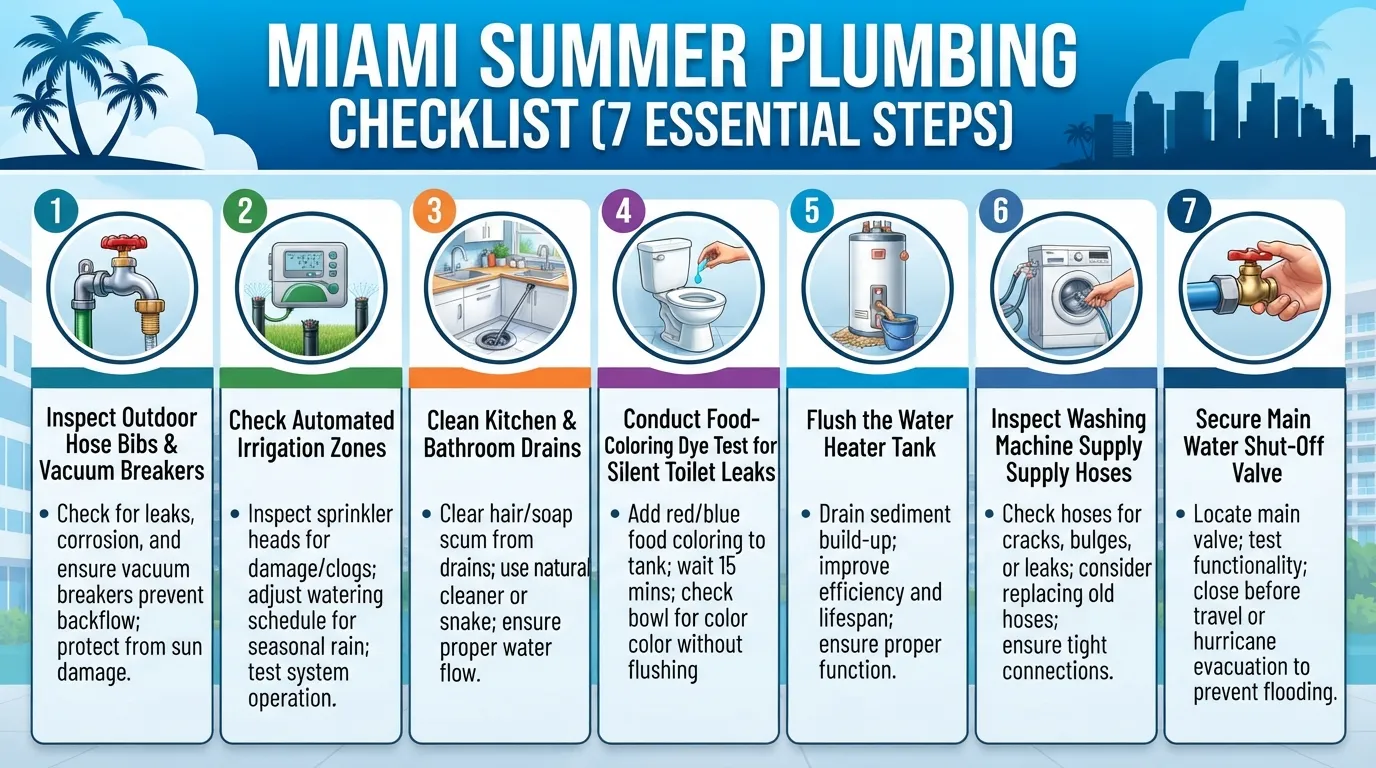
Summer Plumbing Checklist at a Glance
Protecting your home from costly water damage requires a proactive approach as temperatures rise. This actionable checklist is designed for busy homeowners who want a quick, comprehensive guide to safeguarding their plumbing system before summer peak usage begins.
The 7 Tips in 60 Seconds
1. Inspect Hose Bibs and Outdoor Faucets: Check for leaks, cracks, or loose connections before turning on garden hoses to prevent hidden foundation water damage. (Time needed: 5 minutes)
2. Test the Main Water Shut-Off Valve: Locate your main valve, test it to ensure it turns smoothly, and verify that everyone in the household knows how to shut it off in an emergency. (Time needed: 3 minutes)
3. Check Sprinkler and Irrigation Systems: Inspect sprinkler heads and lines for leaks, breaks, or misaligned spray patterns that could pool water against your home’s exterior walls. (Time needed: 15 minutes)
4. Test Sump Pumps and Check Backup Systems: Pour a bucket of water into the sump pit to ensure the pump activates immediately, drains properly, and activates any secondary battery backup. (Time needed: 5 minutes)
5. Inspect Washing Machine Hoses: Look for bulging, cracking, or fraying on rubber supply hoses, and consider upgrading to braided stainless steel lines to prevent catastrophic bursts. (Time needed: 5 minutes)
6. Check for Hidden Toilet Leaks: Drop a few drops of food coloring into the toilet tank; if color seeps into the bowl without flushing, you have a silent flapper leak wasting water. (Time needed: 10 minutes)
7. Flush the Water Heater Tank: Drain sediment buildup from the bottom of your water heater tank to maintain energy efficiency and extend the lifespan of the appliance. (Time needed: 30 minutes)
Printable Summer Plumbing Checklist
Designer Note: Insert high-resolution downloadable PDF link and printable infographic asset placeholder here for offline homeowner use.
Why Summer Is Hard on Your Plumbing in Miami
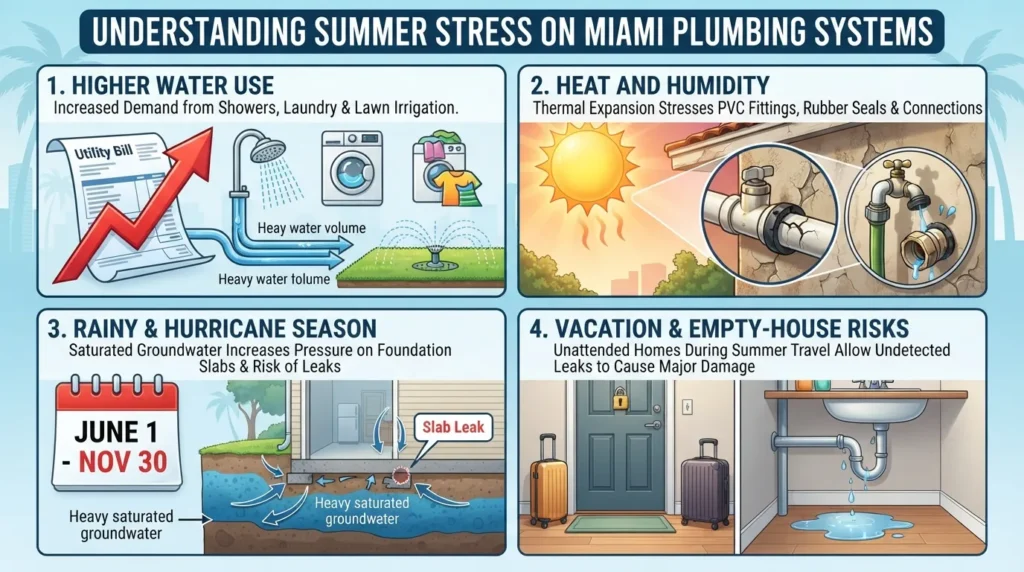
Miami summers present severe environmental and lifestyle pressures that test residential plumbing systems to their limits. Understanding these regional risk factors helps homeowners prevent unexpected structural water damage and soaring utility bills during the hottest months of the year.
Higher Water Use
Summer brings a surge in indoor and outdoor water consumption across Miami households. Frequent showers, daily laundry loads, automated lawn irrigation, and visiting guests cause a massive spike in your monthly water bill. This relentless volume places continuous stress on supply lines, fixtures, and sewer drains.
Daily Strain: Increased household activity leads to constant valve cycling and pipe wear.
Irrigation Demand: Extended lawn watering cycles run sprinkler systems at maximum capacity.
Appliance Overuse: Dishwashers and washing machines run back-to-back cycles, increasing mechanical failure risks.
Heat and Humidity on Pipes, Hoses and Fixtures
Miami’s intense ambient heat and suffocating humidity accelerate the degradation of plumbing materials. Rubber supply hoses, washers, and outdoor connections dry out, crack, and fail prematurely under thermal expansion and high moisture levels.
Material Degradation: Extreme sun exposure weakens exposed exterior PVC and rubber components.
Hidden Vulnerabilities: Constant thermal shifts cause underground joints and fittings to loosen over time.
Fixture Wear: Faucet cartridges and seals deteriorate faster under heavy summer usage.
Rainy Season and Hurricane Season (June 1–Nov 30) Pressure on Drainage
South Florida’s official rainy and hurricane season runs from June 1 through November 30, overwhelming municipal and residential drainage systems. Heavy downpours and tropical storms cause sudden groundwater saturation, threatening homes with severe backups, flooding, and costly slab leaks.
Storm Surge Impact: Rising water tables push against foundation slabs, creating intense pressure on underground pipes.
Drainage Overload: Gutters, downspouts, and French drains must clear high volumes of stormwater instantly.
Slab Leak Risks: Saturated soil shifts foundations, putting dangerous structural stress on under-slab water lines.
Summer Travel and Empty-House Risks
Vacations and extended summer getaways leave Miami homes unoccupied for days or weeks at a time. An empty house means a slow, undetected pinhole leak can run unchecked for days, transforming a minor plumbing malfunction into a catastrophic indoor flood.
Silent Disasters: A minor toilet flapper leak or burst supply line can waste thousands of gallons before discovery.
Stagnant Water: Unused fixtures allow water to stagnate in traps, creating foul odors and pest breeding grounds.
Preventive Action: Shutting off the main water supply before traveling eliminates the risk of catastrophic indoor water damage.
Inspect Outdoor Faucets and Hose Bibs
Checking your outdoor spigots prevents silent water waste and structural damage before high summer usage begins. Neglected leaks at exterior connections can saturate your exterior walls and drive up utility bills without your knowledge.
What to Look For
Spotting early warning signs around your hose bibs saves you from expensive repairs later in the season. Conduct a thorough visual and physical examination of each outdoor spigot around your home.
Handle Drips: Watch for water weeping around the packing nut or handle while the faucet is turned on.
Vacuum Breaker Sprays: Check if water sprays or leaks upward from the small anti-siphon holes on top of the vacuum breaker cap during use.
Damp Wall Stains: Inspect the stucco or siding directly behind or beneath the spigot for persistent moisture, mold, or bubbling paint.
Video Guide: Watch this helpful tutorial on How To: Repair a Leaky Hose Bibb for step-by-step visual guidance.
What a Vacuum Breaker Does and Why It Matters
A vacuum breaker is a vital backflow prevention device screwed onto the nose of your outdoor spigot. It stops contaminated ground or pool water from siphoning backward through your garden hose and into your home’s potable drinking water supply.
Backflow Prevention: Blocks garden fertilizers, pesticides, and dirt from entering household water lines.
Mandatory Code Compliance: Most modern building codes require frost-free or anti-siphon vacuum breakers on all exterior faucets.
Common Failure Point: Constant sun exposure and hard water scale frequently seize or crack these plastic and brass caps.
Quick DIY Fix vs Replacement
Fixing a minor handle leak or swapping a seized vacuum breaker is a straightforward weekend task for most homeowners. However, knowing your limits prevents broken fittings and major plumbing emergencies.
Hand-Loosen Only: Hand-loosen the retaining screw or vacuum breaker cap; never force a corroded brass fitting with a heavy wrench, which can snap the fragile internal stem.
Tighten Packing Nuts: If the handle drips, tighten the packing nut beneath the handle a quarter-turn with a wrench to compress the internal packing washer.
When to Call a Pro: If water leaks directly from behind your stucco or siding rather than the spout itself, you likely have a cracked supply pipe within the wall. In these instances, professional leak detection and repair services are required to safely open the wall and replace the compromised line.
Time, Cost, and Difficulty
Time Needed: 10 to 20 minutes per faucet.
Estimated Cost: $5 to $15 for replacement washers or a new vacuum breaker cap; $150 to $300 if professional in-wall pipe repair is necessary.
Difficulty Level: Easy to Moderate.
Check Your Sprinkler and Irrigation System
Your automated irrigation system works overtime during South Florida’s dry spring spells and intense summer heat. Manually testing and tuning your sprinkler zones prevents wasted water, dying lawn patches, and shocking spikes in your monthly utility bill.
Walk Each Zone While It Runs
Manually cycle through every individual zone on your timer controller and walk the property line while the system is active. Catching misaligned or broken components early keeps your landscape healthy without flooding the yard.
Geysers and Broken Heads: Look for missing spray nozzles or upright pipes shooting water vertically instead of spraying a uniform arc.
Soggy Patches and Pooling: Watch for saturated soil or standing water near foundation walls, which can compromise structural stability.
Dry Spots: Identify clogged nozzles or tilted heads that fail to reach designated turf coverage areas.
Signs of an Underground Irrigation Leak
Not all sprinkler problems happen above ground where you can easily see them. Underground poly pipe breaks and leaking manifold valves can waste thousands of gallons unnoticed until your utility bill arrives.
Sudden Bill Spike: An unexpected doubling or tripling of your water consumption during normal weather points to a mainline break.
Constantly Wet Ground: Spotting muddy grass or deep puddling in an area long after the sprinklers have finished running.
Low Operating Pressure: Noticing weak spray patterns or multiple heads failing to pop up correctly across an entire zone.
Smart Watering Habits
Optimizing your irrigation schedule saves money and protects your lawn from fungal diseases driven by summer humidity. Modern technology helps tailor your watering to actual weather conditions.
Timing: Run your sprinklers in the early morning hours (between 4 AM and 8 AM) to minimize wind drift and aggressive evaporation.
Smart Controllers: Upgrade to a WaterSense-labeled controller that automatically skips watering cycles after heavy summer downpours.
Rainy Season Adjustments: Turn off or scale back automated schedules during June through November when daily tropical storms provide ample natural rainfall.
When to Call a Pro
While swapping a broken sprinkler head is a simple weekend fix, subsurface mainline failures require professional expertise and heavy equipment.
Valve Box Failures: If your irrigation timer fails to trigger specific zones or water continuously leaks from the underground valve box, the solenoid or diaphragm valves may need replacement.
Buried Line Breaks: If you suspect underground pipe damage beneath concrete or pavers, professional technicians can locate hidden leaks quickly without tearing up your entire lawn.
Protect Your Drains From Summer Overload
Summer gatherings, barbecues, and extra houseguests place heavy, sudden demands on your home’s drainage network. Adopting smart daily habits prevents stubborn clogs, foul odors, and messy sewage backups when your plumbing is working at peak capacity.
Kitchen Drain Rules
Kitchen sinks take a severe beating during summer entertaining. Pouring forbidden waste down your pipes or overloading the garbage disposal will quickly trigger a messy, grease-solidified blockage.
Ban FOG: Never pour fats, oils, and grease down the kitchen drain, as they cool and solidify inside pipes to trap food particles.
Scraping Before Washing: Scrape plates into the trash can rather than rinsing large quantities of rice, pasta, or fibrous vegetable peels down the sink.
Disposal Restraint: Feed your garbage disposal in small, manageable amounts while running a steady stream of cold water to chop debris completely.
Hair Catchers and Weekly Stopper Cleaning for Extra Guests
Bathroom drains face a massive surge in hair, soap scum, and body oils when hosting out-of-town guests. Installing cheap preventive barriers saves you from plunging stubborn shower clogs later.
Mesh Strainers: Place inexpensive silicone hair catchers over every shower and tub drain to capture stray hairs before they enter the P-trap.
Weekly Maintenance: Remove pop-up stoppers in bathroom sinks weekly to clear out accumulated hair clumps and toothpaste residue.
Soap Scum Control: Flush bathroom lines regularly with hot water to melt lingering soap buildup.
Do Baking Soda and Vinegar Really Clear Drains?
Pouring baking soda followed by vinegar creates a satisfying fizz, but homeowners often misunderstand its actual cleaning power. Knowing what this natural mixture can and cannot do prevents false security against major blockages.
Reality Check: The bubbling chemical reaction breaks down minor soap scum and deodorizes fresh organic odors near the surface.
Limitations: It lacks the physical force and chemical strength required to dissolve solid grease clogs, hard mineral scale, or packed hair deep in the line.
Plumber’s Take: Use it safely for routine monthly maintenance and odor control, but rely on mechanical snakes or professional hydro-jetting for stubborn blockages.
Slow Drain Warning Signs
Ignoring early symptoms of a restricted pipe guarantees a complete wastewater backup during peak household activity. Watch and listen for these classic distress signals.
Gurgling Noises: A toilet, sink, or shower that gurgles when another fixture drains indicates trapped air pockets behind a developing clog.
Foul Odors: Persistent sulfur or rotting food smells wafting from sink drains signal organic buildup trapped in the P-trap.
Repeated Slowdowns: If water pools around your ankles during a standard shower or takes too long to empty from the kitchen sink, schedule professional drain cleaning before a total blockage occurs.
Test for Silent Toilet Leaks
Silent toilet leaks are one of the leading causes of unexpected high water bills in residential homes. Because water slips quietly past worn internal components directly into the drain without overflowing the bowl, homeowners often remain completely unaware of the waste.
The Food Coloring Dye Test
Checking for a silent leak takes only a few minutes using ordinary household supplies. This quick diagnostic reveals failing seals before they cost you hundreds of dollars.
Remove the Lid: Take off the toilet tank lid and place it safely on a flat surface.
Add Color: Drop a few drops of dark food coloring or a specialized dye tablet into the water inside the toilet tank until it turns a noticeable shade.
Wait and Watch: Do not flush. Wait 10 to 15 minutes to allow the dyed water to work its way through any hidden internal pathways.
Check the Bowl: Look inside the toilet bowl; if colored water seeps into the bowl without you flushing, you have an active silent leak.
Video Guide: Watch this quick demonstration on Is Your Toilet Leaking? Find Out With This Simple Food Colouring Test for a visual walkthrough of the dye test process. [00:07]
What the Result Means
Finding dye in your toilet bowl points directly to a failing component inside the tank mechanism. Pinpointing the exact faulty part determines your next repair step.
Worn Flapper: A warped, degraded, or mineral-encrusted rubber flapper at the bottom of the tank fails to seal tightly against the flush valve opening.
Faulty Fill Valve: If the water level sits too high and constantly spills over the top of the overflow tube, excess water drains away continuously.
Chain Interference: A flush chain that is adjusted too short prevents the flapper from resting completely flat on its seat.
Fixing It
Resolving most running toilet issues is an easy DIY project requiring minimal tools and basic replacement parts.
Flapper Replacement: Turn off the water supply valve behind the toilet, flush to drain the tank, unhook the old rubber flapper, and snap a universal replacement into place. Experts advise replacing standard rubber flappers at least every five years to prevent sudden failure.
Professional Help: If replacing the flapper or adjusting the fill valve fails to stop the leak, professional toilet repair ensures your entire flush mechanism and tank bolts are safely overhauled.
Why Small Leaks Matter
A minor trickle might seem harmless, but a continuously running toilet can waste hundreds of gallons of water every single day. According to EPA’s Fix a Leak Week guidance, household leaks waste nearly 1 trillion gallons of water annually nationwide, driving up utility expenses and straining municipal water systems unnecessarily.
Flush Your Water Heater and Set the Right Temperature
Routine maintenance on your water heater prevents premature tank failure and lowers energy bills. Removing mineral buildup ensures efficient heating and extends the operational life of your appliance.
Why Sediment Builds Up and What It Does
Hard water minerals naturally precipitate out as water heats, settling at the bottom of your storage tank over time. This accumulating layer creates an insulating barrier between the burner or lower heating element and the water.
Decreased Efficiency: The heating element must work significantly longer to heat water through the layer of sediment, driving up electricity costs.
Metal Overheating: Trapped heat causes the tank floor to warp, popping rivets and creating fractures that lead to leaks.
Premature Failure: Unflushed tanks frequently fail years before their expected lifespan due to severe bottom corrosion.
How to Flush a Tank Water Heater
Flushing your tank water heater once a year removes accumulated mineral sand and restores peak performance. Following the correct sequence protects both your safety and the appliance components.
Cut Power and Supply: Turn off the power at the breaker panel for electric units or switch the gas valve to pilot mode, then shut off the cold water supply valve. [00:04], [00:11]
Drain and Flush: Connect a standard garden hose to the drain valve at the bottom of the tank, open the T&P relief valve to release the air lock, and drain the water completely before performing a brief power flush with the cold supply. [00:18], [00:49], [02:26]
Refill and Bleed Air: Close the drain valve, disconnect the hose, open a household hot water tap to bleed trapped air lines, and turn the power back on only after the tank is completely full. [04:15], [04:50]
Video Guide: Watch this practical demonstration on How to Flush a Water Heater Tank | RIOT Plumbing Services for a complete visual walkthrough of the flushing process. [00:00]
The 120°F Setting
Setting your water heater thermostat correctly balances hot water comfort with energy efficiency and home safety.
Optimal Temperature: Adjust your thermostat to 120°F to reduce standby energy losses and eliminate scalding risks.
Bacterial Prevention: While 120°F is standard, households with immunocompromised members sometimes maintain 140°F combined with a mixing valve to inhibit bacterial growth.
Tankless Heaters Are Different
Tankless water heaters do not store standing water in a large reservoir, meaning they avoid traditional sediment tank accumulation. However, they are highly sensitive to hard water scale deposits inside their internal heat exchangers.
Descaling Requirement: Tankless units require annual descaling using a specialized vinegar flush kit and a small circulation pump.
Manufacturer Guidelines: Always follow the specific brand instructions or hire a professional to prevent damaging delicate flow sensors and heat exchangers.
When Not to DIY
While flushing an electric tank is manageable for experienced homeowners, certain scenarios carry high risks of scalding, gas leaks, or costly property damage.
Gas Heaters and Pilot Lights: Relighting complex gas burner assemblies requires specialized care to prevent hazardous gas leaks.
Stuck or Leaking Valves: Forcing a corroded plastic or brass drain valve can snap the stem, unleashing an uncontrolled flood of hot water.
Aging Infrastructure: If your tank is over 10 years old or shows signs of leaking around the T&P valve or tank seams, attempting to drain it can dislodge scale sealing an active hole. In these situations, contact professionals for expert water heater service to evaluate replacement options safely.
Inspect Washing Machine Hoses
Washing machine hose failures are among the most destructive indoor plumbing disasters, capable of releasing hundreds of gallons of water per hour into your home. Regular inspection and proactive replacement of these vulnerable lines safeguard your flooring, drywall, and structural framing.
Warning Signs
Rubber supply lines degrade steadily under constant water pressure and age, displaying visible distress long before a catastrophic rupture occurs. Inspect your laundry connections monthly to catch failing hoses early.
Bulges and Blisters: Look for localized ballooning or soft bubbles on the rubber surface where water pressure pushes against weakened inner walls.
Cracks and Frying: Check for dry-rotted cracking, brittleness, or frayed outer braiding along the length of the supply line.
Rust and Moisture: Examine the threaded metal brass fittings for rust streaks and feel the floor directly behind the washing machine for dampness.
Give the Hoses Room
Improper washer placement places unnecessary physical stress on water supply connections every time the appliance vibrates during a spin cycle.
Maintain Clearance: Keep your washing machine at least 4 inches away from the back wall to prevent the water hoses from being crushed or tightly bent.
Avoid Kinking: Sharp bends restrict water flow and weaken the hose material at the crimped joint, drastically increasing the risk of an unexpected rupture.
Rubber vs Braided Stainless Steel Hoses
Choosing the right supply line material is your first line of defense against catastrophic water leaks in the laundry room.
| Feature | Standard Rubber Hoses | Braided Stainless Steel Hoses |
| Construction | Single-layer reinforced rubber | Inner core wrapped in woven stainless steel mesh |
| Durability | Prone to dry-rot, cracking, and sudden bursts | Highly resistant to kinking, bursting, and punctures |
| Lifespan | 3 to 5 years | 5 to 10+ years |
| Risk Level | High risk of catastrophic flood failure | Exceptional safety and burst protection |
Video Guide: Watch this step-by-step tutorial on How to Replace/Install Washing Machine Hoses to learn how to swap out old lines safely.
How Often to Replace
Knowing when to swap your washing machine supply hoses prevents unexpected indoor flooding. Always consult your appliance manual for specific timelines, but keep these general industry guidelines in mind:
Rubber Line Interval: Standard rubber hoses must be inspected regularly and replaced every 3 to 5 years without exception.
Upgrade Recommendation: Whenever you disconnect your washing machine, upgrade old rubber lines to burst-resistant braided stainless steel hoses for long-term peace of mind.
What to Do If a Hose Bursts
A ruptured supply line requires immediate, decisive action to minimize structural water damage to your home.
Shut Off the Valves: Immediately turn the hot and cold water supply valves behind the washing machine clockwise to the closed position, then cut power to the unit if safe to do so.
Call for Help: Once the water flow is stopped, contact a professional emergency plumber to inspect surrounding damage, extract standing water, and install replacement lines safely.
Prepare Your Plumbing Before Vacations and Storm Evacuations
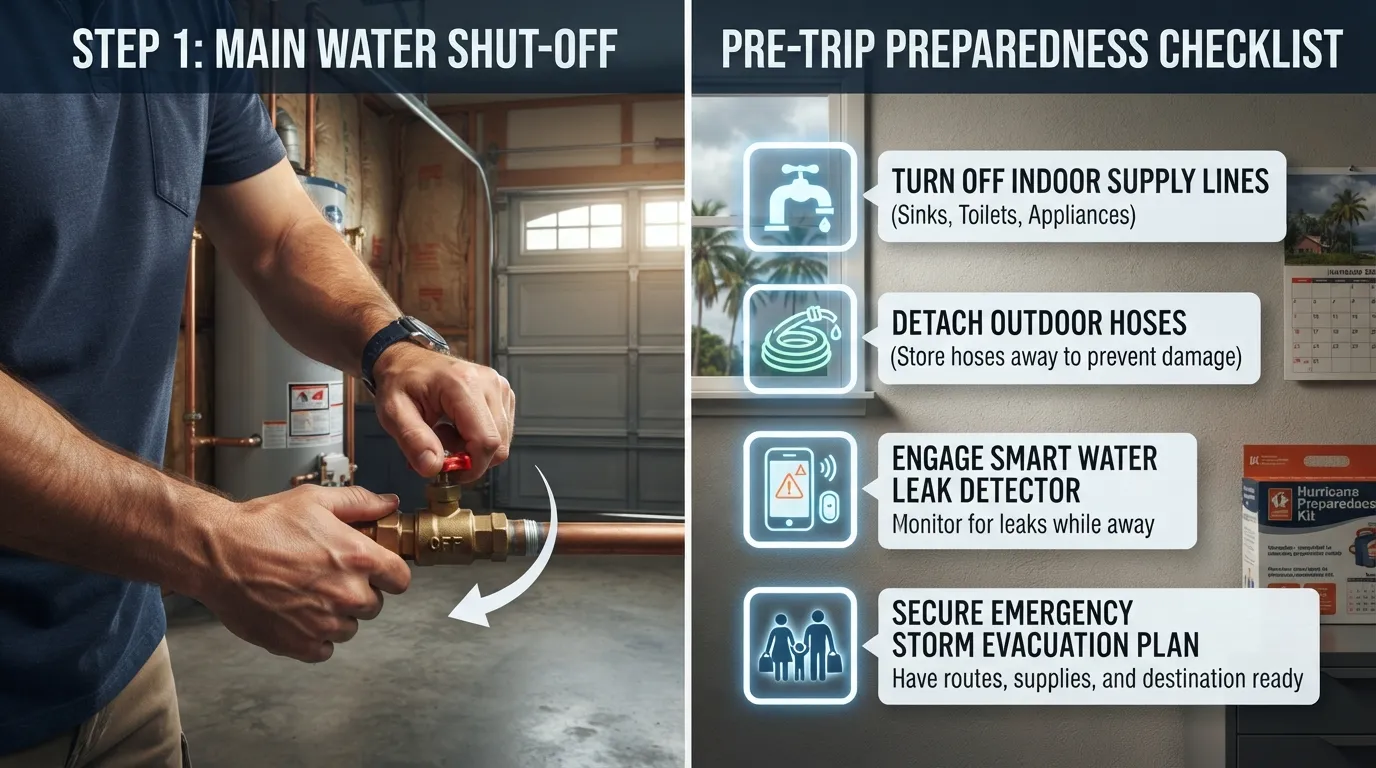
Summer in South Florida brings both extended family vacations and the constant threat of hurricane evacuations. Leaving your home unattended without securing your plumbing system invites catastrophic water damage from slow leaks, pipe bursts, or storm-driven surges.
Your Pre-Trip Plumbing Checklist
Securing your home before leaving for a few days or several weeks requires turning off vulnerable pathways. A quick walkthrough prevents minor issues from escalating into major disasters while you are miles away.
Close the Main Shut-Off: Turn off your home’s main water supply valve to completely eliminate interior pressure on pipes and plumbing fixtures.
Disconnect Outdoor Hoses: Detach garden hoses from exterior spigots so trapped water expands safely without cracking your hose bibs.
Check Appliance Cycles: Ensure dishwashers and washing machines have finished their cycles and remain completely empty before departure.
Water Heater While You’re Away
Leaving your water heater running at full capacity while the house is empty wastes energy and keeps unnecessary thermal stress on the tank. Adjusting your unit correctly protects the appliance during your absence.
Vacation Mode: Switch traditional gas or electric water heaters to their “Vacation” or standby setting according to the manufacturer’s instructions.
Tankless Settings: Many modern tankless water heaters feature digital vacation modes or anti-freeze settings that maintain safe operational parameters without active heating.
Smart Leak Detectors and Automatic Shut-Off Valves
Modern smart home technology offers advanced protection for homeowners who travel frequently or live in flood-prone regions. These devices catch leaks the moment they happen.
Smart Leak Detectors: Place wireless moisture sensors near high-risk areas like washing machines, water heaters, toilets, and under sinks to receive instant smartphone alerts at the first sign of water.
Automatic Shut-Off Valves: Install an automated main valve system that integrates with your leak detectors to automatically shut off your home’s water supply the moment a leak is detected.
Hurricane Season Shut-Off Plan
South Florida’s hurricane season requires an emergency plan that includes safeguarding your home’s plumbing infrastructure against storm surges and severe wind damage.
Pre-Evacuation Shut-Off: Close your main water valve before evacuating for a major storm to prevent pressurized indoor pipe bursts if a tree damages your home or roof.
Sewer Backflow Protection: If your area is prone to municipal sewer surges during heavy tropical downpours, consider closing backwater prevention valves.
Who Should Check the House
Having a trusted local contact look in on your property provides an extra layer of security during extended absences.
Designated Keyholder: Give a reliable neighbor, friend, or property manager a spare key and explicit instructions on your home layout.
Shut-Off Instruction: Show your designated contact the exact physical location of the main water shut-off valve so they can intervene quickly in an emergency.
Bonus Checks: 5-Minute Whole-Home Summer Tests
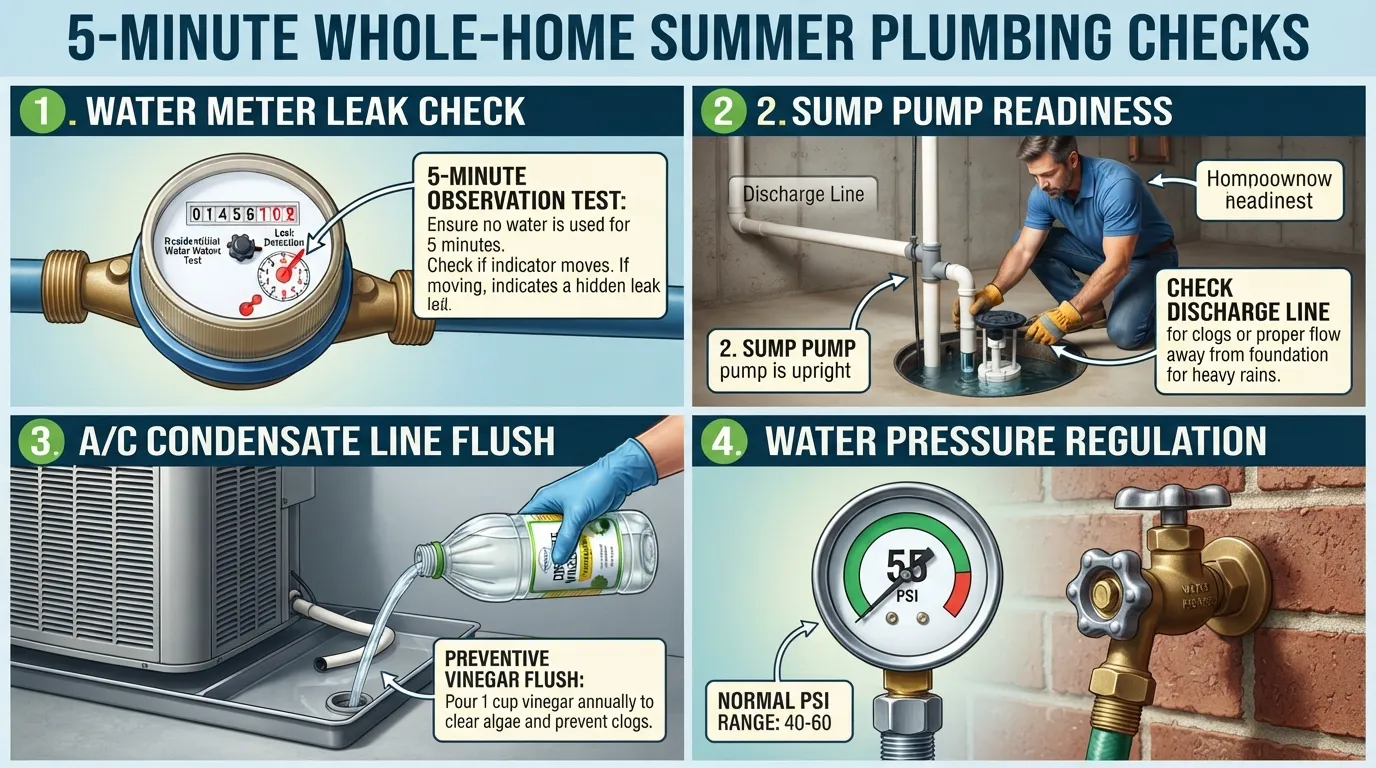
Going beyond your basic checklist ensures that hidden vulnerabilities throughout your property do not turn into emergency repairs. These rapid, five-minute diagnostic tests catch systemic issues early, protecting your entire home from unexpected damage.
The Water Meter Leak Test
Your water meter is the ultimate truth-teller for detecting hidden household leaks that escape visual detection. Performing this test reveals whether pressurized lines behind your walls or under your floors are quietly leaking.
Turn Off All Water: Ensure every indoor and outdoor faucet, shower, toilet, and water-using appliance is completely shut off.
Watch the Leak Indicator: Locate your water meter box and observe the low-flow leak indicator (a small triangular dial or spinning wheel) for at least five minutes. If it moves or flashes, you have an active leak.
Next Steps: If the meter still moves after confirming all fixtures are off, professional leak detection is necessary to isolate underground or in-wall line breaks.
Video Guide: Watch this helpful tutorial on How to Check for Water Leaks Using the Water Meter Leak Indicator for a visual demonstration of the meter test process.
Sump Pump Check
South Florida’s intense summer downpours put heavy demands on subterranean drainage systems. Testing your sump pump before peak storm season arrives prevents basement or crawlspace flooding.
Manual Activation: Pour a five-gallon bucket of water directly into the sump pit to verify that the float switch activates the pump immediately.
Discharge Clearance: Inspect the discharge pipe outside your home to ensure water flows freely away from your foundation walls.
When to Call a Pro: If your pump fails to turn on, makes grinding noises, or leaves standing water in the pit, schedule immediate sump pump service before tropical storms hit.
Sewer Line Warning Signs
Your main sewer line carries all wastewater away from your home, making blockages catastrophic. Catching early structural restrictions keeps raw sewage out of your living spaces.
Multiple Slow Drains: If your kitchen sink, showers, and toilets all drain sluggishly at the same time, the main sewer lateral is likely restricted.
Gurgling Fixtures: Hearing bubbling sounds in your toilet when the washing machine drains points to trapped air in a blocked vent or sewer line.
Root Intrusion and Yard Patches: Unusually lush, bright green patches of grass or soggy depressions in your yard above the sewer line often signal cracked pipes invaded by aggressive tree roots. Contact professionals for sewer line repair and inspection to evaluate the damage with a camera scope.
AC Condensate Drain Line
Miami air conditioners run nearly around the clock in the summer, producing gallons of condensation daily. If the condensate line clogs with algae or dust, overflow water can ruin ceilings, drywall, and flooring.
Inspect the Drain Pan: Check the auxiliary drain pan beneath your indoor air handler for standing water or moisture overflow.
Preventative Flushing: Pour a cup of distilled white vinegar or hot water down the condensate T-port monthly to dissolve algae and prevent clogs.
Check Your Water Pressure
High water pressure places continuous, destructive stress on your home’s entire plumbing network, fittings, and water-using appliances.
Pressure Gauge Test: Screw a standard water pressure gauge onto an outdoor hose bib and turn it on fully to measure your PSI.
Regulator Limits: Ideal residential water pressure sits between 40 and 60 PSI. If your gauge reads above 80 PSI, have a plumber replace or adjust your pressure-reducing valve (PRV) to prevent burst lines.
Common Summer Plumbing Mistakes and What Plumbers Wish You Knew
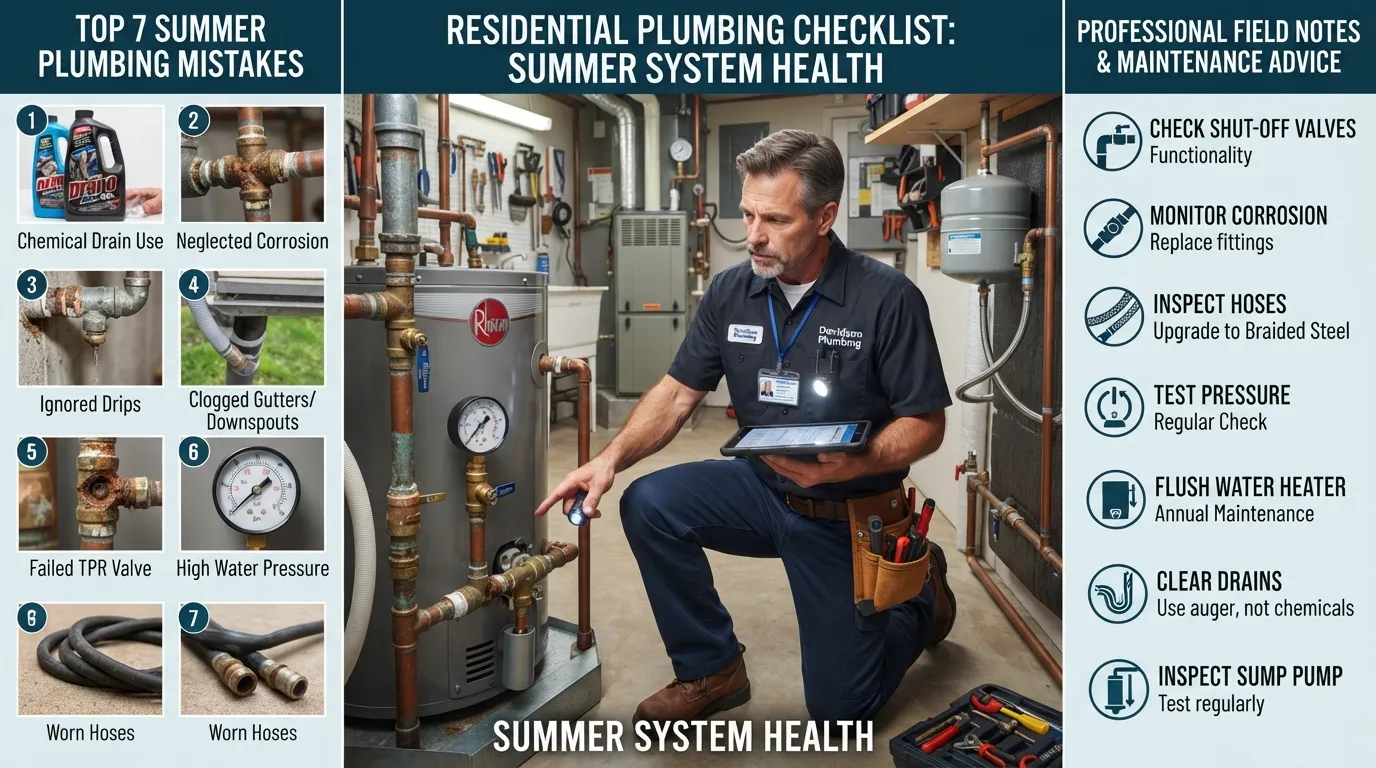
Avoiding costly plumbing emergencies requires understanding the most frequent mistakes homeowners make during peak summer usage. Learning from professional insights ensures your system stays protected against preventable failures.
7 Common Summer Plumbing Mistakes
1. Relying on Chemical Drain Cleaners: Pouring harsh caustic chemicals into slow drains eats away at older pipe walls and destroys rubber gaskets. Fix: Use mechanical snakes or professional hydro-jetting to clear stubborn blockages safely.
2. Flushing “Flushable” Wipes: Disposing of wet wipes, paper towels, or feminine hygiene products down toilets guarantees a severe main sewer line clog. Fix: Stick strictly to human waste and standard toilet paper.
3. Overloading the Garbage Disposal: Stuffing fibrous vegetable peels, potato skins, or grease down the kitchen sink overburdens the motor and clogs the P-trap. Fix: Feed waste in small amounts with cold water running continuously.
4. Forcing Outdoor Hose Bibs: Using heavy pipe wrenches to crank stuck spigots or seized vacuum breaker caps snaps delicate internal stems. Fix: Hand-loosen components or replace worn washers gently without excessive leverage.
5. Skipping Washing Machine Hose Checks: Leaving old, brittle rubber hoses connected for decades invites catastrophic indoor flooding. Fix: Inspect monthly and upgrade to braided stainless steel lines every 5 years.
6. Setting Water Heater Too High: Cranking water heater thermostats above recommended levels accelerates mineral scaling and increases scalding risks. Fix: Maintain your water heater at an efficient 120°F.
7. Ignoring Minor Drips: Brushing off small pinhole leaks or slow running toilets allows water waste to compound silently into massive utility bills. Fix: Perform immediate food-coloring dye tests and fix faulty flappers right away.
What Plumbers Wish Homeowners Knew
Experienced master plumbers emphasize that preventative education is your best defense against catastrophic home water damage.
“Most new homeowners buy a house and have no idea where their emergency shut-off valves are located. Knowing how to isolate your main water supply in the first thirty seconds of a burst pipe is the single most important skill a homeowner can have.” — Master Plumber, Field Notes
“People often wait until a total failure occurs to look at their mechanical room. If you notice a tiny rust stain or calcium buildup on a pipe, even in a brand-new home, that is your early warning sign to call an expert before it ruptures.” — Master Plumber, Industry Insights
Podcast Guide: Listen to expert discussions on The Homeowner’s Guide to Plumbing Essentials featuring experienced trade professionals breaking down essential residential maintenance tips. [00:00] (Note: Loading may be delayed due to audio file length).
Pipe Materials That Cause Trouble
The age and construction material of your home’s piping network dictate your vulnerability to sudden summer leaks and catastrophic failures.
Galvanized Steel Pipes: Installed in older homes decades ago, these iron pipes corrode and narrow internally from mineral buildup, severely restricting water flow and risking sudden bursts.
Polybutylene Pipes: Widely used in residential construction during the 1980s and 1990s, these flexible gray plastic supply pipes degrade over time when exposed to chlorine and high water temperatures, making them notoriously prone to unexpected splitting.
Professional Assessment: If your home contains legacy galvanized or polybutylene piping, consult a licensed plumber to evaluate whether repiping is necessary before seasonal usage spikes.
DIY or Call a Plumber?
Deciding whether to tackle a plumbing fix yourself or hire a licensed professional can save you time, money, and property damage. Understanding your limits ensures minor maintenance tasks never escalate into expensive household emergencies.
Each Tip, DIY Level, Time, and When to Call
| Plumbing Task | DIY Difficulty | Estimated Time | Typical Cost Range | Call a Pro If… |
| 1. Outdoor Hose Bibs | Easy to Moderate | 10–20 mins | $5–$15 (Parts) | Water leaks behind drywall or stucco. |
| 2. Sprinkler Systems | Moderate | 30–60 mins | $10–$50 (Parts) | Mainline breaks or valve boxes fail. |
| 3. Clearing Drains | Easy | 15–30 mins | $10–$25 (Supplies) | Multiple fixtures backup or gurgle constantly. |
| 4. Toilet Flappers | Easy | 10–15 mins | $10–$20 (Part) | Tank bolts leak or base wobbles. |
| 5. Water Heater Flush | Moderate | 45–90 mins | $20 (Hose/Bucket) | Gas units, stuck valves, or tanks over 10 years old. |
| 6. Washing Machine Hoses | Easy | 20–30 mins | $30–$60 (Hoses) | Shut-off valves seize or leak when closed. |
| 7. Vacation Shut-Offs | Easy | 5 mins | Free | Main valve is corroded or stuck open/closed. |
How to Avoid Being Overcharged
Hiring a reliable service provider gives you peace of mind and protects you from predatory pricing practices. Knowing what questions to ask keeps your repair project transparent and fairly priced.
Verify Licensing and Insurance: Always confirm that your technician holds a valid state contractor license and carries general liability and workers’ compensation insurance.
Insist on Written Estimates: Request a clear, itemized written estimate before any physical work begins, specifying whether the contractor charges flat-rate or hourly pricing.
Beware of High-Pressure Tactics: Run away from technicians who use scare tactics, demand cash upfront, or pressure you into signing immediate contracts without explaining options.
Confirm Warranties and Permits: Reputable residential plumbing services stand behind their workmanship with written labor warranties and pull necessary municipal permits for major installations.
Signs You Need a Pro Now
Certain plumbing symptoms indicate systemic failures that require immediate professional intervention with specialized commercial equipment.
Whole-House Low Pressure: A sudden drop in water pressure across multiple sinks and showers points to a main supply line blockage or pressure regulator failure.
Persistent Sewage Odors: Pungent sewer gas smells inside your home or yard indicate a cracked vent stack or a compromised sewer lateral.
Unexplained Water Stains: Discolored drywall, bubbling paint, or warped flooring signals hidden pipe leaks requiring electronic leak detection.
Spinning Meter Continuously: If your water meter leak indicator spins rapidly while every appliance and faucet is turned off, you have a major underground or in-wall break.
Summer Plumbing FAQs
What are some helpful plumbing tips for homeowners?
Proactive maintenance prevents costly emergency repairs throughout the summer season. Key steps include inspecting outdoor hose bibs for leaks, testing your main water shut-off valve, flushing sediment from your water heater tank, testing your washing machine hoses for wear, and performing a quick food-coloring dye test on toilets to catch silent leaks before utility bills spike.
What are the most common plumbing mistakes to avoid?
Homeowners frequently make damaging errors by pouring harsh chemical drain cleaners down slow pipes, flushing “flushable” wipes into sewer lines, and overloading garbage disposals with fibrous food waste. Avoid cranking outdoor faucets with heavy wrenches, ignoring minor rust stains around mechanical fittings, and leaving old rubber washing machine hoses connected for years.
What do plumbers recommend to keep drains clean?
Plumbers recommend practicing strict prevention by never pouring grease, oils, or heavy food scraps down kitchen sinks. Use mesh hair catchers over every shower and tub drain, feed garbage disposals in small amounts with cold water running continuously, and scour kitchen pipes monthly by filling sinks with warm water and letting them drain simultaneously.
What do plumbers say about baking soda and vinegar?
Baking soda and vinegar create a satisfying fizz that helps break down minor surface soap scum and neutralizes fresh organic sink odors. However, plumbers emphasize that this natural combination lacks the physical force and chemical strength required to clear solid grease blockages, hard mineral scale, or packed hair deep inside your plumbing lines.
How can you tell if a plumber is ripping you off?
Protect yourself from overcharging by verifying that your technician holds a valid state contractor license and carries general liability insurance. Always request a clear, itemized written estimate before physical work starts, beware of aggressive scare tactics, confirm that labor warranties are provided in writing, and avoid contractors who demand full cash payments upfront.
Are there more plumbing problems in summer?
Yes, summer introduces unique environmental and lifestyle pressures that stress residential plumbing networks. Higher water volumes from lawn irrigation, daily laundry loads, and visiting houseguests combine with suffocating humidity and South Florida’s rainy season to push drainage and supply lines to their absolute limits.
How often should you flush a water heater?
You should flush your tank water heater at least once a year to remove accumulated hard water mineral sediment. Annual flushing prevents insulating layer buildup, preserves lower heating elements, maintains optimal energy efficiency, and significantly extends the overall operational lifespan of your storage tank.
How often should you replace washing machine hoses?
Standard rubber washing machine supply hoses must be inspected monthly and replaced every 3 to 5 years to prevent catastrophic indoor floods. Whenever you disconnect your washing machine, upgrade old rubber lines to burst-resistant braided stainless steel hoses for long-term safety and peace of mind.
Can you use JB Weld on plumbing?
You can use specialized waterproof epoxy putties like JB Weld for emergency temporary fixes on dry, non-pressurized drain pipes or minor exterior leaks. However, professionals emphasize that this is strictly a short-term band-aid until a licensed plumber can properly replace the compromised pipe or fitting.
Conclusion and Next Step
Implementing these proactive summer plumbing tips ensures that Miami homeowners can protect their properties from unexpected water damage, lower utility bills, and enjoy a stress-free season.
Need Help With Any of These?
Whether you need help inspecting a stubborn line or scheduling a comprehensive whole-home plumbing evaluation, our licensed experts are here to keep your system running smoothly. Book a plumber today to safeguard your home before peak summer usage begins.
Article Information
Author: Content Strategy & Editorial Team
Reviewed by: Licensed Master Plumber
Last Updated: October 2026
Main Services
Related Posts
Need a Plumber in Miami?
Schedule service online or speak directly with the EZ Plumbing team.
Owner-Led Local Service
Know who is behind the business before you request service. The owners, contact line and Miami service pages are published clearly.
- Named business owners
- Direct phone and social channels
- Local Miami service information
Clear Help Before You Book
Review the relevant service page, contact the team directly and use the booking page when you are ready—without relying on vague claims.
- Service-specific information
- Direct questions before scheduling
- Clear online booking route