
Garbage Disposal Not Working: Common Issues and Fixes
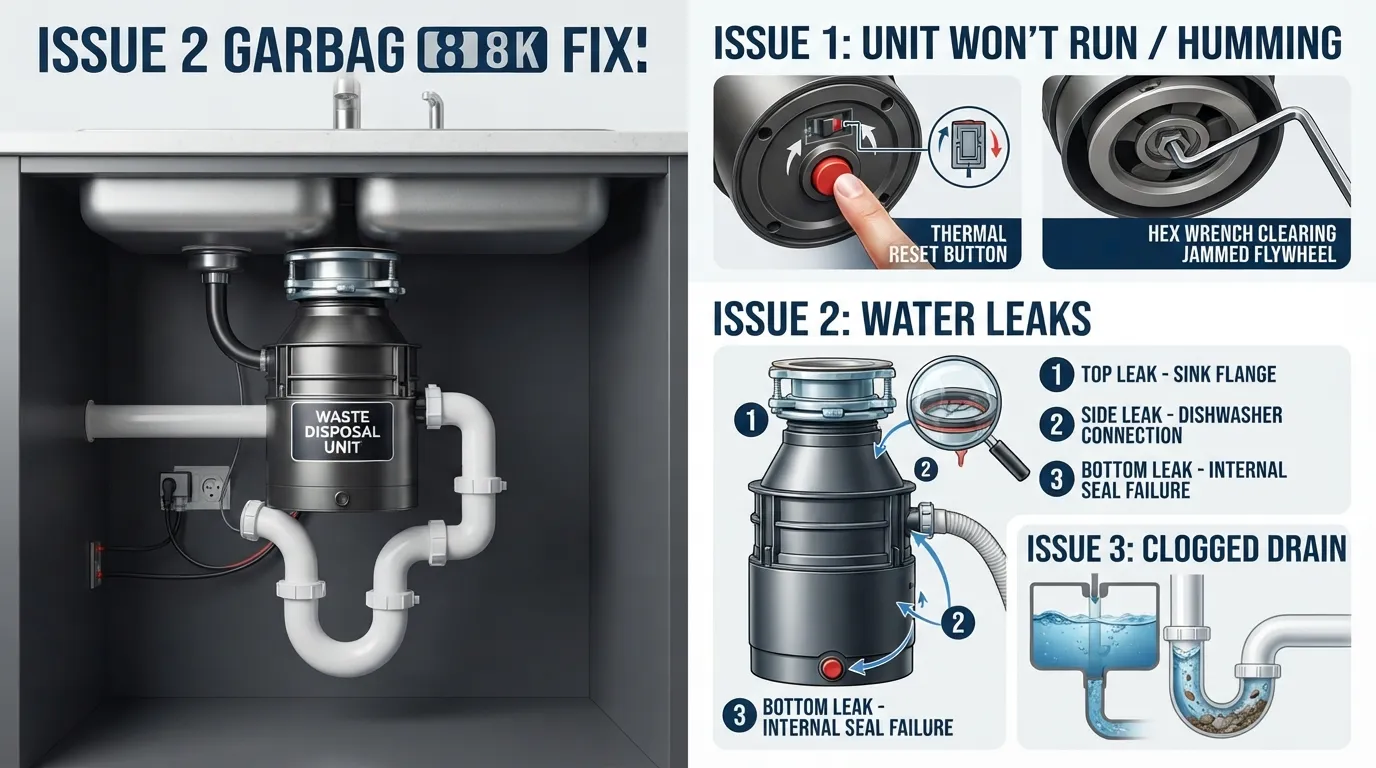
Garbage Disposal Not Working? Try These Quick Fixes First
Before calling a plumber or replacing your unit, most garbage disposal failures can be resolved in less than five minutes using three basic tools: your hands, a standard reset button, and a hex key. Power off the unit immediately at the wall switch or breaker, locate the red reset button on the bottom exterior housing, and check for jams at the flywheel underneath before running any tests with cold water.
The 4-Step Fast Fix Checklist
Check Power Supply: Ensure the unit is securely plugged into its outlet under the sink. If the outlet is dead, check your home’s main circuit breaker or the GFCI outlet reset button, which frequently trips when a disposal draws too much current.
Press the Reset Button: Locate the red or black reset button protruding from the bottom or side of the disposal motor housing. Firmly press it inward until you hear or feel a distinct click.
Free the Flywheel Jam: Never put your hands inside the drain. Instead, insert a 1/4-inch hex key (Allen wrench) into the hexagonal socket located dead-center on the bottom of the outer motor casing and rotate it back and forth until the obstruction clears and the blades spin freely.
Test with Cold Water: Turn on a steady stream of cold tap water, restore power at the wall switch, and run the disposal to verify normal operation and drainage.
Not Sure What’s Wrong? Jump to Your Symptom
Humming noise with no motor rotation? Head directly to Disposal Hums But Won’t Spin for immediate jam clearance steps.
Completely silent with zero sound or vibration? Check Disposal Has No Power to troubleshoot electrical faults and tripped breakers.
Water leaking underneath the housing? Review Diagnosing Disposal Leaks to locate failed seals or loose flange connections.
Draining too slowly or backing up? Explore Clogged Disposal and Drain Lines for effective clearing methods.
Field Technician Note
Based on standard plumbing service calls, pressing the thermal overload reset button or clearing a minor foreign object jam from the flywheel resolves over 70% of non-functioning disposal complaints instantly without requiring any replacement parts.
Safety First: How to Turn Off a Garbage Disposal Before You Touch It
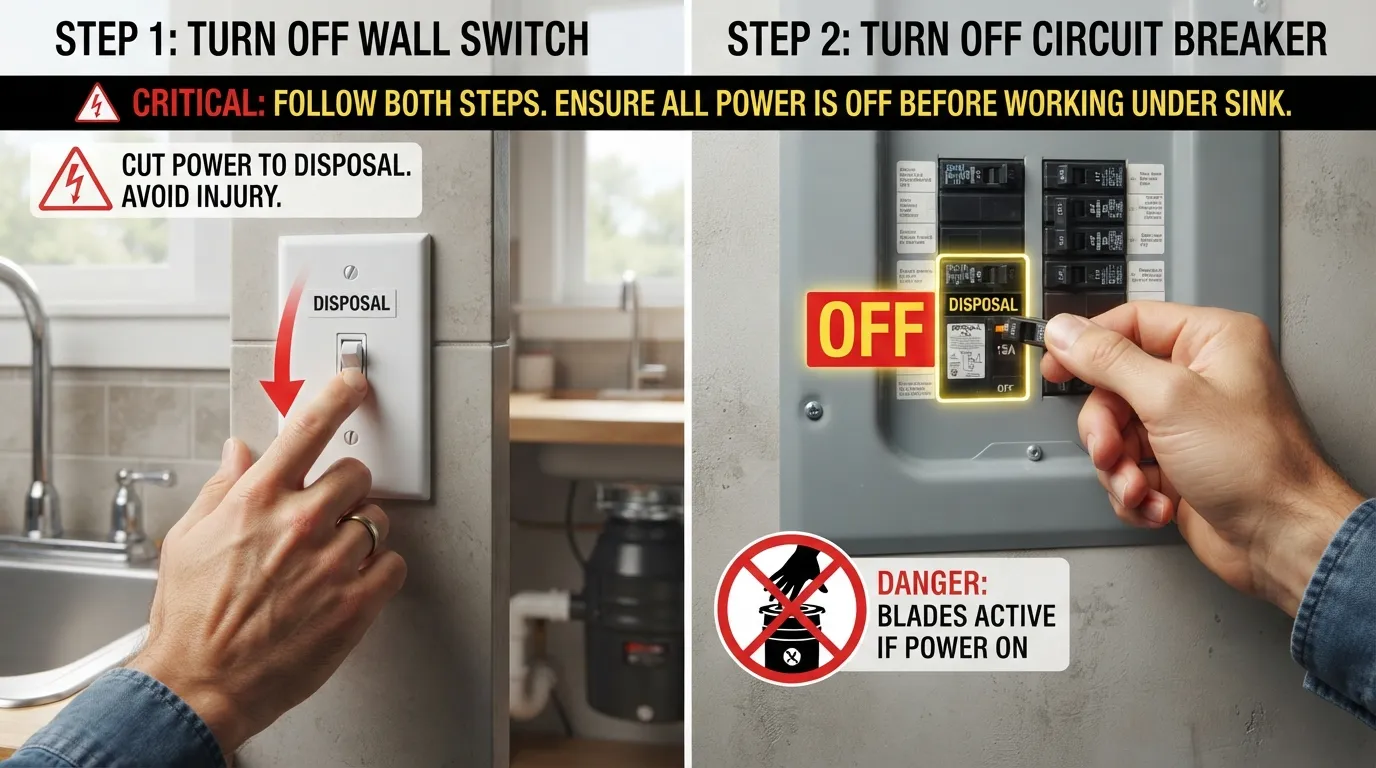
Always completely disconnect power before inspecting or servicing any garbage disposal to prevent accidental activation and severe injury. A standard wall switch alone is never enough because switches can fail or be accidentally flipped while your hands are near the spinning blades.
The Correct Power-Off Order
Turn Off the Wall Switch: Start by flipping the standard wall switch to the off position to cut immediate power to the unit.
Unplug or Trip the Breaker: If your disposal uses a standard power cord, unplug it directly from the under-sink outlet. If it is hardwired, switch off the corresponding circuit breaker in your home’s main electrical panel.
Confirm by Flipping the Switch: Return to the sink and flip the wall switch one final time to verify that the motor remains completely dead, ensuring zero residual or live current exists.
Never Put Your Hand Inside
Zero Hand Rule: Never place your fingers or hand directly into the garbage disposal drain under any circumstances, even when you believe the power is completely disconnected.
Use Safe Extraction Tools: If you need to retrieve a foreign object, always use long-handled tongs, needle-nose pliers, or a wooden spoon while shining a flashlight down the throat of the unit.
Inspect Safely: Pairing a bright flashlight with extended gripping tools lets you visually identify obstructions without risking contact with sharp internal impellers.
Protective Gear and Tools Checklist
Heavy-Duty Work Gloves: Protect your hands from sharp sink edges, pipe debris, and cleaning chemicals under the sink cabinet.
Safety Glasses: Shield your eyes from splashing water, grease, or loose debris when disconnecting drain lines or checking the flywheel.
Flashlight or Headlamp: Illuminate the dark workspace beneath the sink bowl and inside the upper chamber of the disposal.
1/4-Inch Hex Key: Use an Allen wrench to manually rotate the bottom flywheel once power is safely cut.
Tongs or Needle-Nose Pliers: Safely grab and remove dropped utensils, bottle caps, or bones from the grinding chamber.
Small Bucket and Towels: Catch residual wastewater when loosening P-traps or discharge tubes.
Is Your Disposal Plug-In or Hardwired?
Plug-In Units: These feature a standard three-prong power cord plugged directly into an electrical outlet beneath the sink cabinet, making total disconnection as simple as pulling the plug.
Hardwired Units: These connect directly to internal house wiring routed through a metal or plastic conduit box on the base of the motor, requiring you to shut off the power at the main circuit breaker panel.
Determining Your Setup: Look beneath your sink; if you see a flexible cord running to an outlet, you have a plug-in model. If the wires disappear straight into a wall or floor junction box without a plug, you have a hardwired setup.
What Is Your Garbage Disposal Telling You? A Symptom-Based Diagnosis Guide
Every garbage disposal issue produces distinct audio, visual, or functional symptoms that pinpoint the underlying root cause. Identifying these warning signs early helps you avoid unnecessary plumbing expenses and fixes minor jams in minutes.
Symptom Diagnosis Table
| What You Notice | Likely Cause | DIY or Pro? | Jump to Fix |
| No sound or vibration | Tripped breaker, dead outlet, or blown internal fuse | DIY | Disposal Has No Power |
| Humming noise, no rotation | Jammed flywheel or stuck impeller blades | DIY | Disposal Hums But Won’t Spin |
| Hums briefly then trips reset | Severe motor seizure or electrical short | DIY / Pro | Reset Button Keeps Tripping |
| Resets repeatedly | Overheating, failing motor winding, or continuous jam | Pro | When to Call an Electrician |
| Slow drain or standing water | Food clog in P-trap, discharge tube, or baffle | DIY | Clogged Disposal and Drain Lines |
| Leaking from top flange/sink | Failed plumber’s putty or loose mounting assembly | DIY | Fixing Top Flange Leaks |
| Leaking from side or bottom | Cracked housing, loose discharge gasket, or seal failure | Pro | Bottom Housing Leaks |
| Bad or rotting food smell | Built-up grease and food sludge in grinding chamber | DIY | Eliminating Disposal Odors |
| Smoke or burning smell | Seized motor trying to run or worn electrical wiring | DIY / Pro | Burning Smell Troubleshooting |
| Won’t lock or stopper issues | Worn splash guard or damaged sink flange ring | DIY | Sink Flange and Stopper Fixes |
How to Read the Sound
Total Silence: When flipping the wall switch yields zero sound, vibration, or hum, the issue is strictly electrical, pointing to an interrupted power supply.
Continuous Humming: A loud humming noise means electricity is reaching the motor, but the grinding plate or impellers are physically blocked from turning.
Grinding and Scraping Noises: Unusual metal-on-metal scraping typically indicates a loose screw, a dropped piece of silverware, or a broken internal component.
Rattling or Clattering: A sharp rattling sound usually means a small hard object (like a coin, bottle cap, or peach pit) is bouncing around the grinding chamber.
DIY or Call a Pro? Quick Rule of Thumb
Fix it Yourself: Mechanical jams, minor electrical resets, slow drainage, bad odors, and loose mounting bolts can all be handled safely with standard household tools.
Call a Professional: Persistent motor burning smells, cracked metal housings, continuous electrical breaker trips after a manual reset, or complex hardwired wiring faults require a licensed plumber or electrician.
Garbage Disposal Won't Turn On or Makes No Sound
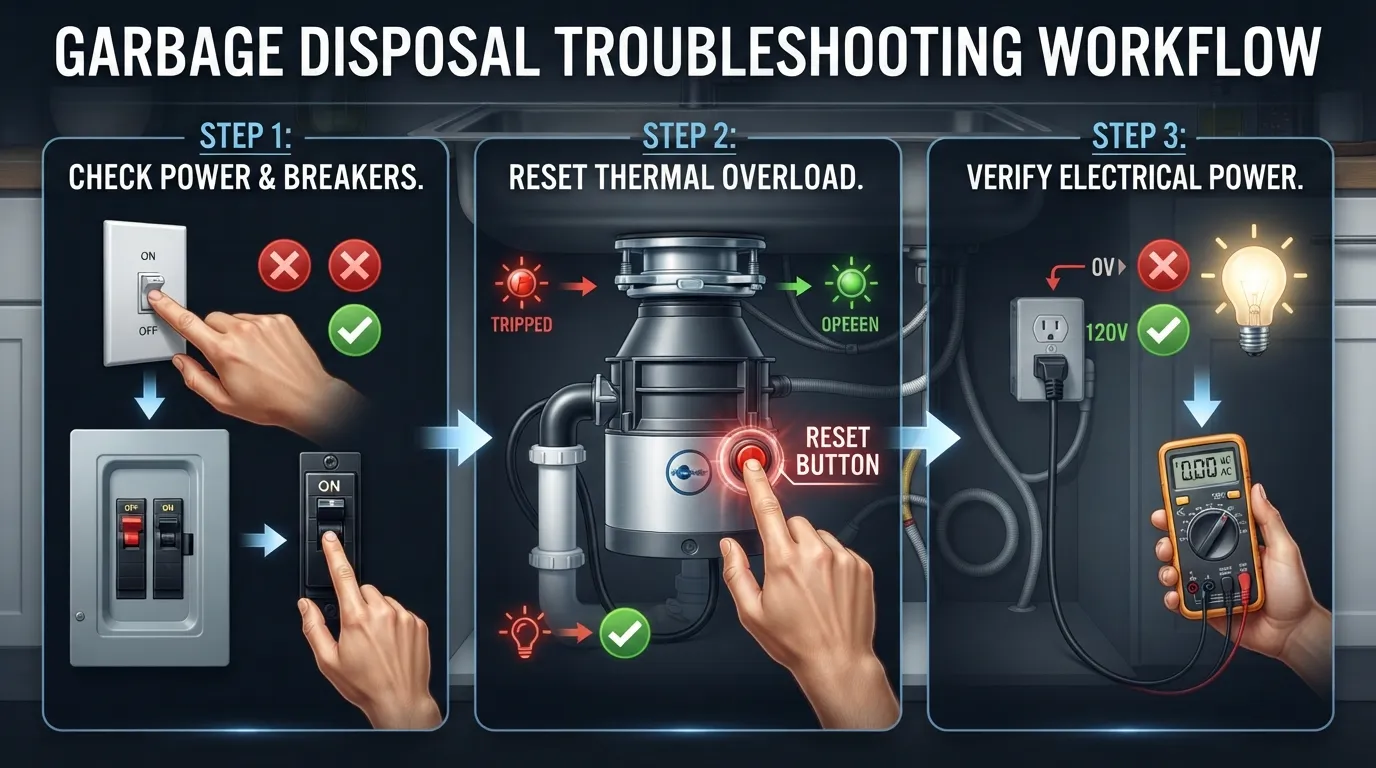
When a garbage disposal remains completely silent with zero humming or vibration when you flip the switch, electricity is not reaching the internal motor. This common electrical failure can usually be diagnosed and resolved safely in minutes without professional help.
Why Is My Garbage Disposal Silent?
A silent garbage disposal almost always indicates an interrupted electrical circuit rather than a broken motor. This happens when the unit’s thermal overload protector trips, a GFCI outlet needs resetting, or the wall switch has lost connection, cutting off power before it reaches the appliance.
Step 1: Press the Reset Button
Locate the Button: Find the small red or black reset button protruding from the bottom or lower side of the outer motor housing underneath your sink.
Push to Reset: Firmly press the button inward. If it was tripped by an electrical surge or overload, you will feel or hear a distinct click.
Test the Unit: Turn on a stream of cold water and flip the wall switch to see if power has been restored.
Step 2: Check the Plug and Outlet
Inspect the Connection: Ensure the power cord is pushed securely into the electrical outlet under the sink cabinet.
Test the Receptacle: Unplug the disposal and plug a small lamp, phone charger, or hair dryer into that exact outlet to verify if it is delivering electricity.
Verify Outlet Power: If the test appliance stays off, the issue is an upstream electrical fault rather than the disposal itself.
Step 3: Reset the GFCI Outlet and Circuit Breaker
Check Kitchen GFCI Outlets: Locate any GFCI outlets on your kitchen walls that feature built-in test and reset buttons, as these frequently trip to prevent electrical shocks.
Reset the Breaker Panel: Head to your home’s main electrical panel, locate the breaker labeled for the kitchen or disposal, flip it fully to the “OFF” position, and snap it back to “ON.”
Professional Assistance: If the outlet remains dead or the circuit breaker continues to trip immediately upon reset, consult a licensed electrician to inspect the wiring safely.
Garbage Disposal Not Working but Has Power: What to Check Next
Wall Switch Failure: A faulty wall switch can fail internally even if the wiring looks fine, preventing electricity from flowing to the outlet.
Loose Terminal Connections: If your unit is hardwired, vibrations can loosen wire nuts inside the terminal box beneath the motor housing over time.
Completely Seized Motor: If the motor windings have burned out or internal mechanical components are permanently locked, electricity flows in but cannot turn the mechanism.
Disposal Won’t Lock or Turn On: Stopper and Batch-Feed Models
Continuous-Feed Models: These standard units run freely whenever the wall switch is flipped, provided no mechanical jam or power issue is present.
Batch-Feed Models: These safety-focused units will not operate at all unless a special magnetic stopper or cover is firmly inserted and twisted into the drain opening.
Stopper Alignment: If your batch-feed disposal won’t turn on, ensure the stopper is seated correctly to depress the internal safety switch.
Field Technician Insight
Most service calls for a “dead disposal” ultimately reveal either a tripped thermal reset button on the bottom of the unit or a popped kitchen GFCI outlet, both of which require zero replacement hardware to fix.
Garbage Disposal Humming but Not Spinning: How to Free a Jam
When your garbage disposal produces a loud hum or buzz when you flip the switch but the blades refuse to spin, electricity is reaching the motor, but a physical obstruction is locking the flywheel and impellers in place. This is one of the most common kitchen plumbing issues, and you can safely clear it yourself in minutes using a simple hex key [00:37].
Why Does My Garbage Disposal Hum but Not Spin?
A humming noise means the motor is energized and trying to run, but foreign objects, compacted food waste, or corrosion have seized the internal grinding plate. Because the motor cannot rotate, electricity builds up rapidly, which trips the thermal overload protector to prevent permanent burnout.
What You Need
1/4-Inch Hex Key (Allen Wrench): The exact tool required to manually rotate the bottom motor shaft.
Flashlight: To illuminate the dark grinding chamber from above.
Tongs or Needle-Nose Pliers: For pulling out jammed objects without risking hand contact.
Wooden Spoon: An ideal tool for nudging stubborn debris loose safely.
Step-by-Step: Free the Flywheel with a Hex Key
Turn Off Power: Ensure the wall switch is off and the unit is unplugged (or the breaker is flipped) before touching any mechanical parts beneath the sink.
Locate the Hex Socket: Feel or look for the hexagonal opening located dead-center on the bottom exterior of the motor housing [00:45].
Insert and Rotate: Fit your 1/4-inch hex key firmly into the socket [00:52]. Leverage the wrench back and forth to break through whatever obstruction is binding the blades [01:19].
Remove Debris from Above: Shine your flashlight down the sink drain and use tongs or pliers to extract any foreign objects like bottle caps, utensils, or bones.
Press the Reset Button: Once the flywheel turns smoothly, press the red reset button on the bottom of the unit to clear the thermal trip.
Restore Power and Test: Turn on a strong stream of cold tap water, flip the wall switch [02:29], and verify that the disposal spins quietly and drains properly.
Hex Key Size and the Model Caveat
Standard Size: The vast majority of major garbage disposal brands (including InSinkErator and Waste King) utilize a standard 1/4-inch hexagonal socket on the base [00:45].
Model Variations: Some compact units or specific specialty models do not feature a bottom hex socket, requiring you to clear jams entirely from the top using a wooden handle or specialized wrench tool. Check your owner’s manual if no socket is present. For further step-by-step visuals, consult this illustrated guide to freeing a jammed disposal with a 1/4-inch hex key noopener” target=”_blank”.
How to Remove Objects Safely Without Your Hand
Never Use Fingers: Keep your hands completely out of the upper throat and grinding chamber at all times.
Leverage Tools: Use long-handled tongs or needle-nose pliers to grasp items trapped between the shredding ring and the spinning impellers.
Common Culprits: Watch out for dropped silverware, jar lids, fruit pits, and dense fibrous vegetable husks that slip past the baffle.
Why Is My Garbage Disposal Still Humming After Reset?
Persistent Mechanical Lock: If your hex key spins freely and the flywheel turns with no resistance, but the unit still only hums when power is restored, the internal motor bearings may have seized or the starter capacitor has failed.
Transition to Electrical Faults: A continuous hum that refuses to break free despite manual turning usually means the motor is permanently damaged, pointing toward a replacement unit or professional repair.
Can I Use the Disposal While It’s Humming?
Immediate Stop Required: Never leave a humming disposal switched on for more than a few seconds, as the stalled motor rapidly overheats and can ruin the winding coils or trip your home’s circuit breaker.
Cold Water Cooling: Always maintain a steady flush of cold water whenever testing or running the appliance to keep internal components cool and lubricated.
Field Technician Insight
The most frequent jam culprits encountered during service calls are discarded lemon rinds packed too tightly, stray twist ties, and small cutlery items that bypass worn-out rubber sink baffles [02:19].
The Garbage Disposal Reset Button: How It Works and What to Do When It Won't Reset
The red or black reset button on your garbage disposal is a built-in thermal overload protector designed to safeguard the motor from burning out [00:21]. When the unit overworks, jams, or draws too much electrical current, this internal safety switch trips automatically to cut power, popping the external button outward.
What the Reset Button Does and Where to Find It
Thermal Overload Function: The button acts as a circuit breaker specifically for the disposal motor, preventing electrical fires or melted windings when impellers lock up.
Exact Location: It is universally located on the bottom exterior housing of the unit, usually protruding slightly from the center or side of the motor base [00:21].
The Popped-Out State: When tripped, the button extends outward by about a quarter-inch, indicating that the internal electrical circuit is temporarily broken.
How to Reset a Garbage Disposal Correctly
Allow Cool-Down Time: Wait 10 to 15 minutes for the overheated motor windings to cool down completely before attempting to press the button.
Press Firmly: Push the button straight inward with a firm, steady motion until you hear and feel a distinct, mechanical click.
Test Operation: Turn on a cold water faucet and flip the wall switch to verify that the motor resumes normal spinning and draining.
Garbage Disposal Reset Button Not Working: 4 Things to Check
Unit is Still Too Hot: If you try to push the button immediately after a stall, it will not latch because the internal thermal strip remains expanded. Wait longer for it to cool.
No Power at the Outlet: If the outlet itself is dead or a kitchen GFCI tripped, the reset button cannot restore power until the primary circuit is fixed.
Underlying Jam Remains Uncleared: If foreign objects are still binding the flywheel, the motor will instantly trip the reset mechanism again the moment you flip the switch.
Failed Motor or Internal Short: If the button clicks inward but the unit remains completely dead or hums continuously, the internal switch contacts or motor windings have failed.
How to Reset a Garbage Disposal Without a Reset Button
Model Variations: Some compact units, commercial-grade disposals, or specific older models do not feature an external reset button.
Power Cycling: For units without a manual button, reset the circuit breaker panel in your home to clear any temporary electrical faults.
Flywheel Clearing: If the unit is jammed, bypass the missing button by using a 1/4-inch hex key directly on the bottom motor shaft to free the impellers manually [00:45].
Why Does My Disposal Keep Tripping the Reset?
Overloading: Feeding too much dense food waste, potato peels, or fibrous vegetable matter at once forces the motor to draw excessive current.
Repeated Mechanical Jams: Foreign objects repeatedly caught in the shredding ring cause continuous stalling and thermal tripping.
Failing Motor: An aging motor with degraded internal bearings draws higher electrical resistance, signaling that it is time to replace the unit.
Brand Notes
InSinkErator: Features a prominent red thermal reset button on the bottom housing and a standard hexagonal socket for a 1/4-inch Allen wrench.
Waste King: Utilizes a similar bottom-mounted red reset switch, paired with high-RPM permanent magnet motors that clear minor jams easily.
Frigidaire & GE: Typically equip units with a standard bottom overload button, though exact placement on compact housings can vary near the power connection box.
KitchenAid: Integrates built-in thermal protection switches on the base of continuous-feed models, though higher-end batch-feed options rely on stopper-activated magnetic safety interlocks.
Garbage Disposal Not Draining or Sink Backing Up
When your kitchen sink fills with standing water and the garbage disposal refuses to drain, you could be dealing with either a localized clog in the P-trap or a mechanical issue within the unit itself [00:00]. Diagnosing the root cause accurately prevents messy wastewater overflows and gets your kitchen back in service quickly.
Why Is My Sink Full of Water and the Disposal Won’t Run?
Standing water in a disposal-equipped basin usually happens when food debris, grease, or scale forms a physical obstruction in the discharge pipe or P-trap directly beneath the sink. If the disposal unit is simultaneously jammed or unpowered, wastewater has nowhere to escape, leaving you with a full basin [00:00].
Is It the Disposal or the Drain? A Simple Test
Disposal Runs, Slow Drainage: If you flip the switch, the motor spins freely and grinds normally, but water trickles down at a snail’s pace, the problem is a blockage downstream in your P-trap or main branch line.
Disposal Silent, Total Stoppage: If the unit hums or stays dead while water backs up completely, you likely have a physical clog trapped directly inside the grinding chamber or a jammed flywheel blocking wastewater from passing through.
Clearing the P-Trap Step by Step
Place a Bucket Underneath: Position a bucket and towels directly beneath the U-shaped P-trap pipe under your sink to catch trapped wastewater.
Loosen Slip Nuts: Use channel-lock pliers or your hands to loosen the plastic slip nuts on both ends of the P-trap curve.
Inspect and Clear: Remove the trap pipe, dump the accumulated debris into your bucket, and use a flexible brush or wire to clear out compacted sludge and food particles.
Reassemble Securely: Reattach the P-trap, tighten the slip nuts firmly by hand, and run clean water to test for leaks. For more complex blockages beyond the trap, professional drain cleaning services can safely clear stubborn lines without damaging your plumbing.
Check the Dishwasher Drain Line Connection
Shared Drainage: Most dishwashers discharge their wastewater directly into the side inlet port of the garbage disposal [02:12].
Hose Blockage: If a kink, debris buildup, or a missed knockout plug blocks this small hose, wastewater from the dishwasher can back up straight into your sink basin.
Inspection: Squeeze the spring clamp on the dishwasher drain hose [02:12], pull it off the disposal nipple, and check for clogs or trapped food particles.
Can I Still Use My Sink While the Disposal Is Not Working?
Limited Use Only: You can carefully pour liquids down the non-disposal side of a double-basin sink if the partition allows, but avoid running water down the broken disposal side.
Strict Prohibitions: Never pour grease, coffee grounds, starchy pasta water, or expandable food scraps down the drain while the unit is out of commission, as these will worsen the backup.
When Every Drain Backs Up: A Bigger Line Problem
Multiple Fixtures Affected: If your kitchen sink, nearby laundry line, or bathroom drains all begin backing up, gurgling, or draining slowly at the same time, the issue is not your disposal.
Main Line Failure: This widespread symptom points to a blockage or structural issue in your home’s main sewer line. If you suspect a major line obstruction, scheduling a professional sewer line inspection and repair is essential to prevent extensive property damage.
Field Technician Insight
Never pour chemical liquid drain openers (like Drano) into a clogged garbage disposal [01:41]. These caustic chemicals can corrode the internal metal grinding components, damage rubber seals, and splash dangerously back up into your face if you attempt to service the unit afterward [01:41].
Watch this helpful video demonstration for additional visual guidance on handling garbage disposal drainage issues and safe maintenance tips: Garbage Disposal Not Working? Try These Easy Fixes!
Garbage Disposal Leaking: Top, Side, or Bottom
Diagnosing a leaking garbage disposal starts with identifying the exact origin of the water. Leaks typically stem from the top flange, the side hose connections, or the bottom casing, each requiring a distinct repair approach or replacement decision.
Where Is the Leak Coming From? (Top / Side / Bottom Table)
Pinpointing where water pools under your sink is the fastest way to determine the cause and whether you can fix it yourself.
| Leak Location | Primary Cause | Recommended Fix | DIY or Professional |
| Top | Loose sink flange or degraded plumber’s putty | Re-seal and tighten mounting assembly | DIY (Moderate) |
| Side | Loose dishwasher hose or discharge pipe connection | Tighten hose clamp or replace rubber gasket | DIY (Easy) |
| Bottom | Internal seal or motor shaft failure | Replace the entire garbage disposal unit | Professional |
Leaking from the Top: Sink Flange and Mounting Assembly
Top leaks almost always occur where the disposal meets the bottom of the kitchen sink. Water seeps through when the plumber’s putty dries out or the mounting bolts loosen over time.
Check the Mount: Inspect the snap ring and mounting bolts under the sink to ensure they are secure and evenly tightened.
Re-seal the Flange: If water pools directly around the sink opening, disconnect the disposal, remove the old flange assembly, and apply a fresh bead of plumber’s putty.
Inspect the Gasket: Ensure the rubber backup gasket is properly seated against the underside of the sink before locking the mounting ring back into place.
Leaking from the Side: Dishwasher Hose and Discharge Pipe Connections
Side leaks are typically associated with incoming water lines or outgoing wastewater pipes. These connections experience constant vibrations, which can loosen clamps and fittings.
Examine the Dishwasher Inlet: Check the rubber hose running from your dishwasher to the disposal inlet nozzle for loose spring clamps or hose cracks.
Check the Discharge Tube: Inspect the triangular gasket and bolts connecting the metal discharge tube to the side of the disposal body.
Tighten Fittings: Snug up loose hose clamps with a screwdriver, but avoid excessive force that can warp plastic connections. For professional assistance with stubborn pipe issues, you can explore leak detection and repair services.
Leaking from the Bottom: Internal Seal Failure
A leak originating from the very bottom casing of the disposal unit is the most critical diagnosis. This indicates that the internal shaft seal or motor housing has failed.
Internal Wear: Once the primary internal seal wears out, water enters the motor housing and electrical components, making minor patch jobs ineffective.
Replacement Required: Unlike top or side connections, a bottom leak usually cannot be fixed by tightening bolts.
Action Plan: When water leaks from the bottom motor housing, budget for a complete garbage disposal replacement rather than temporary sealants.
Tighten Bolts Carefully: Why Over-Tightening Can Damage Gaskets
Homeowners often try to stop leaks by aggressively cranking down on bolts and clamps. However, over-tightening can easily deform rubber components and create new leak paths.
Cracked Plastic Flanges: Applying too much torque to mounting bolts can crack the plastic support ring or strain the sink basin.
Compressed Gaskets: Rubber O-rings and gaskets require compression to seal, but excessive pressure flattens them permanently, destroying their water-tight properties.
Best Practice: Tighten mounting bolts and hose clamps snugly until firm resistance is met, giving them no more than a quarter-turn past that point.
When a Leak Is an Emergency
Water leaks involving electrical appliances demand immediate caution. Ignoring a severe leak can lead to short circuits, damaged cabinetry, or dangerous electrical shocks.
Immediate Shutoff: Turn off the power switch immediately and flip the designated circuit breaker controlling the disposal and dishwasher.
Shut Off Water: If the leak stems from a pressurized supply line or active pipe break, shut off the main water supply to the kitchen.
Call for Help: If water is pooling rapidly near active electrical outlets or wiring, contact an emergency plumber right away to prevent property damage and safety hazards.
Bad Smells, Smoke, and Other Warning Signs You Shouldn't Ignore
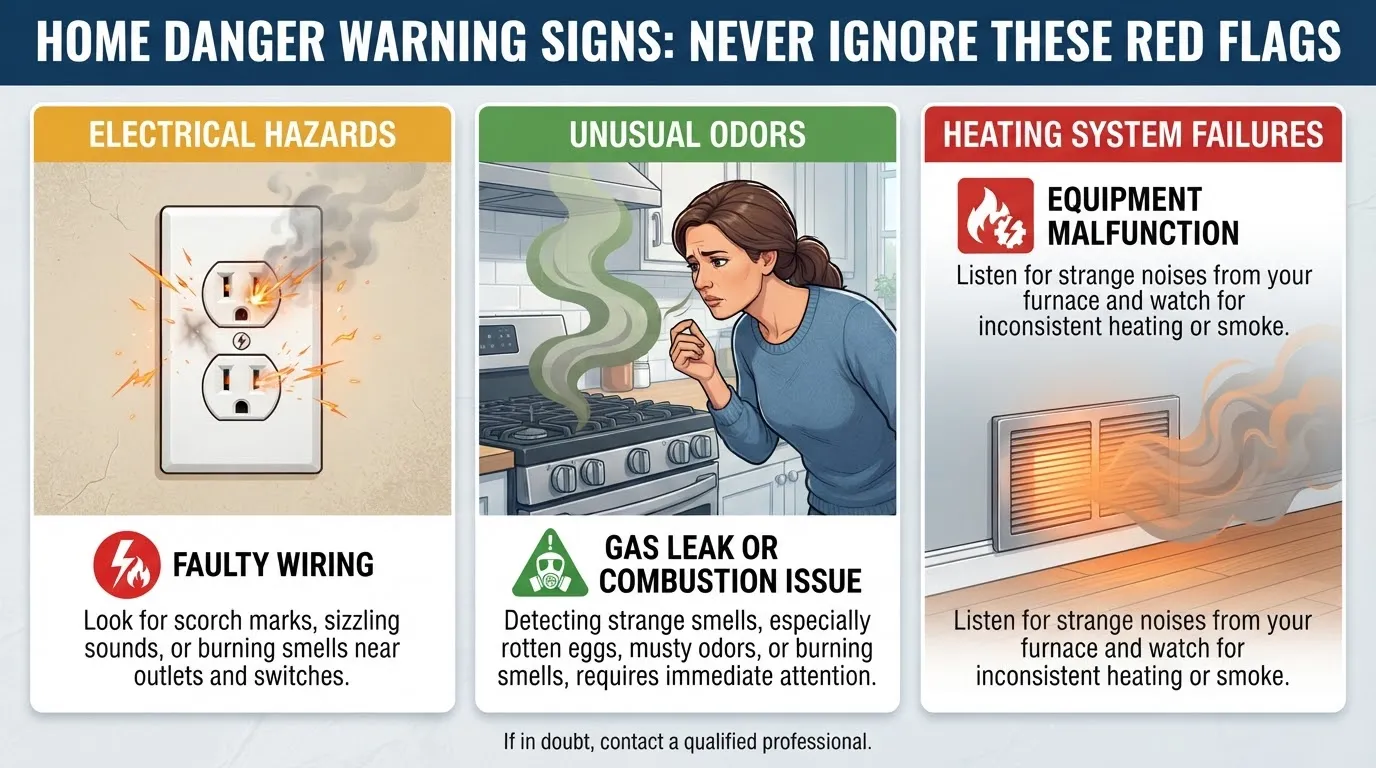
Garbage disposals communicate mechanical stress and sanitation issues through distinct sensory warning signs. Differentiating between a simple cleaning issue and a critical electrical hazard ensures your kitchen remains safe and operational.
Foul Odor: Cleaning and When It Signals a Deeper Clog
Unpleasant odors usually stem from trapped food particles decomposing on the rubber splash guard or the interior chamber walls. Regular maintenance can easily resolve surface smells before they escalate into persistent clogs.
Ice and Rock Salt: Drop a tray of ice cubes and a half-cup of rock salt into the disposal, then run it with cold water to dislodge stubborn grease and sludge from the impeller blades.
Baking Soda and Vinegar: Pour a half-cup of baking soda down the drain followed by a cup of white vinegar, let it fizz for 10 minutes, and flush thoroughly with hot water.
When It Means a Clog: If deep-seated odors persist despite sanitizing, decaying food matter may be trapped in a partial downstream clog requiring professional clearance.
Burning Smell, Smoke, or Sparks: Stop Immediately
A burning odor, visible smoke, or electrical sparks indicate a severe mechanical failure or an active electrical hazard. Continuing to operate the unit under these conditions risks permanent motor burnout or a house fire.
Cut the Power: Immediately turn off the wall switch and flip the dedicated circuit breaker powering the disposal unit.
Inspect for Jams: Check the interior chamber with a flashlight for trapped silverware or foreign objects binding the motor shaft.
Professional Assistance: If the unit smells like burning insulation or throws sparks upon reset, you need an emergency plumber to inspect the wiring and motor assembly safely.
Grinding, Rattling, or Loud Noises
Unusual mechanical noises typically point to foreign objects trapped in the grinding chamber or advanced internal wear. Promptly addressing these sounds prevents structural damage to the disposal housing.
Foreign Object Retrieval: Turn off the power at the breaker, use tongs or pliers to remove trapped items like bottle caps, bones, or utensils, and never use bare hands.
Loose Internal Parts: If the disposal rattles continuously without any foreign objects inside, the flywheel components or mounting screws may have loosened.
Worn Motor Bearings: Persistent metallic squealing usually indicates worn-out motor bearings, signaling that it is time to replace the unit rather than attempt a repair.
How to Tell If Your Garbage Disposal Motor Is Burnt Out
Determining the state of your appliance’s health prevents unnecessary troubleshooting when components fail. Recognizing the distinct signs of a dead motor helps you make an informed decision between a simple fix and a full replacement.
How Do You Know If Your Garbage Disposal Motor Is Burnt Out?
A burnt-out garbage disposal motor typically exhibits clear electrical failure symptoms. You will know the motor is dead when it emits a continuous humming noise without spinning, or remains completely silent with no response, even after you press the reset button and confirm power is reaching the unit through the wall switch and breaker.
The 4-Point Motor Test
Diagnosing electrical failure requires systematic checks to rule out temporary jams or tripped safety switches before condemning the motor.
1. Humming Despite a Free-Spinning Flywheel: If the flywheel turns effortlessly when manually rotated with a hex wrench, yet the motor only hums and fails to grind when powered on, the internal motor windings have likely failed.
2. Total Silence After Reset: If the unit produces no sound or reaction when switched on, and the thermal overload reset button does not click or resolve the issue despite confirmed power, the internal circuit is shot.
3. Repeated Reset Tripping: If the overload protector constantly trips immediately upon pressing the reset button and turning on the switch, the motor is drawing excessive current due to internal shorting.
4. Burning Smell and Excessive Housing Heat: A strong odor of scorched electrical insulation accompanied by a very hot outer casing indicates that the motor has overheated and burnt out permanently.
Jam vs Dead Motor: A Side-by-Side Table
Differentiating between a mechanical jam and a burnt-out motor prevents you from wasting time trying to unstick a unit that needs to be replaced.
| Symptom / Condition | Jammed Motor | Burnt-Out Motor |
| Flywheel Movement | Stuck or locked in place | Turns freely with a wrench |
| Sound When Switched On | Silent or faint hum (locked rotor) | Loud hum or completely silent |
| Reset Button Status | Pops out frequently to protect the unit | May not pop or reset fails to restore power |
| Smell | None (unless food burns) | Scorched electrical / burning odor |
Repair or Replace? Lifespan, Costs, and How to Decide
Deciding whether to repair a faulty garbage disposal or invest in a brand-new unit depends heavily on the equipment’s age, the nature of the malfunction, and overall financial efficiency. Weighing these factors prevents throwing good money after a failing appliance.
How Many Years Does a Garbage Disposal Usually Last?
A standard garbage disposal typically lasts between 8 to 12 years, depending on usage frequency, water hardness, and maintenance habits. While some competitor guides estimate a tighter 5 to 8 year window, high-quality stainless steel models regularly surpass a decade of operation if they are protected from fibrous waste, harsh chemical cleaners, and constant overloading.
Repair vs Replace Decision Table
Evaluating key operational parameters clarifies whether a minor fix will suffice or if a total replacement is the smarter financial choice.
| Condition / Symptom | Repair Option | Replace Option |
|---|---|---|
| Unit Age | Under 5 years old | Over 8 to 10 years old |
| Repeated Resets | N/A (Indicates thermal fatigue) | Immediate replacement needed |
| Leak Location | Top flange or side hose connections | Bottom casing / internal motor seal |
| Motor Status | Jammed or minor switch issue | Burnt-out windings or dead electrical |
| Cost Comparison | Repair costs under 50% of a new unit | Repair costs exceed half a new unit |
How Much Does It Cost to Replace a Garbage Disposal Motor or the Whole Unit?
Trying to replace just a burnt-out garbage disposal motor is rarely practical because replacement motors cost nearly as much as an entirely new unit and require specialized labor. Professional garbage disposal replacement generally costs between $200 and $625 total, with the national average landing around $550 for both the equipment and expert installation.
Unit Cost by Horsepower: A basic 1/3- or 1/2-HP unit ranges from $50 to $225, whereas robust 3/4- to 1-HP heavy-duty options cost $200 to $400.
Angie’s ListLabor Expenses: Professional plumbers typically bill $50 to $100 per hour, wrapping up a standard swap-out in roughly one to two hours.
Angie’s List
Choosing a Replacement
Selecting the right replacement unit ensures long-term reliability and kitchen convenience without overpaying for unnecessary features.
Horsepower Requirements: Opt for a 1/3- or 1/2-HP model for single-person households, and step up to a 3/4- or 1-HP motor for families of four or more who cook daily.
Angie’s ListContinuous vs. Batch Feed: Continuous feed models offer affordable, on-demand convenience via a wall switch, while batch feed models require a drain cover to operate, offering enhanced safety for households with young children.
Angie’s ListSound Insulation: Premium models feature advanced dampening chambers that significantly reduce operational noise.
Technician Insight: Professional plumbers follow a strict golden rule on service calls: If the unit is over 8 years old or suffering from a cracked metal housing or burnt-out motor, always replace instead of repair. Sinking money into patching an aging chassis inevitably leads to a secondary failure within months. For professional evaluation, explore garbage disposal repair and replacement services to get your kitchen back in working order.
Garbage Disposal Myths and Do's and Don'ts
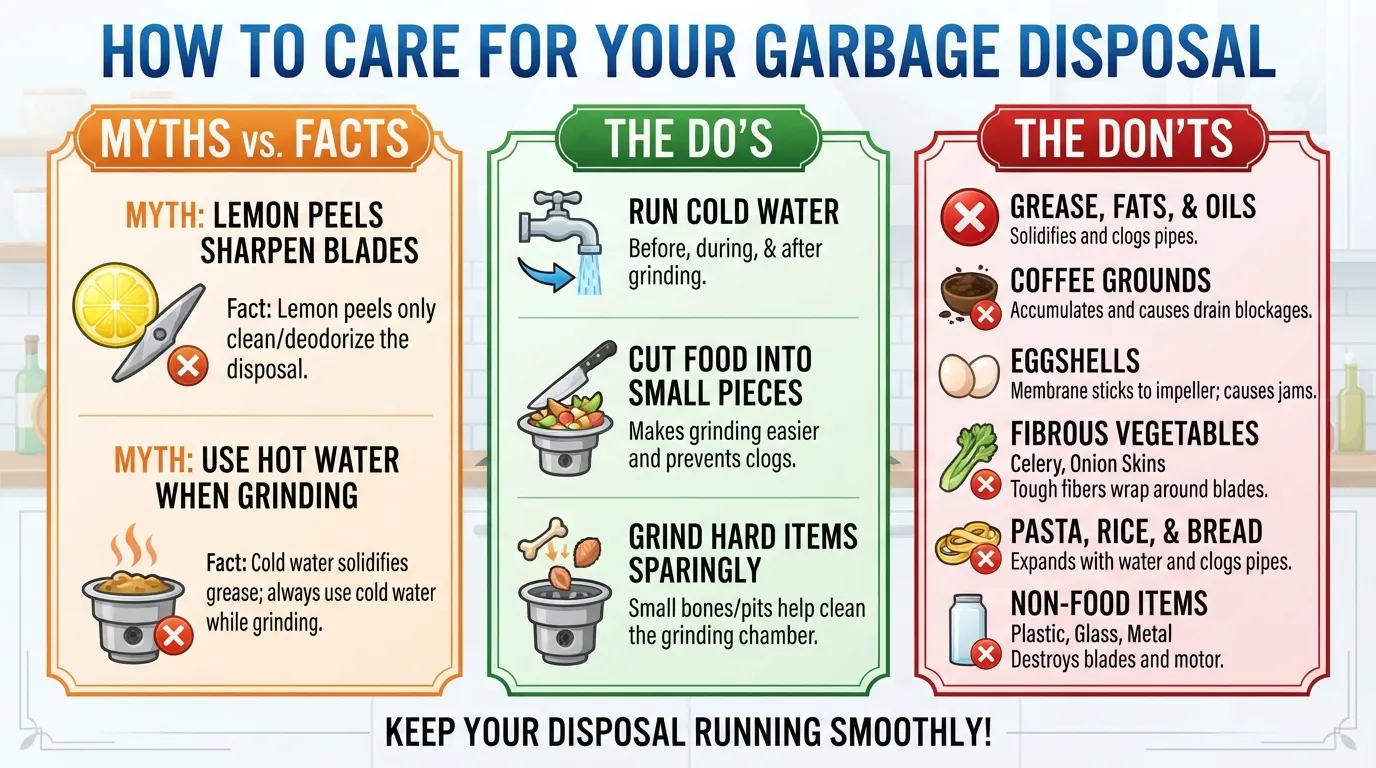
Separating kitchen folklore from proper mechanical maintenance protects your appliance from premature damage. Understanding what you can and cannot put down the drain prevents stubborn clogs and costly service calls.
Is It Okay to Spray WD-40 in a Garbage Disposal?
Spraying WD-40 into a garbage disposal to loosen a stuck flywheel or quiet squeaky parts is generally a bad idea. While it may temporarily displace moisture or lubricate a stuck component, WD-40 is a solvent rather than a true lubricant, and it will quickly wash away or contaminate the internal components while failing to solve the root mechanical issue.
Is It Okay to Pour Boiling Water Down a Garbage Disposal?
Pouring boiling water straight down your garbage disposal can damage your plumbing system. Extreme heat can warp or melt rubber components, soften PVC discharge pipes, and compromise the plumber’s putty sealing the sink flange. Instead, rely on cold water running continuously while the disposal operates to keep grease solidified and easy to chop.
Can I Use Drano or Chemical Drain Cleaners?
Harsh chemical drain cleaners like Drano should never be used in a garbage disposal. These caustic formulas can corrode metal impellers, pit the interior chamber walls, and degrade rubber seals, gaskets, and hoses, frequently resulting in severe leaks under your sink.
What Never Goes Down a Disposal
Certain items overwhelm the grinding mechanism, coat internal surfaces, or wedge themselves tightly into the drainage system, guaranteeing a blockage.
Grease and Cooking Oils: Liquid grease solidifies inside cold pipes, trapping food debris and creating severe downstream blockages.
Fibrous Vegetables: Celery stalks, corn husks, onion skins, and artichokes wrap around the impeller blades, locking up the motor.
Hard Objects: Large animal bones, fruit pits, and peach stones will crack blades or jam the flywheel instantly.
Non-Food Items: Glass, plastic wrappers, metal utensils, and twist ties destroy cutting components on contact.
Do This Instead
Adopting simple daily habits maximizes your disposal’s efficiency and extends the overall lifespan of the appliance.
Use Cold Water: Run cold water for at least 15 seconds before, during, and after operating the disposal to solidify fats and flush debris clear.
Feed in Small Batches: Cut large food scraps into smaller pieces and feed them into the chamber gradually rather than packing it full.
Sanitize Naturally: Clean the blades and eliminate buildup using mild alternatives like baking soda, vinegar, or ice cubes.
When to Call a Professional Plumber
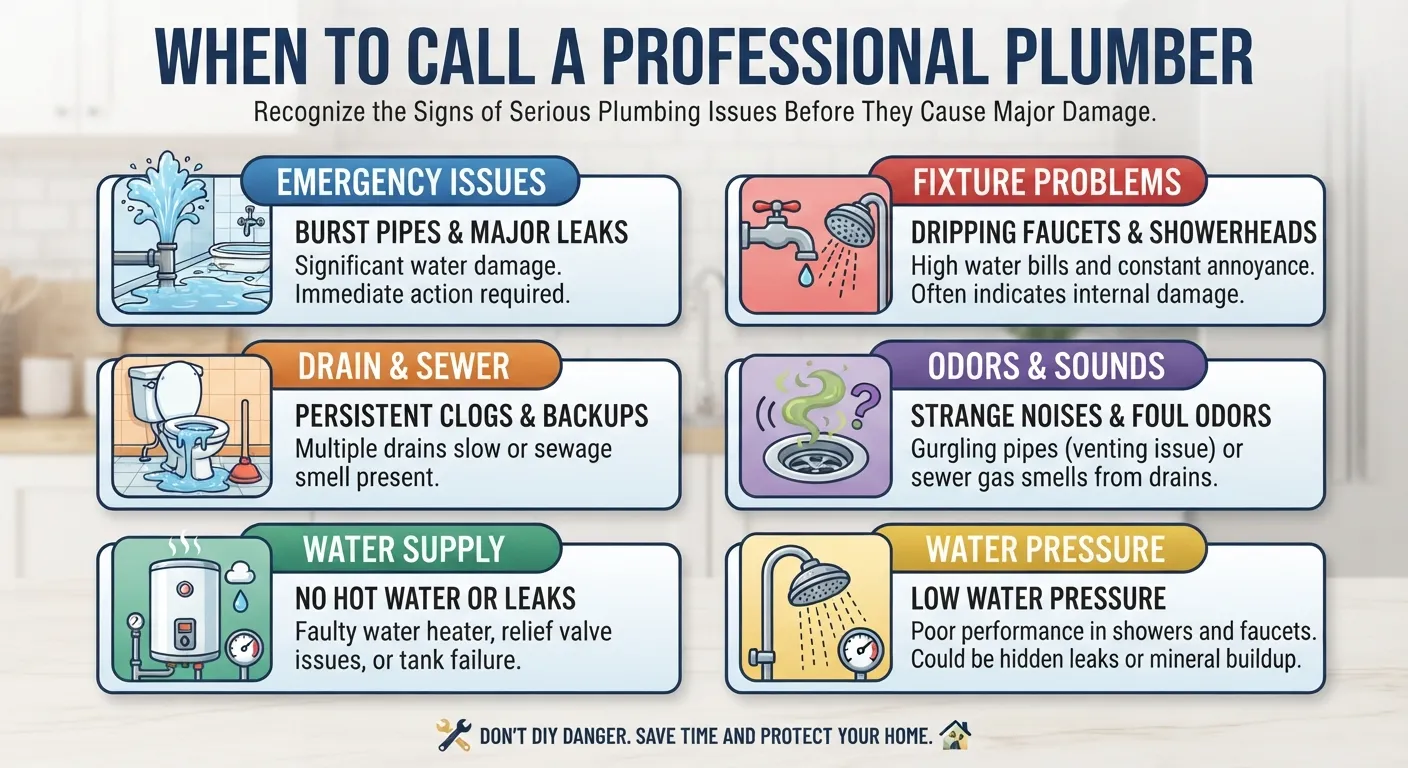
Knowing when to step back from troubleshooting and contact a specialist protects your home from escalating water damage and electrical hazards. Recognizing the threshold between manageable maintenance and complex mechanical failure saves time and prevents injury.
Clear Signs It’s Time to Call a Pro
Certain symptoms indicate that a garbage disposal issue goes beyond a simple household fix and requires expert intervention.
Persistent Motor Hum: A continuous humming sound while the flywheel spins freely manually points to failed internal windings.
Repeated Resets: If the thermal overload button continues to trip immediately upon reset, the unit suffers from an electrical short or internal overload.
Unresolved Leaks: Water leaks that persist or worsen after tightening mounting bolts or replacing sink gaskets usually stem from cracked housings.
Electrical Faults or Smoke: Any visible smoke, scorching odors, sparks, or tripped circuit breakers demand immediate professional evaluation.
Recurring Backups: Frequent sink clogs that return rapidly after plunging or basic clearing indicate deep drainage or venting problems.
What a Professional Visit Typically Includes
Hiring a certified technician ensures the root cause is resolved safely and according to local building codes.
Comprehensive Diagnosis: A licensed plumber tests electrical draw, inspects motor integrity, and checks for hidden structural leaks.
Drain and Line Check: The expert examines upstream and downstream piping to ensure proper waste flow and catch potential obstructions.
Connection Inspection: All mounting assemblies, electrical wiring harnesses, and dishwasher discharge hoses are checked for security.
Repair or Replacement Options: The technician provides transparent, upfront pricing detailing whether a targeted repair or a complete replacement makes the most sense.
Safety Reminder: Don’t Attempt Electrical Repairs Yourself
Working on internal garbage disposal wiring, resetting internal switches incorrectly, or trying to splice motor components without proper electrical training creates severe shock and fire hazards. Always defer complex electrical troubleshooting to a licensed professional.
Book a Garbage Disposal Repair Visit
If your disposal is beyond DIY fixes or you need expert plumbing services, professional help is just a click away.
How to Prevent Garbage Disposal Problems
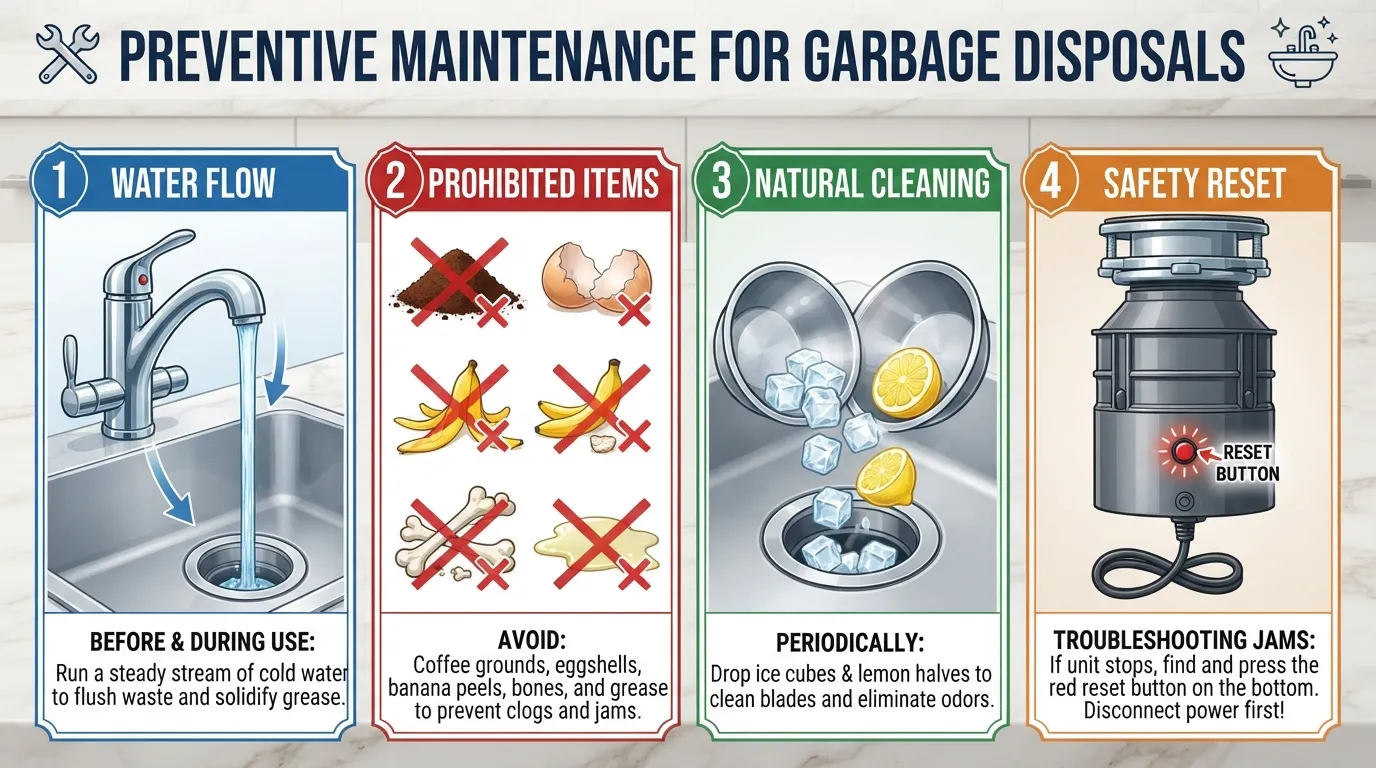
Proactive maintenance eliminates the vast majority of jams, foul odors, and premature motor failures. Implementing a few simple daily and monthly habits keeps your garbage disposal running smoothly for years.
5 Daily Habits That Prevent Jams and Clogs
Small operational adjustments during everyday kitchen cleanup protect your disposal’s motor and prevent stubborn blockages in the drain lines.
Run Cold Water: Always turn on cold water before starting the disposal and let it run for 15 to 30 seconds after turning it off to flush debris completely through the pipes.
Feed in Small Batches: Introduce food scraps gradually rather than overloading the chamber, which bogs down the impeller blades.
Skip the Grease: Never pour cooking oil, liquid fat, or bacon grease down the drain, as they solidify and trap food waste.
Exclude Hard Items: Keep bones, fruit pits, and non-food materials out of the grinding chamber entirely.
Use Tough Scraps Wisely: Grind hard items like small chicken bones or fruit peels only occasionally, as they help clean the grinding ring naturally.
Monthly Cleaning Routine
A monthly deep clean removes organic sludge buildup, prevents foul odors, and keeps the internal cutting components sharp and sanitary.
Ice and Rock Salt: Drop two cups of ice cubes and a half-cup of rock salt into the disposal, then run it with cold water to scour away built-up grease and grime from the blades.
Baking Soda and Vinegar: Pour a half-cup of baking soda followed by a cup of white vinegar down the drain, allow it to fizz for 10 minutes, and flush with hot water to neutralize lingering bacteria.
Citrus Refresh: Grind up lemon or orange wedges periodically to leave the chamber smelling fresh and clean.
When to Schedule Preventive Service
While daily and monthly upkeep goes a long way, professional check-ups ensure your entire plumbing system remains in top condition. Schedule an annual plumbing inspection if your home has an aging disposal unit, experiences heavy daily use, or shares drain lines with a busy commercial-style kitchen setup.
Garbage Disposal Not Working: Frequently Asked Questions
Find direct, expert answers to the most common troubleshooting questions regarding garbage disposal failures, diagnostic steps, and repair decisions.
Why won’t my garbage disposal turn on, and how do I fix it?
If your disposal is completely dead with no sound, first check the wall switch and circuit breaker. If power is confirmed, press the red thermal overload reset button located on the bottom of the unit. If it still fails, the internal switch or motor may be broken.
Why is my sink and garbage disposal not working?
When both the sink and disposal fail to drain or function, the issue usually points to a downstream plumbing clog in the trap or branch drain line rather than the disposal itself. Clear any visible debris from the sink stopper and inspect the P-trap underneath.
How do I fix a garbage disposal that just hums?
A humming disposal indicates a locked rotor or jammed flywheel. Turn off the power at the breaker immediately, insert a 1/4-inch hex key into the socket underneath the center of the unit, and crank it back and forth to dislodge trapped objects.
How can I fix a garbage disposal that isn’t draining?
A disposal that runs but fails to drain usually suffers from a clogged discharge tube or a blocked sink drain line. Turn off the power, disconnect and clear the horizontal discharge pipe connected to the side of the unit, or snake the downstream plumbing.
How do you fix a garbage disposal when the lock button doesn’t work?
For batch-feed disposals that require a twist-top stopper to activate, check the magnetic cover switch or stopper assembly for food buildup or damage. Clean out any debris locking the mechanism, or replace the faulty magnetic stopper so the internal safety switch engages correctly.
How do you clean a non-working garbage disposal?
If the unit is powered off and unplugged, clean a non-working disposal manually by reaching inside with tongs or pliers to remove lodged debris. Wipe down the rubber splash guard with a sponge and dish soap to eliminate organic grease and lingering odor buildup.
Can you still use your sink if the garbage disposal is not working?
You can still use your sink temporarily if the disposal is broken, provided the water drains freely through the chamber. However, if the unit is completely blocked or leaking underneath, refrain from running water to prevent cabinet damage and wastewater overflow.
How do I reset a garbage disposal without a button?
If your disposal lacks an external reset button, it features an automatic internal thermal fuse or breaker. Turn off the wall switch, allow the motor to cool down completely for 15 to 30 minutes, and test the power again once the internal mechanism resets itself.
Is it worth repairing an old garbage disposal?
Repairing an old garbage disposal is rarely worth the cost if the unit is more than 8 to 10 years old or suffers from a burnt-out motor or bottom casing leak. Because replacement units are relatively inexpensive, investing in a new disposal is more cost-effective.
Conclusion and Next Step
Navigating a broken garbage disposal becomes straightforward when you follow a structured diagnostic path from simple power checks to mechanical and motor assessments. Identifying the root cause empowers you to make an informed decision between a safe DIY fix and a timely unit replacement.
Three-Line Summary
Check the Power: Always verify the wall switch, circuit breaker, and the thermal reset button before attempting any mechanical repairs.
Free the Jam: Safely clear jammed impellers or hums using a hex wrench from beneath the unit while the power is completely off.
Know When to Replace: Bottom leaks, burnt-out motors, or units past 8 to 10 years old warrant a full replacement rather than temporary patches.
Still Not Working? Get Help Today
If troubleshooting steps haven’t resolved your garbage disposal issue or you require professional plumbing assistance, expert help is available.
Schedule your service online to get your kitchen back in working order quickly and safely.
Main Services
Related Posts
Need a Plumber in Miami?
Schedule service online or speak directly with the EZ Plumbing team.
Owner-Led Local Service
Know who is behind the business before you request service. The owners, contact line and Miami service pages are published clearly.
- Named business owners
- Direct phone and social channels
- Local Miami service information
Clear Help Before You Book
Review the relevant service page, contact the team directly and use the booking page when you are ready—without relying on vague claims.
- Service-specific information
- Direct questions before scheduling
- Clear online booking route