
Dishwasher Won’t Drain? Common Causes and Easy Fixes
Why Your Dishwasher Won’t Drain
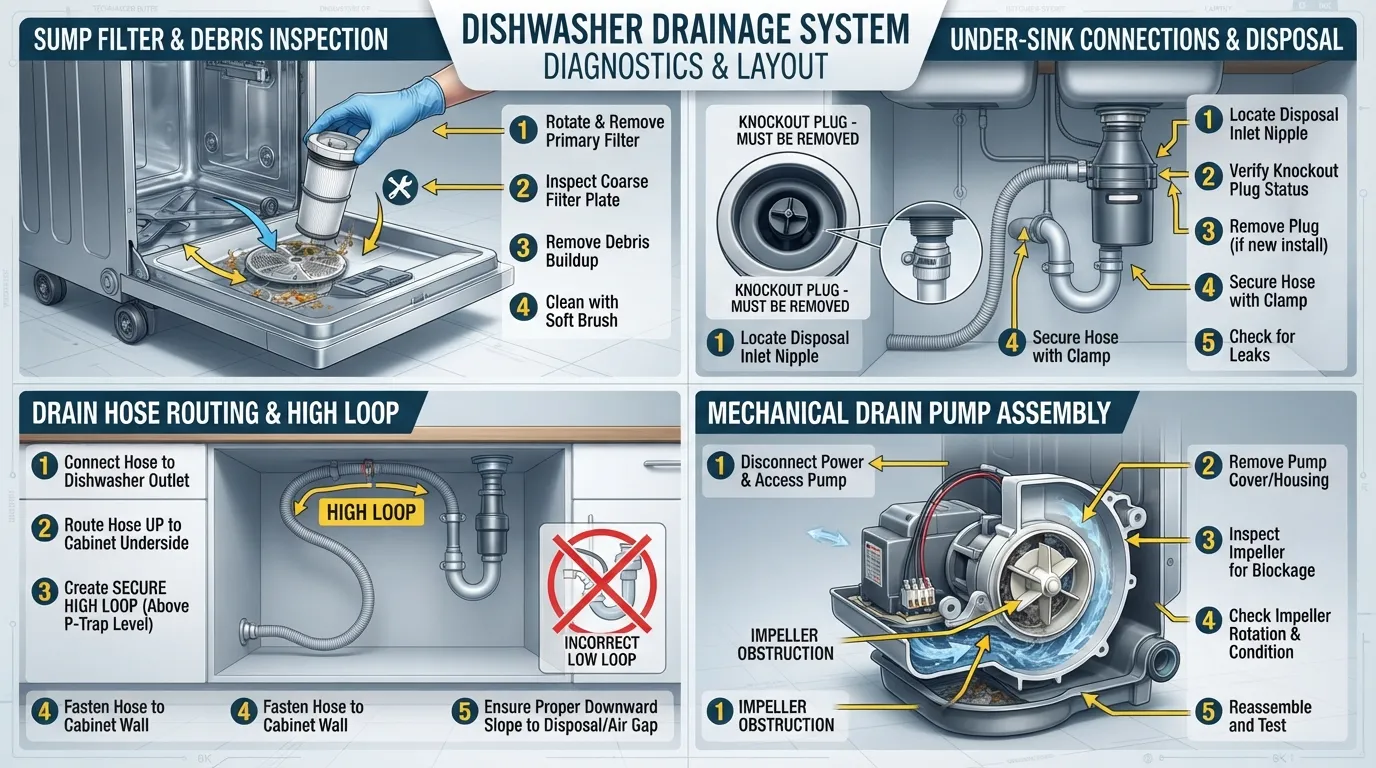
A clogged filter or a blocked drain hose is the most common cause of a dishwasher not draining, usually leaving standing water at the bottom of the tub. Resolving the issue quickly requires checking the primary components in sequence: the drain filter, the garbage disposal connection, the air gap, the drain hose, the check valve, and the drain pump.
What Is the Most Common Cause of a Dishwasher Not Draining?
A clogged filter or blocked drain hose is the most common cause of standing water in a dishwasher. Food debris, grease, and foreign objects accumulate over time, blocking water from exiting through the drain system.
Beyond the filter, a dishwasher not draining can stem from a few other key failure points throughout the drainage cycle:
Drain Filter: Traps food particles before water reaches the pump.
Sink or Disposal Connection: A clogged knockout plug or debris buildup where the hose meets the plumbing.
Air Gap: A small safety device on the sink deck that can become plugged with grease or lint.
Drain Hose: Can become kinked, pinched, or completely blocked by heavy residue.
Check Valve: Prevents wastewater from flowing back into the dishwasher tub.
Drain Pump: The mechanical motor component responsible for pushing water out through the lines.
Quick Summary of the Fixes
| Cause | Quick Fix | Difficulty |
| Clogged Filter | Remove and scrub with warm soapy water | Easy |
| Disposal Connection | Clear the garbage disposal inlet and knockout plug | Moderate |
| Blocked Air Gap | Remove the cover and clear out internal debris | Easy |
| Kinked Drain Hose | Straighten or clear blockages with a wire hanger | Moderate |
| Faulty Check Valve | Inspect and replace the rubber flap valve | Moderate |
| Failed Drain Pump | Test for electrical continuity and replace if dead | Advanced |
To pinpoint the exact failure point in your specific setup, refer to the diagnosis chart in Section 3 for a step-by-step breakdown.
Safety First and How to Remove Standing Water
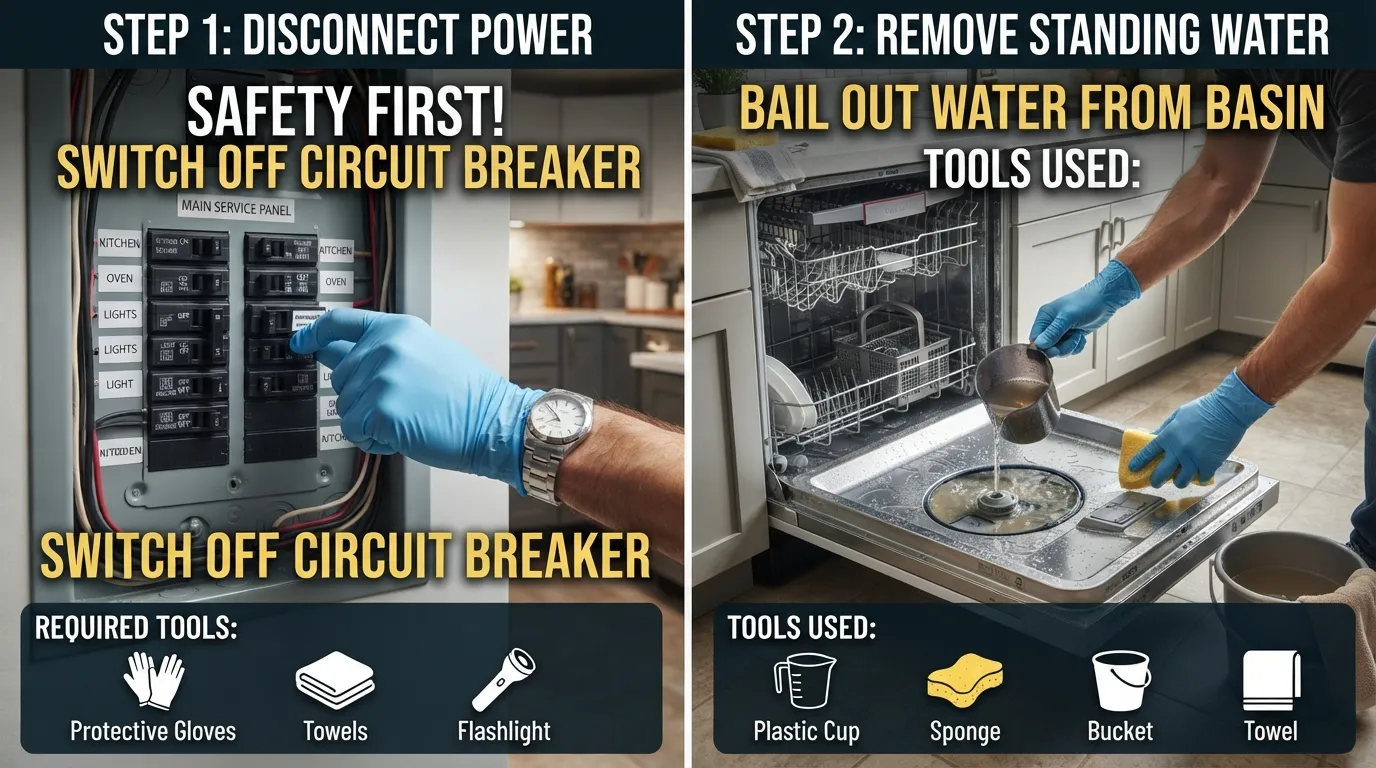
Prioritizing electrical safety and clearing standing water prevents slip hazards and protects your appliance during troubleshooting. Managing these immediate hazards properly lets you safely access interior components without risking shocks or messy kitchen flooding.
Before You Start: Power, Water and Tools
Cutting power and gathering the right equipment protects you from accidental electrical shock and water damage. Always secure your workspace before removing any interior dishwasher panels or filters.
Disconnect Power: Turn off the circuit breaker dedicated to your dishwasher, or unplug the unit directly from the wall outlet if it is easily accessible under the sink.
Shut Off Water Supply: Turn off the hot water shut-off valve located under the kitchen sink, especially if you plan to inspect supply or drain connections.
Gather Tools: Have towels, a shallow container, a sponge or cup, a flashlight, a screwdriver, a soft brush, and an optional wet-dry vacuum ready before opening the door.
How to Remove Standing Water From the Bottom of the Dishwasher
Scooping out standing water manually prevents a tidal wave when you remove the filter assembly. Never run additional wash or rinse cycles in an attempt to flush the water out, as a blocked drain will simply pump more water into an already full tub and risk overflowing the basin.
Scoop and Bail: Use a plastic cup or small container to scoop out the bulk of the standing water and dump it into the sink or a bucket.
Absorb the Remainder: Soak up the remaining shallow puddle using a large sponge, microfiber towels, or a wet-dry vacuum designed for liquid pickup.
Keep It Clean: Wipe down the immediate basin floor to improve visibility when inspecting the drain screen.
Can You Force a Dishwasher to Drain?
Triggering a manual drain cycle can bypass temporary electronic glitches and force the pump to evacuate residual water. Modern appliances feature built-in controls for this exact scenario, though functionality varies by manufacturer.
Cancel and Reset: Press and hold the Cancel/Drain button (or press Start/Reset for 3 to 5 seconds depending on your model) and wait 2 to 3 minutes to see if the pump kicks on.
Brand Variations: Check your specific user manual, as brands like Bosch, Whirlpool, and KitchenAid require distinct combinations like holding the power button or pressing heated dry repeatedly.
Limitations: Forcing a drain cycle only resolves electronic control hiccups or software freezes; it will not overcome a physical blockage in the hose or filter.
Water Overflowing or Leaking Onto the Floor?
Critical Warning: If water is actively overflowing onto your kitchen floor or structural leaks are threatening subflooring, immediately shut off your home’s main water supply and power breakers. If structural or continuous plumbing failure occurs, contact an emergency plumber to inspect and repair your home plumbing lines before attempting further appliance troubleshooting.
Quick Diagnosis: Find Your Cause in 60 Seconds
Pinpointing the root cause of a dishwasher draining failure depends on specific operational symptoms like pump sounds, cycle halts, or unusual odors. Matching your immediate observation to the diagnostic matrix below directs you instantly to the correct repair path.
Symptom-Based Diagnosis Chart
| What You Notice | Likely Cause | Jump to Section |
|---|---|---|
| Pump hums / runs, but water stays | Clogged sump filter, blocked impeller, or jammed drain hose | Section 4 & 5 |
| No sound at all during drain cycle | Thermal fuse blown, stuck door latch, or dead drain pump motor | Section 6 |
| Drains only when powered off and on | Electronic control board lockup or cycle glitch | Section 2 |
| Foul or swamp-like odors | Accumulated food debris in the filter or improper high loop in drain hose | Section 4 |
| Brand new dishwasher won’t drain | Untouched knockout plug inside the garbage disposal inlet | Section 5 |
| Water present when unit is not in use | Faulty check valve or backflowing sink drain line | Section 5 |
Do You Hear the Pump Running?
Listening closely during a forced drain cycle instantly splits your troubleshooting path into two distinct diagnostic directions:
Yes, the pump is humming or running: The motor and electrical components are functioning, meaning the blockage is physical. Water is trapped because debris is physically blocking the filter, impeller blades, drain hose, or disposal inlet.
No sound can be heard from the pump: The issue is likely electrical or mechanical. If the dishwasher remains completely silent, power is not reaching the pump motor, or the motor winding has failed.
Easiest Checks First: Recommended Order of Fixes
Tackling potential issues from the least invasive to the most complex saves time and prevents unnecessary tool handling.
Filter Cleanout: 10 minutes | Easy | Screwdriver and warm water. Removes surface-level sludge and food particles from the basin floor.
Drain Hose Check: 15 minutes | Easy | Flashlight and pliers. Verifies that the hose running to your sink or disposal isn’t kinked or blocked by heavy grease.
Garbage Disposal Inlet Inspection: 20 minutes | Moderate | Screwdriver. Clears out the secondary blockage point where the dishwasher hose meets under-sink plumbing.
Fix 1: Clean the Dishwasher Filter and Drain Area
Clearing accumulated food waste and debris from the dishwasher filter restores optimal water flow. This quick maintenance step resolves the vast majority of slow-draining issues without requiring tools or professional service.
Signs a Clogged Filter Is the Problem
Recognizing early warning signs prevents total drainage failure mid-cycle. Catching a blocked filter early protects your dishes from redeposited food particles and foul odors.
Gritty Residue: A thin film of sand or food grit left on glassware and plate surfaces after a finished wash cycle.
Standing Water Pools: Water remaining in the bottom basin once the cycle completes, signaling restricted flow through the mesh.
Foul Odors: Unpleasant swamp-like smells emanating from the bottom of the dishwasher due to trapped, decaying organic matter.
How to Remove and Clean the Filter
Cleaning the filtration assembly takes only a few minutes when performed step-by-step. Regular upkeep ensures your drainage pump never starves for water flow.
Pull Out the Lower Rack: Slide the bottom dish rack all the way out or remove it entirely to get clear access to the tub floor.
Unlock the Filter: Locate the cylindrical mesh filter at the base of the lower spray arm, twist it counterclockwise, and lift it straight up out of the housing.
Separate Components: Detach the coarse upper filter plate from the fine cylindrical mesh screen if your model uses a two-piece assembly.
Rinse and Scrub: Take the filters to the kitchen sink, rinse them under warm running water, and gently scrub away trapped grease and food particles using a soft brush.
Inspect the Sump Basin: Shine a flashlight into the empty sump hole to check for hidden debris before reinserting the clean filter assembly.
Don’t Forget the Sump and Spray Arm Area
The open sump well beneath the filter frequently traps heavy or dense objects that bypass the screen. Clearing this secondary pocket ensures no lingering obstructions block the impeller inlet.
Check the Impeller Blades: Gently feel around the plastic or metal impeller blades inside the sump with your fingers to ensure they spin freely and are clear of obstructions.
Clear Spray Arm Nozzles: Use a toothpick or straightened paperclip to clear out any mineral scale or food debris clogging the tiny holes on the upper and lower spray arms.
What Most People Miss
Expert Insight: Repair technicians frequently find that homeowners clean the main mesh screen but miss microscopic debris hiding in the lower sump crevices. Tiny paper label fragments from washed jars, slivers of broken glass, and popcorn unpopped kernels regularly wedge themselves underneath the removable basket, jamming the intake and mimicking a broken pump motor.
Quick Fact Box: Time: 10-15 min | Difficulty: Easy | Tools: Soft brush, towel, flashlight.
How to Clean a Dishwasher Filter and Drain
Fix 2: Check the Garbage Disposal and Kitchen Sink Drain
Lorem ipsum dolor sit amet, consectetur a
Since your dishwasher drains its wastewater directly into your kitchen plumbing system, blockages in your garbage disposal or main sink line will instantly back up into the appliance. Verifying these external connections clears a frequent bottleneck that mimics a broken dishwasher pump.
How a Garbage Disposal Blocks Dishwasher Drainage
The dishwasher drain hose connects directly to a specialized side inlet nipple on your garbage disposal housing, sitting just above the main grinding chamber. When food waste accumulates inside this disposal inlet or the internal grinding teeth get jammed with debris, water from the dishwasher cannot escape down the drain.
Run and Clear the Disposal First
Clearing the disposal ensures the wastewater path is completely open before you start opening up hoses or mechanical parts.
Turn On the Tap: Run a steady stream of cold water into the kitchen sink.
Activate the Motor: Turn on the garbage disposal and let it run for 10 to 15 seconds to shred and flush away any built-up food waste.
Listen for Humming: If the disposal hums but doesn’t spin, turn it off immediately, unplug it under the sink, and use an Allen wrench in the hex socket underneath the unit to manually free the jammed flywheel.
Verification: Run a brief manual dishwasher drain cycle; if water now empties into the sink, the disposal blockage is successfully cleared.
Brand New Dishwasher or New Disposal? Check the Knockout Plug
If you just installed a new garbage disposal or a brand-new dishwasher, a hidden plastic barrier is the most likely culprit behind a total failure to drain.
What the Knockout Plug Is: New garbage disposals ship with a solid plastic plug molded inside the dishwasher inlet nipple to prevent debris from falling out during manufacturing and shipping.
Why It Causes Issues: If the installer fails to punch out this plug during setup, the dishwasher hose connects to a completely sealed wall, trapping all wastewater inside the machine.
How to Remove It Safely: Disconnect the power to the disposal, remove the dishwasher drain hose clamp, insert a long screwdriver or punch into the side inlet, and tap it firmly with a hammer until the plastic plug breaks free. Reach inside the disposal chamber with needle-nosed pliers to retrieve the fallen plastic piece so it doesn’t jam the disposal blades.
Verification: Ensure the inlet opening is completely clear and reattach the drain hose securely with a metal clamp.
Is Your Kitchen Sink Itself Draining Slowly?
When the main kitchen sink drain is partially or fully clogged, wastewater from the dishwasher has nowhere to go and backs up directly into the tub basin.
The Sink Test: Fill your kitchen sink with a few inches of water and pull the stopper; if it drains sluggishly or bubbles up into the other basin, your main branch line is obstructed.
Resolution: For severe clogs beyond a standard plunger or baking soda flush, contact a professional for professional drain cleaning to clear grease and scale buildup out of your main kitchen waste pipes.
Verification: Check that water evacuates rapidly down both sink drains without backing up into the dishwasher basin.
dipiscing elit. Ut elit tellus, luctus nec ullamcorper mattis, pulvinar dapibus leo.
Fix 3: Clear a Clogged Air Gap
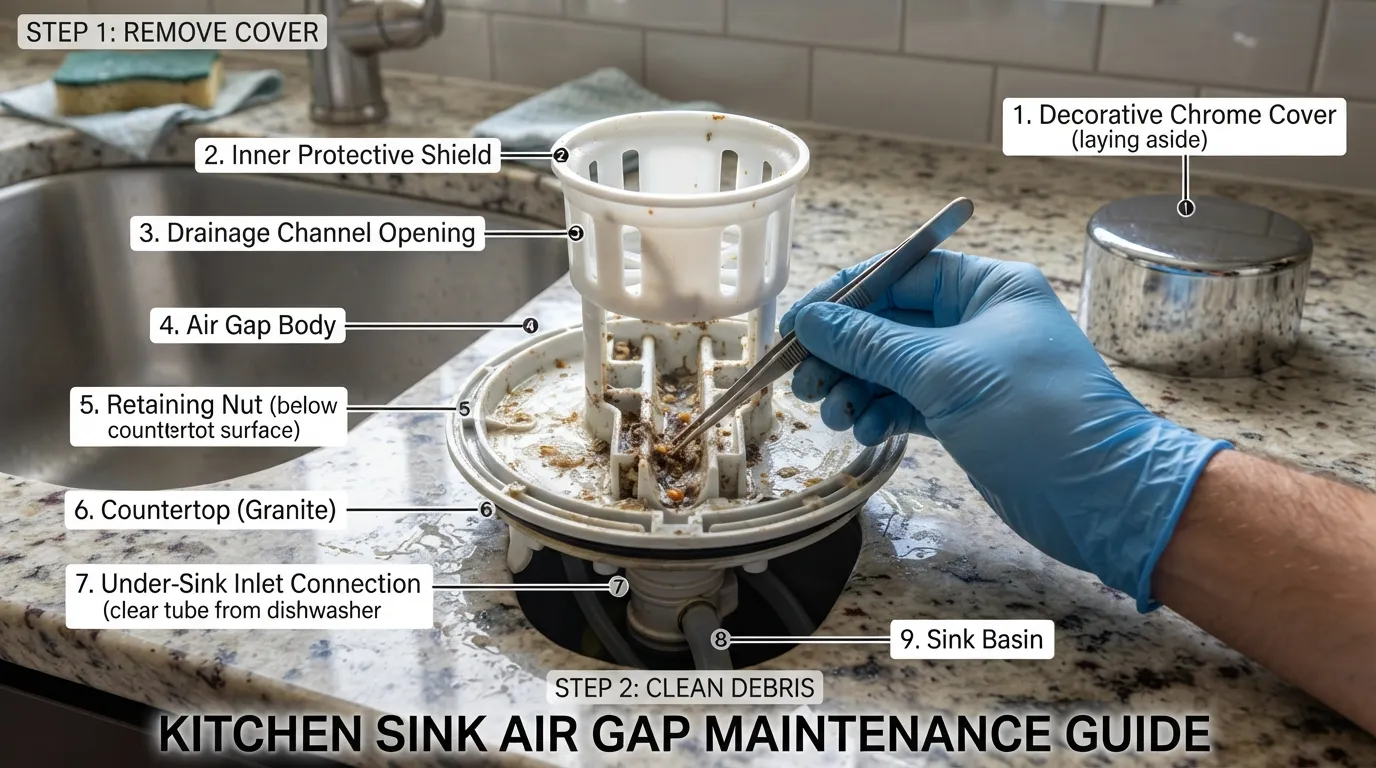
An air gap is a crucial plumbing safety device designed to prevent contaminated wastewater from siphoning back into your dishwasher tub. When grease, soap scum, or debris clogs this small fixture, water becomes trapped and cannot drain out of the machine.
What Is a Dishwasher Air Gap and Do You Have One?
The air gap is a small metal or plastic cylinder mounted on your countertop or kitchen sink deck, usually positioned right next to your main faucet.
Function: It creates a physical break in the air between your dishwasher drain hose and your sink plumbing, satisfying local building codes to prevent backflow contamination.
Presence: Not all kitchens feature an air gap; local plumbing codes dictate whether your unit uses an air gap or a direct high loop configuration under the sink.
How to Clean an Air Gap
Clearing a blocked air gap takes just a few minutes and requires no special plumbing tools.
Remove the Outer Cap: Twist or lift the decorative metal or plastic cylinder cover straight up off the brass body attached to your sink deck.
Remove the Inner Plastic Shield: Pull off the clear or black plastic cap inside to expose the internal channels where debris gets trapped.
Clear the Debris: Use a thin brush, pipe cleaner, or tweezers to scoop out accumulated grease, food particles, or paper labels wedged inside the internal openings.
Flush with Water: Pour a cup of warm water down through the center opening or blast it with a small squeeze bottle to verify that water flows cleanly down into the under-sink hose.
Reassemble: Snap the inner plastic shield back into place and press the outer decorative cap down firmly until it locks securely.
Verification: Run a short test cycle; water should circulate through the air gap without spilling out of the side vents onto your countertop.
What If You Don’t Have an Air Gap?
If your setup does not include a countertop air gap, your drain hose should be secured in a “high loop” configuration high up under the rim of your sink cabinet. If water is backing up because of hose routing rather than a physical clog, check out the upcoming troubleshooting steps for securing and inspecting drain lines.
Fix 4: Inspect the Drain Hose and High Loop
A kinked, pinched, or heavily greased drain hose stops wastewater from leaving your dishwasher, resulting in standing water at the end of every cycle. Inspecting the physical line from the pump to your sink drain solves chronic drainage failures.
Signs of a Kinked or Clogged Drain Hose
Recognizing physical hose restrictions saves you from prematurely replacing expensive pumps or control boards.
Intermittent Draining: The machine drains fine during some loads but leaves water behind when heavy or greasy dishes are washed.
Gurgling Sounds: Water bubbles up into the sink or makes strange choking noises during the pump phase.
Sluggish Evacuation: Water creeps out slowly instead of being pushed out in a forceful stream.
How to Check for Kinks Behind the Dishwasher
Washing machine and dishwasher hoses frequently get pinched when appliances are pushed back into tight kitchen cabinetry slots.
Safely Access the Rear: Unplug the dishwasher and shut off the water, then remove the mounting screws securing the unit to the underside of your countertop.
Pull Out Gently: Pull the dishwasher forward a few inches while protecting your floor with cardboard or towels, being careful not to strain the water supply or electrical lines.
Inspect Line Path: Trace the flexible corrugated drain hose from the pump exit all the way to the cabinet wall to ensure it is not pinched, sharply bent, or crushed.
How to Clean the Drain Hose (Disconnected and in Place)
Clearing stubborn grease blockages requires either physical flushing or suction to clear interior walls.
Method A (Disconnected): Place a towel under the under-sink connection, loosen the hose clamp, detach the hose, and blast hot water through it or use a wet-dry vacuum on the end to suck out hardened grease blocks.
Method B (In Place): While cleaning without removal is tempting, its limits mean you can only clear minor blockages by pouring a boiling water and vinegar solution down the line; stubborn grease clogs require full disconnection.
How to Check and Clean a Dishwasher Drain Hose
The High Loop: A Commonly Missed Installation Issue
An improper hose installation is the silent culprit behind dirty water flowing back into your clean dishwasher.
What It Is: The drain hose must be fastened to the highest point possible under your cabinet sink deck before dropping down to the disposal or tailpiece connection.
Why It Matters: Without this high loop, wastewater from your sink or garbage disposal can easily gravity-feed straight back into your dishwasher tub.
How to Check: Look under your sink cabinet and verify that a zip-tie or bracket holds the upper bend of the hose directly against the underside of the countertop.
Quick Fact Box: Time: 20-40 min | Difficulty: Moderate | Tools: Screwdriver, pliers, bucket.
If your hose or the line beyond it stays blocked despite your best clearing efforts, contact a professional drain cleaning service to clear out stubborn main line blockages.
Dishwasher Not Draining but No Blockage? Check These Next
When a dishwasher refuses to drain despite a completely clear filter, hose, and garbage disposal, the issue usually stems from an internal mechanical failure or an electronic control glitch.
Why Your Dishwasher Doesn’t Drain Even When Nothing Is Clogged
A dishwasher that fails to drain despite having no physical blockages typically suffers from a failed electrical component, a stuck mechanical check valve, or a digital control board error. When water remains trapped even though all hoses and sumps are pristine, the appliance is usually failing to signal or power the drain pump motor.
Faulty Check Valve
The check valve uses a small rubber flapper to let water exit the pump during a drain cycle while stopping wastewater from flowing backward into the machine.
The Issue: If the rubber flap gets stuck in the closed position, warped, or jammed with mineral scale, the pump will run, but water cannot push past it.
How to Verify: Locate the check valve near the sump pump outlet under the dishwasher tub, inspect the rubber flapper for flexibility and proper movement, and replace it if it sticks or tears.
Drain Solenoid, Control Board or Timer Problem
Modern dishwashers rely on electrical signals to open drainage valves and actuate pump motors.
Drain Solenoid: Many models use a wax motor or magnetic solenoid to physically shift the pump into drain mode; if this fails, the motor runs but no water is redirected out.
Control Board: A corrupted electronic control board or failed timer may omit the drain phase of a cycle entirely.
Resolution: These complex electrical components require a multimeter for continuity testing and often necessitate professional replacement.
Dishwasher Drains Only When You Turn It Off and On
If your dishwasher only responds to a manual power cycle reset, the onboard computer has experienced a temporary software crash or glitch.
The Cause: Power surges, steam exposure, or electronic lockups can freeze the control board mid-cycle, interrupting the automatic drain sequence.
Resolution: Perform a hard reset by unplugging the unit (or flipping the breaker) for 5 minutes to clear the system memory, then run a test cycle.
Whirlpool and Other Brands: Known Drain Issues
Different manufacturer designs present unique troubleshooting quirks worth noting:
Whirlpool & Maytag: Frequently experience issues with small items bypassing worn-out chopper blades and jamming the drain impeller directly inside the housing.
Bosch: Known for optical water indicators and integrated check valves that can trigger error codes (like E24) even when hoses look clear.
Samsung & LG: Often feature high-water or drainage error codes (such as 5E or OE) linked to clogged circulation pumps or sensitive sensor feedback.
Cycle Interrupted or Incomplete: How to Reset the Dishwasher
When a wash cycle is interrupted mid-way, the unit may freeze instead of completing its mandatory pre-drain sequence.
Cancel and Reset: Press and hold the Start/Reset or Cancel button for 3 to 5 seconds until the indicator lights shift or turn off.
Wait for Pump: Listen closely for 1 to 2 minutes to verify whether the control board successfully triggers an automatic drain cycle.
Verification: Ensure all panel lights return to a normal standby mode, confirming the electronic reset was successful.
How to Test a Dishwasher Drain Pump
When all filters, hoses, and exterior plumbing connections are completely clear, the drain pump itself may be failing. Identifying whether the pump is jammed, burnt out, or electrically dead requires targeted troubleshooting of the motor and its internal impeller.
Signs of a Bad Dishwasher Drain Pump
Recognizing distinct audio cues and performance patterns helps you distinguish a failed pump from a simple blockage.
Humming with No Draining: The motor emits a loud electrical hum or buzz during the drain cycle, but water remains completely motionless in the basin.
Complete Silence: The dishwasher finishes washing, enters the drain phase, but makes zero noise and takes no action.
Grinding or Rattling: A harsh metallic screeching noise occurs when the pump attempts to run, usually caused by loose glass shards trapped in the housing.
Repeated Error Codes: Modern electronic displays throw specific fault codes (such as OE on LG or E24 on Bosch) indicating a drainage failure.
Common Reasons a Drain Pump Stops Working
Understanding why pumps fail prevents recurring appliance breakdowns after a replacement.
Jammed Impeller: Shards of broken glass, food seeds, or plastic bits wedge tightly against the plastic blades, stalling the motor [02:01].
Burned-Out Motor Windings: Continuous running against a blocked line causes electrical coils to overheat and short out [02:14].
Worn Mechanical Seals: Water leaks past internal shaft seals, corroding the motor bearings and seizing the rotor.
Electrical Fault: Loss of voltage transmission from the control board to the pump terminals.
Step-by-Step: How to Test the Pump
Testing a drain pump involves a methodical sequence of checks, ranging from basic sensory observations to advanced electrical testing.
Perform the Listen Test: Listen closely during a drain cycle to determine if the motor is humming or completely silent.
Inspect the Impeller: Turn off the power breaker, bail out standing water [02:21], access the sump housing, and manually spin the plastic impeller blades to check for smooth rotation.
Check for Debris: Remove the pump housing to check for hidden glass shards or foreign objects blocking the blades [02:28].
Multimeter Continuity Test (Advanced DIY): Disconnect all power to the appliance, detach the electrical wires from the pump terminals, and touch your multimeter probes to the terminals set to ohms; a reading indicating infinite resistance or zero continuity proves the motor winding is dead and the unit must be replaced.
How to Test and Replace a Dishwasher Drain Pump
Can You Replace the Pump Yourself?
Replacing a dishwasher drain pump is a manageable intermediate repair for comfortable DIYers, though it requires unmounting and partially pulling out the appliance.
Difficulty Rating: Moderate (takes about 45 to 60 minutes).
Required Tools: Screwdrivers, nut drivers, pliers, towels, and a multimeter.
When to Hire a Pro: If your dishwasher is integrated into custom cabinetry panels, hardwired without an accessible plug, or leaking from internal molded sump welds, it is safer and more cost-effective to call a qualified appliance technician.
Water in the Bottom of Your Dishwasher When It’s Not in Use
Finding standing water in your dishwasher basin between wash cycles indicates that wastewater is either backflowing from your plumbing or entering through a malfunctioning water supply component. Isolating the source protects your kitchen from messy leaks and unpleasant odors.
Why Does Water Appear in My Dishwasher Between Cycles?
Water accumulation in an idle dishwasher is driven by a few distinct mechanical failures or drainage bottlenecks:
Drain Backup: Wastewater from your kitchen sink or garbage disposal flows backward down the drain hose and pools in the tub because of a missing high loop or clogged air gap.
Faulty Water Inlet Valve: A worn or stuck water inlet valve leaks fresh water continuously into the tub even when the appliance is turned off and idle.
Failed Check Valve: A damaged rubber check valve allows discharged wastewater to return to the machine once the drain pump turns off.
When Several Drains Back Up at Once
If you notice water pooling in your dishwasher alongside slow-draining sinks, gurgling disposal units, or bubbling shower drains, the root cause is usually a blockage in your main household sewer line rather than a dishwasher-specific malfunction.
Symptoms: Multiple plumbing fixtures throughout the kitchen or bathroom back up simultaneously or emit foul sewer odors.
Resolution: Stop using all connected water fixtures immediately and contact a professional plumber to clear your main waste lines.
Quick Tests to Tell Dishwasher Problems From Plumbing Problems
Determining whether the water source is internal or external takes just a quick diagnostic check.
Check the Water Type: If the standing water is clean and clear, your water inlet valve is likely leaking supply water. If the water is murky, greasy, or smells like food waste, it is a drain backup from your sink or disposal.
Perform the Isolation Test: Turn off the hot water supply valve under your kitchen sink for 24 hours; if the dishwasher stays dry, you have confirmed that a faulty inlet valve is leaking.
Verification: If the tub remains completely dry after closing the supply valve, the fresh water leak source is successfully isolated.
For ongoing moisture or pooling beneath the appliance, utilize professional leak detection and repair services to prevent hidden water damage to your kitchen subflooring.
Can You Use Drano or Chemical Cleaners in a Dishwasher?
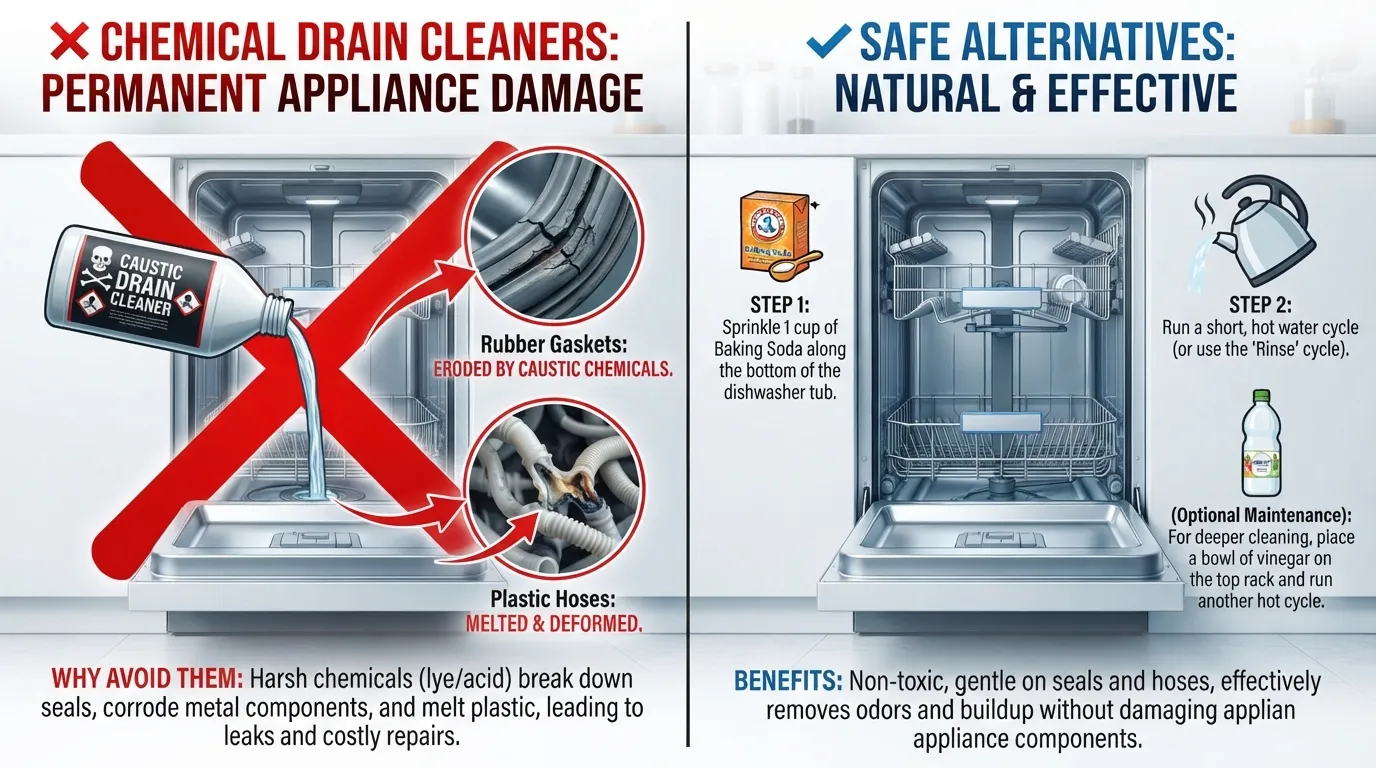
Never pour chemical drain cleaners like Drano into your dishwasher. These caustic formulas are entirely unsuited for appliance interiors and can permanently damage your machine while posing severe chemical safety hazards.
Why Chemical Drain Cleaners Are a Bad Idea
Harsh chemical drain openers rely on strong acids or powerful lye-based compounds designed exclusively to eat through hair, grease, and organic buildup inside heavy iron or PVC home waste pipes. A dishwasher contains delicate rubber gaskets, plastic pump housings, aluminum heating elements, and metal spray arms that cannot withstand these highly corrosive substances.
What Can Go Wrong
Using commercial chemical cleaners inside a dishwasher creates multiple severe hazards:
Rubber Seal and Hose Destruction: Caustic chemicals rapidly degrade internal rubber hoses, door gaskets, and pump seals, resulting in major, costly water leaks.
Chemical Splashback and Burn Risks: If the chemical sits trapped in the stagnant dishwasher sump, removing filters or inspecting components later can cause dangerous liquid splashes onto your skin or eyes.
Toxic Fumes: Mixing chemical drain cleaners with residual dishwashing detergent or stagnant organic matter can release hazardous, toxic vapors into your kitchen space.
Verification: You can verify your system is free of chemical residue by checking that internal components lack chemical corrosion, discoloration, or melting.
Safer Alternatives
When clearing slow drains without risking your appliance or plumbing, opt for mechanical methods and safe natural solutions:
Hot Water and Vinegar Flush: Pour two cups of white vinegar into the bottom of the tub and run a short rinse cycle to break down light grease and mineral scale.
Baking Soda Treatment: Sprinkle a cup of baking soda across the basin floor, let it sit for 15 minutes, and follow with a hot water cycle to neutralize odors.
Manual Debris Removal: Physically clear out the filter basket and sump area by hand to eliminate the root cause of the blockage safely.
Verification: Successful cleaning is verified when water drains rapidly out of the basin during a standard test cycle without leaving chemical odors or residue.
Dishwasher Drain Error Codes by Brand
When a dishwasher encounters an unrecoverable drainage issue, the digital control board often displays a specific alphanumeric code to pinpoint the failure. Identifying your appliance brand and matching its error code lets you diagnose whether you are dealing with a simple clog or a component failure.
Drain Error Codes Table
| Brand | Code | Likely Meaning | First Thing to Check |
| Whirlpool | F9 E1 or “Drain” | Long drain time or blocked pump | Check the drain hose for kinks and clear the sump filter |
| Bosch | E24 or F24 | Drainage blocked or drain pump jammed | Inspect the drain pump housing and check the sink air gap |
| Samsung | 5E or OE | Water failed to drain within the allotted time | Clear out food debris from the filter basket and check disposal inlet |
| LG | OE | Water is not draining out of the tub | Check for clogs in the drain hose and garbage disposal connection |
| GE | CF or 55 | Control failure or blocked drainage cycle | Verify pump continuity and check for blockages in the sump |
| Frigidaire | ER or OP | Drainage failure or pump circuit malfunction | Clean the filter mesh and ensure the drain hose isn’t pinched |
| KitchenAid | F9 E1 | Slow drain or blocked pump assembly | Check the filter, sump, and under-sink disposal knockout plug |
| Maytag | F9 E1 | Extended drain time or restricted flow | Inspect the drain impeller for glass shards or paper label debris |
What to Do When Your Model Isn’t Listed
If your specific appliance brand or error code is not featured above, consult the appliance’s official user manual or look up guidance using the manufacturer’s troubleshooting guide . Manufacturer databases provide precise diagnostic pathways tailored to exact series numbers.
Look Up the Code Online: Search your brand name followed by the exact error code on the manufacturer’s official support portal.
Verify Success: Once you resolve the underlying mechanical or electrical fault indicated by the code, perform a hard system reset by unplugging the unit for 5 minutes, then run a short rinse cycle to confirm the error code does not return.
Where to Find Your Model Number
Locating your dishwasher’s model number is essential for finding accurate parts lists and error code definitions.
Inspect the Tub Frame: Open the dishwasher door and look along the top or side metal perimeter edge of the inner tub door frame.
Check the Side Panels: If it is not on the door trim, look on the left or right interior side panels near the front opening.
Look Behind the Kickplate: Remove the lower access panel (kickplate) beneath the door if no sticker is visible inside the tub.
Dishwasher Drain Pump Replacement Cost and Repair vs. Replace
Deciding whether to repair or replace a broken dishwasher drain pump requires balancing immediate service costs against the appliance’s remaining lifespan. Evaluating repair economics prevents you from sinking money into a machine nearing the end of its operational run.
How Much Does It Cost to Replace a Dishwasher Drain Pump?
Replacing a dishwasher drain pump typically ranges from $150 to $350 total when hiring a professional technician, though costs vary based on your geographic location, appliance brand, and whether you choose the DIY route.
| Expense Category | Estimated Cost | Details |
| Part Cost Only | $50 – $150 | OEM drain pump assembly ordered directly from the manufacturer |
| Professional Labor | $100 – $200 | Service call fee and 1 to 2 hours of technician labor |
| Total DIY Cost | $50 – $150 | Cost of the part alone if you perform the replacement yourself |
| Total Professional Cost | $150 – $350 | Includes parts, labor, and service diagnostic fees |
Verification: Successful replacement and cost-efficiency are verified when the new pump evacuates water forcefully and quietly during a test cycle without leaks.
Is It Worth Repairing or Should You Replace the Dishwasher?
Applying a simple age and cost threshold helps you decide whether to fix the pump or purchase an entirely new appliance:
The 50% Rule: If your dishwasher is less than 5 years old and the repair cost is under half the price of a brand-new unit, repairing it is usually the most economical choice.
When to Replace: If your dishwasher is over 8 to 10 years old (the average lifespan of modern dishwashers) or has required multiple repairs recently, investing in a new appliance prevents throwing money at a failing machine.
Verification: Check your appliance serial tag to confirm manufacture date before scheduling service or buying replacement parts.
Other Common Repair Costs
If your drainage failure stems from a component other than the main pump, understanding typical part prices helps guide your repair budget:
Drain Filter Assembly: $20 to $50 (easily replaced by hand).
Replacement Drain Hose: $15 to $30 (requires pliers and a screwdriver).
Check Valve Kit: $10 to $25 (requires basic access to the sump housing).
Electronic Control Board: $150 to $300 (often exceeds the economic value of older units).
When to Call a Professional Plumber
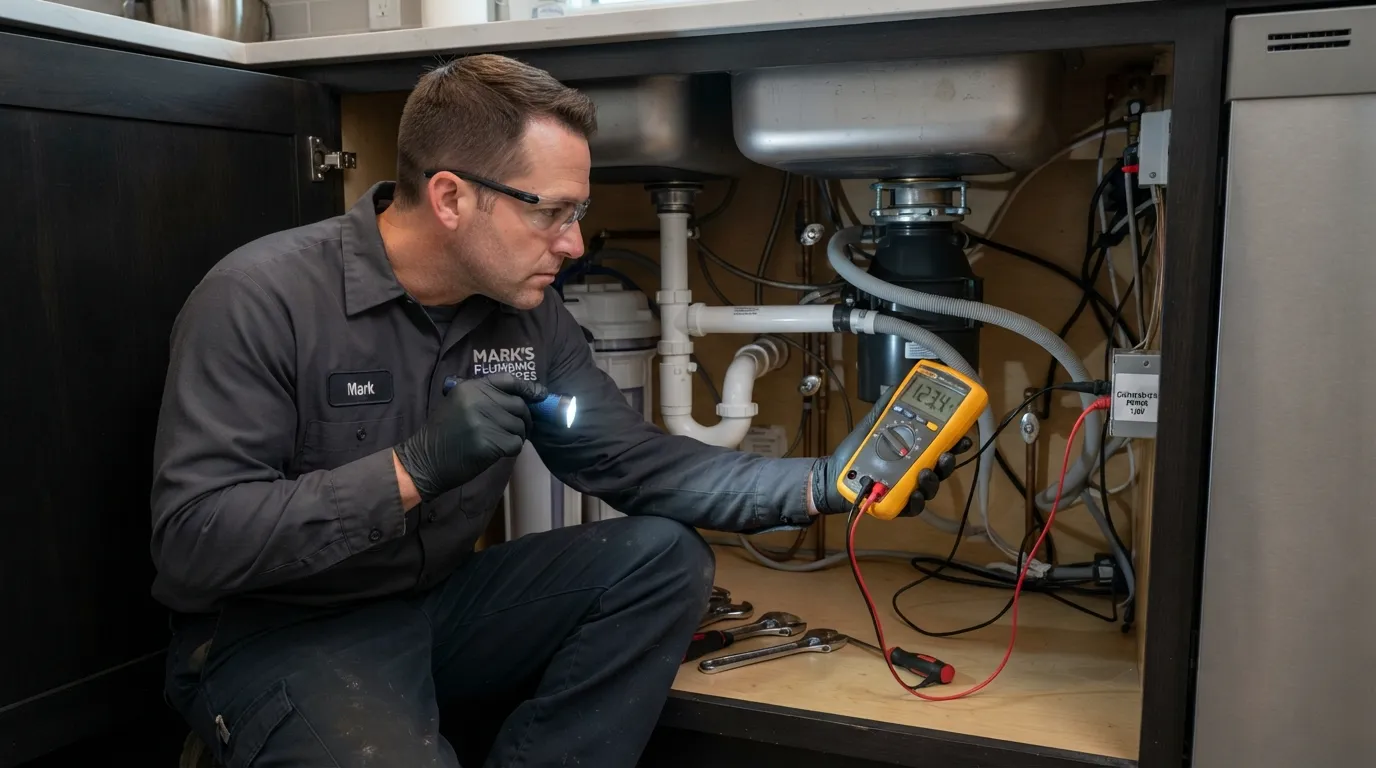
Recognizing when a dishwasher drainage problem exceeds standard DIY repairs protects your appliance and kitchen from costly structural damage. Knowing your limits prevents minor clogs from turning into major household emergencies.
Signs You’ve Reached the Limit of DIY
Certain persistent symptoms indicate that an underlying mechanical or structural plumbing failure requires professional intervention:
Standing Water Persists: Water remains pooled in the bottom tub even after you have thoroughly cleaned the filter, checked the drain hose, and cleared the garbage disposal.
Repeated Clogs: Drainage issues return immediately or within a few days of clearing the lines, pointing to chronic blockage deep within your waste system.
Multiple Fixtures Backing Up: Water bubbles up into your kitchen sink or nearby drains while the dishwasher runs, indicating a main branch or sewer line blockage.
Active Water Leaks: Water leaks from beneath the unit, through cabinet walls, or around the base during fill or drain phases.
Electrical or Control Suspicions: You suspect a dead control board, blown thermal fuse, or internal wiring fault.
Physical Inaccessibility: Your dishwasher is hardwired, built into custom cabinetry panels, or you are uncomfortable unmounting and pulling the appliance out.
What a Professional Will Check
Hiring an experienced service technician or plumber ensures a comprehensive, safe diagnosis using professional tools:
Drain Hose & Line Integrity: Testing for hidden crushing, severe grease buildup, or structural collapses behind cabinets.
Main Line Flow: Verifying that kitchen waste lines and main drainage branches are clear of scale and root infiltration.
Pump & Valve Electrical Testing: Using professional multimeters to measure voltage and continuity across pump motors, solenoids, and check valves.
Dishwasher Drain Help in Miami, FL
If you are located in the Miami, FL area and your troubleshooting steps have not resolved the issue, professional support is readily available. Local plumbing technicians offer prompt, reliable service to diagnose and repair stubborn appliance drainage issues, clear blocked lines, and inspect complex under-sink configurations safely.
Still stuck? Book a plumber for professional drain cleaning services and expert dishwasher diagnostics.
How to Prevent Dishwasher Drain Problems
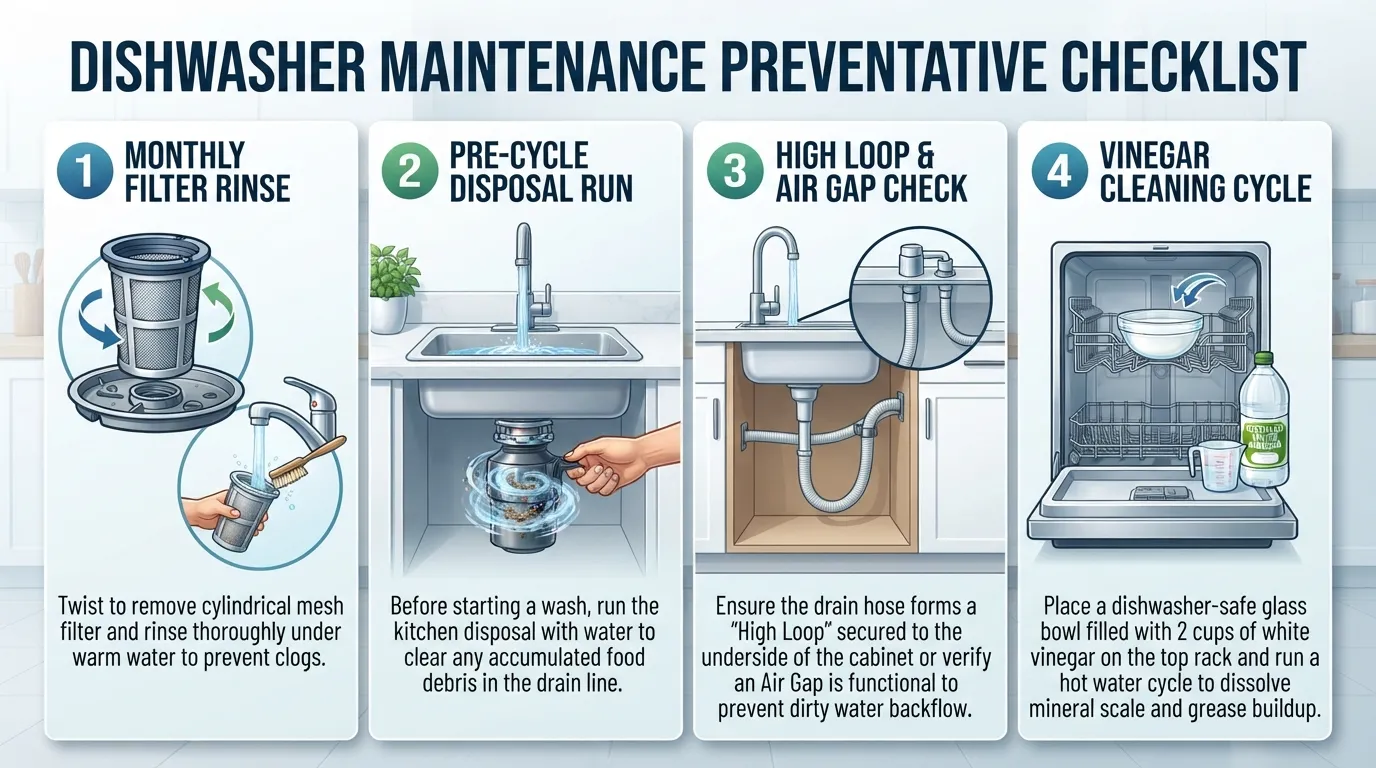
Preventing future dishwasher drainage failures saves you from messy mid-cycle cleanups and costly service calls. Establishing a few simple preventative habits keeps your appliance operating smoothly and extends its working lifespan.
Monthly Maintenance Checklist
Performing quick routine checks once a month prevents grease, soap scum, and food debris from accumulating into stubborn clogs.
Rinse the Filter: Pull out the lower mesh filter assembly, wash away grease and food particles under warm soapy water, and check the sump area for hidden objects.
Run the Disposal First: Always run your kitchen garbage disposal for 10 to 15 seconds before starting a wash cycle to clear the shared drain line of food scraps.
Inspect the Air Gap: Check your countertop air gap or under-sink high loop to ensure lines remain unpinched and clear of debris.
Dishwasher Maintenance and Troubleshooting Tips
Loading and Scraping Habits That Protect the Drain
Your loading technique directly impacts how effectively debris flows into the filtration system rather than lodging in the pump housing.
Scrape, Don’t Pre-Rinse: Scrape solid food scraps and large bones into the trash, but avoid heavy pre-rinsing; modern enzyme-based dishwasher detergents need a small amount of food soil to activate properly.
Eliminate High-Risk Items: Never load paper label fragments from washed jars, toothpicks, fruit pits, or heavy grease into the machine, as these quickly bypass filters and jam impeller blades.
Arrange Dishes Correctly: Ensure tall plates and cutting boards do not block water flow or trap standing pools of water against the lower spray arm assembly.
Running a Cleaning Cycle
Deep-cleaning your dishwasher interior every one to three months removes mineral scale and invisible grease film that restricts water movement.
Frequency: Run a dedicated cleaning cycle every 30 to 60 days, depending on how frequently you run heavy wash loads.
What to Use: Place a bowl filled with two cups of white vinegar on the top rack and run a hot water cycle to cut grease and mineral buildup. Alternatively, use a specialized commercial dishwasher cleaner tablet according to package instructions.
Verification: A successful cleaning cycle leaves the interior tub smelling fresh, free of white calcium scale, and draining rapidly.
Dishwasher Not Draining: Frequently Asked Questions
Find concise answers to the most common questions regarding dishwasher drainage issues, troubleshooting steps, and repair costs.
Why isn’t my dishwasher draining even though there’s no blockage?
When all filters and hoses are clear, standing water is usually caused by a stuck mechanical check valve, a failed drain pump motor, a corrupted electronic control board, or a missing drain signal.
How do I force a dishwasher to drain water?
Press and hold the Cancel or Drain button (or Start/Reset depending on your model) for 3 to 5 seconds. Wait 2 to 3 minutes to see if the control board triggers an automatic pump cycle.
How do I get rid of standing water at the bottom of a dishwasher?
Scoop out the bulk of the standing water using a plastic cup or shallow container, then absorb the remaining shallow puddle using a large sponge, microfiber towels, or a wet-dry vacuum.
What are the common reasons a dishwasher drain pump isn’t working?
Common causes include a jammed impeller blocked by glass shards or food seeds, burned-out motor electrical windings, worn mechanical shaft seals, or a complete loss of electrical voltage from the control board.
What is the most common cause for a dishwasher not to drain?
A clogged mesh filter or a blocked drain hose is the most common cause of standing water, usually resulting from accumulated food debris, grease, and small foreign objects.
How much does it cost to replace a dishwasher drain pump?
Replacing a dishwasher drain pump typically costs between $150 and $350 total when using a professional technician, or $50 to $150 for parts alone if you perform a DIY replacement.
How can I tell if a dishwasher pump is bad?
You can identify a failing pump by listening for a loud electrical hum with zero water movement, noticing complete silence during the drain phase, or detecting a burning smell from the motor housing.
Can you put Drano in a dishwasher to unclog it?
Never use chemical drain cleaners like Drano in a dishwasher. Caustic formulas rapidly destroy delicate rubber seals, hoses, and plastic components while creating severe splashback and toxic fume hazards.
How do I test if a drain pump is bad?
Disconnect all appliance power, access the pump motor, and use a multimeter set to ohms to test the electrical terminals; a reading of infinite resistance or zero continuity proves the motor winding is dead.
Is it worth replacing a pump in a dishwasher?
If your dishwasher is less than 5 years old and the repair cost is under half the price of a new unit, repairing it is generally worthwhile. For units over 8 to 10 years old, replacement is usually more economical.
Why does my dishwasher have water in the bottom when it’s not in use?
Standing water between cycles is typically caused by a drain backup from your sink, a faulty water inlet valve leaking fresh supply water, or a failed rubber check valve allowing wastewater to return.
Why does my dishwasher drain only when I turn it off and on?
This usually points to a temporary digital control board freeze or software glitch caused by power surges or steam exposure, which locks up the automated cycle progression until manually reset.
Conclusion
Resolving a dishwasher drainage issue is simple when you tackle potential causes in a structured order: start by cleaning the filter, check your sink disposal connection and air gap, inspect the drain hose for kinks, and evaluate deeper mechanical components like the pump or control board only if necessary.
With these steps, you can quickly restore your appliance’s performance and prevent future backups. If persistent clogs or mechanical failures remain unresolved, book a plumber to get professional support and keep your kitchen running smoothly.
Main Services
Related Posts
Need a Plumber in Miami?
Schedule service online or speak directly with the EZ Plumbing team.
Owner-Led Local Service
Know who is behind the business before you request service. The owners, contact line and Miami service pages are published clearly.
- Named business owners
- Direct phone and social channels
- Local Miami service information
Clear Help Before You Book
Review the relevant service page, contact the team directly and use the booking page when you are ready—without relying on vague claims.
- Service-specific information
- Direct questions before scheduling
- Clear online booking route