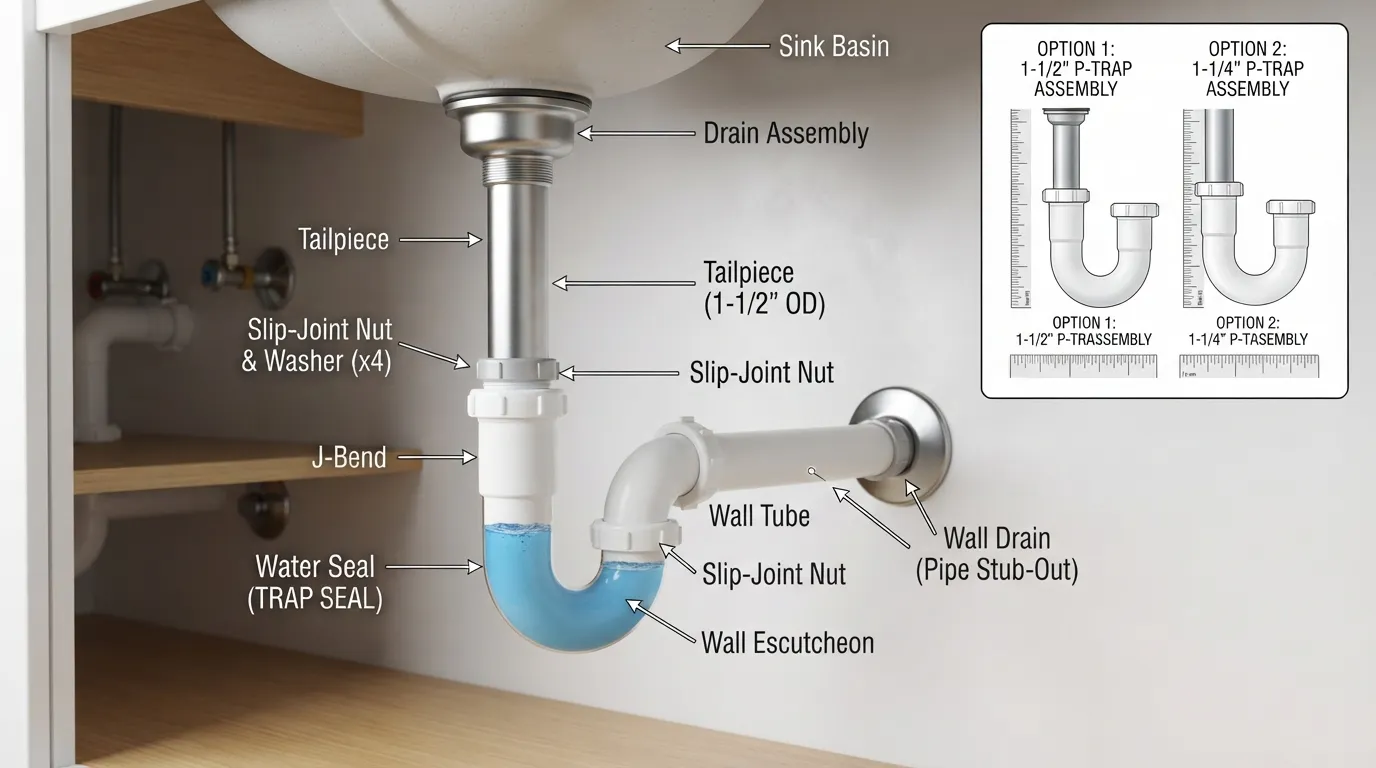
If you are looking under a sink and trying to figure out what each piece of the P-trap is called, you are in the right place. I’ll walk you through the main P-trap parts, what each component does, how the pieces connect, how to identify the right size and material, and what to check before replacing a part.
What Are the Parts of a P-Trap?
A typical under-sink P-trap assembly includes a tailpiece, J-bend, wall tube, slip-joint nuts, and slip-joint washers. Depending on the installation, you may also need a reducing washer or other connection hardware.
The tailpiece carries water down from the sink drain, the J-bend forms the curved trap that holds a water seal, and the wall tube connects the trap toward the drain opening in the wall. Nuts and washers secure the tubular connections and help prevent leaks.
P-Trap Parts at a Glance
When you hear someone say p-trap plumbing parts, they are usually talking about the individual components that make up the trap assembly beneath a sink. The easiest way to understand the assembly is to follow the water path from the sink toward the wall drain.
Sink Drain
Tailpiece
J-Bend / Curved Trap
Wall Tube
Drain Connection
The slip-joint nuts and washers sit at the tubular connections rather than forming the main water path themselves. Their job is to hold the components together and create a watertight seal.
Main P-Trap Components and What They Do
1. Tailpiece
The tailpiece is the vertical section of pipe that comes down from the sink drain or drain basket. It carries wastewater away from the sink and toward the P-trap.
When you look underneath a sink, the tailpiece is usually the first straight section you see immediately below the drain.
2. J-Bend
The J-bend is the curved section of the P-trap. Its shape allows water to remain in the trap after the sink drains.
That standing water forms a water seal that helps prevent sewer gases from traveling back through the drain and into the room.
3. Wall Tube
The wall tube, sometimes called a branch or horizontal drain tube in tubular sink plumbing, extends from the trap toward the drain opening in the wall.
Its length and position need to work with the existing drain connection. A replacement part that looks similar may not fit correctly if its size, connection, or configuration does not match the existing plumbing.
4. Slip-Joint Nuts
Slip-joint nuts are threaded rings that tighten the tubular connections between P-trap components.
They allow the individual pieces to be assembled and adjusted without permanently joining the sections together. This is one reason tubular P-trap assemblies can be relatively straightforward to disassemble for cleaning or replacement.
5. Slip-Joint Washers
Slip-joint washers sit inside the connections and help create a watertight seal when the slip-joint nut is tightened.
A washer that is worn, damaged, flattened, misplaced, or incompatible with the connection can contribute to leakage even when the pipe sections themselves are not damaged.
6. Reducing Washer
A reducing washer can be used in some configurations when the connected components have different nominal sizes. For example, a 1-1/4-inch tailpiece may need compatible transition hardware when connecting to a 1-1/2-inch trap connection.
Do not assume that every P-trap requires a reducing washer. Check the existing components and the replacement manufacturer’s specifications before choosing one.
How the P-Trap Parts Work Together
Knowing the names of the components is useful, but understanding how they work together makes it much easier to diagnose a problem.
- Water leaves the sink through the drain opening and enters the tailpiece.
- The tailpiece carries the water downward toward the curved portion of the assembly.
- The J-bend holds a portion of water, creating the trap’s water seal.
- Water continues through the wall tube toward the building drain.
- Nuts and washers keep the tubular connections sealed so water does not escape at the joints.
This is why a P-trap is more than just the U- or J-shaped pipe you can see under the sink. The surrounding tubes and connection hardware are also important parts of the complete assembly.
How to Identify P-Trap Parts Under Your Sink
If you are holding a replacement part or looking at the plumbing beneath your sink, use the shape and position of each component to identify it.
Usually the tailpiece coming from the sink drain.
The J-bend that holds the water seal.
The wall tube connecting the trap toward the drain.
Usually a slip-joint nut.
Usually a slip-joint washer.
Are All P-Trap Parts the Same Size?
No. P-trap components are available in different sizes and materials, so you should not assume that a replacement part will fit simply because it looks similar to the existing one.
Common sink P-trap sizing you may encounter includes 1-1/4-inch and 1-1/2-inch components, but the correct choice depends on the existing plumbing configuration and the particular connection you are replacing.
Before Buying a Replacement Part, Check These 5 Things
- The size of the existing connection.
- The material of the existing P-trap.
- The type and shape of the connection.
- Whether the replacement includes the required nuts and washers.
- Whether a reducing washer or other compatible transition component is actually needed.
If you are unsure about the size, compare the existing component with the specifications for the replacement rather than relying only on appearance.
P-Trap Parts: PVC vs. Metal
P-trap assemblies and components can be made from different materials, including plastic/PVC-type tubular components and metal options such as brass. The right choice depends on the existing installation, connection compatibility, appearance, durability considerations, and the requirements of the specific plumbing application.
Plastic / PVC-Type Components
Often chosen for tubular sink plumbing because they are lightweight and convenient to assemble. Compatibility with the existing drain system still matters.
Metal Components
Metal P-trap components can provide a different appearance and construction from plastic options. Check the existing connections and specifications before mixing materials.
The best material is not simply the one that looks strongest or costs less. The replacement needs to be appropriate for the existing plumbing configuration.
Which P-Trap Part Do You Need to Replace?
If your goal is P-trap parts replacement, identify the actual problem before buying a complete assembly. A damaged washer does not necessarily mean every component needs to be replaced.
If the Leak Is Around a Joint
Inspect the slip-joint nut, washer, alignment, and connection surfaces. A sealing component or poorly fitted connection can be the source of the leak.
“`
If the Curved Section Is Damaged
The J-bend is a key part of the trap assembly. If it is cracked, damaged, or otherwise unsuitable for continued use, replacement may be appropriate.
If the Drain Connection Does Not Line Up
Check the wall tube, trap configuration, dimensions, and connection type rather than forcing the assembly into position.
If Several Components Are Damaged
A complete P-trap kit may make more sense when multiple parts are worn, damaged, incompatible, or difficult to match individually.
“`
Should You Replace One P-Trap Part or the Whole P-Trap?
The answer depends on the condition of the existing assembly.
Replacing an Individual Part May Make Sense When:
- Only one washer or nut is damaged.
- A single tubular component has a problem while the rest of the assembly is in good condition.
- You can identify the exact replacement and verify compatibility.
A Complete Assembly May Be More Practical When:
- Several components are damaged or deteriorated.
- The existing pieces are difficult to match.
- The current configuration has repeated connection problems.
- A compatible complete kit provides the components you need together.
Common P-Trap Problems and the Parts Involved
Understanding the individual components also makes common P-trap problems easier to investigate.
Leak at a slip-joint:
Check the washer, nut, connection alignment, and condition of the mating components.
Cracked or damaged curved section:
Inspect the J-bend and determine whether the damaged component should be replaced.
Poor alignment:
Check the tailpiece, J-bend, wall tube, and overall configuration rather than forcing the connections together.
Wrong replacement size:
Verify the size and connection requirements before purchasing a replacement component.
Don’t Force a P-Trap Connection
If the components do not line up or the sizes do not match, forcing the connection can create a poor seal or place unnecessary stress on the assembly. Identify the correct component and compatible connection instead.
Can You Make Your Own P-Trap?
You should not treat a P-trap as simply a collection of random pipe pieces that can be assembled in any shape. The trap needs to function correctly, maintain the intended water seal, connect properly to the drain system, and comply with applicable plumbing requirements.
If you are replacing an existing sink P-trap, using components designed for the application and matching the existing connections is generally a better approach than improvising a configuration from unrelated fittings.
What Are the Different Types of P-Traps?
When people search for different types of P-traps, they may be referring to differences in material, size, configuration, or application. For an under-sink plumbing project, the most useful distinction is usually between the different assemblies and materials that can fit a particular sink and drain configuration.
Do not assume that every trap you find online is interchangeable. A bathroom sink, kitchen sink, existing drain connection, available space, and local plumbing requirements can all affect which configuration is appropriate.
P-Trap Parts Buying Checklist
If you are ready to buy replacement P-trap fittings or a complete kit, take these details with you:
- Identify the damaged or missing component.
- Check the existing connection size.
- Check whether the assembly is plastic or metal.
- Confirm the connection configuration.
- Check whether nuts and washers are included.
- Determine whether a reducing washer is necessary.
- Make sure the replacement will work with the existing drain arrangement.
- Check applicable plumbing requirements if you are changing the configuration rather than simply replacing a matching component.
P-Trap Parts vs. a Complete P-Trap Kit
A P-trap kit can be convenient when you need several compatible components at once. An individual replacement part can make more sense when you know exactly which component has failed.
Before choosing a kit, check what it actually contains. Some kits may include the trap and connection pieces, while the exact included components can vary by product and configuration.
If you are unsure which components you need, identify the existing assembly first rather than buying based only on a product photo.
Frequently Asked Questions About P-Trap Parts
What are the parts of a P-trap?
The main parts of a typical under-sink P-trap assembly are the tailpiece, J-bend, wall tube, slip-joint nuts, and slip-joint washers. Some installations may also use a reducing washer or other compatible connection hardware.
What is another name for a P-trap?
In everyday plumbing language, the term P-trap refers to the trap assembly under a fixture that retains water to form a seal against sewer gases. The curved section is commonly called the J-bend or trap bend in tubular sink plumbing.
Are all P-traps the same size?
No. Sink P-trap components are available in different sizes and configurations. Common nominal sizes include 1-1/4 inches and 1-1/2 inches, but you should verify the actual existing connection before purchasing a replacement.
What are common P-trap problems?
Common issues can involve leaking slip-joint connections, worn washers, damaged components, poor alignment, or incompatible replacement parts. The specific cause should be identified before replacing components.
What can be used instead of a P-trap?
You should not replace a required trap with an improvised arrangement simply because it appears to fit. The correct trap configuration depends on the fixture, drainage system, and applicable plumbing requirements.
Can I make my own P-trap?
A sink drain assembly should use compatible plumbing components and maintain the required trap function. Improvised configurations can create drainage, sealing, or compliance problems, so use an appropriate P-trap assembly for the application.
How much does it cost to replace a P-trap?
The cost can vary substantially depending on whether you need a washer, an individual component, a complete P-trap assembly, or professional plumbing service. Because local labor rates and the condition of the existing plumbing vary, there is no single price that applies to every replacement.
When to Call a Plumber for a P-Trap Problem
A simple accessible tubular connection may be straightforward to inspect, but professional help can be worthwhile when the problem is not obvious or the existing plumbing does not line up correctly.
Consider professional plumbing help if:
- You cannot identify the source of a persistent leak.
- The replacement components do not match the existing connections.
- The drain configuration needs to be changed rather than simply repaired.
- The plumbing is damaged beyond the visible P-trap assembly.
- You are concerned about whether the installation meets applicable plumbing requirements.
If you need broader plumbing help, you can also explore our plumbing services to see the types of plumbing problems we handle.
Key Takeaways: Understanding P-Trap Parts
- The main P-trap components are the tailpiece, J-bend, wall tube, slip-joint nuts, and washers.
- The J-bend holds water that forms the trap’s water seal.
- The tailpiece connects the sink drain to the trap assembly.
- The wall tube carries the trap connection toward the drain in the wall.
- Slip-joint nuts and washers secure and seal tubular connections.
- 1-1/4-inch and 1-1/2-inch sink plumbing components are commonly encountered, but the correct size must be verified for the existing installation.
- PVC/plastic and metal components are available, but compatibility matters more than simply choosing one material by default.
- Before buying a replacement, identify the damaged part and verify its size, material, connection, and configuration.
Related P-Trap Resources
If you are comparing replacement parts or learning more about P-trap assemblies, these resources can help you review available components and product information:
- Oatey: What Is a P-Trap and How Does It Work?
- Home Depot: P-Trap and Plumbing Options
- Lowe’s: Under-Sink P-Trap Parts
- PlumbingSupply: Plastic Tubular Drain Parts
Need Help With a P-Trap or Sink Drain?
If you have identified a leak but are not sure which P-trap component is causing it, professional help can save you from replacing the wrong part.
Visit Miami Florida Plumbing
Explore Plumbing Services
Speak With a Plumbing Professional