
A DIYer's Guide to Plumbing Parts and How to Use Them
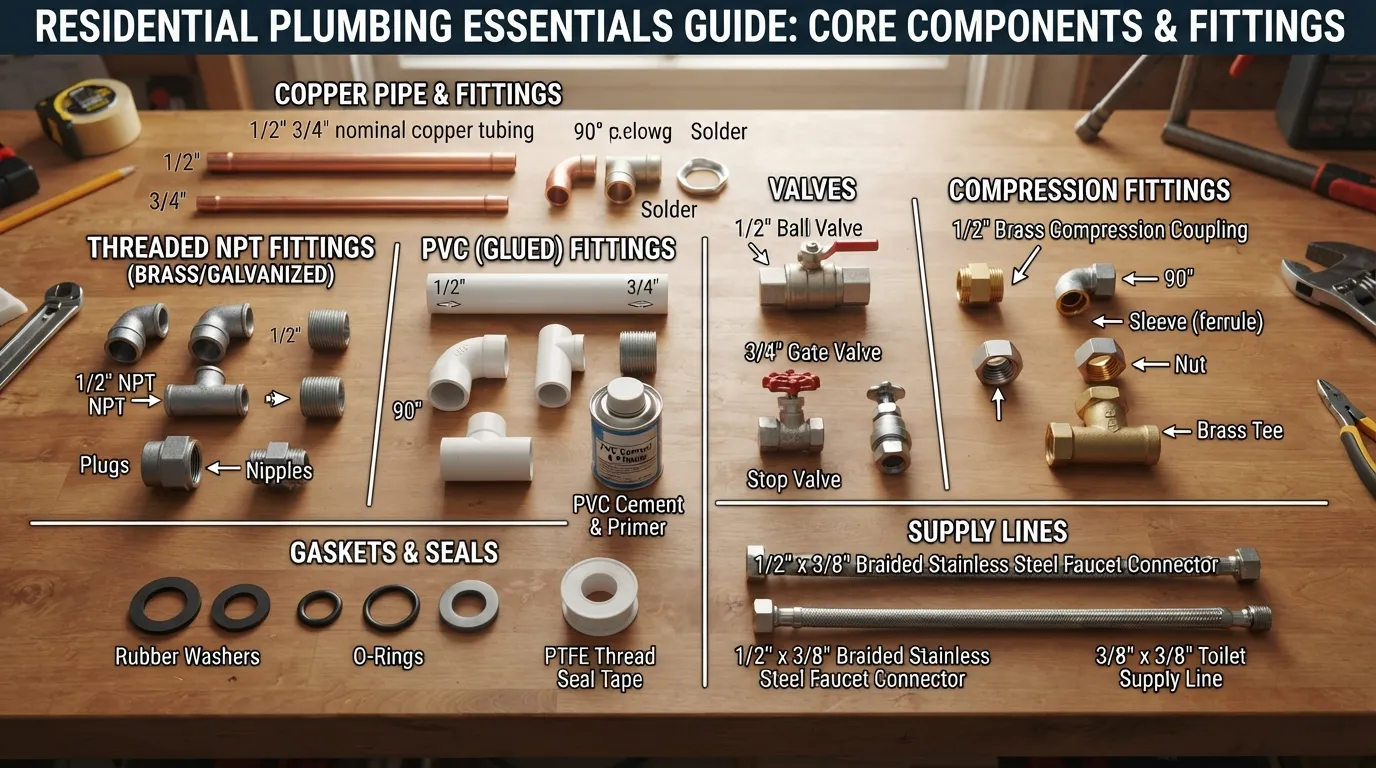
Plumbing Parts at a Glance: What Every DIYer Needs to Know
Understanding residential plumbing starts with recognizing that nearly every repair or installation relies on three core categories: rigid or flexible piping, directional and connective fittings, and flow-control valves with dependable sealants. Mastering these foundational elements prevents leaks and ensures code-compliant repairs.
The 3 Groups of Plumbing Parts
Residential plumbing systems operate through three distinct categories of hardware. Pipes transport water or waste throughout the structure, fittings join or redirect these lines, and valves paired with sealants regulate flow and prevent joint leaks.
Quick-Reference List of the Most Common Parts
PVC: Rigid white plastic pipe primarily used for drain, waste, and vent (DWV) systems.
PEX: Flexible cross-linked polyethylene tubing favored for modern hot and cold water supply lines due to its freeze-resistance and easy installation.
Copper: Traditional rigid metal piping known for high durability and heat resistance, commonly used for main water supply lines.
ABS: Rigid black plastic pipe utilized exclusively for non-pressurized drain and vent stacks.
Elbow: A directional fitting that changes the angle of a pipe run, typically available in 90-degree and 45-degree bends.
Tee: A T-shaped fitting that allows a single pipe line to split into two directions or branch off at a right angle.
Coupling: A short, straight connector used to join two straight sections of pipe of the same diameter.
Reducer: A specialized fitting designed to connect pipes of differing diameters together.
P-Trap: A curved pipe section installed beneath plumbing fixtures to trap sewer gases while allowing wastewater to flow freely.
Ball Valve: A quarter-turn flow-control valve that uses a hollow rotating ball to completely stop or allow water flow.
PTFE Tape: A white thread-seal tape wrapped around male pipe threads to lubricate and seal threaded connections.
Pipe Dope: A liquid thread sealant applied to pipe threads to create a pressure-tight, leak-proof joint.
What You’ll Learn in This Guide
This comprehensive resource breaks down everything required to successfully navigate DIY plumbing projects. The following sections cover material selection, proper tool usage, step-by-step assembly techniques, and expert troubleshooting tips to ensure durable, professional-grade results.
Before You Start: Safety, Tools, and Shutting Off the Water
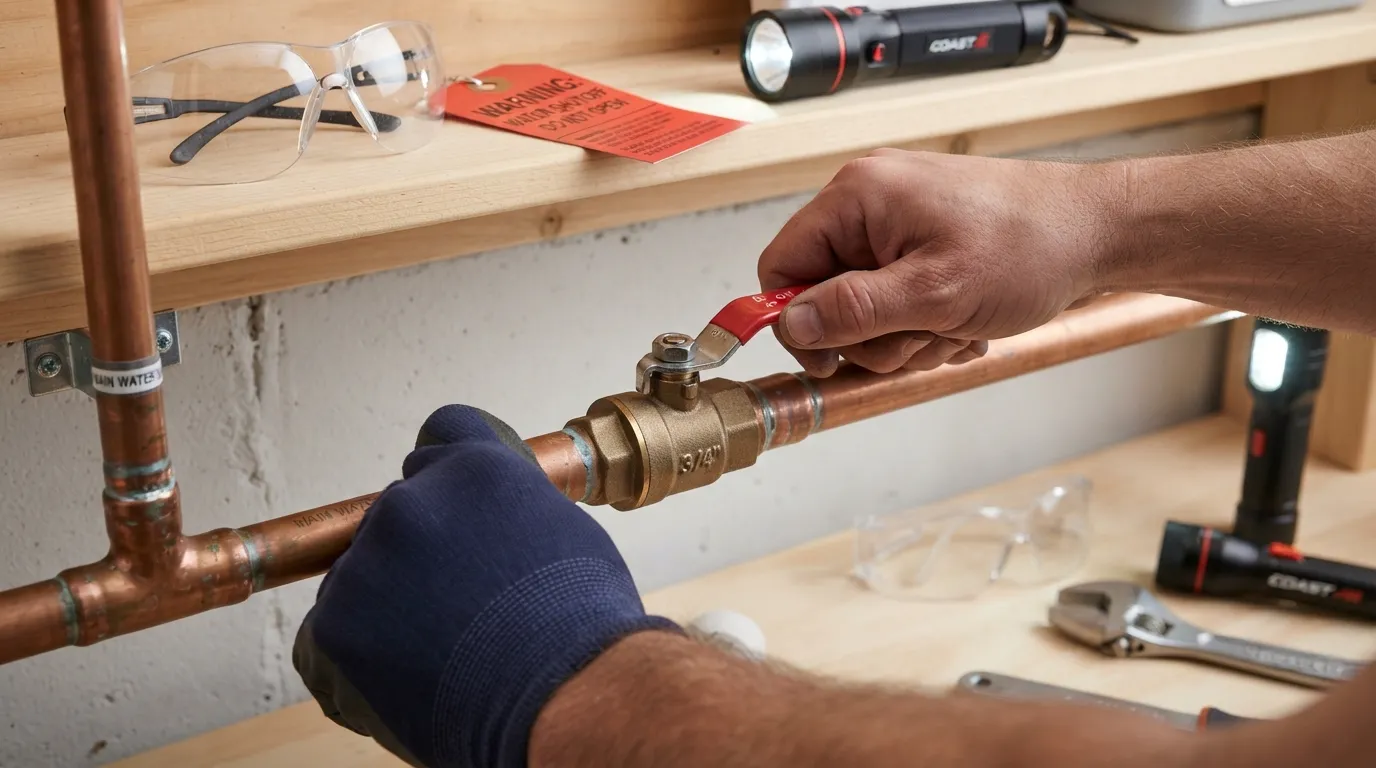
Preparation is the foundation of safe and successful DIY plumbing. Before opening a pipe or fitting a joint, you must isolate the water supply, gather the correct equipment, and know how to handle unexpected emergencies.
How to Find and Shut Off Your Main Water Valve (and Fixture Shutoffs)
Locating your main water shutoff valve before an emergency strikes is crucial to preventing extensive water damage. The main valve is typically located where the municipal supply line enters your home, often in a basement, crawlspace, garage, or near the water meter in an outdoor utility box.
Main Shutoff Valve: Turn the valve wheel clockwise or align a lever perpendicular to the pipe to completely stop water flow into the home.
Fixture Shutoffs: Individual fixtures feature small angle stop valves directly beneath sinks or behind toilets to isolate specific areas without shutting off the whole house.
Pro Tip: Main shutoff valves frequently seize up from mineral buildup due to lack of use. Test your main water valve twice a year by turning it halfway closed and back to ensure it moves smoothly when you need it most.
The Basic DIY Plumbing Toolkit
Having the right hand tools prevents damaged hardware and ensures secure connections. Keep these essential items ready in your toolkit:
Pipe Cutter: Delivers clean, square cuts on copper or plastic pipes.
Hacksaw: Cuts through stubborn bolts, metal brackets, and various pipe materials.
Deburring Tool: Removes sharp burrs and rough edges from freshly cut pipes to ensure smooth internal water flow.
Adjustable Wrench: Tightens nuts, bolts, and compression fittings of various sizes.
Pipe Wrench: Provides heavy-duty gripping power on threaded iron pipes and fittings.
Basin Wrench: Features a pivoting head to reach and tighten hard-to-access nuts behind faucets and sinks.
Tape Measure & Bucket: Essential for precise layout sizing and catching residual water during disassembly.
Safety Glasses: Protects your eyes from flying debris, old rust flakes, and chemical solvents.
Extra Tools for Specific Jobs
Different piping materials demand specialized equipment to guarantee a pressure-tight installation. Add these tools to your kit depending on your project type:
Torch Kit: Propane or MAPP gas torch combined with flux and solder for permanent copper pipe connections.
PEX Crimper: Compresses copper rings securely onto PEX tubing and fittings.
PVC Primer and Cement Kit: Chemically melts plastic surfaces together to create a welded joint for PVC or ABS lines.
What You’ll Find If You Can’t Stop the Water
If a main water valve is stripped, stuck open, or completely fails to shut off the water flow, do not panic or force it aggressively, as snapping the stem will worsen the flood. Head directly to the street-side water meter box near your property line and use a meter key to close the municipal supply valve. If the emergency is entirely out of control or your municipal box is inaccessible, call an emergency plumber immediately to mitigate property damage.
How Your Home's Plumbing System Works: Supply Lines vs. DWV
Residential plumbing operates as two completely separate loops: a pressurized intake network that delivers clean water and a gravity-fed drainage system that removes wastewater. Understanding this dual-loop mental model clarifies why specific pipes, fittings, and valves are required for every task.
Supply Lines: How Pressurized Water Gets to Your Fixtures
Supply lines transport clean municipal or well water under high pressure directly to your faucets, showers, and appliances. These pipes operate continuously under pressure, ensuring that water instantly flows upward and outward whenever a valve opens.
Hot and Cold Lines: Incoming water splits at the main intake, sending cold water directly to fixtures and diverting a portion through the water heater to supply hot water lines.
Continuous Pressure: Because the system remains pressurized, supply lines require rigid or durable flexible materials like copper or PEX paired with threaded or crimped fittings to prevent blowouts.
Drain-Waste-Vent (DWV): How Wastewater Leaves and Why Venting Matters
The Drain-Waste-Vent (DWV) system relies entirely on gravity rather than pressure to safely remove used water and waste from your home. Wastewater flows downward from fixtures into branch lines that connect to the main drain stack exiting out to the municipal sewer or septic tank.
Gravity Drainage: DWV pipes feature a slight downward slope (typically a quarter-inch per foot) to ensure waste moves smoothly toward the main sewer line without clogging.
The Vent Stack: Vertical vent pipes extend through your roof, equalizing air pressure inside the plumbing lines so waste drains freely without pulling water out of fixture traps.
Why Supply and DWV Parts Are Not Interchangeable
Supply lines and DWV systems handle completely different pressures, materials, and operational mechanics, making their components fundamentally incompatible.
Pressure Tolerances: Supply components are engineered to withstand high municipal water pressure (often 40 to 80 psi), whereas DWV parts are unpressurized and built with thin walls.
Fitting Geometry: DWV fittings feature smooth, sweeping internal curves to prevent solid waste blockages, while supply fittings prioritize secure, tight seals to contain high-pressure flow.
Where the Water Heater, Toilet, and Sump Pump Fit In
Major plumbing fixtures and appliances act as the vital bridge between your supply intake and DWV drainage loops.
Water Heater: Connects directly to the cold water supply line to heat water before distributing it through dedicated hot lines; explore options and maintenance guides for your water heater.
Toilet: Combines both systems by utilizing a pressurized supply line to fill its tank, followed by a gravity discharge into a wide DWV waste line.
Sump Pump: Operates in low-lying basements or crawlspaces to eject excess groundwater or flood water upward and away from the home’s foundation; learn more about protecting your home with a reliable sump pump.
Plumbing Pipe Materials Compared: PVC, CPVC, PEX, Copper, ABS, and Galvanized
Selecting the correct pipe material determines whether your plumbing repair lasts for decades or fails prematurely under pressure. Each material is engineered for specific pressures, temperatures, and applications, making a side-by-side comparison essential before starting any project.
Comparison Table
| Material | Typical Use | Joining Method | Pros | Cons | Relative Cost |
|---|---|---|---|---|---|
| PVC | Drain, Waste, Vent (DWV) | Solvent cement (Primer + Glue) | Lightweight, resists corrosion, smooth interior | Cannot handle hot water or high pressure | Low |
| CPVC | Hot & cold water supply | Solvent cement (Specialty CPVC glue) | Withstands hot water up to 200°F, easy to glue | Can become brittle over time | Moderate |
| PEX | Flexible water supply lines | Crimp rings, clamp rings, or expansion fittings | Highly flexible, freeze-resistant, fast installation | Requires specialized crimp tools, UV sensitive | Moderate |
| Copper | Supply lines, main intakes | Soldering (sweating) or push-to-connect | Exceptional durability, heat-resistant, recyclable | High material cost, requires torch skills | High |
| ABS | Non-pressurized drain stacks | Solvent cement (One-step black glue) | Tough in cold weather, single-step glue | Warps in direct sunlight, DWV use only | Low |
| Galvanized Steel | Old supply and vent lines | Threaded fittings and pipe joint compound | Extremely rigid and strong | Prone to internal rust buildup and clogging | High (Legacy) |
PVC: Drain, Waste, and Vent Lines
Polyvinyl Chloride (PVC) is the industry standard for residential drainage and vent systems. It is rigid, lightweight, and completely immune to the rust and corrosion that plague metal pipes.
Application: Utilized strictly for non-pressurized drain, waste, and vent (DWV) lines, as well as outdoor main water supply lines buried underground.
Limitation: PVC softens and warps under high heat, meaning it should never be used for indoor hot or cold water supply lines.
CPVC: Hot and Cold Water Supply
Chlorinated Polyvinyl Chloride (CPVC) is a rigid plastic similar to PVC but manufactured with extra chlorine, allowing it to handle higher temperatures and pressures.
Application: Used for interior hot and cold water supply lines as an economical, easy-to-install alternative to copper.
Joining: Requires specialized CPVC primer and solvent cement, which chemically bonds the pipe and fittings together into a single solid piece.
PEX: Flexible Supply Tubing (and What Red and Blue Mean)
Cross-linked polyethylene (PEX) has revolutionized residential plumbing due to its incredible flexibility and resistance to freezing temperatures.
Color Coding: Red PEX tubing is commonly designated for hot water supply lines, blue PEX is used for cold water supply lines, and white or grey can be used for either.
Installation: Joined using copper crimp rings, stainless steel cinch clamps, or expansion fittings compressed with dedicated mechanical tools.
Copper: Durable but Skill-Intensive
Copper piping has a proven multi-decade track record for durability, reliability, and safety in residential supply networks.
Application: The gold standard for main water supply lines, water heater hookups, and visible stub-outs.
Installation: Requires cutting, cleaning, applying flux, and heating joints with a propane or MAPP gas torch to melt solder into the fitting (sweating), demanding steady hands and safety precautions.
ABS: Black Drain Pipe (and Why You Shouldn’t Mix It Carelessly with PVC)
Acrylonitrile Butadiene Styrene (ABS) is a rigid black plastic pipe utilized similarly to PVC for drainage and vent stacks.
Cold Weather Performance: ABS remains tough and impact-resistant in freezing temperatures where PVC can shatter, making it popular in colder climate regions.
Compatibility Warning: Never use standard PVC solvent cement on ABS pipe. Because they are different chemical plastics, they require a universal transition glue or mechanical transition couplings to prevent joint failure.
Galvanized Steel and Other Pipes to Be Careful With
Older residential plumbing systems frequently feature materials that are now outdated, restricted, or prone to catastrophic failure.
Galvanized Steel: Commonly found as interior supply lines in homes built before the 1960s, these zinc-coated pipes corrode internally over decades, choking water pressure down to a trickle.
Polybutylene: Flexible grey plastic supply tubing used widely between 1978 and 1995; it reacts poorly to chlorine in municipal water and becomes brittle, leading to sudden bursts.
What We Commonly Find in Older Homes: During modern remodeling projects, we frequently open walls to discover heavily rusted galvanized steel supply lines or brittle polybutylene tubing that require complete repiping with PEX or copper to prevent leaks.
Which Pipe Should a Beginner Choose?
For DIY plumbing projects, matching the material to your specific task ensures success without requiring commercial-grade equipment.
For Drains and Vents: Choose PVC or ABS for straightforward cutting and solvent-welding assembly.
For Water Supply Lines: Choose PEX for its flexibility, minimal fittings, and forgiving installation curve, saving you from complex soldering torches.
Plumbing Pipe Fittings Explained: Identify Every Common Fitting
Fittings are the structural connectors of your plumbing system, designed to join, redirect, or seal pipes of various materials. Recognizing each specific connector prevents installation mistakes and ensures your water and drainage lines remain completely secure.
Elbows (45° vs 90°): Changing Direction
Elbows are angular fittings used to redirect the path of a pipe run around obstacles or through walls.
90-Degree Elbow: The standard choice for making sharp right-angle turns in supply or drainage lines.
45-Degree Elbow: Creates a gentle, gradual change in direction, which is heavily favored in DWV systems to maintain smooth wastewater momentum and prevent clogs.
Tees and Wyes: Branching a Line
Branch fittings allow a single primary pipe line to split into two separate directions or receive input from a secondary line.
Standard Tee: Forms a T-shape to split or combine flow at sharp 90-degree angles, common in water supply networks.
Sanitary Wye (and Combination Wye): Features a smooth, sweeping diagonal branch entry designed specifically for drainage systems to guide wastewater downward without backing up.
Couplings and Slip Couplings: Joining or Repairing Straight Pipe
Couplings are cylindrical connectors used to link two straight pieces of pipe together inline.
Standard Coupling: A simple sleeve that permanently joins two pipes of identical diameter during new installations.
Slip Coupling: Features an internal stop-free design that allows the fitting to slide completely over one pipe end, making it invaluable for splicing and repairing mid-run pipe breaks.
Reducers and Bushings: Connecting Different Sizes
When your layout requires transitioning from a larger pipe diameter to a smaller one, sizing fittings bridge the gap.
Reducer: A tapered coupling that gradually steps down the pipe diameter to maintain smooth flow velocity.
Bushing: A threaded or smooth insert that fits inside a larger fitting opening to accommodate a smaller pipe size.
Adapters (Male and Female) and Transition Fittings: Connecting Different Materials
Adapters allow you to switch between different pipe types, such as transitioning from rigid plastic PVC to threaded metal pipes.
Male vs. Female Adapters: Male adapters feature external threads to screw into female fittings, while female adapters feature internal threads to receive male pipe ends.
Transition Fittings: Specialized couplings engineered to securely join dissimilar materials (like copper to PEX or PVC to cast iron) without causing galvanic corrosion or joint leaks.
Unions: Fittings You Can Disconnect Later
Unions consist of three interlocking parts (a nut and two threaded tailpieces) that allow you to disconnect a section of pipe in the future without cutting or destroying the surrounding pipeline.
Caps, Plugs, and Cleanouts
These components seal off pipe ends or provide emergency access for maintenance clearing.
Caps and Plugs: Caps slide over exterior pipe ends, while plugs screw into internal threads to permanently or temporarily terminate a line.
Cleanouts: Removable threaded plugs installed at strategic bends in drainage lines to clear out stubborn clogs with an auger.
Nipples and Flanges
Nipples: Short segments of threaded pipe used to connect two adjacent female fittings or valves.
Flanges: Flat, wide-rimmed collars used to anchor toilets securely to the floor while connecting them directly to the waste stack.
Fitting Identification Cheat-Sheet Table
| Fitting Name | Appearance | What It Does | Where Used |
| 90° Elbow | Sharp right-angle bend | Changes pipe direction by 90 degrees | Tight corners and vertical-to-horizontal transitions |
| Sanitary Tee | T-shaped body with curved internal sweep | Branches a line while directing waste downward | Drain, Waste, and Vent (DWV) branch connections |
| Slip Coupling | Straight sleeve without internal center stop | Bridges and repairs broken pipe sections mid-run | Inline pipe repairs and retrofits |
| Reducer | Tapered cylinder | Connects a large pipe to a smaller pipe diameter | Water supply and drainage main reductions |
| Male Adapter | Fitting with external pipe threads on one end | Transitions from solvent-weld plastic to threaded metal | Valve connections and fixture tie-ins |
| Union | Three-part interlocking threaded connector | Allows future dismantling of a pipe run without cutting | Near water heaters, pumps, and main shutoffs |
Real-World Pro Tip: Common Fitting Mix-Ups
When working on DIY projects, the most frequent mistake beginners make is confusing a standard pressure tee with a sanitary tee or mixing up slip-fit drainage washers. Always verify whether your project requires high-pressure supply fittings or smooth, gravity-swept DWV fittings before applying glue or tightening compression nuts.
Plumbing Valves: Which One to Use and Where
Valves are the critical control points of your plumbing system, allowing you to isolate specific fixtures, regulate water pressure, or stop catastrophic leaks instantly. Choosing the correct valve type ensures long-term reliability and effortless operation during routine maintenance or emergencies.
Ball Valves: Fast, Reliable Full Shutoff
Ball valves are the gold standard for residential water shutoffs because of their durability, ease of use, and dependable seal.
Operation: Features a chrome-plated internal brass ball with a centered hole. Rotating the handle 90 degrees (a quarter turn) aligns the hole with the pipe for full flow or turns it perpendicular to instantly block water.
Durability: The smooth ball design resists mineral scale buildup, ensuring the valve won’t seize up even after years of disuse.
Gate Valves: Older Style and Why They Fail
Gate valves are legacy shutoff devices commonly found in homes built before the year 2000, identifiable by their round metal spinning handles.
Mechanism: Turning the handle lowers or raises a threaded metal wedge (the “gate”) into the water stream to obstruct flow.
Failure Points: Over time, mineral deposits accumulate in the internal track, preventing the gate from sealing completely. Forcing a stuck gate valve frequently strips the internal stem or snaps the handle off entirely.
Why We Prefer Ball Valves for Replacements: During plumbing upgrades, we almost always replace older gate valves with modern quarter-turn ball valves. Ball valves offer instant visual confirmation of flow status and eliminate the risk of jammed stems during a home emergency.
Angle Stops and Straight Stops: Shutoffs Under Sinks and Toilets
Fixture shutoff valves are installed directly beneath sinks and behind toilets to isolate individual fixtures without shutting off water to the entire house.
Angle Stops: Feature a 90-degree bend connecting a wall supply stub directly upward to a faucet or toilet supply line.
Straight Stops: Direct inline shutoffs used when the supply pipe comes up straight through the floor rather than out of the wall.
Modern Preference: Modern angle and straight stops utilize quarter-turn ceramic or ball mechanisms rather than old multi-turn washers to guarantee a drip-free seal.
Check Valves: Preventing Backflow
Check valves are automatic one-way flow control devices designed to keep water moving in a single direction and prevent dangerous cross-contamination or backflow.
Application: Frequently installed on municipal supply inlets, irrigation backflow preventers, and discharge lines; if you are installing or servicing a drainage setup, ensure your sump pump features an operational check valve to prevent discharged water from flowing right back down into the basin.
Operation: Internal spring-loaded flappers or swing gates open automatically under water pressure and snap shut the moment flow reverses.
Pressure-Reducing and Other Specialty Valves
High incoming municipal water pressure (exceeding 80 psi) can destroy household fixtures, making specialty valves essential for system protection.
Pressure-Reducing Valve (PRV): Installed on the main supply line right after the water meter to step down high incoming municipal pressure to a safe residential range (typically 50 to 60 psi).
Thermal Expansion Valves: Relief valves tied to water heater loops to manage pressure spikes caused by closed-loop water heating.
Valve Selection Table
| Valve Type | Best Use | Pros | Cons |
|---|---|---|---|
| Ball Valve | Main water shutoff, branch lines | Instant quarter-turn shutoff, highly durable, leak-proof | Bulky handle requires clearance to rotate |
| Gate Valve | Legacy home supply lines | Compact profile, allows slow flow modulation | Prone to mineral jamming and stem breakage |
| Angle Stop | Beneath sinks and toilets | Direct 90-degree transition to fixture supply hoses | Can develop packing nut leaks over time |
| Check Valve | Sump pump discharge, backflow prevention | Automatically prevents backward water flow | Internal flapper can wear out or trap debris |
| Pressure-Reducing Valve | Main water entry point | Protects appliances and pipes from high-pressure surges | Requires periodic pressure gauge checks and eventual replacement |
P-Traps and Drain Parts: What They Do and How They Fit
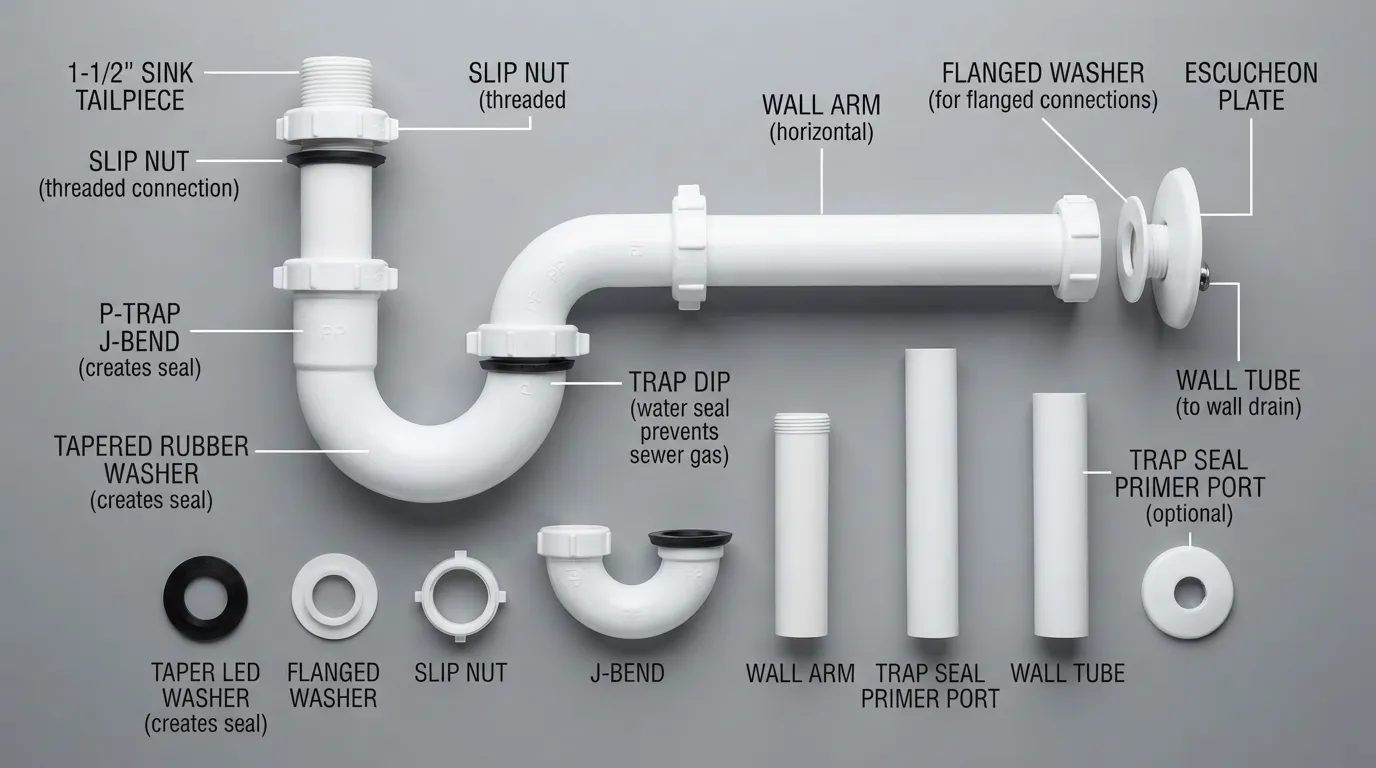
Drainage components under sinks and fixtures play a vital role in keeping your home hygienic and odor-free. Understanding how these parts fit together allows you to troubleshoot slow drains, eliminate foul odors, and handle basic under-sink repairs without calling a professional.
What Is a P-Trap and Why Does It Hold Water?
A P-trap is the curved, U-shaped section of pipe located directly beneath every sink fixture.
The Water Seal: The primary function of the P-trap is to retain a small amount of standing water inside its bend every time the sink is used.
Blocking Sewer Gases: This trapped pool of water acts as an airtight physical barrier that prevents toxic sewer gases, foul odors, and insects from rising up through the drainpipe and entering your living space.
P-Trap Anatomy: Trap Arm, Tailpiece, Slip Nuts, and Washers
A standard slip-joint P-trap assembly consists of four primary components working together to create a watertight, adjustable connection:
Tailpiece: The straight vertical pipe section extending downward from the sink strainer into the top of the trap.
P-Trap Bend: The curved U-bend that holds the standing water seal.
Trap Arm: The horizontal pipe extending from the trap bend directly into the sanitary tee fitting inside the wall.
Slip Nuts and Washers: Threaded plastic or brass nuts paired with tapered rubber washers that compress tightly around the pipe joints to secure the assembly without permanent glue.
P-Trap vs. S-Trap: Why One Is Preferred
While P-traps and S-traps serve the same general purpose of trapping water, their drainage geometry performs very differently under building codes.
P-Trap Design: Directs wastewater horizontally into the wall, maintaining proper air pressure equilibrium within the vent stack.
S-Trap Design: Curves downward through the floor like an ‘S’, which creates a heavy siphon effect that completely sucks the water seal out of the trap. Because dry traps allow sewer gases to enter the home, S-traps are prohibited by modern plumbing codes.
Signs Your Trap or Drain Has a Problem
Recognizing early warning signs helps you address minor blockages before they turn into major overflows.
Foul Odors: A persistent rotten-egg smell near the sink usually indicates a dried-out water seal or a cracked trap.
Slow Draining: Lingering pools around the drain basket point to grease buildup or hair accumulation inside the tailpiece or trap arm.
Gurgling Sounds: Bubbling or gurgling noises when water drains signal restricted airflow or a venting issue pulling air through the trap.
Do Baking Soda and Vinegar Really Clear Drains?
Pouring baking soda followed by vinegar creates a mild fizzing reaction that can help loosen minor soap scum or deodorize smelly drain surfaces. However, it is strictly a light maintenance trick and will not dissolve heavy hair clogs, grease plugs, or structural obstructions trapped deeper down the line.
What Plumbers Recommend to Keep Drains Clean
Maintaining clear, free-flowing drainage systems requires proactive habits rather than aggressive chemical interventions.
Physical Strainers: Install mesh hair catchers in bathroom sinks and showers to trap debris before it enters the trap.
Professional Maintenance: For stubborn clogs or recurring slow drains, rely on professional drain cleaning services using mechanical augers or hydro-jetting.
What We See on Service Calls: During emergency calls, we frequently find that heavy overuse of harsh chemical liquid drain cleaners has eaten through old metal pipe threads or warped plastic slip joints. Always avoid caustic chemicals, as they sit inside the P-trap and corrode the material rather than fixing the root cause of the clog.
Sealants and Connectors: PTFE Tape, Pipe Dope, Plumber's Putty, and Solvent Cement
Even the highest-quality pipes and fittings will leak if the wrong thread sealant or adhesive is applied. Using the correct compound ensures watertight, pressure-resistant joints that stand up to decades of service.
PTFE (Teflon) Tape: How to Wrap It
Polytetrafluoroethylene (PTFE) tape—widely known as Teflon tape—lubricates threaded pipe joints while deforming to fill micro-gaps between male and female threads.
Correct Wrapping Direction: Always wrap PTFE tape around male NPT threads in a clockwise direction (viewed looking directly at the end of the pipe). Wrapping clockwise ensures that as you screw the fitting together, the friction tightens the tape onto the threads rather than unraveling it.
Number of Wraps: Apply 3 to 5 smooth, taut wraps for standard 1/2-inch or 3/4-inch fittings, pulling firmly so the tape molds tightly into the thread grooves.
Pipe Dope (Joint Compound): When to Use It Instead of Tape
Pipe thread sealant (commonly called pipe dope) is a thick, paste-like compound painted directly onto male pipe threads to create a chemical and mechanical seal.
Application: Ideal for metal-to-metal threaded connections (like iron or brass gas and water lines). Many professional plumbers also apply a thin layer of pipe dope directly on top of PTFE tape on metal threads for maximum leak protection.
Compatibility Warning: Never use standard pipe dope on ABS or PVC plastic threads, as petroleum-based sealants can chemically react with and crack plastic fittings.
Plumber’s Putty vs. Silicone: Which Seals What
Non-adhesive sealants and putties create watertight barriers around fixture rims, basket strainers, and mounting surfaces.
Plumber’s Putty: A pliable, clay-like sealing compound used primarily underneath sink strainers, faucet bases, and pop-up assemblies. It stays flexible indefinitely but should never be used on porous materials like marble or granite (as the oil can stain them) or on plastic fixtures prone to cracking.
Silicone Caulk: A waterproof adhesive sealant used for sealing gaps around sink perimeters, shower pans, and tub edges where structural bonding and mold resistance are required.
Primer and Solvent Cement for PVC and CPVC
Plastic pipes do not screw together with sealants; instead, they require chemical welding to melt the mating surfaces into a single solid piece.
Purple Primer: Prepares PVC and CPVC by softening the outer layer of the pipe and fitting while cleaning away surface oils.
Solvent Cement: Applied immediately after primer, this chemical cement chemically fuses the plastic molecular structures together, creating a permanent, pressure-tight joint as it cures.
Washers, Gaskets, and O-Rings
Mechanical connections rely on compressed physical barriers rather than threads or glue to stop water leaks.
Rubber and Neoprene Washers: Used inside slip joints (like P-trap connections) and hose couplings to compress and form a seal.
O-Rings: Circular elastomeric rings seated inside faucet stems and cartridge assemblies to prevent water from bypassing moving parts.
Sealant Selection Table
| Sealant Type | Where to Use | Where NOT to Use |
| PTFE (Teflon) Tape | Metal and plastic male NPT pipe threads | Smooth slip-joint connections or glued plastic fittings |
| Pipe Dope | Metal-to-metal threaded pipes and fittings | Plastic threads (can cause chemical cracking) |
| Plumber’s Putty | Underneath sink strainers, faucets, and drain flanges | Porous stone countertops (marble/granite) or plastic shells |
| Silicone Caulk | Sink perimeters, tub edges, and non-porous surface joints | Inside threaded pipe joints or hidden pressurized lines |
| PVC / CPVC Solvent Cement | Rigid plastic PVC and CPVC pipe and fitting sockets | Metal pipes, flexible tubing, or ABS plastic joints |
How to Join Pipes: Solvent Welding, Soldering, Crimping, and Push-Fit
Mastering how pipes connect is what transforms a DIYer from an observer into a confident plumber. Each piping material requires a specific joining technique designed to handle its unique pressure and thermal expansion characteristics.
Joining Methods Overview Table
| Joining Method | Primary Pipe Types | Required Tools | Skill Level | Relative Cost |
| Solvent Welding | PVC, CPVC, ABS | Pipe cutter, sandpaper, primer, cement | Beginner-Friendly | Low |
| Soldering (Sweating) | Copper | Propane/MAPP torch, flux, solder, wire brush | Advanced | Moderate |
| Crimping | PEX (PEX-A / PEX-B) | PEX cutter, crimp rings, ratcheting crimp tool | Beginner-Friendly | Moderate |
| Push-Fit | Copper, PEX, CPVC | Tubing cutter, deburring tool | Beginner-Friendly | High |
| Compression | Copper, Brass supply | Tubing cutter, adjustable wrenches | Intermediate | Moderate |
Solvent Welding PVC and CPVC
Solvent welding is a chemical fusion process rather than gluing. The cement melts the outer layer of the pipe and the inner socket of the fitting, welding them into a single continuous piece of plastic.
Cut: Use a ratchet cutter or fine-toothed saw to cut the pipe squarely.
Deburr: Scrape away inside and outside plastic burrs using a deburring tool or sandpaper to prevent turbulence and debris accumulation.
Dry Fit: Push the pipe into the fitting dry. It should enter smoothly and stop snugly about halfway to two-thirds deep.
Prime: Apply purple primer to both the outside pipe end and the interior fitting socket to clean oils and soften the plastic.
Cement: Apply an even, generous coat of solvent cement over the primed areas.
Hold: Push the pipe straight into the fitting with a quarter-turn twist to spread the cement, holding it firmly for 30 seconds to prevent it from pushing back out. Allow full curing time per manufacturer guidelines before pressurizing.
Soldering Copper (Sweat Joints): Steps and Safety
Soldering creates a permanent, high-strength metal bond by melting filler metal into a capillary gap.
Preparation: Clean the exterior pipe end and the interior fitting socket with emery cloth or a wire brush until the copper shines bright. Apply water-soluble flux to both surfaces.
Heating: Ignite your torch and apply direct flame to the thickest part of the fitting cup. Test the temperature by touching lead-free solder to the joint; when the copper is hot enough, the solder will melt instantly upon contact.
Feeding: Remove the flame and feed solder into the gap. Capillary action will draw the molten metal completely around the joint. Wipe away excess flux with a damp rag once cooled.
Crimping PEX: Steps and Tool Tips
PEX installation relies on mechanical compression rings to secure flexible tubing over barbed fittings.
Cut and Slide: Squarely cut your PEX tubing and slide a copper crimp ring approximately 1/8 to 1/4 inch from the end of the tube.
Insert: Push the PEX barb fully into the fitting until it is visible through the inspection windows or seated tightly against the shoulder.
Crimp: Position your PEX ratcheting crimp tool squarely over the crimp ring and squeeze until the handles release. Verify calibration using a go/no-go gauge to ensure the ring compressed to the correct diameter.
Push-Fit Fittings: The Beginner-Friendly Option
Push-fit connectors (such as SharkBite) allow instant connections across copper, PEX, and CPVC without special tools, soldering, or glue.
Pros: Extremely fast repairs, requires zero dry time, and can be rotated after installation.
Cons: Significantly higher hardware cost per fitting.
Where NOT to Use: Never bury push-fit fittings behind drywall, under concrete slabs, or in inaccessible ceiling cavities where a slow O-ring leak could cause catastrophic unseen water damage.
Compression and Threaded Connections
Compression Fittings: Utilize a brass ferrule (olive) and a compression nut. As you tighten the nut with wrenches, the ferrule squeezes tightly against copper or soft metal tubing to form a watertight seal.
Threaded Connections: Require proper thread sealant (PTFE tape or pipe dope) on male NPT threads to bridge micro-gaps between rigid metal or plastic parts.
How to Test for Leaks After Joining
Rushing water back into newly assembled pipes before checking seals can lead to sudden indoor flooding.
Pressure Testing: For supply lines, slowly turn on the main water supply while keeping a downstream fixture open to purge trapped air, then close the fixture to test full static water pressure.
Drain Testing: For DWV systems, plug downstream cleanouts and fill test balls or traps with water to verify that all solvent-welded joints hold water without trickling.
Professional Diagnosis: If you encounter persistent weeping joints, complex layout pressures, or hidden line failures, rely on certified leak detection and repair specialists.
Common Causes of Failed Joints: In our field experience, the vast majority of joint failures stem from skipping the dry fit (leading to incomplete socket insertion), failing to deburr plastic or metal edges, or pressurizing solvent-welded lines before the chemical cure time has fully elapsed.
Which Parts Do You Need? Find the Right Parts for Your Project
Knowing the exact names of plumbing components is only half the battle; knowing which specific parts to purchase for a specific repair is what makes a successful DIY project. This breakdown maps common household plumbing problems directly to the exact hardware and tools required to fix them.
Project-to-Parts Table
| Problem / Project | Parts Needed | Tools Required | Difficulty |
| Dripping or Leaking Faucet | Replacement cartridge, O-rings, plumber’s grease | Adjustable wrench, Allen wrenches, screwdriver | Beginner |
| Leaking P-Trap Under Sink | Replacement P-trap kit, slip-joint washers | Bucket, channel-lock pliers (optional) | Beginner |
| Running or Leaking Toilet | Universal flapper, fill valve, wax ring | Sponge, adjustable wrench, bucket | Beginner |
| Replacing a Supply Line | Braided stainless steel supply hose | Adjustable wrench | Beginner |
| Replacing an Angle Stop | Quarter-turn angle stop valve, PTFE tape | Two adjustable wrenches or pliers | Intermediate |
| Adding a Shutoff Valve | Ball valve or inline valve, matching fittings | Pipe cutter, torch (for copper) or primer/cement (for PVC) | Intermediate |
| Extending or Repairing a Short Pipe Section | Matching pipe segment, slip coupling, cement or solder | Pipe cutter, sandpaper, measuring tape | Intermediate |
| Water Heater Connections | Corrugated flexible water connectors, dielectric unions | Pipe wrenches, PTFE tape, pipe dope | Intermediate |
| Sump Pump Discharge Line | PVC discharge pipe, inline check valve, PVC cement | PVC saw, primer, solvent cement | Intermediate |
Toilet Parts: Supply Line, Angle Stop, Flapper, Wax Ring
Toilet repairs are among the most common DIY tasks, involving a distinct set of internal tank components and external supply hardware.
Braided Supply Line: Flexible braided stainless steel hose carrying water from the wall stop valve to the bottom of the toilet tank.
Angle Stop: The wall shutoff valve that isolates water flow specifically to the toilet.
Flapper and Fill Valve: The flapper creates a seal at the bottom of the tank to hold water, while the fill valve controls incoming water refilling the tank after a flush.
Wax Ring: A heavy, compressible wax seal compressed between the bottom of the toilet bowl and the floor closet flange to prevent wastewater and sewer gas leaks. For complex seal failures or persistent rocking issues, consider professional toilet repair services.
Water Heater Connection Parts: Flexible Connectors, Shutoff Valve, Relief Valve Discharge
Water heaters require specialized transition hardware to safely handle thermal expansion, pressure relief, and rigid seismic requirements.
Flexible Water Connectors: Corrugated copper or stainless steel braided hoses that connect rigid household water lines to the water heater tanks while absorbing thermal expansion.
Full-Port Ball Shutoff Valve: Installed on the cold water inlet line right above the tank to immediately shut off incoming water during service.
Temperature and Pressure (T&P) Relief Valve Discharge Pipe: A dedicated copper or CPVC pipe extending downward from the safety relief valve toward the floor to safely direct boiling water or steam away from operators in an over-pressure event. For major installations or safety inspections, rely on professional water heater services.
Sump Pump Parts: Discharge Pipe and Check Valve
Basement flood prevention systems depend on an integrated discharge assembly to move water safely away from the foundation.
Discharge Pipe: Rigid PVC piping (typically 1-1/2 inch) routing pumped water vertically out of the basin and horizontally through the exterior wall.
Inline Check Valve: A spring-loaded or flapper valve installed immediately above the pump discharge outlet to prevent water remaining in the vertical pipe from falling back into the basin and burning out the motor. For drainage upgrades, explore expert sump pump services.
Step-by-Step Beginner Projects
Reading about plumbing parts and techniques is the first step; putting them into practice on real household fixes builds genuine confidence. These three beginner-friendly projects allow you to tackle common household plumbing repairs safely without risking major water damage.
Project 1: Replace a Leaking P-Trap
A leaking P-trap is usually caused by loose slip nuts or deteriorated rubber washers rather than a broken pipe.
Tools & Parts: Bucket, channel-lock pliers (optional), replacement P-trap kit (with tailpiece, trap bend, trap arm, and washers).
Time Estimate: 20 to 30 minutes.
Numbered Steps:
Place the Bucket: Position a bucket directly beneath the sink trap to catch standing water.
Loosen Slip Nuts: Hand-turn the slip nuts counter-clockwise on both ends of the P-trap (where it meets the tailpiece and the wall trap arm). If stuck, use channel-lock pliers gently.
Remove Old Trap: Slide the trap downward off the tailpiece and pull the trap arm out from the wall adapter. Empty the trapped water into the bucket.
Inspect Washers: Discard old, flattened rubber washers and clean any debris off the mating threads.
Install New Trap: Slide new slip nuts and tapered rubber washers (with the tapered cone pointing toward the fitting) onto the new pipes. Align the P-trap between the tailpiece and wall arm.
Hand-Tighten: Tighten all slip nuts securely by hand. Run the faucet for one minute and check for drips; if a slight weep appears, give the nut a quarter-turn with pliers.
Tips & Pitfalls: Never overtighten plastic slip nuts with heavy tools, as crushing the tapered washer causes it to distort and leak.
Project 2: Replace a Faucet or Toilet Supply Line
Old braided supply lines can develop bulges or weeping rubber cores, making pre-emptive replacement a smart maintenance choice.
Tools & Parts: Adjustable wrench, small bucket or towel, new braided stainless steel supply line.
Time Estimate: 15 minutes per line.
Numbered Steps:
Shut Off Water: Turn the angle stop valve clockwise until fully closed to stop water pressure.
Relieve Pressure: Open the faucet handle or flush the toilet to drain residual water from the line.
Disconnect Old Line: Use an adjustable wrench to loosen the coupling nuts at both the fixture connection and the angle stop valve. Have a rag ready for small drips.
Connect New Hose: Screw the new braided supply line onto the angle stop and fixture inlet by hand to ensure threads engage smoothly without cross-threading.
Snug and Test: Tighten the nuts securely with a wrench (about a quarter-turn past hand-tight). Slowly open the angle stop valve and inspect both ends for dryness.
Tips & Pitfalls: Do not use PTFE tape on modern braided supply lines because they seal using built-in rubber gaskets rather than pipe threads.
Project 3: Replace an Angle Stop (shutoff valve)
If an old multi-turn valve drips from the stem or refuses to shut off completely, replacing it with a modern quarter-turn valve solves the issue.
Tools & Parts: Two adjustable wrenches, bucket, new quarter-turn angle stop (compression style), emery cloth.
Time Estimate: 30 to 45 minutes.
Numbered Steps:
Shut Off Main Water: Turn off the home’s main water supply valve and drain downstream lines.
Remove Old Valve: Hold the water supply pipe steady with one wrench while loosening the compression nut on the old valve with a second wrench. Pull the old valve and brass ferrule off the copper stub (if possible; otherwise, leave the existing clean ferrule if compatible).
Clean Pipe Stub: Clean the copper pipe stub thoroughly with emery cloth until the metal shines bright and free of scale.
Install New Valve: Slide the new compression nut and brass ferrule onto the pipe, followed by the new quarter-turn angle stop.
Tighten Compression Nut: Tighten the nut by hand, then use two wrenches to hold the valve body still while turning the compression nut one full rotation to crush the ferrule into a watertight seal.
Tips & Pitfalls: Always verify your main water shutoff works before removing an angle stop, otherwise you cannot control the flow during a slip-up.
How to Test Your Work and What a Good Result Looks Like
Dry Inspection: Wipe all newly connected joints completely dry with a paper towel. Wait 5 minutes, then run water through the system while pressing clean paper towels around each seam.
What Good Looks Like: A successful installation shows zero moisture, no dripping, and smooth mechanical operation (quarter-turn handles move easily, slip joints remain dry under full sink flow).
Difficulty and Time Estimates for Each Project
| Project | Estimated Time | Skill Level | Potential Pitfalls |
| P-Trap Replacement | 20–30 mins | Beginner | Overtightening plastic nuts, misaligned washers |
| Supply Line Swap | 15 mins | Beginner | Cross-threading nuts, forgetting to shut off water |
| Angle Stop Replacement | 30–45 mins | Intermediate | Seized compression nuts, stuck main shutoff valve |
How to Choose the Right Size and Shop Smart: A Hardware Store Checklist
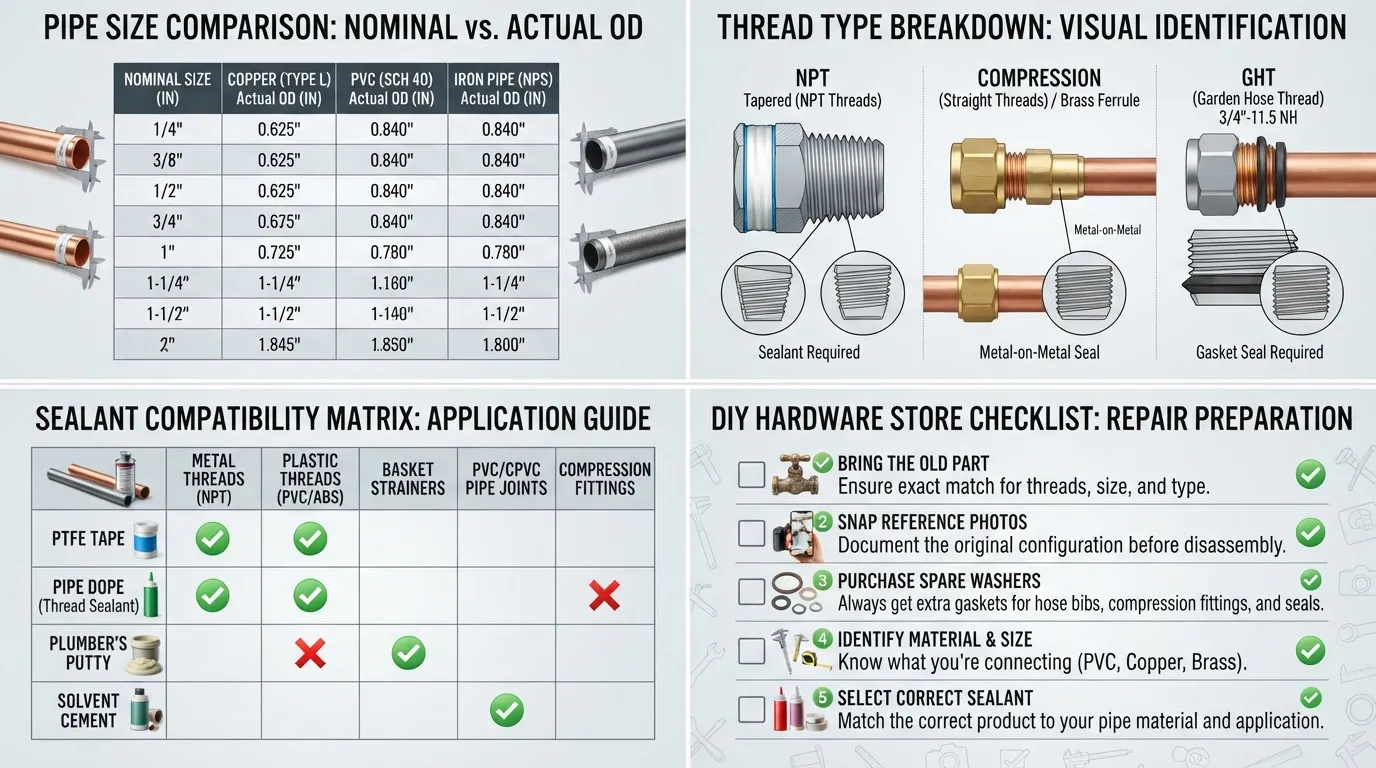
Navigating the plumbing aisle can be intimidating with hundreds of similar-looking fittings, thread pitches, and plastic variations. Mastering how to measure sizes, recognize thread types, and shop with a methodical checklist eliminates guesswork and prevents wasted trips to the hardware store.
How to Measure Pipe Size
One of the most common beginner frustrations is measuring a pipe with a tape measure, buying a matching size, and discovering it doesn’t fit. Plumbing pipe sizes are based on historical nominal pipe size standards rather than exact physical measurements.
Nominal Size vs. Outside Diameter (OD): A 1/2-inch nominal copper or PVC pipe does not measure 1/2 inch across. Instead, a 1/2-inch copper pipe has an actual outside diameter of 5/8 inch (0.625 inches), while 1/2-inch PVC has an outside diameter of 0.840 inches.
Measuring Tip: Always use a caliper or a wrap-around pipe sizing tool to measure the outside diameter, or bring the old piece directly to the store to match it against fitting display blocks.
Thread Types and Why Mismatches Happen
Not all threaded connections screw together, even if they look remarkably similar. Mixing incompatible thread standards will strip fittings and cause leaks.
NPT (National Pipe Thread): Tapered threads used in rigid metal and plastic supply piping. The threads get slightly narrower toward the end to wedge tightly together.
Compression Threads: Straight threads designed solely to hold a compression nut against a brass ferrule (olive) without sealing on the threads themselves.
Garden Hose Threads (GHT): Coarser straight threads found on hose bibbs and washing machine hookups, which require a flat rubber washer to seal rather than PTFE tape.
Materials Compatibility Rules
Joining dissimilar materials incorrectly can lead to rapid pipe corrosion or structural failure.
Galvanized Steel and Copper: Never connect copper directly to galvanized steel piping. The direct metal-to-metal contact triggers galvanic corrosion, eating away the copper rapidly. Always use a dielectric union or a brass transition fitting to separate them.
ABS and PVC: Never use standard PVC cement on ABS plastic (or vice versa). ABS requires specialized black transition cement or mechanical transition couplings to bond securely.
Your Hardware Store Checklist
When heading out to purchase replacement components, follow this professional field checklist to get the right parts on the first try:
Bring the Old Part: Always detach and bring the failed valve, washer, or pipe segment into the store. Matching physical threads side-by-side removes all doubt.
Take Wide and Close-Up Photos: Snap a wide photo showing the entire fixture assembly and a close-up of any stamped manufacturer numbers or valve markings.
Buy Strategic Spares: Buy an extra rubber washer, an extra slip nut, or a spare fitting. Plumbing parts cost only a few dollars, and having a spare saves a second trip when a fragile gasket splits during installation.
Printable Plumbing Parts Cheat-Sheet
To make your hardware store trips completely foolproof, download our official printable quick-reference guide containing sizing matrices, thread compatibility rules, and sealant guides.
Common DIY Plumbing Mistakes to Avoid
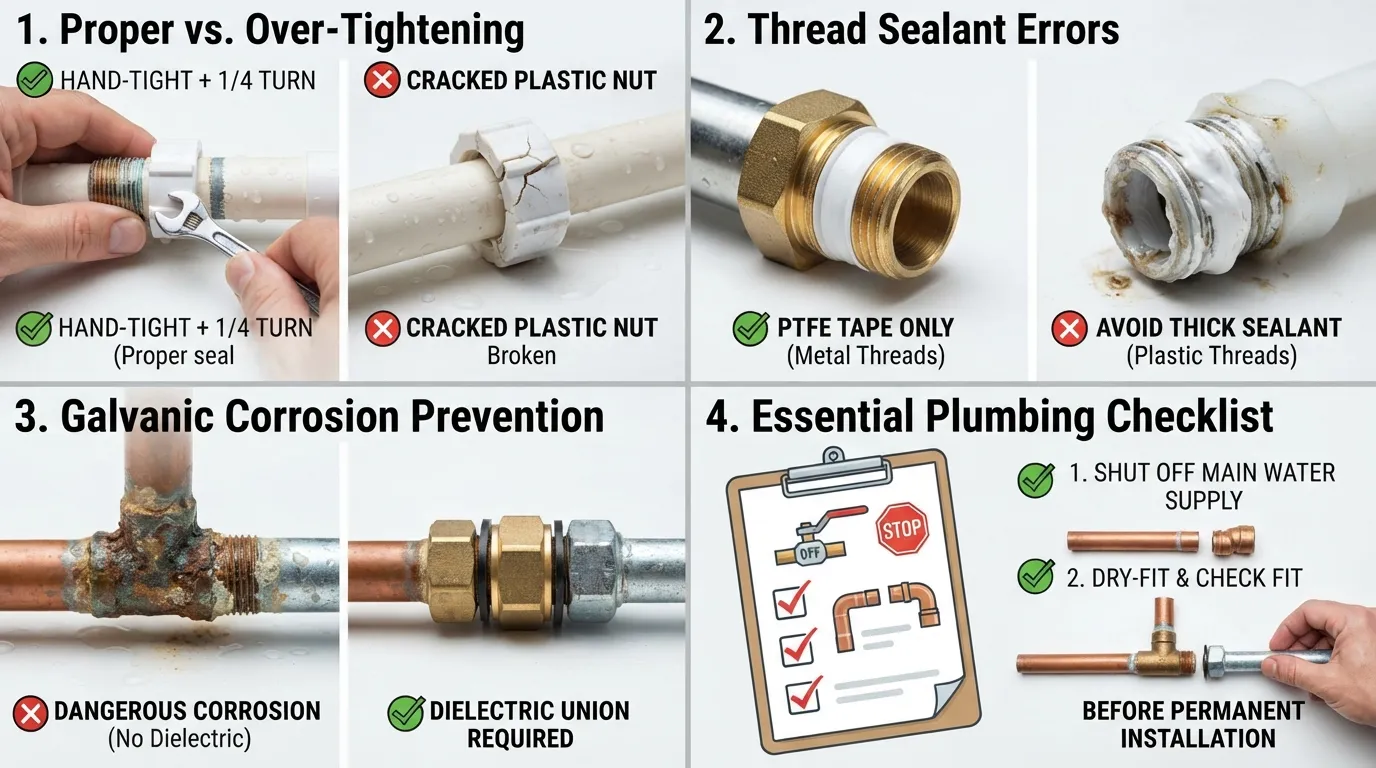
Even with the right parts and tools in hand, small procedural errors can turn a simple weekend repair into an expensive headache. Understanding where homeowners most frequently slip up helps you achieve a professional, leak-free result on your very first try.
The Most Common DIY Plumbing Mistakes
Over-Tightening Fittings: Applying brute force to plastic slip nuts or brass connectors crushes rubber washers, strips threads, and causes the exact leaks you are trying to prevent.
Using the Wrong Sealant: Applying petroleum-based pipe dope to plastic PVC/ABS threads or skipping thread tape on metal NPT joints leads to rapid joint failure.
Failing to Deburr Pipes: Leaving jagged metal or plastic burrs inside newly cut pipes creates turbulent water flow and catches hair, grease, and debris.
Skipping the Dry Fit: Dry-fitting plastic pipe assemblies before applying primer and cement ensures you catch alignment errors before permanent bonding occurs.
Mixing Incompatible Metals: Connecting copper directly to galvanized steel without a dielectric union triggers rapid galvanic corrosion and pinhole leaks.
Ignoring Plumbing Venting: Modifying drain lines without maintaining proper slope and vent stack connection leads to slow-draining fixtures and siphoning traps.
Buying the Wrong Size: Guessing dimensions instead of measuring the outside diameter (OD) or bringing the old part to the store results in incompatible hardware.
Neglecting Leak Testing: Turning the water back on and walking away without performing a pressurized paper-towel inspection allows slow weeping joints to go unnoticed.
Failing to Shut Off the Water: Starting a repair without completely closing the angle stop or main supply valve creates instant indoor flooding.
Relying on Harsh Chemical Cleaners: Pouring harsh acid drain openers into clogged pipes can corrode older metal traps and damage rubber gaskets.
What Plumbers Wish Homeowners Knew
Professional plumbers emphasize that patience and preparation trump speed every time. They wish homeowners understood that most major water damage incidents stem from minor, neglected maintenance issues like a silent running toilet or a slow under-sink drip. Knowing the location of your main water shutoff valve before an emergency strikes is the single most valuable step a homeowner can take.
What Happens If You Put Off Plumbing Repairs?
Delaying simple plumbing repairs allows minor inconveniences to snowball into structural disasters. A slow drip beneath a vanity cabinet will gradually warp wood cabinetry, foster toxic mold growth behind drywall, and rot subflooring. Similarly, a constantly running toilet wastes hundreds of gallons of water daily, while minor hairline cracks in supply lines can suddenly rupture when water pressure spikes at night. For stubborn moisture issues or hidden line failures, professional leak detection and repair services prevent catastrophic property damage.
What Is the Most Common Plumbing Repair?
According to general trade data and service call frequency, fixing a running toilet or replacing a worn-out flapper and fill valve stands as the most common plumbing repair in residential homes. Following closely behind are unclogging slow shower drains and replacing leaking P-trap washers under bathroom and kitchen sinks.
What Is the Hardest Part of Plumbing?
The most challenging aspect of plumbing for both beginners and seasoned pros is working within cramped, unforgiving spaces—such as inside narrow cabinet bases, beneath clawfoot tubs, or behind finished drywall. Beyond physical access constraints, diagnosing the root cause of a complex, intermittent leak hidden behind walls or beneath concrete slabs requires patience and systematic isolation.
DIY or Call a Pro? Knowing Your Limits, Permits, and Costs
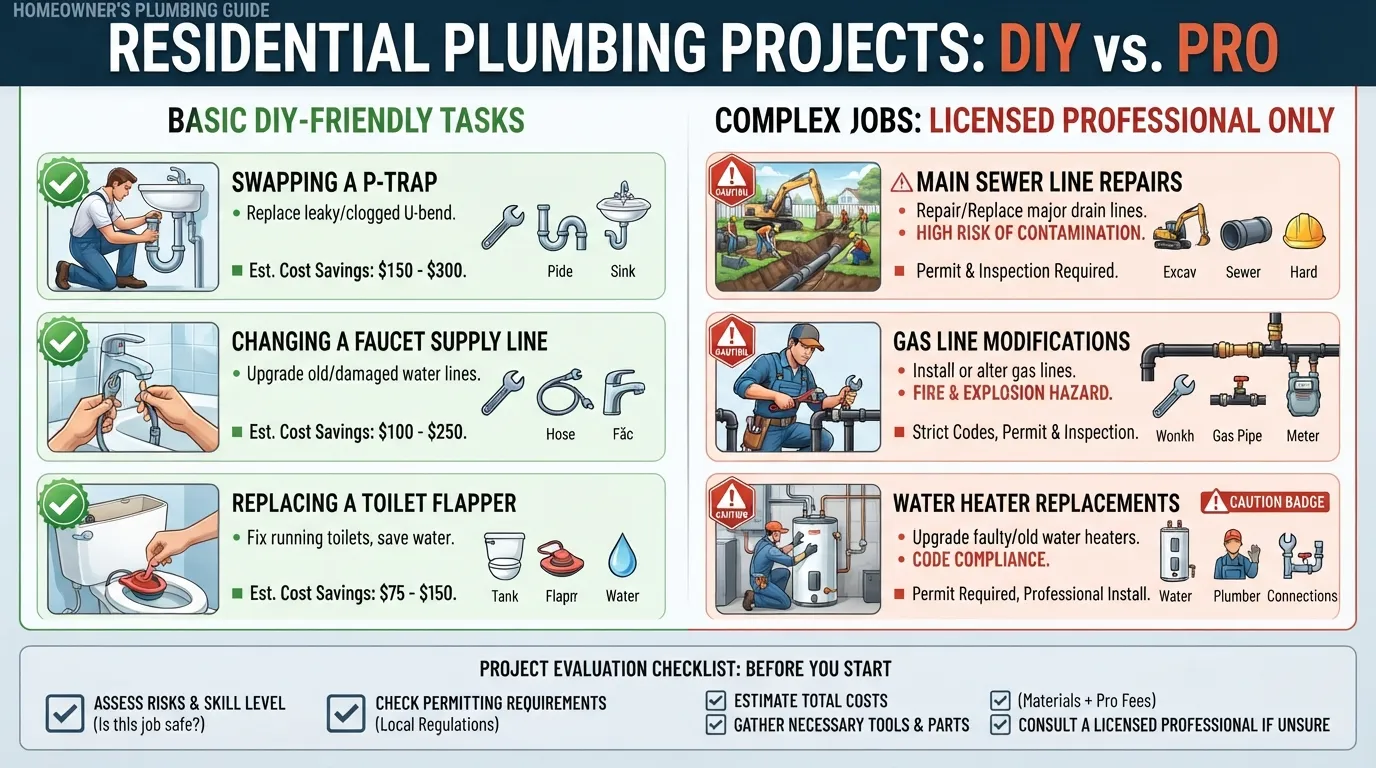
Knowing when to pick up a wrench and when to put it down is the hallmark of an experienced DIYer. While tackling minor fixture repairs saves money, pushing past your comfort zone on complex utility lines can result in severe property damage or code violations.
Plumbing Jobs Most Homeowners Can Handle
Most minor non-pressurized or easily isolated components are well within reach for a motivated beginner with basic tools:
Replacing sink P-traps and tailpieces.
Swapping out worn toilet flappers or fill valves.
Changing braided supply lines under sinks and toilets.
Replacing standard showerheads and bathroom faucets.
Installing a new angle stop (if the main line shuts off reliably).
Jobs You Should Leave to a Licensed Plumber
Certain complex systems carry high risks of structural damage, gas leaks, or contamination, making the help of a licensed plumber essential:
Main Sewer Line Repairs: Clearing major roots or replacing damaged sewer line sections connected to municipal mains.
Gas Line Work: Installing or modifying gas lines for water heaters or ranges requires rigorous pressure testing and specialized permits.
Water Heater Replacement: Handling heavy storage tanks, electrical wiring, and T&P safety venting requires certified expertise.
Hidden or Recurring Leaks: Tracing mysterious moisture behind finished drywall or under concrete slabs.
Whole-House Repiping: Upgrading legacy galvanized or polybutylene piping to modern PEX or copper.
Do You Need a Permit for DIY Plumbing?
Permit requirements vary significantly by municipality, but major structural alterations, new plumbing installations, and water heater replacements generally require local building permits and inspections. For guidelines on compliance and safety standards, review the Florida Building Code. Skipping required permits can complicate future home sales and void homeowner insurance claims if unpermitted work causes water damage.
Real-World Lesson: A homeowner once attempted to replace a corroded shower mixing valve themselves without shutting off the main line properly or cutting an adequate access panel. The valve body twisted, snapping the supply pipe inside the wall. What started as a $50 valve replacement turned into opening drywall, hiring a professional for emergency pipe extraction, and extensive mold remediation. Knowing your limits saves thousands.
How Much Can You Save by Doing It Yourself, and When It Costs More
DIY repairs typically save between $150 and $400 in professional labor fees for minor jobs like swapping a faucet or fixing a running toilet. However, DIY projects cost significantly more when an error leads to a flooded subfloor, ruined drywall, or ruined cabinetry. If a task requires specialized hydraulic pressing tools, core drilling, or main stack modifications, hiring a professional upfront is more economical.
Warning Signs You Need Help Now
If you encounter any of the following critical failures, stop DIY efforts immediately, shut off your main water or gas supply, and call an emergency plumber:
A completely burst pipe or uncontrolled indoor flooding.
Raw sewage backing up into tubs, showers, or floor drains.
Complete loss of water pressure across all household fixtures.
A persistent, pungent smell of sewer gas lingering indoors.
Sudden, unexplained brownish-yellow ceiling stains indicating a hidden overhead leak.
Explore our plumbing services to learn how our licensed experts can assist with your next project.
Frequently Asked Questions
What pipes are bad for plumbing?
Polybutylene pipes (dull gray flexible plastic used from the 1970s to 1990s) and unprotected galvanized steel pipes are widely considered hazardous. Polybutylene degrades over time when exposed to chlorine in public water supplies, while galvanized steel develops internal rust buildup that restricts flow and causes sudden leaks.
What are the most common plumbing mistakes to avoid?
The most common plumbing mistakes include over-tightening slip nuts, using incorrect thread sealants, skipping the dry-fit phase, failing to deburr pipe ends, mixing incompatible metals without dielectric unions, neglecting leak tests, and forgetting to shut off the main water supply before beginning work.
What do plumbers say about baking soda and vinegar?
Plumbers note that a baking soda and vinegar solution can help clear minor, organic surface grease and deodorize slow sink drains through mild fizzing action. However, it lacks the mechanical force or chemical strength to dissolve heavy hair clogs, mineral scale, or deep pipe obstructions.
What do plumbers recommend to keep drains clean?
Plumbers recommend installing hair catchers in all shower and sink drains, running boiling water down kitchen drains weekly to melt grease buildup, avoiding the disposal of fibrous foods or oils, and flushing lines monthly with plain hot water rather than corrosive chemical cleaners.
What is the most common plumbing repair?
Fixing a running toilet—typically by replacing a warped flapper or a worn-out fill valve—is the most common plumbing repair in residential homes. Other frequent repairs include clearing localized drain clogs and replacing leaking rubber washers underneath P-traps.
Can anyone do basic home repair plumbing, or do you need a professional?
Motivated homeowners can successfully handle basic, non-pressurized repairs like swapping faucet supply lines, replacing P-traps, or changing toilet flappers. However, licensed professionals should handle complex work involving gas lines, main sewer connections, or whole-house repiping.
What are the consequences of putting off plumbing repairs?
Delaying minor plumbing repairs allows small, inexpensive leaks to escalate into major structural damage. Unaddressed moisture rots wood cabinetry, creates toxic mold behind drywall, ruins subflooring, and can eventually cause catastrophic indoor flooding or sudden pipe failure.
What are the most common plumbing repairs needed in a home?
The most frequently required home plumbing repairs include fixing running toilets, clearing clogged bathroom and kitchen drains, replacing worn angle stop valves, repairing dripping faucets, and swapping out aging, weeping flexible water supply lines.
How do you fix a plumbing leak without paying a plumber?
For minor leaks at threaded connections or slip joints, you can often fix the issue by hand-tightening loose slip nuts, replacing worn rubber washers, wrapping male NPT threads with fresh PTFE tape, or swapping out an old, degraded braided supply line using basic adjustable wrenches.
Conclusion and Next Steps
Mastering the fundamentals of plumbing parts, joining methods, and sizing standards transforms home maintenance from an intimidating chore into an empowering skill. Whether you are swapping a worn P-trap or upgrading supply lines, preparation and patience are your best tools.
Key Takeaways
Match Your Materials: Always verify pipe dimensions (nominal vs. actual outside diameter) and use compatible joining techniques—such as solvent welding for PVC, soldering for copper, and crimping for PEX.
Respect the Sealants: Use PTFE tape or pipe dope for NPT threads, rubber washers for slip-joint drain fittings, and never rely on sealants to fix a misaligned or improperly cut pipe.
Know Your Limits: Basic non-pressurized repairs are ideal DIY weekend projects, but complex gas lines, main sewer connections, and hidden leaks require professional expertise.
Preparation Saves Property: Shutting off the main water supply, dry-fitting assemblies, and performing thorough post-repair leak tests prevent costly water damage.
Your Next Step
Put your knowledge into action and keep your home protected by utilizing our resources:
Download and print our official plumbing parts cheat-sheet to bring on your next hardware store run.
Start small with a simple weekend project, like replacing a leaky P-trap or swapping a toilet supply line.
When faced with complex installations, major line repairs, or recurring issues, explore all our plumbing services to connect with experienced professionals.
Main Services
Related Posts
Need a Plumber in Miami?
Schedule service online or speak directly with the EZ Plumbing team.
Owner-Led Local Service
Know who is behind the business before you request service. The owners, contact line and Miami service pages are published clearly.
- Named business owners
- Direct phone and social channels
- Local Miami service information
Clear Help Before You Book
Review the relevant service page, contact the team directly and use the booking page when you are ready—without relying on vague claims.
- Service-specific information
- Direct questions before scheduling
- Clear online booking route