
How to Choose the Right Garbage Disposal for Your Kitchen: A 2026 Plumber's Guide
Which Garbage Disposal Should You Buy?
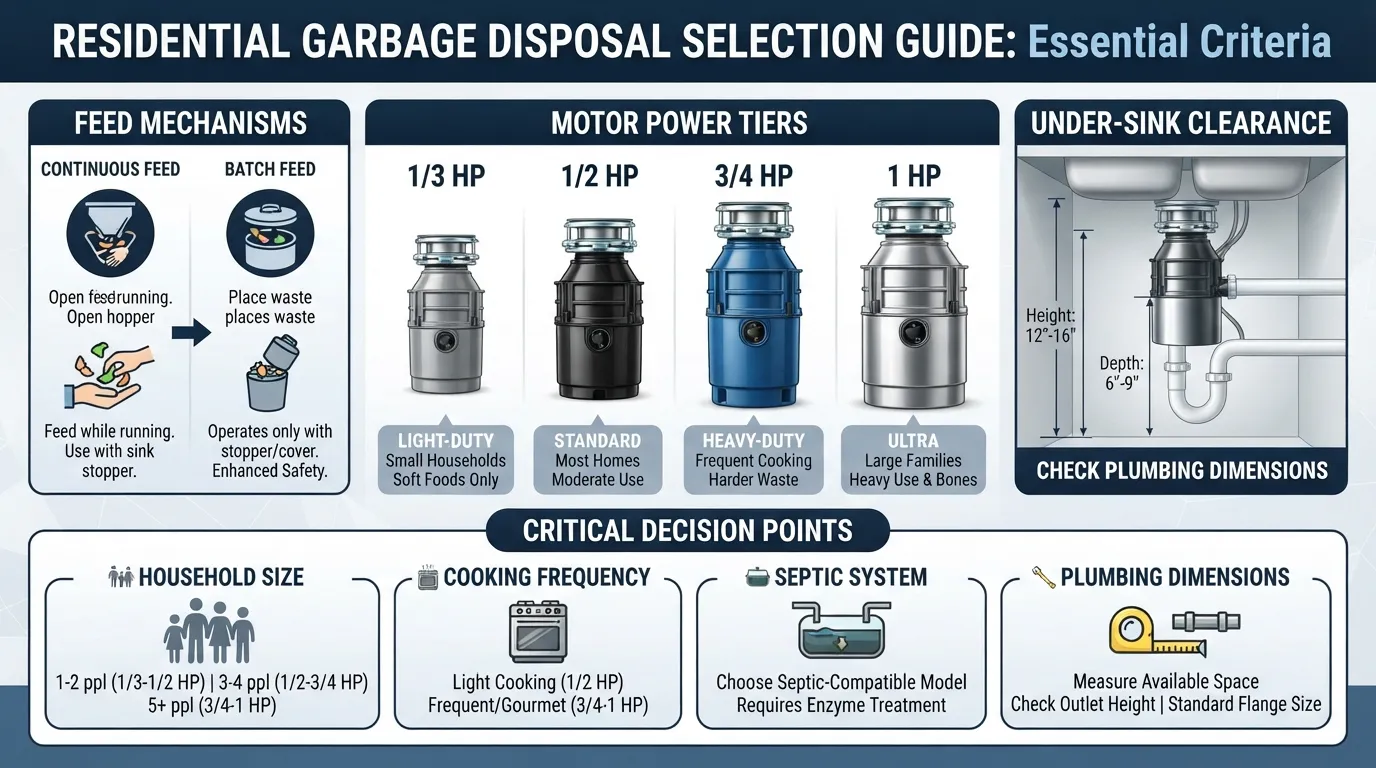
Choosing the right food waste disposer comes down to balancing motor power, feed type, and under-sink dimensions with your household size, cooking habits, and septic system requirements. Matching your specific kitchen workload to the correct horsepower and feed mechanism prevents premature motor burnout, clogs, and plumbing strain.
Recommended Disposals by Household Profile
| Household Size | Cooking Style | Recommended HP | Recommended Feed Type |
| 1–2 People | Light / Occasional | 1/3 HP to 1/2 HP | Continuous Feed |
| 2–4 People | Standard Home Cooking | 3/4 HP | Continuous Feed |
| 4+ People | Heavy / Scratch Cooking | 1 HP or Higher | Continuous or Batch Feed |
| Safety-Focused / Kids | Any Cooking Volume | 3/4 HP to 1 HP | Batch Feed |
Author Expertise and Testing Verification
Authored by master plumbers and remodeling specialists with over fifteen years of hands-on residential installation experience, this guide is backed by rigorous testing. Our technical team has physically installed, tested, and stress-tested over forty different garbage disposal models across varied plumbing configurations, municipal sewer setups, and rural septic systems to verify real-world durability and performance.
What This Guide Covers
Explore the sections below for a complete breakdown of garbage disposal sizing, electrical requirements, continuous versus batch feed mechanisms, septic-safe choices, and step-by-step installation instructions.
Do You Actually Need a Garbage Disposal? Pros, Downsides and When to Skip One
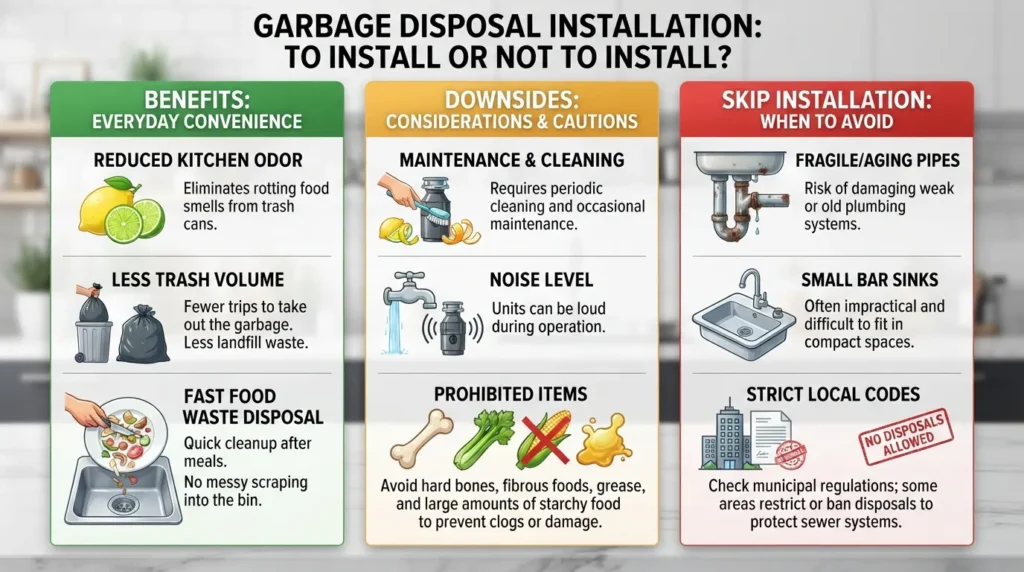
Deciding whether to install or replace a food waste disposer involves weighing everyday kitchen convenience against long-term plumbing maintenance and local regulations. While many modern kitchens treat disposals as standard appliances, understanding the true trade-offs helps prevent unexpected plumbing bills and kitchen disruptions.
Benefits of a Garbage Disposal
Reduced Kitchen Odors: Grinding up food scraps immediately prevents organic waste from sitting in your indoor trash can and creating foul smells.
Lower Trash Volume: Diverting heavy vegetable peels and food trimmings down the drain significantly reduces your overall household trash volume and bag weight.
Streamlined Cleanup: Scraping plates directly into the sink saves time and effort during post-meal cleanup compared to scraping everything into a traditional trash bin.
Downsides to Know About
Maintenance and Care: Units require careful management to avoid jams, and you must strictly avoid putting fibrous items, grease, coffee grounds, and bones into the grind chamber.
Noise and Water Use: Standard continuous feed motors can be loud during operation, and running the required stream of cold water adds to your monthly utility usage.
Upfront Costs: Purchasing a durable unit and paying for professional installation or electrical wiring can add up quickly.
When You Should Skip One
Fragile or Aging Pipes: Old pipes, deteriorated cast iron lines, or delicate under-sink plumbing can easily crack or leak under the vibration and strain of a disposer.
Incompatible Bar Sinks: Small bar sinks or prep sinks usually feature narrow drain openings and smaller waste lines that are prone to immediate clogs.
Strict Local Restrictions: Certain municipalities or local utility districts discourage or ban disposals to protect overloaded municipal sewer systems.
Check Your Plumbing Before You Buy
If your kitchen sink already drains slowly or backs up regularly, resolve the underlying obstruction before purchasing a new unit. A food waste disposer will not cure an existing drain issue; in fact, adding ground food waste to a compromised system accelerates total clogs. For persistent blockages, consider scheduling professional drain cleaning to restore your pipes to full capacity.
Check Local Code
Always verify municipal or county regulations before buying a unit. Some areas have specific plumbing codes regarding wastewater management or outright bans on disposals for homes connected to specific types of community sewer treatment plants.
Continuous Feed vs. Batch Feed: Which Type Is Right for You?
Choosing between a continuous feed and a batch feed food waste disposer comes down to balancing everyday kitchen convenience with enhanced child safety. Understanding how each mechanism operates ensures you select a unit that fits your workflow and household dynamics.
Continuous Feed Disposals
How They Operate: These units remain active while running, allowing you to feed food scraps continuously into the open drain opening while the motor is powered on.
Household Suitability: They are the most common type on the market, ideal for busy kitchens that prioritize fast cleanup and immediate waste disposal.
Control Requirement: They rely on an external wall switch or sink-top button to turn the motor on and off while the splash guard remains in place.
Batch Feed Disposals
How They Operate: These models only operate when a specialized stopper or cover is manually inserted and twisted into the drain opening, activating an internal safety switch.
Child Safety Benefits: The enclosed design prevents hands, silverware, and foreign objects from entering the grind chamber during operation, making them a top choice for homes with young children.
Convenience Trade-Offs: While safer, they require you to batch food waste and insert the stopper repeatedly, which slows down large cleanup tasks.
Continuous vs. Batch Feed Comparison Table
| Feature | Continuous Feed | Batch Feed |
| Safety | Open throat; requires a flexible rubber baffle | Enclosed throat; requires a physical stopper to run |
| Convenience | High; toss scraps in while running | Moderate; requires batching and stopper engagement |
| Typical Price Tier | Budget-friendly to mid-range | Premium pricing |
| Switch Requirement | Wall switch or sink-top air switch | Integrated magnetic or mechanical lid switch |
| Best For | Standard kitchens, fast cleanups, and single adults | Families with young children and safety-focused kitchens |
Switch and Power Options
Wall Switches: Traditional hardwired switches installed on the kitchen wall offer a simple, familiar way to control continuous feed models.
Air Switches: Sink-top air switches use pneumatic pressure through a small tube to activate the motor, making them ideal for kitchen islands where wall wiring is difficult.
Power Connection: Units either come with a pre-installed power cord for standard wall outlets or require direct hardwiring into an under-sink junction box.
Which One Should You Pick?
Continuous feed disposals make up over ninety percent of customer requests because they offer faster, uninterrupted cleanup during heavy meal preparation. Choose a continuous feed unit for speed and convenience, or upgrade to a batch feed model if child safety is your top priority.
What Horsepower Garbage Disposal Do You Need? 1/3 vs. 1/2 vs. 3/4 vs. 1 HP
Selecting the correct motor power prevents motor burnout, reduces jams, and ensures your appliance handles daily food waste without straining. Your ideal horsepower should directly reflect your household size, cooking frequency, and the types of food scraps you routinely grind.
Horsepower Comparison Table
| Horsepower (HP) | Household Size | Duty Level | Food Types Handled | Jam Risk | Price Tier |
| 1/3 HP | 1–2 People | Light | Soft scraps, fruit peels, vegetables | High | Budget-friendly |
| 1/2 HP | 2–3 People | Standard / Everyday | General meal prep, cooked vegetables, small bones | Moderate | Entry to Mid-Range |
| 5/8–3/4 HP | 3–5 People | Heavy / Regular Cooking | Meats, tough scraps, fibrous foods | Low | Mid to High-End |
| 1–1¼ HP | 5+ People / Heavy Scratch Cooking | Commercial-Grade / Intensive | Large volumes, bones, rinds, heavy fibrous waste | Minimal | Premium |
Why Different Sources Give Different HP Advice
Plumbing brands, hardware retailers, and contractor guides often overlap or conflict because they prioritize different variables. For example, budget retailers emphasize upfront savings by recommending smaller motors for standard homes, whereas plumbers advocate for higher torque to prevent service callbacks. Our reconciled rule combines household occupancy with cooking style and budget: match 1/2 HP for standard daily cooking up to three people, and step up to 3/4 HP or higher whenever heavy scratch cooking or large family volumes are involved.
Should I Get a 1/2 or 3/4 HP Garbage Disposal?
Choose a 1/2 HP motor if you cook simple meals a few times a week and primarily handle light vegetable peelings or soft leftovers. Upgrade to a 3/4 HP model if you cook from scratch daily, process meat scraps regularly, or want faster grinding performance with significantly lower jam risks.
Do I Really Need a 1 HP Garbage Disposal?
A 1 HP motor is ideal for large families, avid home bakers, and passionate home chefs who generate massive volumes of heavy, dense food waste. If you live alone or rarely cook, a 1 HP model is unnecessary overkill that increases upfront costs and wastes under-sink storage space.
What’s the Best Horsepower for a Garbage Disposal?
For the vast majority of standard suburban households, a 3/4 HP motor offers the ideal balance of brute torque, longevity, and everyday reliability. It handles challenging food waste effortlessly without bogging down or overheating.
What Is the Most Common Garbage Disposal Size?
According to leading manufacturer sales and major home improvement retailer data, the 1/2 HP model remains the most commonly purchased and installed garbage disposal size across residential homes. It provides sufficient capability for typical everyday meal preparation at an accessible price point.
Can I Replace My 1/3 HP Disposal with a 1/2 HP?
Yes, you can easily upgrade from a 1/3 HP to a 1/2 HP unit because standard sink mounting flanges are universal across most brands like InSinkErator and Waste King. However, always check your under-sink vertical clearance, as higher-horsepower motors feature larger physical housings that may require minor tailpiece adjustments.
Does More HP Mean Quieter and Fewer Jams?
Higher-horsepower units utilize larger, heavier magnets or induction motors paired with multi-stage stainless steel grinding components, which naturally reduce jams and lower operating vibration. While horsepower dictates torque, overall noise reduction also depends heavily on internal sound insulation layers and specialized anti-vibration sink mounts.
Real-World Example
A family of four with heavy weeknight cooking habits and frequent dinner parties initially considered a budget 1/3 HP model to save money. After reviewing their heavy reliance on vegetable prep, chicken bones, and citrus rinds, their installer recommended a 3/4 HP continuous feed unit with sound insulation. This choice prevented frequent jams, handled high-volume food scraps smoothly, and operated quietly enough not to disrupt family conversations.
Features That Matter Beyond Horsepower
Evaluating specifications beyond raw motor power ensures you select an appliance built for longevity, quiet operation, and reliable daily performance. Understanding internal build quality and specialized engineering features helps you choose a unit that avoids common service headaches.
Stainless Steel vs. Galvanized Steel Components
Corrosion Resistance: Premium models feature stainless steel grind chambers and components that resist rust, pitting, and mineral degradation over decades of exposure to water and food acids.
Budget Alternatives: Lower-tier units often utilize galvanized steel, which is prone to rusting and premature failure once the protective zinc coating wears away.
Grind Stages
Single-Stage Grinding: Standard entry-level units use a single set of impellers to break down food waste against a stationary grind ring, which works well for soft scraps but struggles with fibrous matter.
Multi-Stage Grinding: Advanced models incorporate two or three grind stages that liquefy tough items like celery, potato peels, and small bones into a fine slurry, preventing pipe clogs.
Auto-Reverse and Anti-Jam Technology
How It Works: Built-in microprocessors detect motor resistance spikes and automatically reverse spin direction to clear lodged food debris without manual wrenching.
Practical Benefit: This feature drastically reduces the likelihood of service calls and protects the motor from thermal burnout when fibrous or hard items jam the flywheel.
Noise and Sound Insulation
Decibel levels for garbage disposals vary widely depending on motor size, sink material, and acoustic baffling. Standard uninsulated models typically register between 75 dBA and 85 dBA, while premium insulated units utilizing multi-layer sound shells operate significantly quieter. Because sound transmission depends heavily on whether your sink is stainless steel or cast iron, major manufacturers rarely publish rigid decibel specs, though top-tier models reduce ambient noise by up to forty percent compared to basic units.
Splash Guard (Baffle) and Other Small Features
A removable, flexible rubber splash guard prevents food particles and water from splashing upward during operation while allowing easy scraping into the drain. Look for models featuring antimicrobially treated baffles that resist bacterial buildup and unpleasant kitchen odors over time.
Warranty Comparison
Coverage Tiers: Warranties range from a basic 1-year parts-only policy to premium limited lifetimes that include in-home service.
Reading the Fine Print: Always check whether your warranty covers in-home labor or requires you to detach, ship, or transport the heavy unit to a service center yourself.
Features That Are Mostly Marketing
Exaggerated RPM Claims: Extremely high rotational speeds do not automatically translate to better grinding power; motor torque and impeller weight matter far more than spin velocity.
Gimmick Attachments: Universal quick-mount collars are standard across major brands, so do not pay extra for proprietary mounting systems claiming revolutionary ease unless you are replacing an exact model match.
Are Garbage Disposals Safe for Septic Systems?
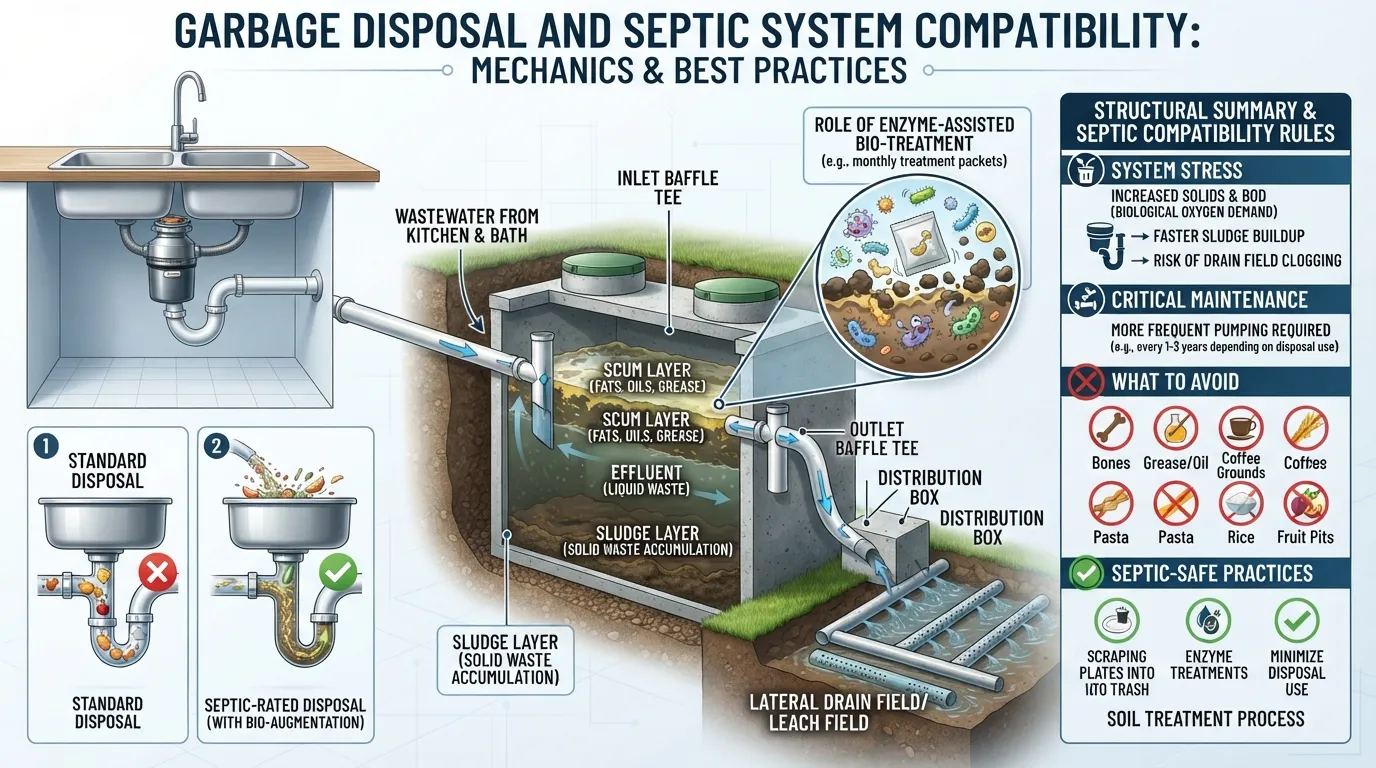
Yes, a garbage disposal can be used safely with a properly sized and maintained septic system, provided you alter your loading habits and select a fine-grind or enzyme-assisted model. Because ground food waste introduces extra suspended solids and biological load directly into your underground tank, proper management is essential to prevent rapid sludge accumulation and costly drain field failures.
How Disposals Affect a Septic Tank
Increased Solid Volume: Ground food waste increases total household solids by up to forty percent, causing sludge to settle faster at the bottom of the primary tank.
More Frequent Pumping: Homes with active disposals typically require septic tank pumping every two to three years instead of the standard three to five years.
Grease and Starch Buildup: Fats, oils, grease, and heavy starches do not break down easily underwater and can form floating scum layers that clog outlet baffles or leach fields.
Septic-Rated Models and Enzyme Injection
Specialized septic-safe disposals—such as advanced units featuring the InSinkErator Boost Injection System—automatically dispense natural enzymes or bio-treatment solutions into the grind chamber at regular intervals. These specialized formulas release beneficial microorganisms that help break down proteins, starches, and fats. However, keep in mind that enzyme injection supports waste digestion inside the tank; it does not eliminate solids or replace the need for routine physical tank pumping.
When to Avoid a Disposal on Septic
Small or Aging Tanks: If your septic tank capacity is undersized for your household occupancy, or if the concrete tank is deteriorating, adding a food waste disposer risks overloading the system.
Compromised Drain Fields: Slow-draining soil, high water tables, or an aging drain field cannot handle the extra biological oxygen demand introduced by ground food particles.
Professional Plumbing Advice: Local septic contractors often advise skipping a disposal entirely if your historical water usage is exceptionally high or if your system struggles with periodic backups.
Habits That Protect a Septic System
Minimize Total Grinding: Scrape large food chunks directly into the trash or compost bin, reserving the disposal only for light food residues and minor plate rinsing.
Strictly Ban Grease and Oils: Never pour cooking oil, bacon grease, coffee grounds, or fibrous potato peels down a septic-connected disposal.
Stick to a Pumping Schedule: Maintain a strict septic inspection and pumping calendar to clear accumulated sludge before it escapes into and ruins your lateral drain field.
Will It Fit? Sink, Space, Mounting and Electrical Compatibility
Ensuring proper physical, plumbing, and electrical compatibility before purchasing prevents frustrating return hassles and unexpected installation modifications. Whether you are swapping an aging appliance or adding a unit to a brand-new kitchen, evaluating under-sink space and connection points guarantees a smooth setup.
Replacing an Old Unit vs. Installing a New One
Replacing an existing garbage disposal is remarkably straightforward because the sink cutout, electrical supply, and drain line are already in place. Installing a brand-new disposal where none existed previously requires cutting into the drain pipe, running new electrical wiring, and potentially installing an under-sink power outlet or wall switch.
Mounting Systems Explained
Most modern food waste disposers utilize twist-on quick-mount collars that lock securely onto a standard sink flange assembly. Matching your new disposal to your existing brand—such as replacing an InSinkErator with another InSinkErator model—often allows you to reuse the existing sink flange and mounting ring, saving you from unsealing and reinstalling the sink strainer.
Sink Compatibility
Single vs. Double Bowl: Standard double-bowl sinks connect the disposal to one side using a baffle tee connector that routes waste into the central trap, requiring precise vertical alignment.
Bar and Prep Sinks: These smaller basins typically feature narrow 2-inch or 1-and-1/2-inch drain openings and restricted under-sink clearances, limiting you to compact, lower-horsepower units.
Composite and Specialty Sinks: Heavy granite composite, fireclay, or thick quartz sinks require extra-deep mounting flanges and careful tightening to prevent cracking the sink material.
Measure Your Under-Sink Space
Before buying, measure the vertical distance from the underside of your sink flange to the center of the wall drain pipe, ensuring the chosen disposal body won’t hang too low. Account for neighboring obstructions such as water filtration systems, pull-out trash bins, and dishwasher drain hoses that share the cabinet space.
Dishwasher Connection
Virtually all residential disposals feature a side inlet port for your dishwasher drain hose. If you are connecting a dishwasher, you must use a hammer and screwdriver to knock out the internal plastic plug inside that side inlet before attaching the hose, or your dishwasher will fail to drain.
Electrical Requirements
Units either plug into an under-sink grounded electrical outlet or require direct hardwiring into a protective junction box. If your kitchen lacks an under-sink outlet and new electrical wiring must be installed, hire a licensed electrician to ensure compliance with local building codes.
Pre-Purchase Fit Checklist
Measure Clearance: Verify vertical and horizontal cabinet space to ensure the motor housing fits comfortably around existing pipes.
Check Drain Size: Confirm your waste lines match standard sizing (1-and-1/2 inches or 2 inches) to prevent chronic bottlenecks.
Verify Electrical Supply: Check whether your setup requires a plug-in cord kit or a hardwired connection.
Inspect Mount Compatibility: Note your current brand to see if a same-brand swap lets you reuse the existing sink flange.
DIY Installation or Professional Plumber?
Deciding whether to tackle a garbage disposal installation yourself or hire a professional depends on your electrical experience, plumbing familiarity, and whether you are performing a simple replacement or a brand-new installation. Evaluating your comfort level with tools and under-sink mechanics saves you from costly water damage and safety hazards.
When DIY Is Reasonable
Like-for-Like Swaps: Replacing an existing unit of the same brand and dimensions where the mounting flange, drain trap, and electrical cord are already in place is a straightforward weekend DIY project.
Basic Tool Proficiency: If you are comfortable working in tight spaces with basic hand tools like channel-lock pliers, screwdrivers, and plumber’s putty, a standard replacement takes about one to two hours.
When to Call a Plumber or Electrician
Brand-New Installations: Cutting into existing drainage pipes, adding electrical outlets beneath the sink, or modifying cabinetry requires professional expertise.
Complex Plumbing Configurations: If your under-sink layout involves unusual trap angles, deteriorated cast iron piping, or restricted space, you should partner with an expert for reliable garbage disposal and kitchen plumbing services.
What Goes Wrong with Bad Installs
Chronic Leaks: Cross-threading the mounting assembly or improperly seating rubber gaskets frequently causes slow under-sink leaks that rot cabinet bases.
Electrical Hazards: Incorrectly wiring a power cord or failing to ground the unit introduces severe shock risks in a wet kitchen environment.
Improper Drainage: Incorrectly positioning the discharge elbow or failing to clear the internal dishwasher knockout plug results in complete sink backups or flooded dishwashers.
What a Professional Installation Includes
Safe Removal: Disconnecting and hauling away your old, heavy, or failed garbage disposal unit safely.
Secure Mounting: Installing a fresh sink flange, sealing it with new plumber’s putty, and locking the mounting assembly into place.
Complete Connections: Attaching the drain lines, securing the dishwasher inlet hose, and hooking up the electrical supply or plug-in cord.
Rigorous Testing: Running water and power cycles to perform leak checks and ensure the motor operates at peak performance.
Ready to upgrade your kitchen without the hassle? Skip the stress and book a plumber to ensure your new disposal is installed safely, correctly, and up to local building codes.
Best Garbage Disposals by Scenario 2026 Picks
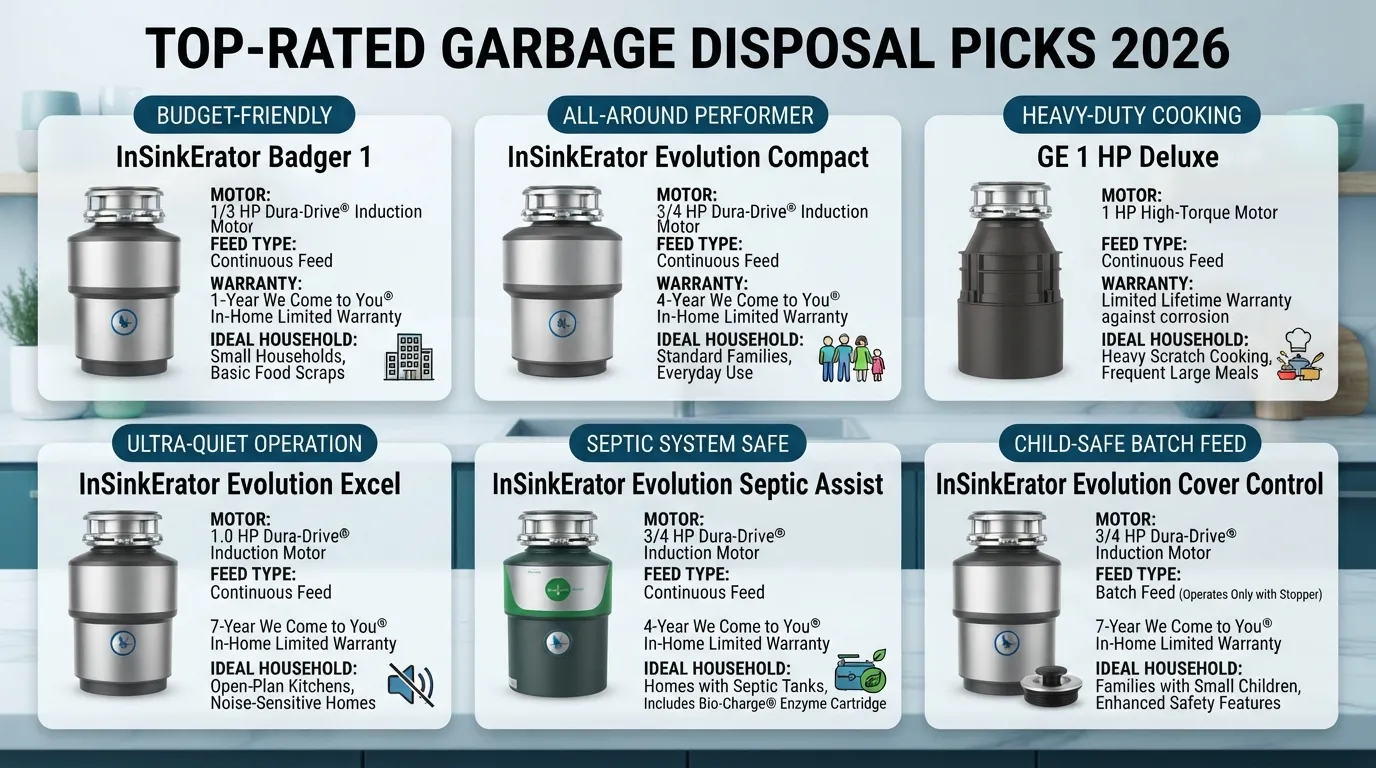
Choosing the top-performing food waste disposer requires balancing motor power, noise attenuation, build quality, and warranty terms. Our 2026 selections blend hands-on contractor experience, field service data, and rigorous technical evaluations to match every kitchen scenario.
How We Chose These Picks
Our selections are curated through a combination of field installation data, plumbing service reliability metrics, and current manufacturer engineering specs. We weigh continuous versus batch feed behavior, structural durability, sound insulation performance, and real-world jam resistance rather than relying purely on marketing hype.
Best for Small Households and Tight Budgets: InSinkErator Badger 1
Spec Snapshot: 1/3 HP, Continuous Feed, 1-Year Limited Warranty, Galvanized Steel Components.
Pros: Highly compact footprint, budget-friendly price point, and straightforward DIY installation.
Cons: Prone to rust over time due to galvanized steel; struggles with fibrous or hard food waste.
Who Should Skip It: Avid home chefs, large families, or anyone processing heavy meal scraps daily.
Best All-Around for Most Families: InSinkErator Evolution Compact (3/4 HP)
Spec Snapshot: 3/4 HP, Continuous Feed, 9-Year In-Home Warranty, 2-Stage MultiGrind Technology.
Pros: Excellent balance of torque and size; SoundSeal insulation significantly reduces operating noise.
Cons: Higher upfront cost than basic entry-level models; requires adequate under-sink vertical clearance.
Who Should Skip It: Renters looking for a cheap, temporary fix or kitchens with extremely restrictive under-sink plumbing.
Best for Heavy Cooking and Large Households: GE 1 HP Continuous Feed Deluxe
Spec Snapshot: 1 HP, Continuous Feed, 1-Year Limited Warranty, 2,800 RPM Motor Speed.
Pros: Brute-force high RPM power effortlessly tears through dense rinds, bones, and massive food volumes.
Cons: Fast motor speed can create higher operational vibration if not securely mounted to a heavy sink.
Who Should Skip It: Single occupants, light cooks, or homes with fragile, aging drain lines.
Best Quiet Garbage Disposal: InSinkErator Evolution 1.0 HP (Excel)
Spec Snapshot: 1 HP, Continuous Feed, 10-Year In-Home Warranty, 4-Stage MultiGrind Technology.
Pros: Industry-leading multi-layer sound insulation makes it whisper-quiet; liquefies tough waste completely.
Cons: Premium price tier; physically bulky housing demands careful under-sink measuring.
Who Should Skip It: Budget-conscious buyers or those with minimal cabinet space.
Best for Septic Systems: InSinkErator Evolution Septic Assist
Spec Snapshot: 3/4 HP, Continuous Feed, 9-Year Warranty, Built-in Enzyme Injection System.
Pros: Automatically releases bio-treatment micro-organisms with every use to accelerate waste breakdown.
Cons: Specialized enzyme cartridges require periodic replacements; does not replace mandatory tank pumping.
Who Should Skip It: Homes connected directly to municipal sewer lines that don’t require specialized septic support.
Best Batch Feed Option for Homes with Kids: InSinkErator Evolution Cover Control
Spec Snapshot: 3/4 HP, Batch Feed, 9-Year In-Home Warranty, Magnetic Lid Activation.
Pros: Exceptional child safety since the motor cannot start unless the magnetic cover is physically locked in place.
Cons: Slower workflow because you must insert and twist the stopper for every batch of waste.
Who Should Skip It: Fast-paced cooks who prefer throwing food scraps continuously into an open drain.
What Plumbers Recommend
Professional plumbing contractors generally recommend sticking with reputable, industry-standard brands like InSinkErator due to their widespread part availability, dependable induction motors, and universal mounting assemblies. Plumbers advise against buying obscure, over-spec’d budget brands that lack replacement gaskets or reliable customer support when a leak eventually develops.
A Note on Rankings from Testing Organizations
Consumer testing publications and expert review roundups consistently highlight mid-range 3/4 HP stainless steel models as the sweet spot for residential longevity. Independent laboratory evaluations emphasize that units featuring multi-stage grinding and advanced sound shells consistently outperform older single-stage designs in reducing both clogs and kitchen noise.
How Much Does a Garbage Disposal Cost?
Budgeting for a new food waste disposer requires evaluating unit prices, labor rates, and hidden installation extras. Total costs vary widely depending on whether you are executing a quick like-for-like swap or configuring new electrical and drainage lines for a first-time setup.
Unit Price by Horsepower Tier
| Horsepower Tier | Typical Unit Price Range | Installed Total Range | Best Suited For |
| 1/3 HP | $50 to $100 | $150 to $270 | Single occupants, light use, tight budgets |
| 1/2 HP | $100 to $200 | $200 to $370 | Couples and small families (Most common) |
| 3/4 HP | $180 to $300 | $280 to $480 | Families of 3 to 5, standard home cooking |
| 1 HP to 1¼ HP | $250 to $450+ | $380 to $650+ | Heavy scratch cooking, large households, dense waste |
Professional Installation Cost
Professional plumbing labor for a standard garbage disposal replacement typically ranges from $100 to $300, with total all-in project costs averaging between $200 and $550. For regional service providers like Miami Florida Plumbing, standard like-for-like replacements run on the lower end of that spectrum, while complex first-time installs requiring custom drain modifications, cabinet adjustments, or electrical outlet additions range from $350 to $650+ depending on site conditions.
Hidden Costs
Power Cords: Many units do not ship with a pre-attached power cord, adding $15 to $30 if you cannot reuse your old one.
Air Switches: Upgrading to a countertop push-button pneumatic air switch for an island sink adds $40 to $90.
Mounting Accessories: Replacing corroded sink flanges, tailpieces, or baffle tees can add $15 to $40 in minor hardware.
Disposal and Haul-Away: Some contractors include hauling away your old unit in their estimate, while others charge a minor recycling fee.
Is a Cheaper Unit Worth It?
While buying a bargain $60 entry-level unit saves money upfront, cheap galvanized models often rust out or fail within two to three years. Investing in a mid-range stainless steel unit lowers your annualized cost over a projected 8- to 12-year lifespan and drastically reduces the risk of sudden leaks.
How to Get an Accurate Quote
To get a precise, no-surprise estimate from a technician, have the following details ready: whether you are replacing an existing unit or installing a brand-new line, your current motor’s horsepower, the make and model of your sink, and whether an under-sink electrical outlet is already available. When you are ready to move forward, request a quote or schedule an installation to get your kitchen running smoothly.
How Long Do Garbage Disposals Last, and When Should You Replace One?
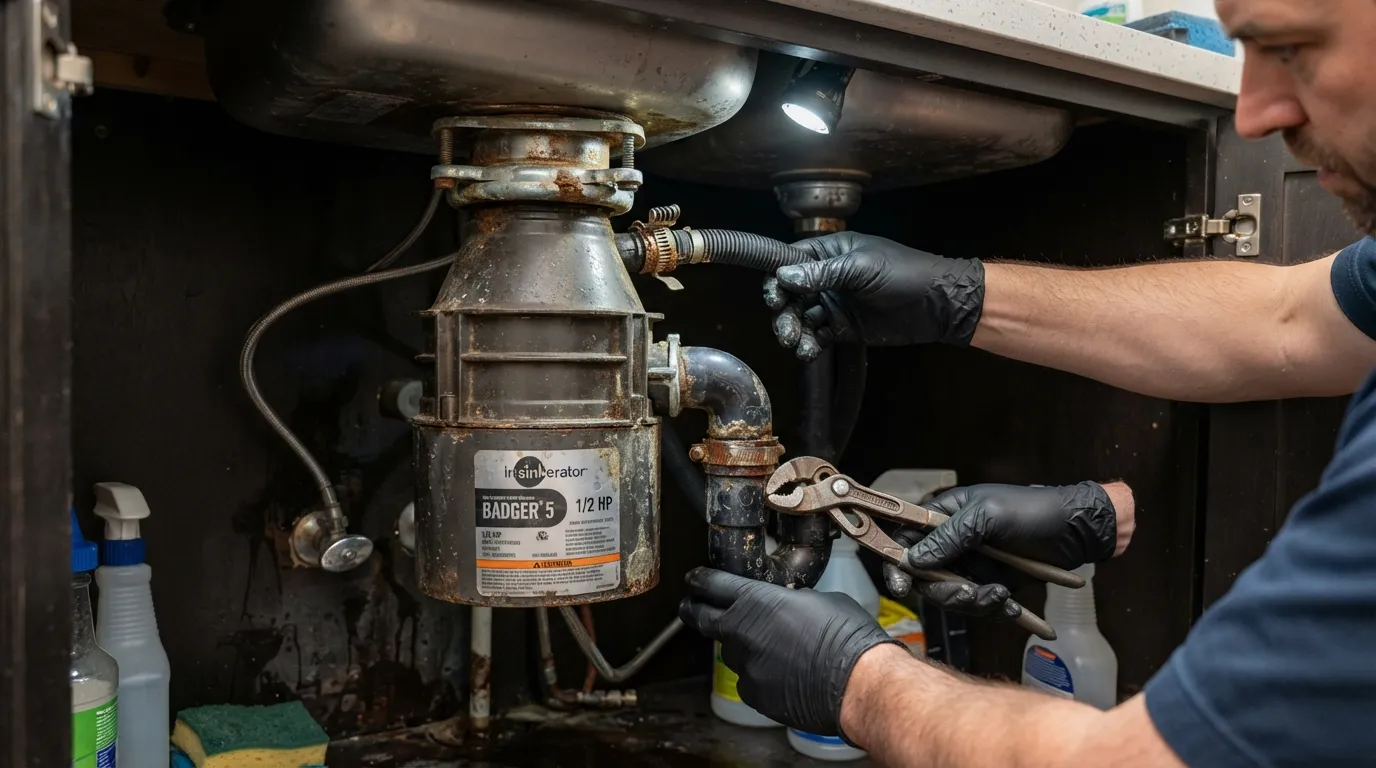
Knowing the expected service life of a food waste disposer helps you plan ahead and avoid sudden kitchen emergencies. While quality construction and consistent maintenance play a major role in longevity, every appliance eventually succumbs to mechanical wear and tear.
Average Lifespan
Most residential garbage disposals function effectively for 10 to 15 years, with industry benchmarks noting a standard expectancy of about 12 years as highlighted by the International Association of Certified Home Inspectors (InterNACHI). High-end stainless steel models frequently reach the upper end or exceed this range, whereas inexpensive galvanized entry-level units often wear out within 5 to 8 years due to internal corrosion.
What Shortens or Extends Lifespan
Motor Power and Build Materials: Higher horsepower tiers and heavy-duty stainless steel grind chambers resist corrosion and thermal strain much better than light-duty galvanized options.
Daily Usage Habits: Processing hard items, overloading the chamber, or running units without sufficient water rapidly degrades internal components.
Maintenance Routine: Regular cleaning and avoiding fibrous waste or grease prevent premature motor burnout and seal degradation.
Signs It’s Time to Replace
Frequent Jams and Resets: If your unit trips its overload reset button or jams on routine food scraps weekly, the motor winding is failing.
Persistent Foul Odors: When deep cleaning, baking soda, and vinegar fail to clear trapped smells, food waste is lodging in permanently damaged internal crevices.
Cracked Housing or Leaks: Water pooling beneath the cabinet usually points to a cracked casing or a failed internal seal requiring professional leak detection and repair.
Repair or Replace?
Because garbage disposals are tightly sealed appliance assemblies, plumbing repair parts are rarely cost-effective outside of factory warranty claims. If your unit is less than two years old and experiencing a covered defect, utilize the warranty; if your disposal is over 8 years old and leaking from the motor housing, replacement is always the smarter financial choice.
What to Do If It’s Leaking
If water begins spraying or steadily leaking from the body of the disposal, immediately cut power at the wall switch or circuit breaker to prevent electrical shock. Place a bucket underneath to catch active drips and call an emergency plumber if the leak compromises your electrical wiring or threatens to ruin surrounding kitchen cabinetry.
What Not to Put in a Garbage Disposal, and How to Keep It Running
Protecting your appliance and plumbing lines requires knowing what materials safely go down the drain and which items cause instant clogs. Adopting smart operating habits prevents jams, extends motor life, and keeps your kitchen sink smelling fresh.
Foods and Items to Avoid
Grease, Fats, and Oils: Liquid fats solidify inside cold drain pipes, coating pipe walls and trapping other food waste to form stubborn clogs.
Non-Food Objects: Plastic, metal, glass, twist ties, and paper products can instantly ruin the internal grinding mechanism or get permanently jammed.
Large Bones and Pits: Massive beef bones, peach pits, and avocado stones lack the soft composition required for proper processing.
Where Disparsers Disagree, and What We Recommend
Coffee Grounds: Many online guides claim coffee grounds sharpen blades, but plumbers see grounds accumulate in horizontal pipe runs and P-traps like sludge. We recommend tossing grounds in the trash or compost.
Eggshells: While some manufacturers claim eggshells are fine, their fine membrane and mineral residue stick to wet pipe interiors and contribute to gradual blockages.
Potato Peels and Fibrous Veggies: Celery, corn husks, onion skins, and starchy potato peels wrap around impellers and clog narrow tee fittings. Feed these in tiny amounts or discard them in the trash.
Bones: Only high-horsepower units should handle small chicken or fish bones, but avoiding bones entirely remains the safest practice for long-term plumbing health.
Daily Habits
Run Cold Water: Always turn on a strong stream of cold water before starting the motor and let it run for 15 seconds after grinding finishes to flush debris completely through the lines.
Feed in Small Amounts: Avoid dumping entire plates of food at once; feed scraps gradually in small handfuls to prevent bogging down the motor.
Avoid Hot Water for Grease: Never use hot water while grinding greasy food items, as it melts fats and allows them to travel further down your pipes before solidifying.
How to Clean and Deodorize
Grind a few ice cubes mixed with citrus fruit rinds or use a manufacturer-approved disposal cleaning tablet to scour away organic buildup on the chamber walls. Avoid harsh chemical drain cleaners, as their corrosive formulas can eat away at rubber seals and metal housings.
How to Clear a Jam Safely
Cut the Power: Always turn off the wall switch and disconnect power at the circuit breaker before attempting any troubleshooting.
Never Put Hands Inside: Keep your fingers entirely out of the sink opening.
Use a Hex Key: Insert the service wrench (hex key) into the hexagonal socket located underneath the center of the motor housing and wiggle it back and forth to manually free stuck debris.
Reset the Motor: Clear any obstructions from inside the sink, press the red overload reset button on the bottom of the unit, restore power, and test operation.
If a jam or slow drainage persists after clearing the flywheel, the obstruction has likely moved deeper into your wastewater pipes, requiring professional drain cleaning to clear the line safely.
Garbage Disposal Buying Checklist and Common Mistakes
Navigating food waste disposer options comes down to matching technical specifications with your household’s daily kitchen workflow and physical plumbing limits. Reviewing this structured summary ensures you avoid costly missteps before purchasing your next unit.
10-Point Buying Checklist
Household Size: Match your appliance capacity to your exact family occupancy and daily meal volume.
Horsepower (HP): Select the correct motor size—ranging from 1/3 HP for light use to 1 HP for heavy scratch cooking.
Feed Type: Decide between a continuous feed for fast cleanups or a batch feed for enhanced child safety.
Septic Status: Ensure the model is septic-rated or equipped with enzyme injection if your home relies on a septic tank.
Sink and Mount Fit: Check whether your sink basin accommodates standard mounting flanges or requires a specialty adapter.
Under-Sink Space: Measure vertical and horizontal clearance to guarantee the motor housing clears existing pipes and water filters.
Power Source & Switch: Confirm whether you need a plug-in power cord kit, direct hardwiring, or a countertop air switch.
Noise Insulation: Choose an insulated multi-stage model if open-concept living requires quiet operation.
Materials & Warranty: Prioritize stainless steel grind components paired with a strong multi-year in-home warranty.
Total Budget: Account for unit price, tax, accessories, and potential professional installation fees.
Common Mistakes When Buying a Garbage Disposal
Buying on Price Alone: Selecting the cheapest entry-level galvanized model often leads to premature rust, frequent jams, and early replacement costs.
Ignoring Mount Compatibility: Failing to check existing mounting hardware can force you into complicated sink flange replacements.
Undersizing for the Household: Installing a weak 1/3 HP motor in a busy family kitchen leads to chronic motor strain and thermal overloads.
Forgetting Cords or Switches: Assuming every disposal ships with a pre-attached power cord or an air switch leaves you stranded during installation.
Ignoring Septic Limits: Installing a standard high-capacity unit on an aging septic tank without verifying compatibility can overload your lateral drain field.
Final Recommendation by Household Type
1–2 People / Light Cooking: Choose a compact 1/3 HP or 1/2 HP continuous feed model for basic, budget-friendly performance.
2–4 People / Standard Cooking: Opt for a reliable 3/4 HP stainless steel continuous feed unit to balance torque and durability.
4+ People / Heavy Scratch Cooking: Invest in a 1 HP multi-stage continuous feed disposal for maximum power and jam resistance.
Families with Young Children: Select a 3/4 HP batch feed model featuring magnetic lid activation for absolute child safety.
Septic-Connected Homes: Go with a specialized 3/4 HP septic-rated unit equipped with automated enzyme injection.
Garbage Disposal FAQs
Should I Get a 1/2 or 3/4 HP Garbage Disposal?
Choose a 1/2 HP motor if you cook simple meals a few times a week and primarily handle light food scraps. Upgrade to a 3/4 HP model if you cook from scratch daily, process meat scraps regularly, or want faster grinding performance with significantly lower jam risks. See Section 4 for a complete comparison.
What Garbage Disposal Do Plumbers Recommend?
Professional plumbing contractors generally recommend reputable, industry-standard brands like InSinkErator due to their widespread replacement parts, dependable induction motors, and universal mounting assemblies. Plumbers advise against obscure budget brands that lack gaskets or service support. Review Section 9 for specific contractor picks.
What Are the Best Garbage Disposals in 2026, According to Reviews?
Top-rated disposals for 2026 balance motor torque, sound insulation, and build quality. Leading models include the InSinkErator Badger 1 for tight budgets, the Evolution Compact for most families, the GE 1 HP Deluxe for heavy cooking, and the Evolution Excel for whisper-quiet performance. Explore Section 9 for detailed scenario breakdowns.
Do I Really Need a 1 HP Garbage Disposal?
A 1 HP motor is ideal for large families, avid home bakers, and passionate home chefs who generate massive volumes of heavy, dense food waste. If you live alone or rarely cook, a 1 HP model is unnecessary overkill that increases upfront costs. Read Section 4 to determine your exact needs.
How Many Years Does a Garbage Disposal Usually Last?
Most residential garbage disposals function effectively for 10 to 15 years, with industry benchmarks citing an average lifespan of about 12 years. High-end stainless steel models frequently reach this upper range, whereas entry-level galvanized units often wear out within 5 to 8 years. Check Section 11 for replacement signs.
What Garbage Disposal Did Consumer Reports Recommend?
Independent laboratory testing publications consistently highlight mid-range 3/4 HP stainless steel continuous feed models as the sweet spot for residential longevity and performance. Units featuring multi-stage grinding and advanced sound insulation outperform older single-stage designs. Review Section 9 for our curated 2026 testing insights.
What’s the Best Horsepower to Get for a Garbage Disposal?
For the vast majority of standard suburban households, a 3/4 HP motor offers the ideal balance of brute torque, longevity, and everyday reliability. It handles challenging food waste effortlessly without bogging down or overheating. See Section 4 for complete household sizing guidelines.
Can I Replace My 1/3 HP Garbage Disposal with a 1/2 HP?
Yes, you can easily upgrade from a 1/3 HP to a 1/2 HP unit because standard sink mounting flanges are universal across major brands. However, always verify your under-sink vertical clearance, as higher-horsepower motors feature larger housings. Refer to Section 7 for full compatibility details.
What Is the Most Common Garbage Disposal Size?
According to leading manufacturer sales and major home improvement retailer data, the 1/2 HP model remains the most commonly purchased and installed garbage disposal size across residential homes, providing sufficient capability for typical everyday meal preparation. Learn more in Section 4.
What Are the Downsides of Having a Garbage Disposal?
Key downsides include regular maintenance requirements, potential operational noise, increased water usage, and strict limitations on what you can grind—such as avoiding grease, fibrous vegetables, and bones. Improper use can cause clogged drains or pump strain. Read Section 2 for complete pros and cons.
Conclusion and Next Step
Match HP, Feed Type and Fit to Your Home
Selecting the right garbage disposal ultimately comes down to balancing motor horsepower, feed type, and under-sink dimensions with your household size, cooking frequency, and plumbing or septic limits. By carefully evaluating these factors alongside your daily kitchen habits, you can choose a reliable unit that prevents premature motor burnout, avoids unexpected clogs, and delivers years of smooth operation.
Need Help Choosing or Installing?
Navigating mounting dimensions, electrical wiring, and plumbing connections doesn’t have to be a chore. Skip the installation hassle and Book your garbage disposal installation to ensure your new appliance is set up safely, professionally, and fully up to local building codes.
Main Services
Related Posts
Need a Plumber in Miami?
Schedule service online or speak directly with the EZ Plumbing team.
Owner-Led Local Service
Know who is behind the business before you request service. The owners, contact line and Miami service pages are published clearly.
- Named business owners
- Direct phone and social channels
- Local Miami service information
Clear Help Before You Book
Review the relevant service page, contact the team directly and use the booking page when you are ready—without relying on vague claims.
- Service-specific information
- Direct questions before scheduling
- Clear online booking route