
What’s the White Buildup on My Shower Head? Causes, Safe Fixes and Prevention
What Is the White Buildup on Your Shower Head?
Understanding Limescale and Hard Water Deposits
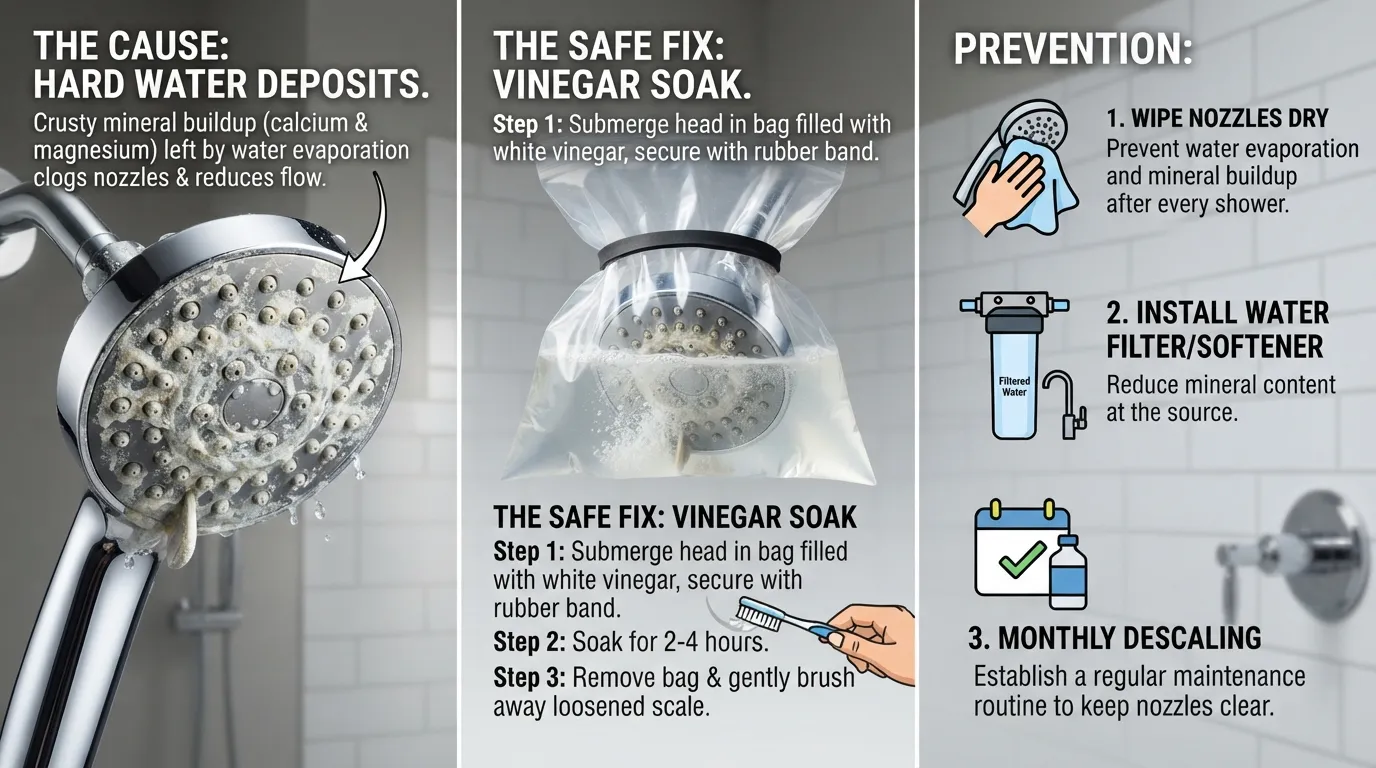
The white, crusty accumulation on your shower head is limescale, a mineral deposit left behind by hard water. As water flows through your plumbing and evaporates around the nozzles, dissolved minerals—primarily calcium carbonate and magnesium—crystallize and bond to metal and plastic surfaces. Over time, these mineral deposits restrict water flow, block individual spray holes, and create an unappealing chalky residue.
What Limescale Looks and Feels Like
Identifying mineral buildup on your shower fixtures is straightforward once you know the physical characteristics:
Color & Appearance: A dull white, off-white, or pale grayish coating around the spray nozzles, faceplate, and pipe connections.
Texture: Rough, crusty, and brittle to the touch, resembling dried plaster or hardened chalk.
Pattern: Concentrated heavily around individual spray holes, often forming small ring-like mounds or solid crusts that clog water channels.
Quick Self-Check: Is It Limescale?
Use this quick checklist to confirm whether the white buildup on your shower head is hard water mineral crust or a different type of residue:
Appearance Test: The buildup is white or off-white, hard, and crusty rather than slimy or soft.
Wipe Test: Scraping or wiping with a plain wet cloth does not remove it easily without an acid-based cleaner.
Vinegar Reaction: Applying a drop of household white vinegar causes the white deposit to fizz and dissolve, confirming it is calcium carbonate.
How to Tell Limescale from Soap Scum, Mold and Sediment
Comparing Shower Deposits: Limescale, Soap Scum, Mold, and Sediment
Identifying the exact type of buildup on your shower head ensures you use the correct cleaning method and prevent fixture damage. Each type of deposit has distinct physical characteristics, root causes, and confirmation methods.
| Deposit Type | Color & Appearance | Texture | Where It Appears | Root Cause | How to Confirm |
| Limescale | White, off-white, or pale gray | Hard, crusty, brittle | Spray holes, faceplate, edges | Dissolved calcium and magnesium from evaporating hard water | Fizzes and dissolves when exposed to household vinegar |
| Soap Scum | Gray, cloudy, or yellowish film | Waxy, sticky, or slimy | Lower fixture areas, tub walls, glass doors | Reaction between soap fats/oils and hard water minerals | Feels slippery when wet and dissolves with dish soap or specialized degreasers |
| Mold & Biofilm | Pink, orange, green, or black patches | Slimy, velvety, or powdery | Damp crevices, underside of shower heads, seals | Airborne fungi and bacteria thriving in moist environments | Wipes away easily with a sponge treated with diluted bleach or hydrogen peroxide |
| Sediment | Brown, reddish-brown, or sandy tan | Gritty or grainy | Inside pipes, aerators, and nozzle tips | Trapped sand, dirt, or oxidized iron/rust particles from water lines | Gritty texture between fingers without the hard crystalline crust of limescale |
The Vinegar Test for Limescale
Distinguishing mineral scale from other residues requires a simple chemical test using household white vinegar. Acetic acid in vinegar reacts directly with calcium carbonate to break down the bond.
Application: Press a clean cloth soaked in white vinegar against the affected area of the shower head for 5 to 10 minutes.
Observation: Limescale will begin to soften, bubble, or completely dissolve, allowing you to wipe it away effortlessly.
Differentiation: If the residue remains completely unchanged, waxy, or slimy, the buildup is soap scum or biofilm rather than hard water scale.
Visual Guide: Recognizing Different Shower Buildup Types
Visual cues on your fixtures help pinpoint the exact nature of the problem before you begin scrubbing.
Hard Mineral Crusts: Solid white rings around individual rubber nozzles indicate heavy calcium and magnesium accumulation.
Waxy Film Layers: A dull, hazy film coating the fixture body points to soap scum accumulation combined with mineral residue.
Gritty Residue: Loose, sandy particles lodged inside the spray face usually consist of pipe sediment or iron flakes rather than bonded scale.
What About Pink, Orange or Black Spots?
Discolorations in vibrant shades of pink, orange, or black are not limescale and require entirely different cleaning approaches. Pink and orange films are typically caused by Serratia marcescens bacteria, while dark spots indicate mold or mildew growth thriving in constant moisture.
Check out this helpful visual breakdown to see these different types of buildup in action:
Is White Buildup on a Shower Head Harmful?
Is Limescale Safe to Shower With?
Limescale itself is made of naturally occurring minerals like calcium and magnesium, making it harmless to contact directly on your skin during a daily shower. However, hard water with heavy mineral concentration can strip natural oils, leaving your skin feeling dry and hair feeling brittle or difficult to manage. While the white crust is not a toxic substance, its physical accumulation directly degrades your overall shower experience and water flow quality.
When Buildup Can Hide Bacteria
While inorganic mineral scale poses minimal direct risk, the rough texture of calcium deposits creates ideal surfaces for bacterial colonies to anchor and form biofilm.
Watch for these warning signs that indicate organic growth is trapped within mineral deposits:
Slippery or Slimy Texture: A film that feels slick to the touch rather than dry and chalky.
Musty Odors: Unpleasant or stale smells coming directly from the shower nozzles when the water runs.
Colored Discoloration: Dark spots, pink halos, or greenish tinting embedded in the white mineral crust.
What Limescale Does to Your Shower
Unchecked limescale accumulation steadily ruins your fixture hardware and plumbing performance over time through mechanical restriction.
Uneven and Crooked Spray: Clogged spray holes force water out at awkward angles or completely block individual jets.
Reduced Flow & Low Water Pressure: Heavy internal mineral deposits restrict overall flow rate, making the shower feel weak.
Shortened Shower Head Lifespan: Internal pressure build-up behind stubborn clogs can warp seals, crack plastic components, and permanently damage delicate shower mechanisms.
When to Seek Professional Advice
If you or a family member has a severely compromised immune system or respiratory vulnerabilities, maintaining clean shower fixtures is an important preventative habit. Consult a licensed plumber if you notice persistent foul odors from your water lines, dark sludge flowing from the pipe, or chronic low pressure across all household fixtures even after thorough cleaning.
Why Limescale Forms on Shower Heads
Hard Water 101: Where the Minerals Come From
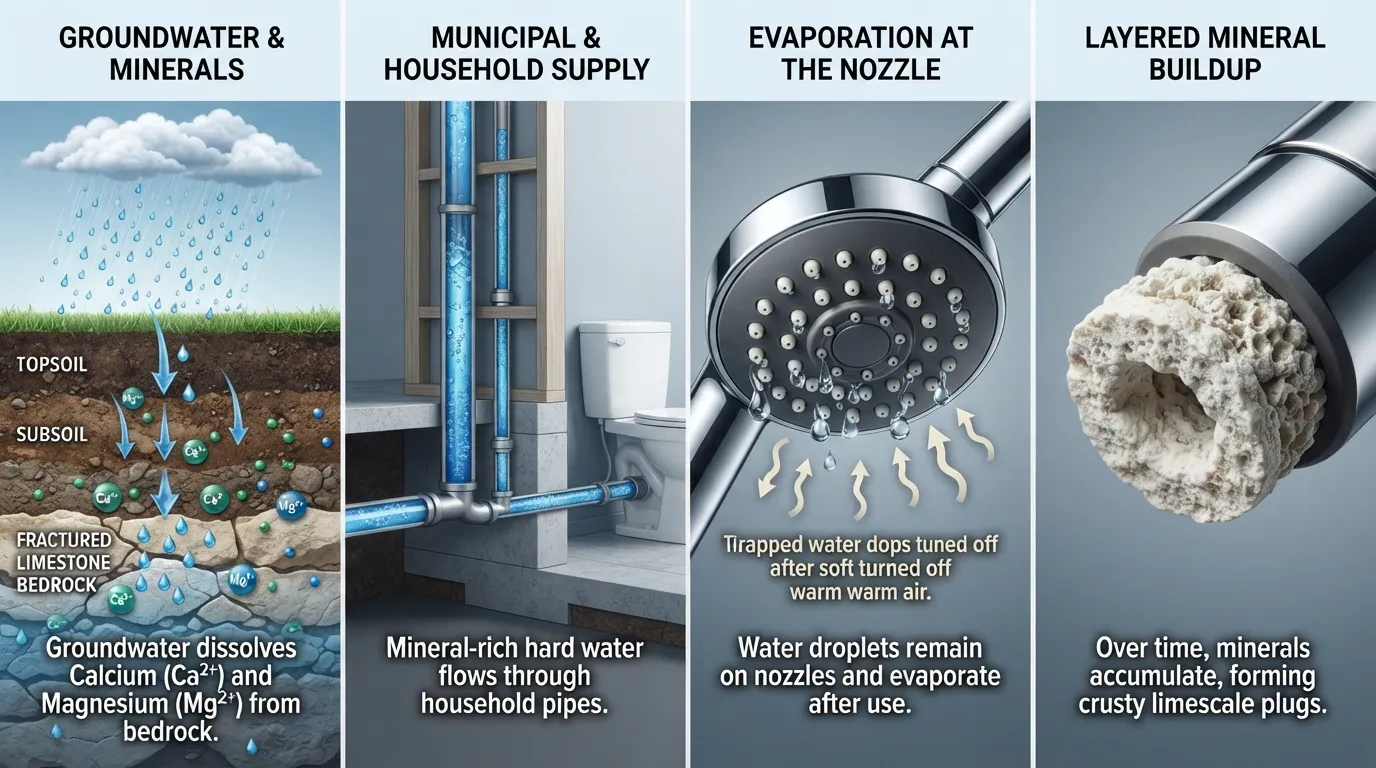
As rain falls, it absorbs carbon dioxide, making the water naturally acidic. As this groundwater trickles through underground layers of limestone, chalk, and gypsum, it dissolves abundant amounts of calcium carbonate and magnesium. Municipal treatment facilities focus primarily on eliminating pathogens and sediment rather than removing these dissolved minerals, leaving municipal and well water supplies rich in hard minerals when they reach your home plumbing system.
The Evaporation Effect
Every time you turn off your shower, small droplets of water remain trapped inside the rubber nozzle tips and around the metal faceplate. As these residual water droplets evaporate into the warm bathroom air, they leave behind tiny mineral crystals. Each subsequent shower adds a new layer, turning invisible microscopic particles into a thick, crusty buildup that gradually chokes water flow.
How Hard Is Your Water? Understanding the Scale
Water hardness is measured in milligrams per liter (mg/L), parts per million (ppm), or grains per gallon (gpg), where 1 gpg is approximately equal to 17.1 mg/L. Standard classifications are based on the USGS water hardness classification:
Soft Water: 0 to 60 mg/L (0 to 3.5 gpg) – Minimal mineral content; leaves virtually no visible scale.
Moderately Hard Water: 61 to 120 mg/L (3.5 to 7.0 gpg) – Minor mineral buildup over long periods.
Hard Water: 121 to 180 mg/L (7.0 to 10.5 gpg) – Frequent crust formation requiring regular cleaning.
Very Hard Water: Greater than 180 mg/L (over 10.5 gpg) – Rapid, severe scale accumulation that clogs nozzles quickly.
You can verify your household hardness levels by reviewing your local water utility’s Consumer Confidence Report (CCR) or using an at-home titration test kit.
Hard Water in South Florida Homes
South Florida relies heavily on groundwater drawn from the Biscayne and Floridan Aquifers, both of which sit atop dense, ancient limestone bedrock. As a result, municipal tap water across cities like Miami, Boca Raton, and Fort Lauderdale routinely tests between 200 and 300 mg/L (11.7 to 17.5 gpg). This pushes local water well into the “Very Hard” threshold, causing rapid shower head clogs and requiring frequent descaling maintenance.
Hard Water Beyond the Shower
Limescale is not isolated to your shower head nozzles. Dissolved calcium and magnesium attach to any household fixture where water heat and evaporation occur, coating faucet aerators, glass shower doors, dishwasher heating elements, and washing machine valves. Over time, heavy mineral USGS water hardness classification, reducing heat transfer efficiency and leading to premature tank failure.
How to Remove White Buildup from a Shower Head with Vinegar
What You’ll Need
Descaling a shower head effectively requires a few standard household items that safely break down calcium carbonate without ruining the finish:
Distilled White Vinegar: Provides the natural acetic acid necessary to dissolve mineral bonds.
Plastic Bag: A sturdy sandwich or grocery bag large enough to fit over the shower head nozzle.
Rubber Band or Zip Tie: Secures the vinegar-filled bag tightly around the shower arm.
Old Toothbrush: Clears softened debris away from rubber nozzles and faceplates.
Toothpick or Interdental Brush: Clears stubborn blockages out of individual spray holes.
Soft Microfiber Cloth: Wipes down and dries the fixture for a polished finish.
Step-by-Step: The Vinegar Bag Method
Fill the Bag: Pour distilled white vinegar into the plastic bag until it is about halfway full.
Submerge the Nozzle: Position the bag over the shower head so that the entire spray faceplate and nozzle tips are completely submerged in the vinegar.
Secure the Bag: Wrap a heavy-duty rubber band or zip tie securely around the shower pipe and the top of the bag to hold it in place.
Soak the Fixture: Allow the shower head to soak undisturbed for at least one hour, or overnight for severe accumulation [00:31].
Remove and Scrub: Take off the bag and discard the used vinegar. Use an old toothbrush to scrub away loosened mineral crust, and use a toothpick to clear any remaining debris from clogged spray holes [00:39].
Flush with Hot Water: Turn on the shower and let hot water run for one to two minutes to flush out any loosened sediment and remaining acid residue.
Watch this quick demonstration of the vinegar soak method in action:
How Long Should You Soak?
| Buildup Severity | Recommended Soak Time | Best Approach |
| Light Film | 30 to 60 minutes | Quick plastic bag soak |
| Moderate Crust | 2 to 4 hours | Extended bag soak with light scrubbing |
| Heavy Calcification | Overnight (8+ hours) | Uncrew and submerge in a bowl of warm vinegar |
Removable vs Fixed Shower Heads
The cleaning technique depends on whether your fixture can be easily detached from the wall pipe:
Removable Shower Heads: If your unit has a swivel nut or a handheld hose, unscrew it from the shower arm using pliers (protected with a cloth to avoid scratching) and let it submerge completely in a bowl of warm vinegar [00:20]. This ensures total 360-degree contact.
Fixed Shower Heads: For permanent wall-mounted shower heads that cannot be easily detached without risking pipe damage, use the plastic bag and rubber band method described above.
Experience Angle: What We See on Service Calls
During routine plumbing service calls, homeowners often attempt to chip away at thick limescale using screwdrivers, metal picks, or abrasive wire brushes. This approach frequently scratches chrome finishes, punctures soft rubber nozzles, and ruins the spray pattern permanently. Allowing standard white vinegar to chemically dissolve the mineral bonds provides a safer, non-abrasive alternative that restores full pressure without compromising fixture hardware.
Common Mistakes to Avoid
Soaking Too Long on Brass or Gold Finishes: Leaving acidic vinegar on sensitive plated finishes for hours can strip the outer coating. Limit decorative fixtures to 30-minute maximum soak intervals.
Scrubbing with Metal Tools: Never use steel wool or metal scrapers, which permanently scratch and pit modern shower finishes.
Forgetting to Rinse: Failing to run hot water through the lines after cleaning leaves lingering vinegar odors and loose debris inside the internal channels.
What to Do When Vinegar Isn’t Enough
Comparing Descaling Alternatives: Vinegar, Citric Acid, CLR, and Commercial Cleaners
When heavy calcification fails to break down with household vinegar, stronger acidic agents or specialized commercial formulations are required to dissolve dense mineral deposits.
| Descaling Solution | Cleaning Strength | Recommended Soak Time | Best Used For | Safety & Finish Cautions |
| Distilled White Vinegar | Mild Acidic | 1 to 8 hours | Routine cleaning and light mineral film | Safe for most standard chrome; test sensitive finishes |
| Citric Acid Solution | Moderate Acidic | 30 to 60 minutes | Moderate to heavy scale; odor-free option | Rinse thoroughly; do not allow powder granules to scratch surfaces |
| CLR (Calcium, Lime & Rust) | Strong Chemical Acid | 2 to 3 minutes (Do NOT exceed) | Severe, petrified scale and stubborn mineral deposits | Requires ventilation; can etch brass, bronze, copper, and matte black |
| Commercial Descalers | Industrial Acidic | Follow product label (1–5 mins) | Rapid commercial descaling and deep maintenance | Always test on a hidden area first; wear protective gloves |
Using Citric Acid or Lemon Juice
Citric acid is a highly effective, natural alternative that breaks down calcium deposits faster than vinegar without leaving behind a strong odor.
Ratio: Dissolve 2 to 3 tablespoons of food-grade citric acid powder into 1 cup of warm water.
Application: Submerge the shower head faceplate or attach a secure bag over the fixture for 30 to 40 minutes.
Alternative: Fresh lemon juice can also be used in a 1:1 mixture with water for light to moderate scale accumulation.
Using CLR and Other Commercial Cleaners Safely
Heavy-duty chemical descalers like CLR use aggressive acids to quickly break down petrified calcium crusts, but they must be handled with care to prevent hardware damage:
Dilute Properly: Mix equal parts CLR and warm water according to package directions.
Limit Contact Time: Submerge the nozzle for no more than 2 to 3 minutes. Never leave commercial chemical cleaners soaking overnight.
Ensure Ventilation: Open bathroom windows and run exhaust fans to clear chemical fumes.
Rinse Thoroughly: Scrub immediately with a soft toothbrush and flush the shower lines with cold water for 2 minutes to remove all chemical residue.
Protect Your Finish
Prolonged acid exposure can strip protective coatings, tarnish plating, and permanently discolor decorative metal finishes. Always review your fixture manufacturer’s care guide before applying acidic solutions.
Chrome: Highly resilient against mild household acids like vinegar and citric acid.
Brushed Nickel & Stainless Steel: Generally safe for short vinegar soaks, but vulnerable to harsh commercial chemicals.
Oil-Rubbed Bronze & Brass: Extremely sensitive; limit vinegar soaks to under 30 minutes to prevent stripped plating.
Matte Black & Specialty Plated Finishes: Highly susceptible to acid etching; use mild dish soap and warm water whenever possible, resorting only to dilute citric acid for very brief applications.
Safety Warning: Never Mix Cleaners
Never combine cleaning products under any circumstances. Mixing bleach with vinegar or any other acid creates toxic chlorine gas, which can cause severe respiratory damage, eye irritation, and throat burning. If you recently used a bleach-based mold spray in your shower, flush the area completely with plain water and allow it to dry fully before applying vinegar, citric acid, or commercial descalers.
What Professional Cleaners Use
Professional cleaning technicians rely on food-grade citric acid solutions or specialized industrial descalers formulated specifically for plumbing fixtures. Rather than relying on extended soak times that risk ruining delicate decorative finishes, professionals combine short, targeted acid treatments with manual agitation—using firm nylon brushes and precision dental picks—to clear individual nozzles quickly without damaging internal components.
How to Unclog Shower Head Spray Holes
Signs Your Nozzles Are Clogged
Mineral accumulation and trapped debris directly alter the spray performance of your plumbing fixtures. Look for these common indicators that your shower head spray holes require manual clearing:
Weak or Erratic Flow: Water streams split apart, spray outward at sharp diagonal angles, or sputter unevenly.
Missing Jets: Entire sections of the faceplate produce no water flow due to blocked internal channels.
Decreased Water Pressure: A noticeable drop in overall force during your shower indicates that mineral deposits have choked off a significant portion of the nozzle openings.
Clearing Rubber or Silicone Nozzles
Modern shower heads feature flexible rubber or silicone spray tips designed to simplify routine maintenance.
Manual Flexing: While the shower is off, run your thumb or fingers firmly back and forth across the rubber nubs. The flexing motion cracks and dislodges dried mineral crystals.
Post-Soak Scrubbing: After treating the fixture with vinegar or citric acid, wipe the rubber faceplate with a soft-bristled brush to sweep away loosened scale particles.
Clearing Fixed Spray Holes Without Damaging Them
For older or rigid plastic and metal shower faces without flexible nubs, stubborn mineral plugs require careful manual extraction.
Use Safe Tools: Insert a wooden toothpick, bamboo skewer, or interdental brush gently into each clogged hole to push the mineral crust out or break it apart.
Avoid Metal Pins: Never use sewing needles, safety pins, or metal paperclips, as these hard metal tools easily scratch the finish, widen the spray hole incorrectly, or snap off inside the nozzle.
Watch this helpful walkthrough on unclogging and cleaning shower head spray holes:
Sediment vs Limescale
While limescale consists of dissolved minerals bonded to the fixture, sediment refers to loose, gritty particles such as sand, dirt, or pipe scale.
Distinction: Sediment floats free or settles inside internal chambers rather than forming a hard crystalline crust.
Reverse Flushing: To clear trapped sediment, unscrew the shower head from the wall pipe and run water backward through the inlet connection to push debris out through the spray face.
Cleaning the Filter Screen Inside
Most shower heads feature a small mesh filter screen or washer located inside the swivel connection nut.
Removal: Unscrew the shower head from the shower arm and inspect the inlet washer for trapped debris.
Rinsing: Pull the mesh screen out gently with needle-nose pliers and rinse it under a strong tap to remove trapped sand, pipe rust, and mineral grit before reattaching the fixture.
How to Stop White Buildup from Coming Back
Simple Habits That Slow Buildup
Preventing scale accumulation requires minimal effort when integrated into your daily and monthly bathroom maintenance routine:
Wipe Down Nozzles After Use: Keep a microfiber cloth or small squeegee near the shower. Taking 5 seconds to wipe water droplets off the rubber faceplate after every shower prevents trapped drops from evaporating and leaving mineral crust behind.
Monthly Spray & Rinse: Spray the shower face with diluted white vinegar once a month during routine bathroom cleaning. Let it sit for 5 to 10 minutes before rinsing to dissolve microscopic deposits before they harden into thick layers.
Recommended Cleaning Schedule
The frequency of preventative cleaning depends directly on the hardness level of your home’s water supply:
| Water Hardness Level | Hardness Range (mg/L or ppm) | Preventative Descaling Frequency | Maintenance Action |
| Soft to Moderate | 0 to 120 mg/L | Every 6 months | Quick 30-minute vinegar bag soak |
| Hard | 121 to 180 mg/L | Every 2 to 3 months | 1-hour vinegar soak and light brushing |
| Very Hard | 181+ mg/L | Monthly | Overnight vinegar soak or citric acid treatment |
Shower Head Filters: What They Can and Can’t Do
Point-of-use shower filters are widely used, but understanding their true mechanical capabilities prevents unrealistic expectations:
What Filters CAN Do: Mesh, KDF, and activated carbon filters excel at removing chlorine, heavy metals, sediment, rust particles, and unpleasant chemical odors from your shower water.
What Filters CANNOT Do: Standard shower filters do not soften water. Dissolved calcium and magnesium ions are microscopic minerals that pass directly through standard carbon and mesh media, meaning shower filters will not eliminate limescale buildup completely.
Mineral Balls and Cartridges: How Often to Replace Them
Filtering shower heads utilizing ionic mineral balls (such as calcium sulfite, ceramic, or tourmaline beads) or replaceable inline filter cartridges gradually lose efficacy as water flows through them.
Replacement Frequency: Most filter cartridges and mineral ball assemblies require complete replacement every 3 to 6 months, depending on household size and usage.
Manufacturer Guidelines: Always check the manufacturer’s product instructions for specific replacement intervals, as heavily saturated cartridges stop trapping sediment and can restrict water pressure.
Whole-House Water Softeners
If mineral scale severely coats your shower heads, glass doors, dishwasher, and faucet aerators, a point-of-use fix may not be enough. Installing an ion-exchange whole-house water softener replaces calcium and magnesium ions with sodium or potassium ions right where water enters the home, completely eliminating hard water scale at the root. Consulting a licensed plumbing professional can assess your whole-house setup to determine if a conditioning or softening system is right for your plumbing infrastructure.
Choosing the Right Fix: Quick Decision Guide
If buildup is isolated only to your shower head: Stick with regular vinegar or citric acid soaks every few months.
If you experience dry skin or chlorine smell alongside light scale: Install an inline shower head filter to improve water quality and strip harsh chemicals.
If scale coats all home faucets, glass doors, and appliances: Evaluate a whole-house water softening or descaling system for total home protection.
When to Call a Plumber or Replace the Shower Head

Signs It’s Time to Replace the Shower Head
Sometimes no amount of vinegar, citric acid, or manual scrubbing can restore a fixture to working order. Consider replacing your unit if you notice any of these irreversible issues:
Irreparable Physical Damage: Cracked plastic housing, broken internal diverter valves, or stripped threads that cause continuous leaks around the connection arm.
Permanently Clogged Nozzles: Internal chambers petrified by hard calcium deposits that resist multiple deep descaling treatments.
Corroded or Flaking Finish: Modern decorative plating that has peeled away, leaving jagged, sharp edges or underlying raw brass exposed to corrosion.
Low Pressure Throughout the Whole House
If cleaning or replacing the shower head fails to fix a weak spray, the root cause is likely an issue deeper within your home’s plumbing system. Persistent low flow across multiple bathroom and kitchen fixtures typically points to localized pressure drop, heavy mineral scale lining main supply lines, or a hidden leak inside your walls. Faulty pressure regulator valves (PRVs) or municipal main pressure drops also require professional diagnostic evaluation rather than fixture cleaning.
Scale Buildup in Pipes or Water Heater
When severe mineral accumulation spreads beyond your shower head, it can compromise major appliances and piping networks.
Watch for these household warning signs:
Noisy Tank Operation: Popping, rumbling, or sizzling sounds coming from your tank indicate that heavy mineral deposits have settled over heating elements inside your water heater.
Shortened Hot Water Supply: Thick mineral sludge insulates water heater elements, causing hot water to run out much faster during daily use.
Widespread Fixture Clogging: Limescale crust appearing simultaneously on faucet aerators, glass shower doors, and appliance water valves.
What a Plumber Can Check
Partnering with a technician helps identify system-wide plumbing issues before they cause costly emergency breakdowns:
Water Pressure & Flow Testing: Verifies whether low force is localized to a single fixture or caused by main supply lines and pressure regulators.
Internal Pipe & Scale Inspection: Evaluates the level of mineral build-up inside galvinized or copper water lines.
Comprehensive Leak Checks: Pinpoints hidden line cracks and valve seepage that waste water and reduce household pressure.
Custom Water Conditioning Solutions: Recommends whole-home filtration or softening systems suited specifically to your municipal water hardness profile.
Experience Angle: A Real Service-Call Example
During a recent maintenance call in a home with severe hard water, the owner had repeatedly soaked their original handheld unit in vinegar without success. A quick diagnostic revealed that while the exterior rubber nozzles looked clean, heavy calcium deposits had fossilized inside the internal flow restrictor and swivel ball joint, completely blocking water passage. Installing a modern high-efficiency fixture immediately restored full pressure, while comprehensive plumbing services helped protect the rest of the home’s water lines from future mineral damage.
If you are dealing with chronic low water pressure or widespread hard water issues, book a plumbing visit with our experienced team to inspect your home’s system today.
Frequently Asked Questions
How do I get rid of white buildup on a shower head?
To remove white buildup, submerge the shower head in a plastic bag filled with distilled white vinegar. Secure the bag with a rubber band, let it soak for 1 to 2 hours (or overnight for heavy crust), then scrub the nozzles with a soft toothbrush and flush thoroughly with hot water.
How do I get rid of calcium deposits on a shower head?
Calcium deposits dissolve naturally when exposed to mild acids. Fill a small bag with white vinegar or a diluted citric acid solution, submerge the affected faceplate, and let the acid break down the calcium carbonate bonds. Finish by brushing away loosened mineral crust and rinsing with clean water.
How do I remove limescale from my shower head?
Remove limescale by soaking the nozzle in household white vinegar or a commercial limescale remover. For removable fixtures, unscrew the unit and submerge it in a bowl of warm vinegar. For fixed units, secure a vinegar-filled bag over the fixture. Scrub the loosened mineral residue with an old toothbrush.
How can I remove sediment buildup from my shower head?
Unlike bonded limescale, loose sediment like sand and rust grit sits inside the shower head. Remove the shower head, take out the internal mesh filter screen from the inlet nut, and rinse it under running tap water. Reverse-flush the fixture by running water backward through the shower arm connection to push debris out.
What dissolves calcium deposits in the shower?
Distilled white vinegar, food-grade citric acid, and fresh lemon juice effectively dissolve organic calcium deposits. For extreme, petrified hard water stains, commercial cleaners like CLR (Calcium, Lime & Rust) rapidly dissolve stubborn mineral crusts. Always follow product instructions and rinse fixtures thoroughly to protect delicate finishes.
Will soaking a shower head in vinegar clean it?
Yes, soaking a shower head in white vinegar cleans it thoroughly. The natural acetic acid in vinegar breaks down calcium carbonate and magnesium crusts without damaging standard chrome finishes. A 1- to 2-hour soak dissolves light mineral film, while an overnight soak clears heavy, stubborn nozzle clogs.
Can I use CLR to clean a shower head?
Yes, you can use CLR to clean severe limescale on shower heads. Mix equal parts CLR and warm water, then submerge the spray holes for no more than 2 to 3 minutes. Never leave CLR soaking long-term or overnight, as strong chemical acids can strip or etch decorative finishes.
How often should I change the mineral balls in my shower head?
Replace ionic mineral balls or filter cartridges in filtered shower heads every 3 to 6 months. Over time, filter media becomes saturated with sediment, chlorine, and minerals, reducing filtration performance and restricting overall water flow. Always check your manufacturer’s care guidelines for specific product replacement schedules.
How do I clean the gunk out of my shower head?
To clear sticky gunk, mold, or soap scum, soak the shower head in warm water mixed with mild dish soap or dilute vinegar. Use a toothbrush to scrub the faceplate and gently insert a wooden toothpick or interdental brush into individual spray holes to clear out trapped internal buildup.
What do professional cleaners use to clean showers?
Professional cleaners typically use specialized commercial descalers or concentrated citric acid solutions to break down limescale quickly. Rather than relying on overnight chemical soaks, professionals combine targeted acid sprays with manual agitation using nylon brushes and precision picks to clear spray holes without stripping hardware finishes.
Why does water still come out of my shower head after I turn it off?
Water dripping briefly after turning off the faucet is usually residual water draining from the shower head body and pipe rise. However, if water drips continuously for hours, the shower valve cartridge inside the wall is worn or damaged and requires replacement by a plumber.
Main Services
Related Posts
Need a Plumber in Miami?
Schedule service online or speak directly with the EZ Plumbing team.
Owner-Led Local Service
Know who is behind the business before you request service. The owners, contact line and Miami service pages are published clearly.
- Named business owners
- Direct phone and social channels
- Local Miami service information
Clear Help Before You Book
Review the relevant service page, contact the team directly and use the booking page when you are ready—without relying on vague claims.
- Service-specific information
- Direct questions before scheduling
- Clear online booking route