
How to Repair Your Dishwasher: 3 Repairs You Can Handle Yourself
Can You Repair a Dishwasher Yourself?
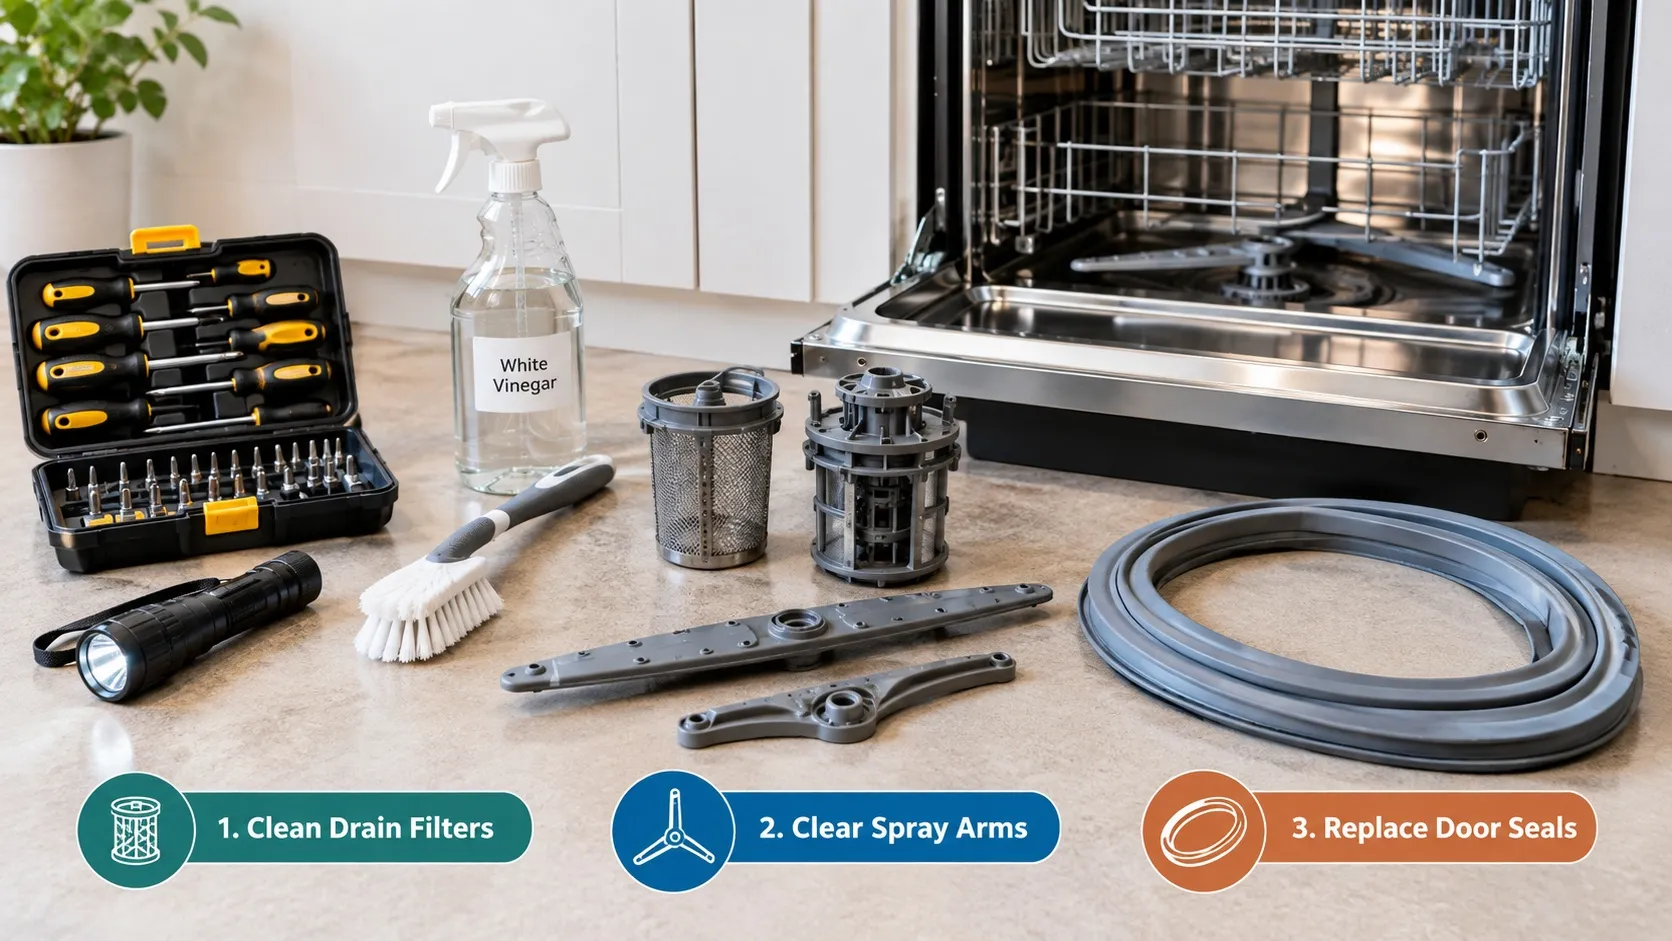
Yes, you can successfully repair many common dishwasher problems yourself without professional help. Homeowners can easily tackle three primary maintenance tasks: cleaning a clogged drain filter, unclogging spray arms, and replacing a worn door gasket.
Taking on these simple fixes saves you money and restores your appliance performance in under an hour.
Which Dishwasher Repairs Are Safe to DIY?
Safe DIY dishwasher repairs focus entirely on mechanical maintenance, wear-and-tear seals, and accessible blockages. Handling these components requires minimal tools and basic household skills.
Cleaning a Clogged Drain Filter
Difficulty: Easy
Time: 10–15 minutes
Tools Needed: None (or a soft-bristled brush)
Unclogging Spray Arms
Difficulty: Easy
Time: 15–20 minutes
Tools Needed: Toothpick, small wire, or paperclip
Replacing a Worn Door Gasket (Door Seal)
Difficulty: Moderate
Time: 20–30 minutes
Tools Needed: New replacement gasket, clean towel
Complex electrical troubleshooting, water pump failures, and control board replacements involve high voltages and specialized plumbing lines. These advanced repairs are not suitable for DIY and should always be left to certified technicians (as detailed further in Section 8).
Watch the video above to see a visual breakdown of common dishwasher issues and learn how to safely perform basic maintenance tasks yourself:
What You’ll Need Before You Start
Proper preparation ensures your DIY dishwasher repair goes smoothly and safely from start to finish.
Always disconnect power to the appliance at the breaker box and shut off the hot water supply before touching any internal components.
Gather basic hand tools, protective gloves, and towels to manage any residual standing water.
Safety First: Before You Touch Your Dishwasher
Working on a dishwasher involves dangerous combinations of high-voltage electricity, pressurized plumbing, and hidden sharp edges. Securing the work area completely before inspecting or servicing any components prevents electrical shocks, severe water damage, and injuries.
Cut the Power and Shut Off the Water
Electrical safety is the absolute first priority whenever you open or service a household appliance. Dishwashers are hardwired or plugged into live circuits that carry severe electrocution risks if left energized.
Locate your home circuit breaker panel and switch off the specific breaker dedicated to the dishwasher.
If your dishwasher is plugged into a standard wall outlet underneath the countertop or behind an adjacent cabinet, simply unplug the unit.
Locate and close the hot water supply shut-off valve, which is usually positioned under the kitchen sink or near the water inlet connection.
Protect Your Floor and Yourself
Residual water trapped inside internal hoses, pumps, and sumps will inevitably spill out the moment you loosen a clamp or detach a component. Preparing your workspace properly safeguards both your home and your hands.
Lay down thick, highly absorbent towels around the base of the dishwasher and keep a shallow pan or bucket handy to catch trapped drainage water.
Wear durable work gloves to protect your hands from sharp sheet-metal edges inside the chassis, exposed screws, and decomposing food debris trapped in filters.
Keep a clean workspace illuminated well so you can clearly see electrical connections, water lines, and drainage hoses before disconnecting them.
What to Do if Water Is Already on the Floor
Discovering an active leak or a large puddle of standing water requires immediate action to protect your home’s structural integrity and prevent electrical short circuits.
Shut off the water supply valve immediately and flip the circuit breaker to cut electrical current to the kitchen area.
Avoid stepping into any standing water near electrical outlets, power cords, or the appliance base to eliminate the risk of electrocution.
If structural flooding occurs or if water continues pooling uncontrollably from behind walls or beneath floorboards, shut off your main home water supply and contact an emergency plumber in Miami to inspect the damage.
Never Mix Cleaners (Bleach and Vinegar)
Chemical safety is just as crucial as physical safety during DIY appliance cleaning and maintenance procedures. Homeowners often attempt to combine powerful cleaning agents to tackle stubborn mineral buildup or mold inside the tub.
Never mix chlorine bleach with vinegar, ammonia, or commercial toilet bowl cleaners under any circumstances.
Combining bleach and vinegar creates hazardous chlorine gas fumes that cause severe respiratory irritation, coughing, and chemical burns.
Always use one cleaning agent at a time, rinse the dishwasher thoroughly between different cycles, and ensure your kitchen area is properly ventilated while cleaning.
What Is Your Dishwasher Telling You?
Pinpointing the exact symptom of your dishwasher failure helps you choose the correct troubleshooting path and saves hours of unnecessary work. Modern units from brands like Bosch and Frigidaire often display specific symptoms or error codes that point directly to failing filters, blockages, or power supply interruptions.
Symptom Chart: Problem, Likely Cause, Which Repair Fixes It
Use the diagnostic reference table below to match your dishwasher’s current behavior with its root cause and the appropriate fix.
| Symptom / Problem | Likely Root Cause | Which Repair Fixes It |
| Dishes still dirty or gritty | Clogged spray arm jets or blocked food filter | Cleaning drain filter or unclogging spray arms |
| Standing water at the bottom | Clogged drain filter or obstructed drain hose | Cleaning clogged drain filter |
| Leaking from the door | Damaged, worn, or warped door gasket seal | Replacing a worn door gasket |
| Won’t start / completely dead | Blown breaker, unlatched door, or control lock | Quick power and latch checks first |
Check These Simple Things First
Before disassembling any mechanical parts or ordering replacement seals, always rule out simple operational interruptions. Many reported dishwasher failures stem from accidental user settings or loose connections rather than broken hardware.
Power Supply: Verify that the wall outlet has power or that the kitchen circuit breaker has not tripped.
Door Latch: Ensure the door clicks shut completely and the latch engages the microswitch; a loose closure prevents cycle initiation.
Child Lock: Check if the control panel control lock feature is accidentally activated, locking out all cycle selections.
Water Supply: Confirm the hot water supply valve under the sink is fully open.
Why Is My Dishwasher Not Draining?
Standing water pooled at the bottom of the tub is usually caused by food debris, grease, or bone fragments blocking the fine mesh drain filter. Clearing this blockage restores proper drainage and prevents foul odors.
For the complete step-by-step restoration procedure, refer to cleaning a clogged drain filter in Repair 1.
Why Is My Dishwasher Not Cleaning Dishes?
Dishes coming out dirty or covered in a gritty film typically indicate that water cannot circulate properly through the spray arm nozzles or that the filtration system is overwhelmed. Mineral scale and trapped food particles restrict water pressure and spray velocity.
Resolving this issue requires servicing the internal components outlined in cleaning a clogged drain filter and unclogging spray arms in Repairs 1 and 2.
Repair #1: Clean a Clogged Drain Filter
Cleaning the drain filter is the single most common and beginner-friendly DIY dishwasher repair you can perform. Tackling this maintenance task resolves slow draining, standing water, and foul odors in less than fifteen minutes without specialized tools.
Signs Your Dishwasher Filter Is Clogged
Recognizing early warning signs prevents complete drainage failure and protects your internal pump components from burning out.
Foul Odors: A rotting smell inside the tub indicates trapped food particles, grease, and stagnant water decomposing on the mesh screen.
Gritty Glasses: A chalky residue or food grit left behind on glassware reveals that dirty wash water is recirculating through clogged spray jets.
Standing Water: A pool of murky water remaining at the bottom of the tub after a complete cycle finishes points directly to a blocked filter assembly.
Step-by-Step: How to Remove and Clean the Filter
Most modern dishwashers feature a combination cylindrical micro-filter and flat plastic mesh located beneath the lower dish rack.
Pull out the lower dish rack completely to access the bottom sump area of the dishwasher tub.
Locate the cylindrical filter, twist it counterclockwise a quarter-turn, and lift it upward along with the flat plastic mesh insert.
Take the filter components to your kitchen sink, rinse them thoroughly under warm running water, and scrub away grease using a soft-bristled brush.
Inspect the sump opening for any trapped glass shards or hard bone fragments, then reinstall the clean filter securely by locking it back into place.
(Note: Filter assembly designs differ by brand, so always consult your owner’s manual before unclipping proprietary locking tabs).
Watch the video above for a complete visual walkthrough of inspecting, removing, and thoroughly cleaning a heavily clogged dishwasher filter: Watch on YouTube.
Common Mistakes to Avoid
Rushing through filter maintenance or using incorrect tools can easily damage delicate plastic mesh components or break plastic locking tabs.
Never force a stuck filter or use pliers and wrenches, as twisting too hard can crack the plastic housing or distort the watertight seal.
Always ensure the filter is completely reseated and locked flush with the tub floor; a loose filter allows large food debris straight into the drain pump.
Avoid using aggressive steel wool or harsh metallic scouring pads that shred fine plastic mesh screens and render them useless.
If Water Still Won’t Drain After Cleaning
If clearing the internal filter does not restore proper drainage, the blockage has likely migrated further down the drainage path.
Inspect the flexible corrugated drain hose underneath your sink to ensure it is not pinched, sharply kinked, or crushed against the cabinet wall.
If your garbage disposal is brand new, verify that the internal knockout plug inside the dishwasher inlet nipple was successfully removed during installation.
If standing water persists, the obstruction is located deeper inside your kitchen plumbing line; contact a licensed expert for professional drain cleaning to clear the main line.
What Plumbers See Most Often
In professional field experience, clogged filters almost always stem from skipping basic scraping habits before loading dishes. Homeowners frequently assume modern dishwashers act as heavy-duty food waste disposers, washing away massive quantities of grease, rice, and storable food scraps.
Over just a few months, this organic sludge bakes onto the fine mesh filter and chokes off water flow entirely. Running a quick maintenance rinse cycle with hot water once a month prevents buildup and keeps your drainage system running smoothly.
Repair #2: Unclog the Spray Arms
Unclogging the lower and upper spray arms directly resolves recurring issues where dishes come out dirty, gritty, or covered in a chalky film. Restoring full water pressure to every spray jet guarantees powerful mechanical scrubbing across all dish racks.
How to Tell If Your Spray Arms Are Blocked
Recognizing spray arm failure early prevents wasted cycles and ensures wash water reaches every corner of the tub.
Failed Spin Test: Give the spray arm a firm manual spin; if it binds, wobbles, or stops immediately, the central hub is blocked or seized.
Weak Water Spray: Noticeable lack of forceful water cascading against the tub walls or glassware during an active wash cycle.
Uneven Cleaning Zones: Dishes in the upper rack remain dirty while lower dishes get clean, or vice versa, indicating restricted spray holes.
Step-by-Step: Remove, Clear, and Soak the Spray Arms
Both the upper and lower spray arms can be detached and cleaned quickly with basic household tools.
Open the dishwasher door and remove the dish racks to gain clear access to the upper and lower spray arms.
Unscrew the retaining nut or pop the plastic spray arm off its mounting hub, taking care not to drop retaining clips down the sump.
Clear out mineral scale and trapped food debris from each individual spray hole using a wooden toothpick, small wire, or paperclip.
Submerge the spray arms in a basin of warm water and white vinegar for 30 minutes to dissolve stubborn calcification, rinse thoroughly, and snap them back onto their hubs.
Watch the video above for a helpful visual guide on removing, inspecting, and clearing clogged dishwasher spray arm jets: Watch on YouTube.
Why Hard Water in South Florida Clogs Spray Arms Faster
Hard water high in calcium and magnesium content accelerates limescale accumulation inside household plumbing fixtures. In regions like Miami, hard water minerals rapidly bake onto hot spray arm surfaces during the drying cycle, sealing shut microscopic water jets and severely choking spray pressure.
Reassembly Check
Always verify that the spray arms rotate completely unobstructed before closing the door or running a new wash cycle. Ensure the retaining nut is tightened securely so the arm remains firmly attached when high-pressure water pumps activate.
Repair #3: Replace a Worn Door Gasket
Replacing a worn, cracked, or hardened door gasket permanently stops annoying water leaks around the front perimeter of your dishwasher. Verifying that the seal is truly the culprit ensures you invest time and money into the correct fix.
Is It Really the Gasket? Other Causes of a Leaking Dishwasher
Before ordering a replacement rubber seal, carefully investigate other common components that mimic gasket failure by leaking water onto your kitchen floor.
Door Latch Misalignment: A loose or broken door latch fails to pull the door tightly against the frame, allowing water to escape past an otherwise healthy seal.
Improper Leveling: If the dishwasher is tilted forward or unlevel, water pools against the lower edge of the door and overflows the gasket lip.
Overloading and Detergent Issues: Overcrowding dishes blocks the spray path, while excessive standard dish soap creates over-sudsed water that forces its way past the door seal.
Internal Plumbing Leaks: If puddles appear underneath the unit with no moisture running down the door face, the leak is originating from an internal hose or valve; contact professionals for leak detection and repair services to locate hidden plumbing failures.
Signs of a Worn or Damaged Gasket
Rubber and vinyl door gaskets lose their flexibility over years of exposure to hot water, steam, and harsh detergent chemicals.
Visible Cracks or Tears: Brittleness, splitting, or chunks missing from the rubber profile.
Permanent Deformation: Gaskets that have flattened out, warped, or shrunk away from the tub corners, leaving noticeable gaps.
Persistent Moisture: Water droplets or pooling along the outer edge of the dishwasher door during or immediately after a wash cycle.
Step-by-Step: How to Replace the Door Gasket
Installing a new dishwasher door seal is a straightforward DIY project that requires no special tools.
Open the dishwasher door fully and locate the ends of the existing rubber seal embedded in the track channel around the tub perimeter.
Grip the old door gasket firmly and pull it straight out of its mounting groove all the way around the frame.
Clean the mounting channel thoroughly using a cloth dampened with white vinegar to scrub away hidden soap scum, mold, and old adhesive residue.
Take your new model-specific gasket, locate the top center mark, and press it firmly into the top center of the channel.
Work your way carefully around both sides and corners without stretching or pulling the rubber, pressing the retaining ribs completely into the groove.
Watch the video above for a helpful visual demonstration of removing an old dishwasher door seal and pressing a new replacement gasket into place: Watch on YouTube.
How to Find the Right Replacement Part
Universal gaskets rarely fit properly and almost always result in ongoing leaks. Always locate the manufacturer model number on the metal tag affixed to the side or top edge of the dishwasher tub. Use that exact model number to order the precise OEM (Original Equipment Manufacturer) replacement part designed for your specific appliance brand.
Test for Leaks After Replacement
Once the new door gasket is fully seated, run a short test cycle while keeping a dry paper towel or hand pressed along the outer door edge. Watch closely to verify that the seal makes uniform contact against the door and that zero moisture escapes during the wash phase.
Tools, Parts, Cost, and Time for Each Repair
Understanding the time commitment, required supplies, and expected financial investment before starting a repair ensures you are fully prepared. Having the right tools and parts on hand prevents frustrating mid-project delays and guarantees a smooth DIY experience.
DIY Repair Comparison Table
Use the reference table below to compare the difficulty, estimated time, tools, and typical parts cost for each of the three primary dishwasher repairs.
| Repair Task | Difficulty | Time Required | Tools & Supplies Needed | Estimated Parts Cost |
| Cleaning the Drain Filter | Easy | 10–15 minutes | Towels, warm water, soft-bristled brush | $0 (Maintenance only) |
| Unclogging Spray Arms | Easy | 15–20 minutes | Toothpick, wire/paperclip, warm water, white vinegar | $0 (Maintenance only) |
| Replacing Door Gasket | Moderate | 20–30 minutes | New OEM rubber seal, vinegar, clean cloth | $15 – $40 |
Basic Toolkit for Dishwasher Repairs
Assembling a simple, dedicated toolkit beforehand makes disassembling and reassembling your dishwasher straightforward and efficient.
Screwdriver Set: Standard Phillips and flathead screwdrivers for removing lower kickplates or access panels if needed.
Soft-Bristled Brush: Perfect for gently scrubbing grease and calcified food debris off delicate mesh filters without tearing them.
Toothpick or Fine Wire: Essential for poking through microscopic spray arm nozzles clogged with hard water scale.
Absorbent Towels and Bucket: Critical for catching standing water and protecting your kitchen flooring during inspections.
White Vinegar: A natural, safe cleaning agent for dissolving mineral buildup and removing soap scum.
Flashlight or Work Light: Illuminates dark sump areas, rear hose connections, and deep chassis channels.
Does Repair Differ by Brand? (Bosch, Frigidaire, and Others)
While the fundamental mechanics of dishwasher operation remain similar across major manufacturers, proprietary design variations do exist.
Filter Locations & Locks: Brands like Bosch often use a multi-stage twist-lock cylindrical filter, whereas Frigidaire models may utilize flat mesh screens with different release tabs.
Spray Arm Mounts: Some manufacturers secure spray arms with simple snap-in hubs, while others use threaded plastic retaining nuts that require careful handling.
Consult the Manual: Always cross-reference your specific appliance owner’s manual using your exact manufacturer model and serial number before ordering replacement gaskets or attempting major part swaps.
When to Stop DIY and Call a Professional
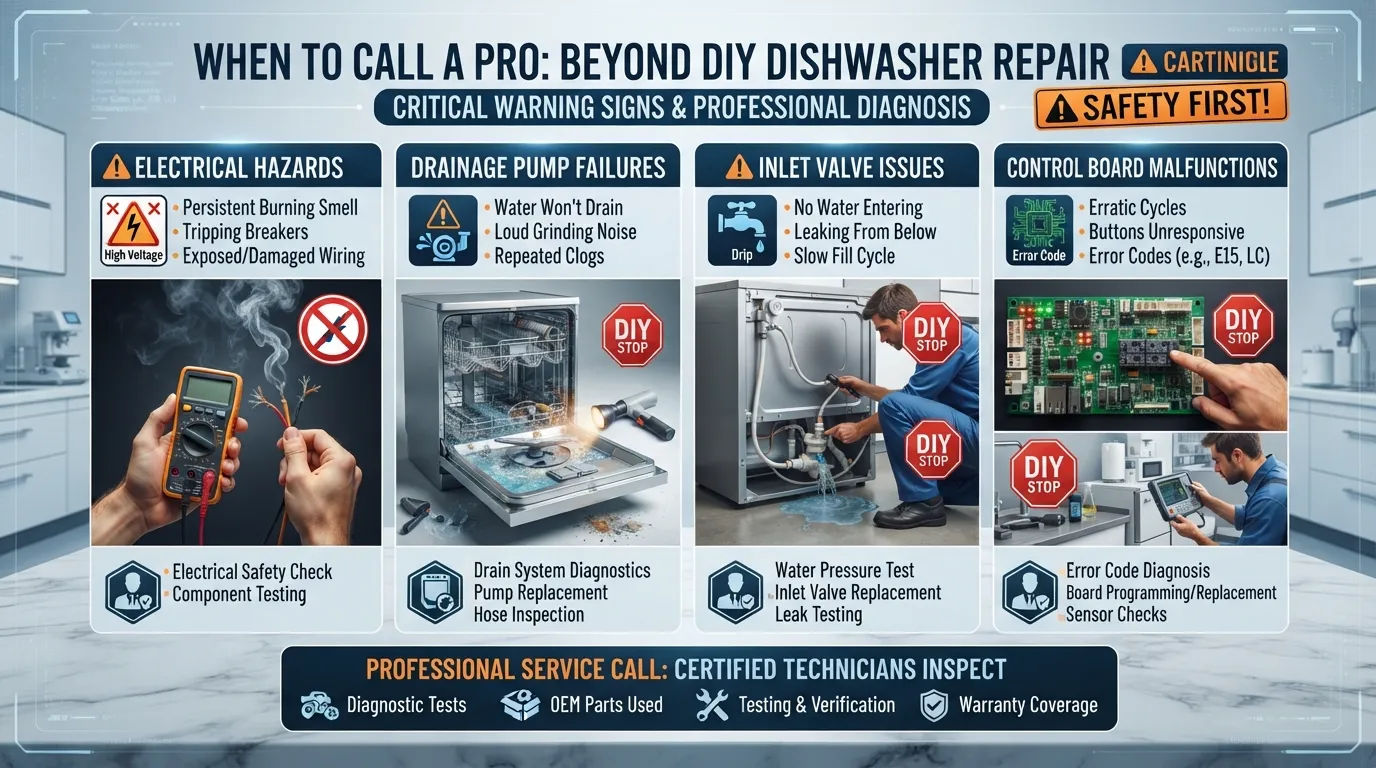
Knowing when to stop DIY troubleshooting and call a certified technician protects your appliance from further damage and prevents electrical hazards. While simple maintenance tasks like cleaning filters or replacing door gaskets are ideal for homeowners, complex mechanical and electrical failures require professional intervention.
Warning Signs a Repair Is Beyond DIY
Recognizing when an appliance problem exceeds basic DIY capabilities saves you hours of frustration and prevents costly mistakes.
Persistent Drainage Failures: Water that keeps pooling repeatedly after you have already cleaned the filter and cleared the drain hose.
Electrical Hazards: A distinct burning smell, sparking, smoking, or recurring breaker trips when the dishwasher turns on.
Component Leaks: Water leaking directly from the motor housing, internal drain pump, or hot water inlet valve rather than the door seal.
Stubborn Error Codes: Control panel error codes that reappear immediately after resetting or power-cycling the appliance.
Heating and Filling Failures: The machine refuses to fill with water or fails to heat water during the wash cycle.
What a Professional Will Check That You Can’t
Certified plumbing and appliance technicians possess specialized diagnostic tools, multimeters, and pressure gauges to evaluate internal components beyond your reach.
Drain Pump & Motor: Testing pump motor winding resistance, impeller blockages, and mechanical failure.
Inlet Valve Performance: Measuring water flow rates and electrical voltage delivered to the water inlet solenoid valve.
Heating Elements: Checking continuity and resistance across internal heating coils that dry dishes and heat wash water.
Control Boards: Diagnosing faulty electronic relay boards, wiring harnesses, and microswitch sensors.
Plumbing Line Integration: Inspecting complex under-sink drain connections, air gaps, and disposal fittings.
Need Help With Your Dishwasher Plumbing in Miami?
If your dishwasher is suffering from persistent internal leaks, electrical issues, or stubborn drainage clogs that defy DIY fixes, expert help is just a click away. Let certified local technicians handle the heavy lifting to restore your kitchen’s functionality safely and quickly.
You can easily book a plumber online to schedule a prompt inspection and professional repair service in the Miami area.
Is It Worth Repairing a Dishwasher or Should You Replace It?
Deciding whether to invest in a dishwasher repair or purchase a brand-new unit depends heavily on the appliance’s age, the frequency of breakdowns, and the total cost of parts versus a replacement. Most standard dishwashers have a reliable operating lifespan of about 9 to 12 years.
Is It Worth Repairing a Dishwasher?
Repairing a dishwasher is almost always worth it if the unit is less than six years old and the repair cost falls below half the price of a new machine. Simple, inexpensive fixes like clearing a clogged filter, replacing a worn door gasket, or unclogging spray arms can easily extend your appliance’s life by several years. However, if multiple major components fail simultaneously on an aging unit, replacement becomes the more economical choice.
When Repair Makes Sense vs When to Replace
Evaluating your dishwasher against established appliance longevity benchmarks helps clarify whether to fix or upgrade. For deeper insights into DIY feasibility and maintenance thresholds, consult Consumer Reports’ guide to appliance repairs you can DIY .
| When Repair Makes Sense | When to Replace |
| Unit Age: Under 6 years old | Unit Age: Over 10 years old |
| Cost Ratio: Repair bill is under 50% of a new unit | Cost Ratio: Major repair exceeds half the price of replacement |
| Failure Type: Isolated issue (clogged filter, loose gasket) | Failure Type: Recurring breakdowns or failed internal motor/pump |
| History: First repair needed in years | History: Constant leaks, rust in tub, or electrical failures |
What Is the Most Common Part to Fail on a Dishwasher?
The most common part to fail or clog on a dishwasher is the drain filter and debris screen. Because it constantly catches food particles, grease, and bone fragments during daily wash cycles, it frequently chokes off water drainage or restricts spray circulation unless cleaned on a regular monthly schedule.
Keep It Running: Dishwasher Maintenance Checklist
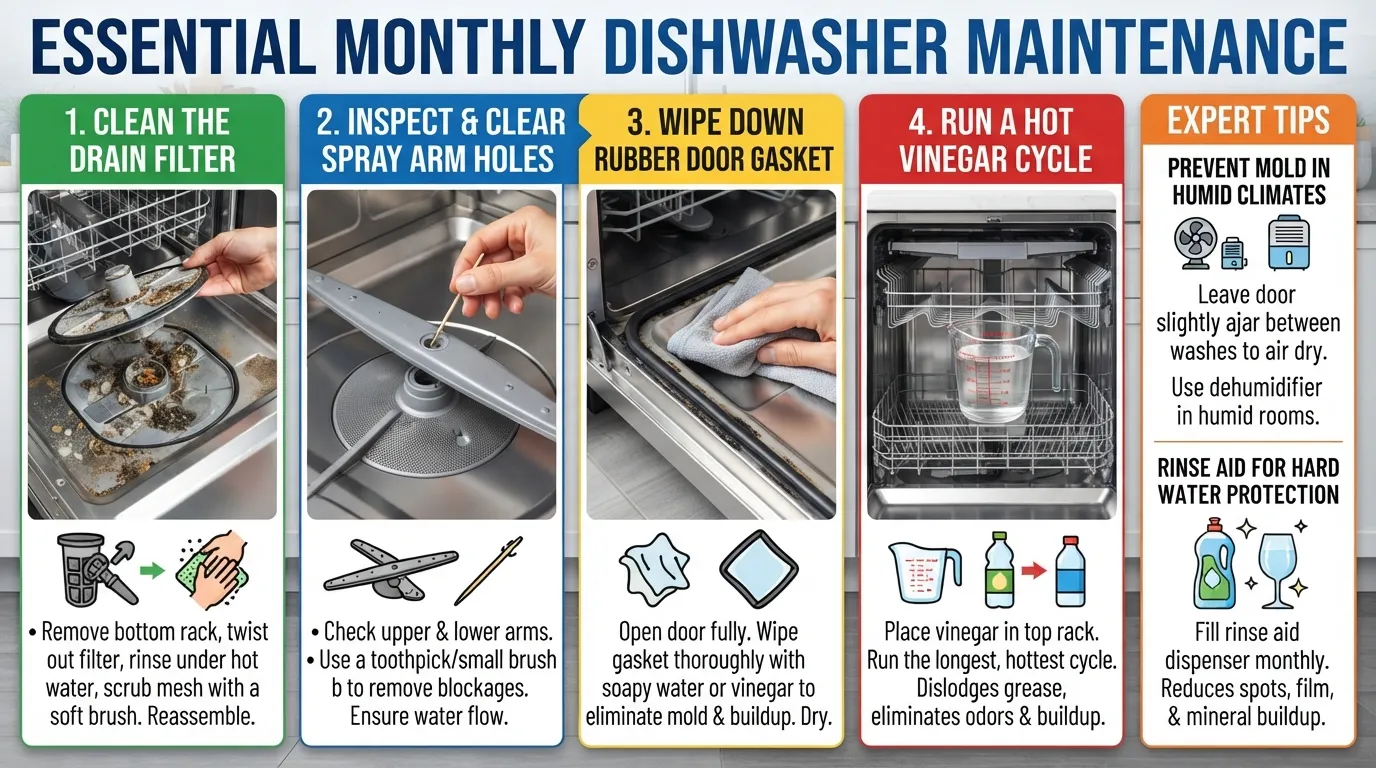
Routine preventive maintenance protects your dishwasher against unexpected breakdowns, foul odors, and premature component wear. Establishing a simple upkeep schedule keeps your appliance running at peak efficiency for years to come.
Monthly Maintenance Checklist
Performing quick checkups every four weeks prevents heavy grease accumulation and mineral blockages before they disrupt your wash cycles.
Clean the Drain Filter: Remove and rinse the mesh filter monthly to eliminate trapped food debris and prevent standing water.
Inspect Spray Arms: Check spray arm holes for mineral scale or food particles, clearing them with a toothpick when necessary.
Wipe the Door Gasket: Clean around the rubber seal and door perimeter using a damp cloth and vinegar to remove mold and soap scum.
Run a Maintenance Cycle: Place a bowl of white vinegar on the top rack and run a hot water cycle to deodorize and descale the tub.
How to Clean a Dishwasher With Black Residue or Mold
Dark slime, black residue, or mold growth typically thrives in warm, damp environments where stagnant water and trapped food particles sit undisturbed.
Scrub Gasket Crevices: Dip a soft brush in a solution of warm water and white vinegar to scrub deep inside the door gasket folds and track corners.
Run a Cleaning Cycle: Use a specialized commercial dishwasher cleaner or a cup of bleach (never mix vinegar and bleach together) on a sanitize cycle to purge internal mildew.
Ventilation in Humid Climates: In humid regions like South Florida, leave the dishwasher door cracked open for 30 minutes after a cycle finishes to let moisture escape and prevent mold regrowth.
Can You Use a Dishwasher That Hasn’t Been Used in a Long Time?
If a dishwasher has sat idle in a vacant vacation home or empty property for months, internal rubber seals can dry out, crack, and leak upon first use.
Inspect Before Starting: Open the unit, check the door gasket for brittleness, and inspect the tub and hoses for signs of mold or critter damage.
Run a Test Cycle: Pour two cups of warm water into the sump to lubricate dry pump seals, then run an empty short cycle with dishwasher cleaner to flush out stale residue before washing dishes.
Reducing Hard Water Buildup
Hard water minerals leave behind a chalky white film on glassware and interior components. Incorporating preventive steps neutralizes these deposits.
Use Rinse Aid: Liquid rinse aid lowers water surface tension during the final drying phase, preventing hard water spots from baking onto dishes.
Periodic Descaling: Run monthly vinegar cycles or use citric acid-based dishwasher descalers to break down stubborn limescale.
Water Softener Systems: If your home has severe hard water, installing a whole-house water softener protects both your dishwasher and plumbing fixtures from mineral scaling.
Frequently Asked Questions
How can I fix my dishwasher myself?
Fixing your dishwasher yourself starts with simple troubleshooting. You can easily clear clogged drain filters, clean debris-blocked spray arms with a wire or toothpick, or replace a worn rubber door gasket with basic hand tools in under thirty minutes. Always unplug the unit or flip the breaker before inspecting internal parts.
What is the most common part to fail on a dishwasher?
The drain filter and debris screen are the most common parts to clog or fail on a dishwasher. Food particles, grease, and bone fragments constantly accumulate here, eventually restricting water drainage and spray circulation unless cleaned monthly.
Is it ever worth it to repair a dishwasher?
Repairing a dishwasher is definitely worth it if the appliance is under six years old and the repair cost is less than half the price of a new unit. Simple DIY fixes like clearing filters or replacing door gaskets can easily extend your machine’s lifespan for several years.
What is the easiest dishwasher to repair?
The easiest dishwashers to repair feature accessible interior components, removable front-access kickplates, and twist-lock filter baskets that require no tools to remove. Brands and models that use modular parts and standard screw connections make DIY troubleshooting much faster and straightforward.
How do you clean a dishwasher that has black stuff in it?
Black residue and mold thrive in warm, damp environments with stagnant water. Scrub the door gasket crevices with a soft brush and a warm vinegar solution. Afterward, run a hot cycle with a specialized commercial dishwasher cleaner or a cup of bleach to purge internal mildew.
Can a dishwasher stop working if it hasn’t been used in a long time?
Yes, a dishwasher that sits idle for months can develop dried-out rubber seals that crack and leak upon first use. Stale water or mold may also accumulate in the sump. Inspect the gaskets and pour warm water into the bottom to lubricate dry pump seals before running an empty test cycle.
Why is my dishwasher not draining?
A dishwasher typically fails to drain because of a clogged drain filter, a blocked garbage disposal connection, or a kinked drain hose. Food debris and grease build up inside the sump filter over time, stopping water from flowing out. Cleaning the filter usually resolves the issue.
Conclusion and Next Step
Tackling common dishwasher malfunctions yourself saves time, avoids costly service call fees, and empowers you to maintain your kitchen appliances effectively. From clearing a clogged drain filter and scrubbing mineral-choked spray arms to swapping out a worn door gasket, handling these three primary repairs requires only basic hand tools and a little patience.
Final Thoughts
While DIY troubleshooting is ideal for routine blockages and minor seal leaks, knowing your limits ensures your home remains safe and protected from water damage. When faced with persistent electrical faults, leaking motors, or unyielding drainage failures, turning to a licensed professional is always the smartest choice.
For complex appliance issues or plumbing repairs across the region, you can easily schedule a visit with expert local technicians. To explore broader home solutions, feel free to browse our plumbing services to see how professional maintenance can keep your entire household running smoothly.
Main Services
Related Posts
Need a Plumber in Miami?
Schedule service online or speak directly with the EZ Plumbing team.
Owner-Led Local Service
Know who is behind the business before you request service. The owners, contact line and Miami service pages are published clearly.
- Named business owners
- Direct phone and social channels
- Local Miami service information
Clear Help Before You Book
Review the relevant service page, contact the team directly and use the booking page when you are ready—without relying on vague claims.
- Service-specific information
- Direct questions before scheduling
- Clear online booking route