
Bathroom Remodel Tips and Plumbing Considerations: A Complete 2026 Planning Guide
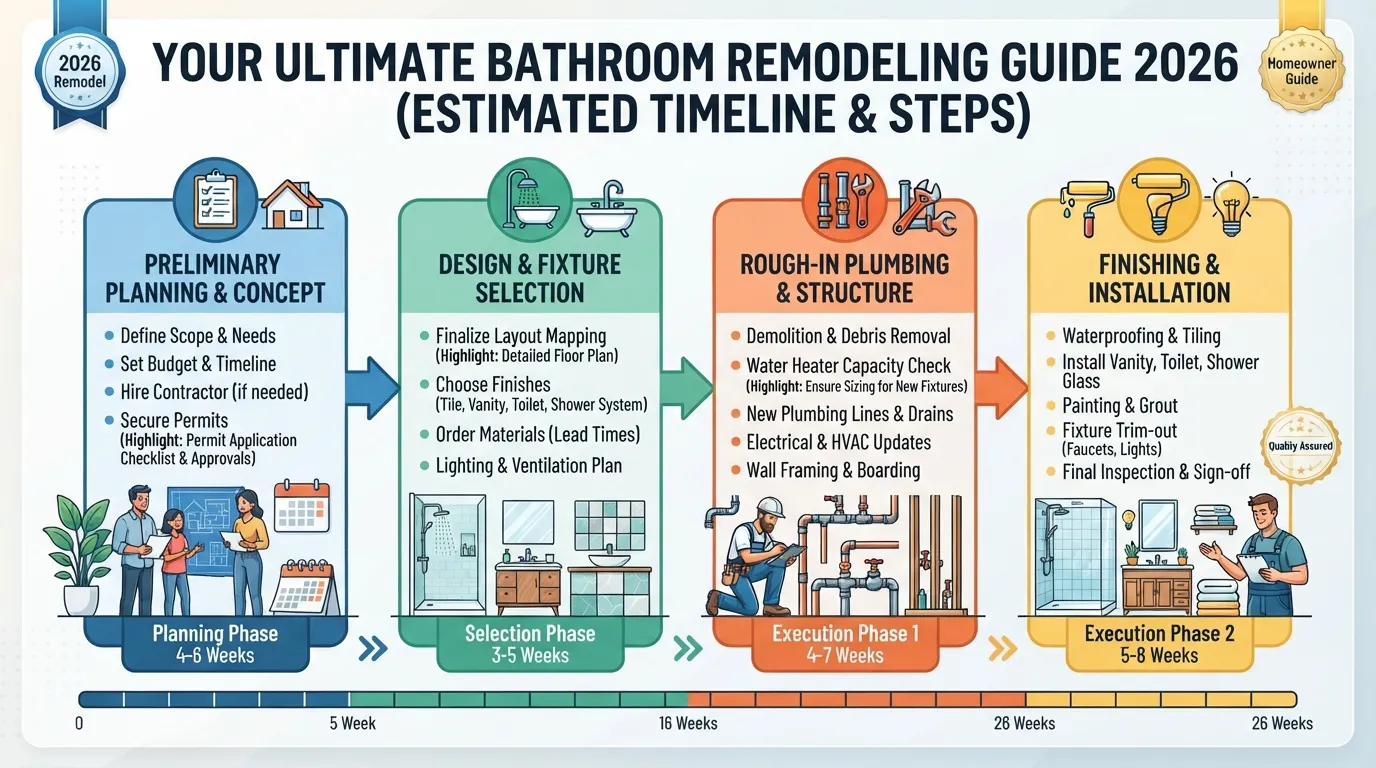
Bathroom Remodel Tips and Plumbing Considerations at a Glance
Essential Plumbing and Remodeling Priorities Before You Start
Planning plumbing decisions first, keeping your existing layout where possible, choosing fixtures before demolition, confirming local permits, and hiring a licensed plumber for any pipe changes will protect your investment. Addressing these critical fundamentals prevents costly delays and structural surprises once work begins.
Keep the existing layout: Retaining your current toilet, sink, and shower positions drastically cuts down labor and material expenses.
Pick fixtures first: Buy your faucets, showerheads, vanity, and tub before demolition so rough-in measurements are precise.
Test water pressure: Check your home’s PSI early to determine if pressure-reducing valves or pipe upgrades are necessary.
Check drain slope and venting: Ensure proper drainage gravity and vent stack alignment to prevent slow drains and sewer gas odors.
Plan ventilation: Design high-efficiency exhaust fans to manage moisture and prevent long-term mold issues.
Pull required permits: Secure municipal approvals beforehand to ensure your remodel meets current building and plumbing codes.
Budget a contingency: Set aside 15 to 20 percent of your total budget for unexpected plumbing repairs behind old walls.
Who This Guide Is For
This guide is specifically designed for homeowners planning a full or partial bathroom remodel, whether you are refreshing a compact powder room or overhauling a spacious master suite. It provides the strategic foundation needed to navigate complex structural and plumbing requirements with confidence.
Quick Reality Check: What Makes Plumbing the Hardest Part
Hidden infrastructure elements like drain lines, vent stacks, and mixing valves concealed behind walls and under concrete slabs drive the majority of budget overruns and project delays. Unforeseen corrosion, outdated galvanized pipes, or non-compliant DIY work from previous owners frequently require immediate professional remediation before aesthetic upgrades can proceed.
What to Decide Before Demolition Starts
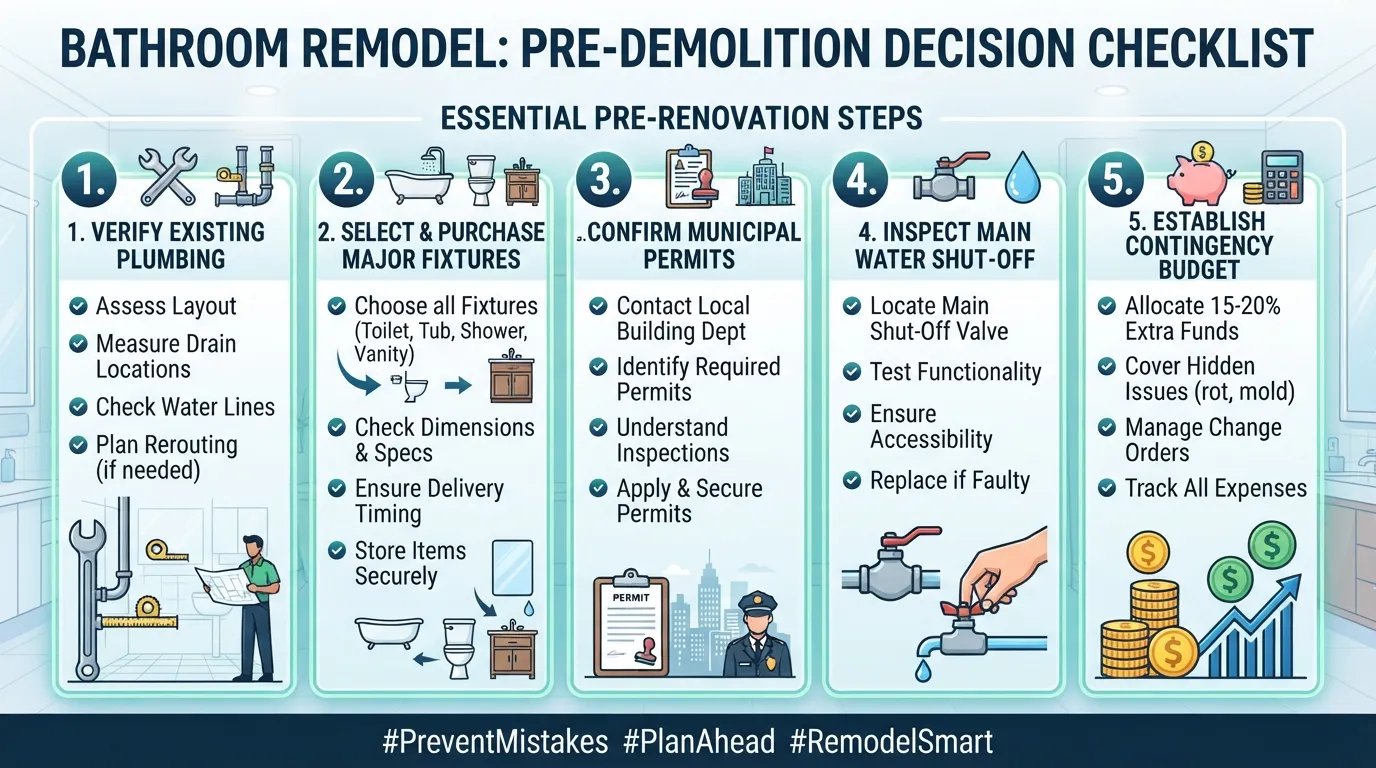
Choose Your Vanity, Shower Valve, Toilet and Drain Models First
Selecting your exact fixture models before demolition begins is vital because rough-in dimensions dictate your entire plumbing layout. Changing your mind after walls are closed means expensive rework, cutting into studs, and reopening finished floors.
Match rough-in dimensions: Toilet rough-ins typically require a 12-inch distance from the finished wall, while vanities dictate supply line heights.
Buy rough-in valves early: Specific thermostatic or pressure-balancing shower valves must be installed behind the tile according to the manufacturer’s exact specifications.
Lock in drain locations: Freestanding tubs and modern walk-in drains require precise subfloor core-drilling before flooring goes down.
Define Your Goals: Cosmetic Update, Partial Remodel or Full Gut
Clarifying your renovation scope early determines how deeply you will need to open walls and alter your existing plumbing infrastructure. Matching your design goals to your structural limits prevents scope creep and budget blowouts.
Cosmetic Update: Swapping out mirrors, light fixtures, and surface-mounted faucets without moving any pipes or touching structural framing.
Partial Remodel: Replacing the vanity, toilet, or bathtub within their exact existing footprints while updating minor shut-off valves.
Full Gut Renovation: Stripping the space down to bare studs and subfloors to reconfigure the entire plumbing layout and upgrade old supply lines.
Inspect Your Existing Plumbing Before Setting a Budget
Evaluating your home’s current infrastructure before finalizing financial numbers prevents severe surprises once demolition uncovers hidden damage. Professional bathroom remodel planning always starts with a thorough physical check of existing pipes and shut-off mechanisms.
Pipe material and age: Identify whether your home still uses corroded galvanized steel, outdated polybutylene, or reliable copper and PEX piping.
Main shut-off valves: Test every local angle stop and the main house shut-off valve to ensure they actually halt water flow in an emergency.
Visible leaks and drain speed: Check under sinks for slow-dripping compression fittings and pour-test drains to spot sluggish venting.
The Overlooked Requirements Most Homeowners Miss
Overlooking logistical details and regulatory steps can halt a remodeling project for weeks and trigger unexpected municipal fines. Factoring these requirements into your initial timeline keeps contractors on schedule.
Building permits: Confirm whether your city requires structural, electrical, or plumbing permits before picking up a sledgehammer.
Inspection timing: Schedule municipal rough-in inspections before hanging drywall or closing up subfloors.
Water shut-off windows: Coordinate service interruptions with household members or neighbors if working in multi-family buildings.
Fixture lead times: Account for custom vanities or specialized tile that can take 8 to 12 weeks to ship.
Work area access: Plan clear pathways and protective floor coverings through your home to safeguard finished living areas.
What Remodelers Wish Homeowners Knew Earlier
Experienced plumbing crews regularly encounter avoidable challenges that stem from unrealistic expectations during early planning phases. Learning from these real-world job site lessons saves time, money, and frustration.
Surprises hide behind old walls: Mold, rotted subfloor framing, and unvented drain lines are almost never visible until demolition exposes them.
Tile thickness alters rough-ins: Adding thick backer boards, waterproofing membranes, and stone tile can shift finished wall depths by an inch or more.
Custom layouts cost more: Shifting a toilet or shower drain even two feet away requires cutting joists and reworking below-floor waste stacks.
Cheap fixtures fail faster: Bargain-bin valves and faucets often lack replacement cartridge availability, leading to full replacements down the road.
The Correct Order to Remodel a Bathroom
Step-by-Step Bathroom Remodel Order
Following a strict, logical sequence ensures your project stays on schedule and prevents costly rework. Every step builds directly upon the previous trade’s completion.
Plan and finalize the design and fixtures: Select all layout configurations, finishes, and specific plumbing trim before any tools touch the room.
Obtain permits: Submit your plans to the local building department to secure necessary structural, electrical, and plumbing permits.
Demolition: Strip out old vanities, tubs, tiles, and drywall down to the bare studs and subfloor, checking for hidden damage.
Repair framing and subfloor: Reinforce sagging joists, replace water-damaged subflooring, and ensure solid backing for future heavy fixtures.
Rough-in plumbing and electrical: Install new supply lines, drain stacks, vent pipes, and electrical wiring according to your fixture specifications.
Inspection: Pass municipal rough-in inspections before closing up walls and floors to ensure strict code compliance.
Waterproofing: Apply high-performance waterproofing membranes, cement backer boards, and shower pan liners to prevent moisture damage.
Walls, tile and flooring: Hang moisture-resistant drywall, lay tile across floors and shower surrounds, and apply grout and sealants.
Install fixtures, vanity and toilet: Mount your vanity, set the toilet, install shower trim, and connect all water supply lines.
Final inspection, caulk and test: Conduct final municipal sign-offs, seal joints with mildew-resistant caulk, and test all systems for leaks.
Where Plumbing Fits at Each Stage
Understanding precisely when plumbing tasks occur helps coordinate specialized contractors and DIY efforts effectively.
| Stage | Plumbing Task | Who Does It |
| Planning | Map supply and drain dimensions, select rough-in valves | Homeowner / Designer |
| Demolition | Cap lines, protect drains from debris, remove old fixtures | General Contractor / Plumber |
| Rough-in | Install supply pipes, vent stacks, and shower valves | Licensed Plumber |
| Inspection | Pressure-test lines for municipal building code sign-off | Plumber / Inspector |
| Finishing | Connect sink faucets, mount toilet, install shower trim | Plumber / Experienced DIYer |
Typical Timeline and Where Delays Happen
A standard full bathroom remodel typically takes anywhere from 3 to 5 weeks depending on the scope and labor availability. Unexpected bottlenecks frequently occur during the inspection phase if corrections are needed, or when waiting for custom tile and specialized plumbing fixtures to clear shipping lead times.
Why Skipping Steps Costs You More
Rushing through the sequence or skipping critical milestones creates expensive downstream complications. For instance, finishing tile work before passing your municipal rough-in inspection can force inspectors to demand holes be cut straight through your brand-new tile to verify pipe connections behind the wall.
The Correct Order to Remodel a Bathroom
Step-by-Step Bathroom Remodel Order
Following a strict sequential workflow ensures that your tradespeople do not undo each other’s work or violate building codes. This structured 10-step order of work keeps your project running smoothly from concept to completion.
Plan and finalize the design and fixtures: Select all core items like your vanity, tub, and toilet to lock in accurate dimensions.
Obtain permits: Submit your architectural and plumbing plans to local municipal authorities for approval.
Demolition: Strip out old cabinets, tiles, drywall, and outdated fixtures down to the studs and subfloor.
Repair framing and subfloor: Inspect exposed wood for water damage or rot, then reinforce studs and level subfloor areas.
Rough-in plumbing and electrical: Run new supply lines, drain pipes, vent stacks, and electrical wiring behind the walls.
Inspection: Pass municipal rough-in inspections for plumbing and framing before closing up any wall cavities.
Waterproofing: Install vapor barriers, cement backer boards, and liquid waterproof membranes in wet zones.
Walls, tile and flooring: Hang greenboard or drywall, lay floor tiles, and tile the shower surround.
Install fixtures, vanity and toilet: Mount your vanity cabinets, drop in the sinks, set the toilet, and connect faucets.
Final inspection, caulk and test: Run pressure tests, seal joints with antimicrobial caulk, and pass final municipal inspections.
Where Plumbing Fits at Each Stage
Integrating plumbing tasks into the correct project phase prevents redundant labor costs and ensures smooth coordination between general contractors and licensed plumbers.
| Stage | Plumbing Task | Who Does It |
|---|---|---|
| Planning | Determine fixture specs and rough-in locations | Designer / Plumber |
| Demolition | Cap off active supply lines and remove old fixtures | General Contractor / Plumber |
| Rough-In | Install supply lines, drain pipes, and vent stacks | Licensed Plumber |
| Finishing | Connect angle stops, faucets, sinks, and toilets | Licensed Plumber |
Typical Timeline and Where Delays Happen
A standard full bathroom remodel takes between 3 to 6 weeks from demolition day to final touch-ups, depending on the scope of work. Major timeline bottlenecks usually happen during municipal inspection scheduling, custom fixture shipping delays, and uncovering hidden structural water damage behind old shower walls.
Why Skipping Steps Costs You More
Rushing through the sequence or skipping mandatory validation checks almost always triggers expensive rework. For instance, tiling a shower enclosure before passing the municipal plumbing rough-in inspection forces contractors to tear out finished tile and waterproof membranes just to correct a hidden pipe leak or code violation.
Keep or Move Your Layout: Fixture Relocation and Its Cost Impact
Why Keeping Your Existing Layout Saves Money
Retaining your existing plumbing layout preserves existing drain stacks, supply lines, and vent paths, slashing labor hours and material costs. Swapping fixtures within their original footprints avoids cutting into structural slabs or joists, keeping your renovation budget securely under control.
What Changes When You Move a Toilet, Shower or Vanity
Relocating major plumbing fixtures alters hidden infrastructure requirements. Reviewing these structural impacts helps you balance design desires with realistic remodeling costs.
| Fixture | What Must Change | Difficulty / Cost Impact |
| Toilet | Extend the 3-inch closet bend and reset the toilet flange | High (Requires precise gravity slope adjustments) |
| Shower / Tub | Reroute the P-trap, drain line, and thermostatic mixing valve | High (Often requires subfloor access or concrete trenching) |
| Vanity / Sink | Shift hot and cold supply risers and horizontal drain arms | Medium (Relatively simple within the same wall cavity) |
Slab Foundation vs Crawl Space vs Second Floor
The structural architecture of your home dictates the complexity and expense of moving drain lines. Many Miami homes feature slab-on-grade construction, meaning that relocating a toilet or shower requires specialized concrete cutting and trenching to reroute waste pipes into the main sewer line services.
Slab-on-Grade: Requires breaking through concrete, laying new PVC pipe beneath the grade, and repouring concrete patches.
Crawl Space: Offers easier access between floor joists, making pipe relocation faster and significantly less disruptive.
Second Floor: Involves running drain lines down through lower-level ceiling cavities or soffits, requiring drywall repair.
When Moving Fixtures Is Worth It
While layout retention saves money, certain circumstances justify the added expense of relocating fixtures. Strategic layout adjustments can completely transform a cramped, dysfunctional space into an ergonomic oasis.
Improving accessibility: Creating wider clearances for wheelchair accessibility or aging-in-place safety standards.
Expanding a cramped shower: Stealing space from an oversized vanity area to build a luxurious walk-in shower.
Fixing awkward traffic flows: Reorienting a vanity or toilet so doors do not collide and natural light flows freely.
Questions to Ask Your Plumber Before Moving Anything
Consulting your licensed plumber about structural constraints before committing to a new floor plan prevents unexpected project halts. Asking the right preliminary questions clarifies feasibility and total expenditure.
Can our existing vent stack handle the new fixture location?
Will shifting this toilet violate local building code slope requirements?
Does our foundation type require concrete core-drilling for this drain shift?
Are our current water supply lines wide enough to feed both relocated fixtures simultaneously?
How many days will this layout modification add to our overall construction timeline?
Rough-In Plumbing Essentials: Pipes, Drains and Vents
What “Rough-In” Means and Why It Matters
The rough-in plumbing stage involves laying all hidden supply lines, waste pipes, and vent stacks inside open walls and subfloors before drywall goes up. Getting this stage right is critical because once finishes are applied, correcting a plumbing mistake requires tearing apart tile, framing, and waterproofing.
Drain Slope and Why It Prevents Slow Drains
Drain pipes rely on gravity rather than water pressure to remove wastewater from your home. Establishing the correct horizontal pipe slope—typically 1/4 inch of drop per foot of run—ensures waste moves smoothly through the system without leaving solid residue behind. Inadequate slope leads to recurring blockages that eventually require professional drain cleaning services to clear out stubborn buildup.
Too flat: Wastewater sluggishly crawls through the pipe, allowing debris to settle and clog the line.
Too steep: Liquid rushes past solid waste, leaving sludge and paper stranded inside horizontal runs.
The sweet spot: Maintaining a steady 1/4-inch fall per foot guarantees optimal scouring velocity.
Vent Stacks and Why Bathrooms Gurgle
Vent stacks connect your plumbing system to the outdoor air through the roof, equalizing air pressure every time water rushes down a drain. When a vent is blocked or improperly sized, draining water creates a vacuum effect that pulls air out of nearby P-traps.
The cause: Restricted airflow creates negative pressure in the waste lines as wastewater cascades downward.
The symptom: Gurgling noises bubbling up from your toilet, sink, or shower drain as air struggles to escape.
The result: Empty P-traps allow foul sewer gases to enter your bathroom and cause extremely slow drainage.
Pipe Materials Compared: PEX vs Copper vs PVC vs Old Galvanized
Choosing the correct pipe material for your supply and drainage lines ensures longevity, optimal flow, and full compliance with modern building codes.
| Material | Typical Use | Pros | Cons | When to Replace |
| PEX | Hot & cold water supply | Flexible, freeze-resistant, fast installation | Susceptible to UV damage if stored outdoors | Replace old brittle plastic immediately |
| Copper | Water supply lines | Highly durable, naturally antimicrobial, rigid | Expensive materials, requires professional soldering | Replace if pinhole leaks or heavy green corrosion appear |
| PVC | Drain, waste, & vent | Lightweight, smooth interior, budget-friendly | Can warp under high heat, brittle in extreme cold | Replace if cracked or sagging along joists |
| Galvanized | Older supply & waste | Rigid steel strength | Prone to interior mineral buildup and rust | Replace entirely during any major bathroom remodel |
Should You Replace Old Pipes During a Remodel?
Opening up bathroom walls during a remodel represents the single cheapest and easiest window to upgrade aging or damaged plumbing infrastructure. Leaving antiquated galvanized or corroded copper pipes in place invites catastrophic leaks just months after finishing an expensive tile installation.
Common Rough-In Measurements to Confirm With Your Plumber
Verifying exact rough-in dimensions with your licensed plumber before closing up walls prevents frustrating alignment errors with your final fixtures.
Toilet flange distance: Exactly 12 inches from the finished back drywall to the center of the waste pipe (unless using a specialty 10-inch or 14-inch rough-in toilet).
Vanity sink drain height: Typically set at 19 to 21 inches from the finished floor, depending on cabinet shelf design.
Shower mixing valve height: Centered between 45 and 48 inches above the finished shower floor for comfortable ergonomic reach.
Tub spout and shower head: Tub spouts standardly sit 4 inches above the rim, while shower heads mount 72 to 80 inches high.
Pro Tip From the Field
Experienced plumbing teams always cap off new supply lines and fill rough drainage systems with air or water pressure tests before scheduling municipal inspections. Leaving the system under static pressure overnight allows contractors to spot minuscule joint weeping immediately on pressure gauges before a single sheet of drywall goes up.
Water Pressure, Shut-Off Valves and Water Heater Planning
Why You Should Test Water Pressure Before Buying Fixtures
Testing your home’s water pressure before selecting showerheads and faucets ensures your new hardware performs exactly as intended. Excessive water pressure above 80 PSI can destroy ceramic cartridges, rupture supply hoses, and cause premature plumbing leaks, while pressure dropping below 40 PSI results in a frustratingly weak shower stream.
How to Check Your Home’s Water Pressure
Measuring your PSI requires an inexpensive screw-on pressure gauge that attaches directly to any threaded hose bib or washing machine valve. Following a few simple steps gives you an accurate baseline before your remodel begins.
Attach the gauge: Screw the water pressure gauge tightly onto an outdoor hose spigot or laundry utility faucet.
Turn off all fixtures: Ensure no indoor taps, toilets, or irrigation systems are running while you test.
Open the valve fully: Turn the spigot completely on and read the static pressure needle on the dial.
Evaluate the reading: Confirm your baseline falls within the ideal residential range of 50 to 60 PSI.
What a Pressure Reducing Valve (PRV) Does
A pressure reducing valve is a specialized bell-shaped brass control device installed near your main water supply line entrance to regulate incoming municipal pressure. If your pressure gauge reads above 80 PSI, installing or replacing a faulty PRV safeguards your newly remodeled bathroom’s fixtures, supply lines, and water heater from damaging pressure spikes.
Install or Upgrade Shut-Off Valves While the Walls Are Open
Replacing old multi-turn angle stops with modern quarter-turn ball valves during your remodel ensures reliable emergency water isolation. Outdated valves frequently seize up or leak when you try to shut them off years later, turning a simple fixture repair into a whole-house water emergency.
Will Your Water Heater Keep Up With a New Shower?
Upgrading to luxury fixtures like high-flow rain showerheads, dual body sprays, or deep soaking tubs drastically increases your household hot water demand. Standard tank water heaters often run cold within minutes under heavy modern loads, making strategic evaluations essential for reliable water heater installation and repair.
Assess existing capacity: A standard 40-gallon tank struggles to supply simultaneous high-flow showers and everyday household tasks.
Consider tankless upgrades: Tankless water heaters provide endless hot water on demand, though they require checking gas line sizes or electrical panel capacity.
Match flow rates: Calculate the combined Gallons Per Minute (GPM) of all shower heads running together to ensure your water heater can support the peak load.
Shower Valves, Waterproofing and Leak Prevention
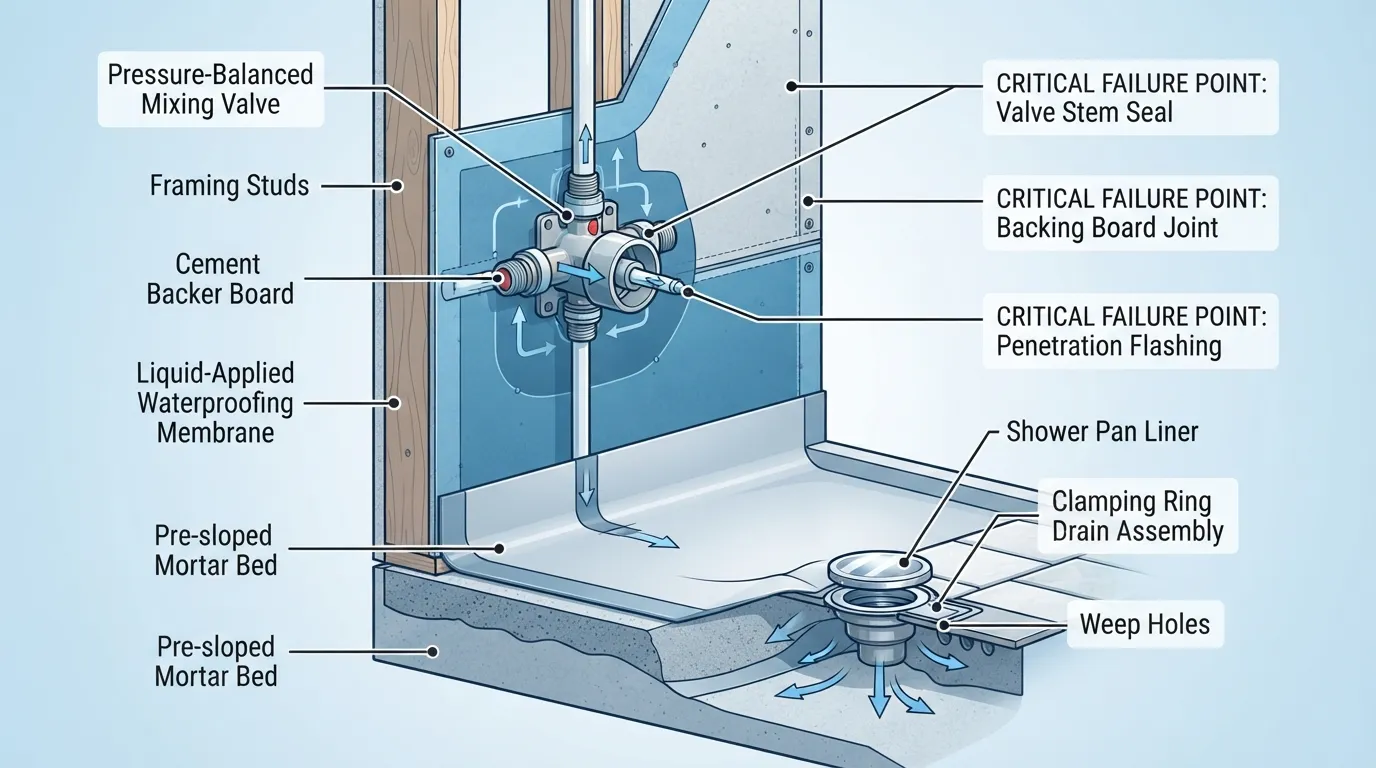
Choosing a Shower Valve: Pressure-Balance vs Thermostatic
Selecting the right shower valve core prevents scalding temperature spikes and ensures consistent comfort every time you turn on the water. Understanding the mechanical differences between valve types helps you balance budget with precise temperature control.
Pressure-Balance Valves: Automatically equalize hot and cold water pressures when someone flushes a toilet or runs a sink elsewhere in the house, preventing sudden scalding.
Thermostatic Valves: Feature separate temperature control dials that utilize a wax thermal element to maintain your exact preferred degree, allowing for higher flow rates and multi-showerhead setups.
Volume Control Integration: Many modern thermostatic setups include independent volume controls so you can adjust water pressure without altering your dialed-in temperature.
Why Waterproofing Is Not the Same as Tile
Many homeowners mistakenly assume that ceramic tile, stone, and cement grout create a waterproof barrier against moisture intrusion. In reality, tile and grout are porous materials that absorb water; true waterproofing must happen behind the tile using specialized liquid membranes or sheet systems applied directly to backer boards.
Porous surfaces: Grout lines naturally allow moisture to seep through during every shower.
Substrate protection: Waterproofing membranes applied beneath the tile prevent trapped moisture from rotting wood studs and drywall.
Mold prevention: Stopping water behind the surface eliminates the dark, damp cavities where black mold thrives.
Shower Pan, Curb and Membrane Basics
Constructing a durable shower enclosure requires a multi-layered assembly that directs water safely into the drain rather than the subfloor. Each component plays a vital structural role in preventing long-term water damage.
Shower pan liner: A flexible PVC or chlorinated polyethylene (CPE) membrane sloping toward the sub-drain catches water that permeates the mud bed.
The pre-slope: A concrete mortar bed shaped beneath the primary liner ensures moisture travels toward the weep holes rather than pooling under the tile.
Curb protection: The shower threshold must be wrapped seamlessly with continuous waterproofing membrane to prevent moisture migration across the bathroom floor.
How to Flood-Test a Shower Pan Before Tiling
Conducting a proper flood test before setting tile verifies that your shower pan and drain assembly are 100 percent watertight. Performing this test correctly prevents catastrophic slab leaks and expensive post-remodel repairs.
Plug the drain: Insert a mechanical test plug securely into the main shower drain pipe.
Fill the pan: Pour water into the shower basin until it reaches a depth of 2 to 3 inches.
Mark the water level: Use a permanent marker or tape to note the exact water surface line.
Hold for 24 hours: Allow the water to sit undisturbed for a full 24 hours, checking periodically for any drop in water level or dampness below.
Early Warning Signs of a Hidden Leak After a Remodel
Catching plumbing issues early prevents structural rot and expensive remediation work after a bathroom project is finished. Keeping an eye out for these subtle indicators helps protect your home.
Musty, persistent damp odors emanating from baseboards or hallway walls near the bathroom.
Unexplained discoloration, bubbling paint, or peeling wallpaper on walls adjacent to the shower enclosure.
Loose, spongy, or shifting floor tiles near the shower entrance or toilet base.
Unusually high water bills when household water usage habits have not changed.
Professional leak detection and repair services can pinpoint hidden pipe failures safely using thermal imaging and acoustic sensors before structural damage spreads.
Choosing Toilets, Vanities and Fixtures
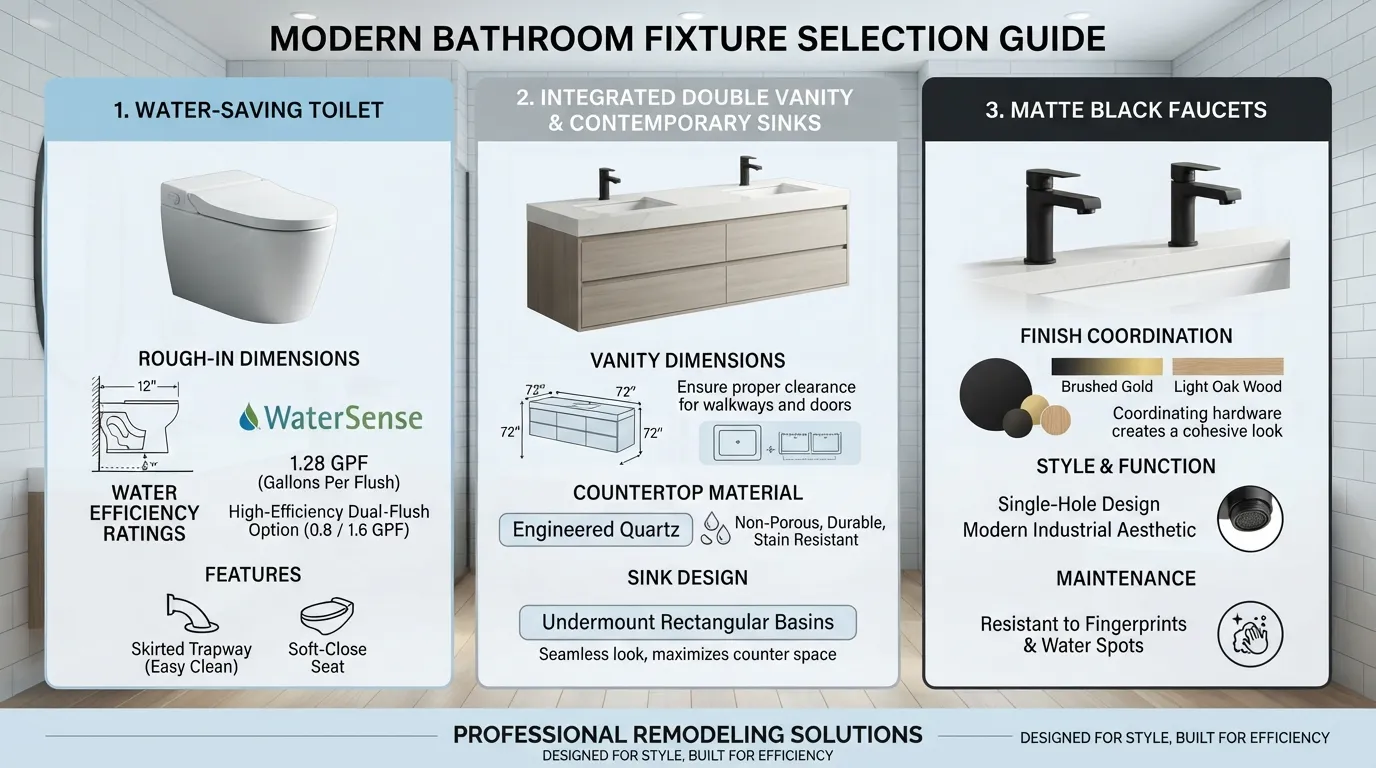
Should You Buy Your Own Tile, Grout and Fixtures?
Deciding whether to purchase your own remodeling materials or let your general contractor source them involves a careful trade-off between creative control and liability. Homeowner-supplied materials allow you to curate exact aesthetic styles and hunt for retail sales, but they shift full responsibility for missing parts, freight damages, and warranty coordination onto you. Conversely, contractor-supplied materials streamline accountability, ensuring that if a specialized valve or tile box arrives defective, the contractor replaces it immediately without delaying your project timeline.
Homeowner-supplied pros: Total creative freedom, direct access to specialty finishes, and potential savings from retail discount shopping.
Homeowner-supplied cons: You absorb restocking fees for incorrect items, shipping delays, and liability for damaged or missing components.
Contractor-supplied pros: Seamless warranty protection, professional-grade material matching, and zero labor downtime if items arrive damaged.
The golden rule: Always clarify in writing who bears financial responsibility for handling replacement parts if a product arrives defective on site.
Toilet Choices: Rough-In Size, Height and Water Efficiency
Selecting the right toilet requires measuring critical rough-in dimensions and matching bowl geometry to your household’s ergonomic needs. If you are keeping any existing fixtures elsewhere in the home during your remodel, minor leaks can often be resolved proactively with professional toilet repair services instead of full replacements.
Rough-in dimensions: Standard American bathrooms require a 12-inch rough-in distance from the finished wall to the waste pipe center, though compact spaces occasionally utilize 10-inch or custom 14-inch models.
Bowl height options: Standard round-front bowls save space in tiny powder rooms, while elongated chair-height (ADA compliant) models offer superior comfort for daily use.
Water efficiency: Modern high-performance gravity-flush toilets achieve powerful bulk waste extraction using only 1.28 gallons per flush or less.
Vanity and Faucet Fit: Drain Alignment and Clearances
Matching your vanity cabinet interior layout with your wall supply lines and waste pipe locations prevents frustrating installation modifications. Standard vanity configurations require precise alignment between the sink basin drain tailpiece and the horizontal wall stub-out to accommodate flexible P-traps and angle stops without kinking supply hoses.
Water-Saving Fixtures That Don’t Sacrifice Performance
Upgrading to high-efficiency plumbing fixtures dramatically reduces household water consumption without weakening stream pressure or washing performance. For certified efficiency standards, homeowners can explore guidelines on EPA WaterSense-labeled toilets to identify rigorously tested models that conserve resources while maintaining top-tier flushing power.
Aerated faucets: Modern aerators mix air into the water stream, producing a robust, splash-free flow while reducing flow rates to 1.5 gallons per minute or less.
Pressure-compensating showerheads: These fixtures maintain a steady, drenching spray sensation across fluctuating household water pressures while conserving hot water.
Dual-flush mechanisms: Offering a split-button flush option allows users to select lower water volumes for liquid waste, cutting overall bathroom water waste by up to 20 percent.
Warranty, Spare Parts and Serviceability
Investing in reputable, name-brand plumbing fixtures guarantees long-term serviceability and easy access to replacement cartridges, washers, and diverter stems. Bargain-bin imported faucets frequently lack local distributor support, turning a simple ten-minute cartridge swap into a costly wall-opening replacement project when internal seals inevitably fail.
Ventilation, Humidity and Mold Control
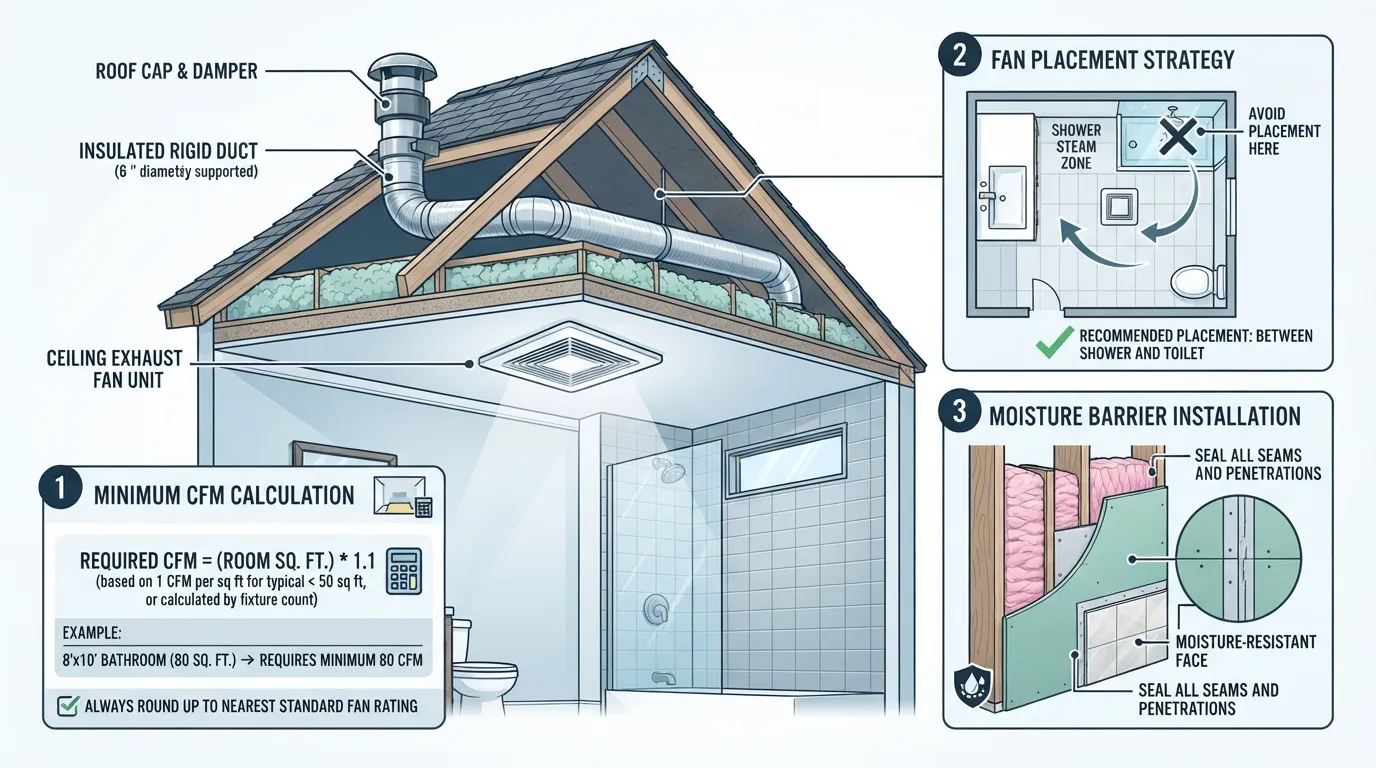
Why Every Bathroom Needs a Properly Sized Exhaust Fan
Installing a high-performance exhaust fan is the single most effective way to eliminate moisture, prevent mold growth, and protect your bathroom finishes. Without mechanical ventilation, hot shower steam saturates drywall, wood framing, and porous grout lines, rapidly creating the damp conditions that foster toxic black mold.
How to Choose the Right CFM for Your Bathroom Size
Selecting an exhaust fan requires calculating your room volume to ensure adequate air changes per minute. Standard building guidelines recommend matching your fan’s cubic feet per minute rating directly to your bathroom’s square footage for rooms under 100 square feet.
Standard sizing rule: Provide at least 1 CFM per square foot of floor space (e.g., a 70-square-foot bathroom requires a minimum 70 CFM fan).
Fixture additions: Add 50 CFM for each enclosed toilet stall, standard shower, or bathtub enclosure, and 100 CFM for large jetted soaking tubs.
Ceiling height adjustments: If your bathroom features ceilings higher than 8 feet, scale up your fan capacity by 20 percent to account for the increased air volume.
Quiet operation (Sones): Choose a model rated at 1.5 sones or less to ensure the fan runs quietly enough that household members will actually turn it on.
Ducting to the Outdoors: A Common Mistake to Avoid
Exhaust fans must vent completely to the exterior of the house—through the roof or an exterior wall soffit—using rigid metal or smooth PVC ducting. Venting bathroom moisture directly into an attic or crawl space traps humid air against roof decking and wooden rafters, triggering silent rot and massive mold colonies.
Keep runs short and straight: Avoid sharp 90-degree elbows where possible, as each bend cuts overall fan efficiency by up to 25 percent.
Insulate attic duct runs: Insulated flexible ducting prevents warm shower air from condensing inside cold attic pipes during winter months and leaking back down.
Install backdraft dampers: Built-in dampers stop outdoor wind and cold drafts from blowing backward through the fan housing into your bathroom.
Humidity, Mold and Moisture Damage in Florida Homes
In humid subtropical climates, managing indoor relative humidity requires an aggressive, multi-layered defense strategy. Warm ambient air holds immense moisture; when it meets cold air-conditioned interior walls or uninsulated plumbing lines, heavy condensation forms instantly, turning a newly remodeled bathroom into a breeding ground for mold within weeks.
Other Moisture Controls: Fan Timers, Humidity Sensors, Window Placement
Relying on family members to manually switch off an exhaust fan often leaves moisture trapped in the room long after showers end. Integrating automated control systems ensures your ventilation runs long enough to completely clear ambient humidity.
Digital countdown timers: Set fans to run for 20 to 30 minutes after you leave the bathroom to extract lingering steam.
Automatic humidity sensors: Smart switches detect rising moisture levels and turn the fan on automatically, shutting it off only when relative humidity drops back to baseline levels.
Strategic window placement: Operable windows paired with high-flow exhaust fans provide excellent cross-ventilation, though mechanical extraction remains mandatory under building code for complete moisture control.
Permits, Codes and Inspections
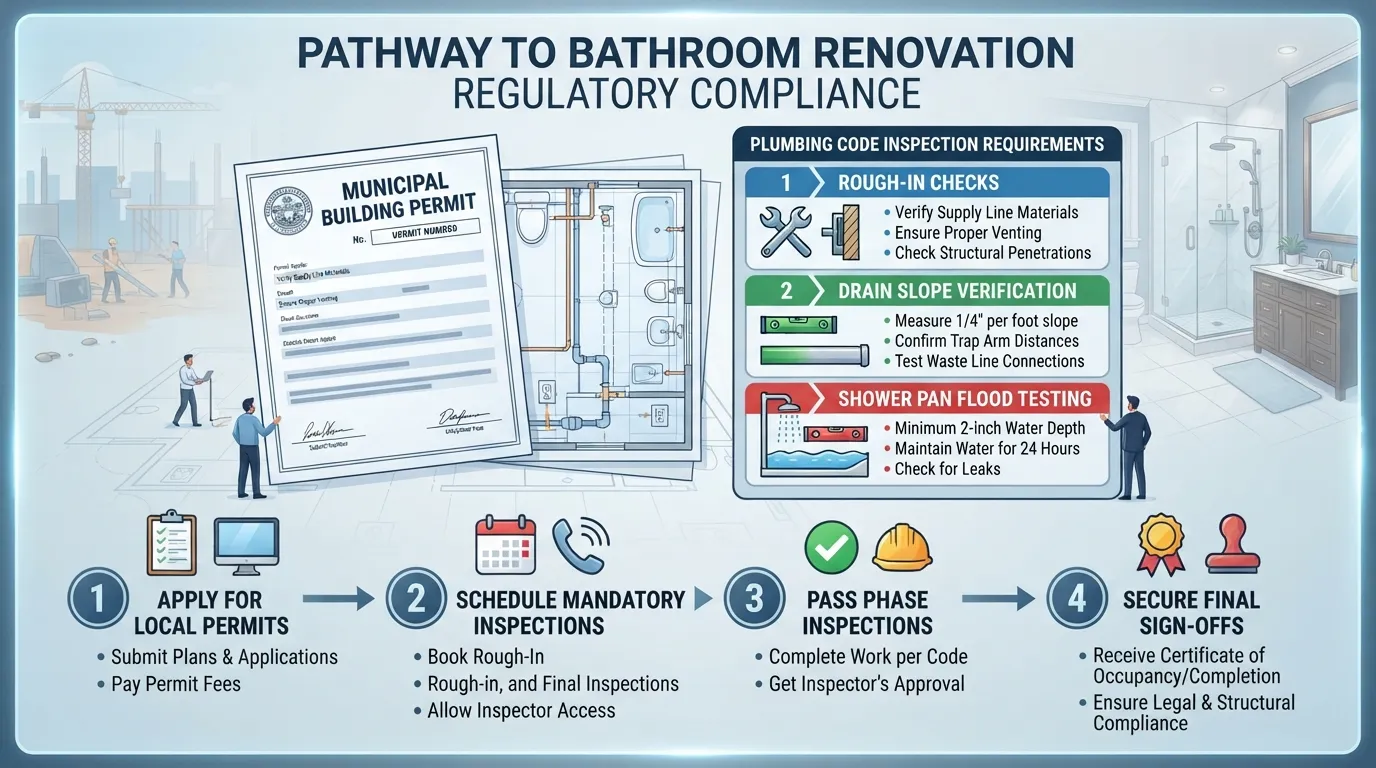
When Do You Need a Plumbing Permit for a Bathroom Remodel?
You need a plumbing permit whenever your renovation project involves installing new supply pipes, relocating drain lines, altering vent stacks, or replacing a shower pan. While simple cosmetic updates like swapping a faucet or changing a vanity in its exact same footprint usually do not require permits, rules vary by city and county, so always confirm requirements directly with your local building department before starting work.
Typical Inspection Stages
Municipal building departments require formal inspections at specific milestones to verify that hidden infrastructure complies with safety regulations. Navigating these checks successfully keeps your project legally sound.
Rough-In Inspection: Conducted after framing, electrical wiring, and plumbing pipes are installed but before any walls, subfloors, or insulation are closed up.
Final Inspection: Performed after all fixtures are completely installed, caulked, and tested, granting official closure to the permit file.
Risks of Skipping Permits
Attempting to bypass the permitting process to save time or money introduces severe legal, financial, and safety liabilities that can haunt you for years.
Forced rework: Code enforcement officers can issue a stop-work order or force contractors to tear down finished tile and drywall to inspect unpermitted pipes.
Insurance claim denials: Insurance carriers frequently deny coverage for water damage or fires if the underlying plumbing or electrical work was performed without official permits.
Resale complications: Unpermitted renovations surface during home inspections when selling a house, resulting in delayed closings, forced retrofits, or reduced purchase offers.
Who Pulls the Permit: You or Your Contractor?
Hiring a licensed contractor typically means they take full responsibility for pulling the necessary plumbing and building permits on your behalf. If you choose an owner-builder exemption for your primary residence, you assume direct legal responsibility for scheduling inspections and ensuring all work strictly adheres to the local building code.
Florida and Miami-Dade Considerations
Strict regulatory standards govern home renovations across South Florida due to high humidity and hurricane safety codes. Under the Florida Building Code and Miami-Dade County guidelines, any structural alteration, concrete slab penetration for drain relocation, or mechanical ventilation upgrade mandates licensed contractor oversight and detailed trade sub-permits to guarantee compliance.
DIY or Hire a Licensed Plumber?
Remodel Tasks Most Homeowners Can Do Themselves
Tackling specific aspects of a bathroom remodel on your own is a great way to control labor costs without compromising structural integrity. Safe DIY tasks include painting walls, demolishing non-load-bearing cabinets, hanging mirrors, and assembling bathroom accessories. You can also handle simple aesthetic fixture swaps, such as installing new sink faucets or cabinet hardware, as long as the underlying supply lines and shut-off valves remain untouched.
Tasks That Should Be Left to a Licensed Plumber
Any modification involving hidden supply lines, wastewater drainage, or structural gas connections requires the expertise of qualified licensed plumbing services. Attempting to move waste stacks, reroute copper or PEX supply lines, install shower mixing valves, or upgrade water heaters without professional certification introduces massive liability for leaks, code violations, and property damage.
DIY vs Professional Comparison Table
| Task | DIY Appropriate? | Risk If Done Incorrectly |
| Painting & Decorating | Yes | Cosmetic flaws, peeling paint from moisture |
| Demolition (Non-Structural) | Yes | Damaging hidden electrical wires or pipe runs |
| Installing Accessories & Mirrors | Yes | Loose fixtures, drywall anchors pulling free |
| Faucet & Vanity Hardware Swaps | Yes (if no line modifications) | Minor supply hose leaks under the basin |
| Rough-In Drain & Vent Relocation | No | Slow drains, sewer gas leaks, code failure |
| Shower Valve & Waterproofing Installation | No | Catastrophic hidden slab leaks and rot |
| Water Heater Upgrade & Gas Lines | No | Explosive gas leaks, carbon monoxide, flooding |
How to Choose a Plumber for Your Remodel
Selecting the right plumbing partner sets the tone for a smooth, stress-free bathroom renovation. Always verify that your contractor holds an active state license, carries comprehensive liability insurance, and maintains a proven track record of local code compliance. Request detailed written quotes that outline exact material brands, labor hours, and permit handling responsibilities so there are no surprises midway through construction.
Questions to Ask in Your Plumbing Quote
Before signing a contract or committing funds to your remodel plumbing scope, run through this targeted question checklist with prospective contractors:
Are you fully licensed and insured as a plumbing contractor in this state and county?
Will your team handle pulling all necessary plumbing permits and scheduling municipal rough-in inspections?
Does your estimate cover the cost of pressure testing the water supply and flood-testing the shower pan?
What specific warranty do you offer on labor workmanship and installed fixture components?
How are unforeseen issues like corroded subfloor pipes or unexpected framing obstacles handled and billed?
Book a plumber for your remodel to ensure your bathroom project is backed by expert craftsmanship, code compliance, and reliable upfront pricing.
Hidden Problems and How to Budget a Contingency
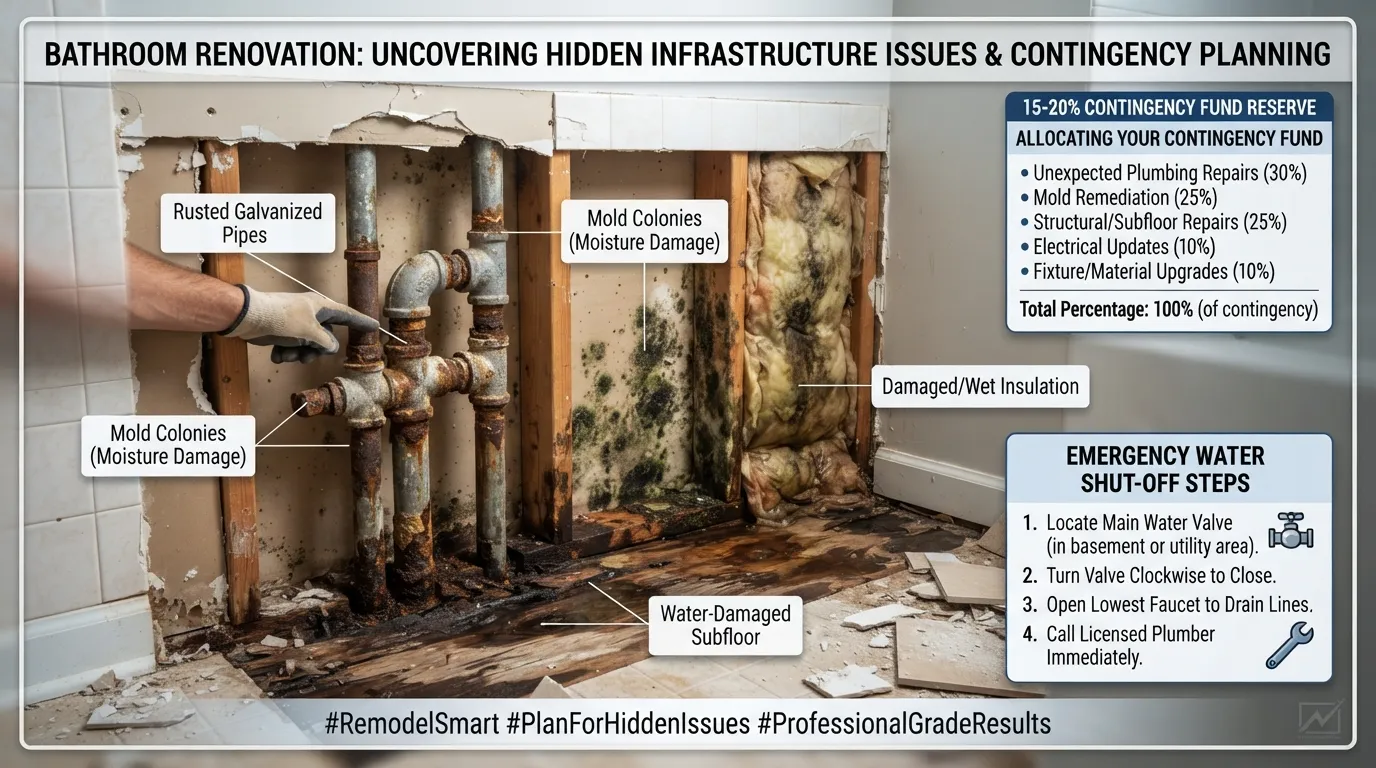
Common Surprises Found Behind Bathroom Walls
Opening up old bathroom walls and subfloors during a remodel frequently reveals hidden deterioration that was completely invisible from the outside. Once finishes are stripped away, contractors often encounter corroded galvanized pipes, water-damaged wooden subfloors, black mold colonies, unvented drain lines, and seized main shut-off valves. Anticipating these realities before swinging the first demolition hammer keeps your project moving forward without stalling over unexpected setbacks.
How Much Contingency to Set Aside
Experienced contractors and industry standards universally recommend setting aside a contingency fund of 15 to 20 percent of your total bathroom remodel budget specifically for hidden repairs. If your renovation involves an older home built more than thirty years ago, increasing your contingency buffer to 25 percent ensures you are financially prepared for extensive subfloor replacement or framing reinforcement.
Calculate your buffer: On a twenty-thousand-dollar remodel, a 20 percent contingency equals four thousand dollars held in reserve.
Avoid project halts: Having readily available cash prevents construction delays when unexpected plumbing or structural issues demand immediate attention.
Treat it as insurance: Consider the contingency fund as essential project insurance rather than optional spending money.
What to Do If You Find a Leak or Burst Pipe Mid-Remodel
Discovering an active leak or a compromised water line during demolition requires swift, decisive action to minimize property damage and protect your home’s structure.
Locate the emergency shut-off: Immediately close the bathroom supply valves or shut off the main water supply to the entire house.
Document the damage: Take clear photos and videos of the exposed issue before cleanup begins for contractor evaluation and potential insurance claims.
Call an emergency plumber: Contact a professional service right away to evaluate the compromised infrastructure, safely cut out damaged sections, and execute code-compliant repairs.
A Real Example From the Field
During a routine bathroom update in a mid-century home, our team removed an old cast-iron bathtub and discovered a slow, unnoticeable seal leak that had been rotting the adjacent subfloor joists for over a decade. Because the homeowner had prudently set aside a 20 percent contingency fund, we were able to sister new lumber to the compromised framing, replace the rotted plywood subfloor, and upgrade the surrounding waste drain without derailing the project timeline or scrambling for emergency financing.
Bathroom Remodel Budget: What Is Realistic?
Typical Cost Ranges by Remodel Level (Cosmetic, Mid-Range, Full)
Setting a realistic budget requires understanding how project scope, material grade, and labor demands scale across different remodeling tiers. The national average for a standard bathroom remodel sits at $16,500, with most homeowners spending between $8,000 and $45,000 depending on layout changes and fixture quality.
| Remodel Level | What’s Included | Plumbing Share | Cost Range |
| Cosmetic Update | Painting, mirror replacement, new vanity swap, standard toilet replacement (no layout changes) | 15% – 20% | $2,000 – $5,000 |
| Mid-Range Remodel | New tub-to-shower conversion, tile surround, vanity, flooring, updated lighting, existing footprint | 25% – 35% | $16,000 – $28,000 |
| Full Gut Renovation | Complete teardown to studs, moving waste/supply lines, new vent stacks, custom shower, premium fixtures | 30% – 40% | $30,000 – $50,000+ |
Where the Plumbing Portion of the Budget Goes
Plumbing typically accounts for 25 to 35 percent of a standard bathroom renovation budget due to the specialized labor and structural precision required behind walls.
Rough-in infrastructure: Installing new supply lines, drain pipes, and vent stacks averages $2,000 to $7,000 depending on whether walls are open.
Fixture installation: Hooking up sinks, faucets, toilets, and shower mixing valves adds $150 to $750 per individual fixture.
Layout relocation: Moving a toilet or main drain more than three feet from its original stack requires cutting concrete slabs or reframing joists, adding $2,500 to $3,500 in specialized labor.
How to Remodel a Bathroom Under $3,000
Executing a bathroom renovation on a strict sub-$3,000 budget is entirely possible if you focus exclusively on surface-level cosmetic upgrades while keeping the existing plumbing layout intact.
Retain the existing footprint: Never move toilets, sinks, or shower drains, as rough-in plumbing changes instantly consume a modest budget.
Paint instead of re-tiling: Apply a mold-resistant, moisture-curated semi-gloss paint to walls and use specialized tile paint or epoxy kits to refresh old wall tiles.
Swap hardware and accessories: Replace dated faucets, cabinet pulls, showerheads, and mirrors with modern, budget-friendly off-the-shelf options.
Refinish instead of replacing: Hire a professional tub-refinishing service to reglaze a scratched or discolored bathtub for a fraction of replacement costs.
Where to Save and Where Not to Cut Corners
Balancing your spending means knowing exactly which items can be sourced economically and which components demand top-tier investment.
Where to save: Choose mid-grade porcelain tiles, stock vanities, and standard mirrors rather than custom luxury millwork.
Where not to cut: Never compromise on waterproofing membranes, shower mixing valves, ventilation CFM capacity, or licensed trade labor. Skimping on these core elements leads directly to structural rot and catastrophic leaks.
How to Compare Quotes Fairly
When evaluating multiple contractor bids, ensure you are comparing identical scopes of work rather than bottom-line totals.
Verify that every quote explicitly includes permits, debris disposal, and material cleanup fees.
Check that licensed plumbers and electricians are itemized with verifiable license numbers and insurance certificates.
Scrutinize allowances for fixtures and tile; low-ball bids often use unrealistic material allowances that trigger expensive change orders later.
Bathroom Remodel Mistakes to Avoid
Top Mistakes Contractors and Plumbers See Most Often
Navigating a bathroom renovation requires strict adherence to sequencing, technical standards, and material specifications. Avoiding common pitfalls prevents costly change orders, structural damage, and code violations.
Choosing Fixtures After Rough-In
What goes wrong: Buying shower valves, freestanding tubs, or vessel sinks after plumbing pipes are already installed often leads to mismatched rough-in heights and costly wall teardowns.
What to do instead: Select and purchase all major plumbing fixtures and finish trim kits before your contractor begins rough-in framing and pipe layout.
Skipping the Shower Pan Flood Test
What goes wrong: Tiling over an un-tested shower pan can result in hidden slab leaks that rot subfloors within months of project completion.
What to do instead: Always plug the drain and perform a mandatory 24-hour flood test on the shower pan before laying any tile.
Installing an Undersized Exhaust Fan
What goes wrong: Choosing a low-CFM or overly noisy exhaust fan leaves lingering moisture trapped in the room, fueling black mold growth.
What to do instead: Calculate your exact room volume and install an exhaust fan rated for at least 1 CFM per square foot with a quiet sound output under 1.5 sones.
Rerouting Fixtures Without a Layout Plan
What goes wrong: Moving toilets, sinks, or showers haphazardly without verifying drain slope and stack locations creates slow drainage and venting gurgles.
What to do instead: Keep existing footprints where possible, or map out precise waste line drops with a licensed plumber before altering layouts.
Hiring Unlicensed Handymen for Plumbing
What goes wrong: Cutting corners with unlicensed labor introduces severe risks of catastrophic leaks, insurance denials, and failed municipal inspections.
What to do instead: Always verify active state licensing, bonding, and general liability insurance before hiring trade contractors.
Tiling Before Rough-In Inspection
What goes wrong: Closing up walls and finishing tile work before municipal inspectors sign off on rough-in pipes can result in forced teardowns.
What to do instead: Schedule and pass all rough-in building and plumbing inspections before hanging drywall or laying floor tile.
Ignoring Old Main Shut-Off Valves
What goes wrong: Attempting to work on old, seized angle stops or main water valves during a remodel turns a simple repair into an emergency flood.
What to do instead: Replace antiquated multi-turn valves with modern quarter-turn ball valves right at the start of demolition.
Confusing Tile with Waterproofing
What goes wrong: Assuming grout and ceramic tile create an impenetrable moisture barrier leads to rotting studs and structural decay behind walls.
What to do instead: Install a continuous liquid or sheet waterproofing membrane directly over cement backer boards prior to tile installation.
Mistake Checklist You Can Use Before Signing a Contract
Before signing any remodeling agreement or handing over a deposit, run through this final pre-construction verification checklist:
Are all selected fixtures, finish trims, and rough-in specifications explicitly listed in the contract scope?
Does the bid itemize permit acquisition, municipal inspection fees, and debris disposal?
Is there a dedicated contingency budget of 15 to 20 percent set aside for hidden surprises?
Have you confirmed who holds liability for replacing damaged or incorrect material deliveries?
Are contractor license numbers, insurance certificates, and workmanship warranties documented in writing?
2026 Bathroom Trends and Their Plumbing Requirements
Popular 2026 Bathroom Trends
Modern bathroom design focuses heavily on spa-inspired minimalism, seamless spatial flow, and integrated smart technology. Homeowners and interior designers are moving away from cluttered, high-maintenance layouts in favor of clean lines, natural textures, and architectural wet rooms. Achieving these high-end aesthetics requires more than surface-level styling; it demands rigorous coordination between modern design choices and the hidden plumbing infrastructure that supports them.
The Plumbing Needed for Each Trend
Integrating contemporary design elements into your renovation introduces specific engineering and rough-in challenges that must be addressed before finishing materials are installed.
| Design Trend | Plumbing Requirement | Things to Plan For |
| Curbless Showers / Wet Rooms | Recessed subfloor pitch, linear trench drain, continuous waterproofing membrane | Subfloor must be dropped or feathered to maintain correct water slope without creating a tripping hazard at the bathroom entry. |
| Wall-Hung Toilets | Steel in-wall carrier tank, concealed supply connection, specific carrier anchoring to studs | Framing must support heavy vertical loads; wall cavity must be deep enough to house the tank and actuator plate assembly. |
| Thermostatic & Smart Showers | Digital mixing valves, dedicated power supply, balanced water pressure lines | Requires accessible service panels for electronic valves and verified water heater capacity to handle high-flow multi-head setups. |
| Freestanding Tubs | Floor-mounted tub filler rough-in, below-floor waste and overflow drain assembly | The exact drain tailpiece must align precisely with the tub’s internal trap; subfloor access is necessary for final waste connections. |
| Wall-Mounted Faucets | Concealed valve rough-in boxes, extended supply lines routed inside wall framing | Wall cavity depth must accommodate mixing valves; spout height and handle clearances must be locked in before tiling. |
What Makes a Bathroom Look High-End Without Overspending
Creating a luxurious, high-end bathroom does not require blowing your entire budget on imported custom millwork or exotic stone slabs. Strategic design choices paired with flawless plumbing execution can deliver an upscale look while keeping costs under control.
Invest in hero surfaces: Splurge on one statement feature—such as a striking linear shower drain or an artisanal tile accent wall—and keep surrounding materials clean and budget-friendly.
Coordinate finish hardware: Match your sink faucets, shower trims, and cabinet pulls in a cohesive finish like brushed brass or matte black to elevate the entire visual composition.
Keep plumbing lines concealed: Opt for wall-mounted or minimalist concealed valves that reduce visual clutter and make cleaning effortless.
Prioritize installation quality: Even affordable tiles and stock vanities look expensive when installed with precise grout lines, perfect waterproof seals, and professional trade craftsmanship.
Small Bathroom vs Master Bathroom Considerations
Small Bathroom Remodel: Space-Saving Plumbing Ideas
Remodeling a compact powder room or a tight hallway bathroom requires creative space planning to maximize functionality without overwhelming the limited square footage. Strategic plumbing choices can make a small bathroom feel open and uncluttered while ensuring every fixture operates efficiently.
Corner sinks and wall-hung basins: Free up valuable floor space by installing wall-mounted sinks or corner vanities that expose more flooring, visually expanding the room.
Compact and skirted toilets: Choose space-saving elongated toilets with a shortened projection or skirted trapways that fit comfortably into tight clearances.
Tub-to-shower conversions: Replacing a bulky traditional bathtub with a sleek, walk-in shower stall eliminates dead weight and creates an open, accessible washing area.
Recessed storage solutions: Build recessed medicine cabinets and shower niches directly between wall studs to provide storage without encroaching on floor space.
Master Bathroom Remodel: Double Vanities, Soaking Tubs and Larger Showers
Expanding or remodeling a primary master bathroom allows for luxury fixtures and dual-user conveniences, but it also places a heavy burden on your home’s underlying plumbing and water heating infrastructure.
Dual-sink supply and drainage: Installing a double vanity requires running separate hot and cold supply lines, independent P-traps, and vented drain branches to prevent pressure drops when both sinks run simultaneously.
Increased water heater demand: Large soaking tubs and multi-head shower systems demand substantial hot water capacity, often necessitating an upgrade to a high-capacity tankless water heater.
Advanced venting and drainage: Adding a secondary wet zone or freestanding tub requires careful calculation of your main stack’s drainage capacity to ensure rapid, gurgle-free wastewater removal.
Bathroom Size vs Plumbing Complexity
| Feature / Metric | Small Bathroom / Powder Room | Master Bathroom / Primary Suite |
| Footprint & Layout | Compact (typically 20 to 45 sq. ft.) | Spacious (often 80 to 150+ sq. ft.) |
| Plumbing Fixture Count | 2 to 3 fixtures (sink, toilet, small shower/tub) | 4 to 6+ fixtures (double vanity, toilet, soaking tub, multi-head shower, bidet) |
| Supply & Demand Load | Low; minimal risk of simultaneous high-volume water use | High; simultaneous use requires balanced pressure and upgraded supply lines |
| Water Heating Requirements | Standard water heater capacity is usually sufficient | High demand; frequently requires tankless or high-capacity hybrid water heaters |
| Rough-in & Structural Complexity | Straightforward; minor adjustments to existing footprint | Complex; often involves concrete slab cutting, framing alterations, and multi-vent routing |
Free Bathroom Remodel Plumbing Checklist
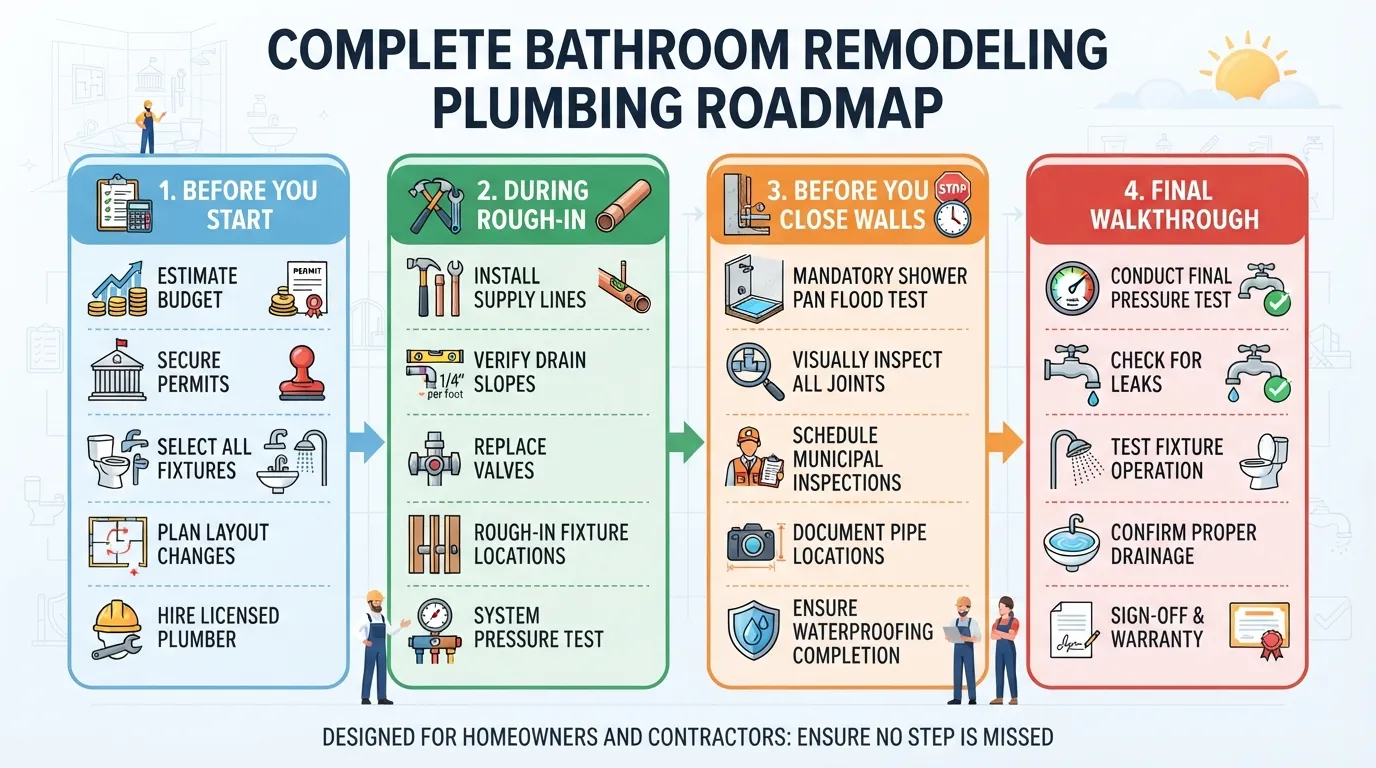
Before You Start Checklist
Preparation is the foundation of a successful renovation. Complete these essential steps before scheduling contractors or purchasing materials:
Set a comprehensive project budget that includes a dedicated 15 to 20 percent contingency fund for hidden surprises.
Verify whether your municipality requires building and plumbing permits for your specific scope of work.
Select and finalize all major plumbing fixtures—including sinks, faucets, toilets, and shower valves—to ensure exact rough-in specifications are known.
Verify your home’s main water shut-off valve is fully operational and accessible.
Assess your existing water heater capacity to ensure it can handle your proposed showerhead flow rates or soaking tub volume.
Interview and vet licensed plumbing contractors, confirming active state licensing, bonding, and general liability insurance.
Secure written, itemized quotes that detail labor, materials, permit handling, and debris cleanup responsibilities.
During Rough-In Checklist
As demolition wraps up and framing opens, monitor the rough-in plumbing phase closely to ensure code compliance and structural integrity:
Map out precise supply line locations and waste pipe slopes with your licensed plumber before drilling into studs or joists.
Replace antiquated multi-turn water supply valves with modern quarter-turn ball valves.
Verify that new drain lines maintain the proper downward slope of one-fourth inch per foot toward the main stack.
Ensure all vent stacks are correctly tied into the home’s primary venting system to prevent sewer gas leaks and slow drainage.
Check that shower mixing valve heights and spout placements match your chosen fixture and tile trim specifications.
Confirm that pressure testing is performed on all new supply lines to detect potential joint leaks under pressure.
Review framing reinforcements to ensure load-bearing walls or floor joists were not compromised during pipe routing.
Before You Close the Walls Checklist
Never hang drywall or cement backer boards until you have verified every component hidden behind the structure:
Perform a mandatory 24-hour shower pan flood test to guarantee the waterproof liner and drain seal hold water without any drop in level.
Apply a continuous liquid or sheet waterproofing membrane directly over all wet-zone backer boards.
Schedule and officially pass your municipal rough-in plumbing and building inspections.
Take detailed high-resolution photographs and videos of all hidden pipe runs and electrical lines for future reference.
Check that insulation is properly installed in exterior walls to prevent freezing pipe risks during winter months.
Verify that all backing blocks for grab bars, vanities, and wall-hung fixtures are securely fastened to framing studs.
Clean out all construction debris, wood scraps, and dust from wall cavities before sealing them up.
Final Walkthrough Checklist
During the final inspection and punch list review, ensure every fixture operates at peak performance before making final contractor payments:
Test every sink, shower, and tub faucet for smooth hot and cold water delivery, balanced pressure, and zero leaks.
Check under all vanity basins and around toilet base connections for any signs of slow seepage or loose fittings.
Run a full flush test on toilets to ensure powerful, clear waste removal without gurgling.
Verify that shower drain flow rates match or exceed your showerhead’s maximum gallons-per-minute output.
Test mechanical exhaust fans to ensure quiet operation (under 1.5 sones) and adequate humidity clearance.
Inspect all silicone caulking around tubs, shower bases, and vanity backsplashes for smooth, complete seals.
Obtain your signed final municipal inspection certificate, contractor workmanship warranty documents, and manufacturer fixture manuals.
Download the Printable PDF
To keep this complete plumbing roadmap handy on the job site or attach it to your contractor agreement, download our formatted guide:
Download the Free Bathroom Remodel Plumbing Checklist (PDF) — A complete, print-ready punch list designed to keep your renovation organized, code-compliant, and on budget from demo day to final walkthrough.
Frequently Asked Questions
What do I wish I knew before my bathroom remodel?
Homeowners often wish they had budgeted a 15 to 20 percent cash contingency fund for hidden damages like corroded pipes and rotted subfloors. Choosing all fixtures before rough-in framing is essential to prevent costly alignment errors, delays, and unexpected change orders.
What is the correct order to remodel a bathroom?
The correct renovation sequence starts with careful planning and permits, followed by demolition, rough-in plumbing and electrical, framing inspections, waterproofing, wall and floor tiling, fixture installation, and finally, finish painting and detailing.
What should I choose first when remodeling a bathroom?
Always select your major plumbing fixtures—such as the bathtub, shower valve, sink basins, and toilet—before construction begins. Knowing their precise rough-in dimensions dictates how plumbers configure water supply lines and drain heights.
What is the hardest part of a bathroom remodel?
Uncovering hidden infrastructure issues behind old walls, such as black mold, deteriorated subfloors, and outdated galvanized pipes, is universally considered the hardest part. These surprises require immediate remediation and professional plumbing services before aesthetic work can resume.
What is the overlooked requirement before a bathroom remodel?
Checking water heater capacity and calculating exhaust fan CFM ratings are frequently overlooked. Upgrading to a high-flow multi-head shower without verifying hot water supply or proper ventilation will lead to lukewarm showers and humidity damage.
What not to do in a bathroom remodel?
Never skip the 24-hour shower pan flood test, ignore waterproofing membranes behind tile, or hire unlicensed handymen for complex plumbing changes. Skipping these critical steps guarantees catastrophic leaks and structural rot.
What is a realistic budget for a bathroom remodel?
A standard mid-range bathroom remodel realistically costs between $16,000 and $28,000, with plumbing labor and materials accounting for 25 to 35 percent of that total. Cosmetic updates can cost significantly less if the existing layout remains untouched.
What makes a bathroom look high-end?
Achieving an upscale look relies on investing in hero surfaces like artisanal tile accents, coordinating finish hardware in brushed brass or matte black, maintaining flawless grout lines, and keeping plumbing lines concealed.
Do I need a permit to remodel a bathroom?
Yes, permits are typically required if your project involves moving plumbing drain lines, altering electrical circuits, changing structural framing, or replacing a water heater. Cosmetic updates like painting usually do not require permits.
Can I update a bathroom without renovating the whole thing?
Yes, you can execute a budget-friendly cosmetic refresh by painting walls, swapping out cabinet hardware, replacing mirrors, refinishing an old bathtub, and changing out sink faucets without altering the underlying plumbing footprint.
How long does a bathroom remodel take?
A standard mid-range bathroom renovation typically takes between three to six weeks from demolition day to final walkthrough. Full gut remodels involving structural framing and concrete slab cutting may extend timeline requirements further.
Conclusion and Next Steps
Key Takeaways
Transforming your bathroom from a dated necessity into a stunning, functional sanctuary requires meticulous planning, strict adherence to building codes, and a thorough understanding of hidden infrastructure. Keeping these core principles in mind will protect your investment and prevent costly mistakes:
Plan rough-ins early: Finalize all major fixtures, rough-in heights, and supply locations before demolition begins to prevent alignment errors and expensive change orders.
Prioritize waterproofing: Never skimp on continuous liquid waterproofing membranes and mandatory 24-hour shower pan flood tests to safeguard against catastrophic leaks and mold.
Build a realistic contingency fund: Always set aside 15 to 20 percent of your total budget to absorb unexpected subfloor rot or corroded pipe repairs behind walls.
Know your limits: Handle cosmetic updates like painting or accessory swaps yourself, but always rely on a licensed professional for supply line relocations, gas work, and valve replacements.
Inspect and verify: Schedule municipal rough-in inspections and complete a thorough final walkthrough punch list before making your final contractor payments.
Ready to Start Your Bathroom Remodel Plumbing?
Navigating the complexities of rough-in plumbing, code compliance, and fixture installation does not have to be overwhelming. Partnering with experienced professionals ensures your bathroom renovation is built on a rock-solid, leak-free foundation. Our licensed team brings decades of local expertise to every project, guaranteeing precision craftsmanship from initial teardown to final inspection.
Book Your Plumber today to secure expert plumbing support, transparent estimates, and reliable scheduling for your upcoming bathroom remodel.
Main Services
Related Posts
Need a Plumber in Miami?
Schedule service online or speak directly with the EZ Plumbing team.
Owner-Led Local Service
Know who is behind the business before you request service. The owners, contact line and Miami service pages are published clearly.
- Named business owners
- Direct phone and social channels
- Local Miami service information
Clear Help Before You Book
Review the relevant service page, contact the team directly and use the booking page when you are ready—without relying on vague claims.
- Service-specific information
- Direct questions before scheduling
- Clear online booking route