
Garbage Disposal Maintenance: 7 Tips to Keep It Running Smoothly
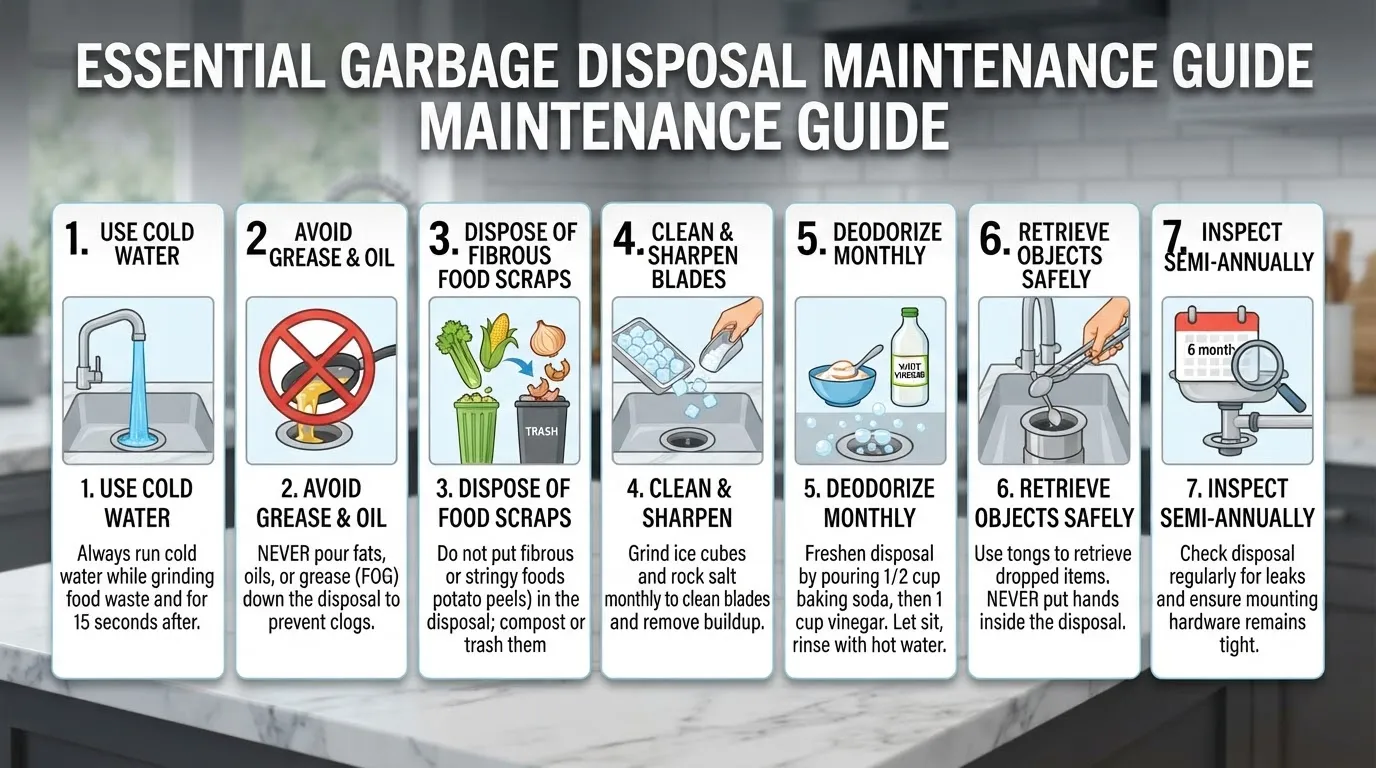
7 Garbage Disposal Maintenance Tips
Maintaining your food waste disposer prevents stubborn clogs, unpleasant odors, and expensive plumbing repairs. A few simple daily habits keep your unit running smoothly and extend its lifespan significantly.
The 7 Essential Tips at a Glance
Run cold water: Always run a steady stream of cold water before, during, and after operating your garbage disposal to solidify and flush away fats.
Feed small amounts: Introduce food scraps gradually rather than stuffing the hopper to prevent motor jams and overload.
Never pour grease: Keep fats, oils, and grease out of the disposal because they coat the blades and build up inside pipes.
Avoid fibrous and hard items: Skip tough materials like celery stalks, corn husks, bones, and fruit pits that wrap around components or dull blades.
Clean monthly: Grind a handful of ice cubes along with coarse salt or baking soda to dislodge built-up grime and sharpen the impeller edges.
Deodorize with citrus: Toss in lemon or lime wedges to naturally neutralize foul odors and freshen the grinding chamber.
Never put hands inside: Always disconnect the power source before attempting to retrieve dropped items or inspect internal components.
Why Disposal Maintenance Matters
Routine upkeep prevents unexpected clogs, persistent odors, and mechanical jams that lead to costly plumbing repairs. Establishing these proactive habits ensures your unit operates efficiently for years to come.
How to Use Your Garbage Disposal the Right Way Every Day
Proper daily habits prevent premature wear, motor burnouts, and messy backups. Correct operation ensures food waste is efficiently processed and safely carried away through your drain line.
Always Run Cold Water Before, During and After Use
Always turn on a steady stream of cold water before activating your unit, keep it running while grinding, and let it flow for 15 to 20 seconds after turning the disposal off. Cold water is essential because it keeps fats and oils in a solid state so the unit’s components can chop them up and flush them down the drain line instead of coating your pipes.
How Long Should You Run a Garbage Disposal?
Most food waste items clear the grinding chamber within 5 to 15 seconds, meaning you rarely need to run the unit for more than 30 seconds at a time. The popular “30-second rule” refers to the maximum continuous run time recommended for standard residential horsepower units to prevent motor overheating. Running a disposal past this threshold without a break can strain the motor, even if the grinding process sounds finished.
Feed Waste Slowly in Small Amounts
Feed scraps into the grinding chamber gradually rather than dumping large masses all at once. Inside the unit, food is pulverized by the rotating impeller (often called blades) against the stationary grind ring walls. Overloading this chamber chokes the mechanism, causing food to back up and jam the drain line.
Is It Okay to Run a Garbage Disposal Dry?
Never operate your garbage disposal without water running or when the chamber is completely empty. Running a unit dry generates intense friction and heat, which can quickly warp rubber components, damage the internal seals, and burn out the motor.
Continuous Feed vs. Batch Feed: Any Difference in Care?
Continuous feed models allow you to add waste while the unit is running via an open sink baffle, whereas batch feed models require a specialized stopper to be twisted in place before activation. While batch units offer an extra layer of safety by preventing accidental hand entry, both types require identical care, cold water usage, and waste-feeding habits.
Practical Insight Box: “The 3-Habit Rule”
Professional plumbers emphasize three simple daily practices that prevent most service calls:
Always use cold water: Run it before, during, and after every use to solidify greases.
Feed small amounts: Drop scraps in gradually to avoid overwhelming the motor and drain line.
Never overload: Process waste in batches rather than stuffing the grinding chamber to capacity.
What You Can and Can't Put Down a Garbage Disposal
Knowing exactly what belongs in your disposal prevents the vast majority of mechanical jams, stubborn clogs, and costly plumbing service calls. While the grinding chamber safely pulverizes soft daily food waste, treating your unit like a standard trash can will inevitably destroy the motor and block your drain line.
Safe to Grind vs. Never Grind
Stick to soft, biodegradable food scraps that easily dissolve in water to keep your drain flowing smoothly. For an exhaustive breakdown of model-specific capabilities, always consult your manufacturer’s official use-and-care guide.
| Item | Safe? | Why |
| Small soft food scraps | Yes | Pulverizes easily and flows smoothly through the drain line without buildup. |
| Citrus peels | Yes | Small amounts freshen the chamber and naturally combat foul odors. |
| Ice | Yes | Helps dislodge stuck debris and cleans the grind ring components. |
| Grease, oil, fats | No | Liquid when hot, but solidifies into massive, stubborn blockages in pipes. |
| Coffee grounds | No | Form a dense, sludgy paste that settles and completely blocks the P-trap. |
| Eggshells | No | The inner membrane wraps around the impeller; shells grind to a heavy sand. |
| Pasta & rice | No | Starchy foods absorb water, expanding into thick, glue-like clogs. |
| Potato peels | No | Turn into a dense, starchy paste that stops the impeller from spinning. |
| Celery & corn husks | No | Fibrous strings wrap tightly around moving parts, causing instant motor jams. |
| Bones & fruit pits | No | Too hard for standard units; dulls components and risks motor burnout. |
| Onion skins | No | The thin outer membrane slips past the grind ring and clogs the drain. |
| Non-food items | No | Glass, plastic, twist ties, and metal quickly destroy internal components. |
Why Grease Is the #1 Enemy
Hot grease, cooking oils, and animal fats are the leading causes of catastrophic plumbing failures because they change state inside your pipes. While liquid when poured into the sink, grease rapidly cools and hardens as it travels down the drain line.
This hardened fat coats the inner walls of your plumbing, capturing other food debris like a sticky trap. Over time, this thick buildup completely chokes the pipe, often requiring expensive professional hydro-jetting to remove.
Fibrous, Starchy and Hard Items Explained
Different prohibited items attack your garbage disposal in entirely different ways. Starchy foods like pasta, rice, and potato peels act like sponges, rapidly absorbing water and swelling into an impenetrable paste that traps other waste.
Fibrous materials like celery stalks, corn husks, and onion skins bypass the chopping action entirely. Their tough, thread-like strings twist around the impeller assembly, blinding the mechanism until the motor completely seizes.
Hard items like beef bones and large fruit pits create immediate trauma to the disposal. They bounce violently around the grinding chamber, blunting the metal components and potentially cracking the unit’s outer housing.
5 Common Mistakes That Ruin Disposals
Homeowners unintentionally destroy their disposals by practicing a few easily avoidable bad habits. Correcting these mistakes immediately extends the life of your appliance and prevents frequent pipe clogs.
Overloading the chamber: Shoving massive plates of food into the hopper all at once completely overwhelms the motor.
Pouring hot grease: Flushing fats with hot water only pushes the liquid grease further down the plumbing line before it solidifies.
Grinding the wrong items: Treating the unit like a trash bin by tossing in non-food items, eggshells, and coffee grounds guarantees a clog.
Running without water: Dry grinding creates extreme friction and heat that burns out the motor and warps internal seals.
Ignoring odd noises: Continuing to run the disposal while it hums, rattles, or grinds metallic objects forces the motor to overheat and trip the breaker.
Why Do Plumbers Dislike Garbage Disposals?
Plumbers often caution against heavy garbage disposal use because they constantly see the expensive aftermath of user error and plumbing system overloading. Most homeowners mistakenly treat disposals as primary trash receptacles rather than tools for managing incidental plate scrapings.
When excess food waste is forced down the drain line instead of the trash or compost pile, it dramatically increases the organic load in the P-trap and municipal sewer lines. However, most plumbers agree that when used strictly for minor, soft scraps alongside plenty of cold water, disposals remain perfectly safe and highly convenient appliances.
Garbage Disposal Myths vs. Facts
Sorting plumbing folklore from actual maintenance best practices prevents unintended damage to your kitchen sink. Many common kitchen hacks sound clever, but they can actually degrade your unit or compromise your plumbing lines over time.
Is It Good to Put Ice Cubes Down a Garbage Disposal?
Putting ice cubes down your disposal is entirely safe and beneficial, but with one important clarification: ice does not sharpen the components. Garbage disposals do not have traditional razor-sharp blades; instead, they feature blunt impellers that pulverize food against a stationary grind ring. However, churning a handful of ice cubes (optionally mixed with rock salt) helps scour away stubborn food residue and congealed grease from the chamber walls.
Are Lemon Peels Good for a Garbage Disposal?
Lemon and orange peels are great for neutralizing foul odors and releasing fresh citrus oils into your kitchen. To use them safely, always cut the citrus into small pieces before feeding them in gradually with a steady stream of cold water. Avoid tossing in massive chunks or overusing them, as large pith fragments can tangle around the internal mechanism.
Is It Okay to Pour Boiling Water Down a Garbage Disposal?
Pouring boiling water directly into your disposal is generally discouraged for two major reasons. Extremely hot water can warp rubber components, damage splash guards, and soften PVC pipe fittings under the sink. Furthermore, boiling water melts fats and oils in the drain line, allowing them to travel further down your plumbing before cooling and solidifying into a stubborn blockage. A safer alternative is to run cold water during operation and use warm, soapy water for routine cleaning.
Is It Okay to Pour Vinegar Down a Garbage Disposal?
Occasional use of white vinegar is safe and helpful for managing light odors and buildup. Many homeowners combine baking soda and vinegar to create an active fizzing reaction that lifts organic grime from the chamber walls. However, this reaction is mostly mechanical bubbling and will not dissolve tough clogs or clear out heavy grease.
Can You Lubricate a Garbage Disposal?
Most modern residential garbage disposals come equipped with permanently lubricated, sealed motor bearings that never require manual oiling. Attempting to force household lubricants or oils into motor housings can damage internal electrical components. Always check your specific manufacturer manual before attempting any maintenance beyond basic cleaning.
Do Chemical Drain Cleaners Belong in a Disposal?
Harsh chemical drain cleaners should never be used in a garbage disposal. These commercial products contain potent caustic or acidic formulas that can splash back out of the sink, eat through rubber seals, and corrode metal housing components. If a clog occurs, rely on manual clearing tools or a professional plumber instead of chemical fixes.
Quick Reference Table: Myth / Verdict / Reason
| Myth / Common Belief | Verdict | Reason |
| Ice sharpens disposal blades | Myth | Disposals use blunt impellers, not sharp blades; ice cleans residue instead of sharpening steel. |
| Citrus peels deodorize the unit | Fact | Natural citrus oils neutralize sulfur odors safely when cut into small pieces and flushed with cold water. |
| Boiling water cleans the pipes | Myth | Extreme heat can warp PVC fittings and melt grease deeper into the main drain line. |
| Baking soda and vinegar clear clogs | Partial Fact | Fizzing lifts surface grime and freshens smells, but it lacks the power to dissolve solid blockages. |
| Disposals need regular oiling | Myth | Residential units feature permanently sealed, lubricated bearings that require no user maintenance. |
| Chemical drain cleaners fix jams | Myth | Harsh chemicals corrode metal, degrade rubber seals, and present severe splash-back safety hazards. |
How to Clean a Garbage Disposal Step by Step
Deep cleaning your garbage disposal eliminates trapped food particles and neutralizes stubborn bacteria. Following a structured multi-step routine keeps your sink smelling fresh and extends the lifespan of your unit.
Safety First: Turn Off Power Before You Start
Always unplug the disposal under the sink or flip the dedicated circuit breaker before performing any maintenance. Never put your hands inside the grinding chamber under any circumstances. Use long-handled tongs or pliers to safely retrieve visible foreign objects or debris.
Step 1: Clean the Splash Guard (Baffle)
The rubber splash guard is a primary hidden source of foul kitchen odors due to slime accumulation on its underside. Remove the baffle if your model allows, or scrub both sides thoroughly using a long-handled brush and dish soap.
Step 2: Grind Ice and Rock Salt
Fill the empty grinding chamber completely with ice cubes and add a half-cup of rock salt. Run cold water and turn on the disposal until all the ice is pulverized to scour away congealed grease and food residue.
Step 3: Baking Soda and Vinegar Foam Treatment
Pour a half-cup of baking soda down the drain followed by one cup of white vinegar. Let the mixture fizz and foam for 10 to 15 minutes to break down organic slime before flushing it thoroughly with warm water.
Step 4: Citrus Peel Refresh
Drop small lemon or orange peel wedges into the running disposal while keeping a steady stream of cold water flowing. The natural citrus oils will deodorize the grinding chamber and leave your sink smelling clean.
Step 5: Clear the Drain Trap (P-Trap)
Place a bucket underneath the sink P-trap to catch residual water before unscrewing the slip nuts by hand. Clean out any trapped sludge or debris from inside the curved pipe before reassembling and tightening the connections securely.
Should You Use Store-Bought Disposal Cleaners?
Commercial foaming cleaning pods and specialized disposal tablets offer a convenient alternative for routine maintenance. While they effectively cut through grease and freshen the unit, they should complement—rather than replace—manual scrubbing and ice treatments.
What We Found When Testing Cleaning Methods
Hands-on testing reveals that combining mechanical scouring (ice and salt) with chemical deodorizing (baking soda and vinegar) yields the best results. Ice and salt physically strip away stubborn black slime from the impellers, while vinegar and baking soda eliminate lingering odors that scrubbing alone misses.
How to Get Rid of Garbage Disposal Smell for Good
Persistent kitchen sink odors indicate organic buildup trapped within internal components or connected plumbing lines. Masking foul smells with temporary fresheners only treats symptoms; eliminating the root cause requires targeted cleaning and proper plumbing inspection.
Why Your Garbage Disposal Smells
Foul odors stem from specific buildup areas across your sink assembly:
Decaying food waste: Microscopic food particles trapped on the underside of the rubber splash guard and along the upper chamber walls rot and breed bacteria.
Grease film: Accumulated fat layers coat the interior walls and P-trap, absorbing foul gases and organic waste.
Dishwasher drain connection: Backflow from a poorly positioned dishwasher hose can introduce stagnant food particles and gray water into the disposal inlet.
Quick Fixes vs. Long-Term Fixes
| Approach | Method | Best For |
| Quick Fix | Grinding citrus peels or running ice cubes | Masking temporary odors and clearing surface residue |
| Quick Fix | Baking soda and vinegar fizz treatment | Neutralizing light organic acids in the chamber |
| Long-Term Fix | Scrubbing the splash guard and chamber walls | Removing bacteria-harboring slime at the source |
| Long-Term Fix | Cleaning the P-trap and dishwasher drain line | Stopping trapped sludge and backflow gases permanently |
When the Smell Won’t Go Away
If rigorous cleaning and deodorizing fail to eliminate persistent odors, the issue likely originates deeper within your plumbing system. A clogged P-trap, a blocked roof plumbing vent, or sludge buildup further down the main drain line can trap sewer gases right at your sink basin. When DIY efforts fall short, scheduling professional drain cleaning ensures hidden blockages and bacterial sources are completely cleared from your pipes.
Garbage Disposal Maintenance Schedule and Checklist
Establishing a consistent maintenance schedule prevents unexpected breakdowns, eliminates foul odors, and protects your plumbing system. Breaking tasks down into manageable timeframes ensures your food waste disposer remains in peak operating condition year-round.
Daily and Weekly Habits
Building simple daily and weekly routines takes only moments but prevents heavy grease and food residue buildup:
Daily: Always run a steady stream of cold water before, during, and after use. Feed food scraps in small quantities and never pour grease or oils down the drain.
Weekly: Run a handful of ice cubes through the unit to scour away surface film, and flush the system thoroughly with warm, soapy water.
Monthly Deep Clean
Performing a monthly deep clean eliminates the organic slime and bacteria responsible for kitchen odors:
Scrub the splash guard: Remove or wipe down both sides of the rubber baffle using dish soap and a long brush.
Scour the chamber: Grind a full tray of ice cubes combined with a half-cup of rock salt.
Deodorize with foam: Pour baking soda followed by white vinegar down the drain, let it fizz for 15 minutes, and flush with warm water.
Every 6 to 12 Months: Inspection
Conducting a semi-annual or annual physical inspection catches minor wear before it turns into an expensive plumbing emergency:
Check for leaks: Inspect the body, reset button area, and P-trap connections for water droplets or dampness.
Inspect mounting assembly: Ensure the sink flange and mounting ring are tightly secured and free of wobbling.
Examine gaskets and hoses: Look for rubber degradation around the splash guard and check the dishwasher drain hose connection for tightness and wear.
Going on Vacation or Leaving the Home Empty
Leaving a garbage disposal idle for extended periods can cause internal components to rust, seize up, or breed foul stagnant odors:
Clean thoroughly before leaving: Perform a full ice and baking soda treatment to remove all organic waste particles.
Run water upon return: When you come back home, run the disposal with cold water for 30 seconds to re-lubricate seals and clear the lines before normal use.
Printable Maintenance Schedule Checklist
| Frequency | Maintenance Task | Time Needed |
| Daily | Use cold water; feed waste slowly; avoid grease | 1 minute |
| Weekly | Run ice cubes; flush with soapy water | 2 minutes |
| Monthly | Deep clean baffle, ice/salt scour, and baking soda fizz | 10 minutes |
| Semi-Annually | Inspect for leaks, corrosion, and loose mounting hardware | 15 minutes |
Garbage Disposal Troubleshooting: Humming, Jammed, Dead, Slow or Leaking
Diagnosing garbage disposal malfunctions quickly can save you from costly emergency plumbing bills. Most common issues—ranging from a sudden hum to a completely silent unit—can be resolved safely with basic troubleshooting tools.
Quick Diagnosis Table
| Symptom | Likely Cause | DIY Fix | Call a Plumber If |
| Humming / Not Spinning | Object jammed between impellers and grind ring | Unplug power, use hex key to free flywheel, press reset | The motor stays locked or trips immediately after clearing |
| Completely Dead | Tripped overload button or blown fuse | Press the red reset button; check wall switch and breaker | The unit remains completely unresponsive after resetting power |
| Draining Slowly | Sludge accumulation in P-trap or drain line | Clean out the trap or schedule drain cleaning service | Clearing the trap does not resolve the backup |
| Leaking Water | Loose mounting flange, gasket wear, or cracked body | Tighten bolts or arrange leak detection and repair | The disposal housing itself is cracked and leaking |
| Flooding Cabinet | Severe pipe separation or major seal failure | Turn off water supply and call an emergency plumber immediately | Water is rapidly damaging cabinetry and flooring |
Garbage Disposal Humming but Not Spinning
A distinct humming noise without any motor rotation means an object or food debris has jammed the flywheel, preventing the impellers from moving. Leaving the power on while the unit hums will quickly overheat and burn out the motor winding.
Garbage Disposal Completely Dead
If flipping the wall switch produces absolute silence with no humming sound, the unit’s internal electrical safety breaker has likely tripped. Power interruptions can also stem from a tripped GFCI outlet under the sink or a blown main circuit breaker.
How to Use the Reset Button and Hex Key Safely
Cut the power: Unplug the disposal cord from under the sink or flip off the dedicated circuit breaker to ensure total safety.
Locate the reset button: Find the red thermal overload button on the bottom exterior housing and push it firmly inward until it clicks.
Insert the hex key: Fit an Allen wrench (hex key) into the hexagonal socket located right in the dead center of the disposal’s bottom plate.
Rotate back and forth: Work the wrench back and forth to manually free whatever object or residue is locking up the internal flywheel.
Clear debris: Look inside the top chamber using long-held tongs to remove any dislodged items before restoring power and testing.
Garbage Disposal Draining Slowly
When water pools in your sink basin instead of flowing away smoothly, a partial blockage has formed in the P-trap or main branch drain line. Starch paste, grease films, and coffee grounds frequently accumulate inside these curved pipes, choking the flow rate.
Garbage Disposal Leaking
Pinpointing the exact source of a leak determines whether a simple tightening will fix it or if the unit must be replaced. Water originating from the top sink flange indicates a failed plumber’s putty seal, while leaks from the side dishwasher inlet point to a loose hose clamp. If water leaks directly out of the metal motor housing seams, the internal shell has corroded and the entire unit must be replaced.
When the Problem Isn’t the Disposal
If multiple fixtures—such as your secondary sink, shower, or washing machine drain—begin backing up simultaneously, the issue is not your garbage disposal. This symptom indicates a blockage deep within your home’s main lateral drain pipe or a severe sewer line problem that requires professional sewer clearing equipment.
Special Situations: Septic Systems, Dishwashers and Rentals
Unique household setups, alternative waste systems, and rental agreements require tailored maintenance approaches. Navigating septic tanks, dishwasher connections, and regional water conditions prevents premature equipment failure and costly property disputes.
Is a Garbage Disposal Bad for a Septic System?
Garbage disposals are not strictly forbidden with septic systems, but they significantly increase the solid organic waste load entering your tank. Because septic tanks rely on bacterial breakdown for solid waste, pulverized food scraps can quickly overwhelm the system, increase sludge accumulation, and require more frequent professional pumping. If you operate a septic system, use your disposal sparingly, stick exclusively to soft food scraps, and consult a local septic professional regarding your tank capacity.
Caring for the Dishwasher Drain Connection
Your dishwasher drains wastewater directly through a hose connected to the side inlet port of your garbage disposal. On new installations, remember to punch out and remove the internal plastic knockout plug inside the disposal inlet so wastewater can actually pass through. Periodically inspect this rubber hose connection under the sink for kinks, loose clamps, or clogs caused by trapped food debris flowing backward from the disposal chamber.
Rental Homes and Apartments: What to Fix Yourself vs. Report to the Landlord
Living in a rental property means distinguishing between basic tenant upkeep and major plumbing repairs that are the landlord’s responsibility:
Tenant responsibilities: Performing routine cleaning, avoiding prohibited food waste items, using cold water, and clearing minor jams using the external hex wrench.
Landlord responsibilities: Repairing electrical wiring faults, replacing worn-out mounting assemblies, fixing structural pipe leaks, or replacing a burned-out motor unit.
South Florida Considerations
Regional water conditions heavily influence how quickly internal buildup and mineral scale accumulate inside plumbing fixtures. Hard water high in calcium and magnesium content leaves stubborn mineral deposits that interact with soap scum and food residue, accelerating scale buildup along disposal walls and drain lines. Regular preventative cleaning is especially crucial in mineral-heavy regions to keep drainage systems flowing freely.
When to Call a Plumber or Replace Your Garbage Disposal
Knowing when to transition from DIY fixes to professional service prevents minor kitchen disruptions from turning into major plumbing emergencies. Recognizing the warning signs of equipment failure helps you make a cost-effective choice between a simple repair and a full system replacement.
7 Warning Signs You Need a Professional
Repeated jams: If the unit locks up constantly even when feeding soft foods, internal impeller wear is likely to blame.
Persistent water leaks: Moisture leaking from the metal housing seams indicates internal seal failure or shell corrosion.
Burning smell: An acrid electrical odor points to motor overheating or worn-out internal windings.
Loud, unusual grinding: Metallic screeching or rattling noises mean loose components or broken grind rings are damaging the interior.
Recurring slow drains: Chronic backups that return immediately after clearing point to deep branch line or plumbing vent obstructions.
Visible rust: Orange corrosion around the bottom casing or sink flange signals structural breakdown.
Tripping breaker: A disposal that constantly trips the reset button or wall circuit breaker indicates an internal electrical short.
How Long Does a Garbage Disposal Last?
A standard garbage disposal typically lasts between 8 to 12 years with proper maintenance and mindful usage. Entry-level models with plastic grinding components often fail closer to the 8-year mark, while high-end stainless steel units backed by robust motors can operate reliably for up to 15 years.
Repair or Replace? A Simple Decision Guide
| Unit Age | Minor Issue (Jam / Reset Needed) | Major Issue (Housing Leak / Motor Failure) |
| Under 5 Years | Repair | Repair or Replace |
| 5 to 10 Years | Repair | Consider Replacing |
| Over 10 Years | Consider Replacing | Replace |
What a Plumber Will Check During a Service Visit
When a licensed plumber evaluates your disposal setup, they look beyond the appliance itself to ensure the entire assembly meets code and operates safely. A comprehensive service inspection includes:
Testing electrical voltage, wall switches, and under-sink GFCI circuits.
Inspecting the sink flange, plumber’s putty seal, and mounting ring security.
Checking the dishwasher drain hose and inlet port for backflow risks.
Evaluating the P-trap alignment and connecting branch drain lines for hidden buildup.
If your troubleshooting efforts fall short or your unit has reached the end of its operational lifespan, you can schedule a plumbing appointment to have a professional inspect, repair, or replace your garbage disposal safely.
Garbage Disposal Maintenance FAQs
Find quick, authoritative answers to the most common questions homeowners ask about garbage disposal care, troubleshooting, and daily operation.
What’s the longest you should run a garbage disposal?
You should typically run a garbage disposal for no longer than 15 to 30 seconds at a time. Let cold water flow continuously while the unit operates until the grinding sound stops, indicating that all food waste has been fully pulverized and cleared down the drain line.
What are the best maintenance tips for a garbage disposal?
The best maintenance practices include always using cold water when operating the unit, feeding food scraps in small quantities, and avoiding fibrous or starchy items like potato peels and grease. Regularly scour the chamber with ice cubes and clean the splash guard to prevent organic buildup.
Is it good to put lemon peels in your garbage disposal?
Yes, cutting lemon peels into small wedges and feeding them into the running disposal helps neutralize foul kitchen odors. The natural citrus oils deodorize the grinding chamber, while the fibrous peel texture provides a light scrubbing action against the interior walls.
Is it okay to pour boiling water down your garbage disposal?
Pouring boiling water directly down a garbage disposal is generally discouraged because it can melt or warp PVC drain pipes, soften rubber components, and melt PVC sink gaskets. Instead, use cold water during operation and warm water for occasional rinsing.
Is it okay to pour vinegar down the garbage disposal?
Pouring white vinegar down your garbage disposal is completely safe and highly effective. When combined with baking soda, the resulting fizzing action breaks down stubborn organic slime, neutralizes trapped bacteria, and freshens the sink without harming metal or plastic components.
What do plumbers recommend to clean a garbage disposal?
Plumbers recommend a two-step cleaning approach combining mechanical scouring and chemical deodorizing. Grind a tray of ice cubes with rock salt to physically strip away congealed grease from the impellers, followed by a baking soda and vinegar treatment to eliminate hidden bacteria.
Is it okay to run my garbage disposal dry?
Running a garbage disposal without water is never recommended. Water acts as the carrier fluid that flushes pulverized food waste through your pipes; running the unit dry can overheat the motor, dull the impellers, and cause food debris to pack tightly in the chamber.
Is there any way to lubricate a garbage disposal?
Garbage disposals do not require manual lubrication with oils or commercial lubricants. The grinding components are self-lubricated by the water and food waste passing through them; adding external oils or petroleum products can damage internal rubber seals.
Is it good to put ice cubes down your garbage disposal?
Putting ice cubes down your garbage disposal is a fantastic practice. Pulverizing ice acts as a natural abrasive that knocks off built-up grease and food sludge from the grind ring and impellers without damaging the internal mechanical components.
Why won’t my garbage disposal turn on?
A garbage disposal typically fails to turn on when its internal thermal overload switch trips due to a jam or overheating. It can also be caused by a tripped GFCI outlet under the sink, a blown house circuit breaker, or a faulty wall switch.
What are the most common problems with garbage disposals?
The most frequent garbage disposal issues include motor jams caused by foreign objects, electrical failures that trip the reset button, foul odors from bacterial slime buildup, and water leaks originating from worn-out sink flange seals or cracked housing units.
What could cause a garbage disposal to drain slowly?
Slow draining is usually caused by an accumulation of grease, starch paste, or coffee grounds in the P-trap or branch drain line. A partially blocked dishwasher connection or venting obstruction can also restrict wastewater flow through the sink assembly.
How often should I clean my garbage disposal?
You should perform a light cleaning weekly by running ice and soapy water, and execute a thorough deep clean monthly. A monthly routine combining an ice-and-salt scour with a baking soda and vinegar treatment keeps the unit sanitary and odor-free.
Conclusion and Next Step
Mastering garbage disposal maintenance protects your kitchen plumbing, eliminates foul odors, and extends the lifespan of your appliance. Simple daily habits and routine inspections keep your system running smoothly for years to come.
Key Takeaways
Always use cold water: Run a steady stream of cold water before, during, and after operation to solidify grease and flush waste safely down the line.
Avoid grease and fibrous items: Never pour cooking oils down the drain or feed stringy vegetables, potato peels, and coffee grounds into the grinding chamber.
Commit to a monthly clean: Perform a regular deep clean using ice cubes, rock salt, and a baking soda-and-vinegar treatment to eliminate bacteria and slime.
Prioritize safety: Always cut power at the circuit breaker or unplug the unit before inspecting components or removing visible debris with tongs.
Know when to call a pro: Leave structural leaks, electrical wiring issues, and repeated motor jams to a licensed professional.
Need Help With Your Garbage Disposal?
Whether your disposal has reached the end of its lifespan or a stubborn leak requires expert repair, professional assistance is just a click away. You can easily book a plumber online to ensure your kitchen plumbing in Miami is serviced safely and efficiently.
Main Services
Related Posts
Need a Plumber in Miami?
Schedule service online or speak directly with the EZ Plumbing team.
Owner-Led Local Service
Know who is behind the business before you request service. The owners, contact line and Miami service pages are published clearly.
- Named business owners
- Direct phone and social channels
- Local Miami service information
Clear Help Before You Book
Review the relevant service page, contact the team directly and use the booking page when you are ready—without relying on vague claims.
- Service-specific information
- Direct questions before scheduling
- Clear online booking route