
How to Use a Garbage Disposal Properly: Steps, Dos and Don'ts
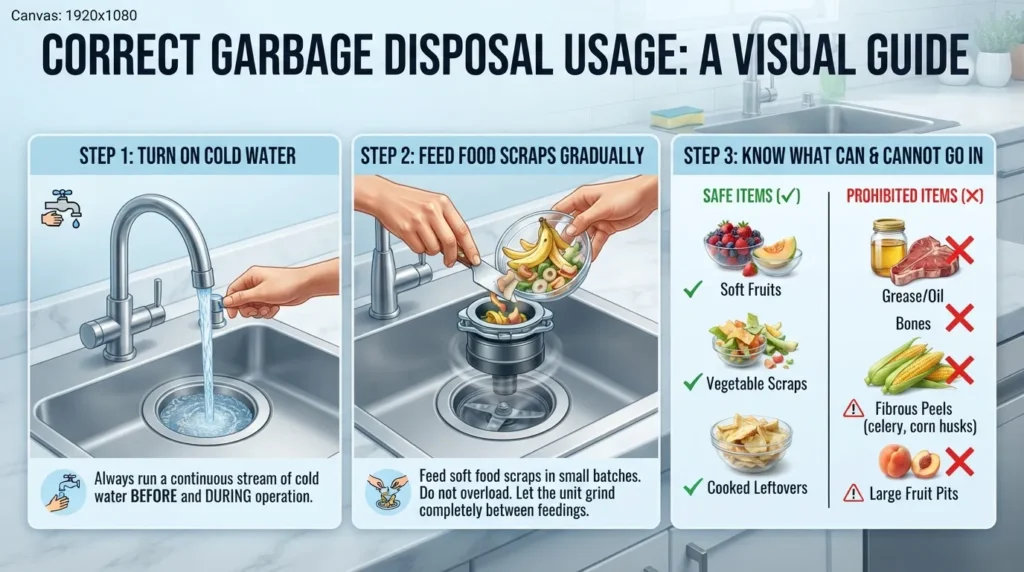
How to Use a Garbage Disposal Properly: 5 Simple Steps
Using a garbage disposal correctly prevents costly plumbing repairs, extends the life of your motor, and ensures smooth kitchen cleanup. Follow these five simple steps to operate your continuous feed unit safely and efficiently.
Step 1: Run a Steady Stream of Cold Water First
Always turn on the cold water faucet and let it run into the kitchen sink before activating the garbage disposal. Cold water is essential because it keeps any fats, grease, or oils in the food scraps solid, allowing the grinding chamber and blades to chop them into tiny particles that safely wash down the drain pipe. Hot water melts grease, which can coat your pipes and eventually cause clogs.
Step 2: Turn the Disposal On Before Adding Food
Flip the wall switch to start the motor before dropping any food scraps into the sink drain. Turning the disposal on first prevents jamming and protects the motor from sudden resistance, ensuring the cutting mechanism is already at full speed when waste enters the chamber.
Step 3: Feed Scraps Gradually, in Small Pieces
Drop food scraps into the sink opening in small, manageable quantities rather than dumping a large pile all at once. Overloading the grinding chamber strains the motor and can cause the unit to jam or trip its internal circuit breaker.
Step 4: Keep It Running for 10-15 Seconds After the Grinding Stops
Allow the garbage disposal to run for an additional 10 to 15 seconds after the sound of grinding completely fades away. This ensures that all remaining food particles are thoroughly pulverized and flushed out of the chamber and into the main plumbing line.
Step 5: Switch the Disposal Off First, Then the Water
Turn off the wall switch to stop the motor first, and let the cold water continue running for another 15 seconds. This final flush clears any lingering residue from the drain pipe and prevents buildup.
Quick-Recap Box: The 5-Step Checklist
Turn on a steady stream of cold water.
Switch on the garbage disposal.
Feed food scraps gradually in small pieces.
Let the unit run for 10-15 seconds after grinding stops.
Turn off the disposal, then shut off the water.
What Proper Operation Sounds Like
When you are using your garbage disposal correctly, you will hear a smooth, consistent whirring or humming sound as food is rapidly pulverized against the grinding ring. If you hear a harsh rattling, metallic clanging, or a strained, low-pitched hum, it usually means the unit is overloaded, jammed with a hard object, or operating without enough water.
Video A: How to Use a Garbage Disposal Properly
Know Your Garbage Disposal Before You Use It
Understanding how your kitchen cleanup system operates prevents common jams, protects internal components, and builds total confidence for first-time users. Knowing your unit’s design ensures you avoid the safety pitfalls and plumbing mishaps frequently discussed in home maintenance forums.
How a Garbage Disposal Actually Works
A food waste disposer does not use dangerous rotating knives; instead, it relies on heavy-duty metal impellers mounted on a spinning flywheel to force food particles against a stationary grinding ring, pulverizing waste into a fine liquid slurry.
Rubber Baffle / Splash Guard: The removable rubber flaps at the sink opening that keep food from flying upward during operation.
Grinding Chamber: The internal metal housing where food scraps are collected and broken down.
Flywheel & Impellers: The rotating components that build momentum and push waste outward against the jagged grinding ring walls.
Continuous Feed vs. Batch Feed Disposals
Continuous feed units are activated by a wall switch or countertop air switch and run continuously as you add waste, whereas batch feed disposals require a specialized stopper to be manually inserted and twisted to engage internal safety switches.
Continuous Feed: Popular in most standard homes because you can keep adding waste while the motor runs.
Batch Feed: Ideal for households prioritizing child safety, as the unit will not start unless the safety cover is firmly locked in place.
Brand Context: Major manufacturers like InSinkErator engineer both types, tailoring them to different kitchen workflows and safety preferences.
Where to Find the Power Switch, Reset Button, and Hex Wrench Socket
The primary power switch is typically a standard wall-mounted switch or a push-button air switch on the sink deck, while the troubleshooting components are tucked underneath the sink cabinet.
Reset Button: Located on the bottom exterior of the motor housing; it trips automatically to protect the motor during jams or electrical overloads.
Hex / Allen Wrench Socket: Found dead-center on the bottom of the motor housing, used with a standard hex wrench to manually rotate and free jammed flywheels.
Does Horsepower (1/3 HP to 1 HP) Change What You Can Put Down It?
Motor power ranges from 1/3 HP for basic, compact kitchens to 1 HP for heavy-duty commercial-grade performance, but higher horsepower primarily dictates speed and capacity rather than licensing you to discard large bones or fibrous waste.
1/3 HP to 1/2 HP: Perfect for smaller households handling light vegetable peels and soft table scraps.
3/4 HP to 1 HP: Offers greater torque to prevent stalling, making it ideal for larger families or frequent cooking.
Core Rule: Regardless of horsepower, fibrous vegetables and dense bones can still clog your drainage system.
What a Disposal Is (and Isn’t) Meant to Do
A garbage disposal is specifically engineered to handle light food residue and small remnants left on dinner plates, functioning as a pre-treatment device rather than a heavy-duty substitute for your municipal trash can.
What it does: Pulverizes minor plate scrapings, small cooked vegetable bits, and soft organic residues.
What it doesn’t do: Accept large quantities of potato peels, coffee grounds, grease, or bones all at once. Treat it as a secondary safeguard, not a general waste basket.
What You Can Safely Put Down a Garbage Disposal
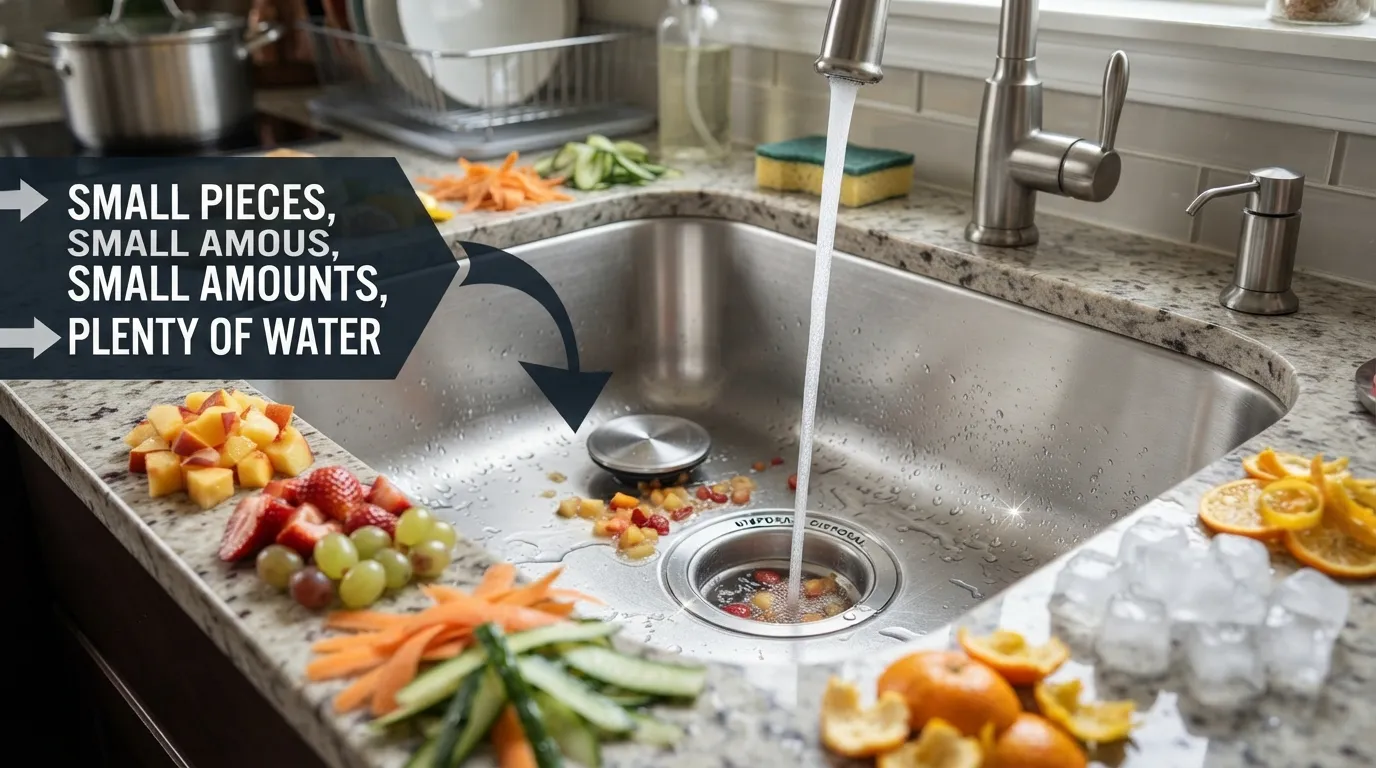
Knowing which items are safe to process prevents unexpected jams and keeps your kitchen smelling fresh. While units are built to handle basic meal remnants, following a few guidelines ensures smooth, trouble-free operation.
Soft Food Scraps and Small Leftovers
Soft table scraps and minor leftovers break down effortlessly under the weight of the rotating impellers. Feeding these items in moderation keeps your sink clear without straining the motor.
Cooked grains, soft pasta, and tender meats cut into small pieces.
Leftover cooked vegetables and soft starches.
Small pieces of bread or crackers.
Fruit Pieces and Vegetable Peelings
Most soft fruits and cooked vegetable pieces process cleanly into a fine liquid slurry. Always chop bulk items down before dropping them into the drain to prevent clogs.
Soft fruits like berries, melon chunks, and peeled apples.
Cooked root vegetables and steamed squash.
Small portions of leafy greens when fed gradually with running water.
Citrus Peels (for Freshness, in Small Amounts)
Cutting up leftover lemon, lime, or orange rinds and feeding them down the drain in small pieces is a great way to eliminate foul food odors. The natural citric acid and essential oils deodorize the grinding chamber instantly.
Cut peels into quarter-inch strips before feeding them in.
Run plenty of cold water to wash away the citrus oils effectively.
Avoid dropping whole rinds or large wedges all at once.
Small Amounts of Ice Cubes (and What Ice Really Does)
Dropping a handful of ice cubes down the disposal serves as a natural maintenance trick for the internal components. As the impellers crush the ice, the hard, jagged edges scrub away stubborn grease, food residue, and slime buildup from the grinding ring and walls.
Toss 6 to 10 ice cubes into the chamber while running cold water.
Listen for the grinding sound to shift, signaling the ice has been pulverized.
Use this monthly to keep the cutting edges clean and sharp.
Cooked, Soft Foods in Moderation
Cooked proteins and soft starches are generally safe, provided you do not dump large quantities down the drain at the same time. Moderation prevents heavy slurries from sticking to the walls of the drain pipe.
Small amounts of well-cooked poultry or fish without large bones.
Soft casseroles and pureed soups introduced slowly.
The Golden Rule: Small Pieces, Small Amounts, and Plenty of Water
The secret to a long-lasting disposal is managing the volume of waste entering the chamber at any given moment. Feeding scraps gradually ensures the motor maintains peak torque and prevents clogs further down the line.
Small Pieces: Chop bulky items before letting them touch the splash guard.
Small Amounts: Feed waste in steady pinches rather than a massive dump.
Plenty of Water: Let cold water run continuously during and after grinding.
What You Should Never Put Down a Garbage Disposal
Knowing what not to put down your drain protects your plumbing from catastrophic clogs, pipe corrosion, and costly repairs. Avoiding prohibited items ensures your kitchen stays clean and fully functional.
Grease, Cooking Oil, and Fats (FOG) and How They Build Up in Pipes
Never pour liquid grease, bacon fat, or cooking oil down your garbage disposal. Fats, oils, and grease (FOG) stay liquid when hot, but they solidify the moment they hit cold water inside your drain line or P-trap. Over time, these layers build up, narrowing the pipe diameter and trapping other food particles until a total blockage forms.
Proper Disposal: Let grease cool completely, pour it into an empty container, and throw it in the trash.
The Damage: FOG coats pipe walls [00:38], making it nearly impossible for regular water flow to clear out the residue.
Coffee Grounds (why they form sludge)
Coffee grounds should stay out of your disposal because they do not break down into a slurry. Instead, they bypass the grinding ring and pack together into a dense, muddy sludge that settles in the bottom curves of your drain pipe, sealing off water flow just like wet cement.
The Problem: Fine grounds clump together in moist pipes.
Eco-Friendly Alternative: Toss used coffee grounds into your garden or compost bin.
Eggshells (and the debate around them)
Eggshells are a frequent point of debate, but putting them down your disposal risks major clogs. While some believe the shells sharpen blades, disposals do not have sharp knives. Instead, the thin membrane inside raw eggshells can peel away, wrap around the spinning impellers, and trap other debris.
Shell Accumulation: Heavy shell particles can settle in low spots of the drain line.
Best Practice: Drop eggshells into your compost pile instead of your sink.
Large Bones and Pits
Large beef, pork, or turkey bones and hard fruit pits exceed the torque capacity of residential motors. Attempting to grind them will stall the flywheel, jam the impellers, or trip the unit’s thermal overload reset button.
Impact on Motor: Heavy impacts can crack the internal grinding chamber casing.
Safe Rule: Throw all hard bones and fruit stones directly into the trash can.
Fibrous Foods: Celery, Corn Husks, Artichokes, Onion Skins
Fibrous vegetables are public enemy number one for garbage disposals. Items like celery stalks, corn husks, artichokes, and onion skins feature long, stringy plant threads that refuse to chop cleanly.
The Tangle Hazard: Fibrous strands wrap tightly around the motor shaft and impellers like fishing line.
Result: This binding action halts the motor, forces a jam, and requires manual extraction.
Starchy and Expanding Foods: Rice, Pasta, Potato peels, Bread
Starchy foods absorb standing water and expand rapidly, turning into a thick, paste-like dough inside your plumbing. Potato peels add to this risk because raw starch turns gummy when processed in volume.
Rice & Pasta: Swell up inside the P-trap, creating a solid plug.
Potato Peels: Heavy starches overwhelm the grinding chamber and line the walls of the drain pipe.
Non-Food Items: Plastic, Glass, Metal, Paper Towels, Cigarette Butts
Non-food items have no place in a food waste disposer. Dropping bottle caps, twist ties, glass shards, or paper towels into the sink will instantly jam the mechanism, puncture seals, or destroy the motor.
Paper Products: Paper towels and wipes absorb water and pack tightly into blockages.
Hard Objects: Metal and glass break internal components or cause sparks.
Can You Put Soup Down a Garbage Disposal?
Yes, you can pour thin, smooth broths down a garbage disposal safely, provided you run plenty of cold water. However, you should never dump thick, chunky stews filled with heavy starches, rice, large chunks of meat, or root vegetables down the drain, as they will quickly clog your P-trap.
Safe Liquids: Clear broths and thin, pureed liquids with zero chunky remnants.
Avoid Chunks: Strain out solid pieces of potato, pasta, or rice before pouring liquid down the sink.
Can I Put This Down the Disposal? Quick-Check Table
Use this comprehensive quick-check decision tool to determine whether an item can safely go down your garbage disposal. Refer to this list instantly before clearing your dinner plates to protect your plumbing from unexpected clogs.
Food-by-Food Decision Matrix
| Item | Safe? | Why? | Pro Tip |
| Apple Cores | Yes | Soft flesh and seeds pulverize easily under standard impellers. | Chop into smaller chunks before feeding into the drain. |
| Banana Peels | No | Stringy fibers wrap tightly around the motor shaft and cause jams. | Throw banana peels directly into your compost or trash. |
| Butter / Margarine | No | Melts and solidifies as FOG (Fats, Oils, Grease) inside cold pipes. | Wipe greasy pans with a paper towel before washing. |
| Chicken Bones (Small) | No | Soft tissue is okay, but hard bones exceed residential motor torque. | Always discard poultry and meat bones in the trash. |
| Citrus Peels | Yes (Sometimes) | Natural citric acid and oils deodorize and clean the chamber. | Cut into small strips and feed in moderation with cold water. |
| Coffee Grounds | No | Bypass the blades and pack into a dense, cement-like sludge in the P-trap. | Add used grounds to your garden soil or compost bin. |
| Cooked Vegetables | Yes | Soft textures break down smoothly into a liquid slurry. | Feed gradually while running a steady stream of cold water. |
| Dairy Products | No | Fats and milk solids coat pipe walls and sour inside drains. | Pour spoiled milk or cream directly down the toilet. |
| Eggshells | No | Thin inner membrane peels off and wraps around the impellers. | Compost eggshells to enrich garden soil naturally. |
| Fish Bones | Yes | Small, brittle bones crush instantly without straining the motor. | Flush with plenty of cold water during and after grinding. |
| Fruit Pits | No | Extremely hard stone material stalls flywheels and cracks chambers. | Toss all stone-fruit pits straight into the trash can. |
| Ice Cubes | Yes | Hard edges scrub away grease, slime, and debris from the walls. | Run 6 to 10 cubes monthly to clean the cutting ring. |
| Lemon Wedges | Yes | Excellent for eliminating foul odors and freshening the sink. | Slice into small pieces and process one piece at a time. |
| Meat Scraps (Lean) | Yes | Soft protein pieces process safely in small quantities. | Cut into bite-sized pieces and avoid large chunks or fat trimmings. |
| Nuts & Shells | No | Hard shells act like rocks; nut butters form sticky paste. | Dispose of all nuts, shells, and nut pastes in the trash. |
| Oatmeal / Grains | Yes | Soft, cooked grains wash away easily with running water. | Avoid dumping massive pots of thick, dry oatmeal all at once. |
| Onion Skins | No | Dry, papery layers float past blades and clog drain openings. | Peel onions over the trash can instead of the sink. |
| Pasta (Cooked) | No | Expands rapidly and clumps together into a dough-like plug. | Scrape leftover pasta into the trash or compost. |
| Potato Peels | No | Heavy starch content turns gummy and coats pipe walls. | Throw raw or cooked potato skins in the organic waste bin. |
| Rice (Cooked/Raw) | No | Absorbs water, swells up, and creates solid blockages in traps. | Scrape rice into the trash rather than rinsing down the drain. |
| Shrimp Shells | No | Thin, tough shells tangle around the motor and trap debris. | Throw seafood shells into a sealed trash bag to prevent odor. |
| Soup (Broth) | Yes | Thin liquids pass safely through the system with cold water. | Strain out chunky noodles, rice, and meat pieces first. |
| Vegetable Scraps | Yes | Soft scraps process cleanly when fed in small amounts. | Cut long veggies into short segments before disposal. |
The “When in Doubt, Use the Trash” Rule
When you are unsure whether a specific food item or waste product is safe for your garbage disposal, default to your municipal trash can or compost bin. Taking a few extra seconds to scrape waste into the trash saves you from hours of plumbing labor, costly service call fees, and unexpected kitchen leaks.
Cold Water, Hot Water, and Boiling Water: What's Right?
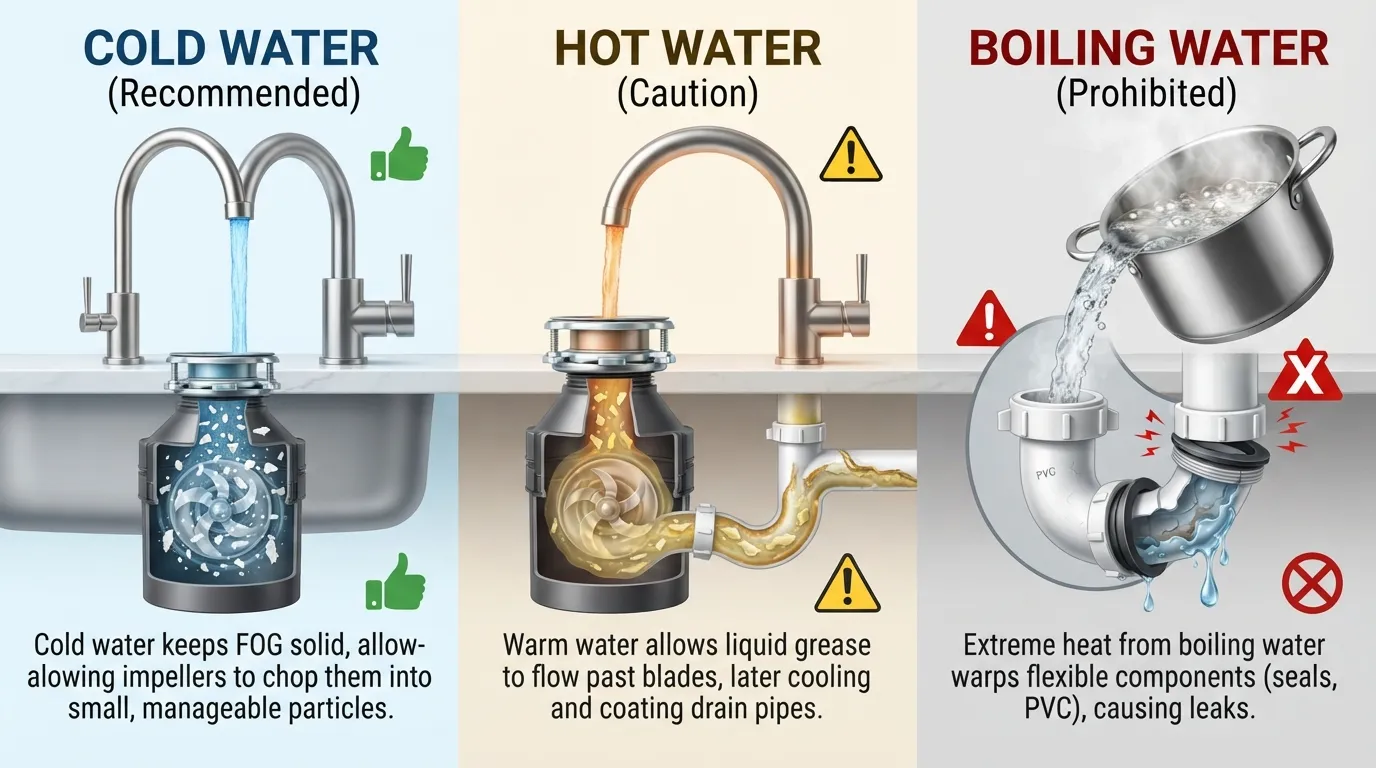
Managing water temperature correctly is critical for protecting your garbage disposal motor and preventing costly plumbing damage. Understanding how water interacts with food waste ensures your kitchen drainage system stays clear and functional.
Are You Supposed to Run Water While Using a Garbage Disposal?
Yes, you must always run a steady stream of water while operating your garbage disposal. Water acts as a lubricant and transport medium, flushing pulverized food waste through the grinding chamber and keeping the drain line clear of clogs.
Immediate Activation: Turn on the faucet before flipping the switch to prime the system.
Continuous Flow: Keep the water running throughout the entire grinding process.
Why Cold Water Beats Hot Water During Grinding
Cold water is the best choice for running a garbage disposal because it keeps any fats, oils, and grease in your food scraps in a solid state. The impellers can then easily chop these hardened fats into tiny particles that wash harmlessly down the drain pipe.
Solidifies Fats: Prevents liquid grease from coating your internal pipe walls.
Protects the Motor: Cold water also helps cool the motor winding during heavy use, preventing overheating.
Is It Okay to Pour Boiling Water Down a Garbage Disposal?
Pouring boiling water directly down your garbage disposal is generally a bad idea and can damage your plumbing. Extremely hot water weakens PVC pipe joints, warps rubber components like the splash guard, and degrades the rubber seals and plumber’s putty around the sink flange.
Pipe Damage: Boiling water softens PVC drain pipes and loosens slip-joint connections, leading to leaks under the sink.
Seal Degradation: High heat can warp rubber seals, compromising the waterproof barrier of your disposal assembly.
How Long to Run Water Before and After
Timing your water flow ensures that debris is cleared not just from the disposal unit itself, but from your entire home plumbing network.
Before: Let the water run for 3 to 5 seconds before turning on the disposal and adding food scraps.
After: Keep the cold water running for 10 to 15 seconds after the grinding sound stops to completely flush the line.
Are You Supposed to Put a Lot of Food Down at Once?
No, you should never dump a large volume of food scraps into your garbage disposal all at once. Overloading the grinding chamber overwhelms the motor, slows down the flywheel, and frequently causes the unit to jam or trip its internal circuit breaker.
Feed Gradually: Drop food down in small, manageable pinches or spoonfuls.
Maintain Speed: Feeding waste slowly allows the motor to maintain peak torque and ensures thorough pulverization.
Common Mistakes That Ruin a Garbage Disposal
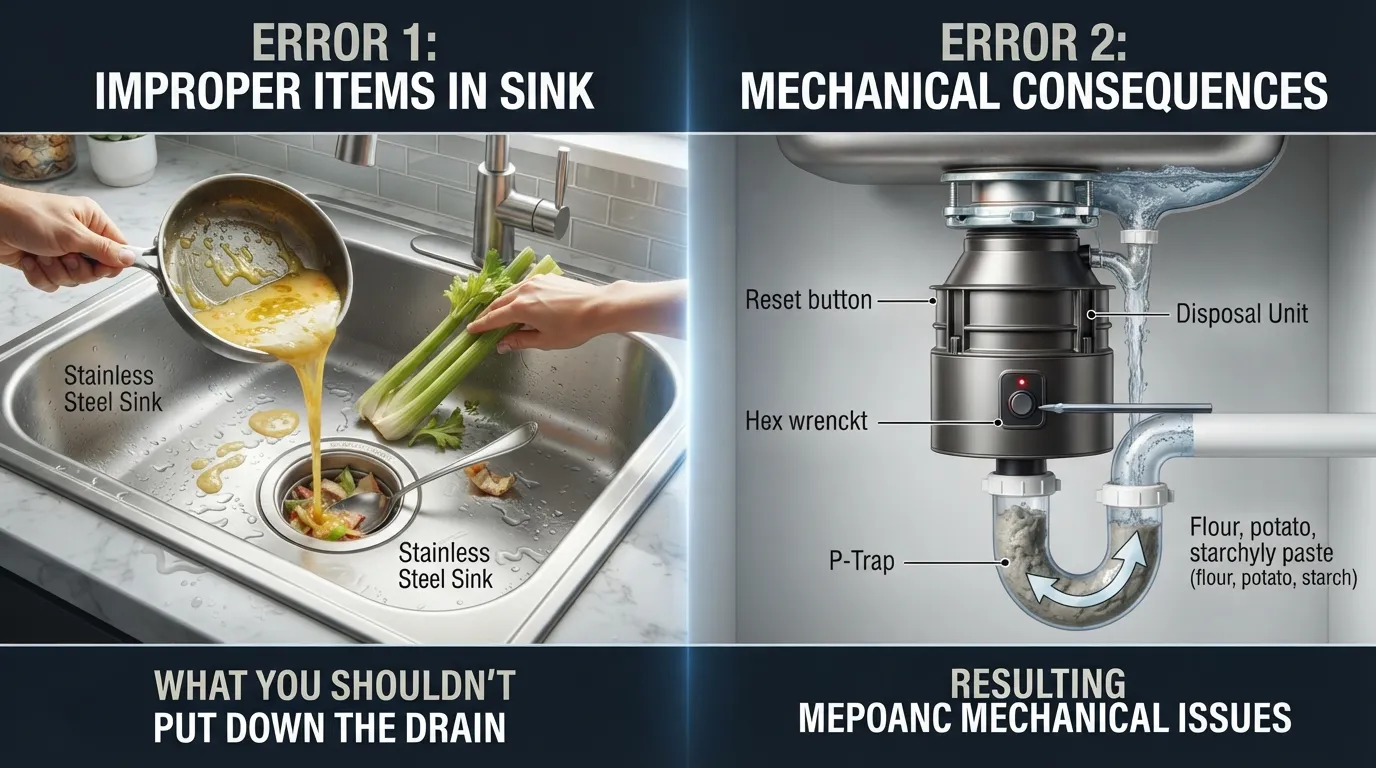
Avoiding everyday operational errors extends the lifespan of your appliance and prevents unexpected plumbing emergencies. Recognizing these mistakes helps you protect your motor and keep your kitchen sink draining smoothly.
Running It Without Water
Operating a garbage disposal without a steady stream of water is one of the fastest ways to burn out the motor and ruin the internal seals. Without water to lubricate the chamber, friction builds up rapidly, generating excessive heat that warps rubber components and dulls the grinding mechanism.
Motor Strain: Dry grinding forces the motor to work twice as hard, leading to premature burnout.
Debris Buildup: Without fluid transport, food residue bakes onto the chamber walls and creates stubborn blockages.
Overloading It with Too Much Food at Once
Dumping a massive pile of holiday leftovers or a full plate of scraps into the sink all at once overwhelms the grinding ring and stalls the motor. This sudden resistance trips the thermal overload protector, leaving your unit completely unresponsive until it cools down and you manually clear the jam.
Feed in Stages: Introduce food waste in small, measured pinches to maintain full motor torque.
Clear Before Adding More: Wait for the sound of grinding to finish entirely before feeding the next handful.
Pouring Grease Down “Just This Once”
Rationalizing that a small amount of liquid bacon grease or frying oil won’t hurt leads to chronic plumbing issues over time. Once hot grease enters the cold drain pipe, it solidifies instantly, catching future food particles and forming a concrete-like blockage in your P-trap.
The “Just Once” Trap: Cumulative grease buildup narrows pipe diameters months after you poured it down.
Safe Practice: Always wipe greasy pans with a paper towel or collect oil in a jar before washing.
Grinding Hard or Non-Food Objects
Treating your sink like a general trash can by dropping in glass, metal twist ties, bottle caps, or fruit pits will instantly destroy your disposal. Hard objects either wedge tightly between the impellers and grinding ring or shatter the internal aluminum housing.
Instant Jams: Foreign objects lock the flywheel in place, causing the motor to hum loudly without spinning.
Permanent Damage: High-speed impacts can crack the grinding chamber, forcing a complete unit replacement.
Ignoring Strange Noises and Slow Draining
Failing to act when your disposal starts emitting a metallic screech, a low-pitched hum, or drains sluggishly allows minor mechanical issues to cascade into major system failures.
Metallic Clanging: Usually indicates a loose screw, foreign object, or broken component trapped inside.
Slow Draining: Signals an accumulating clog in the drain line or tailpiece that requires immediate attention.
Using Harsh Chemical Drain Cleaners in the Disposal
Pouring caustic chemical drain cleaners down a garbage disposal can severely damage your equipment and plumbing system. These harsh commercial formulas eat away at rubber seals, corrode internal metal parts, and splash back dangerously if the unit is turned on accidentally.
Component Corrosion: Chemical burns pit the metal grinding ring and ruin rubber splash guards.
Safe Alternative: Use baking soda and vinegar or grind ice cubes with citrus peels to clean and deodorize safely.
Real Plumbing Insights from the Field
In residential service calls, the most frequent emergency replacements stem from homeowners dumping raw potato peels and fibrous celery stalks into an underpowered 1/3 HP motor without running cold water. The resulting starch paste and stringy threads tightly bind the motor shaft, tripping the reset button repeatedly until the electrical windings finally short out. Operating the appliance with intentional care and plenty of cold water eliminates almost all of these preventable service calls.
Garbage Disposal Myths, Debunked
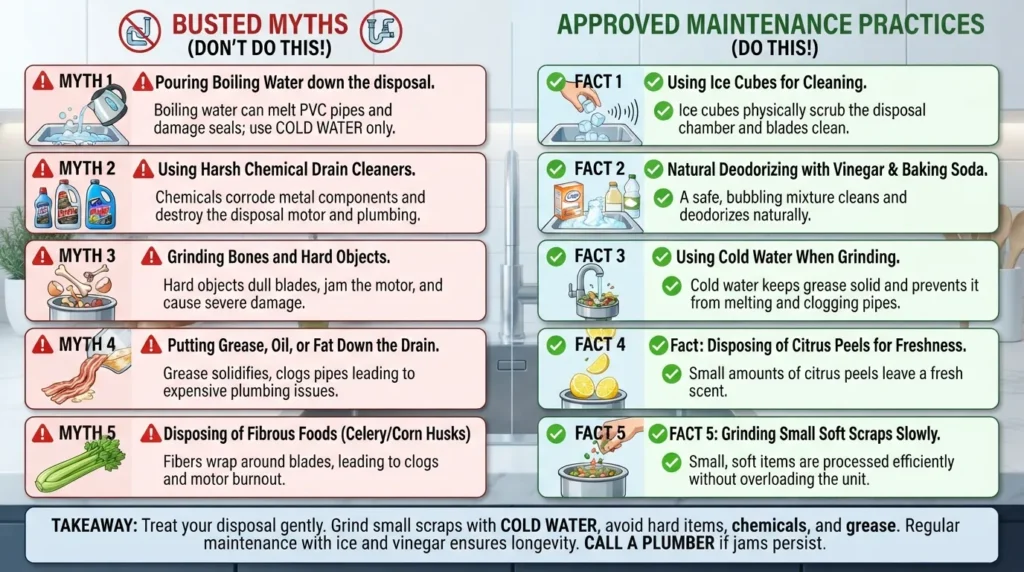
Separating fact from fiction protects your kitchen plumbing and saves you from repeating outdated maintenance wives’ tales. Understanding how cleaning agents and temperatures actually affect your unit keeps your garbage disposal running efficiently for years.
Does Putting Ice Down a Garbage Disposal Clean It?
Yes, this is one of the few maintenance hacks that is completely true. Dropping ice cubes into the grinding chamber acts as a physical abrasive scrubber that knocks loose slimy food residue, grease film, and organic buildup from the spinning impellers and stationary grinding ring.
How it works: The ice freezes and hardens soft residue, making it easier for the jagged edges to shatter and scrape away the film.
Pro Tip: Toss a handful of ice cubes down monthly with cold water running to keep your unit sparkling clean.
Is It Okay to Pour Vinegar Down the Garbage Disposal?
Yes, pouring white vinegar down your garbage disposal is safe and effective when paired with baking soda. The gentle acid neutralizes alkaline odor compounds, while the fizzing reaction lifts light grime from hard-to-reach crevices inside the chamber.
Deodorizing Power: Vinegar naturally eliminates sour or sulfurous smells without corroding rubber seals or metal components.
Best Practice: Pour half a cup of baking soda followed by one cup of vinegar, let it fizz for ten minutes, then flush with cold water.
Can I Use Dawn Dish Soap to Clean My Garbage Disposal?
Yes, Dawn dish soap is an excellent, safe cleaning agent for breaking down minor grease films inside your disposal. Squirting a few drops of dish soap into the running unit creates a rich, sudsy foam that lifts surface oils and washes them cleanly down the drain pipe.
Safe Formulation: Unlike harsh chemical drain openers, dish soap will not pit metal or degrade rubber gaskets.
Freshening Aid: Combine dish soap with cold water and a few citrus peels for an easy, pleasant clean.
Do Lemon Peels Really Clean the Disposal?
Yes, lemon peels offer genuine cleaning benefits by releasing natural citrus oils and citric acid that cut through grease and neutralize foul food odors instantly. However, they act primarily as a deodorizer and light polisher rather than a heavy-duty degreaser.
Aromatic Benefit: Leaves your kitchen smelling fresh by masking lingering organic decay scents.
Usage Rule: Cut lemons into small quarters and feed them in gradually with plenty of cold water to prevent jamming.
“Hot Water Flushes Grease Away” (Why It Only Moves the Problem Down the Line)
This is one of the most destructive plumbing myths in home maintenance. While hot water temporarily liquifies grease inside the disposal chamber, it simply carries the oil further down your main drainage pipes where the water cools, causing the grease to solidify deeper in your plumbing system and form a severe clog.
The Hidden Risk: You won’t see the blockage forming until your kitchen sink backs up weeks later.
Correct Approach: Always use cold water during grinding to keep fats solid so the unit can chop and flush them safely.
Using the Disposal with Your Sink and Dishwasher
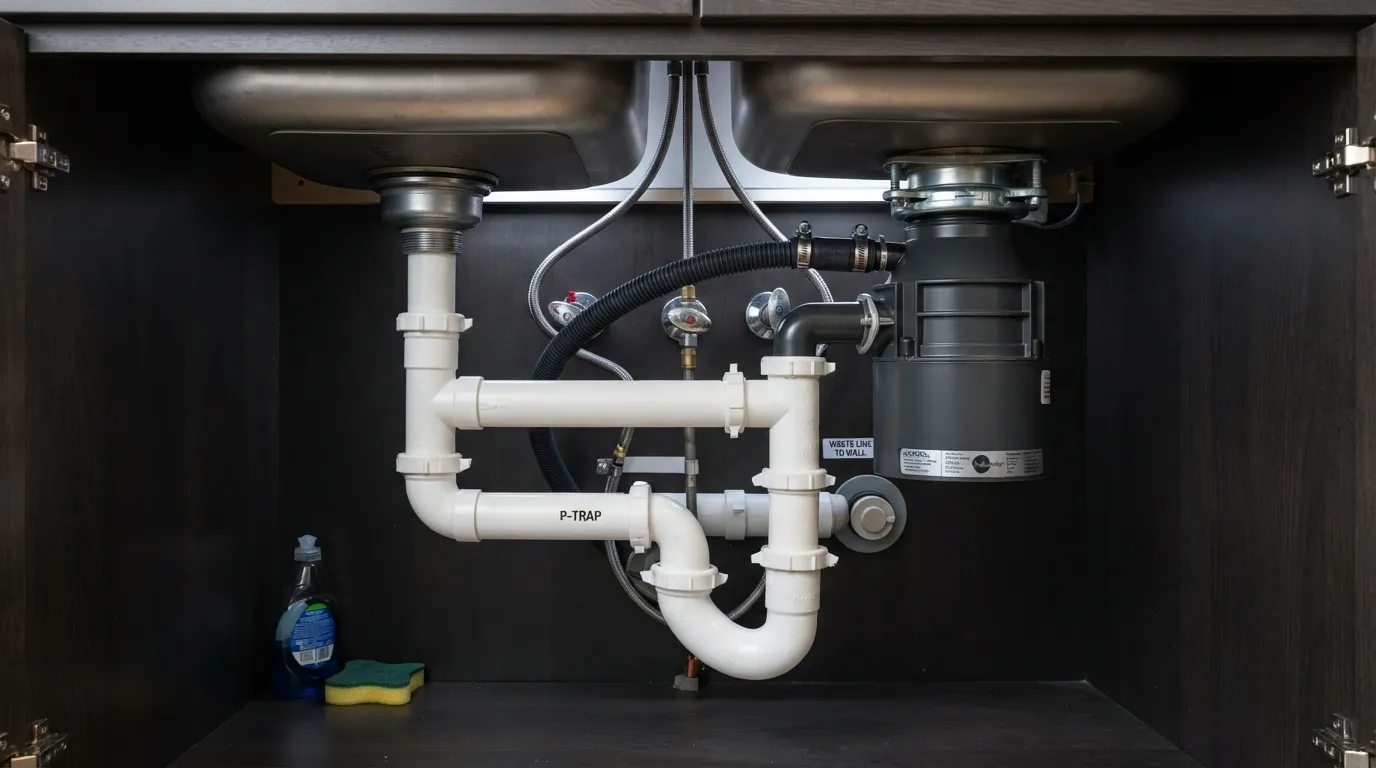
Integrating your garbage disposal smoothly with your double-bowl kitchen sink and dishwasher setup prevents common plumbing backups. Understanding how these interconnected drainage lines work together ensures seamless daily kitchen cleanup.
Do You Wash Dishes on the Garbage Disposal Side of the Sink?
Yes, you should wash dishes or rinse plates on the side of the sink equipped with the garbage disposal, as this allows you to immediately sweep food scraps down the drain without transferring messy debris across countertops.
Double-Bowl Setup: In a two-basin sink, one side houses the disposal while the other connects to a standard drain strainer.
Efficiency Tip: Keep your sponge and dish soap on the disposal side to make quick scraping and rinsing effortless.
How the Dishwasher Drains Through the Disposal
Your dishwasher connects directly to the garbage disposal via a flexible drain hose that attaches to a specialized inlet nipple on the upper side of the disposal housing. When your dishwasher pumps out wastewater during a wash cycle, the water flows through the disposal unit before passing down into the main P-trap and drain pipe.
Crucial Knockout Plug: When installing a new disposal, you must punch out the plastic knockout plug inside the dishwasher inlet nipple; forgetting this step causes dishwasher wastewater to back up into your sink.
Running the Disposal: It is best practice to run your garbage disposal briefly before starting a dishwasher cycle to clear out any residual food particles and ensure a completely open path for drainage.
Can I Unclog My Kitchen Sink Using Both the Disposal and the Dishwasher?
No, trying to clear a stubborn kitchen sink clog by running the garbage disposal or cycling your dishwasher will not fix the blockage and often makes the situation worse. If your main drain line or P-trap is clogged, pumping more water through the dishwasher or spinning the disposal will cause dirty wastewater to overflow into the opposite sink basin.
The Backup Risk: Blockages trapped downstream cannot be cleared by appliance motors or dishwasher pumps.
Correct Action: Shut off the power, bail out standing water, and inspect the P-trap or clear the line manually with a snake.
Scraping Plates First: What Belongs in the Trash vs. the Disposal
Maximizing the lifespan of your drainage system relies heavily on scraping plates thoroughly into the trash or compost bin before placing them in the sink. The garbage disposal is designed only for minor food residues, not as a substitute for your municipal waste bin.
Belongs in the Trash: Large amounts of food waste, bones, heavy starches, grease, and fibrous vegetable peels.
Belongs in the Disposal: Light plate scrapings, small soft food remnants, and minor organic residue washed down with steady cold water.
Garbage Disposals and Septic Systems
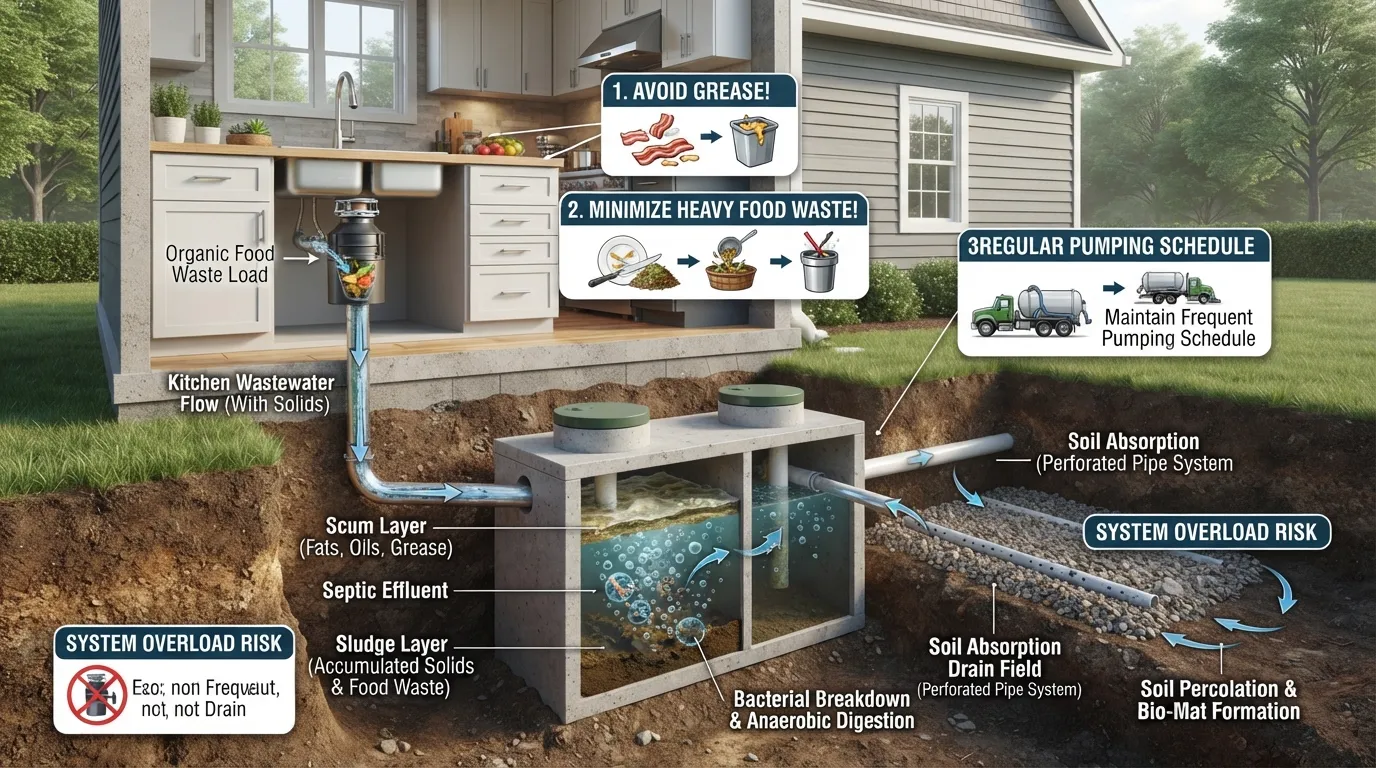
Operating a garbage disposal when your home relies on an on-site wastewater treatment system requires careful management. Understanding how food waste interacts with your underground tank protects your entire property from premature failure.
Can You Use a Garbage Disposal with a Septic Tank?
Yes, you can use a garbage disposal with a septic system, but it significantly increases the volume of solid waste entering your tank. Because septic systems rely on natural bacterial breakdown rather than municipal treatment plants, adding ground food scraps requires more frequent maintenance and careful waste sorting.
Increased Solid Load: Food waste adds significant organic mass that does not dissolve easily.
System Capacity: Many local inspectors recommend larger tank sizes or alternative designs if a disposal is installed.
How Food Waste Affects Septic Tank Solids and the Drain Field
Food waste separates into scum and sludge inside your buried tank just like regular sewage, but ground scraps break down much more slowly and can overload the bacterial environment. If excess solids accumulate before decomposing, they escape the tank and flow straight into your drain field, clogging the soil pores and causing expensive system failure.
Sludge Accumulation: Ground food scraps sink to the bottom or remain suspended as cloudy particulate matter.
Drain Field Clogging: Fine particles block the soil absorption trenches, leading to standing sewage in your yard.
Tips for Septic Homeowners
Protecting your septic tank and drain field requires strict daily habits and adherence to manufacturer guidelines. Implementing preventative measures ensures your private system functions smoothly for decades.
Use Less: Limit disposal use to light plate rinsing rather than heavy meal prep disposal.
Avoid Grease: Never introduce fats, oils, or grease, as they destroy beneficial tank bacteria and coat internal pipes.
Increase Pumping Frequency: Homes with disposals usually need their septic tanks pumped every 1 to 2 years instead of every 3 to 5 years.
Consult Professionals: Review official guidelines such as the EPA guidance on septic systems for comprehensive management strategies.
Safety First: How to Use Your Disposal Without Getting Hurt
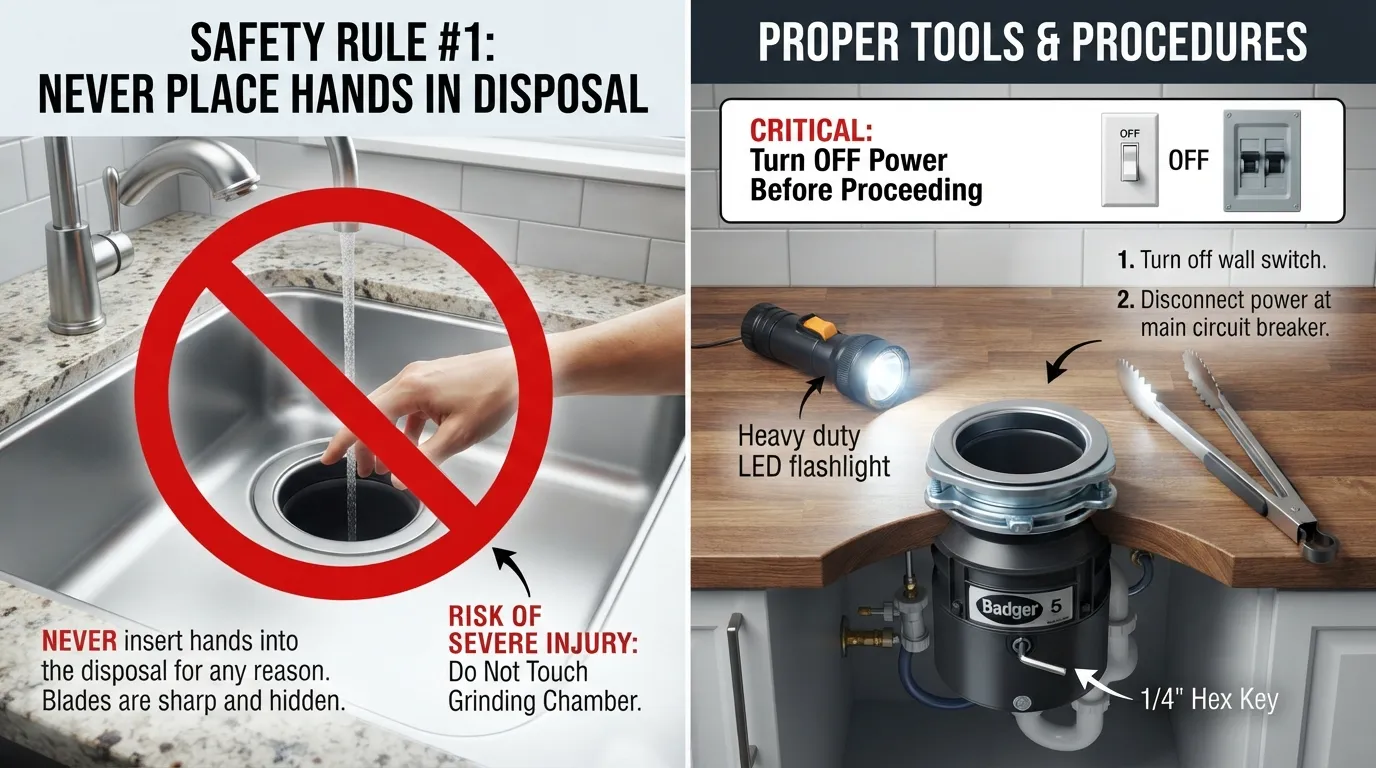
Prioritizing safety during daily operation and troubleshooting prevents severe injuries and mechanical accidents. Following established safety protocols ensures you handle minor jams and routine maintenance with complete confidence.
Never Put Your Hand Inside a Garbage Disposal
Never insert your fingers, hands, or any body part into the grinding chamber, even when the appliance is turned off. Because garbage disposals contain hidden, jagged impellers and a sharp grinding ring, reaching inside creates an extreme risk of severe lacerations or puncture wounds.
Golden Rule: Your hands should never cross the plane of the sink drain opening.
Use Tools Instead: Always rely on long-handled utensils or specialized retrieval tools to examine or clear the interior.
Turn Off the Wall Switch and the Circuit Breaker Before Any Fix
Before looking inside your disposal or attempting to retrieve a fallen object, switch off the wall power and cut the electrical supply at your home’s main circuit breaker box. This dual-safeguard completely eliminates the risk of an accidental electrical surge or someone flipping the switch while your tools are inside.
Wall Switch: Acts as the primary immediate disconnect.
Circuit Breaker: Provides absolute safety against accidental activation during manual wrenching or debris removal.
Safe Tools: Flashlight, Tongs, Hex/Allen Wrench
When investigating a jam or a foreign object, keep the proper safety tools on hand to protect your fingers and ensure a controlled repair process.
Flashlight: Illuminates the dark grinding chamber so you can visually identify foreign items without touching anything blindly.
Tongs or Pliers: Safely reach deep into the sink opening to grab and lift out dropped silverware or stubborn objects.
Hex / Allen Wrench: Inserts into the bottom motor socket to manually rotate the jammed flywheel from underneath the sink cabinet.
Keeping Children and Pets Away
Kitchen areas become high-risk zones when children or curious pets are present during appliance maintenance. Always supervise kids closely around running sinks and store wall switches or continuous feed controls out of toddler reach.
Child Safety: Teach children that the kitchen sink is not a toy and that the disposal requires adult operation only.
Batch Feed Alternatives: Consider installing a batch feed unit if you have young children to ensure the disposal cannot run without a locked cover.
What to Do If Something Falls In
If a spoon, ring, or bottle cap slips into the grinding chamber, do not panic and never reach down to grab it with your bare hand. Follow these safe steps to retrieve the item:
Turn off the wall switch immediately and trip the circuit breaker.
Peel back or remove the rubber splash guard to get a clear view of the interior.
Use a strong flashlight and a pair of long tongs or needle-nose pliers to grasp and pull the object out.
If the object is wedged tightly against the impellers, use the hex wrench underneath the sink to gently rock the flywheel back and forth until the item releases.
Troubleshooting: Jammed, Humming, or Not Turning On
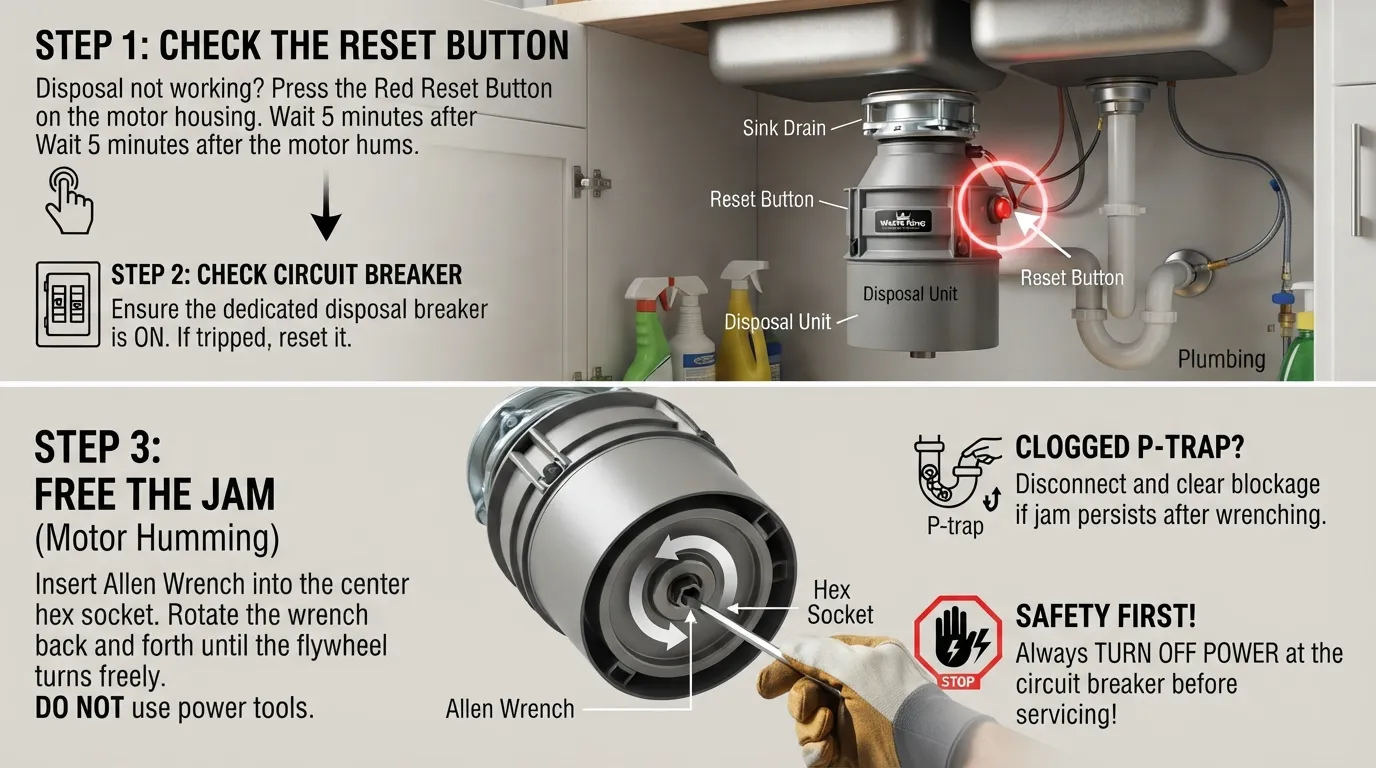
Resolving minor garbage disposal malfunctions quickly saves you from expensive plumbing service calls and restores your kitchen workflow in minutes. Most common issues stem from simple electrical overloads or mechanical jams that you can safely fix at home.
Why Won’t My Garbage Disposal Turn On?
If pressing your wall switch or air switch produces absolute silence with no motor hum, the unit is likely receiving no electrical power. A tripped circuit breaker, a tripped thermal overload button on the disposal itself, or a loose plug under the sink is usually the culprit.
Check the Plug: Ensure the unit’s power cord is securely plugged into the electrical outlet beneath the sink.
Inspect the Breaker: Verify that your home’s main electrical panel hasn’t tripped the circuit dedicated to the kitchen appliances.
Disposal Humming but Not Spinning: Using the Hex Wrench to Free a Jam
When your disposal emits a loud humming sound but the motor fails to spin, a foreign object or food scrap has jammed the flywheel against the grinding ring. The hum indicates electrical power is reaching the motor, but safety features are preventing the blades from turning.
Step 1: Turn off the wall switch and unplug the disposal immediately to prevent accidental starts.
Step 2: Locate the hex/Allen wrench socket in the dead-center of the motor housing underneath the sink.
Step 3: Insert a 1/4-inch hex wrench into the socket and rock it back and forth to manually force the flywheel to spin free. Once the debris loosens, remove the wrench and clear any objects from the top chamber using tongs.
How to Press the Reset Button
The red or yellow reset button on the bottom exterior of the motor housing acts as a thermal circuit breaker that pops out when the motor overheats from a jam or excessive workload.
Let It Cool: Wait 10 to 15 minutes for the motor windings to cool down completely after a jam.
Reset the Switch: Firmly push the reset button inward until it clicks and stays flush with the housing. Turn the wall switch back on to test the motor.
Slow Draining or Standing Water After Use
If water backs up into your sink basin or drains sluggishly during operation, organic gunk or a partial clog has formed further down your plumbing line. If water still won’t drain, a professional drain cleaning service can clear the blockage safely before it overflows into your kitchen.
P-Trap Inspection: Food particles and grease often settle in the curved P-trap beneath the sink, restricting flow.
Avoid Caustic Chemicals: Skip harsh liquid drain openers to protect your rubber seals and pipes.
Removing Gunk Buildup from the Disposal
Over time, organic slime, grease film, and food particles coat the interior walls of the grinding chamber, causing persistent unpleasant odors.
The Ice and Salt Method: Pour two cups of ice cubes and a cup of rock salt down the drain, then run the disposal with cold water to scour away slime.
Dish Soap Scrub: Run a stream of cold water while squeezing a generous amount of Dawn dish soap into the running unit to lift surface oils.
Fixing Bad Smells from the Disposal
Sour food odors typically result from trapped organic waste clinging to the rubber splash guard or the upper rim of the grinding chamber.
Citrus Freshness: Grind small quarters of fresh lemon or orange peels with cold water to release deodorizing essential oils.
Baking Soda Trick: Pour half a cup of baking soda down the drain, follow with white vinegar, let it fizz for ten minutes, and flush clean.
Can I Still Wash Dishes If the Garbage Disposal Is Broken?
Yes, you can still wash dishes while your garbage disposal is out of commission, provided you take a few precautions to prevent further backups.
Avoid Using the Side: Wash your dishes exclusively on the non-disposal side of a double-bowl sink, or place a solid drain strainer over the disposal opening to catch loose food scraps.
Keep It Dry: Do not flip the wall switch or run water down the broken disposal unit until a plumber or technician repairs or replaces the appliance.
Cleaning and Maintenance Routine
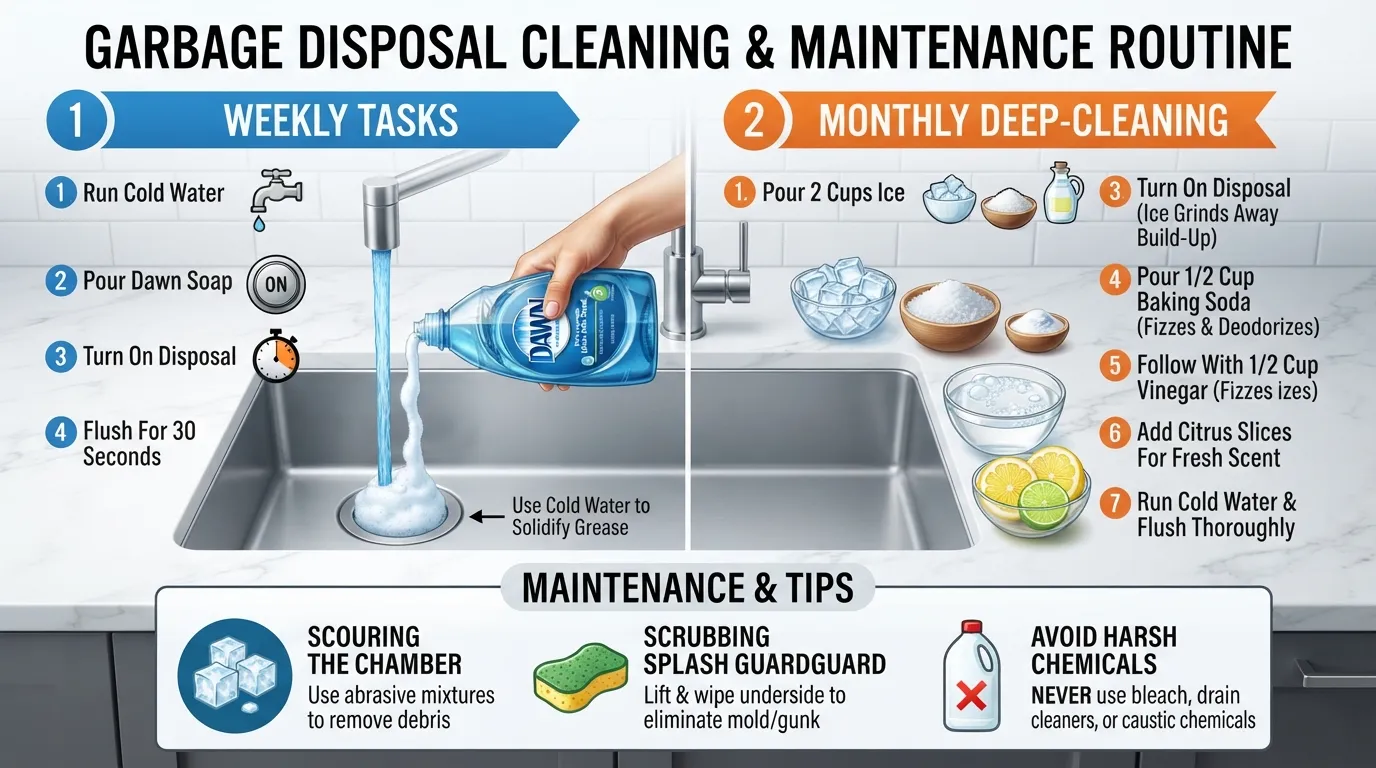
Establishing a consistent cleaning and maintenance schedule prevents foul odors, eliminates stubborn organic buildup, and extends the operational lifespan of your garbage disposal. Implementing these simple weekly and monthly habits ensures your kitchen sink stays fresh and trouble-free.
Weekly: Run Cold Water and Flush After Use
Integrating a few quick daily and weekly habits into your routine prevents food residue from baking onto your internal grinding components.
Flush Diligently: Always run a steady stream of cold water for 15 to 20 seconds after every single use to clear lingering particles.
Weekly Suds Flush: Once a week, squirt a generous amount of Dawn dish soap into the running disposal while letting cold water flow for a full minute to lift surface grease.
Monthly: Deep Clean Using Safe Methods (baking soda, ice, citrus)
Performing a monthly deep clean strips away hidden slime, sharpens the cleaning action of your impellers, and neutralizes sour bacterial odors without damaging internal seals.
Ice and Salt Scrub: Drop 6 to 10 ice cubes and a quarter cup of coarse kosher salt into the chamber, then run the disposal with cold water to scour away grease film.
Baking Soda & Vinegar Fizz: Pour half a cup of baking soda followed by one cup of white vinegar down the drain, let it fizz for ten minutes, and flush with cold water.
Citrus Polish: Grind small lemon or orange peel quarters with cold water to release aromatic natural oils.
Cleaning the Splash Guard (where odors hide)
The removable rubber splash guard is one of the most common hiding spots for foul kitchen odors and hidden mold growth.
Pop It Out: Pull the rubber baffle out from the sink drain opening.
Scrub Thoroughly: Wash both sides of the rubber flaps using a sponge, dish soap, and an old toothbrush to remove trapped black slime and food grease before snapping it back into place.
What to Avoid: Bleach, Harsh Chemicals, and Boiling Water
Using the wrong cleaning products can permanently destroy your garbage disposal housing, degrade rubber gaskets, and ruin your under-sink plumbing.
Harsh Chemical Drain Cleaners: Caustic commercial openers pit metal components and create dangerous splash-back hazards.
Bleach: Strong chlorine bleach corrodes internal aluminum parts and ruins rubber seals without cutting through grease film effectively.
Boiling Water: High heat weakens PVC joints and warps flexible rubber components, leading to leaks under the sink.
Printable-Style Maintenance Checklist
[ ] Run cold water for 15-20 seconds after every use.
[ ] Scrub the rubber splash guard weekly with soapy water and a sponge.
[ ] Run ice cubes and coarse salt monthly to scour away grease buildup.
[ ] Deodorize monthly using baking soda, vinegar, or fresh citrus peels.
[ ] Inspect under the sink monthly for slow leaks around the P-trap or flange.
When to Call a Professional Plumber
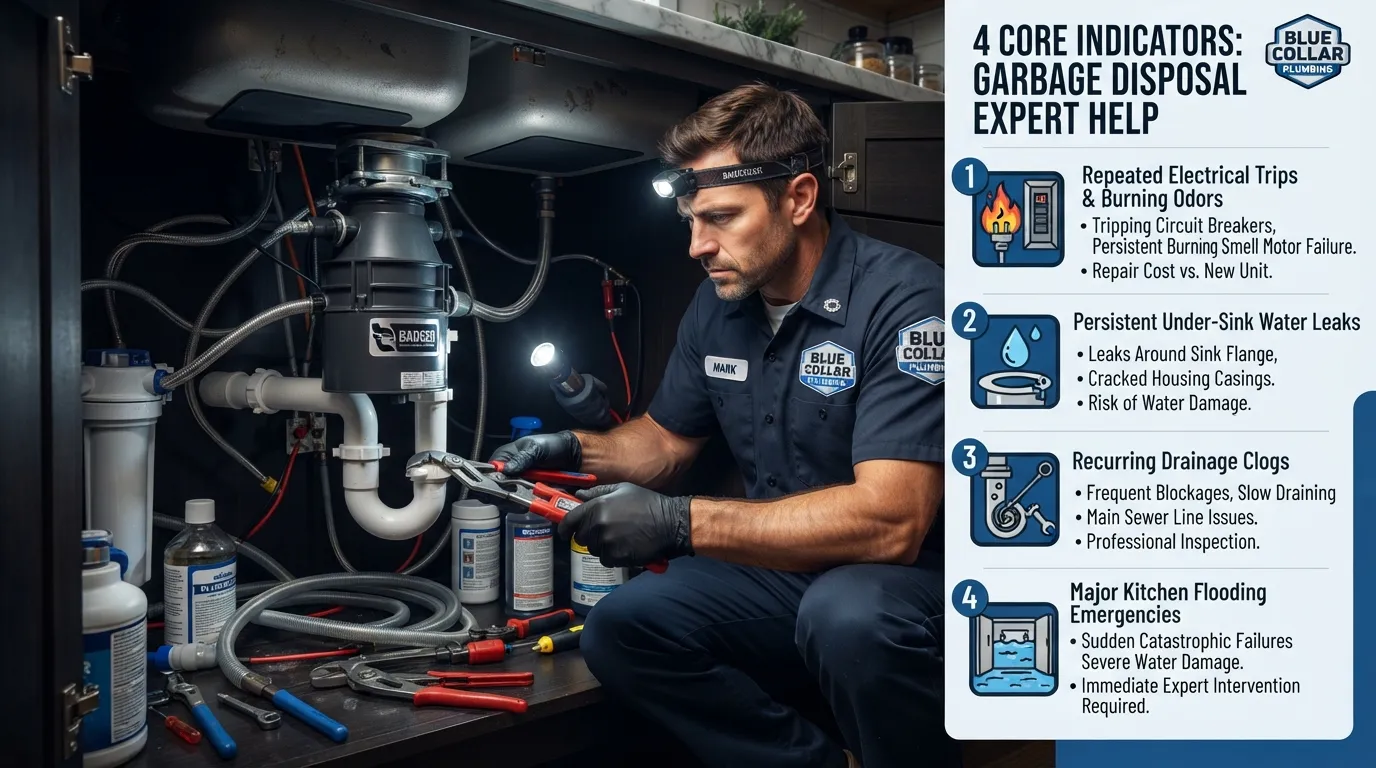
Knowing when to transition from a DIY fix to hiring an expert protects your plumbing system and prevents property damage. Recognizing major red flags ensures you secure professional assistance before minor malfunctions escalate into costly home repairs.
Signs You Need Professional Help
While many minor jams and electrical trips can be resolved with a hex wrench and the reset button, certain symptoms demand expert intervention.
Repeated Jams: If your unit jams continuously despite proper loading habits, internal wear or a failing motor is likely to blame.
Persistent Electrical Trips: When pressing the reset button only works temporarily before tripping again, the motor windings are overheating or shorting out.
Burning Smells: An acrid electrical odor indicates internal motor burnout, requiring immediate electrical inspection or full appliance replacement.
Leaks Under the Sink or Around the Disposal Unit
Water pooling in your under-sink cabinet can originate from the sink flange, the dishwasher hose connection, or cracked housing casings. If tightening slip-joints fails to stop the moisture, schedule leak detection and repair services to prevent subfloor rot and cabinet mold.
Flange Leaks: Often require re-sealing the plumber’s putty and tightening the mounting assembly ring.
Cracked Housings: If the aluminum or stainless steel housing casing develops a fracture, the entire unit must be replaced.
Repeated Clogs or Sewage Backups
When slow drains persist across multiple sinks or raw sewage pushes up into your fixtures, the obstruction has moved past the P-trap and into your home’s main drainage architecture. For these systemic blockages, specialized sewer line services will use professional camera inspections and hydro-jetting to clear the pipe.
Main Line Warning: A clog affecting both your dishwasher and disposal side points directly to your central branch line.
Health Hazard: Raw wastewater backups require immediate containment and sanitization.
Water Flooding the Kitchen or Backing Up Fast
Sudden, uncontrolled water overflow requires immediate action to protect your home’s structural integrity. Shut off your home’s main water supply valve immediately and contact an emergency plumber to mitigate the damage and resolve the failure.
Immediate Containment: Use towels and buckets to stop water from reaching wood flooring or baseboards.
Power Safety: Ensure the electrical breaker for the kitchen is tripped before stepping near standing water around appliances.
Repair or Replace? A Simple Guide
Deciding whether to fix a broken garbage disposal or invest in a brand-new unit depends on the age of the appliance, the severity of the malfunction, and ongoing maintenance expenses.
When to Repair: If the unit is under 5 years old and suffers from simple electrical trips, minor jams, or loose gaskets, professional repairs typically range from $120 to $270.
When to Replace: If your disposal is over 8 to 10 years old, has a cracked grinding chamber, or suffers from complete motor failure, replacement is the more economical choice. Professional garbage disposal replacement generally costs between $200 and $625, depending on motor horsepower and labor.
Expert Consultation: For comprehensive evaluations of your kitchen setup, consult trusted local plumbing services to weigh your repair and replacement options.
Garbage Disposal FAQs
Find quick, authoritative answers to the most frequently asked questions regarding garbage disposal operation, maintenance, and troubleshooting.
What are the most common problems with garbage disposals?
The most common problems with garbage disposals include sudden motor jams caused by hard objects, electrical overloads that trip the reset button, and slow draining due to organic gunk buildup. Most of these issues can be easily diagnosed using the steps outlined in our Troubleshooting section.
What are the most common ways people ruin their garbage disposals?
People most frequently ruin their garbage disposals by running the unit without cold water, pouring hot liquid grease down the drain, or overloading the grinding chamber with fibrous vegetables and potato peels. For a complete breakdown of destructive habits to avoid, check our detailed guide on Common Mistakes That Ruin a Garbage Disposal.
What could be the reason for a garbage disposal draining slowly?
Slow drainage is usually caused by an accumulation of sticky food residue inside the P-trap or a partial grease clog further down the tailpiece. You can learn how to clear these obstructions safely by reviewing our instructions on Slow Draining or Standing Water After Use.
Is it okay to run the disposal without food to clean it?
Yes, running the disposal without food is completely fine when you are performing maintenance tasks like scouring the grinding chamber with ice cubes or running soapy water to flush out surface oils. Always keep a steady stream of cold water flowing during these cleaning cycles, as explained in our Cleaning and Maintenance Routine.
How often should I use my garbage disposal?
You should use your garbage disposal regularly throughout the week to prevent internal mechanical parts from seizing up and to keep the P-trap properly filled with water. Operating the unit consistently with a steady stream of cold water ensures optimal performance, as detailed in our 5 Simple Steps Guide.
Can I put dish soap down the disposal every day?
Yes, squirting a few drops of mild dish soap down your garbage disposal daily is safe and helps lift minor grease films without damaging internal seals. For more details on safe and unsafe cleaning agents, refer to our breakdown of Cleaning and Maintenance Routine.
Final Thoughts and Next Steps
Mastering your garbage disposal requires just a few consistent daily habits, such as running cold water, feeding scraps in moderation, and keeping prohibited items out of the drain. By following these proven best practices, you protect your plumbing system and ensure your kitchen operates smoothly for years to come.
The 5-Second Rule Recap: Cold Water, Small Scraps, Run After, Never Hands, No Grease
Keep these core operational rules in mind every time you use your kitchen sink to prevent almost all common disposal failures:
Cold Water First: Always turn on a steady stream of cold water before activating the motor.
Small Scraps & Amounts: Feed food waste in gradual, bite-sized pinches rather than massive dumps.
Run After Grinding: Let the unit and water run for 10 to 15 seconds after the grinding sound stops.
Never Hands: Keep your fingers completely away from the drain opening; use tools for retrieval.
No Grease or Fibers: Never pour liquid FOG or feed stringy celery and potato peels down the drain.
Need Help with a Stubborn Disposal or Drain?
If your garbage disposal is facing persistent mechanical failures, stubborn leaks, or a severe mainline clog that DIY troubleshooting cannot fix, it is time to bring in professional expertise.
Expert Assistance: Licensed plumbers can quickly diagnose motor windings, clear deep-set obstructions, or safely replace worn-out units.
Schedule Service Online: Need help with a jammed disposal, slow drain, or leak? Book a plumber online to restore your kitchen’s functionality today.
Main Services
Related Posts
Need a Plumber in Miami?
Schedule service online or speak directly with the EZ Plumbing team.
Owner-Led Local Service
Know who is behind the business before you request service. The owners, contact line and Miami service pages are published clearly.
- Named business owners
- Direct phone and social channels
- Local Miami service information
Clear Help Before You Book
Review the relevant service page, contact the team directly and use the booking page when you are ready—without relying on vague claims.
- Service-specific information
- Direct questions before scheduling
- Clear online booking route