
How to Clean a Garbage Disposal: Remove Odors and Gunk Safely
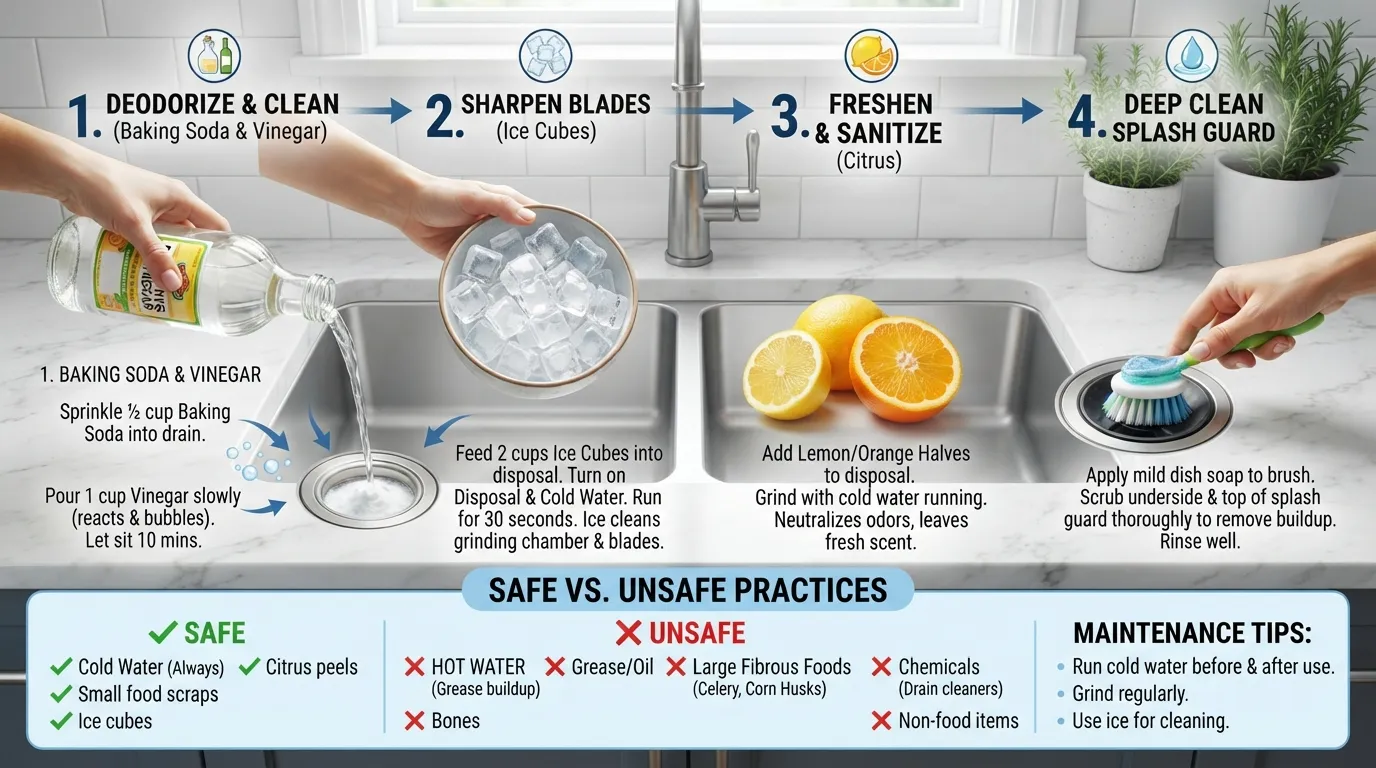
How to Clean a Garbage Disposal
Cleaning your garbage disposal quickly and effectively takes about 15 to 20 minutes using common household ingredients. Follow these four core steps to eliminate odors and maintain peak performance:
Power Off: Ensure the disposal is completely disconnected from the power source or turned off at the breaker for safety.
Scrub the Splash Guard: Remove and clean the rubber baffle thoroughly, as trapped food residue here causes most odors.
Deodorize: Pour baking soda down the drain, follow with white vinegar, and let it fizz for a few minutes.
Finish with Ice & Citrus: Run cold water while grinding ice cubes and citrus peels to sharpen and scour the blades.
What Can You Put Down a Garbage Disposal to Clean It?
Using the right natural abrasives and cleaners protects your blades and plumbing while keeping your sink fresh.
Baking Soda & White Vinegar: Neutralizes stubborn organic acids and breaks down grease buildup inside the grinding chamber.
Ice Cubes: Scours away stubborn sludge and stuck-on food particles from the impeller blades without damaging them.
Citrus Peels (Lemon or Orange): Releases natural oils that leave a fresh, clean scent throughout the unit.
A Few Drops of Dish Soap: Helps lift and wash away lingering grease films during the final flush.
How Long Does It Take?
A standard, routine cleaning takes only 15 to 20 minutes from start to finish. Performing this maintenance every two weeks prevents heavy buildup and extends the overall lifespan of your motor and blades.
Plumber’s Note: The single most common cause of a foul disposal odor is trapped food residue decomposing underneath the rubber splash guard, rather than deep down inside the grinding chamber itself. Always scrub both sides of the baffle first.
Safety First: What to Do Before You Start
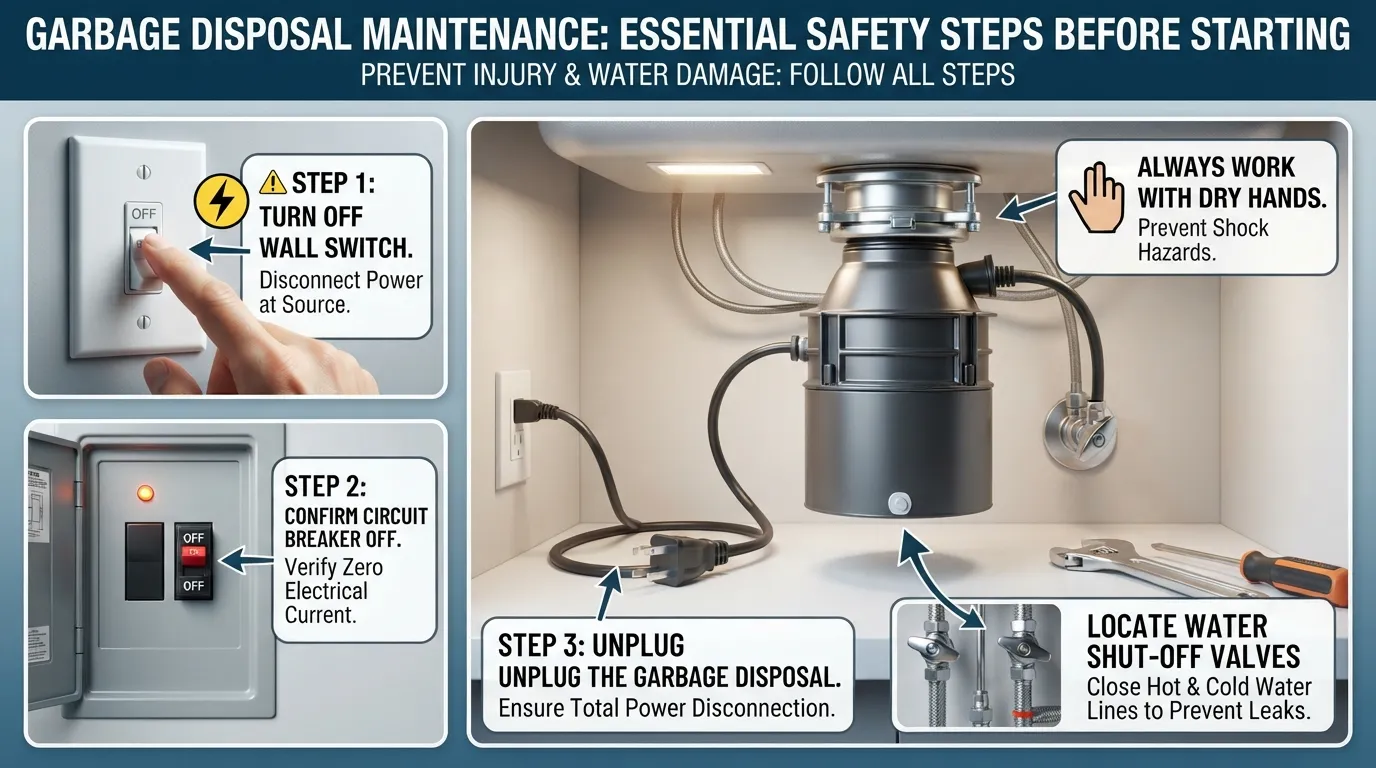
Prioritizing safety before touching your garbage disposal prevents accidental injuries and ensures you can clean the unit without risk. Taking a few precautionary steps protects your hands and respiratory system while maintaining electrical safety.
Turn Off the Power at the Switch or Breaker
Disconnecting power is required for any hands-on cleaning or physical inspection inside the unit.
Flip the Wall Switch: Turn off the dedicated wall switch that operates the disposal.
Unplug the Unit: If your disposal plugs directly into a wall outlet under the sink, unplug it entirely.
Kill the Circuit Breaker: For ultimate safety, switch off the corresponding circuit breaker in your electrical panel so the unit cannot be accidentally turned on.
Never Put Your Hand Inside
Your hands should never go directly into the grinding chamber, even when the power is completely off.
Use Safe Tools: Reach for long-handled tongs or long-nosed pliers to retrieve foreign objects or scrub inner components.
Use a Flashlight: Shine a bright flashlight down the drain opening to inspect the interior walls and blades without risking contact.
When the Power Goes Back On
You will need to restore power during the final flushing stages, which can seem confusing when alternating between hands-on work and motorized cleaning.
Power Off for Scrubbing: Keep the disposal off while scrubbing the splash guard and letting baking soda fizz.
Power On Only for Grinding: Reconnect or switch on power exclusively when you are ready to grind ice cubes and citrus peels with cold water running.
Clear Separation: Treat the cleaning phase as strictly manual (no power) and the scouring phase as strictly mechanical (power on with water), ensuring instructions never overlap dangerously.
Protective Gear
Wearing the right gear protects your skin and eyes from debris, backsplash, and harsh cleaning solutions.
Rubber Gloves: Shield your hands from bacteria, grease, and cleaning acids while handling the splash guard.
Eye Protection: Wear safety glasses to prevent dirty water or debris from splashing into your eyes.
Old Toothbrush: Keep a dedicated toothbrush handy for scrubbing tight crevices around the rubber baffle and sink flange.
Do Not Mix Cleaning Chemicals
Mixing cleaning agents can create hazardous conditions under your sink that threaten your health.
Never Combine Bleach and Vinegar: Mixing bleach with white vinegar releases dangerous, toxic chlorine gas fumes.
Stick to Safe Basics: Use natural cleaners like baking soda, vinegar separately, and dish soap to avoid accidental chemical reactions.
What You'll Need
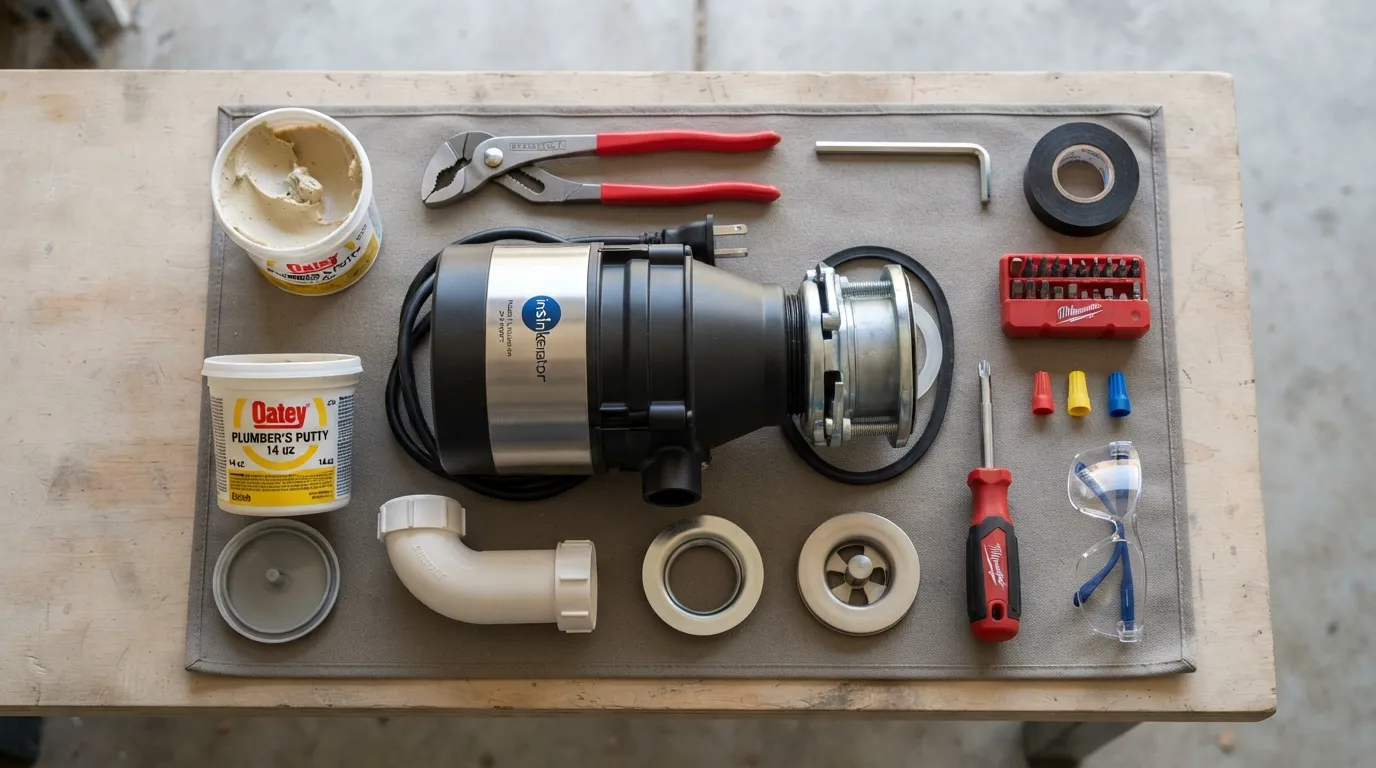
Gathering your supplies beforehand ensures a smooth, uninterrupted cleaning process. Having everything organized under the sink lets you move quickly between manual scrubbing and natural deodorizing steps.
Supplies Checklist
Preparing the right household items and tools makes deep cleaning efficient and safe:
Baking Soda: Neutralizes trapped food odors and breaks down organic buildup.
White Vinegar: Reacts with baking soda to lift grime and clean interior surfaces.
Ice Cubes: Scours sludge and sharpens disposal impeller blades when ground.
Coarse Salt (Rock or Kosher Salt): Acts as an abrasive partner to ice cubes for scrubbing sticky residue.
Lemon or Orange Peels: Releases natural citrus oils to leave a fresh scent.
Dish Soap: Cuts through lingering grease films during the final rinse.
Old Toothbrush: Reaches tight crevices around the rubber splash guard.
Scouring Pad: Scrubs away surface grime safely around the sink flange.
Rubber Gloves: Protects hands from bacteria, grease, and cleaning acids.
Flashlight: Illuminates the dark interior of the grinding chamber safely.
Optional: Commercial Disposal Cleaners
If you prefer a pre-measured alternative to household remedies, specialized commercial disposal cleaner tablets or foaming packets are widely available. These products are designed to foam up and strip away grease without requiring harsh chemicals.
Step-by-Step: How to Clean Your Garbage Disposal
Deep cleaning your garbage disposal requires a systematic approach to eliminate bacteria, grease, and trapped food debris. Follow this step-by-step process to restore freshness and efficiency to your sink.
Step 1: Clean the Splash Guard (Rubber Baffle)
Action: Scrub the underside of the rubber baffle thoroughly using dish soap, an old toothbrush, and warm water. On many modern models, the entire splash guard can be completely popped out for a deep soak or dishwasher rinse.
Why it works: This is where the vast majority of foul kitchen odors originate, as decomposing food particles cling relentlessly to the rubber flaps.
How long: Takes about 3 to 5 minutes.
Watch the full video walkthrough on cleaning your garbage disposal.
Step 2: Deodorize with Baking Soda and Vinegar
Action: Pour half a cup of baking soda down the drain, followed by one cup of white vinegar. Let the mixture fizz and react for 10 to 15 minutes, then flush it with hot tap water.
Why it works: The chemical fizzing action neutralizes stubborn organic acids and lifts light grease films.
Honest Note: This step primarily deodorizes and loosens light residue; it will not scrub away heavy, hardened sludge on its own.
How long: Takes about 10 to 15 minutes of resting time.
Step 3: Scour the Grinding Chamber with Ice and Salt
Action: Pour two cups of ice cubes and half a cup of coarse rock salt (or kosher salt) down the drain. Turn on the cold water and run the disposal until all the ice is completely crushed and flushed away.
Why it works: The hard ice acts as an abrasive scrubber that knocks loose stuck-on food sludge from the impeller blades and walls without damaging metal components.
Salt Caution: Use coarse salt sparingly (once a month or less) to prevent long-term corrosion risks on older metal components.
How long: Takes about 1 to 2 minutes.
Step 4: Freshen with Citrus
Action: Drop a few lemon or orange peels into the running disposal with cold water enabled for 15 to 30 seconds.
Why it works: The natural citrus oils cut through lingering grease and release a crisp, clean scent across the entire sink basin.
How long: Takes about 30 seconds.
Step 5: Final Rinse
Action: Keep the cold water running continuously for 30 seconds after everything has cleared to push all loosened debris completely down the main drain line.
Why it works: Ensures no residual grit or salt stays trapped in the P-trap.
How long: 30 seconds.
What We See on Service Calls: In professional plumbing service visits, over 70% of garbage disposal odor complaints are solved not by fixing the motor, but by simply cleaning a slimy, neglected rubber splash guard.
Before Cleaning: The splash guard appears dark, slimy, and coated in hardened black organic buildup that traps food particles during every sink use.
After Cleaning: The rubber baffle is clean, flexible, and completely free of residue and trapped smells.
How to Deep Clean a Smelly Disposal and Remove Black Gunk
If routine cleaning fails to eliminate persistent odors or if your sink emits a foul smell, your unit requires a more intensive deep clean. Tackling stubborn buildup ensures your kitchen remains hygienic and fully functional.
What Is the Black Gunk in My Garbage Disposal?
The dark, slimy buildup commonly found inside a garbage disposal is a combination of built-up food residue, accumulated grease, and trapped bacterial or mold growth. This biofilm typically thrives on the underside of the rubber splash guard and along the upper lip of the grinding chamber where dishwater constantly splashes.
Why Disposals Smell Worse in Warm, Humid Climates
High temperatures and elevated humidity levels dramatically accelerate the decomposition of microscopic food particles trapped inside kitchen plumbing. In warm regions, organic matter breaks down much faster, creating heavy bacterial slime and foul odors in a fraction of the time compared to cooler climates.
The Deep-Clean Method
Restoring a heavily soiled disposal requires targeted manual labor beyond standard rinsing cycles:
Remove and Soak the Baffle: Pop out the rubber splash guard completely if your model permits, and soak it in a mixture of warm water and dish soap.
Scrub the Upper Lip: Take a soapy scouring pad or an old toothbrush to aggressively clean the upper rim and collar where grease and black gunk accumulate.
Flood the Chamber: Pour half a cup of baking soda down the throat of the unit and add warm water to create a cleansing slurry that loosens stubborn organic films.
Final Flush: Run cold water through the disposal while operating the motor to clear away all dislodged biofilm and grease.
Grinding Hard Items Occasionally
Dropping a few hard items like clean fruit pits or small ice-bound bones down the disposal can help mechanically scour away stubborn internal sludge. Always check your manufacturer’s manual first, as certain high-end or older models can be damaged by overly rigid materials.
When Odor Isn’t Coming from the Disposal Itself
If deep cleaning the disposal unit fails to resolve the smell, the underlying issue may originate elsewhere in your plumbing system. Check your dishwasher air gap, sink overflow drain, or the P-trap beneath the sink for trapped debris.
Garbage Disposal Cleaning Myths and What Is Actually Safe
Garbage disposal maintenance is plagued by old wives’ tales that often do more harm than good to your plumbing system. Separating outdated home remedies from plumbing science protects your appliance and extends its lifespan without risking costly repairs.
Is It Safe to Put Baking Soda and Vinegar Down the Garbage Disposal?
Baking soda and vinegar are safe for your garbage disposal in normal household amounts, acting as a mild deodorizer rather than a heavy-duty cleaner. The classic fizzy reaction creates carbon dioxide gas, which can help loosen minor surface odors, but it lacks the chemical power to cut through heavy grease buildup.
How it works: Pour half a cup of baking soda down the drain, follow with one cup of white vinegar, and let it fizz for 10 minutes.
The limitation: While it neutralizes minor smells, it will not remove the thick layer of organic sludge clinging to the interior walls.
Best practice: Use this method strictly for routine freshness between deep cleanings rather than as a primary degreaser.
Does Putting Ice in the Garbage Disposal Clean It?
Ice helps knock off loose, semi-solid food residue from the grinding chamber, but it melts too quickly to perform a deep clean. Furthermore, a widespread myth claims that ice sharpens disposal components; however, standard residential garbage disposals rely on blunt rotating impellers rather than sharp blades.
The mechanical reality: Disposals use centrifugal force and heavy-duty metal lugs to pulverize waste against a stationary grind ring, not razor edges.
Proper execution: Running a couple of trays of ice cubes helps dislodge stubborn food particles stuck to the sidewalls.
Authoritative reference: Review the manufacturer’s cleaning guidance noopener” target=”_blank”} for official instructions on maintaining your specific model safely.
Can I Put a Dishwasher Pod in My Garbage Disposal?
Dishwasher pods should never be placed directly into a garbage disposal because they are formulated for enclosed, high-water-volume dishwasher cycles. These concentrated pods generate an overwhelming amount of suds that can flood the sink and fail to rinse away properly inside the grinding chamber.
Concentrated surfactants: The high-concentration detergents inside pods can strip protective lubricants and damage internal rubber seals.
Foam overflow: Excess suds will quickly back up through the sink drain and surrounding air gaps, creating a messy cleanup hazard.
Safer alternative: Stick to liquid dish soaps or specialized disposal cleaning tablets designed specifically for low-suds requirements.
Can I Use Dawn Dish Soap to Clean My Garbage Disposal?
Dawn dish soap is safe to use in small amounts when paired with plenty of cold water to cut through trapped grease. Because dish soap creates suds, controlling the volume prevents an overflow while effectively breaking down oily residues left behind by food waste.
Application method: Squirt a small amount of liquid dish soap directly onto the interior walls while the disposal is turned off.
Rinsing technique: Turn on a steady stream of cold water and run the disposal for 15 to 30 seconds to flush away dissolved grease.
Suds warning: Never over-pour dish soap; excess foam will fill the chamber and trap debris instead of washing it down the drain.
Is It Okay to Pour Boiling Water Down the Garbage Disposal Drain?
Pouring boiling water straight down your garbage disposal drain can warp PVC pipes, soften rubber sink gaskets, and compromise glued plumbing joints. While hot water is necessary to melt grease, boiling water pushes drainage materials past their thermal limits.
Thermal shock risk: Standard residential PVC drain lines are typically rated for hot water up to 140°F, meaning boiling water can weaken pipe integrity.
Rubber component damage: Extreme heat can degrade the splash guard and internal sink flanges, leading to premature leaks under the sink.
Recommended alternative: Use hot tap water combined with a mild dish soap to safely flush out residues without risking plumbing damage.
Garbage Disposal Cleaners: Myth vs. Fact
| Cleaning Method | Reality | What to Do Instead |
| Baking Soda & Vinegar | Mild deodorizer only; cannot cut heavy grease. | Use for routine odor control; follow with cold water flushes. |
| Ice for Sharpening | Disposals use blunt impellers, not sharp blades. | Use ice solely to knock loose, stuck-on food residue. |
| Dishwasher Pods | Causes extreme sudsing and damages seals. | Use mild liquid dish soap or approved disposal tablets. |
| Boiling Water | Can warp PVC pipes, fittings, and rubber seals. | Use hot tap water to safely flush debris and grease. |
What You Should Never Put Down a Garbage Disposal
Preventing plumbing emergencies starts with understanding that a garbage disposal is designed exclusively for light food scraps, not as a universal trash can. Knowing which materials cause severe clogs and mechanical damage saves you from expensive plumbing repairs and protects your drainage system.
Grease, Oil, and Fat
Pouring hot grease, cooking oil, or melted fat down your garbage disposal creates major blockages as these liquids cool and solidify inside your plumbing lines. While they may flow smoothly at first, they coat the interior walls of your pipes and trap other food particles over time.
The clumping effect: Congealed fats act as an adhesive, binding loose debris together to form stubborn, immovable clogs.
Odor development: Trapped fats turn rancid inside the grinding chamber, causing persistent, unpleasant kitchen odors.
Proper disposal: Let grease cool completely, pour it into an empty container, and throw it in the trash or take it to a local collection site.
Coffee Grounds, Eggshells, and Pasta or Rice
Coffee grounds pack tightly together in drain traps to form a mud-like paste, while eggshells have a thin membrane that wraps around impellers and coats pipes. Starchy foods like pasta and rice continue to expand when they absorb water, turning into a glue-like sludge that easily jams the disposal mechanism.
Drain trap accumulation: Coffee grounds bypass the grinding blades easily but settle in low points of the plumbing, causing slow drains.
Membrane wrapping: Eggshell fragments do not sharpen blades; instead, they slip past and accumulate in pipe bends.
Sustainable alternative: Divert coffee grounds, eggshells, and starchy scraps into your home compost bin instead of the sink.
Fibrous Foods
Fibrous foods like celery stalks, corn husks, onion skins, and artichokes feature long, stringy plant threads that wrap tightly around the disposal’s motor shaft. Because these fibers resist being pulverized, they stall the motor and burn out the unit.
Shaft jamming: Tough threads wind around the rotating parts like rope, locking up the motor instantly.
Blade obstruction: Impellers struggle to cut through dense cellulose structures, leading to frequent system jams.
Best practice: Always throw fibrous vegetable trimmings into the trash or compost pile rather than feeding them down the drain.
Harsh Chemical Drain Cleaners
Harsh chemical drain cleaners should never be used in a garbage disposal because their corrosive formulas can eat through metal components and damage rubber seals. These caustic liquids can also splash back out of the sink drain when the disposal is accidentally run, creating a severe safety hazard.
Corrosive damage: Strong acids and lye deteriorate the interior metal grind ring and ruin the rubber splash guard.
Plumbing risks: Chemical heat reactions can warp PVC pipes and weaken glued plumbing joints under the sink.
Safe alternative: If your disposal clogs, manually clear it using a hex wrench underneath the unit and a plunger, or call a professional plumber.
Non-Food Items
Non-food items such as glass, plastic, metal, and rubber objects will instantly jam, crack, or destroy your garbage disposal if they fall into the chamber. Even small items like twist ties, toothpicks, or silverware can shatter the grinding mechanism or pierce the housing.
Catastrophic failure: Hard objects shatter against the metal components, causing severe mechanical damage that usually requires a total unit replacement.
Safety hazard: Trying to retrieve foreign objects with your hands while the unit is connected to power risks severe injury.
Prevention routine: Keep the sink stopper in place when not actively grinding food to block accidental entry of foreign debris.
What Not to Put Down Your Disposal
| Item | Why It Is a Problem | Better Alternative |
| Grease, Oil, & Fat | Solidifies in pipes and traps debris to cause clogs. | Collect in a container and throw in the trash. |
| Coffee Grounds & Eggshells | Packs into dense sludge and clogs pipe traps. | Add to your compost bin for nutrient-rich soil. |
| Fibrous Foods | Stringy threads wrap around the motor shaft and stall it. | Place celery and corn husks in the trash or compost. |
| Chemical Drain Cleaners | Corrodes metal parts, ruins seals, and damages pipes. | Use a manual hex wrench to clear jams safely. |
| Non-Food Items | Shatters components and destroys the grinding mechanism. | Keep the sink stopper in place to block foreign objects. |
How Often Should You Clean Your Garbage Disposal?
Establishing a structured cleaning routine prevents foul odors, eliminates grease buildup, and extends the lifespan of your garbage disposal. Balancing daily maintenance with light weekly and monthly upkeep keeps your kitchen plumbing running smoothly and efficiently.
Recommended Cleaning Schedule
A predictable maintenance calendar prevents organic buildup before it hardens into stubborn clogs or foul-smelling sludge. Following a tiered schedule ensures every part of the appliance gets the right attention at the right time.
| Frequency | Cleaning Task | Purpose |
| After Each Use | Flush with cold water for 15 to 30 seconds. | Clears out remaining food particles and hardens any residual grease. |
| Weekly | Grind ice cubes or citrus peels. | Knocks loose loose debris and refreshes the sink aroma. |
| Monthly | Run baking soda and vinegar. | Neutralizes minor odors and breaks down light organic film. |
| Quarterly | Remove and scrub the rubber splash guard. | Eliminates hidden mold, slime, and trapped bacteria. |
Daily Habits That Prevent Odors
Implementing simple daily habits stops food debris from decomposing inside the grinding chamber and eliminates the root cause of kitchen sink odors. Proper water usage and mindful scraping protect your plumbing system from unnecessary strain.
Run cold water early: Turn on a strong stream of cold water a few seconds before turning on the disposal, and let it run for 30 seconds after it shuts off.
Scrape plates thoroughly: Remove heavy food scraps and solid waste into the trash or compost before rinsing dishes in the sink.
Feed waste gradually: Avoid dumping large amounts of food all at once; feed scraps slowly while the motor is running to prevent overloading.
Adjusting for Heavy Use or Large Households
Homes that cook frequently, process high volumes of organic waste, or accommodate large families need to adjust their cleaning schedule to handle extra wear. Increasing maintenance frequency prevents accelerated buildup from heavy daily use.
Upgraded weekly routine: Double the frequency of ice or citrus cleanings to twice a week to combat heavy grease and starch accumulation.
Proactive degreasing: Perform the baking soda and vinegar treatment every two weeks instead of monthly to stay ahead of heavy food preparation residue.
Regular inspection: Check the rubber splash guard and under-sink connections monthly rather than quarterly to catch minor leaks or slime buildup early.
Still Smells or Not Working After Cleaning? Troubleshooting
When standard cleaning methods fail to eliminate foul odors or your disposal stops operating entirely, the issue typically lies deeper within your plumbing network or mechanical components. Pinpointing the root cause prevents unnecessary appliance replacements and helps you determine when to call a professional.
Bad Smell Still There After Cleaning
If stubborn odors persist despite thorough cleaning and deodorizing, the source is likely trapped outside the immediate grinding chamber [00:10]. Persistent smells often point to hidden grease accumulation further down the drain line or an issue with your plumbing vents.
Drain line residue: Decomposing organic film coating the interior walls of your waste pipes requires professional drain cleaning to fully remove.
Dry P-trap: If a sink is rarely used, water in the curved P-trap can evaporate, allowing foul sewer gases to enter your kitchen.
Venting and sewer issues: A blocked roof vent prevents proper airflow, pulling sewer odors back up through your sink drain.
Slow Draining or Standing Water in the Sink
Standing water or sluggish drainage indicates a clog located past the garbage disposal unit itself. Running the disposal will not fix a blockage further down the pipe and can cause dirty water to back up into the basin.
Beyond the unit: The obstruction is typically lodged in the tailpiece, trap, or main branch line rather than the disposal chamber.
Professional intervention: When plunging or manual snaking fails to restore normal flow, expert drain cleaning services can safely clear deep obstructions.
Smell in Multiple Drains at Once
When foul odors appear simultaneously across your kitchen sink, bathroom vanity, or shower drains, the problem stems from a main sewer line issue rather than a localized disposal problem. This requires immediate investigation to prevent major sewage backups.
Main line compromise: Clogs, root intrusions, or structural damage in your primary sewer lateral restrict airflow and waste movement.
Targeted solutions: Multi-fixture odors require specialized sewer line services to inspect, clean, or repair your main plumbing system.
Humming Noise, Jammed Unit, or No Power
If your disposal emits a hum without grinding, or fails to turn on entirely, the unit has likely tripped its internal safety overload or suffered a physical jam [00:52]. Always shut off power at the wall switch or circuit breaker before inspecting the appliance.
Reset button: Press the red reset button located on the bottom or side of the motor housing to restore power after an overload.
Hex key rotation: Insert a hex wrench into the socket underneath the center of the unit to manually free stuck impellers.
Consult your manual: Follow the manufacturer’s troubleshooting guide for specific safety steps and electrical reset instructions.
Leaks Under the Sink
Water pooling beneath your garbage disposal usually stems from a loosened mounting assembly, a deteriorating sink flange, or a cracked discharge tube. Catching leaks early prevents structural cabinet damage and subfloor rot.
Common trouble spots: Inspect the rubber splash guard seating, the three-bolt mounting ring, and the slip-joint connections on the drain pipes.
Immediate action: Tighten loose connections gently, replace worn gaskets, or schedule professional leak detection and repair if the disposal housing itself is cracked.
Garbage Disposal and Dishwasher Connection: Common Questions
Integrating a dishwasher with a garbage disposal streamlines kitchen waste management, but it introduces specific connection and maintenance considerations. Understanding how these two appliances interact prevents drainage failures, code violations, and unexpected backups under your sink.
Can I Drain My Dishwasher Directly into the Garbage Disposal?
You can drain your dishwasher directly into the garbage disposal by attaching the dishwasher drain hose to the dedicated inlet port on the side of the unit. This setup allows food particles rinsed from dishes to be pulverized and washed away through the main plumbing line, provided your installation complies with local plumbing codes.
Connection setup: The flexible rubber hose from your dishwasher secures directly to the disposal’s side inlet nipple using a sturdy hose clamp.
High loop requirement: Many installations require routing the dishwasher hose as high as possible beneath the countertop to prevent dirty sink water from backflowing into the appliance.
Code verification: Always check local plumbing regulations before installation to ensure direct disposal connections are permitted in your municipality.
Does a Dishwasher Need an Air Gap If You Have a Garbage Disposal?
Whether your dishwasher needs a physical air gap mounted on the sink depends entirely on your local plumbing code requirements. An air gap is a small, protective device that prevents wastewater from siphoning back into your dishwasher, though a properly installed high loop of the drain hose often serves as an approved alternative in many areas.
Code variations: Certain regional building codes strictly mandate physical air gaps, while others accept a high loop configuration under the countertop.
Overflow prevention: If your sink clogs, an air gap safely directs backing-up water out onto the countertop rather than flooding your dishwasher basin.
Consult professionals: Verify local requirements with a licensed plumber or your city’s building department to ensure compliance.
Should I Remove the Knockout Plug Before Using the Dishwasher?
When installing a new dishwasher with a new garbage disposal, you must remove the internal plastic knockout plug from the disposal inlet, or your dishwasher will completely fail to drain. Leaving this plastic plug intact traps water inside the dishwasher and can cause severe appliance flooding during its first cycle.
Removal technique: Tap the plastic plug inward using a hammer and a long screwdriver until it pops loose into the grinding chamber.
Critical safety warning: Always reach inside and retrieve the plastic disk from the disposal unit before operating the appliance to prevent jammed impellers or motor damage.
New installations: This step only applies to brand-new garbage disposals; replacement units connected to existing dishwashers will already have an open inlet.
Why This Matters for Cleaning
The connection between your dishwasher and garbage disposal creates a shared pathway where organic debris can accumulate and trigger lingering kitchen odors. Because dishwasher discharge passes directly through the disposal inlet port, regular maintenance of both appliances is essential for long-term freshness.
Residue transfer: Oils and food particles from dishwasher cycles can coat the internal inlet nipple and the rubber splash guard, breeding bacteria.
Hidden buildup: Sludge frequently hides inside the dishwasher hose connection point, requiring periodic inspection and cleaning.
Integrated upkeep: Running routine cleaning cycles keeps both the disposal chamber and the dishwasher drainage path completely clear of trapped grease and food particles.
When to Call a Professional Plumber
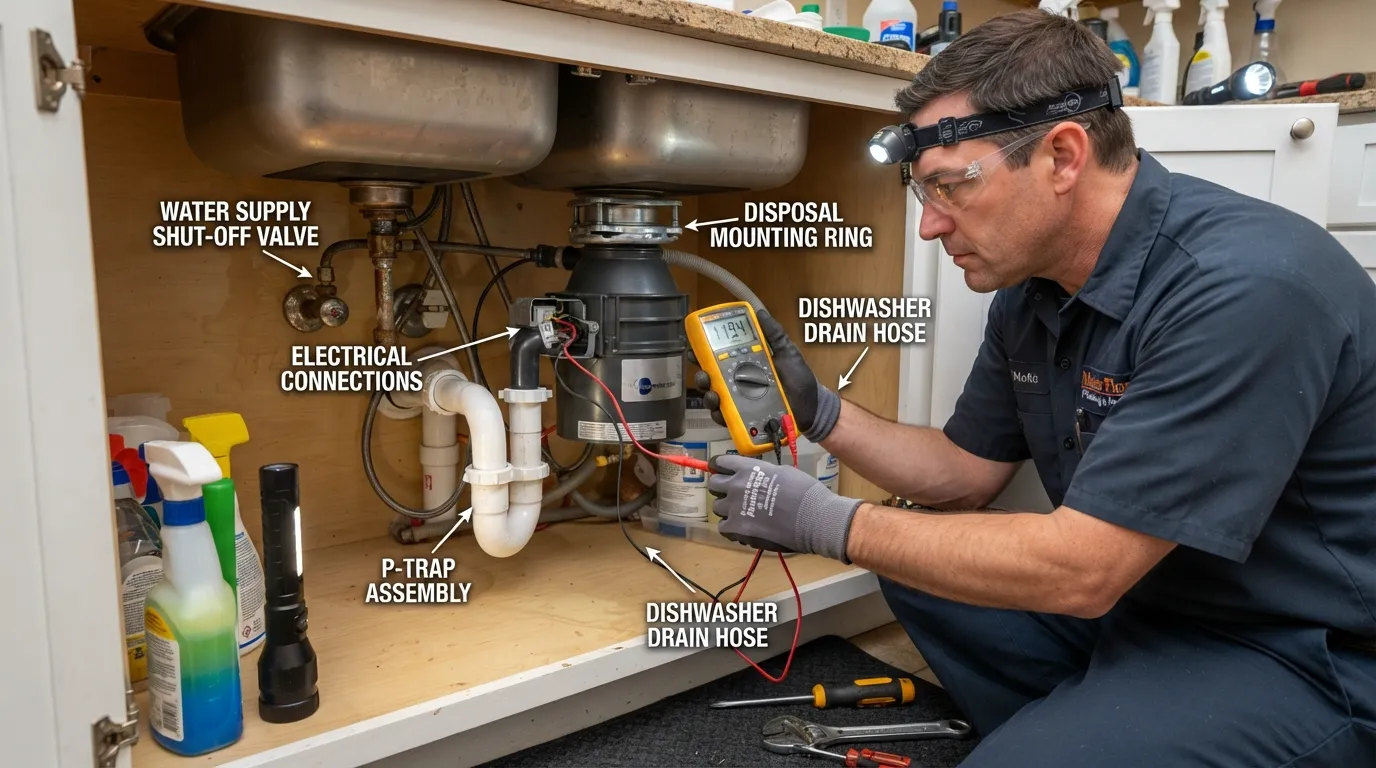
While routine maintenance and basic troubleshooting can resolve many garbage disposal issues, certain plumbing problems require expert intervention. Knowing when to stop DIY repairs and call a licensed plumber protects your home from extensive water damage and ensures your kitchen drainage system operates safely.
Signs It’s Time to Call a Plumber
Recognizing the early warning signs of a failing garbage disposal or compromised plumbing line helps you prevent minor inconveniences from turning into costly household emergencies. Persistent performance issues usually point to deep mechanical or structural failures.
Repeated clogs: If your disposal clogs frequently despite proper usage and cleaning, a deeper blockage exists within the waste lines.
Persistent sewer smells: Odors that return immediately after cleaning indicate venting failures or severe organic buildup inside your drain pipes.
Structural leaks: Water leaking from cracked disposal housings or corroded sink flanges requires immediate component replacement.
Total motor failure: When a unit hums or refuses to turn on even after resetting and clearing jams, the electrical components have burned out.
Water Leaking or Flooding Under the Sink
Sudden water leaks or active flooding beneath your kitchen sink demand immediate action to prevent subfloor rot, mold growth, and structural damage to cabinetry. Safety must always come first when dealing with water near electrical appliances.
Emergency shutdown: Immediately turn off the under-sink water supply valves and switch off power to the disposal at the wall or circuit breaker.
Immediate professional help: Contact an experienced emergency plumber to diagnose the leak, replace damaged pipes, or install a replacement unit safely.
Book a Plumbing Visit
When troubleshooting steps fail to restore your garbage disposal or drainage system, scheduling a professional service visit is the most reliable path forward. A certified technician will perform a comprehensive inspection to diagnose the root cause and provide a lasting solution.
Diagnostic checklist: A professional will thoroughly inspect your disposal motor, under-sink connections, P-trap, and main drain line.
Transparent solutions: Technicians provide clear repair recommendations, whether that involves clearing a deep blockage or completing a complete disposal replacement.
Schedule your service: Book an appointment today to get your kitchen back in working order with expert care.
Broader Plumbing Needs
Garbage disposal issues are frequently connected to wider plumbing or drainage challenges throughout your home. Partnering with skilled professionals ensures every part of your system functions seamlessly.
Comprehensive care: Beyond garbage disposals, expert plumbing services cover everything from fixture installations to whole-home repiping and advanced leak detection.
Garbage Disposal Cleaning FAQs
Quick, authoritative answers to common questions about garbage disposal maintenance help resolve lingering doubts and ensure safe, effective appliance care.
How Do I Get Rid of the Smell in My Garbage Disposal Fast?
Fast odor elimination requires cleaning the underside of the rubber splash guard with dish soap and scrubbing away accumulated slime. Follow this by running ice cubes and citrus slices through the grinding chamber to freshen the drain instantly.
What Is the Best Thing to Clean a Garbage Disposal with?
The best routine cleaner is a combination of mild dish soap, cold water flushes, and specialized disposal cleaning tablets. These options cut through grease safely without damaging internal rubber components or corroding metal parts.
Can I Use Bleach in My Garbage Disposal?
Bleach is not recommended as a routine garbage disposal cleaner because it can degrade rubber seals and splash guards over time. Furthermore, never mix bleach with vinegar, ammonia, or other cleaning products, as this creates toxic and hazardous chemical fumes.
Is It OK to Leave a Garbage Disposal Unused for a Long Time?
Leaving a garbage disposal unused for an extended period allows trapped food residue to dry out and attract bacteria, leading to severe odors. If you are going away, flush the system thoroughly and run water periodically to keep seals moist and prevent stagnation.
How Do I Clean a Disposal Without a Splash Guard I Can Remove?
If your splash guard is permanently fixed, use an old toothbrush or a small bottle brush dipped in dish soap to scrub underneath the rubber flaps. Take your time wiping away the hidden slime and grime where bacteria and odors originate.
Can Lemon Peels Damage a Garbage Disposal?
Cutting up lemon peels and grinding them in small amounts is a great way to deodorize your sink and freshen the unit. However, avoid dumping massive quantities or stringy fibrous peels all at once, as they can wrap around the motor shaft and cause a jam.
Main Services
Related Posts
Need a Plumber in Miami?
Schedule service online or speak directly with the EZ Plumbing team.
Owner-Led Local Service
Know who is behind the business before you request service. The owners, contact line and Miami service pages are published clearly.
- Named business owners
- Direct phone and social channels
- Local Miami service information
Clear Help Before You Book
Review the relevant service page, contact the team directly and use the booking page when you are ready—without relying on vague claims.
- Service-specific information
- Direct questions before scheduling
- Clear online booking route