
Signs Your Dishwasher Water Line May Need to Be Replaced: What to Do Next
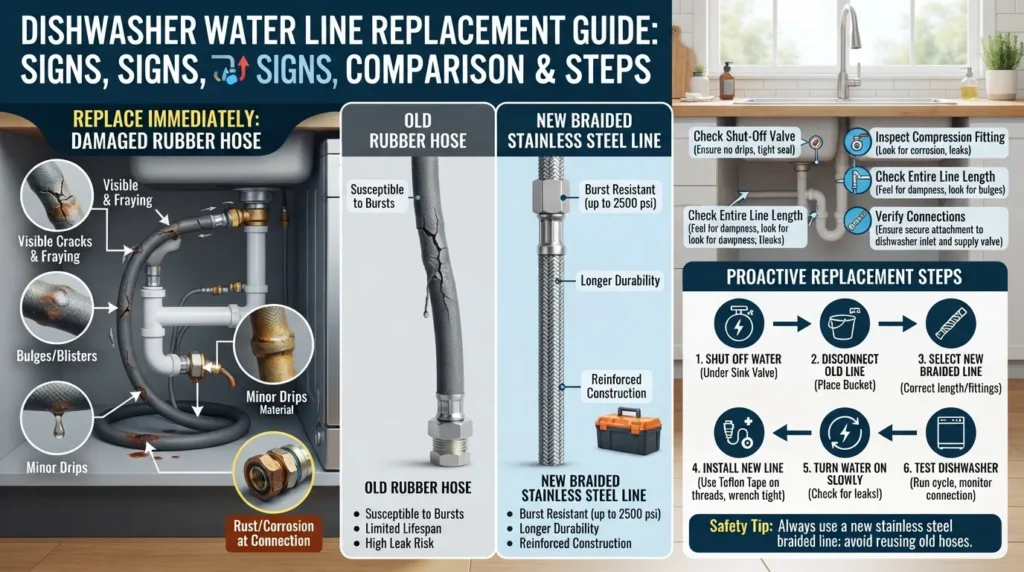
Signs Your Dishwasher Water Line May Need to Be Replaced
A failing dishwasher water line typically reveals itself through visible leaks, cracks, bulges, severe kinks, or rust on the braided stainless steel or copper tubing, as well as when the appliance fills slowly or fails completely. Because standard supply lines have a dependable lifespan of 5 to 10 years, catching these warning signs early is essential to protecting your kitchen from catastrophic water damage.
Safety First: Turn off the under-sink shut-off valve and the dishwasher’s breaker before touching anything. If you are dealing with an active indoor flood or a severe pipe burst, consult an cy plu
emergenmber immediately.
This guide covers the critical warning signs of hose degradation and outlines proactive steps for scheduling a timely water line replacement.
Visual Indicators of Hose Wear and Tear
Braided stainless steel and copper supply lines undergo constant thermal expansion, water pressure fluctuations, and natural aging behind your cabinetry. Routine checks during your annual inspection can catch minor issues before they turn into costly structural repairs.
Moisture or Active Puddling: Finding unexplained wetness beneath the sink, pooled water directly under the dishwasher door, or damp subflooring points directly to a compromised supply line or failing compression fitting.
Corrosion and Rust Spots: Rust patches, green oxidation, or mineral crust buildup along metal fittings indicate that the outer protective mesh or core tubing is corroding and losing structural integrity.
Bulges and Blisters: A localized ballooning effect or swollen section on the flexible hose means the inner tubing has ruptured under pressure and is moments away from bursting.
Kinks and Sharp Bends: Severe pinches restrict water flow into the appliance drum while creating high-stress fracture points in the metal or braided material over time.
Operational Red Flags Indicating Line Restriction
Physical damage is not always visible on the exterior; internal scaling or severe pinching can choke off the water supply entirely, impacting your appliance’s cleaning performance.
Sluggish Filling Cycles: If your dishwasher takes twice as long to fill or frequently pauses during the cycle, mineral blockages or a pinched water line may be restricting incoming volume.
Complete Lack of Water Supply: When the machine runs its cycle dry despite hearing the inlet valve hum, verify whether the line is completely blocked or if the supply valve is jammed.
Age-Related Brittleness: Rubber or polymer inner cores harden, crack, and become brittle once the hose exceeds its recommended 5 to 10 year lifespan.
Proactive Prevention and Maintenance Checklist
Preventing unexpected kitchen floods requires adopting a routine maintenance schedule to monitor the condition of your plumbing infrastructure.
Conduct Annual Inspections: Inspect the entire length of the dishwasher water supply line and connection joints at least once a year using a flashlight and a dry paper towel to test for hidden moisture.
Replace on Schedule: Swap out old supply lines proactively every 5 to 10 years, even if they appear functional, to eliminate the risk of sudden material fatigue.
Upgrade to Braided Stainless Steel: Replace outdated plastic or plain rubber hoses with high-burst-rated braided stainless steel lines that offer superior durability and kink resistance.
Verify Valve Operation: Test the under-sink shut-off valve annually to ensure it closes completely and smoothly in the event of an urgent plumbing leak.
Dishwasher Water Line Warning Signs at a Glance
This quick-reference guide breaks down common dishwasher water line symptoms, what they mean for your plumbing infrastructure, and the exact action you need to take to prevent major water damage.
Quick-Reference Table
| Symptom / Sign | What It Usually Means | Urgency Level | What to Do |
|---|---|---|---|
| Active Leak or Puddling | Compromised hose wall, loose compression fitting, or pinhole puncture. | Urgent | Shut off the water supply valve immediately and dry the area to prevent floor rot. |
| Hose Bulge or Blister | Inner core material has failed under pressure; material is ballooning. | Urgent | Replace the supply line immediately before a catastrophic high-pressure burst occurs. |
| Visible Rust or Corrosion | Outer braided mesh or metal connectors are oxidizing and losing structural strength. | Medium | Schedule a proactive water line replacement during the week to avoid sudden failure. |
| Severe Kink or Bend | Pinching restricts water volume and creates a high-stress metal fracture point. | Medium | Straighten or reroute the line carefully; replace it if the inner lining is permanently creased. |
| Slow Filling Cycles | Partial blockage, scaling, or inline valve restriction slowing down water intake. | Low / Medium | Inspect the inlet screen and supply line for mineral buildup or flow restrictions. |
| Hissing Noise During Fill | High-velocity water forcing through a severely constricted or failing hose section. | Urgent | Turn off the machine and investigate the connection points for structural distortion. |
How to Read the Urgency Levels
Urgent: Demands immediate action to shut off water supplies and prevent active structural flooding, cabinetry damage, or electrical hazards.
Medium: Indicates progressive wear or sub-optimal performance requiring planned maintenance or component replacement within a few days.
Low: Highlights minor operational friction or maintenance reminders that can be checked during your next routine household inspection.
7 Signs Your Dishwasher Water Line Needs to Be Replaced
Water Pooling Under or Around the Dishwasher
What you’ll see: Unexplained puddles, damp flooring, or warped wood directly beneath or adjacent to the appliance.
Why it happens: Microscopic fractures in a rubber hose or a loose compression fitting allow water to escape continuously during fill cycles. In our field experience, the most common failure we see on 7-year-old rubber lines is weeping around the compression nut.
What to do: Dry the area completely, run a diagnostic cycle while using a flashlight to trace the leak, and arrange for professional leak detection if the source remains hidden behind cabinetry.
Cracks, Bulges, or Worn Spots on the Hose
What you’ll see: Visible blistering, localized swelling, or hairline surface fractures along the length of the supply line.
Why it happens: Constant water pressure fluctuations and thermal expansion fatigue the interior core of older braided stainless steel hose or standard plastic tubing.
What to do: Shut off the water supply valve immediately and replace the degraded hose before a high-pressure blowout occurs.
Kinked or Folded Supply Line
What you’ll see: A sharp pinch, fold, or acute angle where the hose bends behind the kickplate or cabinetry.
Why it happens: Improper installation or shifting the dishwasher back into tight cabinet enclosures can crimp the line, severely restricting interior volume.
What to do: Pull the unit forward carefully, inspect the line for permanent creases, and reroute or replace the pinched tubing to restore unobstructed flow.
Dishwasher Fills Slowly or Not at All
What you’ll see: The wash cycle stalls during initial startup, or the machine hums without taking in water.
Why it happens: Severe internal collapse, heavy mineral scaling, or a pinched fill line creates an inlet restriction that starves the appliance.
What to do: Inspect the inlet valve screen for debris and check the supply line path to ensure water is moving freely from the source.
Dirty Dishes and Soapy Film (Low Water Volume)
What you’ll see: A gritty residue, cloudy glassware, or undissolved detergent tablets left in the dispenser cup after a complete cycle.
Why it happens: When a constricted water line reduces the fill volume, spray arms lack the pressure needed to dissolve soap and rinse food particles away.
What to do: Measure your cycle’s fill time and inspect the supply line for internal clogging or pinching that restricts incoming water volume.
Hissing or Whistling Noise at the Start of a Cycle
What you’ll see: An audible hiss, squeal, or whistling sound coming from under the sink or behind the dishwasher when filling begins.
Why it happens: High-velocity water forces its way through a partially collapsed inner core, a tightly restricted kink, or a failing shut-off valve.
What to do: Pause the cycle, locate the source of the noise, and check the line for structural deformation or internal blockage.
Rust, Corrosion, or Mineral Buildup on Fittings
What you’ll see: Flaking rust, green oxidation crust, or white mineral deposits coating the metal connection nuts and braided mesh.
Why it happens: Hard water minerals accelerate galvanic corrosion on standard metal fittings, weakening the structural integrity of the connection.
What to do: Clean away minor surface crust to check for pitting, and replace corroded connectors with a durable braided stainless steel hose.
Bonus: Musty Smell, Mold, or Warped Cabinet Floor
What you’ll see: A persistent mildew odor, peeling laminate, or soft, spongy cabinet base damage near the dishwasher base.
Why it happens: Chronic, slow seepage from a micro-leak keeps adjacent wood damp over months, fostering mold growth and structural decay.
What to do: Empty the cabinet base, check the subflooring for moisture, and replace both the leaking water line and any water-damaged cabinetry.
Repair or Replace? How to Decide
Deciding whether to repair a minor plumbing issue or swap out your dishwasher water line entirely comes down to evaluating the source of the problem, the age of the material, and the risk of catastrophic water damage. Use this clear decision framework to determine the right path forward without guesswork.
When Tightening a Fitting Is Enough
The Direct Answer: You can simply tighten a connection when the leak stems strictly from a loose compression nut or a slightly compressed brass fitting without any physical damage to the hose itself.
What to Check: Inspect the threaded connection under the sink or at the inlet valve; if the tubing and rubber gasket remain completely supple and uncracked, a quarter-turn with a wrench usually resolves the weep.
Proactive Tip: Always dry the joint completely after tightening and run a test cycle with a paper towel underneath to verify that the fix is secure.
When You Must Replace the Line Immediately
The Direct Answer: Immediate replacement is mandatory whenever you spot structural hose damage, active weeping from the tubing wall, or severe material fatigue.
Critical Triggers: Any visible bulge, deep kink, hairline crack, or active spray means the line has lost its pressure rating and represents an immediate flood hazard.
Action Plan: Shut off the water supply valve instantly and install a new braided stainless steel supply line before operating the dishwasher again.
Age-Based Rule of Thumb (5 to 10 Years)
The Direct Answer: If your dishwasher water supply line is older than 5 to 10 years, proactive replacement is always safer than attempting a repair.
Material Breakdown: Standard rubber and polymer inner cores harden, dry out, and become brittle over time, losing their ability to handle daily thermal expansion and water hammer pressure spikes.
Maintenance Strategy: Treat supply lines as consumable hardware items and swap them out on a predictable schedule to avoid unexpected kitchen flooring disasters.
Why Patching a Hose Is Never Worth the Risk
The Direct Answer: Attempting to patch, tape, or clamp a damaged dishwasher water line is a dangerous gamble that invariably leads to a major indoor flood.
The Underlying Danger: Household water supply lines operate under constant municipal water pressure, meaning temporary fixes like duct tape or rubber patches will quickly rupture under stress.
Peace of Mind: Because replacement lines are inexpensive and quick to install, replacing the entire assembly is the only reliable way to guarantee long-term safety.
Dishwasher Water Line Types and How Long They Last
Choosing the right replacement material ensures long-term reliability and protects your kitchen from costly structural damage. Different supply line materials vary significantly in durability, burst resistance, and overall lifespan.
Comparison Table: Material Performance and Lifespan
| Material Type | Typical Lifespan | Burst Risk | Typical Cost | Best Use Case |
| Braided Stainless Steel | 8 to 10+ years | Very Low | Moderate ($15–$25) | The gold standard for residential dishwashers; highly kink-resistant. |
| Standard Rubber | 3 to 5 years | High | Low ($8–$12) | Older installations; prone to dry rotting and blistering over time. |
| Rigid Copper Tubing | 10 to 15 years | Low | High ($20–$35) | Permanent hard-piped setups, though rigid and difficult to adjust. |
| Flexible Plastic / Vinyl | 3 to 5 years | High | Very Low ($5–$10) | Temporary connections or older builder-grade setups; prone to cracking. |
Why Braided Stainless Steel Is the Usual Upgrade
The Core Advantage: Braided stainless steel lines combine a flexible polymer inner core with an outer woven steel mesh that prevents the hose from expanding or ballooning under pressure.
Kink and Puncture Resistance: The metal outer weave protects the vulnerable inner tube from being pinched or punctured by cabinet hardware or the dishwasher’s leveling legs.
Industry Standard: Professional plumbers and manufacturers overwhelmingly recommend braided stainless lines because they drastically reduce the statistical risk of sudden catastrophic floods.
Choosing the Right Length and Fitting Size
Measure Twice: Measure the exact distance from your under-sink shut-off valve to the dishwasher inlet valve, adding 6 to 12 inches of slack to allow for easy positioning.
Verify Fitting Dimensions: Most modern dishwashers utilize standard connections, typically requiring a 3/8-inch compression fitting on the supply valve side and a specific thread size for the dishwasher inlet.
Inlet Elbow Requirements: Many units require a 90-degree brass elbow fitting at the machine connection to prevent the hose from bending too sharply against the back panel.
How Much Does It Cost to Replace a Dishwasher Water Line?
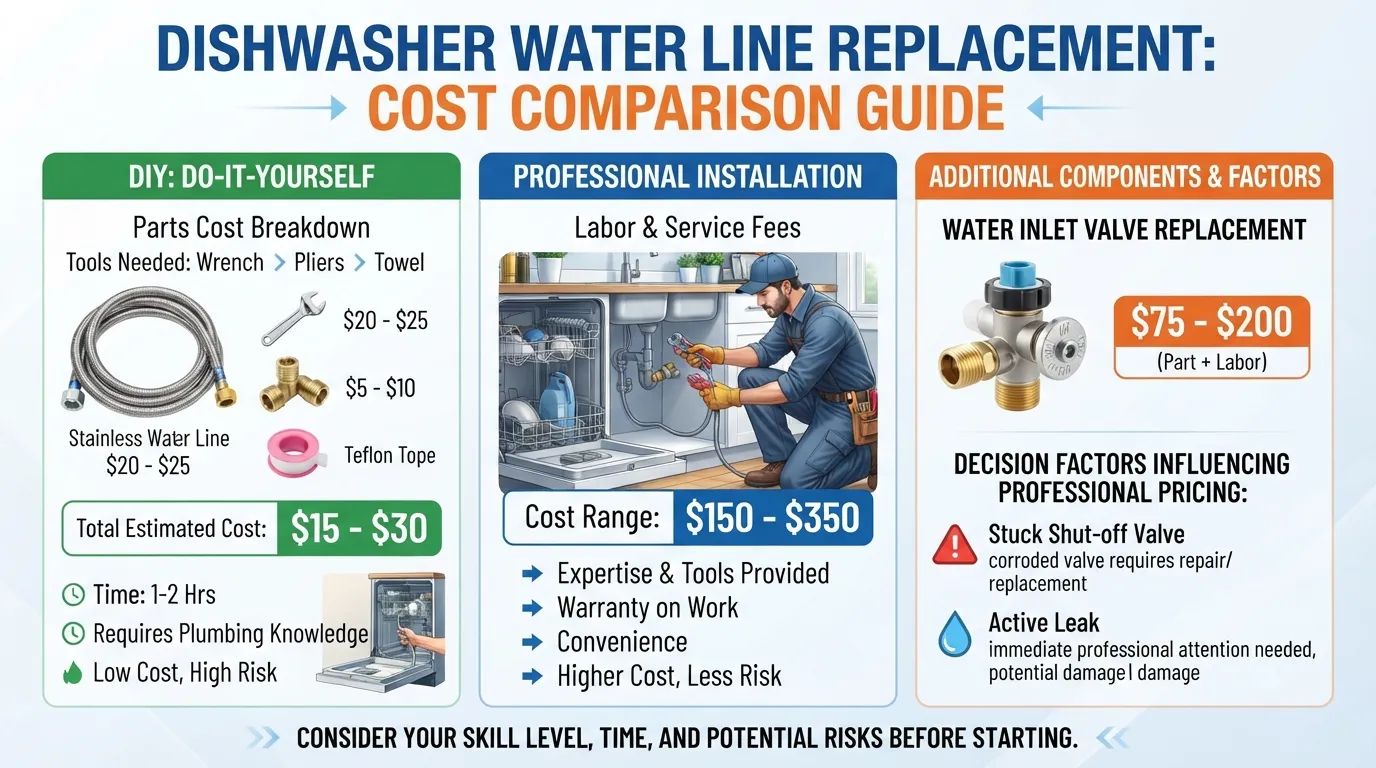
Understanding the financial breakdown of a water line replacement helps you budget accurately and decide whether to tackle the project yourself or hire a professional. Total costs vary depending on whether you are buying basic hardware or paying for expert labor.
Parts Cost vs. Labor Cost
The Direct Answer: Replacing a dishwasher water line typically costs between $15 and $30 in parts if you do it yourself, while professional replacement runs between $150 and $350 when factoring in technician labor and service fees.
Parts Breakdown: A high-quality braided stainless steel supply line and necessary fittings account for $15 to $25 of the total, with optional components like a 90-degree brass elbow adding a few extra dollars.
Labor Breakdown: Professional pricing largely covers the plumber’s hourly service rate, safe extraction of the old appliance, leak testing, and proper disposal of degraded materials.
DIY vs. Hiring a Plumber: Cost and Risk Compared
The DIY Approach: Ideal for confident homeowners who have basic hand tools, an hour of free time, and easy access to the under-sink shut-off valve.
The Professional Approach: Recommended if you want a guaranteed, leak-free installation backed by a warranty, saving you from the stress of potential kitchen flooding.
Risk Trade-Off: A mistake during a DIY installation—such as cross-threading a fitting or over-tightening a compression nut—can result in thousands of dollars in hidden subfloor damage.
When to Call a Licensed Plumber
Corroded or Stuck Shut-Off Valves: If your existing water shut-off valve is calcified, frozen, or drips when turned, trying to force it can snap the pipe and cause a major emergency.
Older or Fragile Plumbing Infrastructure: Homes with aged copper or galvanized pipes require professional expertise to attach new lines without fracturing legacy fittings.
Active Leaking or Hidden Damage: When water is already pooling under cabinetry, you need licensed plumbing services to inspect structural moisture and safely resolve the root issue.
Water Inlet Valve Replacement Cost (PAA)
The Direct Answer: If your dishwasher still fails to fill after a new line is installed, the internal water inlet valve may be broken, costing an additional $75 to $200 for parts and professional installation.
Why It Fails: Electrical solenoid failure, mineral scaling inside the screen, or a stuck float switch can prevent the valve from opening even when water pressure is fully available at the hose end.
Ready to upgrade your plumbing setup safely? Book a plumber today to ensure a flawless, leak-free installation.
How to Replace a Dishwasher Water Line Quick DIY Guide
Replacing a dishwasher water line is a straightforward weekend project if you have basic tools and follow proper safety precautions. This step-by-step DIY guide walks you through safely swapping an old or degraded supply line to protect your kitchen from water damage.
Tools and Materials
Adjustable Wrench: Used to gently tighten and loosen compression nuts and fittings without rounding them off.
New Braided Stainless Steel Supply Line: Ensure you purchase the correct length and matching diameter for your setup.
Teflon Tape (Thread Seal Tape): Applied sparingly to threaded pipe joints if required by your specific inlet configuration.
Bucket and Towels: Positioned beneath the connection points to catch residual water trapped inside the old line.
Flashlight or Work Light: Essential for illuminating tight spaces beneath the sink and behind the kickplate.
Replacement Steps
Cut Power and Water: Turn off the circuit breaker that powers the dishwasher and close the under-sink shut-off valve tightly.
Remove the Access Panel: Unscrew and remove the lower kickplate or access panel at the base of the dishwasher to expose the water inlet valve.
Disconnect the Old Line: Place a bucket underneath the connection, then use your adjustable wrench to disconnect the water supply line from the inlet valve.
Disconnect Under the Sink: Unscrew the other end of the supply line from the under-sink shut-off valve, allowing any trapped water to drain into your bucket.
Attach the New Line: Connect the new braided stainless steel supply line to the under-sink shut-off valve, tightening it securely by hand followed by a quarter-turn with the wrench.
Secure to the Inlet Valve: Route the line cleanly without sharp bends, then attach the opposite end (using a 90-degree elbow connector if needed) to the dishwasher’s water inlet valve.
Restore Water and Test: Slowly open the under-sink shut-off valve and inspect all connection points for signs of moisture before turning the electrical power back on.
Leak Test After Installation
Dry Inspection: Wipe every joint completely dry with a paper towel and let the system sit pressurized for 5 minutes.
Run a Test Cycle: Start a short rinse cycle on the dishwasher while keeping a flashlight focused on both the sink connection and the base inlet valve.
Final Check: Recheck all fittings for any hint of weeping or moisture before replacing the lower access panel and cabinetry items.
Common DIY Mistakes
Over-Tightening Fittings: Applying too much torque with a wrench can crack brass fittings, crush rubber gaskets, or strip delicate threading.
Using Incorrect Fittings: Forcing mismatched thread sizes or skipping necessary elbow adapters creates chronic micro-leaks.
Skipping the Leak Test: Turning the machine on and walking away without checking connections under pressure often results in unnoticed floor damage.
How to Prevent Dishwasher Water Line Failure
Preventing a catastrophic kitchen leak requires a proactive approach to routine plumbing maintenance. Implementing simple inspection habits and modern safety upgrades can completely eliminate the risk of unexpected hose blowouts.
Yearly Inspection Checklist
Examine Connection Points: Inspect the under-sink shut-off valve and the dishwasher inlet connection once a year using a dry paper towel to check for hidden moisture.
Test the Shut-Off Valve: Turn the supply valve completely off and on annually to ensure it remains smooth and functional for emergencies.
Check for Kinks and Tension: Verify that the supply line is not pinched behind cabinetry or pulled taut by the dishwasher’s leveling feet.
Upgrade to a Braided, Burst-Resistant Line
Replace Older Lines: Swap out standard plastic or rubber supply lines every 5 to 10 years, regardless of their visual appearance.
Choose Braided Steel: Install a burst-rated braided stainless steel supply line to gain superior protection against wear, abrasion, and high water pressure.
Hard Water, Heat, and Humidity: What Regional Homes Should Watch For
Hard Water Mineral Scaling: High mineral content deposits calcium inside fittings and hoses, accelerating internal corrosion and reducing water flow.
Thermal Expansion Stress: Frequent hot water cycles cause flexible hoses to expand and contract constantly, wearing down polymer inner cores over time.
High Humidity and Mold: Humid environments trap moisture beneath sinks and behind baseboards, turning slow, unaddressed weeping leaks into active mold colonies within 24 to 48 hours.
Leak Detectors and Auto Shut-Off Valves
Smart Leak Sensors: Place wireless water sensors on the floor directly beneath your dishwasher and sink base to receive instant smartphone alerts at the first sign of moisture.
Automatic Shut-Off Systems: Install an automated water valve shut-off system that detects abnormal water flow or pooling and instantly cuts off the home’s water supply.
What to Do If a Leak Already Damaged Your Floor or Cabinets
Stop the Source Immediately: Close the under-sink shut-off valve and shut off the circuit breaker powering the dishwasher.
Mitigate and Document: Extract standing water, set up fans or dehumidifiers, and photograph all damaged flooring and cabinetry before cleanup begins to satisfy Consumer Safety and Insurance Guidelines ( target=”_blank”).
Frequently Asked Questions
How long do dishwasher water lines last?
Dishwasher water supply lines typically last between 5 and 10 years. Braided stainless steel hoses offer the longest lifespan and greatest durability, whereas standard rubber or plastic lines degrade faster due to constant thermal expansion, water pressure fluctuations, and natural material aging.
What are the signs that my dishwasher is leaking water?
Common signs of a dishwasher leak include unexplained puddles beneath or around the appliance, damp subflooring, warped wood on cabinet bases, musty mildew odors, and cloudy or gritty residue left on dishes due to insufficient fill volume caused by pressure drops.
How do I check my dishwasher water supply line?
Inspect your supply line by shining a flashlight behind the kickplate and under the sink. Run a dry paper towel along the entire length of the hose and compression fittings to catch hidden moisture, and check for visible bulges, sharp kinks, or corrosion.
What happens if the water inlet valve in my dishwasher leaks?
When a dishwasher water inlet valve leaks, water escapes directly into the bottom access pan or onto your kitchen floor during fill cycles. This failure is usually caused by internal mineral scaling, a cracked valve body, or a faulty electrical solenoid.
Can I replace a dishwasher water line myself?
Yes, replacing a dishwasher water line is a manageable DIY project if you have basic hand tools, an adjustable wrench, and a new braided stainless steel hose. The process involves cutting power, shutting off the water, disconnecting the old line, and securing the new one.
Is a leaking dishwasher line an emergency?
An active dishwasher water line leak is an emergency because continuous water flow under pressure can quickly ruin subfloors, warp cabinets, and trigger mold growth. Shut off the water valve immediately and contact emergency plumbing services if you cannot stop the flow.
Conclusion and Next Step
Catching the early warning signs of a failing dishwasher water line protects your kitchen from costly structural damage and sudden indoor flooding. Whether you notice slow fill cycles, visible corrosion, or unexplained moisture beneath your cabinetry, taking proactive action ensures your plumbing remains safe and dependable.
Key Takeaways
Monitor Lifespan: Inspect or replace your dishwasher water line every 5 to 10 years to prevent unexpected material fatigue and high-pressure bursts.
Watch for Warning Signs: Look out for puddling water, bulges, kinks, rust on fittings, or unusual hissing noises during the fill cycle.
Prioritize Proactive Upgrades: Replace old rubber or plastic hoses with durable, burst-resistant braided stainless steel supply lines.
Maintain Yearly Routines: Conduct annual plumbing inspections and test your under-sink shut-off valves to ensure emergency readiness.
Need Help With a Leaking or Failing Water Line?
If you spot active leaks, corroded shut-off valves, or require professional water line replacement, expert help is just a click away. Book your appointment today to secure fast, reliable plumbing service.
Main Services
Related Posts
Need a Plumber in Miami?
Schedule service online or speak directly with the EZ Plumbing team.
Owner-Led Local Service
Know who is behind the business before you request service. The owners, contact line and Miami service pages are published clearly.
- Named business owners
- Direct phone and social channels
- Local Miami service information
Clear Help Before You Book
Review the relevant service page, contact the team directly and use the booking page when you are ready—without relying on vague claims.
- Service-specific information
- Direct questions before scheduling
- Clear online booking route