
How to Unclog a Shower Drain with a Plunger (Step-by-Step Guide)
How to Unclorg a Shower Drain with a Plunger
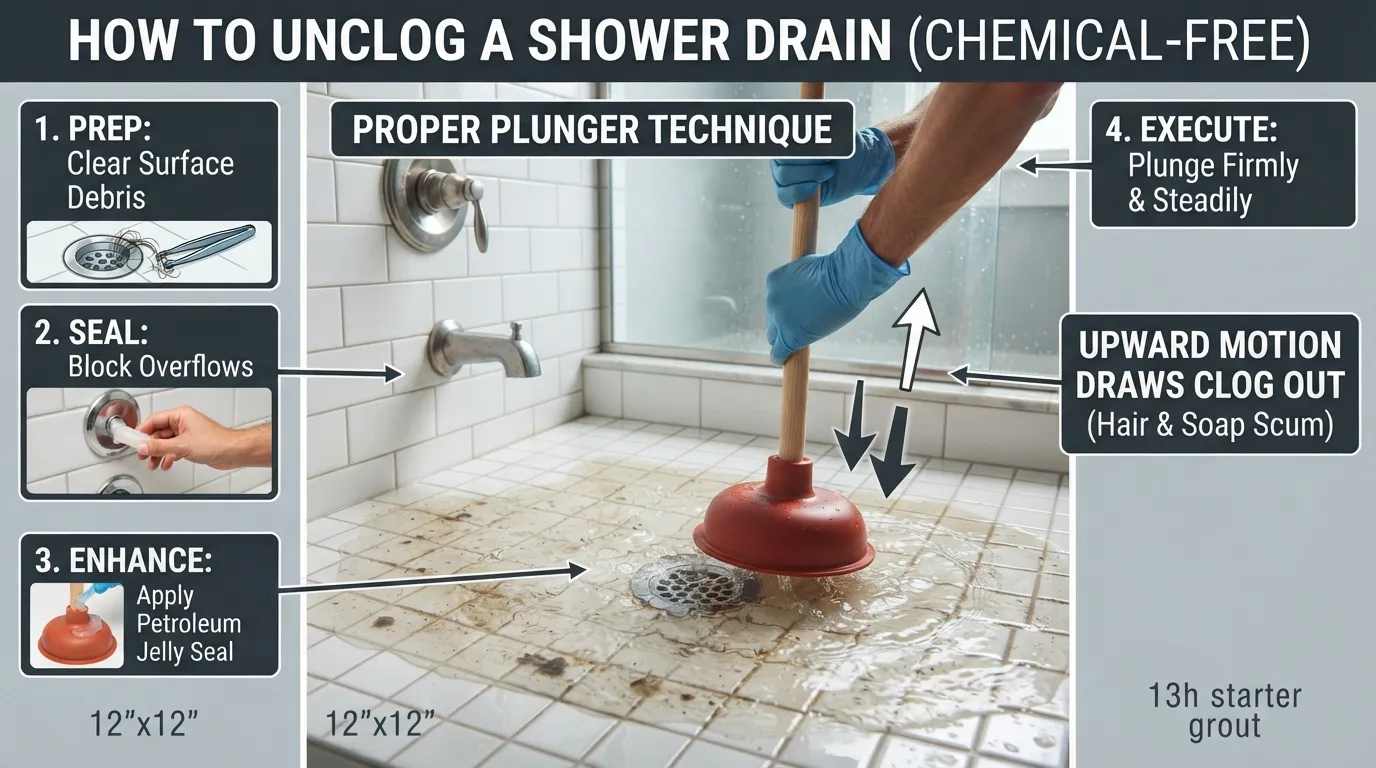
Clearing a shower drain using a cup plunger is a fast, chemical-free, and highly effective DIY method for resolving hair and soap scum blockages. By creating an airtight seal and using rhythmic water pressure, you can dislodge stubborn debris without damaging your plumbing.
Immediate Solution: Fix standing water and slow drainage using household tools you already own.
Safe for Pipes: Avoid harsh chemical drain cleaners that can corrode older metal or PVC plumbing.
Targeted Results: Easily break up surface-level and mid-pipe clogs caused by organic buildup.
Is It Safe to Plunge a Shower Drain?
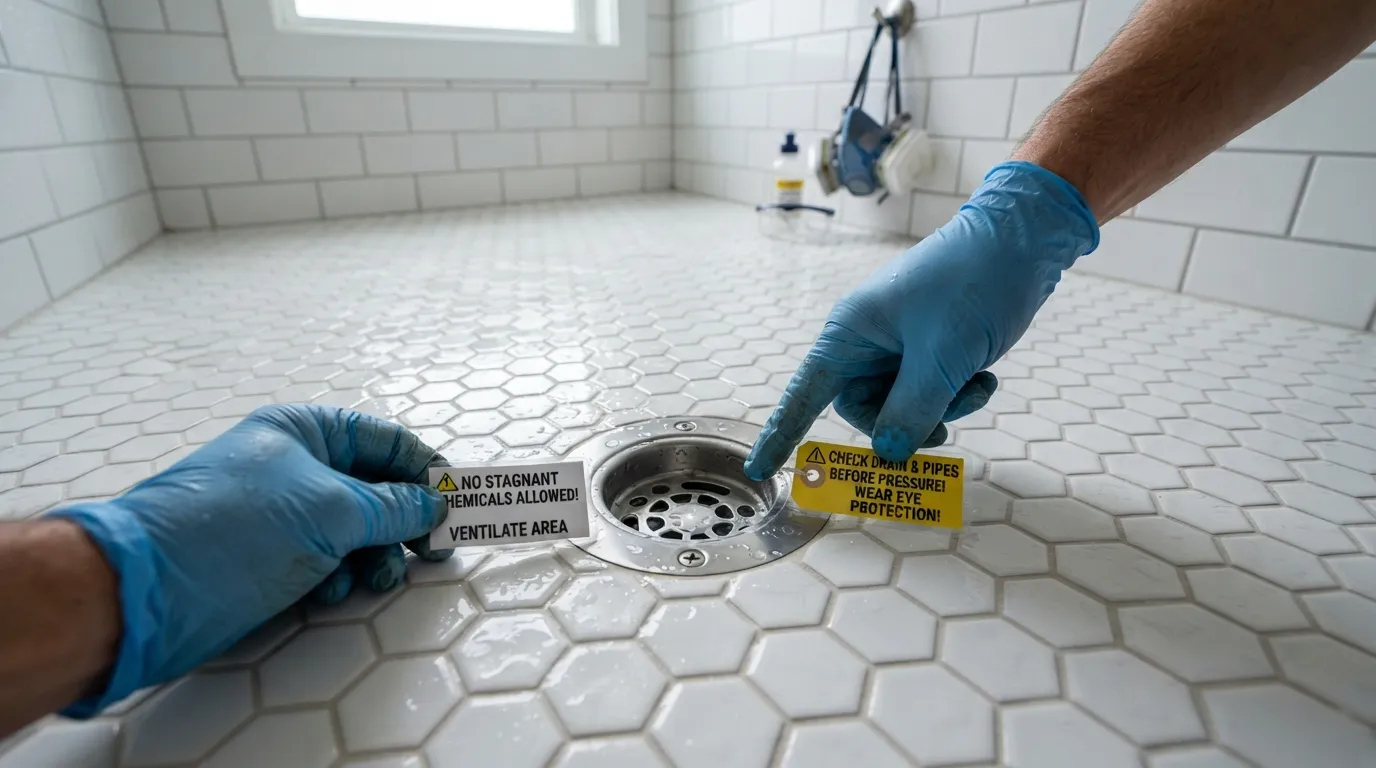
Using a plunger on a shower drain is entirely safe, provided you haven’t recently poured harsh chemical cleaners down the pipe. Following basic safety precautions prevents dangerous chemical splash-back and protects both your skin and eyes from corrosive residue.
Check Chemical History: Never plunge a drain immediately after applying store-bought chemical openers.
Wear Protection: Put on rubber gloves and safety glasses to shield against accidental water splatter.
Verify Pipe Integrity: Ensure your fixtures are secure and free of structural cracks before applying forceful pressure.
The Drano + Plunger Danger
Plunging a drain containing active chemical cleaners creates a severe hazard of corrosive splash-back. If caustic substances like lye or sulfuric acid spray upward during plunging, they can cause chemical burns on skin and permanent eye damage. Furthermore, agitating these chemicals releases toxic fumes that irritate the respiratory tract and compromise indoor air quality.
Severe Skin Burns: Splashed chemicals react instantly upon contact with unprotected skin.
Toxic Fumes: Mechanical agitation aerosolizes chemical residues into the bathroom air.
Eye Safety Risks: Even tiny droplets can cause catastrophic injury to unprotected eyes.
When NOT to Plunge
Certain plumbing scenarios demand that you skip the plunger entirely to avoid worsening the problem or risking injury. If chemical cleaners are still sitting stagnant in the drain basin, wait until they are fully neutralized or professionally flushed. Additionally, plunging cracked or severely compromised older pipes can cause sudden leaks behind walls or beneath floorboards.
Active Chemical Presence: Wait at least 24 hours after using commercial drain openers before attempting mechanical clearing.
Damaged Infrastructure: Avoid high-pressure plunging if your shower basin or drainage pipes show visible cracks.
Deep Main Line Clogs: Stop plunging if multiple fixtures in your home back up simultaneously, as this signals a main sewer line blockage requiring an expert.
What You'll Need Before You Start
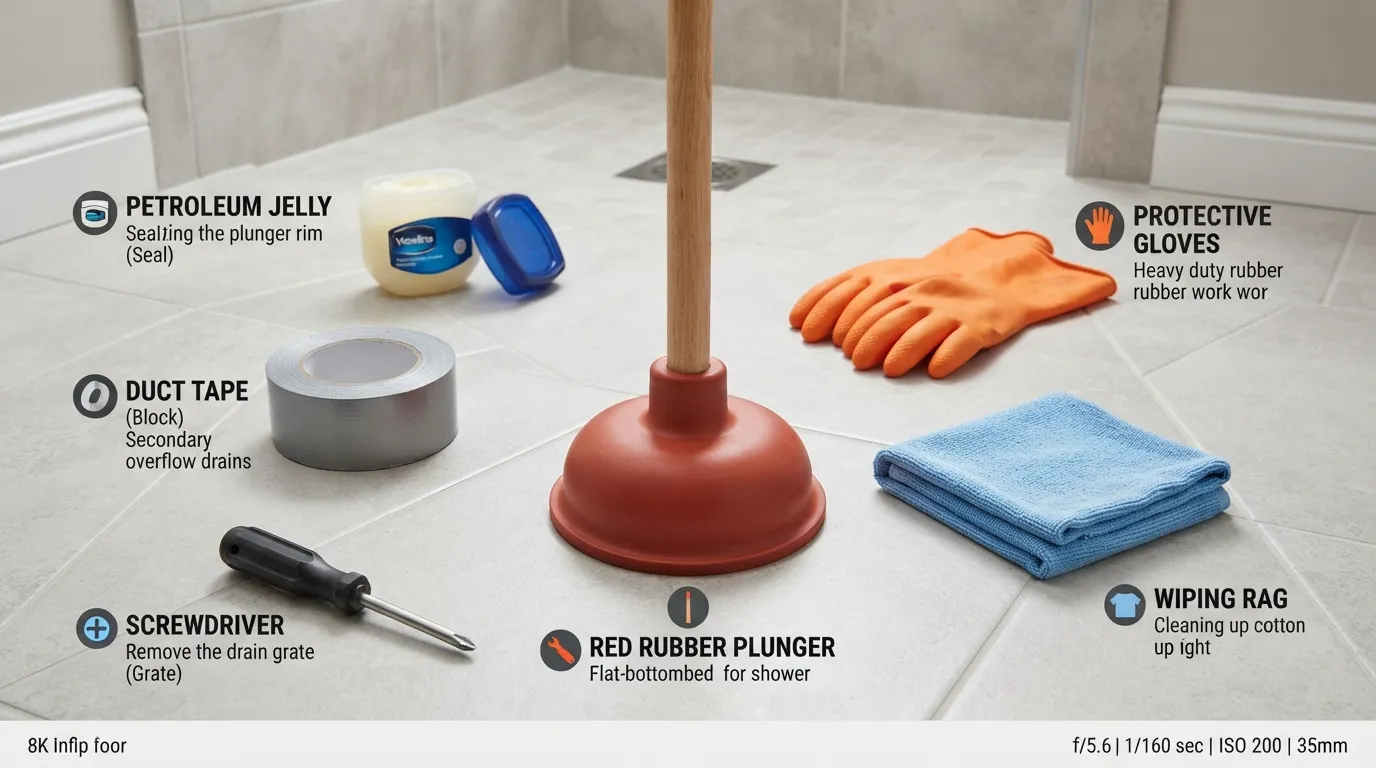
Gathering your supplies beforehand ensures a smooth, mess-free unclogging process and prevents you from scrambling mid-job. Having the right type of plunger and a few household items on hand makes achieving a proper airtight seal much easier.
Tool Selection: Choose the correct style of plunger designed specifically for flat shower basin surfaces.
Prep Supplies: Keep wiping rags, petroleum jelly, and sealing tape nearby for quick adjustments.
Safety Gear: Put on rubber gloves to maintain proper hygiene while working with standing gray water.
Cup Plunger vs Flange Plunger — Which One Works Best for Showers?
A standard flat-bottomed cup plunger (often called a sink plunger) works best on flat shower floors because it creates a wide, even suction seal over the drain opening. In contrast, flange plungers feature an extra soft rubber flap designed specifically to fit inside curved toilet bowl openings, making them less effective on flat surfaces. If your shower features a raised drain grate or a flat basin floor, stick with a traditional cup plunger to maximize suction pressure.
Cup Plunger Advantage: Provides maximum flat-surface contact around standard shower drain covers.
Flange Limitations: The inner fold prevents a tight seal on flat fiberglass or tile shower floors.
Alternative Option: A flat accordion plunger can also work if it forms a complete perimeter seal around the drain.
Supplies Checklist
Preparing a few basic household items before you begin helps create a tighter vacuum and makes cleaning up effortless. Applying a small amount of lubricant to the rim of the plunger cup instantly improves suction on uneven or textured tile surfaces.
Cup Plunger: A clean, flat-bottomed rubber cup plunger with a sturdy handle.
Petroleum Jelly or Vaseline: Smear a thin layer along the rim of the rubber cup to help create an airtight seal.
Duct Tape or Rag: Use a damp rag or pieces of duct tape to seal any secondary overflow holes or nearby drain openings to prevent air from escaping.
Screwdriver: Required only if your shower drain features a protective screw-in metal grate that needs temporary removal.
Step-by-Step Guide to Plunging Your Shower Drain
Clearing a blocked shower drain requires careful setup and a precise physical technique to generate maximum vacuum suction. Following this step-by-step method ensures you dislodge deep hairballs and soap scum efficiently without harming your plumbing.
Preparation: Clear surface blockages and seal secondary openings before applying pressure.
Execution: Focus on the upward pulling stroke to safely draw trapped debris out of the pipe.
Finalizing: Clean out the loosened waste and test drainage with a hot water flush.
Step 1 — Remove the Drain Cover and Clear Visible Debris
Start by taking off the protective screw-in metal drain grate using a screwdriver if necessary. Reach into the top opening with your gloved fingers or a bent wire coat hanger to pull out any visible hairballs, soap sludge, or gunk. Removing this surface debris clears the path so your plunger can make direct contact with the main blockage [01:49].
Access the Pipe: Expose the direct drain opening for optimal tool placement.
Remove Surface Gunk: Extract trapped hair clumps to prevent them from interfering with the suction seal.
Clear Surrounding Grime: Wipe away slimy buildup around the drain rim to help the plunger grip better.
Step 2 — Block the Overflow Drain (Crucial for Tub-Shower Combos)
If your shower features a combined bathtub setup, you must seal the overflow opening located higher up on the wall. Because air takes the path of least resistance, an open overflow port will let air escape, destroying the vacuum pressure needed to move the clog [00:58]. Jam a wet sponge, soaked washcloth, or tight piece of tape firmly into the overflow slot to lock the system [01:10].
Prevent Pressure Loss: Blocking the overflow ensures all plunging force focuses entirely on the drain clog.
Use a Wet Rag: A soaked cloth molds tightly against the interior contours of the overflow opening [01:10].
Check Dual Drains: If working on a double basin or linked system, seal the secondary drain completely [01:36].
Step 3 — Create a Water Seal for Maximum Pressure
Pour enough water into the shower basin so that it completely covers the rubber rim of your cup plunger. Water is non-compressible, meaning it transmits kinetic energy much more efficiently through pipes than air does. Having a shallow pool of standing water guarantees that your plunging motions create a powerful hydraulic wave directly hitting the blockage [00:09].
Submerge the Cup: Ensure at least 1 to 2 inches of standing water cover the plunger lip.
Enhance Hydraulic Force: Water acts as a medium to transfer pressure deep into the drainage line.
Prevent Air Pockets: Submerging the tool eliminates trapped air bubbles that weaken suction.
Step 4 — Apply the Petroleum Jelly Trick for an Airtight Seal
Smear a thin layer of petroleum jelly or Vaseline around the bottom rim of the rubber plunger cup. Shower basin surfaces—especially textured tiles or fiberglass—often feature microscopic gaps where air can leak. This simple trick creates an absolute airtight vacuum seal, dramatically multiplying your plunging efficiency [02:13].
Boost Suction: Petroleum jelly fills tiny surface imperfections to prevent air leakage.
Secure the Grip: Helps the rubber cup stay firmly planted during aggressive strokes.
Easy Cleanup: The lubricant rinses away effortlessly with warm water after the job is done.
Step 5 — The Correct Plunging Technique (Why Pulling Beats Pushing)
Place the plunger directly over the drain opening and press down firmly to expel trapped air. Instead of aggressively hammering up and down, focus heavily on a strong, deliberate upward pulling motion [01:55]. Pushing too hard can pack debris tighter into a dense knot, whereas pulling draws the trapped hairball and sludge upward toward the opening where it can be easily extracted [01:55].
Invert Your Effort: Emphasize the pull stroke to dislodge and draw out stubborn blockages [01:55].
Maintain Rhythm: Execute 5 to 10 steady, rhythmic pumps without breaking the seal [02:49].
Break Up Clumps: The back-and-forth hydraulic action loosens compacted soap scum and hair [02:36].
Step 6 — Test the Drain and Flush with Hot Water
Once you feel the suction release or notice the standing water rapidly draining away, remove the plunger and clear out any debris that floated to the surface. Pour a bucket of hot tap water (or boiling water if your pipes are metal) down the drain to melt away remaining grease and soap residue. Reinstall your drain cover and run the shower for 30 seconds to verify smooth, unobstructed flow [02:49].
Clear Loose Debris: Remove any pulled-up gunk from the basin before it washes back down.
Melt Residue: Hot water flushes away residual grease and soap scum lining the pipes.
Verify Flow: Run the tap to ensure the drainage speed has completely returned to normal.
Plunger Not Working? Alternative Methods to Try
If a plunger fails to clear your stubborn blockage, several powerful, chemical-free alternatives can break down organic buildup. These household solutions dissolve greasy soap scum and hair tangles safely without risking damage to your pipes.
Grease Dissolvers: Use heated water or dish soap to melt viscous soap residue holding the clog together.
Chemical-Free Fizzing: Leverage natural acid-base reactions to dislodge trapped organic debris.
Quick Assessment: Compare alternative methods using effectiveness ratings to pick the best fix for your specific clog.
Boiling Water Method — Does It Actually Work?
Boiling water effectively melts congealed soap scum, body oils, and hair grease that line your drainage pipes. However, this method only works if you have metal plumbing, as boiling water can warp, weaken, or crack older PVC pipes and loosen slip-joint fittings. Pour a full kettle of boiling water down the drain in two or three stages, allowing a few seconds of contact time between pours to react with the blockage.
Best for Metal Pipes: Highly efficient on cast iron or copper plumbing lines.
PVC Warning: Avoid using boiling water on plastic PVC pipes to prevent structural warping.
Grease Breakdown: Instantly liquefies solidified soap and body fats trapping hair clumps.
Dawn Dish Soap + Hot Water Trick
Dawn dish soap acts as a powerful surfactant that breaks the surface tension of greasy clogs, lubricating the pipes so debris slides away easily. Squirt a generous amount of liquid dish soap directly into the drain, followed by a pot of very hot tap water. Let the mixture sit for 10 to 15 minutes to penetrate the blockage before flushing the line thoroughly with clean water.
Surfactant Action: Cuts through sticky soap scum and oils binding the hairball together.
Pipe Safe: Gentle on all plumbing materials, including vulnerable PVC lines.
Lubrication: Eases the passage of stubborn debris through narrow pipe traps.
Baking Soda and Vinegar Method
Combining baking soda and vinegar creates a natural, fizzing chemical reaction that agitates and loosens compacted drain buildup. Pour half a cup of baking soda down the drain, followed immediately by half a cup of white vinegar, and cover the opening with a plug or cloth to trap the expanding foam. Let the mixture fizz for 20 to 30 minutes before flushing the drain with hot water to wash away the loosened waste.
Natural Fizzing Action: Expands inside the pipe to mechanically loosen stuck particles.
Odor Elimination: Neutralizes foul, stagnant smells rising from organic pipe buildup.
Eco-Friendly: Completely safe for household septic systems and delicate plumbing fixtures.
Comparison Table — Plunger vs Boiling Water vs Dawn Soap vs Baking Soda
| Unclogging Method | Primary Mechanism | Effectiveness Rating | Best Used For | Safety on PVC Pipes |
| Cup Plunger | Hydraulic suction and pressure | High (8/10) | Hairballs and surface clogs | Safe |
| Boiling Water | Thermal melting | Moderate (5/10) | Grease and soap scum | Unsafe (risk of warping) |
| Dawn Dish Soap | Surfactant lubrication | Moderate (6/10) | Greasy buildup | Safe |
| Baking Soda & Vinegar | Acid-base effervescence | Moderate (6/10) | Organic sludge and odors | Safe |
When to Use a Drain Snake or Call a Professional
When a plunger and chemical-free solutions fail to restore water flow, the obstruction is likely located deep within the P-trap or main branch line. Transitioning to physical retrieval tools or contacting a professional ensures you address stubborn blockages safely.
Evaluate Limitations: Recognize when a superficial tool like a cup plunger can no longer reach the source of the blockage.
Mechanical Intervention: Use specialized physical tools to hook and extract compressed hair masses.
Professional Backup: Know when a recurring or worsening plumbing issue requires an expert hand.
Signs the Clog Is Too Deep for a Plunger
If your shower continues to back up despite rigorous plunging and chemical-free treatments, the obstruction has likely moved past the immediate drain opening. Clogs seated deep inside the P-trap or further down the drainage line resist surface hydraulic pressure and require direct physical contact [01:44]. Furthermore, if multiple fixtures like your bathroom sink or toilet gurgle or back up simultaneously, the issue extends far beyond a simple shower blockage [02:47].
Persistent Standing Water: Water refuses to recede even after multiple correct plunging attempts.
Multi-Fixture Backups: Showers or toilets backing up together indicate a main line restriction.
Recurrent Blockages: Clogs that return immediately after clearing signal underlying pipe damage or heavy internal buildup.
Using a Drain Snake or Hair-Snagging Tool
When surface tools fall short, deploying a drain snake or mechanical auger allows you to physically pierce and retrieve deep obstructions [01:44]. For accessible hair masses just beneath the grate, a flexible plastic hair-snagging tool or needle-nose pliers can pull the clump right out [00:39]. For deeper clogs, feed a drum auger down through the overflow or main drain, rotating the cable clockwise to catch and break apart the mass [01:52].
Flexible Plastic Zippers: Barbed plastic hair snakes easily slide past drain grates to hook trapped hair.
Manual Drum Augers: Feed the metal cable carefully until you feel resistance, then rotate to snag the debris [02:12].
Controlled Extraction: Retract the cable slowly to pull the tangled mass up and out of the pipe [02:21].
When It’s Time to Call a Licensed Plumber
Persistent drainage failures, cracked infrastructure, or suspected main sewer line collapses mean it is time to call a licensed plumber. Professional technicians utilize advanced video pipe inspection cameras and commercial-grade hydro-jetting to diagnose and clear complex issues safely [02:47]. If your situation involves an overflowing or completely backed-up system, reaching out to an emergency plumber prevents extensive water damage to your home’s subfloors and drywall.
Advanced Diagnostics: Plumbers use micro-cameras to locate hidden root intrusions or structural pipe collapses.
Heavy-Duty Power: High-pressure hydro-jetting obliterates decades of hardened scale and grease buildup.
Urgent Interventions: Rapid response teams handle overflowing fixtures to protect your home from costly water damage.
Preventing Future Shower Drain Clogs
Preventing future shower blockages saves you from the frustration of recurring standing water and protects your plumbing infrastructure from wear. Implementing simple daily habits and routine upkeep stops hair and soap scum from forming dense clogs in the first place.
Capture Debris Early: Use physical barriers to stop hair before it ever enters the drain pipe.
Establish Routine Maintenance: Flush lines regularly with safe, natural solutions to melt away microscopic buildup.
Schedule Expert Care: Know when proactive professional servicing keeps your drainage system running at peak performance.
Install a Hair Catcher / Drain Strainer
Installing a high-quality hair catcher or mesh drain strainer is the single most effective way to stop shower clogs before they start. These inexpensive devices sit directly over or inside your drain opening, trapping loose hair and large soap flakes while letting water flow through freely. Simply lift out the strainer every week, empty the trapped debris into the trash, and rinse it clean.
Immediate Protection: Catches 90% of stray hair before it sneaks past the drain grate.
Low Maintenance: Requires only a 30-second weekly wipe to stay effective.
Universal Fit: Available in silicone, stainless steel, and rubber designs to match any shower floor.
Monthly Maintenance Routine to Avoid Buildup
Establishing a monthly maintenance routine keeps your P-trap clear of greasy body oils and lingering soap scum. Pour a cup of baking soda down the drain followed by hot water once a month, or use a gentle vinegar flush to dissolve organic residue. This proactive habit prevents soap scum from acting like glue that binds stray hairs into stubborn clogs.
Regular Dissolving: Breaks down microscopic film lining the pipe walls before it thickens.
Odor Prevention: Neutralizes damp, musty smells rising from organic sludge accumulation.
Safe Upkeep: Protects your pipes without resorting to harsh chemical drain openers.
How Often Should You Professionally Clean Your Drains?
For most residential homes, having a specialist professionally clean your drains every 1 to 2 years prevents catastrophic backups. Routine professional hydro-jetting or mechanical snaking clears away mineral scale and hidden grease layers that DIY methods cannot reach. Homes with large families, long hair, or hard water mineral issues may benefit from annual drain maintenance.
Proactive Protection: Catches hidden root or pipe scale issues before they turn into emergency leaks.
Extended Pipe Life: Keeps drainage lines clear and operating at maximum flow capacity.
Peace of Mind: Ensures your plumbing system remains dependable year-round.
Frequently Asked Questions
Why is my toilet still clogged even after I use the plunger?
A toilet may remain clogged if you are using a flat cup sink plunger instead of a flange plunger, which prevents a proper seal in the curved toilet trap. Additionally, if the obstruction consists of dense non-water-soluble items or sits deep in the main waste line, surface air pressure alone cannot shift it.
Incorrect Tool: Flat cup plungers cannot form an airtight vacuum inside a toilet bowl outlet.
Foreign Objects: Hard items like toys or excessive hygiene products require mechanical retrieval rather than plunging.
Main Line Blockage: Multiple sluggish fixtures indicate a deeper obstruction requiring an auger.
Will pouring boiling water down a shower drain unclog it?
Boiling water can melt grease and soap scum, but it is only effective if your shower features cast iron or copper plumbing lines. Pouring boiling water down older PVC or plastic pipes can warp the material, soften glue joints, and cause severe leaks.
Material Limits: Safe exclusively for metal pipes; avoid entirely on standard PVC plumbing.
Grease Dissolving: Highly effective at liquefying congealed soap fats and body oils.
Caution Required: Always pour carefully in stages to prevent splashing scalding water.
What do plumbers use instead of Drano?
Professional plumbers strictly avoid harsh chemical drain openers because corrosive formulas can eat away at pipe walls, destroy rubber gaskets, and create toxic fumes. Instead, experts rely on mechanical hand augers, motorized drum snakes, enzyme-based treatments, or high-pressure hydro-jetting systems to clear lines safely. You can read more about professional safety practices and tool choices in this guidance on Roto-Rooter Drain Cleaning.
Mechanical Augers: Physical cables that grab and pull out deep hair masses.
Enzyme Cleaners: Natural biological formulas that digest organic matter without corrosion.
Hydro-Jetting: Commercial high-pressure water streams that scour pipe interiors clean.
How to unblock a badly blocked shower drain?
Clearing a severely blocked shower drain requires removing the surface grate, extracting visible hair with a tool, and using a cup plunger with a blocked overflow. If pressure fails, feed a manual drum auger down the drain line to snag and break apart the compacted mass.
Clear Surface Obstructions: Pull out top-level hair clumps before attempting pressure techniques.
Seal Secondary Openings: Block tub overflows or dual drains to maximize vacuum force.
Deploy an Auger: Use a hand snake to reach deep into the P-trap where heavy clogs settle.
Is there a trick to using a plunger?
The secret to successful plunging is creating an absolute airtight seal and prioritizing the upward pulling stroke rather than forceful pushing. Pushing aggressively packs hair tighter, while pulling draws the trapped debris upward toward the drain opening for easy extraction.
Petroleum Jelly Seal: Smear lubricant on the plunger rim to eliminate microscopic air gaps.
Submerge the Cup: Ensure 1 to 2 inches of standing water cover the plunger lip to drive hydraulic pressure.
Focus on the Pull: Emphasize the upward stroke to draw out the core blockage safely.
Can using a plunger damage pipes?
Using a standard cup plunger correctly will not damage properly installed, healthy plumbing pipes. However, excessively aggressive plunging on brittle, cracked, or severely corroded older infrastructure can strain weak pipe joints and cause minor leaks.
Normal Wear: Standard manual hydraulic pressure is entirely safe for modern PVC and metal lines.
Vulnerable Infrastructure: Old, rusted, or cracked pipes can fracture under extreme, forceful pressure.
Best Practices: Use steady, controlled hydraulic strokes rather than violent hammering to protect your plumbing.
Conclusion
Unclogging a shower drain with a cup plunger is a straightforward, chemical-free, and highly effective way to restore proper water flow. By understanding how to create an airtight seal, blocking overflows, and prioritizing the upward pulling stroke, you can safely resolve most hair and soap scum blockages on your own.
However, if your DIY efforts fail or you are dealing with a recurring, deep-seated blockage, you do not have to struggle alone. You can easily book a professional plumber to get your bathroom back in order. For an unexpected emergency drain issue or severe backup, expert support is available to protect your home from costly water damage.
Main Services
Related Posts
Need a Plumber in Miami?
Schedule service online or speak directly with the EZ Plumbing team.
Owner-Led Local Service
Know who is behind the business before you request service. The owners, contact line and Miami service pages are published clearly.
- Named business owners
- Direct phone and social channels
- Local Miami service information
Clear Help Before You Book
Review the relevant service page, contact the team directly and use the booking page when you are ready—without relying on vague claims.
- Service-specific information
- Direct questions before scheduling
- Clear online booking route