
How to Use a Drain Auger: Step-by-Step DIY Guide
What Is a Drain Auger?
A drain auger—commonly referred to as a plumbing snake or drain snake—is a specialized manual or motorized tool designed to physically break up, hook, or retrieve deep-seated pipe blockages. It consists of a flexible metal cable housed inside a drum or canister, featuring a corkscrew or spiral auger head at the tip that navigates tight plumbing bends to clear stubborn clogs.
Primary Mechanism: A high-tensile steel cable extends through pipes to reach obstructions safely past P-traps.
Target Issues: Ideal for hair clogs, organic buildup, and foreign objects lodged deep within bathroom and kitchen lines.
Versatility: Available in handheld manual cranks for sinks and heavy-duty motorized units for main sewer lines.
What a Drain Auger (Plumbing Snake) Actually Does
A drain auger operates by rotating through residential piping to mechanically engage with a blockage rather than just pushing it further down the line. As you feed the flexible cable into the pipe, the corkscrew tip drills directly into the mass, allowing you to either break it apart into smaller pieces or snag it so you can pull it back out.
Mechanical Disruption: The rotating steel cable punches through dense clusters of hair, soap scum, and grease.
Safe Navigation: Engineered flexibility allows the snake to bend seamlessly through 90-degree pipe elbows without damaging PVC or metal plumbing.
Retrieval Capability: Spiral heads effectively latch onto solid obstructions or clumped debris for physical extraction.
When You Should Reach for an Auger vs a Plunger
A standard cup or flange plunger relies on air and water pressure to dislodge shallow surface blockages, whereas a drain auger is strictly required when a clog is structural, deep, or completely resistant to suction. Knowing which tool to deploy saves time and prevents unnecessary pipe stress.
Use a Plunger When: Water is slow-moving or standing in a single fixture (like a toilet or shallow sink basin) and the obstruction is within the immediate trap.
Use a Drain Auger When: Plunging fails repeatedly, water backs up into secondary drains, or the clog is located several feet down inside the pipe network.
Multi-Fixture Impact: If a blockage causes backup across multiple home drains, skip the plunger entirely and deploy an auger to address the main branch line.
Expert Insight: Always feed the auger cable slowly into the drain opening. Forcing the metal cable too quickly can cause it to kink inside the pipe, potentially scratching interior walls or damaging delicate pipe joints.
Types of Drain Augers (Comparison)
Choosing the correct drain auger depends heavily on the severity of the blockage, the distance to the obstruction, and the specific plumbing fixture involved. Selecting the right hardware prevents pipe damage and ensures maximum clearing efficiency for both minor bathroom clogs and stubborn main line obstructions.
Manual Crank Auger
A manual auger features a hand-crank handle attached directly to a flexible cable, making it the most cost-effective and straightforward tool for light household duties [00:03]. It relies entirely on physical rotation to maneuver through shallow traps.
Operation: Manually rotated via a crank handle while hand-feeding the cable forward [00:48].
Ideal Scenarios: Best suited for minor sink, tub, and shower clogs located close to the drain opening [00:03].
Limitation: Offers limited reach and requires significant arm stamina for tough blockages.
Power/Motorized Auger
A power auger incorporates an electric motor or a drill-attachment mechanism to spin the cable at high RPMs, effortlessly tearing through dense, compacted blockages. It delivers heavy-duty torque without manual strain.
Operation: Motor-driven rotation controlled by a trigger or foot pedal for continuous speed.
Ideal Scenarios: Designed for severe main sewer line blockages, thick grease buildup, and heavy root intrusion.
Limitation: Heavier, more expensive, and carries a higher risk of pipe damage if mishandled due to extreme torque.
Canister Auger
A canister auger houses its flexible cable inside a compact, fully enclosed plastic or metal housing, preventing dirty drain water from splashing onto floors and walls during operation. This design makes it a favorite for indoor bathroom maintenance.
Operation: Cable pulls directly out of the protective storage canister and locks securely with a thumb screw or lever [00:27].
Ideal Scenarios: Perfect for routine residential bathroom sink and bathtub maintenance where cleanliness is a priority.
Limitation: Shorter cable lengths restrict its use to localized fixture traps.
Drum Auger
A drum auger utilizes a larger rotating drum container to safely store and retract longer cables, offering increased stability and leverage during deep plumbing interventions. It balances high storage capacity with mechanical control.
Operation: The entire drum housing rotates or contains an internal winding mechanism to manage extended cable lengths.
Ideal Scenarios: Ideal for longer runs, secondary drain lines, and deep-seated household clogs.
Limitation: Bulkier to store and carry compared to lightweight canister models.
Drain Auger Comparison Table
| Auger Type | Average Cable Length | Best Use Case | Difficulty Level |
| Manual Crank Auger | 3 to 15 feet | Surface sink and tub clogs [00:03] | Beginner |
| Canister Auger | 15 to 25 feet | Bathroom fixtures and tight P-traps | Beginner to Intermediate |
| Drum Auger | 25 to 50 feet | Long secondary lines and deep blockages | Intermediate |
| Power/Motorized Auger | 50 to 100+ feet | Main sewer lines and root cutter applications | Advanced |
Safety Precautions Before You Start
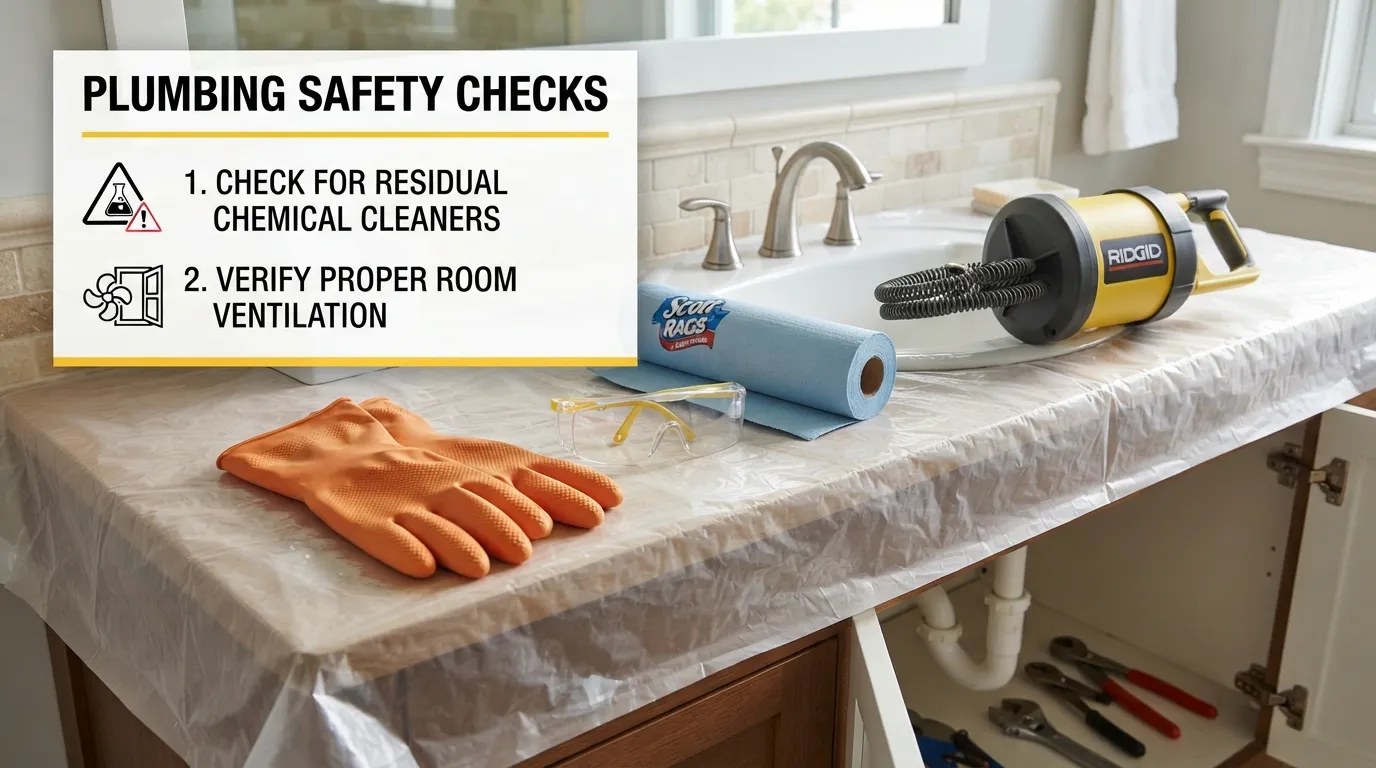
Operating a drain auger requires strict adherence to personal safety protocols to prevent chemical exposure, eye injuries, and physical strain from sudden tool malfunction. Proper preparation safeguards you against toxic splash-back, contaminated bacteria, and severe equipment kickback inside confined plumbing spaces.
Mandatory Personal Protective Equipment: Always equip heavy-duty rubber gloves and ANSI-rated safety glasses before touching any plumbing line or access point.
Hygiene and Biohazard Control: Protect exposed skin and keep shop towels nearby to immediately wipe away trapped bacteria, mold, and sewage residue extracted from the line.
Workspace Preparation: Clear the surrounding work area, keep children and pets away, and ensure proper room ventilation before feeding the cable into position.
Gloves and Eye Protection: What Actually Works
Standard fabric gloves offer zero protection against jagged metal cable burrs and corrosive drain residue, making heavy-duty rubber or neoprene-dipped work gloves essential. Simultaneously, wrap-around safety glasses shield your eyes from unexpected high-velocity fluid spray and debris kicked up during manual cranking.
Glove Selection: Use waterproof, textured-grip rubber gloves to maintain a firm hold on the spinning cable while blocking harmful bacteria.
Eye Defense: Wear tight-fitting safety goggles rather than standard fashion glasses to block lateral splashes from pressurized pipe openings.
Verification: Ensure your gloves fit snugly without loose cuffs that could get caught in the rotating auger drum or manual crank handle.
Why Chemical Drain Cleaners Are Dangerous With an Auger
Combining a mechanical drain auger with a leftover chemical drain opener creates a severe safety hazard due to highly corrosive liquid splashing. According to Poison Control safety guidelines on caustic chemicals, commercial liquid drain cleaners rely on concentrated alkaline or acidic compounds that cause instantaneous chemical burns upon skin or eye contact .
Splash-Back Risk: Rotating a metal cable through standing chemical cleaner causes caustic fluid to splatter onto skin, face, and surrounding fixtures.
Toxic Fumes: Agitating treated water with a mechanical snake releases hazardous vapors that irritate the respiratory tract and lungs.
Verification: Confirm that no chemical drain openers have been poured into the fixture for at least 24 hours before introducing a physical auger.
Preventing Cable Kickback and Kinking
A high-tensile steel drain cable stores considerable torsional energy when twisted inside tight pipe bends, creating a risk of sudden kickback or permanent kinking. Managing feed tension properly prevents the flexible snake from whipping out of control and scratching porcelain or fracturing PVC joints.
Controlled Feeding: Never force the cable forward against a solid blockage; instead, lock the thumbscrew and rotate slowly to let the auger head work.
Short Working Lengths: Keep only 6 to 8 inches of exposed cable outside the drain opening or overflow plate to maintain structural control.
Verification: Stop immediately and retract the cable if you feel excessive resistance or binding, as this indicates the snake is kinking inside the pipe.
Tools & Materials Checklist
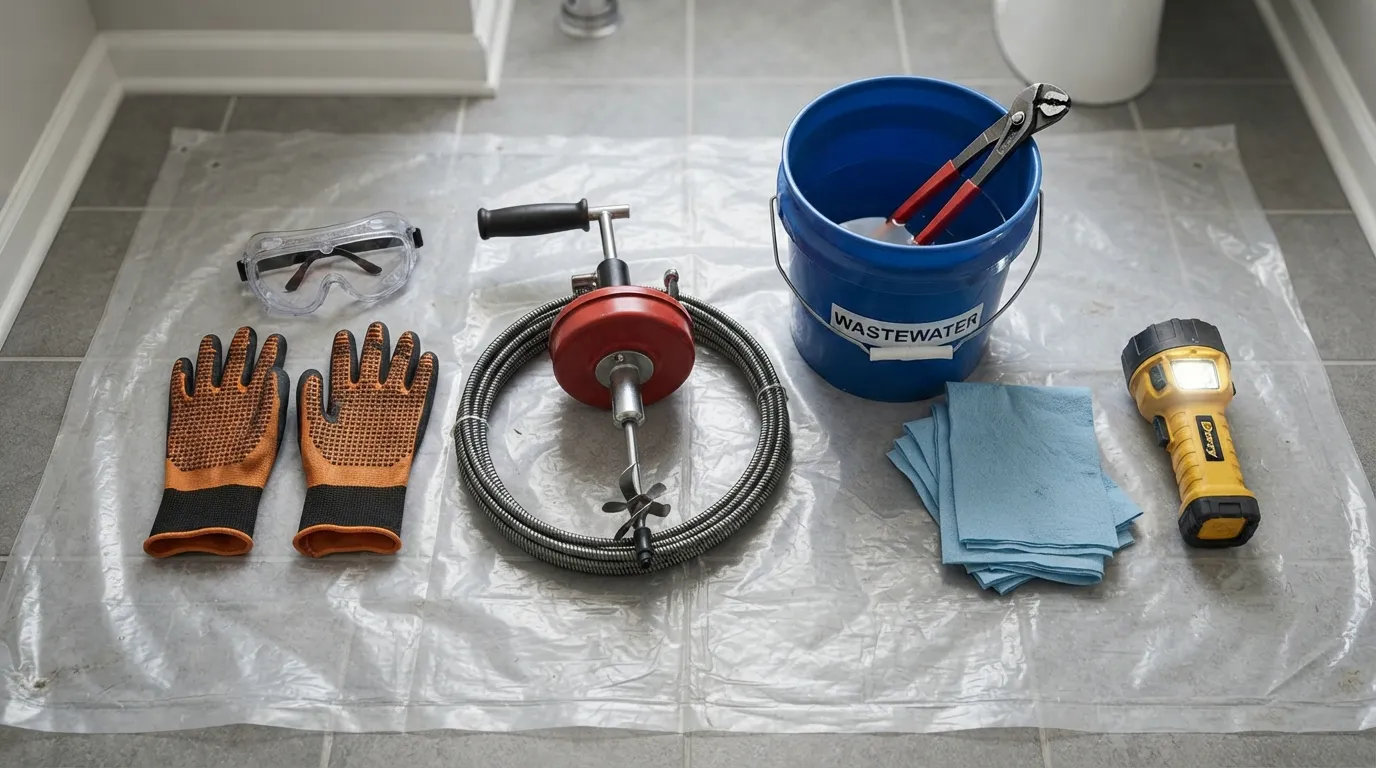
Gathering the proper equipment before starting your plumbing repair ensures an efficient workflow, protects your flooring from messy wastewater, and keeps necessary safety gear within arm’s reach. Having everything prepped eliminates mid-job interruptions and helps contain biohazards safely.
Drain Auger: Select the appropriate manual, canister, or drum model based on your specific fixture and clog depth.
Heavy-Duty Rubber Gloves: Waterproof, textured gloves protect your hands from jagged cable burrs, sewage, and bacteria.
Safety Glasses: Wrap-around protective eyewear prevents high-velocity water splashes and debris from entering your eyes.
Bucket or Catch Basin: Placed underneath P-traps or sink connections to capture standing greywater when dismantling pipes.
Old Rags or Shop Towels: Essential for wiping down the dirty cable as it retracts and cleaning up localized spills.
Flashlight or Work Light: Illuminates dark under-sink areas, utility spaces, and overflow access points for precise visibility.
Plastic Drop Cloth: Protects bathroom tiles, hardwood floors, and vanity cabinets from dirty drainage and sludge splatter.
Step-by-Step — How to Use a Drain Auger (Core Section)
Mastering the correct operational sequence of a drain auger ensures you safely reach, break up, and extract stubborn blockages without fracturing interior pipe walls. Executing this step-by-step process with precision transforms a messy plumbing headache into a quick, controlled fix.
Step 1: Insert and Feed the Cable
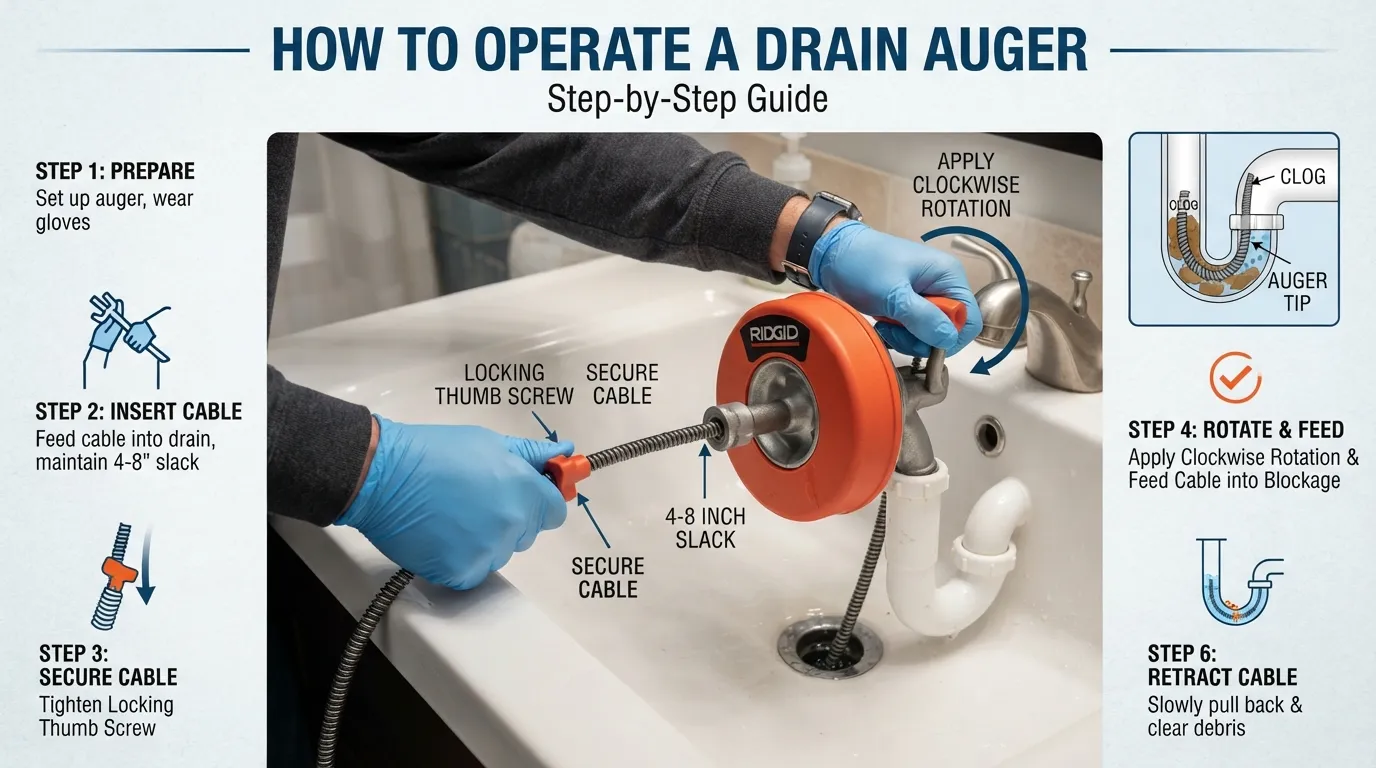
Guide the flexible metal cable out of the drum or canister and manually feed it directly into the fixture opening or removed clean-out port [00:40]. Push the snake smoothly into the pipe until you feel it come to a complete stop against an obstruction or tight P-trap bend [00:40].
Entry Point Selection: Go through a tub overflow plate or an unthreaded sink clean-out to prevent the cable from catching incorrectly on internal baffles.
Manual Guidance: Push the cable forward slowly by hand until natural physical resistance signals you have reached the blockage [00:40].
Step 2: Lock the Cable (4–8 Inch Slack Rule)
Pull the cable back slightly from the obstruction so that precisely 4 to 8 inches of snake remains exposed between the drain opening and the drum housing [00:47]. Securely engage the thumb screw or locking lever to lock the cable in place [00:47].
Maintaining Control: This specific slack rule prevents the flexible steel line from bowing out of control outside the pipe.
Lock Verification: Ensure the locking mechanism is tightly fastened so the cable cannot slip forward or backward while you apply rotation torque.
Step 3: Crank Clockwise and Push
Grip the crank handle and rotate the drum in a clockwise direction while simultaneously applying gentle, steady forward pressure [00:52]. The clockwise rotation forces the corkscrew head to bore into the clumped mass rather than uncoiling inside the pipe.
Rotational Direction: Always turn the handle clockwise; counter-clockwise rotation can cause the internal spring coils to unravel and jam.
Controlled Force: Combine the turning motion with mild forward momentum to let the spiral tip drill through dense hair or soap buildup [00:52].
Step 4: Hook or Break the Clog
Continue the cycle of cranking and feeding until the resistance suddenly gives way, indicating the blockage has broken apart or the spiral tip has snagged the debris [00:58]. If you feel the cable catch securely onto a mass of hair or fabric, you have successfully hooked the obstruction.
Breaking Dense Masses: Hard mineral or grease buildup will fracture into smaller, flushable fragments under the rotational torque.
Snagging Clumps: Soft organic clogs will wrap tightly around the spring head, allowing you to physically drag them out of the line [00:22].
Step 5: Retract and Clean the Cable
Unlock the thumbscrew, pull back 6 to 8 inches of cable into the drum, lock it again, and manually pull the snake out of the pipe to retrieve trapped debris [00:58]. Use old shop towels or paper towels to wipe down the dirty cable as it enters the housing to keep your workspace clean [02:45].
Debris Removal: Strip away accumulated hair and sludge from the auger tip using a disposable towel or utility knife before storing [02:45].
Incremental Pulling: Repeat the unlock-and-retract sequence carefully to avoid splashing residue onto surrounding bathroom or kitchen surfaces.
Step 6: Flush With Hot Water to Confirm
Turn on the hot water tap and let it run steadily down the drain to wash away any remaining loose particulate matter and verify full pipe capacity [02:38]. A clear-flowing drain confirms that the blockage has been completely pulverized and cleared from the system.
Residue Clearing: Hot water melts lingering grease films and carries small sediment down the main stack [02:38].
Flow Verification: Watch the basin for a clean, rapid vortex to ensure the drainage channel is fully restored.
Pro Tip: A Real-World Mistake First-Timers Make
Leaving too much slack between the canister housing and the drain opening is the most common mistake beginners make, often resulting in a painful cable whip. If you allow 2 or 3 feet of loose cable outside the pipe while cranking, the high-tensile steel will instantly buckle, kink, or whip violently against your hands and porcelain fixtures [03:20]. Always keep your working length restricted to a tight 4 to 8 inches to maintain complete structural control over the snake [00:47].
How to Use a Drain Auger on Different Drains
Different plumbing fixtures feature unique piping geometry, bends, and traps that require tailored augering techniques to achieve successful clog removal. Adapting your approach to match the specific drain type prevents equipment damage and ensures the snake navigates directly to the obstruction without hanging up on internal components.
Fixture-Specific Routing: Kitchen lines, bathroom basins, tubs, and toilets demand different entry points and handling strategies.
Trap Navigation: Understanding whether to remove a P-trap or enter through an overflow plate dictates the speed and safety of the job.
Kitchen Sink Drain
Kitchen sink blockages typically accumulate from grease, food scraps, and soap scum inside the horizontal arm or the P-trap assembly beneath the basin. If a double-sink setup is present, stuff a wet rag tightly into the opposing drain opening to maintain upward pressure and prevent the auger cable or wastewater from blowing back out of the parallel side.
Access Point: Feed the cable directly down the sink strainer basket or remove the curved P-trap section for direct straight-line access.
Grease Management: Rotate the crank slowly to bore through thick organic sludge, and run hot water simultaneously to liquefy remaining fats.
Bathroom Sink Drain (P-Trap Considerations)
Bathroom sink clogs are heavily dominated by hair and toothpaste buildup, which usually lodges right inside the curved P-trap or the pop-up stopper mechanism. Detaching the pop-up linkage or removing the P-trap entirely is often required before feeding the cable into the wall branch pipe.
Stopper Removal: Unscrew or pull out the sink stopper assembly from above to create a clear vertical channel for the snake.
Trap Inspection: If the cable continually binds at the first curve, drop the P-trap manually to clear out the primary trap bend before tackling deeper wall pipes.
Tub / Shower Drain (Overflow Access Point)
Clearing a bathtub or walk-in shower drain requires going through the upper overflow plate rather than the floor drain to prevent the flexible cable from curling backward uselessly. Removing the overflow cover plate grants a direct downward trajectory straight into the sanitary tee and the waste-and-overflow piping.
Overflow Removal: Unscrew the trip lever or faceplate on the bathtub overflow and pull the internal linkage mechanism out.
Direct Descent: Feed the auger straight down the open overflow pipe so gravity and alignment guide it past the trap and into the main drain line.
Toilet Drain (Internal Link Opportunity)
Toilet traps feature a built-in, S-shaped porcelain siphon designed to maintain a water barrier against sewer gases, which makes standard steel cables prone to scratching the bowl finish. If a standard auger fails to clear a stubborn commode blockage, professional intervention or a specialized closet auger with a protective vinyl guard is required. For complex bowl obstructions or cracked porcelain risks, consult expert toilet repair services to avoid severe bathroom water damage.
Porcelain Protection: Always use a rubber-coated bowl guard on your auger to prevent the bare metal cable from scratching or gouging the ceramic interior.
Alternative Tools: Standard plumbing snakes are less effective in toilets than dedicated closet augers designed explicitly to navigate the tight, built-in porcelain trapway.
Common Mistakes to Avoid
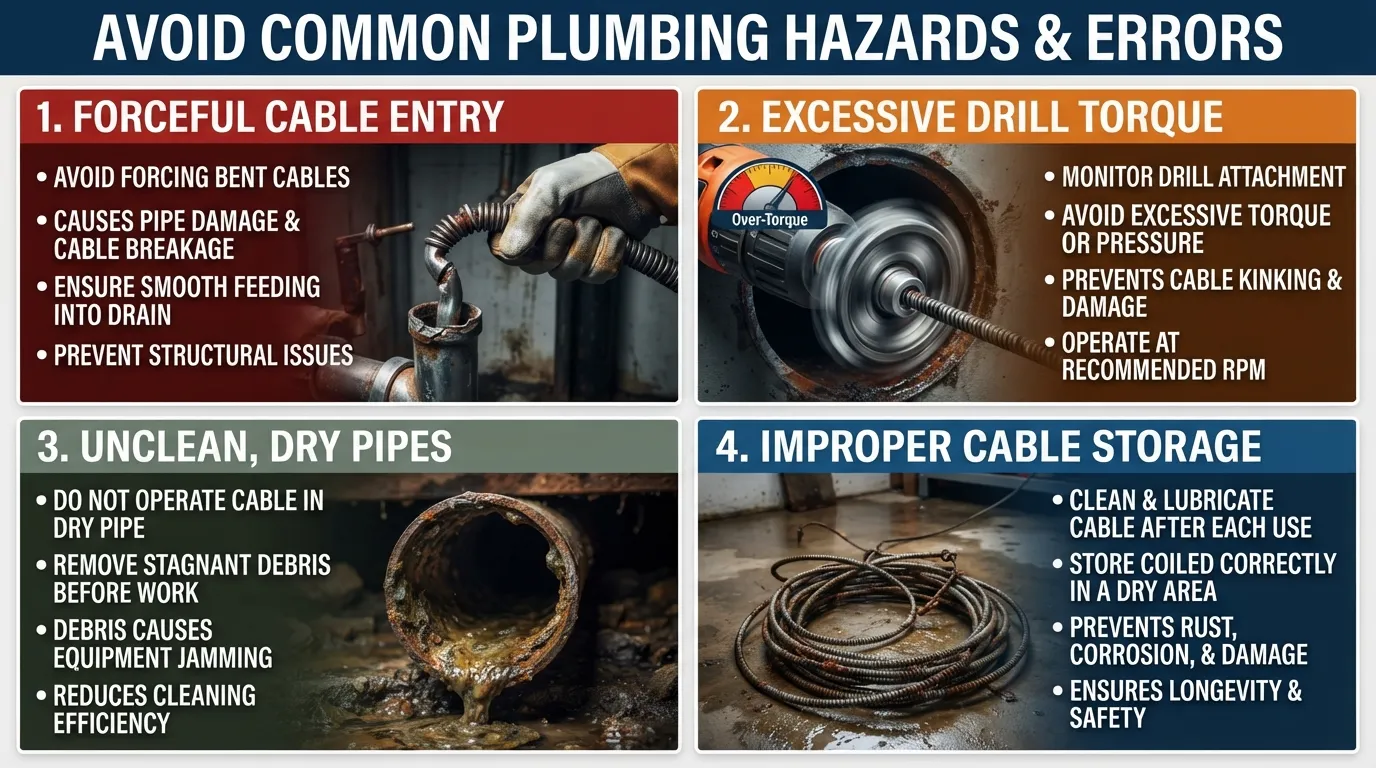
Avoiding typical operational errors during drain auger deployment prevents severe pipe damage, equipment failure, and frustrating re-clogs. Recognizing these pitfalls ensures your DIY plumbing repair remains safe, efficient, and entirely nondestructive to your home infrastructure.
Patience is Critical: Rushing the process or forcing hardware through lines invariably leads to kinked cables and cracked pipe joints.
Maintenance Matters: Proper post-job cleaning and controlled rotation speeds prolong the lifespan of both your tools and your plumbing network.
Forcing the Cable Instead of Working It Gently
Shoving a drain snake forward with brute force when it hits an obstacle is the primary cause of pipe damage and permanent cable kinking. When the metal snake meets heavy resistance, forcing it can cause the flexible steel to double back inside the wall, puncture fragile PVC elbows, or gouge aging cast iron lines. For severe pipe stress or suspected structural leak detection and repair services should be consulted immediately if you suspect a fractured pipe.
Gentle Progression: Let the rotating spiral head do the cutting work rather than pushing weight against the blockage.
Bind Recognition: Stop and retract the cable slightly the moment you feel abnormal rigidity to prevent structural pipe failures.
Rotating Too Fast
Spinning a manual or power auger at excessive RPMs strips away your control, increases the risk of violent cable whipping, and can scratch interior pipe surfaces. High-speed rotation makes it difficult to feel what the auger head is engaging with, turning a precise clearing tool into an uncontrollable hazard.
Controlled Torque: Maintain a steady, moderate cranking speed to keep the torsional energy safely distributed along the cable length.
Power Tool Precautions: If attaching a drill to a compatible auger drum, lock it strictly to low-speed mode to prevent sudden torque overload.
Skipping the Water Flush Step
Terminational failure often happens when users pull the auger out and immediately declare victory without thoroughly flushing the line with high-volume water. Leaving loosened debris sitting in the pipe guarantees that residual soap and hair will rapidly re-bind into a brand-new blockage within days.
Flushing Residue: Run a steady stream of hot water for several minutes after retrieval to sweep pulverized particles completely down the main stack.
Flow Verification: Always observe a clean vortex and rapid water drop in the basin to confirm total blockage elimination.
Reusing a Dirty, Uncleaned Cable
Coiling a filthy, bacteria-laden cable straight back into its storage drum or canister without wiping it down accelerates rust, degrades the steel wire, and spreads foul odors. Corroded cables lose their structural integrity and are significantly more prone to snapping mid-job during future plumbing repairs.
Wipe Down: Use disposable shop towels to clean wastewater, sludge, and hair off the entire length of the cable as it retracts into the housing.
Maintenance Routine: Allow the metal snake to air dry completely before sealing it away in storage to maximize its working lifespan.
Troubleshooting — What If the Auger Doesn't Work?
When a standard drain auger fails to clear a stubborn obstruction, the blockage is typically situated deeper within the municipal or secondary drainage infrastructure beyond the reach of handheld cables. Knowing how to interpret persistent drainage resistance helps you determine whether a specialized tool or professional intervention is required.
Signs the Clog Is Beyond the P-Trap
If your standard 15-to-25-foot canister cable feeds out completely without encountering noticeable resistance or clearing the standing water, the obstruction has bypassed the localized P-trap and moved deep into the vertical stack. Standard household snakes lack the extended length and heavy torque needed to break up distant blockages.
Full Cable Extension: Reaching the end of the snake with zero change in standing water indicates the clog is located further down the branch line.
Persistent Sluggishness: Slow drainage that returns immediately after partial snaking means accumulated buildup is lining the pipe walls beyond your reach.
Signs the Blockage Is in the Main Line
A localized fixture clog only affects a single sink or tub, whereas a main drain line issue manifests as simultaneous backups across multiple disconnected plumbing fixtures throughout your home. If flushing your toilet causes water to bubble up into your bathtub or kitchen sink, the failure is centralized in the primary drainage stack.
Multi-Fixture Impact: Observing wastewater rise in a secondary basin when running a different appliance signals a mainline obstruction.
Structural Failures: Heavy grease crystallization, collapsed clay pipes, or severe shifting require heavy-duty sewer line hydro-jetting or mechanical cutting equipment.
When A Backup Signals a Bigger Sewer Line Problem
When underground sewer lines experience catastrophic failures, standard DIY snakes are completely ineffective against heavy root intrusion, structural cracking, or ground settling. Ignoring widespread backup symptoms can lead to severe structural property damage, hazardous wastewater overflow, or basement flooding that requires immediate emergency mitigation and reliable sump pump installation to protect your home.
Tree Root Intrusion: Invasive roots tear through pipe joints, creating massive blockages that require professional root-cutting augers.
Professional Diagnosis: Advanced camera inspections pinpoint exact underground pipe breaks without guesswork, ensuring long-term plumbing rehabilitation.
Drain Snake vs. Drain Auger — What's the Difference?
While the terms drain snake and drain auger are frequently used interchangeably in everyday conversation, professional plumbers recognize distinct structural and functional differences between the two devices. Understanding these differences ensures you choose the right tool for your specific blockage severity, pipe diameter, and reach requirements.
Terminology Confusion: Retail packaging often blends both names, leading many DIYers to believe they are identical tools.
Design Variance: The primary distinction lies in how the wire cable is housed, how much torque it can deliver, and its overall operational depth.
Key Structural and Functional Differences
A drain snake typically refers to a light-duty, highly flexible wire tool—such as a simple closet auger or a bare cable with a corkscrew tip—designed for shallow, localized clogs near fixture openings. It prioritizes extreme flexibility to easily navigate tight porcelain or P-trap bends over heavy cutting power.
In contrast, a drain auger usually describes a more robust, heavy-duty apparatus featuring a protective drum or canister housing, a high-tensile steel cable, and a mechanical crank or power-drill attachment. An auger delivers significantly greater torque and structural rigidity, allowing it to penetrate compacted organic masses, grease buildup, and deep-seated branch line obstructions.
Flexibility vs. Strength: Drain snakes excel at navigating delicate, twisting trap geometries, whereas drain augers provide the high rotational strength needed to break through dense, compacted blockages.
Depth of Clog: Snakes are generally limited to short runs of 3 to 15 feet, whereas drum and power augers offer extended reach from 25 to over 100 feet for deep secondary and main lines.
Housing and Control: True augers feature enclosed drums or trigger mechanisms that keep messy wastewater contained during retrieval, whereas basic manual snakes expose the entire wire length during use.
FAQs (People Also Ask)
Should You Run Water While Using a Drain Snake?
Running a slow stream of water while operating a drain snake helps lubricate the pipe walls, breaks up loose debris, and washes away stubborn residue as the cable rotates. It also assists in cleaning wastewater off the steel cable as you retract it into the housing.
Is It Better to Snake a Drain Wet or Dry?
Snaking a drain wet is generally preferred for active clogs because standing water or a trickle helps flush pulverized particles down the line. However, working with a dry pipe may be necessary during initial troubleshooting to keep your work area clean and clearly visualize localized fixture traps.
Do Drain Snakes Damage Pipes?
Drain snakes can scratch interior pipe walls, puncture fragile PVC elbows, or crack aging pipes if forced forward with excessive brute force or spun at reckless speeds. Using moderate torque, keeping exposed cable slack short, and avoiding chemical cleaners beforehand prevents structural plumbing damage.
Does Pouring Boiling Water Down a Drain Help Unclog It?
Boiling water effectively melts minor grease, soap scum, and oil clogs in metal pipes. However, it should never be poured into porcelain toilets or standard PVC plumbing, as extreme thermal shock can instantly crack ceramic bowls or warp plastic pipe joints.
Why Shouldn’t You Use Baking Soda and Vinegar to Unclog A Drain?
Baking soda and vinegar create an acid-base neutralization reaction that produces mostly carbon dioxide gas and saltwater, offering very little actual cleaning power against dense hair or grease clogs. Furthermore, mixing these ingredients in a sealed pipe can generate localized pressure that worsens existing pipe cracks.
What Do Plumbers Recommend to Unclog Stubborn Drains?
Professional plumbers recommend using a mechanical drum or power auger matched to the correct pipe diameter for physical blockages. For severe or recurring main line blockages caused by tree roots or grease, they advise utilizing specialized hydro-jetting equipment and camera inspections.
When to Call a Professional Plumber
While store-bought drain snakes, plunging, and DIY chemical treatments can sometimes provide a temporary fix, certain plumbing issues signal that it’s time to step away from the tools and bring in an expert. Recognizing the difference between a minor localized blockage and a major system-wide failure can save you from extensive property damage and costly structural repairs. If you are experiencing persistent plumbing issues that refuse to go away, calling a professional plumber is the safest and most effective course of action.
Recurring Clogs in the Same Drain
If you find yourself plunging or snaking the exact same sink, shower, or tub every few weeks, you aren’t actually solving the core issue—you’re merely punching a temporary hole through the debris.
The Underlying Problem: A recurring clog usually points to deeper structural problems within your pipes, such as heavy grease accumulation, pipe corrosion, mineral scaling, or a sagging section of pipe (known as a “belly”) where waste constantly collects.
Why DIY Fails: Standard household augers often lack the reach or scrubbing power to thoroughly scour the interior pipe walls.
The Solution: A certified technician can utilize professional-grade hydro-jetting or specialized rotary equipment to completely clear the line, ensuring long-term flow.
Multiple Drains Backing Up at Once
When water begins bubbling up in your bathtub or shower when you flush the toilet, or your kitchen sink backs up whenever the washing machine drains, you are dealing with a main sewer line blockage rather than a simple fixture-level issue.
The Severity: This is a high-priority plumbing emergency. Wastewater from multiple parts of your home has nowhere else to go and is actively threatening to flood your living spaces.
The Solution: Because main line issues require heavy-duty intervention—such as video camera inspections and advanced sewer line repair—you should immediately contact an emergency plumber to diagnose and resolve the blockage before wastewater causes severe structural or sanitary damage to your home.
Signs of Tree Root Intrusion
Underground sewer lines are subjected to shifting soils, extreme temperatures, and nature itself. One of the most destructive subterranean threats is tree roots, which naturally seek out the moisture and nutrients escaping from tiny microscopic cracks or loose joints in older pipes.
Warning Signs: Frequent backups, unusually lush patches of grass directly over your sewer line path, foul sewage odors in your yard, or gurgling sounds coming from your toilet bowls.
Why DIY Fails: Standard hand augers cannot cut through thick, woody root masses, and chemical root killers only offer temporary suppression while potentially damaging your pipe material.
The Solution: Professionals utilize specialized heavy-duty root-cutting augers, trenchless pipe lining, or complete excavation and replacement options to permanently remove the intrusion and restore the integrity of your drainage system.
Conclusion & Call-to-Action
Mastering the proper operation of a drain auger transforms a frustrating household plumbing emergency into a manageable, controlled fix. By selecting the right tool, following strict safety protocols, and using careful rotation techniques, you can successfully clear stubborn clogs without damaging your pipes.
However, when deep-seated blockages, tree root intrusion, or main line backups prove too complex for DIY equipment, attempting to force the issue can lead to costly water damage. When stubborn clogs refuse to clear or you need professional assistance to safely unclog your drainage system, expert help is just a click away.
Need Immediate Assistance? Don’t let a stubborn blockage disrupt your home. Schedule an appointment with our certified plumbing experts today to restore full flow and protect your infrastructure.
Main Services
Related Posts
Need a Plumber in Miami?
Schedule service online or speak directly with the EZ Plumbing team.
Owner-Led Local Service
Know who is behind the business before you request service. The owners, contact line and Miami service pages are published clearly.
- Named business owners
- Direct phone and social channels
- Local Miami service information
Clear Help Before You Book
Review the relevant service page, contact the team directly and use the booking page when you are ready—without relying on vague claims.
- Service-specific information
- Direct questions before scheduling
- Clear online booking route