
How to Unclog a Kitchen Sink: 7 Easy DIY Methods That Actually Work
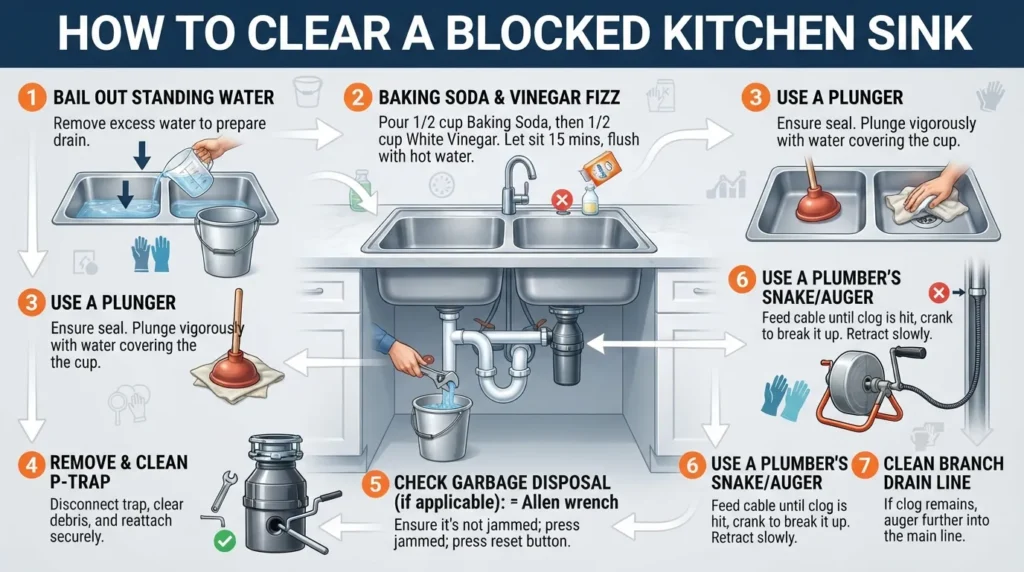
Understanding and Clearing Kitchen Sink Blockages
Kitchen sink blockages disrupt daily routines instantly, usually stemming from a buildup of stubborn grease, food particles, and soap scum inside the pipes. Addressing these clogs effectively requires distinguishing between routine maintenance and addressing stagnant, standing water scenarios.
What Causes a Clogged Kitchen Sink?
Drain blockages rarely happen overnight. They typically build up gradually as everyday waste accumulates along the interior walls of your plumbing lines until water can no longer pass through.
Grease and Oil Accumulation: Pouring cooking oils, fats, and melted butter down the drain leads to solidification as they cool, narrowing the pipe diameter.
Food Particle Buildup: Starchy foods, coffee grounds, and fibrous vegetable peels slip past strainers and wedge tightly inside pipe bends.
Soap Scum and Mineral Deposits: Hard water minerals combine with soap residue to form a chalky, restrictive crust over time.
Improper Garbage Disposal Use: Overloading disposal units or processing fibrous items without enough running water causes immediate backups.
Fastest Way to Unclog It Right Now
For immediate relief from a sluggish or completely blocked drain, a mechanical approach using standard household tools is the most effective DIY method.
Step 1: Clear any standing water using a cup or small container if the sink is completely full, leaving about two inches of water in the basin to create a proper suction seal.
Step 2: Position a heavy-duty cup plunger directly over the drain opening, ensuring a tight seal, and run a damp rag across the second basin or overflow hole if applicable.
Step 3: Push and pull the plunger vigorously up and down 6 to 8 times without breaking the seal, then sharply pull up to dislodge the obstruction.
Step 4: Flush the drain thoroughly with hot tap water for at least two minutes to wash away the loosened debris and verify clear flow.
Pro Tip: Avoid mixing chemical drain cleaners with mechanical plunging or subsequent physical snaking, as corrosive chemical splashes pose severe safety hazards to your skin and eyes.
Before You Start — Dealing With Standing Water
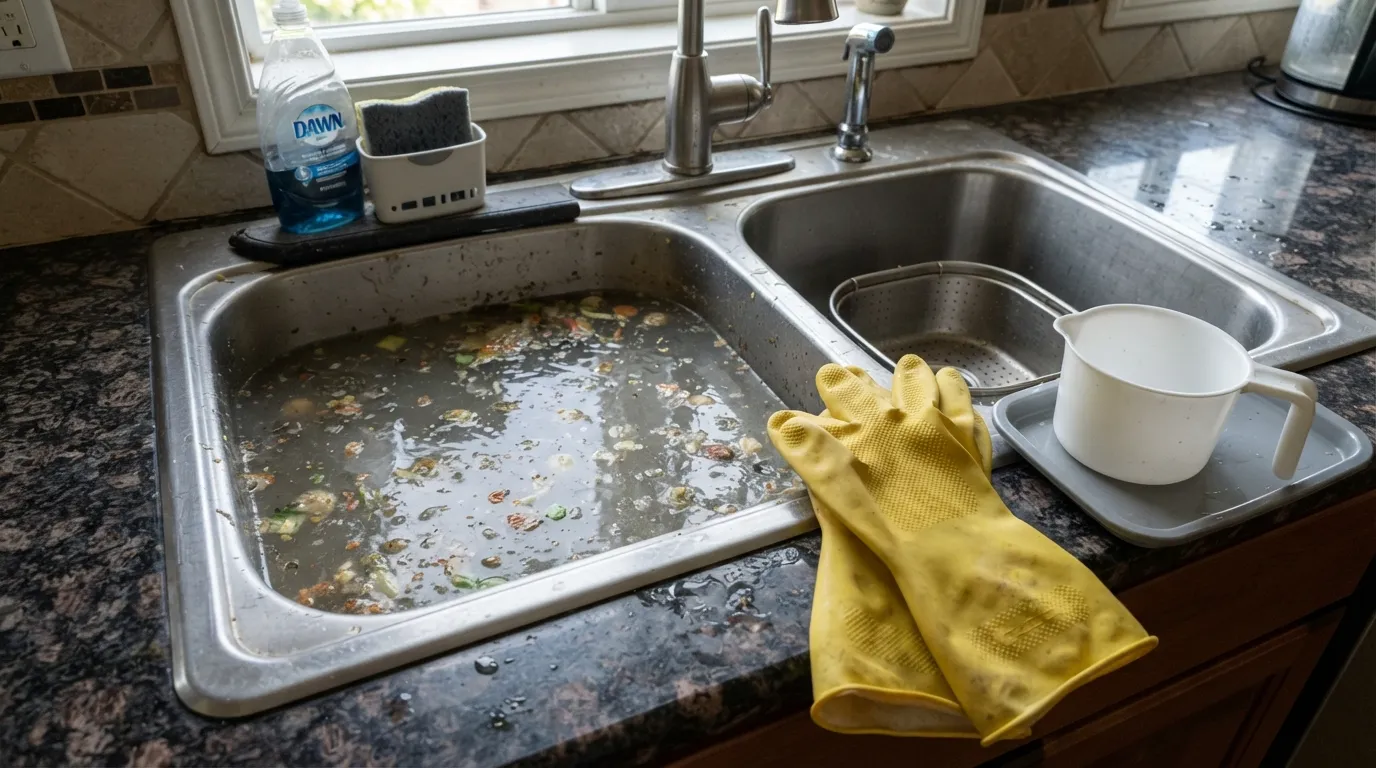
Clearing a kitchen sink full of stagnant, dirty dishwater requires careful bailing before you attempt any plunging or chemical treatments. Tackling this safely protects your kitchen from messy overflows and prevents harsh chemical splashes.
How to Safely Bail Out Standing Water
Removing excess water allows you to establish a proper seal for a plunger and gives you clear visibility of the drain opening. Wear heavy-duty rubber gloves to protect your skin from bacteria and food residue trapped in the basin.
Prep Your Workspace: Place a large bucket directly beneath the sink cabinet and lay down old towels around the base of the sink to catch accidental spills.
Use the Cup Method: Take a plastic cup, bowl, or deep ladle and scoop out the standing water systematically.
Transfer into Buckets: Pour the bailed water into your bucket or a secondary bathroom toilet until only a couple of inches of water remain in the basin.
Dry and Clear: Wipe away any floating debris around the drain flange so your plunging tool can form an airtight vacuum seal.
Can You Pour Drano in Standing Water? (Safety Note)
Pouring chemical drain openers like Drano directly into a sink full of standing water is strongly discouraged and hazardous. Dilution drastically reduces the formula’s effectiveness against deep grease and food clogs.
Splash Hazards: Bailing or plunging after adding chemicals can cause caustic liquid to splash back onto your skin, eyes, or countertops.
Corrosive Damage: Standing chemical pools can sit against metal sink strainers or older pipes for too long, causing structural damage or corrosion.
Alternative Approach: Always bail out the basin first or use mechanical methods like a plunger or drain snake before introducing any chemical solutions.
Pro Tip: If your double-basin sink has water backing up into the second side, tightly clamp or block that secondary drain with a wet cloth while plunging the primary side to force air pressure downward.
Method 1 — Baking Soda and Vinegar (Natural Method)
Using household items like baking soda and white vinegar provides a safe, chemical-free way to dissolve minor buildup and freshen up slow-moving kitchen pipes. This foaming reaction breaks down light organic residue without corroding your plumbing lines.
Step-by-Step: Baking Soda + Vinegar Flush
Executing this natural treatment correctly ensures maximum chemical efficacy from the effervescent reaction.
Step 1: Pour one pot of boiling water directly down the drain to preheat the pipes and loosen surface grease.
Step 2: Pour one cup of baking soda down the drain opening and let it sit undisturbed for 5 to 10 minutes.
Step 3: Pour one cup of white vinegar down the drain, triggering a bubbling foaming reaction that mimics a miniature volcano.
Step 4: Cover the drain with a stopper or cloth to force the fizz downward, allowing the mixture to work for another 5 to 10 minutes.
Step 5: Finish by pouring a second pot of boiling water, followed by running hot tap water for five minutes to flush all loosened debris away.
Why This Method Sometimes Doesn’t Work (Grease vs. Organic Clogs)
While popular, the baking soda and vinegar method is not a silver bullet for every type of kitchen sink blockage. Understanding its limitations prevents frustration when dealing with stubborn obstructions.
The Neutralization Myth: Mixing a base (baking soda) and an acid (vinegar) creates a neutralization reaction that produces carbon dioxide gas and salt water; once they neutralize each other, much of their individual cleaning power is lost.
Grease Clog Resilience: Solidified cooking oils and hard grease clogs require intense heat or strong surfactants to break down, which mild effervescence alone cannot penetrate.
Physical Obstructions: Foreign objects, cutlery, or heavy food particle blockages require mechanical extraction rather than chemical or natural bubbling treatments.
Method 2 — Dawn Dish Soap + Hot Water
When grease is the primary culprit behind a sluggish kitchen drain, Dawn dish soap paired with hot water offers a powerful targeted solution. Because commercial dish soap is formulated to break down heavy culinary fats, it acts as an effective surfactant to dissolve sticky blockages without damaging your pipes.
How Dish Soap Breaks Down Grease
Grease and cooking oils cling tightly to the interior walls of drain pipes, trapping other food particles and forming dense blockages over time.
Surfactant Action: Dawn molecules reduce the surface tension of water, allowing it to penetrate and lift grease away from PVC or metal pipe surfaces.
Emulsification: The formula breaks large oil globs into tiny, suspended droplets that easily flow away with running water.
Lubrication: The soapy mixture coats the interior plumbing, helping stubborn debris slide smoothly down the line during the final flush.
Step-by-Step Dawn + Hot Water Method
Applying this technique correctly ensures the soap reaches the core of the clog before the water cools down.
Step 1: Squirt a generous amount of Dawn dish soap (about one-quarter cup) directly down the dry or partially drained sink opening.
Step 2: Let the dish soap sit undisturbed for 10 to 15 minutes so it can coat and begin breaking down the accumulated grease barrier.
Step 3: Heat a large pot of water on the stove until it is steaming hot, but avoid reaching a rolling boil if your home has older PVC pipes that could warp.
Step 4: Pour the hot water down the drain in a steady, controlled stream to wash away the emulsified grease.
Step 5: Run your hot tap water for an additional two minutes to completely clear out any remaining residue from the traps.
Does It Actually Work? (Honest Take)
While this method is exceptionally effective for fresh, grease-based clogs, it has clear operational limitations you should keep in mind.
High Success Rate for Grease: It works remarkably well for slow drains caused by everyday dishwashing fats and mild soap scum buildup.
Ineffective Against Hard Objects: It will not clear physical blockages like utensils, hard fruit pits, or dense, compacted coffee grounds.
Temperature Sensitivity: If the water is not hot enough, the dissolved grease can simply re-solidify further down the main plumbing line, shifting the clog instead of removing it.
Method 3 — Using a Plunger
When natural flushes and dish soap fail to shift a stubborn blockage, a physical cup plunger is your next line of defense. Proper hydraulic pressure forces water back and forth against the obstruction, breaking up compacted food particles and grease.
Step-by-Step Plunging Technique
Executing a controlled plunging motion creates the necessary air and water vacuum to dislodge debris safely.
Step 1: Cover the drain opening completely with a rubber cup plunger, ensuring the rubber flange forms a tight, even seal against the sink surface.
Step 2: Maintain about two inches of standing water in the basin to submerge the bell of the plunger and enable hydraulic suction.
Step 3: Push down gently to release trapped air, then pump the handle up and down vigorously 6 to 8 times without breaking the rim seal.
Step 4: Break the suction sharply on the final upward pull to shock the clog and encourage the debris to break apart.
Step 5: Test the drain by running warm water; repeat the cycle if the water still drains sluggishly.
How to Plunge a Double-Basin Kitchen Sink
Double-basin sinks share an interconnected under-sink plumbing layout, which causes air and water pressure to escape through the secondary drain if not properly sealed.
Identify the Shared Tee: Both basins typically meet at a central sanitary tee or baffle waste fitting directly beneath the divider wall.
Seal the Secondary Drain: Tightly plug the second basin’s drain hole using a rubber stopper, or wrap a heavy wet dishcloth firmly around the opening.
Apply Downward Pressure: Press your hand or a weighted object over the wet cloth to hold the seal securely in place while you plunge the primary basin.
Prevent Blowback: Sealing the adjacent side forces 100 percent of your plunger’s compressed air energy directly into the blockage rather than letting it push dirty water out of the opposite drain.
Method 4 — Cleaning the P-Trap
When surface plunging and natural flushes fail to move an obstruction, the clog is usually trapped physically inside the curved U-bend beneath your basin, known as the P-trap. Removing and cleaning this section provides direct physical access to the trapped debris, hair, and sludge.
Tools You’ll Need
Gathering the right equipment before opening your plumbing lines prevents unexpected messes and makes reassembly straightforward.
Large Bucket: Placed directly beneath the trap assembly to catch stagnant water and sludge when the pipes are opened
Channel-Type Pliers or Pipe Wrench: Used gently on stubborn slip-joint nuts if they cannot be loosened by hand
Rubber Gloves and Old Rags: Essential for protecting your hands and wiping down pipe threads.
Bottle Brush or Wire Hanger: Helpful for pushing out compacted gunk inside the curved pipe sections.
Step-by-Step P-Trap Removal and Cleaning
Following a systematic disassembly process ensures you can clean the lines and put everything back together without permanent damage.
Step 1: Position your bucket directly under the P-trap to catch the trapped water that will spill out immediately upon loosening.
Step 2: Loosen the large threaded slip nuts at both ends of the U-shaped P-trap using your hands or adjustable pliers.
Step 3: Lower the trap carefully, empty the contents into your bucket, and inspect the interior for grease plugs or solid obstructions.
Step 4: Scrub the inside of the pipe thoroughly using a bottle brush or a straightened wire, then rinse it clean with water from a separate source.
Step 5: Reattach the P-trap securely, hand-tighten the slip nuts, and run the faucet to test for proper flow and check for a persistent drip after reassembly that may require professional leak detection and repair services if the moisture continues.
Common Mistake: Over-Tightening Slip Nuts
Many DIYers make the mistake of cranking down plastic or metal slip nuts with heavy wrenches, which damages the internal rubber washers.
Cracked Washers: Excessive torque distorts or slices the tapered rubber washers inside the nuts, immediately causing joint leaks.
Hand-Tight Standard: Always tighten slip-joint nuts firmly by hand, adding just a slight quarter-turn with pliers only if a minor drip occurs during testing.
Thread Alignment: Ensure the washers and nuts are threaded straight before tightening to avoid cross-threading, which strips plastic fittings permanently.
Method 5 — Drain Snake / Auger for Deep Clogs
When plunging and cleaning the P-trap leave your sink still blocked, the obstruction has settled further down into the branch pipe or main line. A drain snake, or plumbing auger, is specifically engineered to reach past immediate bends and physically break apart deep-seated blockages.
What Is a Deep Clog?
A deep clog occurs beyond the accessible U-bend of your P-trap, typically residing deep inside the horizontal wall pipe or the vertical stack.
Persistent Backups: Water drains slowly or overflows immediately even though the P-trap is entirely clean and clear of debris.
Multi-Fixture Impact: Gurgling noises in nearby appliances or water backing up into the dishwasher signal a blockage further down the main line.
Compacted Sludge: Decades of accumulated grease and organic matter harden into a dense mass that chemical solutions cannot dissolve.
Step-by-Step Using a Drain Snake/Auger
Operating a hand-cranked drum auger safely requires patience and controlled rotational force to prevent damaging older metal or plastic pipes.
Step 1: Disconnect the P-trap to gain direct access to the wall stub-out pipe, creating a clear entry point for the auger cable.
Step 2: Loosen the thumb screw on the auger drum and pull out a few inches of the flexible steel cable, guiding the tip straight into the wall pipe.
Step 3: Feed the cable slowly inward until you feel physical resistance, indicating you have reached the obstruction.
Step 4: Tighten the thumb screw and crank the handle clockwise while applying gentle forward pressure to bore through or snag the clog.
Step 5: Retract the cable slowly, wiping away retrieved debris, and repeat the process until the cable spins freely through the line.
Signs You Need a Professional Auger
Certain plumbing blockages exceed the reach and capability of standard household hand tools, requiring specialized trade intervention.
Infinite Cable Depth: If you feed the entire length of your consumer snake into the pipe without encountering resistance or clearing the blockage, the issue lies deep within the main sewer stack.
Structural Pipe Failures: Tree root intrusion, collapsed clay lines, or heavily corroded cast-iron pipes require heavy-duty motorized equipment.
Persistent Backups: If DIY methods fail repeatedly, scheduling professional drain cleaning services ensures the entire plumbing network is thoroughly cleared and inspected.
Chemical Drain Cleaners — Drano vs. Natural Methods
Navigating chemical drain cleaners requires weighing their raw clearing strength against significant safety risks to your plumbing and health. Understanding how commercial formulas compare to natural solutions helps you choose the right approach without causing pipe damage.
Is Drano Safe for Your Pipes?
Commercial chemical drain openers like Drano rely on caustic ingredients such as lye or sodium hypochlorite to generate intense heat and dissolve organic matter.
PVC Pipe Vulnerability: The extreme heat generated by chemical reactions can warp, soften, or crack older PVC pipes and loosen slip-joint washers.
Corrosion Risks: Frequent use accelerates corrosion on metal sink strainers, brass P-traps, and garbage disposal internal components.
Manufacturer Guidelines: Always consult official usage instructions on the Drano Clog Basics Guide before application to prevent chemical burns and dangerous splashbacks.
Drano vs. Baking Soda/Vinegar — Which Is Stronger?
Comparing chemical strength against natural methods highlights a direct trade-off between aggressive dissolving power and home safety.
Raw Power: Drano is significantly stronger at melting dense organic hair and grease clogs through heavy chemical reactions.
Eco-Friendly Safety: Baking soda and vinegar provide a mild effervescent reaction that is completely safe for delicate pipes, though it struggles against heavy blockages.
Surface Protection: Natural mixtures will never etch metal finishes or compromise plumbing seals, whereas chemical spills permanently stain porcelain and countertops.
What Professional Plumbers Use Instead
When commercial chemicals and DIY tools fail, licensed plumbers avoid caustic consumer formulas in favor of specialized trade equipment.
Enzyme Cleaners: Biological treatments use active bacteria and natural enzymes to safely digest grease and organic buildup over time without heat or corrosion.
Motorized Drain Augers: Heavy-duty commercial snakes physically cut through roots, wipes, and dense grease masses lodged deep in the main line.
Hydro Jetting: High-pressure water streams scour pipe interiors completely clean, removing years of accumulated scale and grease buildup down to the bare pipe walls.
Pro Tip: Never mix different chemical drain cleaners or follow a failed chemical treatment with a plunger, as trapped caustic liquid can easily spray into your face and eyes.
Recommended Tools (Buyer's Guide Angle)
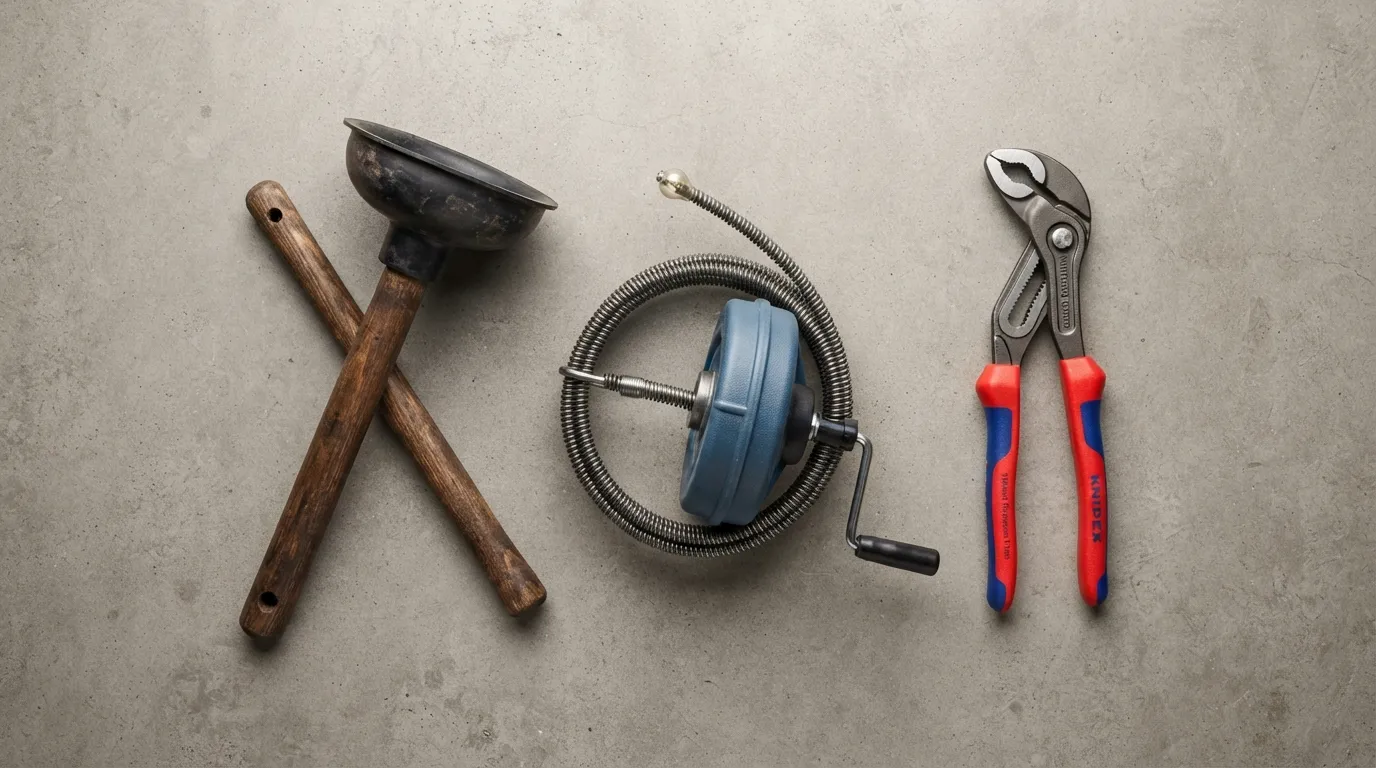
Equipping your home with the right plumbing tools transforms a frustrating kitchen sink backup into a quick five-minute fix. Having specialized manual equipment on hand saves you from emergency plumber fees and eliminates the need for harsh chemical cleaners.
Best Plunger Types for Kitchen Sinks
Choosing the correct plunger style ensures you generate maximum water displacement over flat drain openings.
Cup Plunger (Flat Bottom): The gold standard for kitchen sinks, featuring a flat rubber cup designed to form an airtight seal over smooth, level sink surfaces.
Accordion Plunger: Features flexible bellows that hold more water volume and generate up to three times more force than traditional flat cup models, though they require a firmer grip.
Avoid Toilet Flange Plungers: While popular for bathrooms, the soft inner extension flap on toilet plungers prevents a proper flat seal over a kitchen drain opening.
Best Drain Snake for Home Use
When plungers and natural flushes fail to reach deep obstructions, a dedicated hand tool provides the necessary mechanical reach.
Hand-Crank Drum Auger: Features 15 to 25 feet of flexible steel cable safely housed inside a plastic or metal storage drum to keep your floors clean during operation.
Quarter-Inch Cable Width: The ideal diameter for navigating tight 90-degree kitchen P-traps and branch lines without getting stuck.
Compact Hair Snake Strips: Inexpensive, barbed plastic strips that work wonderfully for catching shallow surface debris and food clumps right at the drain opening.
How to Prevent Future Clogs
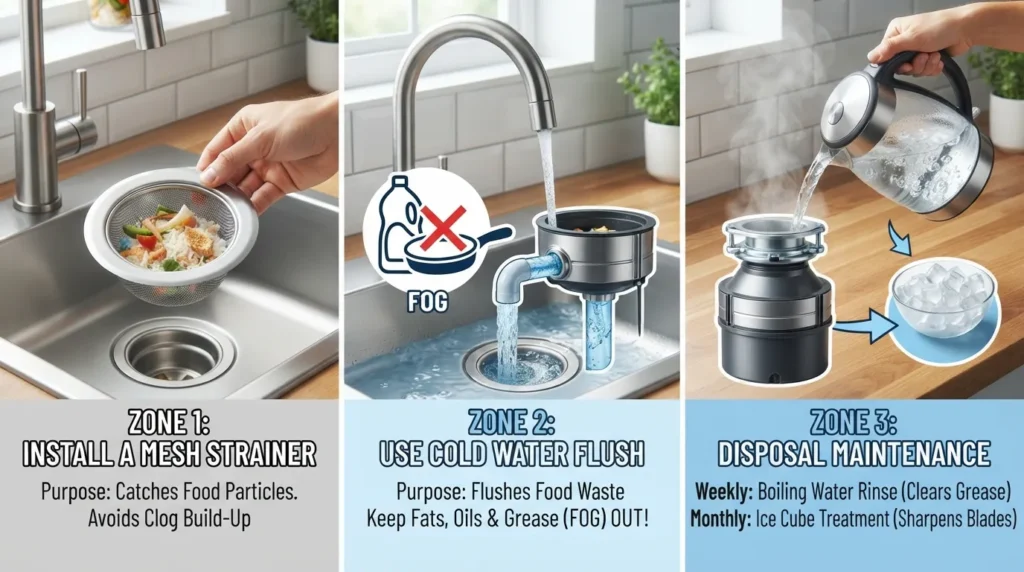
Preventing future plumbing backups requires adopting smart daily habits and knowing which items to keep out of your pipes altogether. Establishing a consistent maintenance routine protects your kitchen infrastructure and saves you from recurring drainage headaches.
Daily Habits to Avoid Clogs
Small changes in your daily dishwashing and kitchen cleanup routines go a long way toward keeping your plumbing clear.
Use a Fine Mesh Strainer: Place a stainless steel mesh strainer over your drain opening to catch tiny food particles and coffee grounds before they enter the waste line.
Run Cold Water Flushes: Always run cold tap water for 15 to 30 seconds after using the sink to wash away residual soap and tiny particles.
Weekly Boiling Water Rinses: Pour a pot of hot water down the drain once a week to melt away minor surface grease before it hardens into a dense barrier.
What Never to Pour Down a Kitchen Sink
Certain household substances react poorly with plumbing systems, quickly turning into stubborn blockages.
Fats, Oils, and Grease (FOG): Never pour liquid bacon grease, cooking oil, or melted butter down the drain; let them solidify in a can and throw them in the trash.
Starchy Expansion Foods: Keep pasta, rice, flour, and potato peels out of the sink, as these foods absorb water, swell up, and form a concrete-like sludge inside the pipes.
Fibrous Vegetable Peels: Celery strings, onion skins, and corn husks wrap tightly around pipe walls and auger cables, creating impenetrable tangles.
Garbage Disposal Maintenance Tips
Proper garbage disposal upkeep prevents mechanical jams and ensures waste is ground down into safely transportable particles.
Grind Ice Cubes: Run a handful of ice cubes through the disposal once a month to sharpen the impeller blades and knock away trapped grease buildup.
Deodorize with Citrus: Grind up leftover lemon or orange wedges to freshen the disposal chamber and neutralize trapped food odors.
Always Use Running Water: Keep a strong stream of cold water running before, during, and for 30 seconds after operating your disposal to flush ground waste entirely through the system.
When to Call a Professional Plumber
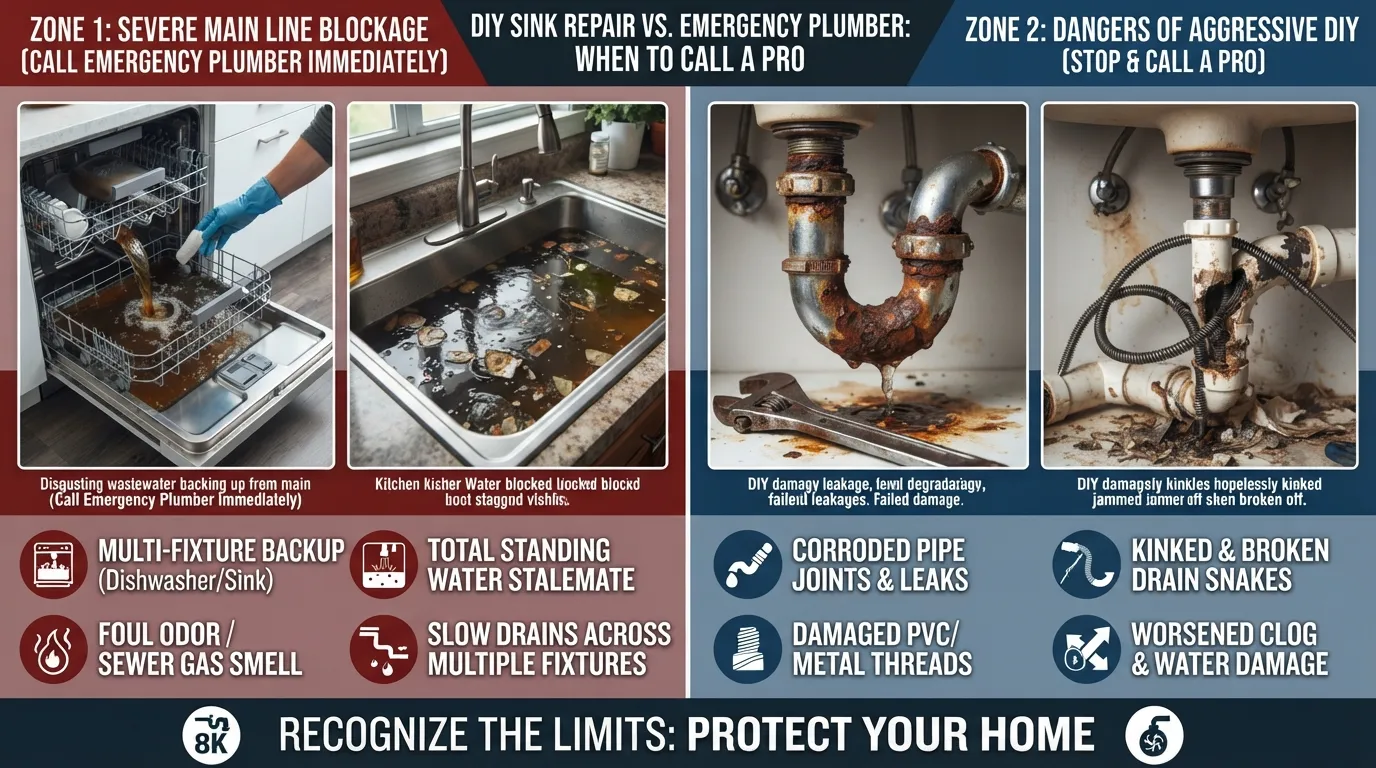
Knowing when to stop DIY troubleshooting and call in an expert prevents minor drainage issues from turning into major structural water damage. When household remedies and hand tools fail to restore proper flow, it is time to bring in professional equipment and expertise.
Signs Your Clog Needs Professional Help
Certain symptoms indicate that your kitchen sink blockage extends far beyond a simple trap or branch line obstruction.
Multi-Fixture Backups: If water bubbles up into your dishwasher, laundry tub, or secondary bathroom sink when you run the kitchen faucet, you are dealing with a main sewer line blockage.
Recurring Blockages: If your kitchen sink clogs repeatedly within a few weeks despite thorough cleaning, an underlying pipe defect or structural offset requires an emergency plumber to inspect the line.
Total Standing Water Stalemate: If heavy plunging, snaking, and chemical bailing leave the basin completely full with zero movement, the obstruction is tightly compacted deep within the system.
Why DIY Methods Sometimes Make It Worse
Aggressive home remedies can occasionally compromise your plumbing infrastructure if applied incorrectly.
Corroded Pipe Joints: Overusing harsh chemical drain cleaners degrades older metal threads and softens PVC fittings, causing sudden under-sink leaks.
Kinked Drain Snakes: Pushing a manual auger too hard or fast around tight pipe bends can knot the steel cable, puncturing thin-walled drainage pipes.
Compacted Blockages: Plunging without sealing secondary drains can push a soft obstruction further down into narrow vertical stacks where it hardens permanently.
Need Expert Help? If your DIY attempts haven’t cleared the blockage, trust a professional drain cleaning service to restore your plumbing. Book a plumber now to get your kitchen back to normal.
Frequently Asked Questions
What is the best home remedy for unblocking a sink?
A combination of baking soda, white vinegar, and hot water is the most popular and effective natural remedy for minor organic buildup and slow drains. For grease-heavy blockages, hot water mixed with a quarter cup of Dawn dish soap works exceptionally well as a natural surfactant.
What is the strongest thing to unclog a sink?
The strongest DIY method is a mechanical drum auger or drain snake, which physically bores through and breaks up dense blockages. Professionally, hydro jetting and motorized commercial augers represent the absolute strongest methods for clearing severe, compacted main line clogs.
Does Dawn really unclog drains?
Yes, Dawn dish soap effectively unclogs drains that are restricted by grease, cooking oils, and soft food residue. Because it is formulated to cut through heavy culinary fats, it emulsifies the blockage and allows hot water to flush the grease away.
How do you unblock a kitchen sink with standing water?
Start by wearing rubber gloves and bailing out the excess dirty dishwater using a cup or bowl into a bucket beneath the sink. Once only a couple of inches of water remain to maintain a vacuum seal, use a heavy-duty cup plunger to pump and dislodge the blockage.
What is a quick way to unclog a kitchen sink?
The fastest DIY method is using a rubber cup plunger over the drain opening to create rapid hydraulic pressure. Pumping vigorously 6 to 8 times usually breaks up minor food and soap blockages in under a minute.
What do plumbers use instead of Drano?
Licensed plumbers avoid corrosive consumer chemicals, choosing instead to use professional motorized drain augers, biological enzyme cleaners, and high-pressure hydro jetting systems. These tools clear pipes completely without risking structural pipe corrosion.
Why shouldn’t you use baking soda and vinegar to unclog a drain?
Mixing baking soda and vinegar causes a neutralization reaction that produces carbon dioxide gas and salt water, which cancels out much of their individual cleaning power. Furthermore, the mild effervescence lacks the strength required to dissolve thick grease plugs or physical foreign objects.
Can you put Drano in a clogged sink with standing water?
No, you should never pour Drano into a sink full of standing water because the standing liquid heavily dilutes the chemical formula. Additionally, bailing or plunging afterward creates severe chemical splashback hazards that threaten your skin and eyes.
How do I unclog a deep clog in my kitchen sink?
If clearing the P-trap does not resolve the issue, you must use a hand-crank drain snake or auger. Feed the flexible steel cable past the wall stub-out until it reaches the obstruction, then crank the handle to bore through the deep-seated blockage.
Can I pour vinegar down the drain to unclog it?
Yes, pouring vinegar down the drain is safe and helps deodorize light buildup, especially when paired with baking soda. However, vinegar alone is too mild to clear out heavy grease or solid food obstructions.
How do you unclog a double kitchen sink with standing water?
Bail out the excess standing water from the primary basin, and then tightly plug or seal the secondary drain using a rubber stopper and a wet cloth. Sealing the adjacent opening forces all of your plunger’s compressed air pressure directly into the blockage instead of letting it escape out the other side.
Main Services
Related Posts
Need a Plumber in Miami?
Schedule service online or speak directly with the EZ Plumbing team.
Owner-Led Local Service
Know who is behind the business before you request service. The owners, contact line and Miami service pages are published clearly.
- Named business owners
- Direct phone and social channels
- Local Miami service information
Clear Help Before You Book
Review the relevant service page, contact the team directly and use the booking page when you are ready—without relying on vague claims.
- Service-specific information
- Direct questions before scheduling
- Clear online booking route