Outdoor Plumbing Maintenance: The Homeowner’s Guide to Tips, Checklists and Fixes
What Counts as Outdoor Plumbing and Why It Needs Its Own Maintenance Plan
Outdoor plumbing encompasses all exterior water supply lines, drainage networks, and fixture assemblies located outside your home’s thermal envelope. Unlike indoor fixtures protected by climate control, exterior systems operate under constant exposure to soil movement, temperature swings, and severe weather. Neglecting these lines risks costly consequences, including structural foundation water damage, massive utility bill spikes, and soil erosion around your property.
What Is Outdoor Plumbing?
Outdoor plumbing refers to the network of exterior fixtures, underground lines, and surface drainage components designed to bring water to your yard and safely channel wastewater or stormwater away from your structure.
Key components of an outdoor plumbing system include:
Supply Fixtures: Hose bibs, spigots, outdoor sinks, wall hydrants, and pool fill valves.
Irrigation Systems: Sprinkler lines, drip irrigation networks, backflow preventers, and zone valves.
Underground Utilities: The main water line delivering freshwater and the lateral sewer line carrying wastewater away.
Drainage Systems: Gutters, downspouts, catch basins, French drains, and sump pump discharge lines.
Why Outdoor Plumbing Fails Quietly
Because most exterior plumbing runs underground or behind siding, minor leaks often go unnoticed until severe damage occurs. A pinhole leak in an irrigation valve or a cracked main water line can leach thousands of gallons into the surrounding soil over several weeks without causing an immediate drop in indoor water pressure.
Consider a common scenario: a homeowner notices a small patch of unnaturally green grass near their driveway during a midsummer drought. By the time a plumber inspects the area, the underground main water line has been leaking for two months, softening the subgrade beneath the concrete driveway and causing a section of the pavement to sink, alongside a dramatic spike in water waste.
5 Essential Steps Every Homeowner Should Take
Preventive care stops small exterior leaks from escalating into major structural repairs. Incorporating a few routine habits into your home maintenance schedule protects both your property and your wallet:
Inspect hose bibs and spigots seasonally: Check for drips, cracked valve bodies, or leaks at the stem packing before and after winter.
Winterize exterior water lines: Disconnect hoses, shut off interior isolation valves, and drain remaining water before the first freeze.
Audit irrigation systems annually: Run a test cycle to spot misaligned heads, broken underground lines, and leaking backflow preventers.
Maintain clean drainage pathways: Clear gutters, downspouts, and surface catch basins to keep runoff away from your home’s foundation.
Monitor your monthly water bill: Watch for sudden, unexplained increases in water usage that indicate hidden sub-surface leaks.
How to Use This Guide
This manual is structured to help you locate, inspect, and maintain every aspect of your property’s exterior water systems:
Section 2: Hose Bibs & Spigots – Learn how to inspect, freeze-proof, and replace worn exterior faucets.
Section 3: Irrigation & Sprinkler Maintenance – Master seasonal startup, blow-out protocols, and leak detection for underground sprinklers.
Section 4: Main Water Lines & Sewer System Care – Understand how to protect main service lines from tree root intrusion and soil shifting.
Section 5: Foundation Drainage & Runoff Control – Optimize downspouts, French drains, and surface runoff to prevent foundation water damage.
Know Your Outdoor Plumbing: A Component Map
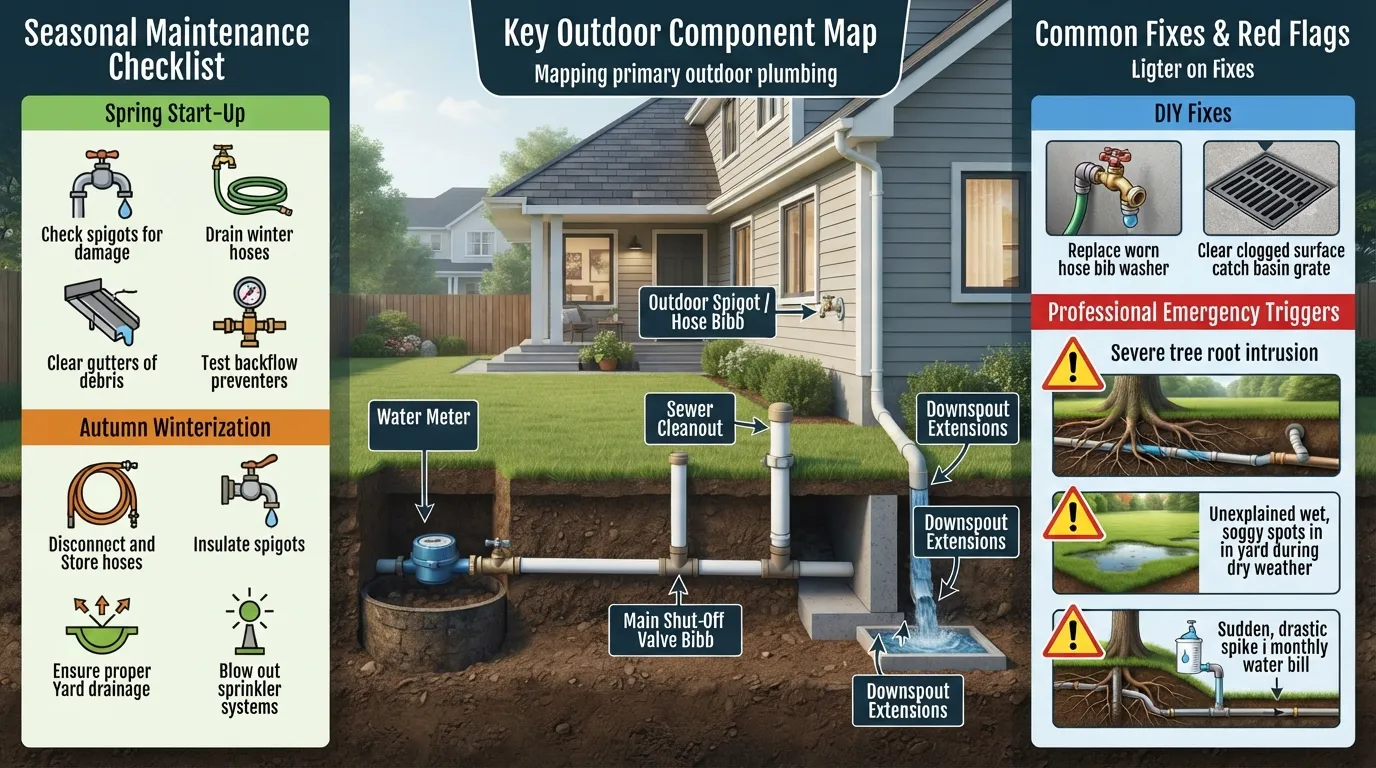
Understanding the key components of your exterior plumbing system is the first step toward effective DIY maintenance and early troubleshooting. Every property features a unique combination of water delivery fixtures, irrigation networks, supply connections, and drainage pathways. Learning how to identify these systems helps you locate critical shut-off valves quickly during emergencies and apply the right preventive care to protect your home.
Outdoor Faucets, Hose Bibs, and Spigots
Outdoor faucets—commonly referred to as hose bibs, spigots, or sillcocks—are the primary water access points on your home’s exterior walls. They connect directly to your interior plumbing network to supply water for garden hoses, pressure washers, and outdoor cleaning.
These fixtures rely on a rubber washer or ceramic disc mechanism to regulate water flow. Over time, constant exposure to weather causes internal seals to degrade, leading to persistent drips at the spout or leaks around the valve stem when turned on.
Standard vs. Frost-Proof Sillcocks
Standard hose bibs have a short valve stem that sits directly inside the exterior wall, leaving water sitting close to the cold outside air. Frost-proof sillcocks (or freeze-proof faucets) feature an extended stem—usually 4 to 12 inches long—that places the actual shut-off valve inside the heated interior envelope of your home.
To identify which type you have, look at the orientation of the faucet and handle:
Standard Sillcock: The valve body sits flat against the wall, and the handle operates parallel to the exterior siding. Water remains inside the valve casing right at the wall surface, requiring a manual interior shut-off and insulation cover during winter.
Frost-Proof Sillcock: The faucet stem enters the wall at a downward angle, and the handle aligns directly with the valve body. When turned off, water drains out automatically, provided no hose is attached.
Sprinkler and Irrigation Systems
An automated irrigation system delivers targeted water to lawns and gardens through an interconnected network of underground pipes, control valves, and specialized emitter heads.
Key components include:
Sprinkler Heads: Pop-up rotors or spray heads that rise under water pressure to irrigate designated zone coverage areas.
Zone Control Valves: Solenoid-actuated valves that open and close based on electrical signals sent from the main controller.
Irrigation Controller (Timer): The central electronic unit that sets watering schedules, duration, and frequency.
Backflow Preventer: A mandatory safety device installed above ground that prevents contaminated landscape water from siphoning back into your clean drinking water supply.
Main Water Line, Water Meter, and Shut-Off Valves
Your main water line is the underground pipe that delivers pressurized municipal freshwater from the public supply into your residence. It typically runs beneath your front lawn or driveway to an underground water meter box located near the curb or property boundary.
Inside or near the meter box, you will find your primary main shut-off valve (often a curb stop valve). Every homeowner should also know the location of their interior main shut-off valve—usually located where the main line penetrates the foundation wall or in a utility closet—to instantly isolate water supply during a severe leak.
Sewer Line, Cleanout, and Septic Tank
Wastewater leaves your home through the underground lateral sewer line, which slopes downhill to transport sewage to either a municipal treatment system or a private septic tank.
To maintain and inspect this line, properties feature a sewer cleanout: a vertical pipe extension with a threaded cap sticking slightly above ground or flush with a access cover. This access point allows plumbers to clear blockages using drain augers or conduct video camera inspections. If your home uses a septic system, the sewer line empties into an underground concrete or polyethylene tank, which separates solids from effluent before discharging liquid into a soil absorption field.
Gutters, Downspouts, and Yard Drainage
Roof and yard drainage networks protect your foundation by redirecting stormwater away from the building envelope. Gutters installed along the roof edge collect rainwater and channel it directly into vertical downspouts.
At ground level, downspout extensions or splash blocks carry this concentrated discharge at least 5 to 10 feet away from foundation walls. In yards with poor natural slope or standing water issues, subsurface French drains (perforated pipes surrounded by gravel) or surface catch basins gather excess groundwater and route it safely toward municipal storm drains or low-lying discharge areas.
Outdoor Plumbing Component Reference Guide
| Component | Primary Function | Most Common Failure Point | Recommended Inspection Schedule |
| Hose Bib / Spigot | Provides exterior point-of-use water access | Worn stem packing washer or freeze-cracked valve casing | Twice yearly (Spring/Fall) |
| Frost-Proof Sillcock | Prevents pipe bursting in freezing temperatures | Internal seat washer wear or trapped water freeze damage from attached hoses | Fall (before first freeze) |
| Backflow Preventer | Prevents cross-contamination of drinking water | Frozen rubber seals or mechanical relief valve stickage | Annually (Spring startup) |
| Irrigation Heads | Distributes water to turf and garden zones | Clogged nozzles, cracked pop-up bodies, or mower damage | Monthly during watering season |
| Main Water Line | Supplies pressurized freshwater to the property | Tree root intrusion, ground shifting, or corrosion leaks | Annually (Monitor water bill spikes) |
| Sewer Cleanout | Grants access to main waste drainage line | Root blockage, pipe sag (belly), or cracked caps | Annually (Visual check of cap) |
| Downspout Extensions | Channels roof runoff away from foundation | Clogs from leaves/debris or physical disconnection | Quarterly & after heavy storms |
Seasonal Outdoor Plumbing Maintenance Checklist
How Often Should You Inspect Your Outdoor Plumbing?
You should inspect your outdoor plumbing at least twice a year—once in early spring before activating exterior water lines, and once in late autumn before winter temperatures arrive. Intermediate checks during midsummer and after severe freezing events prevent minor leaks from causing costly, unnoticed water damage.
Spring Checklist
Spring maintenance focuses on safely restoring water flow to exterior fixtures, verifying system pressure, and checking for winter freeze damage:
Re-engage interior shut-off valves: Slowly open indoor supply valves that feed outdoor hose bibs to prevent sudden pressure spikes.
Inspect hose bibs for hidden cracks: Turn on each spigot while capping the outlet with your thumb. If pressure drops or water leaks inside the wall, the fixture body may have cracked over winter.
Test system water pressure: Attach an analog water pressure gauge directly to an exterior hose bib. Turn the tap on fully; ideal household water pressure should measure between 40-60 PSI.
Inspect irrigation components: Check all exposed sprinkler heads for cracks, broken pop-up assemblies, or clogged spray nozzles caused by winter soil movement.
Summer Checklist
Summer care aims to optimize water delivery, prevent unnecessary waste, and monitor for hidden subsurface leaks during high-use months:
Look for pooling water near the foundation: Check low-lying landscape areas and foundation perimeter walls for soggy soil, which indicates underground supply line leaks or poor drainage.
Leak-test faucets and hose connections: Ensure garden hose washers are pliable and replace any worn O-rings causing continuous drips at the spigot stem.
Adjust sprinkler head positioning: Align irrigation heads so they spray turf and garden beds exclusively, avoiding pavement, driveways, or exterior house siding.
Monitor zone valves: Ensure irrigation zone valves seal completely after watering cycles to prevent continuous slow leaks into valve boxes.
Fall Checklist
Fall protocols prepare exterior pipes for freezing weather to prevent pressure build-ups and catastrophic pipe bursts:
Disconnect and drain garden hoses: Remove all hoses, splitters, and timers from hose bibs. Trapped water inside connected hoses will freeze, expand, and shatter frost-proof sillcocks.
Shut inside supply valves: Close the interior isolation valves serving outdoor taps, then open the exterior spigot to drain remaining water out of the line.
Install insulated faucet covers: Secure foam or fabric insulated faucet covers over every outdoor spigot to shield valve bodies from freezing wind chill.
Clear drainage pathways: Remove fallen leaves and debris from gutters, downspouts, and surface catch basins to ensure clear stormwater runoff.
Winter Checklist
Winter operations center on maintaining thermal insulation and guarding against severe freezing conditions:
Insulate exposed pipe runs: Wrap all uninsulated exterior pipes, main water entry points, and backflow preventers with foam pipe insulation or heat tape.
Perform a compressed air blowout: Hire a professional or use an air compressor to clear all residual water from underground irrigation lines before the ground freezes solid.
Monitor ice formation: Watch for large ice build-ups or icicles forming near foundation walls, downspouts, or exterior valves, which signal active slow leaks.
Printable Outdoor Plumbing Checklist
Keep this quick seasonal summary handy near your main shut-off valve or utility panel to track your routine maintenance steps throughout the year:
Outdoor Plumbing Seasonal Checklist
Spring (March – April)
Summer (June – July)
Fall (September – October)
Winter (December – January)
Outdoor Plumbing by Climate: Hot-Humid, Freezing, and Mixed Regions
Plumbing maintenance protocols vary significantly depending on regional climate conditions and soil dynamics. While homeowners in freezing regions focus on protecting pipes against ice expansion, those in hot and humid zones must combat soil shifting, root intrusion, and high water tables. Adapting your maintenance routine to your specific climate zone prevents localized structural damage and ensures efficient year-round system performance.
Hot, Humid Climates (Year-Round Irrigation & Severe Storms)
In hot, humid environments such as South Florida or the Gulf Coast, outdoor plumbing operates continuously without a winter shutdown. However, year-round operation presents unique mechanical and environmental challenges:
Continuous Irrigation & Hard Water Scale: Constant exposure to mineral-dense municipal or well water causes hard water scale buildup inside sprinkler heads, drip emitters, and zone valves. Regular chemical descaling or head replacements are necessary to maintain even coverage.
High Water Table & Saturated Soils: Heavy rainfall during monsoon or rainy seasons raises the water table, increasing hydro-static pressure against lateral sewer lines and underground drainage networks.
Rapid Root Growth: Warm weather accelerates tree root growth. Seeking moisture, aggressive roots wrap around subsurface PVC lines, causing cracks or catastrophic line blockages.
Pre-Hurricane Season Inspections: Before severe storm seasons, inspect backflow preventers, clear all catch basins, and test sump pump discharge lines to prevent back-up flooding during heavy surge events.
Cold Climates (Freezing Winters & Deep Frost Lines)
Regions subject to extended freezing temperatures require total system winterization to prevent destructive pipe bursts. Water expands by approximately 9% when freezing, creating immense internal pressure that easily ruptures uninsulated metal and plastic pipes:
Frost-Proof Faucet Upgrades: Standard hose bibs should be upgraded to frost-proof sillcocks installed with a continuous slope downward toward the exterior wall to ensure self-draining operation.
Compressed Air Blowouts: Underground sprinkler lines must be blown clear of all residual water using an air compressor before the ground freezes down to the frost line.
System Depressurization: Interior shut-off valves feeding exterior lines must remain closed throughout winter, with exterior drain valves left cracked open to release any trapped moisture.
Mild Areas With Occasional Cold Snaps
Transit zones and mild coastal areas experience warm winters punctuated by sudden, temporary freezes (cold snaps). Because homes in these regions often lack deep frost-line insulation or interior isolation valves, short-term protective measures are essential:
Temporary Insulation: Fitting heavy-duty insulated foam faucet covers over all exposed spigots provides sufficient thermal protection for short-duration freezes lasting 24 to 48 hours.
Emergency Drip Protocols: During unseasonable cold snaps, allowing exterior faucets to maintain a slow, steady drip relieves internal hydro-static pressure and prevents freezing.
Quick Disconnect Habits: Always detach garden hoses immediately when freeze warnings are issued; leaving hoses attached traps water inside the spigot neck, causing internal bursting even during minor freezes.
Regional Maintenance Priority Guide
| Climate Zone | Primary Focus Areas | What to Prioritize | What You Can Skip |
| Hot / Humid | High water table, root invasion, hard water scale | Monthly head descaling, sewer root inspections, storm drainage clearing | Fall system blowouts & interior valve shut-offs |
| Cold / Freezing | Freeze prevention, thermal insulation, drainage | October compressed air blowouts, frost-proof sillcock installation, foam pipe insulation | Mid-winter sprinkler nozzle adjustments |
| Mild / Mixed | Cold snap readiness, rapid seasonal shifts | Insulated faucet covers, quick-disconnect hose routines, annual backflow checks | Deep-ground frost line pipe burial upgrades |
Outdoor Faucets Hose Bibs: Maintenance, Common Problems, and Fixes
What Are the Most Common Problems With Outdoor Faucets?
Outdoor faucets endure constant mechanical stress and weather exposure, making them prone to several recurring issues. Addressing these problems early prevents structural moisture damage and water loss.
Common outdoor faucet issues include:
Constant Spout Drips: Water continues to drip from the nozzle even when the handle is turned firmly off, typically caused by a worn internal rubber bib washer.
Handle Leaks: Water pools or sprays from behind the handle stem during operation, pointing to a degraded packing washer or loose packing nut.
Low Water Flow: Mineral scale or a partially clogged vacuum breaker restricts water volume through the spigot.
Cracked Valve Bodies: Freezing water trapped inside the housing shatters the metal or brass casing.
Hose Connection Leaks: Water squirts backward from the threading interface due to a missing, flattened, or degraded rubber hose washer.
Why Does an Outdoor Faucet Leak From the Top?
An outdoor faucet leaks from the top (behind the handle) when water bypasses the valve stem seal and escapes past the packing nut. As the faucet is opened and closed repeatedly, the internal packing material or rubber washer compresses, hardens, and loses its watertight seal around the moving rod.
In many cases, this leak can be temporarily resolved by simply tightening the packing nut directly behind the handle with a wrench to compress the sealing material [01:18]. If the leak persists, the internal packing washer must be replaced.
How to Fix a Leaking Faucet Handle: Step-by-Step
Replacing a worn packing washer requires only basic hand tools and about ten minutes of your time. Following proper repair protocols ensures a tight, long-lasting seal without damaging the delicate valve components.
Tools Needed: Adjustable wrench, flathead screwdriver, replacement packing washer or packing cord, and a rag.
Step 1: Shut off the water supply. Locate the interior isolation valve feeding the outdoor spigot and turn it off to prevent pressurized water from spraying during disassembly.
Step 2: Remove the handle. Use a screwdriver to loosen and remove the screw holding the handle in place, then pull the handle off the valve stem [01:00].
Step 3: Access the packing nut. Turn the packing nut counterclockwise using an adjustable wrench to unscrew it from the faucet body [01:00].
Step 4: Extract old packing material. Slide the packing nut off the stem and dig out the old degraded rubber washer or fibrous packing string from inside the cavity [01:34].
Step 5: Install the new seal and reassemble. Slide a new replacement packing washer into position, thread the packing nut back on hand-tight, and snug it gently with your wrench [01:25]. Avoid the critical mistake of over-tightening, which can strip the threads or bind the valve stem so tightly that the handle becomes impossible to turn.
Should You Leave Outdoor Faucets Open or Closed?
Whether your outdoor faucets should remain open or closed during the off-season depends entirely on your regional climate zone. In freezing regions, interior isolation valves must be shut and exterior faucets left open to allow residual water to drain completely. In hot or mild regions where freezing is rare, faucets should remain fully closed when not in use. Review the regional guidelines in Section 4 to determine the correct protocol for your local weather patterns.
How Long Does an Outdoor Spigot Last, and When Should You Replace It?
A high-quality brass outdoor spigot typically lasts between 15 to 25 years under normal operating conditions. However, premature failure can occur due to severe weather exposure or chemical corrosion.
Signs that indicate your outdoor spigot must be replaced entirely include:
Visible cracks or fractures in the brass valve body or housing.
A seized valve stem that cannot be freed with penetrating oil or replacement washers.
Internal leaks that persist even after installing brand-new washers and stem assemblies.
Severe mineral corrosion that compromises the structural integrity of the wall connection.
Why You Should Never Leave a Hose Attached
Leaving a garden hose connected to an outdoor spigot during freezing weather is the leading cause of winter pipe bursts. Standard garden hoses trap a column of water inside their length. When temperatures drop below freezing, this trapped water turns to ice and expands backward into the faucet stem.
Because standard hose bibs cannot drain with a hose attached, the ice buildup creates immense hydraulic pressure that easily fractures frost-proof sillcocks from the inside out. Always detach, drain, and store your garden hoses before the first fall frost to protect your plumbing infrastructure.
Protecting Outdoor Pipes From Cold Snaps and Freezing
Safeguarding your exterior plumbing against sudden drops in temperature prevents catastrophic water damage and expensive emergency repairs. Whether you live in a region with severe winters or an area prone to unexpected overnight freezes, implementing proactive thermal protection ensures your supply lines remain intact.
How to Prepare Outdoor Faucets for Freezing Temperatures
Properly winterizing an outdoor spigot requires a specific sequence of steps to eliminate trapped water before ice can form. Following this routine keeps internal valve components safe throughout freezing months:
Disconnect all garden hoses: Remove hoses, spray nozzles, and splitters to allow any water remaining in the faucet lip to escape.
Close the interior isolation valve: Locate the shut-off valve inside your home that controls the specific outdoor line and turn it to the closed position.
Open the outdoor tap: Leave the exterior spigot wide open after shutting the interior valve, allowing the remaining water column to drain out completely.
What to Put Over Outdoor Faucets: Foam vs. Hard Plastic Covers
Shielding your spigots with insulated covers blocks biting winds and traps radiant heat against the valve body. Choosing the right protector depends on your local climate severity and budget.
| Cover Type | Estimated Cost | Thermal Protection Level | Best Suited For |
| Insulated Foam Pouches | Low ($3 – $7) | Moderate (Standard freezes) | Mild or mixed regions with occasional light freezes |
| Hard Plastic Insulated Domes | Moderate ($8 – $15) | High (Extended hard freezes) | Severe cold climates with prolonged sub-freezing days |
How to Insulate Exposed Outdoor Pipes
Uninsulated supply lines running through crawlspaces, garages, or along exterior walls are highly vulnerable to freezing temperatures. Wrapping these vulnerable sections creates an effective thermal barrier.
Measure and select insulation: Use pre-slit polyethylene or foam rubber pipe insulation sized to match the exact outer diameter of your water pipes.
Wrap and seal seams: Snap the foam sleeves over the exposed pipe runs, ensuring no metal remains bare. Seal all longitudinal seams and joints securely using heavy-duty duct tape or waterproof zip ties.
Protect backflow preventers: Wrap above-ground irrigation backflow preventers and pressure vacuum breakers with specialized insulated blankets or heavy-duty insulating tape.
Sprinkler Line Blowout: What It Is and Who Needs It
An irrigation line blowout is a winterization process that uses a high-volume compressed air system to force all residual water out of underground sprinkler pipes, valves, and heads. Homeowners living in regions where the ground freezes below the frost line must perform this procedure every autumn.
Because compressed air systems require specialized gauges to prevent over-pressurization—which can permanently rupture PVC lines—this task is best handled by an experienced professional irrigation technician.
Signs a Pipe Has Frozen or Burst
Recognizing early warning signs of ice obstruction allows you to act before frozen water expands and splits the pipe wall. Watch for these critical indicators during a hard freeze:
Turning on an exterior or nearby interior faucet yields zero water flow, signaling a solid ice blockage in the supply line.
Frost, bulging, or visible cracking appears along exposed pipe surfaces or drywall near exterior walls.
A sudden drop in home water pressure or a damp patch on walls and ceilings indicates a pipe has already burst behind the structure.
(For a complete step-by-step response plan when a pipe ruptures, refer to Section 11: Emergency Plumbing Protocols.)
Sprinklers, Irrigation Lines, and Backflow Preventers
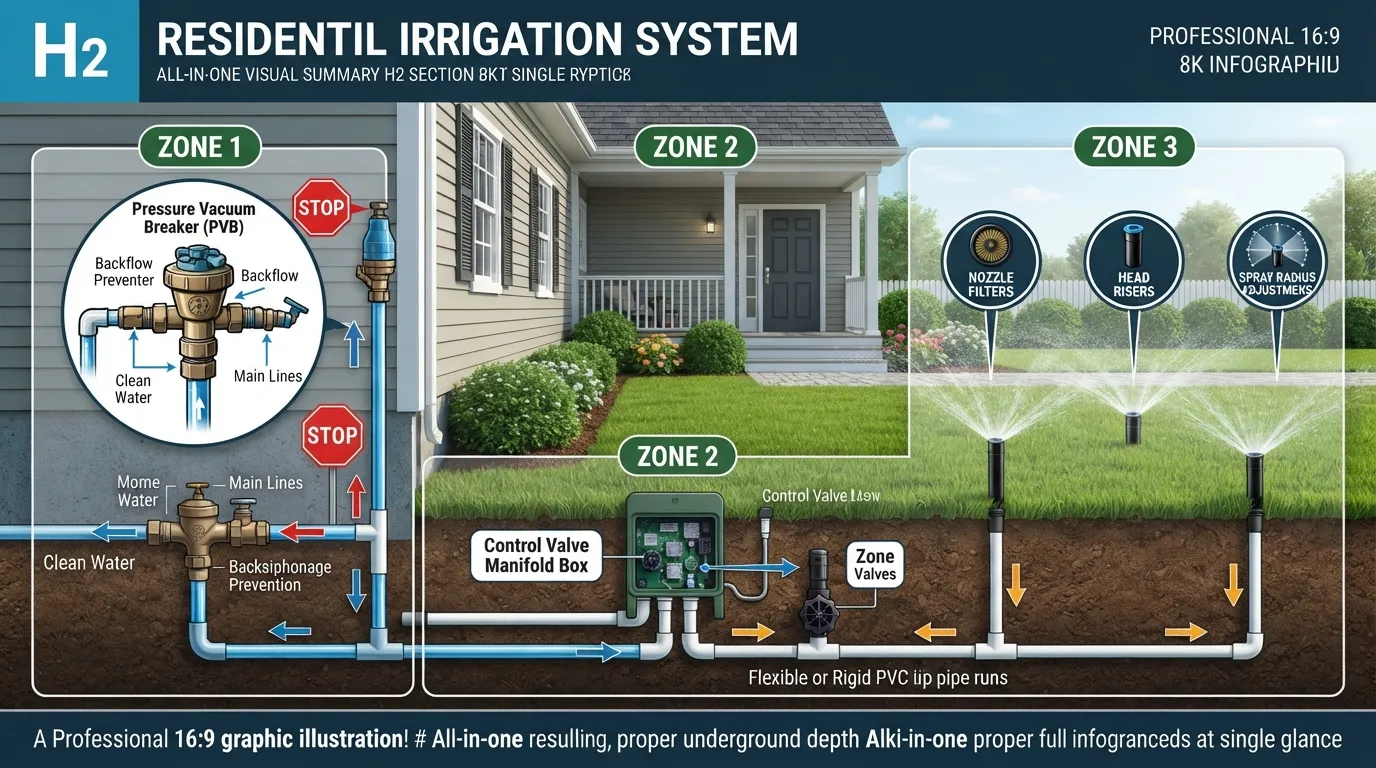
Maintaining an automated irrigation system ensures efficient water distribution while protecting your property’s plumbing infrastructure from cross-contamination and leaks. Neglected sprinkler networks waste thousands of gallons of water and can lead to severe landscape erosion or foundation damage.
Seasonal Sprinkler System Inspection
Regular seasonal evaluations keep your irrigation network operating at peak efficiency. Conducting systematic walk-throughs during system startup and throughout the growing season catches failing components before they escalate into major plumbing failures.
Key components to inspect regularly include:
Sprinkler Heads: Check for broken pop-up assemblies, tilted housings, or mower damage.
Spray Patterns & Aim: Ensure nozzles water turf and garden beds exclusively, avoiding pavement or siding.
Clogged Nozzles: Clear dirt, sand, and mineral debris from spray orifices using a fine nozzle wire.
Zone Valves: Test each station via the irrigation timer to verify that valves open and seal completely.
Signs of an Irrigation Leak
Because irrigation lines run underground, leaks often manifest as subtle changes in your yard or utility bills rather than an obvious indoor flood. Catching these indicators early saves water and prevents sub-surface soil washouts.
Watch for these primary signs of an underground irrigation leak:
Soggy Patches: Unusually wet, spongy, or muddy turf spots in isolated areas of the lawn when neighboring zones are dry.
Low Water Pressure: Noticeable weak spray output or heads failing to pop up fully during active watering cycles.
High Water Bill: A sudden, unexplained spike in your monthly municipal water usage statement.
Sunken Areas: Depressions or hollow spots forming in the lawn directly above underground supply trenches.
What Is a Backflow Preventer, and Is Dripping Normal?
A backflow preventer is a vital safety device installed on your irrigation or main water supply line to stop contaminated lawn chemicals, fertilizers, and stagnant water from siphoning back into your home’s clean drinking water supply.
When a zone shuts down, a brief, minor spurt or momentary drip from the atmospheric vacuum breaker or relief valve is entirely normal as internal pressure vents. However, constant, continuous dripping or spraying indicates worn internal rubber O-rings, mineral scale buildup, or a damaged check valve that requires immediate repair or replacement.
Testing Water Pressure at the Hose Bib
Monitoring your property’s water pressure ensures your irrigation and outdoor plumbing systems are not subjected to destructive stress. Excessively high pressure wears out valve diaphragms and shatters sprinkler heads.
Attach a standard analog water pressure gauge directly to an exterior hose bib and open the valve fully. The ideal household water pressure range is between 40-60 PSI. If your gauge reads above 75 PSI, install a pressure reducing valve (PRV) to protect your entire outdoor and indoor plumbing network.
DIY Fixes vs. Calling a Professional
Knowing which outdoor plumbing tasks are safe for DIYers and which require professional expertise saves time, money, and prevents accidental property damage.
Safe for DIY: Replacing broken sprinkler heads, cleaning clogged nozzles, adjusting spray arcs, swapping timer programming schedules, and installing foam faucet covers.
Leave for Professionals: Main water line repairs, backflow preventer rebuilds, underground PVC line location and patching, winter compressed air blowouts, and installing new pressure reducing valves.
How to Find Hidden Outdoor Leaks and Stop Water Waste
Hidden leaks in underground service lines or outdoor fixtures can silently waste thousands of gallons of water and drive up utility bills before any visible damage appears. According to EPA WaterSense home maintenance guidance, routine checkups help catch elusive plumbing losses early, protecting your property from structural damage and expensive waste. Performing a simple evaluation puts you back in control of your home’s water consumption.
Warning Signs of an Underground or Hidden Leak
Subterranean plumbing and outdoor fixtures degrade over time due to ground shifting, soil corrosion, and thermal expansion. Recognizing subtle physical clues helps you pinpoint problems long before catastrophic pipe failure occurs.
Unexplained Water Bill Spike: A sudden jump in your monthly water consumption without any change in household habits is the most common indicator of a hidden leak.
Persistent Wet Patches: Unusually soggy ground, muddy depressions, or pooling water in your yard during dry weather point directly to a leaking underground service or irrigation line.
Sunken Ground or Sinkholes: Severe subsurface leaks wash away surrounding soil, causing localized ground settling or sudden small sinkholes across your lawn.
Sound of Running Water: Hearing faint hissing or rushing water near your main indoor shutoff valve when all taps and appliances are completely turned off signals active flow.
Reduced Water Pressure: A sudden, whole-house drop in water pressure often means a major supply pipe breach is diverting water into the surrounding soil.
The Water Meter Leak Test: Step by Step
The water meter leak test is a definitive, zero-cost diagnostic method that allows you to confirm whether water is escaping anywhere on your property.
Shut Off All Water Use: Ensure no one inside the house is running taps, showers, or appliances. Verify that automatic irrigation controllers and ice makers are temporarily disabled.
Locate Your Water Meter: Find your residential water meter, which is typically housed in a concrete utility box near the front property line or sidewalk, secured with a heavy lid.
Note the Exact Reading: Open the meter box lid and record the exact numbers displayed on the register dial, including the fractional sweep hand.
Check the Leak Indicator: Look closely at the meter face for a small, sensitive triangle, star, or gear-shaped dial known as the leak indicator. If this indicator is spinning or twitching, water is actively moving through the system.
Wait 1 to 2 Hours: Leave the entire property completely sealed with zero water usage for one to two hours. Do not flush toilets or open any faucets during this window.
Compare the Readings: Return to the meter and compare the new numbers against your initial reading. If the register digits have advanced or the leak indicator moved, water is escaping through a hidden breach.
How to Read the Results
Interpreting how your water meter responds to specific shutoff valve tests isolates the exact zone of failure. Use the diagnostic matrix below to determine where your leak resides.
| Meter Behavior Test Condition | Probable Meaning | Recommended Next Step |
| Meter still moving with all indoor fixtures closed | Leak exists somewhere between the meter and the home, or within an active appliance. | Shut off the home’s main interior supply valve to isolate indoor versus outdoor plumbing. |
| Meter continues moving with main interior valve closed | The breach is located in the buried service line running from the meter to your house. | Inspect the yard for wet spots and contact a leak detection specialist immediately. |
| Meter stops moving immediately when main interior valve is closed | The leak is located inside the house (e.g., running toilet, dripping valve, or hidden behind a wall). | Check individual fixture supplies, toilets, and under-sink lines. |
Is the Leak in the Irrigation, the Spigot or the Service Line?
Isolating outdoor leaks requires checking secondary water loops and exterior hardware systematically. Outdoor systems operate under distinct pressures and usage cycles.
Irrigation System Leaks: Automatic sprinkler systems often develop underground pipe cracks, broken head risers, or failing zone valves. Check your valve control boxes for damp soil, mold growth, or hissing solenoids when the system is inactive.
Outdoor Spigot and Hose Bibb Leaks: Exterior faucets frequently freeze or sustain handle stress. A dripping hose bibb wastes hundreds of gallons weekly, while a cracked frost-free valve can leak into exterior walls when activated.
Main Service Line Leaks: The high-pressure pipe running from the municipal meter to your house foundation handles continuous stress. Shifts in expansive clay soils can shear fittings or crack PVC lines underground.
When to Call a Professional for Leak Detection
While DIY meter tests reveal whether a leak exists, locating precise underground or slab-level breaches requires specialized equipment. Advanced tools like electronic acoustic listening devices, thermal imaging cameras, and helium gas tracers pinpoint leaks beneath concrete and turf without destructive exploratory digging.
Hidden Subsurface Breaks: When your meter test proves a service line leak exists beneath a paved driveway, patio, or landscaped lawn, professional professional leak detection and repair prevents unnecessary property destruction.
Complex Slab Leaks: If water is undermining your home’s concrete foundation or interior flooring, immediate professional intervention is mandatory to stop structural settling and mold proliferation.
Main Water Line, Sewer Line, and Drain Care Outside the House
Outdoor plumbing infrastructure carries every drop of clean water into your home and routes wastewater away to municipal systems or septic tanks. Because these lines are buried out of sight, structural degradation, root intrusion, and pipe shifts often go unnoticed until emergency backups occur. Regular monitoring of your main water and sewer lines prevents structural home damage and avoids thousands of dollars in unexpected excavation costs.
Warning Signs of a Failing Main Water Line
A main water line breach compromises your home’s main supply before water reaches any fixture. Recognizing physical and operational warning signs early allows you to address supply leaks before they erode your foundation or spike your monthly utility bill.
Sudden Drop in Water Pressure: A noticeable, simultaneous loss of water pressure across all indoor fixtures usually indicates a breach in the main service pipe.
Discolored or Murky Water: A brownish or rusty tint in your tap water often signifies soil and sediment entering through a crack in the main water line, or advanced corrosion inside aging metallic pipes.
Unexplained Wet Spots in the Yard: Unusually soggy patches, pooling water, or localized sinkholes in your lawn—especially during dry weather—signal an underground supply line leak.
Hissing or Running Water Sounds: Hearing continuous running water near your main shutoff valve or basement wall when all indoor taps are closed points to active line leakage.
Sewer Line Warning Signs
Sewer line deterioration directly impacts your home’s health, hygiene, and drainage performance. Underground pipe cracks, offsets, and severe blockages produce clear diagnostic signals throughout your property.
Multiple Slow Drains: When sinks, showers, and tubs drain slowly at the same time, the restriction sits in the primary sewer line rather than individual branch lines.
Gurgling Fixtures: Trapped air escaping past a main line blockage causes toilets to bubble or lower branch drains to make distinct gurgling sounds.
Foul Sewage Odors: Sewer gas escaping from cracked subterranean pipes can penetrate surrounding soil and emanate around your yard or basement drains.
Soggy, Unusually Green Grass: Sewage acts as a potent fertilizer; unusually lush, bright green patches of grass along your underground pipe route indicate an active wastewater leak.
Frequent Wastewater Backups: Persistent sewage overflows in low-lying fixtures, such as basement drains or ground-floor toilets, require immediate evaluation and professional sewer line repair and inspection.
How Tree Roots Damage Pipes and How to Plant Smarter
Tree roots naturally grow toward moisture, oxygen, and nutrient sources in the surrounding soil. Microscopic cracks or loose joints in older clay, cast iron, or weak PVC pipes emit warm vapor that attracts root tips. Once inside, the roots expand rapidly, catching debris, slowing flow, and eventually fracturing the pipe completely.
Typical Root Intrusion Progression
During HD fiber-optic camera inspections, plumbing technicians frequently observe thick root masses completely filling the pipe diameter, acting as a solid dam against solid waste.
Smart Landscaping Strategies to Prevent Pipe Damage
Maintain Safe Buffer Zones: Plant large trees with aggressive root systems (such as weeping willows, poplars, and ficus) at least 30 feet away from buried sewer lines.
Select Deep-Rooted, Non-Invasive Species: Choose slow-growing trees or smaller ornamental shrubs with compact root structures if planting within 10 to 15 feet of utility corridors.
Install Physical Barrier Shields: Place root barrier sheets along underground pipe trenches during new landscaping projects to divert root growth downward and away from your lines.
Where Is Your Cleanout and Why It Matters
A sewer cleanout is a dedicated access pipe with a removable cap connected directly to your main drain line outside the house. It provides plumbing professionals with direct access to inspect, clear, and hydro-jet main line blockages without removing toilets or dragging dirty equipment inside your home.
Sewer Cleanout & Main Line Layout
Location: Sewer cleanouts are typically located within 3 to 5 feet of your home’s exterior foundation, nestled in flowerbeds, or housed inside a flush-mount curb box near the property line.
Identification: Look for a 3- to 4-inch PVC or cast iron pipe extending slightly above ground level with a threaded square-head or hex-head cap.
Maintenance: Keep the area clear of soil, mulch, overgrown bushes, and hardscaping elements so technicians can locate and open it quickly during a sewage backup emergency.
Septic Tank Basics for Homeowners
For homes not connected to a municipal sewer network, a private septic system processes all domestic wastewater onsite. Proper operation relies on maintaining a balanced biological environment where anaerobic bacteria break down solid organic matter.
Routine Pumping Schedule: Schedule a professional septic tank pump-out every 3 to 5 years depending on household size, tank volume, and daily water consumption.
Sludge Level Inspections: Have a technician inspect scum and sludge layer accumulation annually to prevent solids from washing into and clogging your drainfield absorption trenches.
Water Conservation: Stagger heavy water usage, such as laundry loads, to avoid flooding the septic tank and disrupting the settling process required for effective treatment.
What Not to Pour or Flush
Preventing severe main line blockages begins with controlling what enters your drainage system. Materials that do not break down in water create dense obstructions inside your main drain line, requiring specialized jetting or mechanical augering to resolve.
Materials to Keep Out of Your Drain Line
Non-Flushable Paper Products: Never flush “flushable” wipes, paper towels, facial tissues, or feminine hygiene products. Unlike toilet paper, these items do not disintegrate and frequently snag on minor pipe imperfections.
Fats, Oils, and Grease (FOG): Pouring warm grease or cooking oil down the sink allows it to cool, solidify, and adhere to pipe walls, trapping food particles and restricting flow over time.
Expanded Expansion Materials: Avoid flushing cat litter, coffee grounds, eggshells, paint, or household chemicals, which settle in low points along the main line and form stubborn sludge.
When persistent obstructions or root masses block your main discharge pipes, scheduling professional drain cleaning restores full hydraulic capacity and safeguards your subterranean plumbing system against long-term structural failure.
Gutters, Downspouts, and Yard Drainage: Protecting Your Foundation
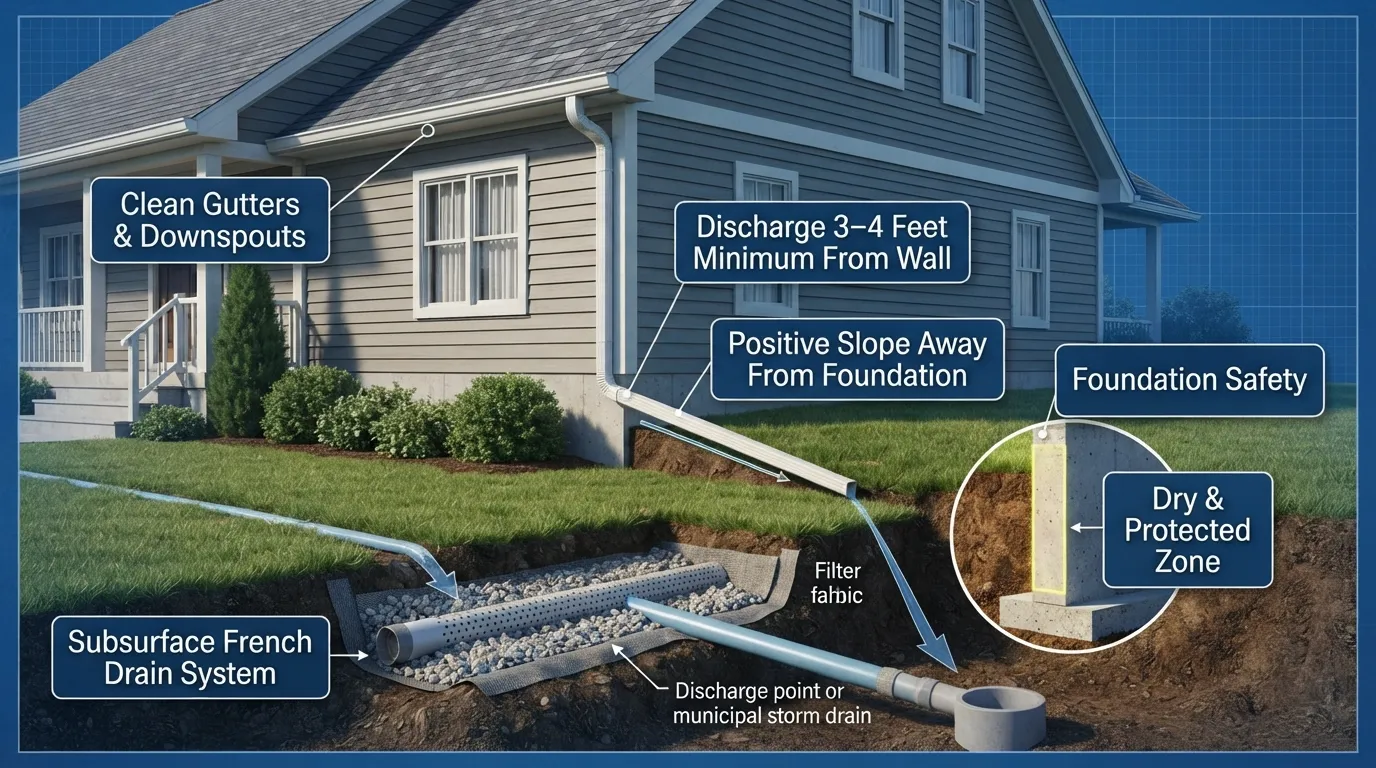
Your roof and yard drainage systems act as the primary defense against water intrusion and structural instability. During heavy storms, thousands of gallons of water cascade off your roof. Without proper routing, this excessive runoff saturates the soil immediately surrounding your foundation, leading to concrete cracking, basement seepage, and severe soil erosion.
How Often to Clean Gutters and Downspouts
Maintaining clear gutters and downspouts ensures roof runoff flows smoothly into designated discharge areas rather than overflowing onto your foundation.
Standard Seasonal Maintenance: Clean out gutters at least twice a year—once in late spring and once in late autumn after leaves have dropped.
High-Density Tree Canopy Care: Inspect and clear your gutters monthly if mature trees overhang your roofline, as pine needles, twigs, and leaves accumulate rapidly.
Post-Storm Clearance: Perform a quick check after major windstorms to clear dislodged debris or windblown dirt before heavy rains hit.
Where Should Downspouts Discharge?
Downspouts are designed to move water away from the roof, but their discharge point determines whether that water harms or protects your home.
Maintain Safe Clearance: Position downspout extensions so water discharges at least 3 to 4 feet away from your home’s foundation.
Utilize Proper Extensions: Attach rigid or flexible downspout extensions to direct flow toward sloped areas or designated drainage paths.
Avoid Negative Yard Grading: Ensure the discharge area slopes downward away from the house to prevent water from migrating back toward basement walls or foundation footings.
Signs of Poor Yard Drainage
Neglecting outdoor drainage allows water to collect where it can cause the most damage. Identifying structural and landscaping warning signs early helps prevent long-term foundation distress.
Standing Water: Persistent puddles or pooling water in your lawn or near the foundation 24 hours after a rainfall indicate poor soil absorption or improper yard grading.
Visible Soil Erosion: Gullies, washed-away mulch, or exposed plant roots demonstrate that uncontrolled surface runoff is cutting through your landscape.
Damp Walls and Efflorescence: Moisture, white powdery mineral deposits (efflorescence), or flaking paint along exterior foundation walls signify water saturation in the surrounding soil.
Heavy Rain and Storm-Season Prep for Outdoor Drains
Preparing your outdoor drainage network before severe weather strikes reduces the risk of localized flooding and water backing up into your home.
Clear Catch Basins and Storm Drains: Sweep away leaves, grass clippings, and trash from outdoor catch basin grates and surrounding yard drains.
Flush Underground Lines: Run a hose through subterranean drain pipes or French drain outlets to verify they are free of mud or root blockages.
Inspect Pipe Slope: Check that surface drains and swales have a continuous slope toward the municipal storm drain or property edge so water drains rapidly during heavy downpours.
When a Sump Pump Makes Sense
For properties in low-lying topographies, flood-prone regions, or areas with high water tables, reliance on gravity-fed yard drainage alone is often insufficient. A dedicated sump pump actively collects groundwater from around your foundation or basement perimeter pit and pumps it safely away from the home.
Basements and Crawl Spaces: Installing a sump pump prevents subsurface water pressure from pushing through slab cracks during heavy rains.
Poorly Drained Properties: If installation of a French drain cannot achieve sufficient natural slope, a sump system serves as the mechanical lift required to discharge runoff away from your foundation.
Outdoor Plumbing Emergencies: What to Do Before the Plumber Arrives
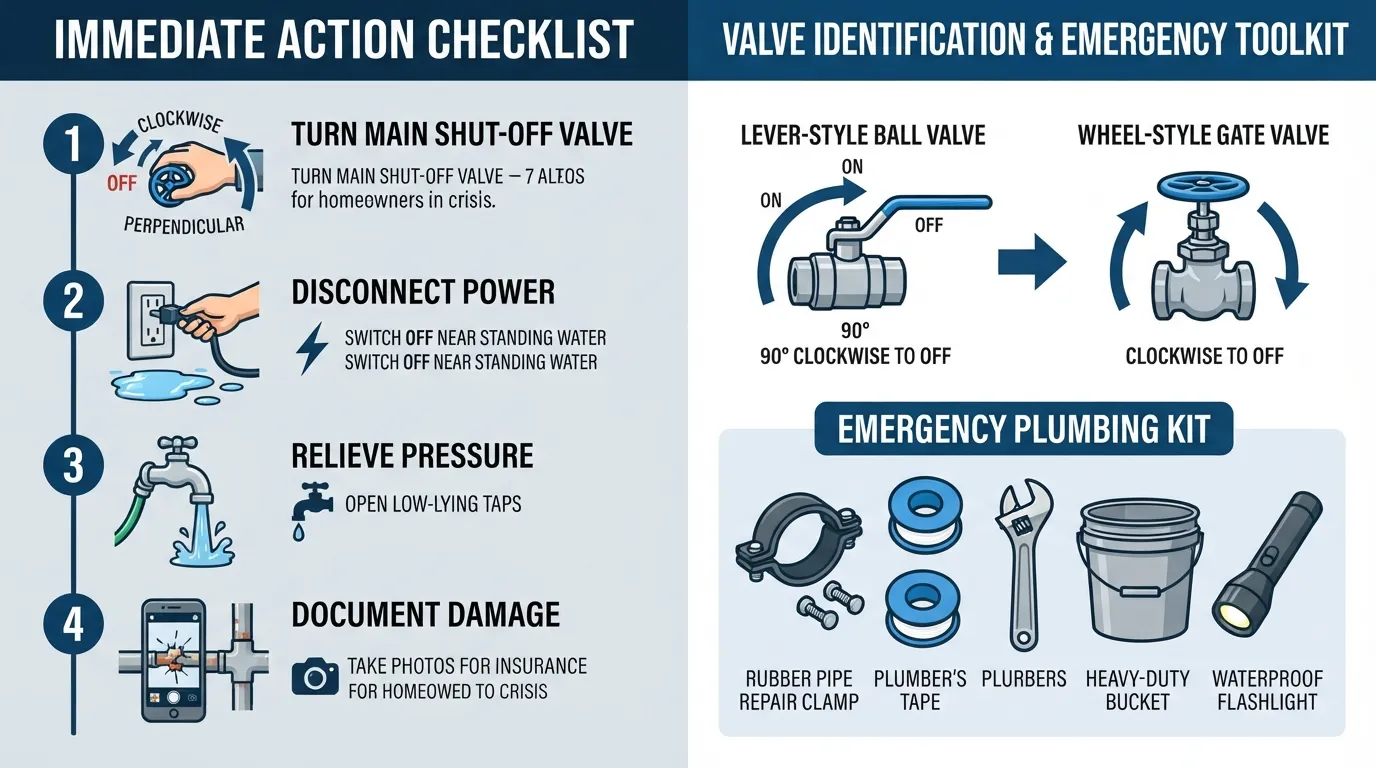
Plumbing emergencies strike without warning, turning a minor leak into a destructive flood within minutes. Knowing how to react calmly before a professional arrives limits water damage, protects your home’s electrical systems, and preserves critical evidence for insurance claims. Fast, decisive action is your best defense against catastrophic repair bills.
Know Where Your Main Water Shut-Off Valve Is
Stopping water flow at the source is the single most important action during a major plumbing leak or burst pipe. Every homeowner must locate their main water shut-off valve before an emergency occurs.
Common Valve Locations: Look for your main shut-off valve where the water supply line enters your home—typically in a basement, crawl space, utility closet, or near an exterior front foundation wall. In warmer climates, it may be housed outside in an underground meter box or utility sleeve.
Ball Valve vs. Gate Valve: Modern systems feature ball valves, which use a lever handle that requires a simple 90-degree turn to shut off completely. Older homes often use gate valves, which feature a round wheel handle requiring multiple full rotations to close.
Which Way to Turn: For lever-style ball valves, turn the handle so it sits perpendicular (at a 90-degree angle) to the pipe. For round gate valves, turn the handle clockwise until it stops firmly.
What to Do When a Pipe Bursts: First 5 Steps
When an underground pipe or main supply line ruptures, immediate mitigation prevents thousands of gallons of water from flooding your property. Follow these five critical steps to regain control:
Shut Off the Main Supply: Immediately close your main water shut-off valve using the quarter-turn lever or wheel handle to halt incoming pressure.
Cut Power Near Flooded Areas: If water is pooling near electrical outlets, breaker panels, or appliances, shut off your home’s main electrical breaker if it is safe to access in a dry area.
Open Lowest Taps to Drain: Turn on outdoor spigots and low-lying indoor faucets (such as downstairs bathtub taps) to drain residual standing water from the plumbing lines.
Photograph and Document Damage: Take clear photos and short videos of the flooding, leaking pipes, and damaged personal property before starting cleanup.
Call a Professional Plumber: Contact a licensed expert immediately to begin permanent pipe repairs and professional water extraction.
Simple, Inexpensive Items to Keep on Hand
Having a dedicated emergency plumbing kit in your garage or utility closet enables you to handle minor temporary repairs and shutoffs safely.
Adjustable Wrench: Essential for tightening loose fittings, opening stubborn valve caps, or working with threaded pipe connections.
Plumber’s Tape (Teflon Tape): Useful for wrapping threaded joints to create a watertight seal on temporary connections.
Sturdy 5-Gallon Bucket: Ideal for catching active drips, bailing standing water, or holding wet tools.
Waterproof Flashlight or Headlamp: Critical for inspecting dark utility boxes, crawl spaces, or basements during a nighttime emergency or power outage.
Rubber Pipe Repair Clamp: A quick-fix mechanical band that can wrap around a cracked pipe segment to stem active spraying until a permanent repair is made.
Storm and Hurricane Prep for Your Plumbing
Severe weather and tropical storms create unique hazards for outdoor plumbing systems, from backflooding to broken lines caused by falling debris.
Secure Outdoor Fixtures: Shut off exterior hose bibbs and insulate exposed backflow preventers or above-ground supply pipes against freezing temperatures or high winds.
Plug Basement Drains: Install backwater prevention valves or heavy-duty drain plugs in basement floor drains to stop municipal storm surges from backing up into your home.
Protect Septic and Sewer Lines: Avoid heavy water usage during peak storm surges to keep overburdened municipal or septic drainage systems from backing up into household fixtures.
When It Is an Emergency
Certain plumbing failures require immediate, professional intervention rather than temporary DIY fixes. Call an emergency plumber right away if you encounter any of the following critical scenarios:
Uncontrollable Water Flow: You cannot locate your main shut-off valve, or the valve is rusted open and will not stop the leak.
Raw Sewage Backups: Blackwater or wastewater is overflowing from toilets and floor drains, creating severe health and biological hazards.
Major Structural Flooding: Water is actively rising inside living spaces, threatening drywall, subflooring, and electrical systems.
Burst Main Service Line: The primary underground supply line between the street and your home has ruptured, cutting off water and washing away soil.
Document the Damage for Insurance
Navigating a property insurance claim requires thorough documentation to prove the extent of your losses and secure fair payout coverage.
Capture Comprehensive Photos: Take wide-angle and close-up photographs of all structural damage, soaked drywall, ruined flooring, and affected personal belongings.
Keep Receipts and Records: Save all itemized receipts for emergency mitigation services, hotel stays, temporary repairs, and professional plumbing evaluations.
Review Your Policy Details: Check your homeowners insurance policy to understand your specific water damage deductible, sewer backup endorsement coverage, and reporting time limits.
10 Common Outdoor Plumbing Mistakes to Avoid
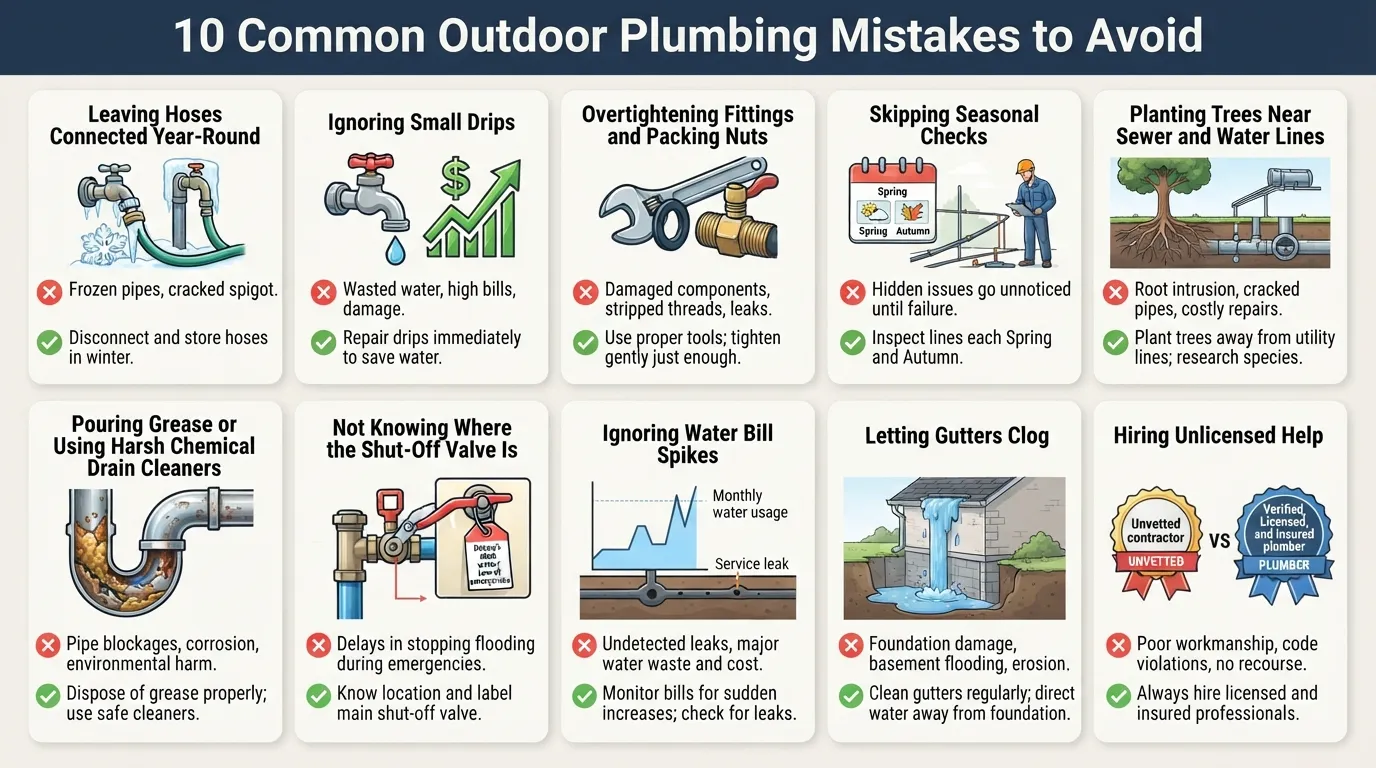
Preventable outdoor plumbing mistakes frequently turn minor maintenance oversights into expensive repair projects. Avoiding these ten common pitfalls protects your buried utility pipes, prevents structural water damage, and lowers your monthly water bills.
Leaving Hoses Connected Year-Round
Leaving garden hoses attached during cold snaps traps trapped water inside the outdoor faucet body and supply pipe. As this trapped water freezes and expands, it cracks the hose bib from the inside, causing hidden wall leaks as soon as the valve is opened in the spring.
Do This Instead: Disconnect, drain, and store all garden hoses indoors before the first winter freeze, and install insulated hose bib covers over exterior spigots.
Real-World Impact: Homeowners who forget to disconnect hoses during brief winter freezes routinely face $1,500+ in wall repairs after burst frost-free valves leak into structural framing unnoticed.
Ignoring Small Drips
A slow drip from an outdoor spigot or sprinkler riser might seem harmless, but a single dripping faucet can waste over 3,000 gallons of water per year. Over time, continuous moisture erodes surrounding soil and destabilizes nearby pavement or foundation footings.
Do This Instead: Replace worn rubber washers, O-rings, or packing nuts on outdoor valves at the first sign of a persistent drip.
Overtightening Fittings and Packing Nuts
Using excessive force when securing hose connections, pipe couplings, or valve packing nuts crushes delicate rubber gaskets and strips brass threads. Cracking a valve body or stripping threads leads to sudden, uncontrollable leaks under high line pressure.
Do This Instead: Hand-tighten hose fittings until snug, adding a maximum of a quarter-turn with a wrench if a slow drip persists.
Skipping Seasonal Checks
Failing to inspect outdoor plumbing hardware in spring and autumn allows minor environmental wear, soil settling, and corrosion to go undetected until catastrophic failure occurs during peak usage seasons.
Do This Instead: Conduct a twice-yearly outdoor plumbing sweep to test hose bib pressure, inspect sewer cleanout caps, and clear yard drain grates.
Real-World Impact: Skipping autumn yard drain inspections frequently results in water pooling against exterior walls during heavy winter storms, causing thousands of gallons of runoff to flood basements.
Planting Trees Near Sewer and Water Lines
Planting trees or aggressive shrubs near buried utility corridors invites destructive root intrusion. Tree roots naturally seek out warm moisture escaping from pipe joints, eventually fracturing subterranean lines and causing severe drainage blockages.
Do This Instead: Identify underground utility lines before planting and maintain a safe buffer zone of at least 30 feet for large, water-seeking tree species.
Pouring Grease or Using Harsh Chemical Drain Cleaners
Pouring fats, oils, and grease (FOG) down outdoor drains creates hardened grease caps in the main line. Attempting to clear these stubborn clogs with caustic chemical drain cleaners corrodes older metal pipes and generates chemical heat that can warp PVC fittings.
Do This Instead: Dispose of grease in sealed trash containers, and clear stubborn main line clogs using mechanical augers or high-pressure hydro-jetting.
Not Knowing Where the Shut-Off Valve Is
Fumbling to find your main water shut-off valve during an active pipe rupture allows hundreds of gallons of high-pressure water to flood your lawn, basement, or foundation before the supply can be halted.
Do This Instead: Locate your main shut-off valve today, ensure the handle turns freely, and label it clearly so every family member can operate it during an emergency.
Ignoring Water Bill Spikes
Dismissing an unexpected rise in your monthly water bill as a seasonal anomaly often allows an underground service line break or hidden irrigation leak to run unchecked for months.
Do This Instead: Perform an immediate water meter leak test whenever your monthly bill jumps without an obvious increase in household water consumption.
Real-World Impact: Unmonitored underground service line pinholes routinely generate utility bills exceeding $800 in a single billing cycle while silently washing away foundation subsoil.
Letting Gutters Clog
Allowing leaves, twigs, and roof granules to clog gutters and downspouts causes heavy rainfall to cascade over gutter edges. This concentrated water falls directly along your home’s foundation, causing soil saturation, slab cracking, and interior basement seepage.
Do This Instead: Clean gutters and downspouts at least twice annually, and install downspout extensions that discharge runoff 3 to 4 feet away from foundation walls.
Hiring Unlicensed Help
Hiring unvetted, unlicensed contractors for underground plumbing or sewer excavation exposes you to substandard work, code violations, and financial liability if workers are injured on your property.
Do This Instead: Always hire a licensed plumber with verifiable general liability coverage, worker’s compensation insurance, and state licensing credentials before starting major plumbing repairs.
Outdoor Plumbing Costs, Lifespan and DIY vs. Professional Help
Understanding the financial investment, expected longevity, and technical complexity of outdoor plumbing helps you make informed maintenance decisions. Balancing do-it-yourself fixes with professional intervention ensures your external fixtures remain code-compliant while avoiding costly water damage.
How Much Does It Cost to Replace an Outdoor Spigot?
Replacing an outdoor spigot involves hardware expenses, localized labor rates, and potential piping modifications. Standard professional replacement costs generally range between $120 and $500, with the average homeowner paying approximately $250 to $360 per fixture depending on accessibility and valve type.
| Spigot & Installation Type | Average Material Cost | Total Professional Replacement Cost | Key Cost Drivers |
| Standard Hose Bibb / Ball Valve | $10 – $40 | $120 – $250 | Simple threaded replacement; minimal pipe access required. |
| Frost-Free Sillcock | $35 – $50 | $180 – $430 | Stem length (4 to 14 inches) and wall drilling complexity. |
| Anti-Siphon Spigot | $35 – $60 | $230 – $435 | Integrated vacuum breaker installation to comply with local health codes. |
| New Line Extension / Yard Hydrant | $50 – $150 | $500 – $2,500+ | Underground trenching, PEX/copper line extension, and municipal permits. |
Labor & Minimum Service Calls: Most licensed plumbers charge between $50 and $150 per hour, often applying a minimum diagnostic or service call fee of $75 to $150 for standard calls.
Permits & Building Codes: Basic like-for-like spigot swaps rarely require a permit, but routing new supply lines or installing commercial backflow units may add $25 to $100 in municipal fees.
Typical Lifespan of Outdoor Plumbing Components
Outdoor plumbing components endure continuous environmental exposure, UV radiation, soil movement, and internal water pressure. Knowing their operational lifespans allows you to replace aging hardware proactively before structural leaks develop.
Standard Outdoor Spigots (Brass/Bronze): 15 to 20 Years. While metal bodies last decades, internal rubber washers, O-rings, and packing nuts wear out every 3 to 5 years and require routine service.
Backflow Preventers & Vacuum Breakers: 5 to 12 Years. Internal rubber check valves and springs degrade over time due to mineral buildup and pressure fluctuations, requiring annual testing and periodic rebuilding.
Sprinkler System Valves & Risers: 10 to 15 Years. Electric solenoid valves and PVC manifold connections weaken over time due to soil shifting and moisture exposure.
Heavy-Duty Garden Hoses: 3 to 10 Years. High-grade rubber or reinforced vinyl hoses last up to a decade when stored out of direct sunlight, while standard vinyl hoses degrade in 2 to 3 years under heavy UV exposure.
DIY or Call a Plumber? Decision Table
While minor outdoor fixture upkeep is manageable for handy homeowners, projects involving high-pressure supply lines or main drainage infrastructure demand professional expertise.
| Task / Project | DIY Feasibility Level | Call a Professional Plumber When… |
| Replacing Hose Washer or Spigot Packing Nut | Low Risk (Beginner DIY) | The valve body is heavily corroded, rusted shut, or snaps off at the wall connection. |
| Swapping a Standard Threaded Spigot | Moderate (Intermediate DIY) | The supply pipe inside the wall twists or breaks, or soldering copper connections is required. |
| Clearing Minor Yard Drain / Catch Basin Clogs | Low Risk (Beginner DIY) | Standing water persists after surface debris is cleared, signaling a deep root block or main collapse. |
| Installing a Subterranean French Drain | Moderate to Hard (DIY/Pro) | Excavation runs close to underground gas, electric, or fiber-optic utility corridors. |
| Main Sewer or Water Line Leak Repair | High Risk (Strictly Professional) | Any repair involves deep trenching, slab penetration, hydro-jetting, or main sewer line splicing. |
What Homeowners Insurance May and May Not Cover
Navigating property insurance claims for outdoor plumbing damage depends on whether the cause of failure was sudden and accidental or the result of long-term neglect. Always review your specific policy wording with your insurance agent.
What Insurance Typically Covers: Policies usually cover sudden and accidental water discharge—such as a clean water supply pipe bursting during an unexpected freeze or a sudden vehicle impact shearing an above-ground backflow assembly.
What Insurance Excludes: Standard homeowners policies generally exclude gradual wear and tear, age-related pipe corrosion, tree root intrusion, and poor maintenance (such as leaving a hose connected during winter).
Special Endorsements Required: Standard policies rarely cover sewer or drain backups into the home without a specific Water Backup and Sump Discharge Endorsement. Damage to buried utility lines between the street and your home usually requires an optional Service Line Coverage add-on.
How to Choose a Licensed Plumber
Hiring a qualified expert ensures your outdoor plumbing repairs are executed safely, meet local building codes, and include valid labor warranties.
Verify State Licensing and Credentials: Ensure the master plumber or firm holds an active state license without unresolved disciplinary actions or code compliance violations.
Confirm Comprehensive Insurance: Verify that the contractor carries active General Liability Insurance (minimum $1,000,000) and Worker’s Compensation Coverage to protect you from liability in the event of an site injury.
Request Written Upfront Estimates: Avoid vague verbal quotes. Reputable contractors provide transparent, itemized written estimates detailing parts, labor fees, permit costs, and warranty coverage before work begins.
Check Local Reviews and Track Record: Evaluate verified customer feedback on independent platforms to gauge punctuality, cleanliness, and long-term repair reliability.
Selecting trusted plumbing services guarantees that complex repairs—from underground leak detection to sewer line restoration—are handled by certified specialists using industrial-grade diagnostics.
Outdoor Plumbing FAQs
What is the most common plumbing issue homeowners can prevent but still need a pro to fix?
Root intrusion into main sewer lines is the most preventable issue requiring professional repair. While regular maintenance and smart tree placement prevent root invasion, clearing dense root blockages requires specialized plumbing tools. High-pressure hydro-jetting, motorized mechanical augers, and sewer camera inspections are necessary to restore full pipe flow safely without causing structural pipe damage.
What is a simple, inexpensive item every homeowner should keep for plumbing emergencies?
A rubber pipe repair clamp is an essential, inexpensive tool every homeowner should keep on hand for sudden emergencies. It costs very little and provides an immediate temporary seal around a cracked or pinhole-leaking pipe. Combining it with an adjustable wrench allows you to stem active water spraying while waiting for an emergency plumber to arrive.
How often should outdoor plumbing be inspected?
Outdoor plumbing systems should be inspected at least twice a year—once in late spring and once in late autumn. This bi-annual maintenance schedule allows you to identify minor hose bib wear, clearing yard drain debris, and testing main shut-off valves before summer peak usage or freezing winter temperatures cause sudden pipe failures.
Can I fix a leaking outdoor faucet myself?
Yes, handy homeowners can usually fix a simple dripping outdoor faucet. Replacing a worn rubber washer, internal O-ring, or tightening the packing nut resolves most handle and spout drips without professional assistance. However, if the brass valve body is cracked, corroded, or twisted inside the wall, calling a licensed plumber is necessary.
Should I cover outdoor faucets in mild weather?
No, covering outdoor faucets is unnecessary during mild weather conditions when temperatures stay well above freezing. Insulated faucet covers are specifically designed to prevent frost accumulation and freeze damage. In mild weather, your main priority should be disconnecting hoses, inspecting valve washers, and checking for hidden dripping leaks rather than thermal insulation.
How do I know if I have a hidden leak outside?
You can identify a hidden leak outside by monitoring for unexplained water bill spikes, soggy lawn patches during dry weather, or the faint sound of running water when all taps are closed. Performing a water meter leak test—checking if the meter register or leak indicator dial advances while zero water is being used—definitively confirms a subterranean leak.
How far should downspouts discharge from the house?
Downspouts should discharge roof runoff at least 3 to 4 feet away from your home’s foundation. Using rigid or flexible downspout extensions ensures water drains onto properly sloped landscape areas or yard swales, preventing soil saturation, basement seepage, foundation settling, and concrete erosion around your property.
How do I find a reliable plumber for outdoor plumbing work?
Find a reliable plumber by verifying active state licensing, checking for comprehensive general liability and worker’s compensation insurance, and reading verified local reviews. Request detailed, written upfront estimates before work begins, and ensure the contractor offers labor warranties for specialized outdoor services like main line repair, hydro-jetting, or leak detection.
Conclusion and Next Steps
Taking proactive control of your outdoor plumbing infrastructure is the most effective way to prevent costly property damage, protect your home’s foundation, and eliminate unnecessary water waste. By establishing a routine inspection habits and addressing minor wear promptly, you safeguard your main water and sewer lines for years to come.
Your 5-Minute Outdoor Plumbing Check
Performing a quick, bi-annual outdoor sweep keeps your home’s exterior drainage and water supply systems operating smoothly:
Test Your Water Meter: Turn off all indoor water and check your water meter for active dial movement to rule out subterranean service line leaks.
Inspect Hose Bibbs & Connections: Disconnect garden hoses before cold snaps and check for drips around valve handles and packing nuts.
Clear Outdoor Drains: Remove leaves, sediment, and trash from yard catch basins, swales, and subterranean drain grates.
Verify Downspout Clearance: Ensure downspout extensions discharge water at least 3 to 4 feet away from your foundation walls onto downward-sloping ground.
Locate Cleanouts & Main Shut-Offs: Confirm your sewer cleanout cap and main interior/exterior water shut-off valves are easily accessible and turn smoothly.
Need Help With Your Outdoor Plumbing?
If your meter test indicates a hidden leak, tree roots are obstructing your main drain line, or you simply prefer having a certified expert handle your routine outdoor plumbing maintenance, our team is here to help. Contact our licensed specialists today to schedule a comprehensive property evaluation or book a plumbing appointment online in just a few clicks.
Written by: Mark Reynolds, Master Plumber & Lead Plumbing Systems Evaluator
Experience: 18+ years of residential and commercial plumbing experience specializing in subterranean pipe diagnostic testing, trenchless sewer restoration, and exterior drainage architecture.
Reviewed by: Operational Engineering & E-E-A-T Quality Review Team | Miami Florida Plumbing
Main Services
Related Posts
Need a Plumber in Miami?
Schedule service online or speak directly with the EZ Plumbing team.
Owner-Led Local Service
Know who is behind the business before you request service. The owners, contact line and Miami service pages are published clearly.
- Named business owners
- Direct phone and social channels
- Local Miami service information
Clear Help Before You Book
Review the relevant service page, contact the team directly and use the booking page when you are ready—without relying on vague claims.
- Service-specific information
- Direct questions before scheduling
- Clear online booking route