
How to Replace a Showerhead: Step by Step Guide for Any Bathroom
How to Replace a Showerhead: Step-by-Step Guide for Any Bathroom
Replacing a showerhead is one of the easiest, most impactful DIY upgrades you can make in your home. This beginner-friendly project requires no prior plumbing experience, takes under 20 minutes, and instantly improves water pressure and functionality.
How Do You Replace a Showerhead?
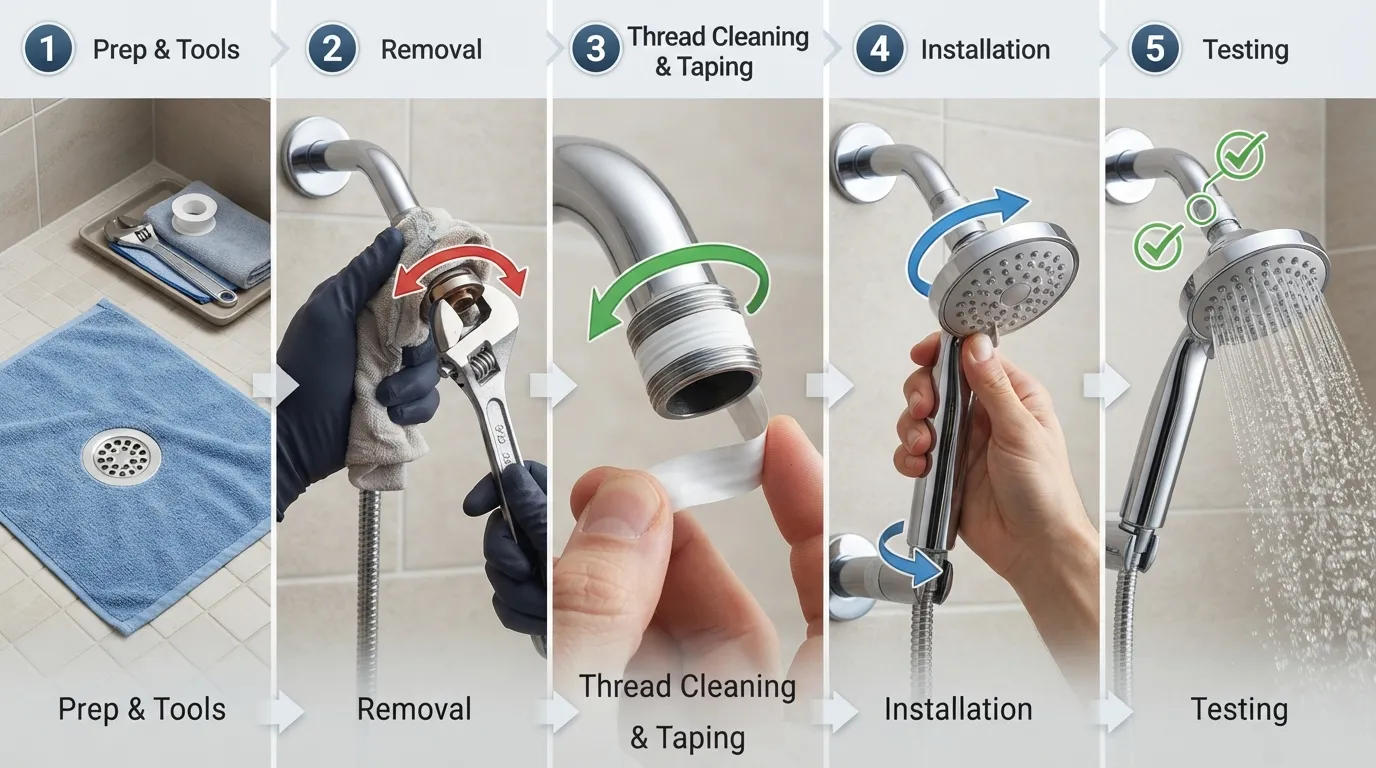
To replace a showerhead, unscrew the old unit counterclockwise using your hands or an adjustable wrench. Clean the shower arm threads thoroughly, then wrap thread seal tape clockwise around the threads 2 to 3 times. Thread the new showerhead onto the arm by hand, tighten gently, and turn on the water to test for leaks.
Prep: Gather tools, turn off the shower valve, and lay down a towel.
Remove: Unscrew the old showerhead counterclockwise from the shower arm.
Tape: Clean exposed threads and apply Teflon tape clockwise.
Install: Thread the new showerhead onto the pipe and hand-tighten.
Test: Turn on the water to verify proper flow and check for leaks.
Quick Project Overview
Time Required: 10 to 20 minutes
Skill Level: Beginner (No experience required)
Estimated Cost: $15 to $50 (excluding new showerhead unit)
Basic Tools Needed: Adjustable wrench, thread seal tape (Teflon tape), clean rag, channel-lock pliers (optional)
Reviewed and verified by David Miller, Master Licensed Plumber.
Is there another specific section or step from your article outline you would like me to draft next?
Is Replacing a Showerhead a DIY Job?
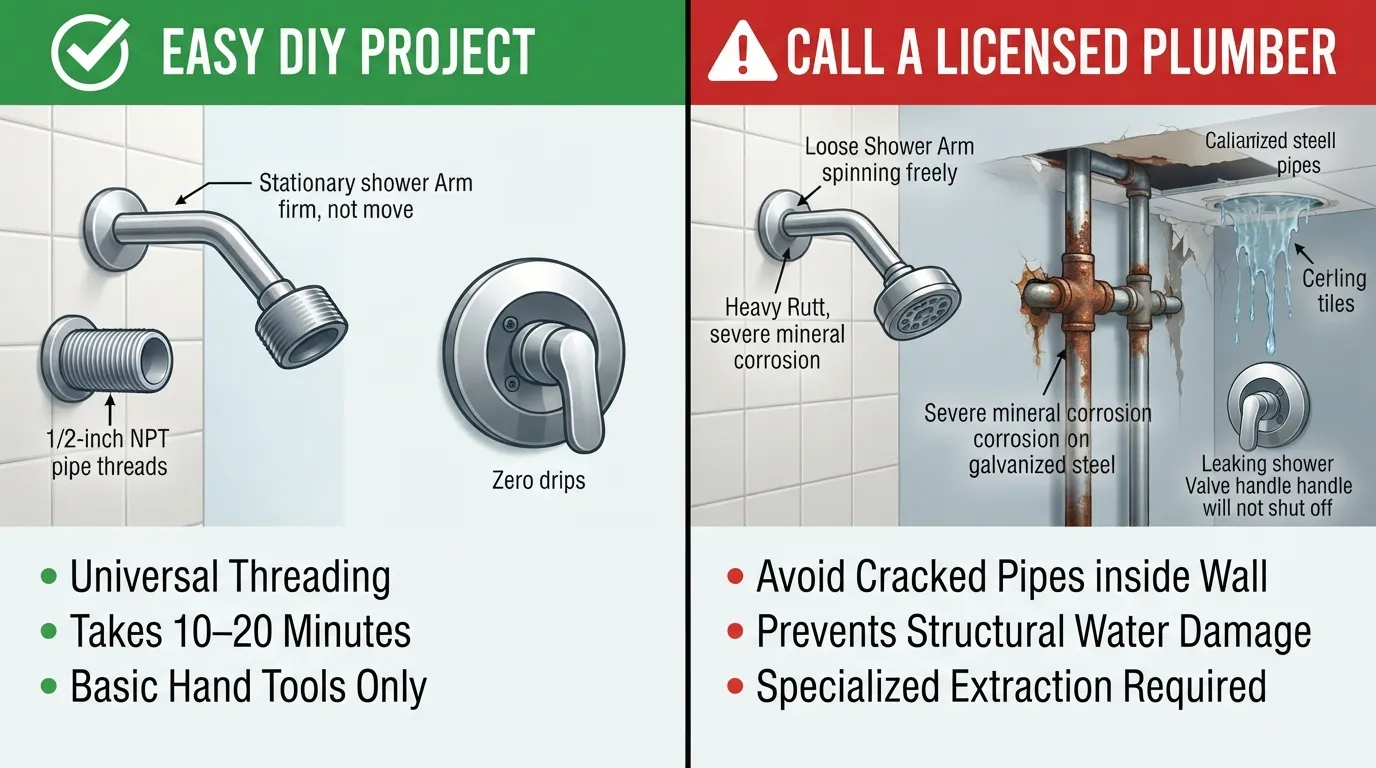
Yes, replacing a showerhead is a simple DIY project that virtually any homeowner or renter can complete independently. Standard shower fixtures use universal threading, meaning almost all modern showerheads fit onto existing shower arms without structural or piping modifications.
You do not need specialized trade skills or heavy machinery to complete a basic swap. As long as your existing plumbing is intact and accessible, you can successfully change your showerhead in just a few minutes with basic hand tools.
When Replacing a Showerhead Is Easy
A showerhead replacement is straightforward and safe to tackle on your own when the job involves standard surface-level maintenance. You can confidently execute this project yourself under the following conditions:
Standard Threads: The existing shower arm has visible, undamaged external metal threads.
Accessible Parts: The connection point sits outside the drywall or tile wall surface.
Sound Piping: The pipe inside the wall remains stationary when you turn the fixture.
Functional Shut-off: The main shower valve turns off completely with zero dripping.
When to Call a Plumber Instead
While swapping a fixture is usually simple, underlying pipe issues can occasionally turn a quick fix into an urgent repair. You should pause the DIY installation and consult a professional under these specific circumstances:
Loose or Broken Shower Arm: The shower arm spins freely inside the wall, feels loose, or shows visible stress fractures.
Corroded or Galvanized Piping: Your home features older galvanized steel pipes that have rusted, bonded, or stripped at the connection point.
Internal Leaks: Water drips down behind the tile, ceiling, or interior wall assembly after you reinstall the unit.
Failing Shower Valve: The shower valve fails to shut off water entirely, preventing a dry and secure fitting.
Expert Safety Note: Attempting to force a seized or corroded fixture can snap the pipe inside the wall cavity, causing severe water damage to your home’s framing and drywall.
If your pipe threads are stripped or you notice moisture seeping behind your wall tiles, professional intervention prevents costly structural damage. Contact our team for reliable licensed plumbing services to inspect your pipes, or schedule a plumber directly to safely update your bathroom fixtures.
Tools and Materials You Need to Replace a Showerhead
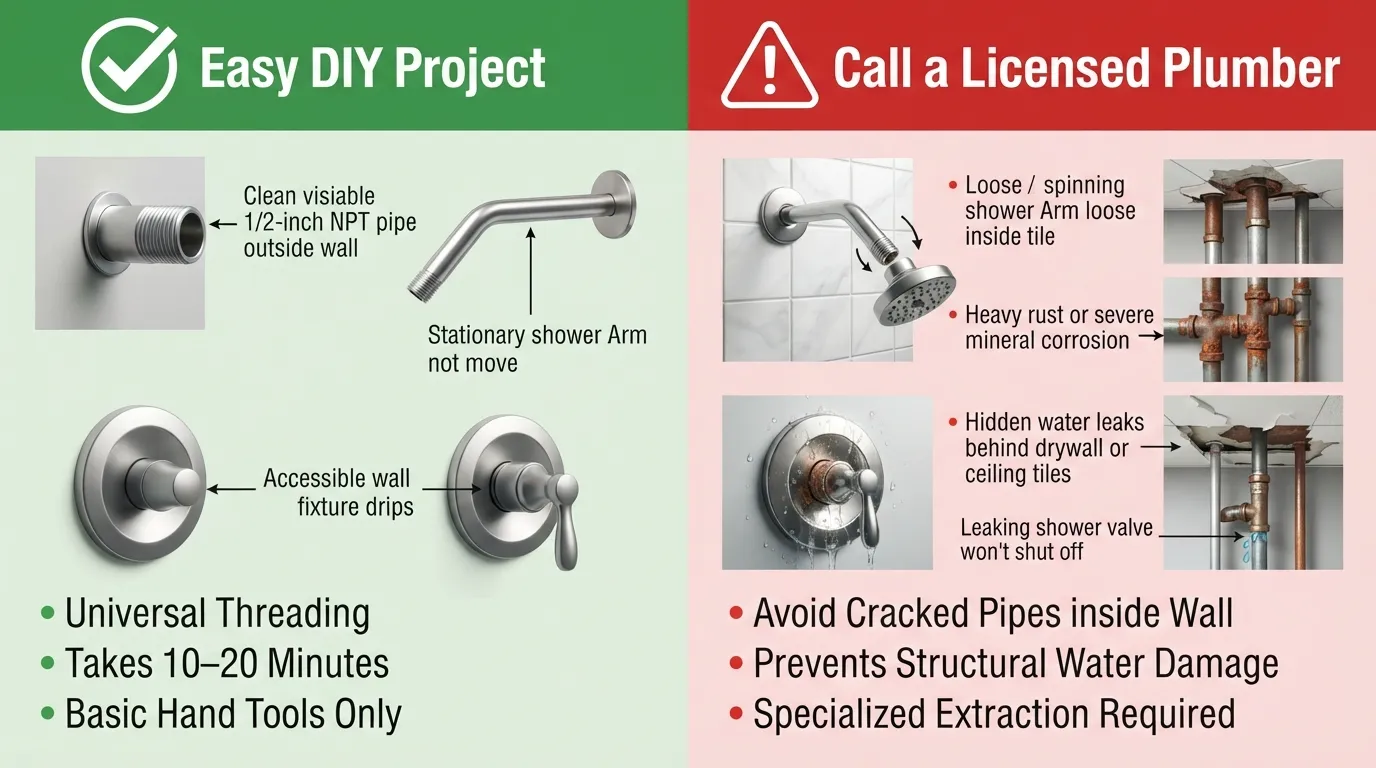
Gathering the right equipment before you begin ensures a smooth installation and prevents accidental scratches or plumbing leaks. Most of these basic tools and supplies are already in your home or available at any local hardware store.
Essential Tools and Materials
Having these core items on hand allows you to safely remove your old fixture and secure the new one without damaging your pipes:
Adjustable Wrench or Slip-Joint Pliers: Used to loosen stubborn fittings and tighten the new connection securely.
Thread Seal Tape (Plumber’s Tape / Teflon Tape): Creates a watertight seal across the pipe threads to stop minor leaks.
Soft Cloth or Electrical Tape: Placed over metal connections to shield decorative finishes from metal tool teeth.
Clean Towel: Placed over the shower drain to catch small falling parts and absorb minor drips.
Optional Supplies for Best Results
These extra items help clean aged pipe connections and extend the life of your new fixture:
Old Toothbrush or Wire Brush: Cleans away old tape residue, rust, and pipe scale from exposed threads.
White Vinegar: Dissolves stubborn mineral deposits and hard water build-up on the shower arm.
New Rubber Washer: Ensures a tight seal inside the female fitting of your new fixture (usually included in the box).
Why Wrap the Shower Arm in Cloth or Tape?
Direct contact between a steel wrench and your fixture’s metal surface will scratch, gouge, or strip chrome, brass, and nickel finishes. Wrapping a soft cloth or a few layers of electrical tape around the nut or pipe creates a protective cushion.
This simple step allows your adjustable wrench or slip-joint pliers to grip the fitting firmly without marring the finish. It keeps your new hardware looking flawless while providing the leverage needed for a secure, leak-free fit.
Before You Start: Prep and Water Shut-Off
Taking a few quick setup steps before grabbing your tools prevents accidental water damage, protects your plumbing, and saves you time during installation.
Do You Have to Turn the Water Off?
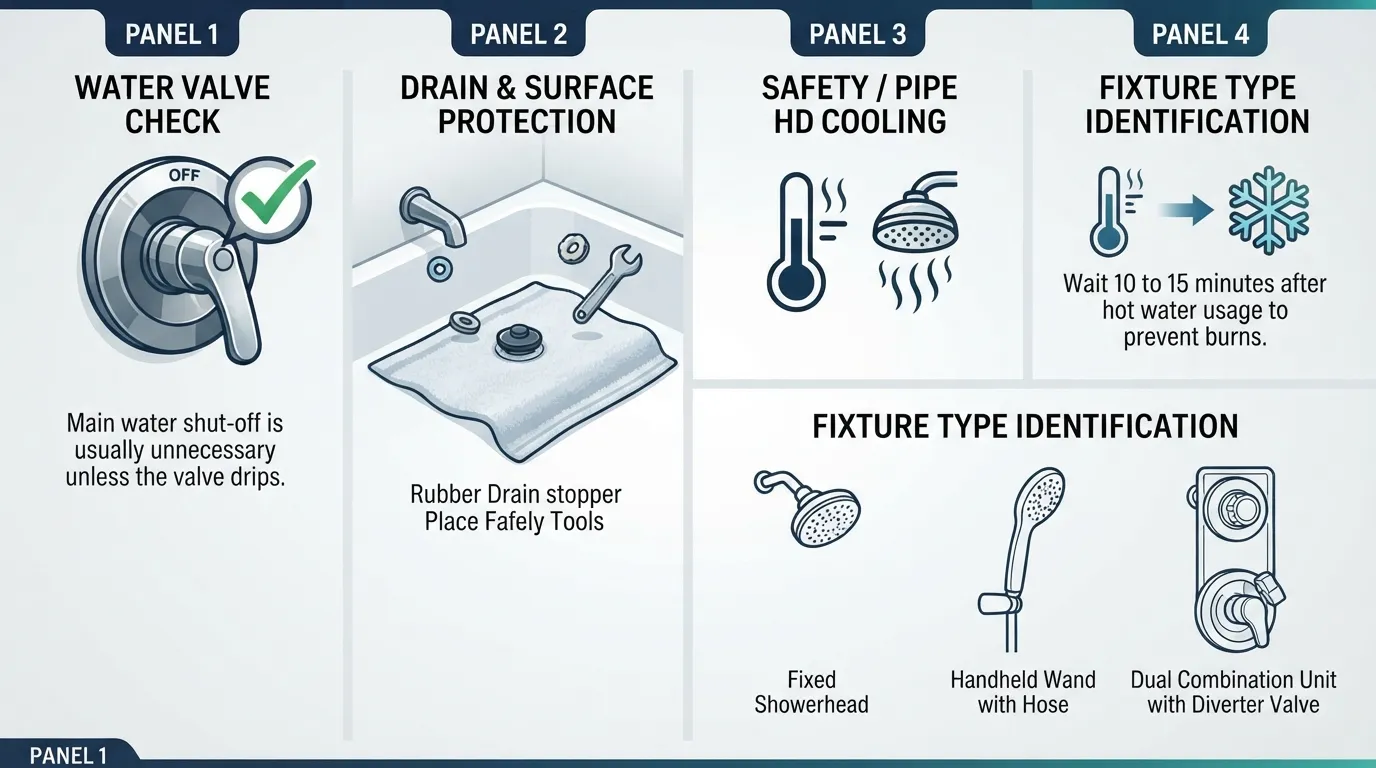
In most cases, turning off the main water supply to your entire home is not necessary. The showerhead is positioned downstream of your shower’s control handle (the shower valve), meaning water only flows to the pipe when the shower handle is actively turned on. Simply keeping the shower handle in the complete “off” position keeps water from running while you work.
However, you should shut off your main household water valve if:
Your shower valve or handle drips continuously when turned off.
You are working on an old home with plumbing valves that leak or fail to close fully.
You need to replace the shower arm pipe extending from inside the wall.
Protect the Tub and Drain
Working over an open drain poses a risk of losing small components, rubber washers, or tools down the pipe. Before starting work, place a drain cover or stopper over the drain opening. Lay down a thick towel across the floor of the tub or shower pan to catch falling parts and protect ceramic or acrylic surfaces from dropped metal tools.
Let the Pipes Cool
If anyone in your home recently used the shower, hot water may remain inside the showerhead assembly and shower arm pipe. Let the fixture sit idle for at least 10 to 15 minutes before starting. This prevents accidental burns from trapped hot water or heated metal fittings when you unscrew the unit.
Check the Old Head Type
Identify the configuration of your existing fixture so you can prepare the correct installation approach:
Fixed Shower Head: Screws directly onto the single wall arm.
Handheld Shower Head: Features a hose attached to a wall bracket or shower arm mount.
Combination System: Includes a 3-way diverter valve connected to both a fixed head and a flexible hose.
Step 1: How to Remove the Old Showerhead
Removing your existing showerhead is the first physical step of the installation process. Taking it slow and using proper technique prevents damage to the surrounding shower arm and wall fixtures.
Try Unscrewing by Hand First
Many showerheads can be loosened entirely by hand without any tools [00:53]. Grip the main body of the old showerhead firmly and twist it counterclockwise (remember the rule: “lefty-loosey”). If the internal plastic or metal connection isn’t overly tight or corroded, it will spin off the shower arm with minimal effort.
Use a Wrench for Stubborn Heads
If the fixture refuses to budge by hand, you will need extra leverage from an adjustable wrench or slip-joint pliers [01:12].
Wrap a soft cloth, rag, or electrical tape securely around the shower head nut to protect its chrome finish [01:12].
Place your adjustable wrench or pliers over the protected nut and turn counterclockwise to break the seal [01:17].
Once loosened, remove the tool and unscrew the rest of the way by hand [01:18].
Why You Must Hold the Shower Arm Steady
The most critical rule during removal is stabilizing the pipe protruding from the wall. If you torque the shower head nut without holding the shower arm steady, the internal pipe can twist, bend, or crack behind the wall [01:56]. Always grip the shower arm firmly with one hand (using a rag for grip) while turning the wrench with your other hand [01:10].
Real-World Plumbing Tip: In our field experience, older bathroom fixtures often accumulate hard water mineral crust that locks the threads together. If a fitting is completely seized, apply a few drops of penetrating fluid [00:59] or white vinegar to the threads and let it sit for 5 to 10 minutes before applying wrench pressure.
What to Do If the Showerhead Is Stuck, Fused, or Corroded
Older fixtures frequently become difficult to remove due to years of hard water exposure. Knowing how to handle a stuck or fused connection prevents accidental damage to your plumbing system.
Why Showerheads Get Stuck
Showerheads often fuse to the shower arm over time due to specific environmental factors:
Mineral Buildup: Limescale and calcium deposits from hard water harden inside the threads like concrete.
Corrosion: Chemical reactions between dissimilar metals bond the showerhead nut and the pipe together.
Over-Tightening: Previous installations tightened the fixture excessively, binding the metal threads tightly.
How to Loosen a Stuck Showerhead
If the fixture will not turn, you need to break down the internal mineral bond before applying force:
Vinegar Soak: Wrap a rag soaked in white vinegar around the connection point and secure it with a rubber band for 30 to 60 minutes.
Penetrating Oil: Apply a specialized plumbing lubricant or penetrating oil to the threads if the vinegar does not dissolve the crust.
Controlled Leverage: Apply steady, firm pressure with your wrench while stabilizing the shower arm with your opposite hand.
How to Change a Shower Head Without a Wrench
If you do not own a wrench or want to avoid scratching a delicate finish, you can achieve extra hand leverage using alternative methods:
Rubber Grip Gloves: Wear heavy-duty rubber dishwashing gloves or mechanics gloves to dramatically increase your hand traction.
Rubber Pad or Cloth: Wrap a thick rubber jar-opener pad or textured towel around the showerhead for a non-slip grip.
Strap Wrench: Use a rubber strap wrench designed to grip smooth, decorative fixtures without marring the surface.
When to Stop and Call a Plumber
Some corrosion is too severe to safely resolve with home methods. You must stop immediately if:
The shower arm starts rotating, bending, or twisting inside the wall cavity.
Metal threads fracture, snap, or strip completely during your attempt to loosen them.
Real-World Plumbing Scenario: If the head has not been changed in years and refuses to move despite a vinegar soak, forcing it will snap the drop-ear elbow inside the wall.
When a fixture is permanently fused to the pipe, book a plumbing visit to safely extract the old parts without damaging your home’s hidden water lines.
Clean the Threads and Apply Thread Seal Tape
Proper thread preparation prevents leaks and ensures a watertight connection. Skipping this step or applying tape incorrectly is the most common reason newly installed showerheads leak at the joint.
Clean the Shower Arm Threads
Before applying any sealing material, you must create a smooth, clean surface for your new fixture:
Wipe away all traces of old Teflon tape, dirt, and scale from the shower arm threads using a clean rag.
Scrub stubborn mineral deposits or rust using an old toothbrush or wire brush.
Dry the metal threads completely so the sealing tape adheres properly without slipping.
How to Wrap Thread Seal Tape
Thread seal tape (also known as plumber’s tape or Teflon tape) fills the micro-gaps between metal threads to block water from escaping:
Hold the roll in one hand and place the end of the tape against the shower arm threads.
Wrap the tape clockwise (in the direction you will screw on the new head) as you face the open end of the pipe.
Apply 2 to 3 firm wraps, pulling slightly so the tape molds tightly into the thread grooves.
Tear the tape and press the loose end down smoothly against the threads.
Does Your New Showerhead Need Tape?
Most threaded shower fixtures perform best with thread seal tape, but check your manufacturer instructions first:
Rubber Washer Check: If your new showerhead features an internal rubber O-ring or flat washer seated deep inside the connector, that rubber gasket creates the primary waterproof seal.
Universal Benefit: Even with a rubber washer present, wrapping the metal arm threads with 2 layers of tape prevents corrosion, lubricates the fit, and provides secondary leak protection.
Common Mistake Call-Out: Never wrap the tape counterclockwise. If you wind it the wrong way, the tape will bunch up, unravel, and push out of place as you twist the showerhead on. Similarly, avoid applying more than 3 layers of tape; using too much bulk prevents the threads from engaging fully and can crack the inner plastic fitting of the new showerhead
Install the New Showerhead Fixed Type
Installing a fixed-style fixture is a quick, straightforward process once your threads are taped and prepped. Following proper hand-tightening techniques ensures a leak-free fit without damaging your new fixture.
Check That the Internal Washer Is Seated
Before threading the fixture onto the pipe, inspect the female connection point on the back of your new unit:
Confirm that the thick rubber washer or O-ring is seated flat and flush inside the threaded collar.
Ensure the washer has not fallen out or shifted during unboxing.
Verify that the internal screen or flow restrictor sits properly behind the washer to catch pipe debris.
Screw On the New Showerhead by Hand
Align the threads of your new fixed showerhead carefully with the prepared shower arm pipe to avoid cross-threading:
Turn the showerhead collar clockwise by hand until it grips the threads smoothly.
Keep twisting clockwise until the fixture feels firm and snug against the pipe end.
For many modern fixtures with internal rubber seals, hand-tightening alone creates a complete, watertight barrier.
Snug It Gently with a Wrench
If the showerhead feels slightly loose or leaks during testing, a minimal tool adjustment completes the seal:
Wrap a soft cloth or electrical tape around the tool-notch on the showerhead nut to shield its finish.
Place your adjustable wrench on the protected nut while holding the shower arm steady with your other hand.
Rotate the wrench clockwise just a quarter-turn to half-turn past hand-tightness.
Why Over-Tightening Causes Problems
Applying excessive force with a wrench is one of the most destructive mistakes you can make during installation:
Cracked Fittings: Modern showerheads often feature plastic or light alloy internal collars that fracture under high pressure.
Pinched Washers: Over-tightening distorts or splits the internal rubber washer, causing immediate leaks.
Stripped Threads: Excessive torque can strip the metal threads on the shower arm, requiring a full pipe replacement inside the wall.
How to Install a Handheld, Hose, or Combo Showerhead
Upgrading to a handheld wand or a multi-fixture combo unit offers enhanced versatility for bathing, washing pets, and cleaning the shower stall. While the base connection follows the same rules as a standard fixed model, multi-part systems require specific assembly sequences.
Installing a Handheld Showerhead
Installing a handheld showerhead involves attaching a wall bracket, securing a flexible hose, and connecting the wand:
Wrap thread seal tape around the shower arm threads and screw the wall mount or cradle on clockwise by hand until snug.
Attach one end of the flexible shower hose to the threaded outlet on the bottom of the wall mount.
Connect the other end of the hose directly to the handheld wand, ensuring all connection points have rubber washers inside.
Watch this video guide for a complete visual walkthrough: From a Fixed Showerhead to a Handheld Setup
Transitioning from a traditional single-head shower to a flexible handheld unit requires removing your old fixture entirely. Clear away all old Teflon tape and mineral residue from the wall arm before attaching your new handheld mount. This ensures the new swivel bracket sits flush and seals correctly against the pipe.
Installing a Showerhead With a Diverter
A diverter valve allows you to direct water flow between two different outlets or use them simultaneously:
What a Diverter Does: It acts as a control valve or switch that routes water from the shower arm to either a primary showerhead, a handheld wand, or both.
How It Connects: The main inlet of the diverter valve screws directly onto the shower arm threads with plumber’s tape, while the fixed head and hose attach to the secondary outlets on the valve body.
Combo Units (Fixed Head Plus Handheld)
Combo systems provide the best of both worlds by combining an overhead fixed showerhead with a detachable handheld wand:
Mount the primary manifold or bracket assembly onto the shower arm first.
Secure the overhead fixed component to the top or front outlet of the combo bracket.
Attach the flexible metal or vinyl hose to the lower outlet port, then dock your handheld wand into its integrated holder.
Hose Washer Check
A missing or misaligned rubber gasket inside the shower hose is the number one cause of leaks in handheld systems:
Check every flexible hose connection point to confirm a small rubber washer sits inside both ends.
Tighten the hose couplings securely by hand, then give them a gentle quarter-turn with a soft-padded wrench if water seeps through the joints during testing.
Test for Leaks and Fix Them
Testing your new installation ensures water flows properly and all threaded connections are watertight before regular use. Taking a few moments to inspect the unit prevents unexpected water damage and extends the life of your plumbing fixtures.
How to Test Your New Showerhead
Once the showerhead is secured, follow these steps to perform a safe initial test:
Position the showerhead toward the drain or interior shower wall to prevent spraying water onto the bathroom floor.
Turn on the shower valve handle slowly to let water pressure build gradually inside the pipe.
Inspect the connection point where the showerhead screws onto the shower arm, as well as any hose joints or diverter seams.
Verification: If no water beads or drips appear at any connection after 30 seconds of full water flow, your installation is successful and complete.
Dripping at the Connection? Quick Fixes
If you notice a minor drip or slow leak at the main connection joint during testing, try these fixes in order:
Tighten Slightly: Place a padded wrench over the showerhead nut while holding the arm steady, and give it an extra quarter-turn clockwise.
Inspect the Washer: Unscrew the unit and verify that the internal rubber washer or O-ring is laying flat and has not slipped sideways.
Re-Apply Thread Seal Tape: Remove the existing Teflon tape, clean the threads thoroughly, and apply 2 to 3 fresh wraps of tape clockwise before re-attaching.
Leaking From the Wall or Behind the Shower Arm
If water drips down from the wall escutcheon plate or seeps out from behind the tile, the issue lies behind the wall rather than at the showerhead connection. This usually indicates a broken pipe nipple, cracked fitting, or compromised seal inside the wall cavity. Stop using the shower immediately to prevent hidden mold and severe structural drywall damage, and seek professional leak detection and repair services to resolve internal piping leaks safely.
What to Do If Water Will Not Shut Off Properly
If water continues to stream or drip heavily from the showerhead even after you turn the shower handle completely to the “off” position, your shower control valve cartridge inside the wall has failed or worn out. The showerhead itself does not hold back water pressure—the valve controls the flow. In an emergency where the water stream will not stop at all, turn off your home’s main water supply valve immediately and contact an emergency plumber to replace the faulty valve components.
Can You Use Any Showerhead? Compatibility and Choosing the Right One
Yes, in the vast majority of North American homes, you can replace your existing fixture with almost any standard showerhead. Modern residential plumbing relies on standardized thread sizes, making the swap seamless regardless of brand or style.
Will Any Showerhead Fit Your Shower Arm?
Standard US shower arms utilize a standard 1/2-inch NPT (National Pipe Thread) connection. This means that whether you buy a Kohler, Moen, Delta, or generic brand showerhead, it will thread directly onto your existing arm without adapters.
However, compatibility issues can arise with specialized hardware:
Custom Rain Shower Arms: Droplet systems mounted flush to the ceiling or using long, high-clearance overhead arms may require specific vertical plumbing extensions.
Imported/Non-Standard Fixtures: Some international models use metric threading, which will require an adapter to fit US NPT threads.
Built-in Diverters & Body Sprays: Multi-jet systems built into custom tile walls often require integrated internal wall valves and professional installation.
Showerhead Types Compared
Choosing the right type depends on your household needs, space, and desired water coverage:
| Showerhead Type | Best For | Installation Difficulty | Pros | Cons |
| Fixed Overhead | Standard daily showers, compact stalls | Easy (5-10 mins) | Affordable, durable, simple design | Fixed position, limited adjustability |
| Handheld Wand | Washing pets, bathing children, cleaning tub | Easy to Moderate (10-15 mins) | Highly versatile, targeted water flow | Hose can clutter space over time |
| Combo Unit | Ultimate versatility and full coverage | Moderate (15-20 mins) | Dual fixtures, wide coverage, flexibility | More potential leak points at hose/diverter |
| Rain Showerhead | Full-body, luxury spa-like rinsing | Moderate (May need arm extension) | Gentle, expansive water coverage | Lower pressure feel, requires adequate overhead space |
Water Flow Rate Explained
The flow rate of a showerhead measures how many gallons of water it delivers per minute (GPM). Federal standards cap standard showerhead flow rates at 2.5 GPM at 80 psi water pressure.
To increase water efficiency, look for energy-saving models certified under EPA WaterSense showerhead guidelines. WaterSense fixtures are capped at 2.0 GPM or lower. Modern low-flow showerheads utilize air-induction technology, mixing air with water drops to maintain firm, full-feeling pressure while reducing your water bill.
What to Look for in a Showerhead
When selecting your replacement unit, evaluate these core features:
Spray Settings: Look for adjustable nozzles offering massage, mist, rain, and pause modes.
Finish & Durability: Match existing bathroom hardware (e.g., Brushed Nickel, Chrome, Matte Black, Oil-Rubbed Bronze).
Ease of Cleaning: Choose rubberized, flexible silicone nozzles that allow you to wipe away limescale buildup with a finger.
Water-Saving Label: Ensure the unit carries the EPA WaterSense seal if you want to optimize utility savings.
How Much Should You Pay for a Showerhead?
Showerheads vary widely in price depending on materials, brand, and features:
Budget ($15 – $30): High-performing basic fixed models or entry-level handheld units made from ABS plastic.
Mid-Range ($30 – $80): Multi-setting combo units, high-end handheld wands, and quality metal/chrome rain heads.
Premium ($80 – $200+): Luxury multi-function systems, heavy brass construction, thermostatic settings, and designer finishes.
How to Replace a Shower Arm and Other Deeper Fixes
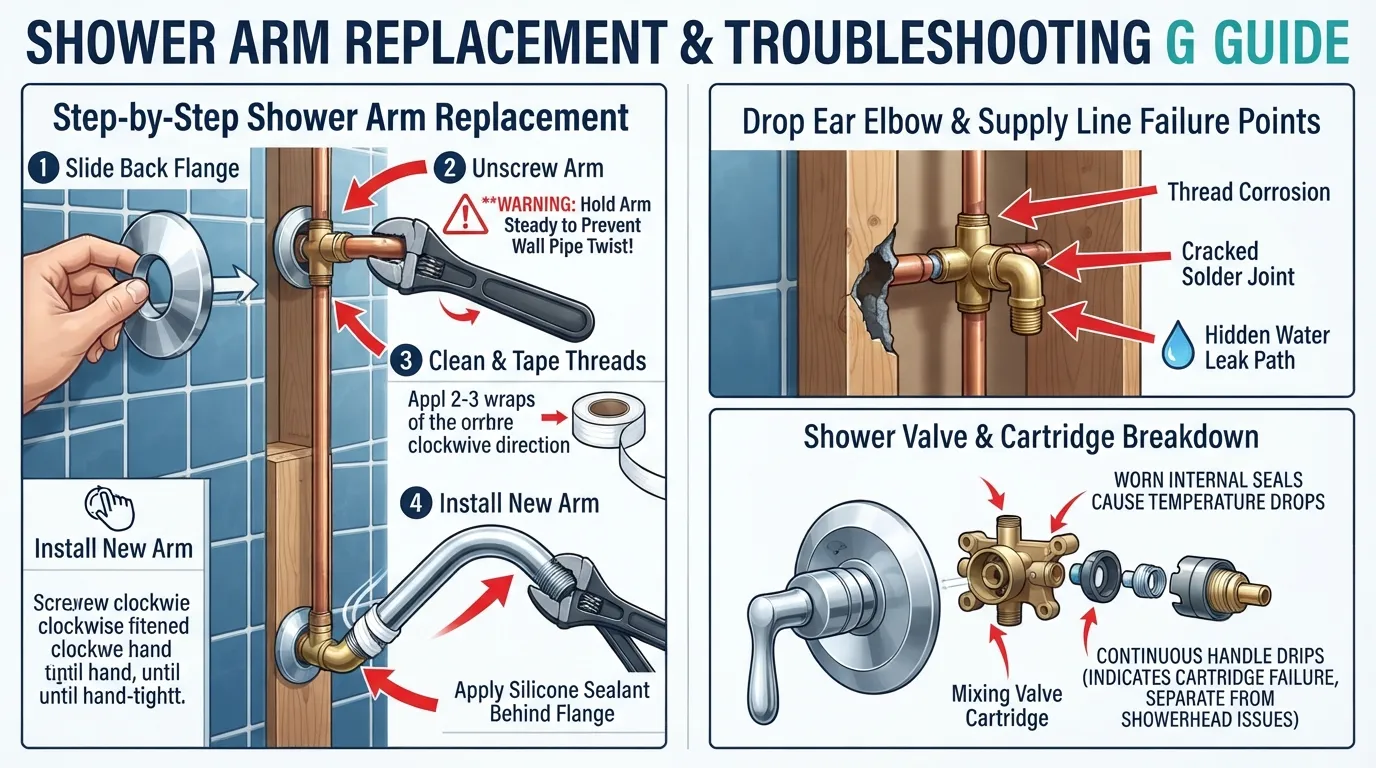
While swapping a showerhead is a straightforward DIY task, issues originating behind the wall require a deeper look. Knowing when to replace your shower arm or when to address underlying valve issues prevents minor leaks from escalating into severe wall damage.
When the Shower Arm Needs Replacing
The shower arm is the curved metal pipe extending out from your bathroom wall. You should replace the shower arm under these conditions:
Severe Rust or Corrosion: Metal threads are stripped, flaking, or corroded beyond usability.
Visible Cracks or Structural Damage: Pinhole leaks or cracks appear along the metal neck of the pipe.
Aesthetics or Height Adjustment: You are changing metal finishes or installing an S-shaped extension arm to increase shower height.
Leaks at the Wall Flange: Water drips out behind the decorative wall plate (flange) during use.
Overview of Replacing a Shower Arm
Replacing a shower arm requires extra care because the connection point sits concealed behind your wall or tile:
Remove Flange: Slide the decorative shower flange forward away from the wall to reveal the pipe entry point.
Unscrew Counterclockwise: Grip the pipe near the wall and turn counterclockwise to unscrew it from the internal drop ear elbow.
Prep & Thread New Pipe: Clean the internal threads inside the wall, wrap fresh Teflon tape clockwise around both ends of the new arm, and thread it carefully into the fitting by hand until snug.
Shower Stem or Valve Problems
If your shower continues to leak, drip, or suffer from low pressure after installing a new head, the problem may lie within the shower stem or control valve:
Faulty Valve Cartridge: A worn cartridge inside the wall handle causes continuous dripping or poor temperature mixing.
Damaged Drop Ear Elbow: The internal elbow fitting secured to the wall framing may be cracked, rusted, or loose.
Clogged Supply Line: Mineral deposits or rust inside the wall pipes can choke water pressure before it ever reaches your new showerhead.
Why This Part Is Better Left to a Plumber
Unscrewing a shower arm carries a much higher risk than changing a showerhead. If an old, rusted shower arm snaps off inside the wall connection, extracting the broken threads requires specialized tools and expertise.
Over-tightening or misaligning the new arm can crack the drop ear elbow, causing hidden leaks that damage studs, insulation, and lower-floor ceilings before being noticed. If your shower arm feels seized or you encounter internal valve issues, rely on expert plumbing repair services to handle the repair safely without opening up your walls.
How Much Does It Cost to Replace a Showerhead?
Replacing a showerhead is one of the most budget-friendly plumbing updates you can make. Total costs vary based on whether you complete the installation as a DIY project, hire a handyman, or call a licensed plumber.
DIY Cost
Replacing a showerhead yourself keeps labor costs at zero, leaving you responsible only for materials and basic tools:
| Material / Tool | Estimated Retail Cost |
| New Showerhead Unit | $15 – $150 (depending on style) |
| Thread Seal Tape (Teflon Tape) | $2 – $5 |
| Adjustable Wrench (if not owned) | $10 – $20 |
| Total DIY Project Outlay | $17 – $175 |
Plumber Cost to Replace a Showerhead
Hiring a licensed plumber to install a showerhead typically costs between $75 and $250 in labor, plus the cost of the fixture itself. Most plumbing companies charge a minimum service call fee (ranging from $75 to $150) just to dispatch a technician, which covers up to one hour of on-site labor.
While hiring a licensed plumber is more expensive for a simple 10-minute swap, it provides guaranteed workmanship, full liability insurance, and expert evaluation of your home’s internal pipe threads.
Handyman Cost
A local handyman or handyman service generally charges between $50 and $120 for a basic showerhead replacement. Handyman hourly rates average $50 to $90 per hour, often with a one-hour minimum charge.
Hiring a handyman is an economical choice if you have a bundle of small household tasks to complete during the same visit, such as fixing a loose cabinet door or replacing light fixtures.
Does Home Depot Install Showerheads?
Home Depot does not employ in-house associates to visit your home for standalone showerhead swaps. Instead, Home Depot connects homeowners with pre-screened, independent local contractors through its Pro Referral network.
Through the Pro Referral program, independent local pros set their own rates, which generally range between $75 and $150 for a standard showerhead replacement. You can request a quote online or at the service desk, evaluate local pros, and pay the independent contractor directly for the installation.
Cost Comparison Table
This breakdown compares expenses, typical timeframes, and what is included across each service option:
| Service Option | Total Cost Range (Labor + Materials) | Typical Time | What Is Included |
| DIY Installation | $17 – $175 | 10 – 20 mins | Basic swap, self-provided tools and cleanup |
| Handyman | $65 – $220 | 15 – 30 mins | Basic installation, minor thread cleaning, work guarantee |
| Licensed Plumber | $100 – $350 | 15 – 30 mins | Pipe inspection, leak testing, full warranty, professional licensing |
What Can Raise the Price?
Certain unforeseen complications during installation can increase your final bill:
FUSED OR STUCK FIXTURES: Severe mineral buildup or rust that requires penetrating oils, heat, or pipe extraction adds extra labor time.
SHOWER ARM REPLACEMENT: Replacing a cracked, stripped, or rusted shower arm pipe adds $30 to $100 in extra labor and parts.
HIDDEN IN-WALL LEAKS: Discovering leaking drop-ear elbows or damaged supply lines behind the wall requires professional pipe repairs, raising costs to $250–$600+.
AFTER-HOURS OR EMERGENCY SERVICE: Scheduling an emergency plumber on weekends, holidays, or late nights incurs trip fees of $150 to $300+ before work begins.
If you encounter rusted threads or prefer a professional touch, request a plumbing quote to receive an upfront cost estimate for your bathroom upgrade.
Common Mistakes and Pro Tips
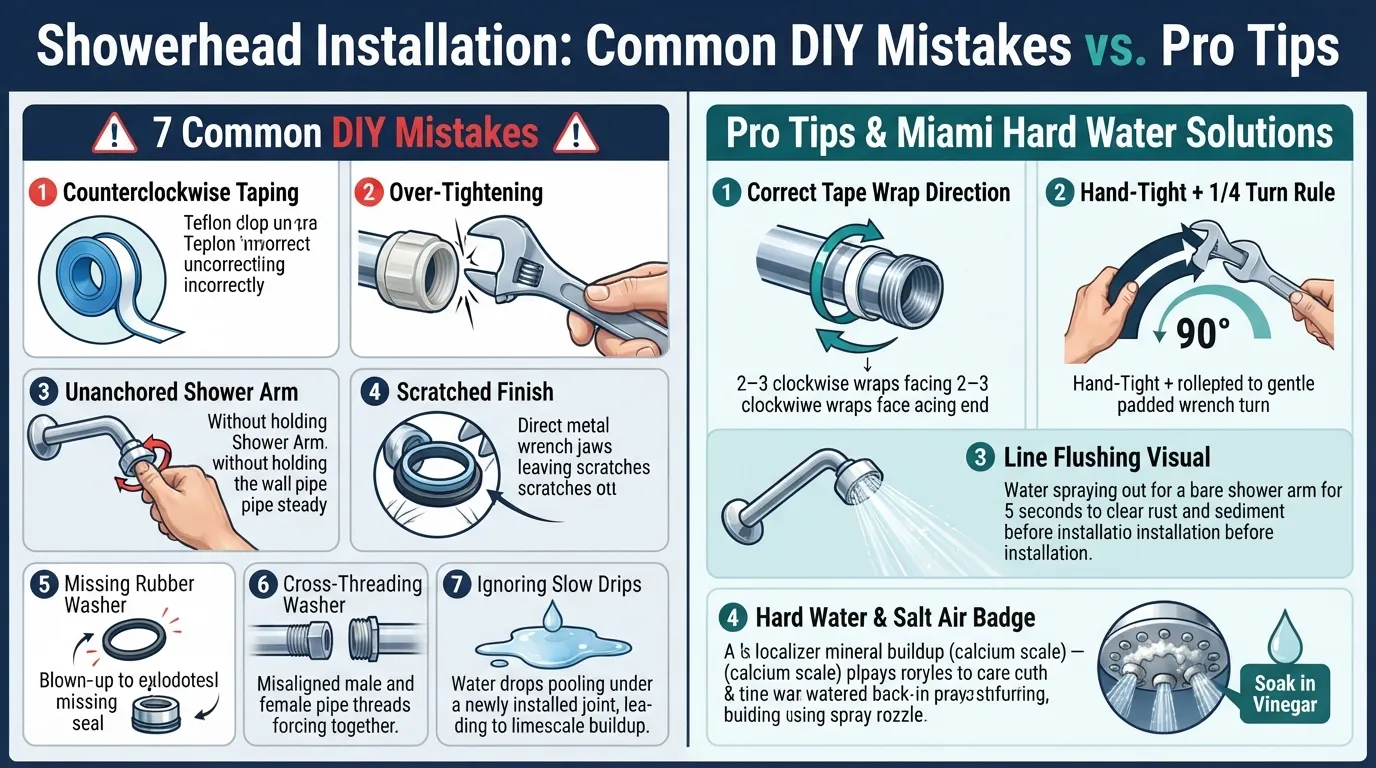
Installing a showerhead is straightforward, but avoiding minor errors ensures a clean, long-lasting installation. Drawing on years of field experience, our team has gathered the most common mistakes homeowners make and practical ways to avoid them.
7 Mistakes People Make When Replacing a Showerhead
Avoid these frequent DIY pitfalls to prevent frustrating leaks and broken plumbing components:
Wrapping Tape the Wrong Way: Winding plumber’s tape counterclockwise causes it to unspool and bunch up as you screw on the new head. Always wrap clockwise.
Over-Tightening the Connection: Cranking down with a heavy wrench can crack inner plastic threads, crush rubber washers, or strip the metal shower arm.
Not Holding the Arm Steady: Turning a stubborn showerhead without anchoring the wall pipe can twist or snap the fitting hidden inside your wall.
Scratching the Decorative Finish: Applying raw metal pliers directly to chrome, matte black, or brushed nickel gouges the protective finish. Always cushion tool jaws with a rag or electrical tape.
Forgetting or Misaligning the Washer: Leaving out the internal rubber O-ring or allowing it to sit crooked inside the collar will cause immediate leaking.
Mixing Incompatible Parts: Forcing metric or specialized fittings onto standard 1/2-inch NPT pipe threads damages the threads beyond repair.
Ignoring a Slow Drip: Leaving a tiny drip unchecked allows mineral buildup to fuse the new fixture to the arm over time.
Pro Tips From Our Plumbers
Our field technicians rely on a few simple guidelines to ensure a clean, professional finish every time:
Use a Quality Tape: Standard thin white Teflon tape works, but thicker pink (plumber’s density) or gray nickel tape creates a cleaner, more resilient seal with fewer wraps.
Hand-Tight Plus a Quarter-Turn: Thread the showerhead on as far as you can by hand, then use a padded wrench for just a 90-degree turn. This creates a secure seal without over-stressing the threads.
Flush the Line Before Mounting: Before threading on your new showerhead, turn the shower handle on for 5 seconds to blow out any loose rust, sediment, or old tape fragments from the pipe.
What We See in Miami Homes
Working across South Florida, our team regularly addresses specific environmental challenges unique to local plumbing systems:
Biscayne Aquifer Hard Water: Water across Miami ranges from 8 to 12 Grains Per Gallon (GPG), placing it firmly in the “Hard to Very Hard” category. Calcium and magnesium deposits build up inside showerhead nozzles rapidly, causing erratic spray patterns and premature clogging.
Humid Coastal Air Corrosion: High ambient humidity paired with coastal salt air accelerates surface oxidation on exposed shower arm threads. This causes metal fixtures to seize and bond together much faster than in drier climates.
Tested by Our Team: Regular maintenance goes a long way in South Florida. Soaking your showerhead in a bag of warm white vinegar for 45 minutes every few months dissolves hard water scale and keeps water pressure at its peak without damaging the internal seals.
Troubleshooting After Installing a New Showerhead
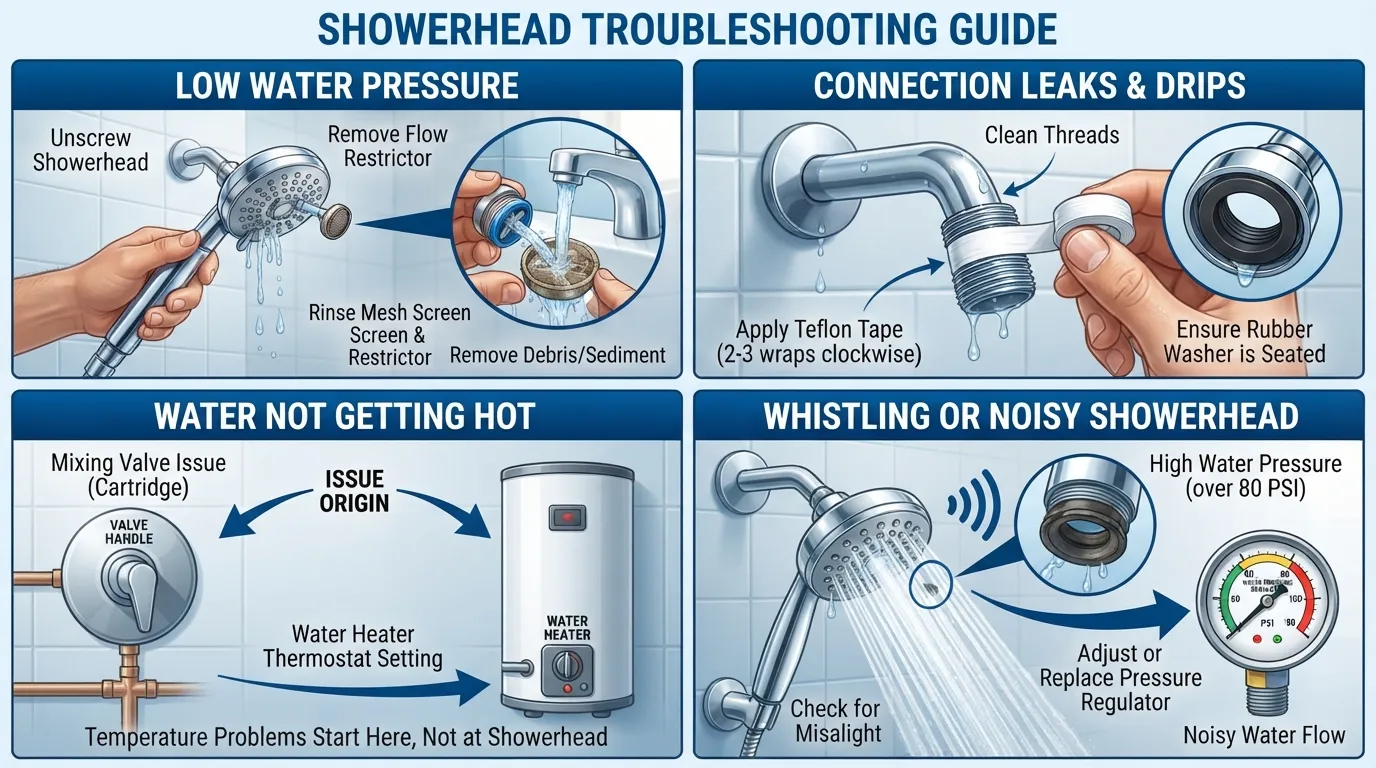
Installing a new showerhead usually results in instant improvement, but minor performance issues can occasionally crop up right after setup. Understanding how to diagnose post-installation problems saves time and keeps your shower running at peak performance.
Low Water Pressure After Replacing the Showerhead
If your new showerhead delivers a surprisingly weak stream of water, the issue is almost always tied to internal restrictions rather than your home’s main plumbing:
Flow Restrictor Disk: Federal regulations mandate a flow cap of 2.5 GPM (or 2.0 GPM for WaterSense units). Modern showerheads use a small plastic mesh disk inside the swivel connection to restrict flow, which can feel too weak in homes with lower baseline water pressure.
Clogged Mesh Screen: Debris, pipe scale, or loose pieces of old Teflon tape dislodged during installation can flow down the pipe and clog the small wire filter screen located behind the showerhead washer.
Incompletely Opened Valve: Ensure your main shower handle is turned all the way to its maximum open position.
Shower Spray Is Uneven or Sputtering
A spray pattern that shoots sideways, spurts erratically, or chatters usually points to air pockets or minor blockages inside the showerhead housing:
Trapped Air: New showerheads and empty flexible hose lines often trap air. Turn the shower on to full hot for 60 seconds to purge trapped air from the lines completely.
Factory Manufacturing Residue: Small bits of plastic flash or molding dust from the factory can block individual rubber nozzles. Rub your thumb firmly across the flexible silicone spray tips while water is running to clear the jets.
Mineral Sediment Flushes: If you did not flush the shower arm pipe before attaching the new head, rust flakes from the pipe threads may be blocking internal spray channels.
Water Is Not Getting Hot Enough
If your shower water remains lukewarm despite installing a new showerhead, the issue lies further upstream in your heating infrastructure:
Faulty Mixing Valve: The pressure-balancing cartridge inside your shower wall handle may be worn out or incorrectly set, limiting the ratio of hot water entering the mix.
Water Heater Failure: If lukewarm water affects multiple fixtures across your home, the problem stems directly from your water heater’s heating elements, thermostat, or dip tube.
Diagnostic Note: A showerhead is simply a terminal fixture—it cannot reduce water temperature on its own. If you experienced poor heating prior to changing the fixture or notice reduced hot water capacity across your bathroom, explore dedicated water heater services to inspect your tank or tankless heating system.
Whistling or Noisy Showerhead
High-pitched whistling, humming, or buzzing sounds coming from a newly installed showerhead indicate high water velocity passing through restricted internal passages:
Excess Water Pressure: If your home’s water pressure exceeds 80 psi, high velocity forcing water through tiny spray nozzles generates a whistling vibration. Installing a pressure-reducing valve (PRV) on your main water line resolves this issue home-wide.
Misaligned Rubber Washer: An internal rubber gasket that has slipped out of place can vibrate like a reed under water pressure, creating a loud humming sound. Unscrew the unit and verify that the rubber washer sits completely flat inside the collar.
Frequently Asked Questions
Do you have to shut the water off to change a shower head?
No, you do not need to shut off your main water supply. The shower handle acts as a shut-off valve that stops water downstream, so keeping the handle in the “off” position is sufficient unless the valve itself is leaking.
Do I need a plumber to replace a shower head?
In most cases, you do not need a plumber to replace a standard showerhead. It is a beginner-friendly DIY task that can be completed in under 20 minutes using basic tools like an adjustable wrench and thread seal tape.
Can I replace my shower head with any shower head?
Yes, almost all residential showerheads in North America use a standardized 1/2-inch NPT thread size. This universal fitting allows you to replace your old unit with a fixed, handheld, or combo showerhead without needing special adapters.
Can I replace a shower head myself?
Yes, replacing a showerhead is a simple home improvement project that requires no prior plumbing experience. All you need to do is unscrew the old fixture counterclockwise, clean the pipe threads, apply Teflon tape, and thread on the new showerhead.
How much will a plumber charge to change a shower head?
A licensed plumber typically charges between $75 and $250 for labor to replace a showerhead. This fee usually covers their minimum service call charge and includes pipe inspection, proper thread sealing, and leak testing.
How expensive is it to replace a shower head?
Replacing a showerhead ranges from $17 to $175 for a DIY installation, depending on the price of the new unit and minor supplies. If you hire a professional handyman or plumber, total costs generally range between $65 and $350.
How much should you pay for a shower head?
A basic, functional showerhead costs between $15 and $30. Mid-range units offering multiple spray settings or handheld options cost between $30 and $80, while premium rain showerheads and luxury dual-head systems cost $80 to $200+.
Will Home Depot install a shower head?
Home Depot does not offer direct in-house installation services for showerheads, but they connect customers with licensed local contractors through their Pro Referral network. These independent pros charge around $75 to $150 for installation.
How do I install a new shower head if the old one is fused onto the pipe?
To remove a fused showerhead, wrap a rag soaked in white vinegar around the corroded connection for 30 to 60 minutes to dissolve mineral scale. Apply steady wrench pressure counterclockwise while firmly stabilizing the shower arm with your opposite hand.
Can I change a shower head without a wrench?
Yes, you can often change a showerhead by hand if the connection is not over-tightened or corroded. Wearing rubber dishwashing gloves or wrapping a textured rubber pad around the collar provides the necessary grip and leverage to spin the fixture loose.
Final Thoughts: Replace Your Showerhead With Confidence
Upgrading your showerhead is one of the most cost-effective ways to improve daily comfort, optimize water efficiency, and update your bathroom’s style.
Remove: Hold the shower arm steady and unscrew the old head counterclockwise.
Clean: Scrape away old tape, rust, and scale from the exposed pipe threads.
Tape: Wrap thread seal tape clockwise around the threads 2 to 3 times.
Install: Screw on the new showerhead by hand until snug, then give it a gentle quarter-turn with a padded wrench.
Test: Turn on the shower slowly and inspect all joints for leaks or drips.
Need Help With a Stuck Showerhead or a Leaking Shower?
If your existing fixture is permanently fused, your shower arm rotates loosely inside the wall, or you discover a hidden leak behind your tile, skip the frustration and let a professional handle it safely.
Our licensed, local Miami plumbing technicians provide fast response times, upfront pricing, and fully insured service to protect your home’s plumbing infrastructure. You can also explore our full plumbing services for complete bathroom upgrades and pipe repairs.
Main Services
Related Posts
Need a Plumber in Miami?
Schedule service online or speak directly with the EZ Plumbing team.
Owner-Led Local Service
Know who is behind the business before you request service. The owners, contact line and Miami service pages are published clearly.
- Named business owners
- Direct phone and social channels
- Local Miami service information
Clear Help Before You Book
Review the relevant service page, contact the team directly and use the booking page when you are ready—without relying on vague claims.
- Service-specific information
- Direct questions before scheduling
- Clear online booking route