
7 Essential Fall Plumbing Tips to Prepare for Cold Weather in South Florida
Essential Fall Plumbing Preparation Guide for South Florida Homes
Preparing South Florida plumbing for an unexpected winter cold snap requires proactive measures, as regional homes are often uniquely vulnerable to sudden drops in temperature. While freezing weather is rare, uninsulated pipes, exposed outdoor spigots, and neglected water heaters can sustain severe damage when temperatures plummet overnight.
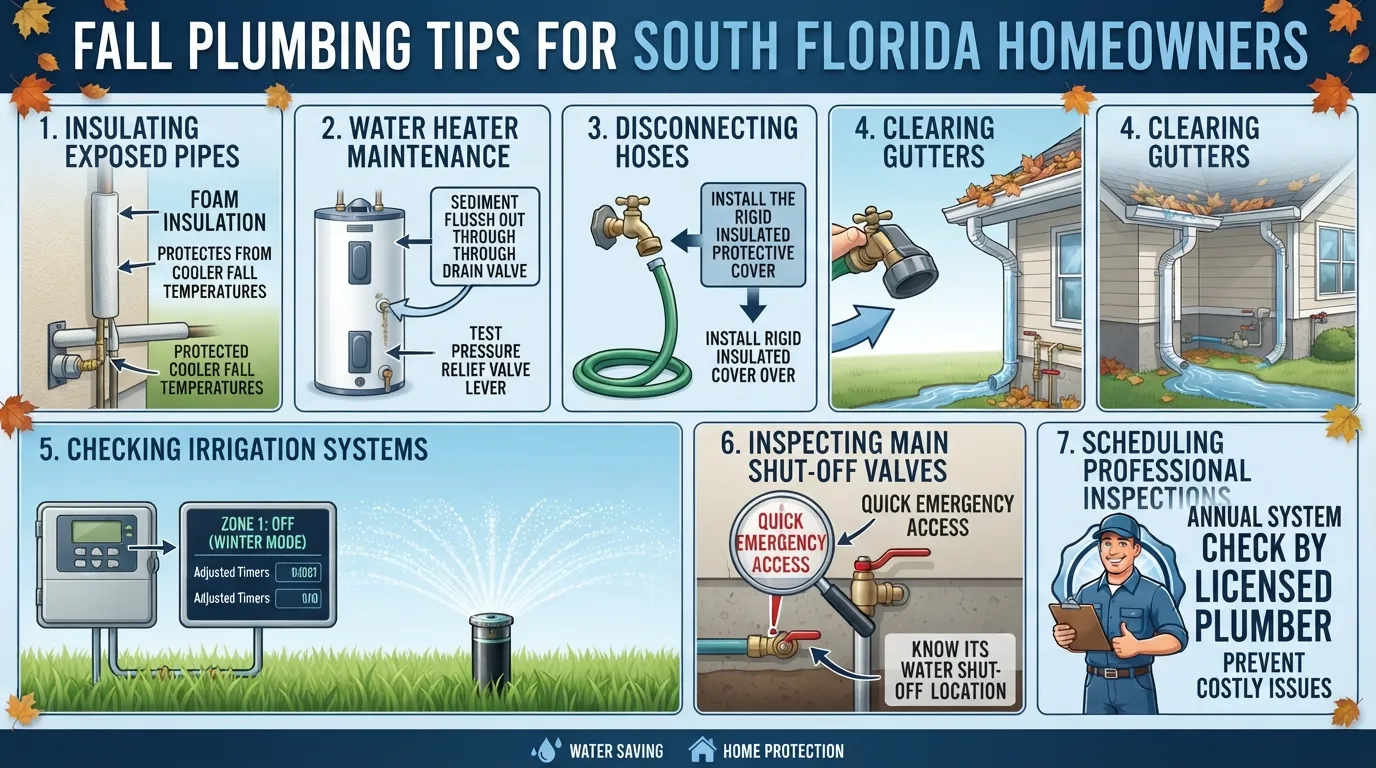
7 Essential Fall Plumbing Tips for South Florida Homes
1. Disconnect and Drain Hoses: Remove all garden hoses from outdoor spigots to prevent trapped water from freezing and backing up into the supply line.
2. Insulate Exposed Outdoor Pipes: Wrap exterior pipes, backflow preventers, and hose bibbs with specialized foam insulation sleeves or heavy-duty tape.
3. Seal Crawl Spaces and Vents: Close foundation vents and seal drafts around crawl spaces to keep freezing wind away from vulnerable interior plumbing lines.
4. Locate and Test Your Main Shut-off Valve: Ensure your main water shut-off valve is fully functional and clearly labeled so you can act quickly in a burst pipe emergency.
5. Service Your Water Heater: Flush sediment buildup from your water heater tank ahead of high-demand winter months to maintain peak efficiency.
6. Protect Indoor Pipes on Exterior Walls: Open kitchen and bathroom cabinet doors during severe freezes to allow warm indoor air to circulate around vulnerable pipes.
7. Schedule a Professional Plumbing Inspection: Have a licensed plumber evaluate your system for hidden vulnerabilities, leaks, and insulation gaps before severe cold weather hits.
When Should You Start Your Fall Plumbing Prep?
Timing is everything when protecting your plumbing system against unexpected temperature drops. Knowing exactly when and why to execute preventive plumbing maintenance ensures your home remains resilient before an overnight freeze catches you off guard.
Why Fall Is the Right Time
Proactive maintenance should begin well before the first cold snap hits your region. Summer rain and storm season frequently leave behind hidden stress, minor leaks, and soil shifts that compromise outdoor fixtures.
Post-Storm Recovery: Inspecting your system after hurricane season allows you to catch foundation settling or damaged seals before winter arrives.
Material Longevity: Addressing wear and tear during mild autumn weather prevents minor issues from becoming costly emergencies under thermal stress.
Contractor Availability: Scheduling checks early avoids the rush of emergency calls that flood local plumbers the moment a sudden freeze hits.
Do Florida Homes Really Need Cold-Weather Plumbing Prep?
South Florida homeowners frequently assume freezing temperatures are a non-issue, but sudden cold fronts regularly catch local properties off guard. Because regional construction prioritizes cooling over heat retention, plumbing infrastructure faces unique structural vulnerabilities.
Uninsulated Vulnerabilities: Pipes in attics, garages, and exterior walls are rarely insulated against sub-freezing winds because builders do not anticipate prolonged deep freezes.
Rapid Thermal Shock: When temperatures plummet overnight, unacclimated materials expand and contract rapidly, leading to sudden joint failures and structural cracks.
The Element of Surprise: A single night of sub-freezing temperatures is all it takes to rupture unprotected exterior spigots and uninsulated supply lines.
A Simple Fall Timeline
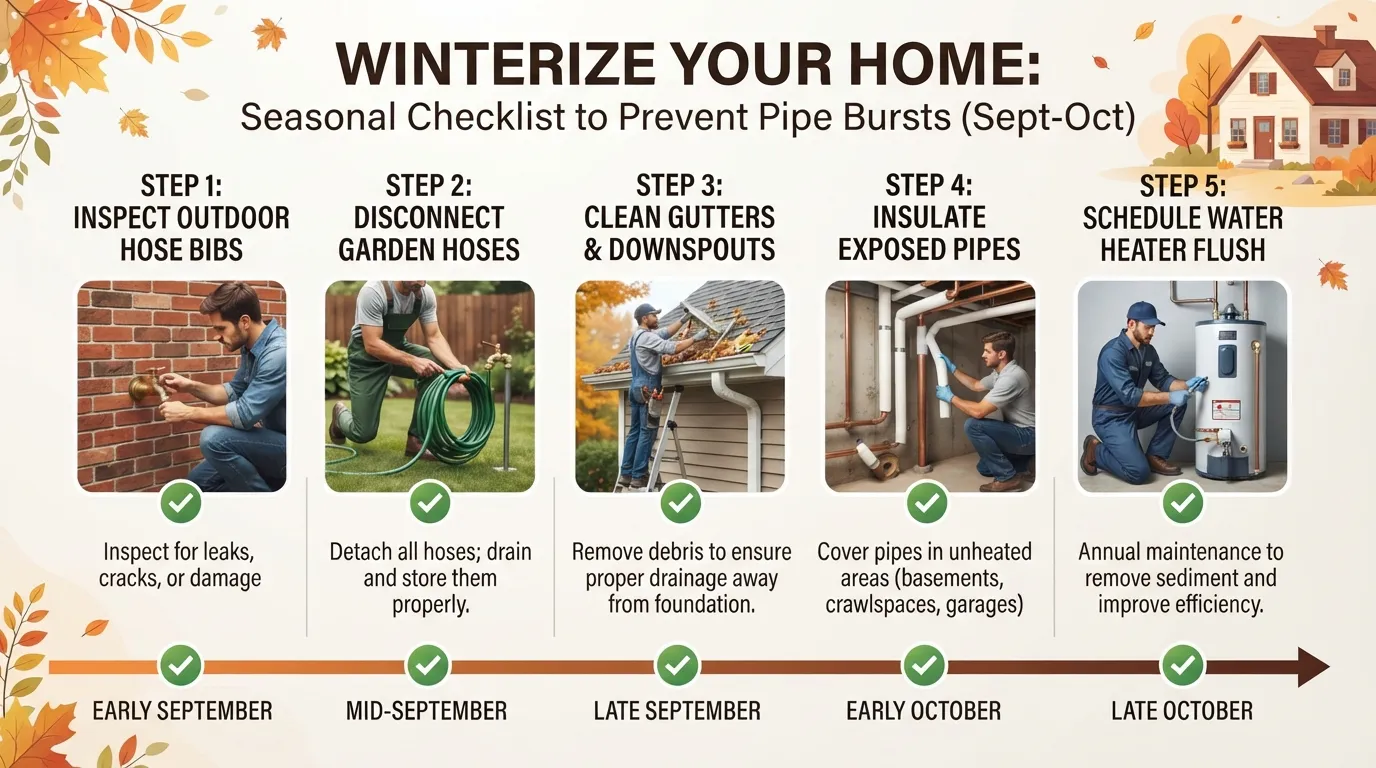
Spreading your preparations across the autumn months ensures nothing gets overlooked when temperatures begin to drop. Following a structured schedule makes seasonal maintenance manageable and stress-free.
Early Fall: Flush your water heater, check for active leaks, and disconnect garden hoses as summer weather winds down.
Mid-Fall: Insulate exposed outdoor pipes, service backflow preventers, and seal any drafts around crawl spaces or exterior vents.
Before a Forecast Cold Night: Test your main water shut-off valve, prepare interior cabinet doors for airflow circulation, and monitor local weather alerts closely.
Disconnect Hoses and Shut Off Outdoor Spigots
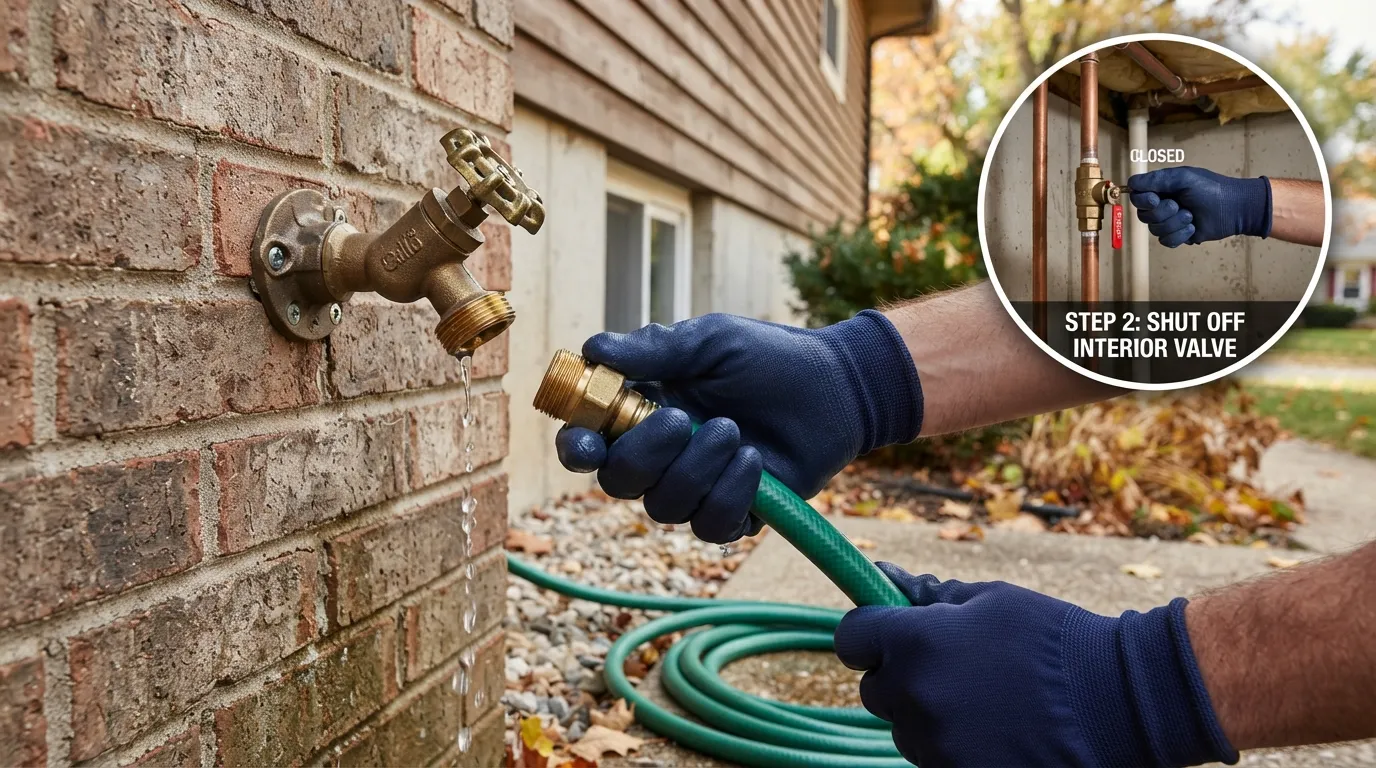
Prevent catastrophic pipe bursts during a cold snap by disconnecting your garden hoses, shutting off the dedicated indoor supply valve, and draining all residual water from the outdoor spigot.
Step by Step: Disconnect, Drain, Close the Interior Valve, Open the Outside Faucet
1. Disconnect the Garden Hose: Unscrew all attached hoses from your outdoor hose bibbs to ensure water cannot remain trapped inside the line. Verification: Inspect the spigot nozzle to confirm it is completely free of hose attachments and adapters.
2. Locate the Interior Supply Valve: Find the shut-off valve located along the interior water supply line (typically in the garage, crawl space, or utility room) that feeds that specific outdoor spigot. Verification: Turn the valve clockwise until it is fully closed.
3. Open the Outdoor Faucet: Twist the outdoor spigot handle completely open to let any remaining water drain out completely. Verification: Observe the spout until water stops dripping entirely.
4. Drain and Store Hoses: Coil your garden hoses neatly and store them in a garage or shed to protect them from cracking in freezing temperatures. Verification: Check that no water flows out when the hose is lifted or coiled.
Why Trapped Water Cracks Pipes
Plumbers frequently see frozen pipe damage because homeowners leave garden hoses attached when temperatures drop. When water freezes, it expands by approximately 9%, creating immense hydraulic pressure. If a hose is connected, that frozen block forces pressure back through the outdoor spigot and into the rigid copper or PEX supply lines inside your walls, causing them to rupture.
DIY or Call a Plumber?
Many modern South Florida homes lack a dedicated indoor shut-off valve for exterior hose bibbs, leaving the primary line exposed to sudden cold snaps. If your home does not feature an interior shut-off valve or if your spigot is already leaking, contact a professional plumber through our main services page to install a frost-free sillcock or an isolation valve before freezing weather arrives.
Insulate Exposed Pipes
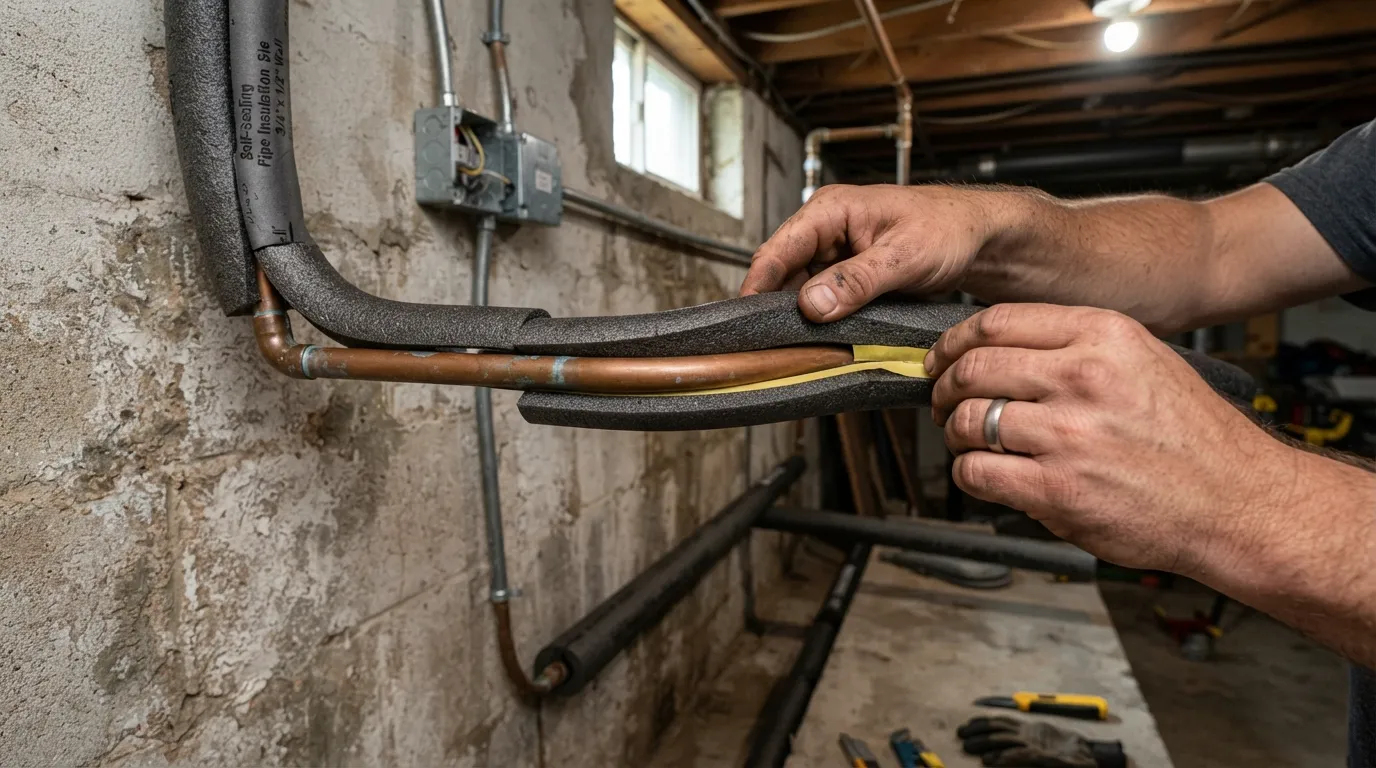
Protect your home from unexpected freeze damage by wrapping vulnerable water lines in foam pipe sleeves or heat tape, focusing specifically on unconditioned spaces like attics, garages, and exterior walls.
Which Pipes Are Most at Risk
Professional plumbers frequently discover that regional homes lack adequate pipe protection in specific structural zones. Because southern construction emphasizes cooling efficiency, heating elements are often omitted from unconditioned utility areas.
Attic Supply Lines: Main water feeds routed through unconditioned attic spaces are directly exposed to frigid drafts penetrating the roof deck.
Garage Plumbing: Exposed utility sinks, washing machine hookups, and supply runs in unheated garages take the brunt of sudden cold air surges.
Exterior Walls: Pipes running through outer wall cavities often lack sufficient insulation behind drywall to block freezing outdoor temperatures.
Outdoor Lines: Above-ground backflow preventers, irrigation valves, and exposed hose bibbs are prime targets for overnight frost damage.
Foam Sleeves vs Heat Tape: Which to Use and When
Choosing the right insulating material depends on the location of the pipe, its proximity to electrical sources, and the severity of the expected cold snap. Using the appropriate product guarantees reliable thermal protection.
Foam Pipe Sleeves: These pre-slit tubular insulators are ideal for easily accessible straight runs in attics or garages. Best Use: Standard indoor or sheltered outdoor pipes where mild-to-moderate freezing temperatures occur.
Electric Heat Tape: This self-regulating heating cable wraps around pipes to actively supply warmth during extreme weather drops. Best Use: Severely exposed outdoor lines or pipes located in unheated crawl spaces that experience frequent freezing conditions.
Common Insulation Mistakes
Incorrectly applying insulation can leave small gaps that allow freezing air to reach the pipe wall and cause sudden bursts. Avoiding these installation errors ensures true peace of mind.
Leaving Gaps at Joints: Failing to overlap or tape sleeve junctions leaves elbows and T-fittings completely exposed to cold drafts.
Compressing the Material: Squeezing foam sleeves too tightly into tight spaces reduces their R-value and compromises their ability to trap heat.
Ignoring Valve Bodies: Wrapping only the straight pipe lengths while leaving backflow preventers or shut-off valves unprotected invites localized freezing.
Seal Drafts Near Pipes
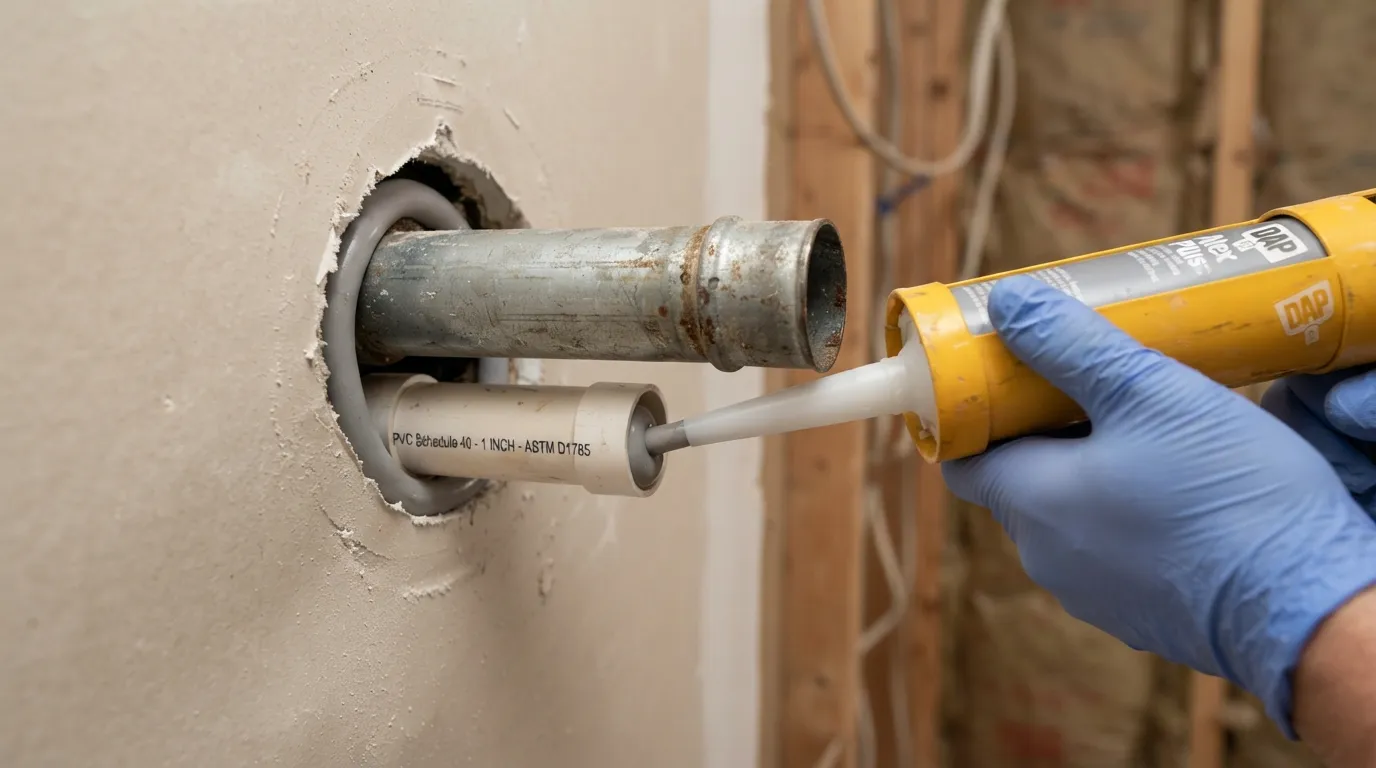
Block sub-freezing winds and stop cold air from penetrating your living areas by sealing pipe penetrations, gaps around exterior walls, and vulnerable entry points with high-grade caulk and weatherstripping.
Where Cold Air Sneaks In
Cold drafts can quietly infiltrate your home through tiny structural gaps, driving down ambient temperatures around hidden water supply lines. Identifying these weak points is critical to stopping freeze-ups before they start.
Pipe Penetrations: Holes drilled through exterior walls for plumbing supply lines, drain pipes, and hose bibbs frequently leave open air gaps.
Exterior Wall Gaps: Cracks in siding, brickwork, or foundation interfaces allow freezing wind to blow directly into interior wall cavities.
Doors and Windows: Loose seals around exterior doors and window frames create convection currents that chill adjacent baseboards and lower cabinets.
Vents and Soffits: Unsealed attic access panels, dryer vents, and crawl space openings let cold outside air circulate freely near overhead or sub-floor plumbing lines.
Caulk or Weatherstripping: Which Fits Which Gap
Choosing the correct sealing material ensures a permanent, airtight barrier against cold outdoor drafts. Applying the right product to each specific gap maximizes your home’s thermal defense.
Silicone or Polyurethane Caulk: Ideal for sealing small, stationary gaps around pipe penetrations, exterior wall joints, and trim edges. Verification: Inspect the dried bead to ensure it completely fills the gap without any pinholes or shrinkage gaps.
Heavy-Duty Weatherstripping: Best suited for movable junctions like exterior doors, operable windows, and attic access hatches. Verification: Close the door or window and check that you feel no moving air or draft along the perimeter seals.
Service Your Water Heater Before Winter Demand
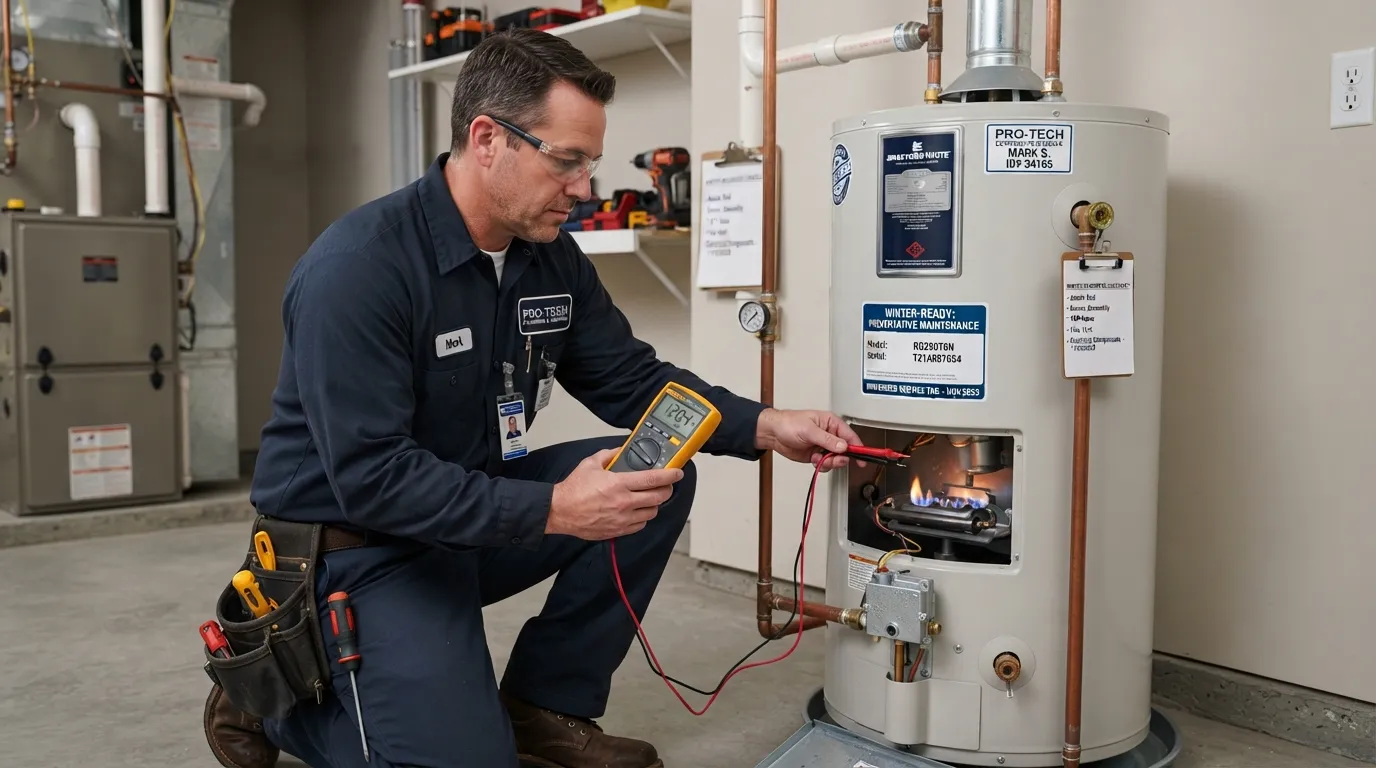
Maintain your water heater’s efficiency and prevent unexpected breakdowns during the winter months by flushing accumulated sediment from the tank and scheduling routine safety checks before peak hot-water demand begins.
Why Water Heaters Work Harder in Cooler Months
As incoming groundwater temperatures drop during autumn and winter, your water heater has to burn significantly more energy to raise that colder water up to your desired hot-water setting. This extra workload puts older or poorly maintained components under intense thermal stress, making seasonal preparation critical for uninterrupted hot water.
Flushing Sediment: What It Is and What It Does
Over time, minerals present in your water supply settle to the bottom of the water heater tank and harden into a dense layer of sediment.
The Heating Barrier: This sediment layer acts as a physical barrier between the burner elements and the water, forcing the system to run longer cycles and driving up your utility bills.
Tank Damage: Trapped heat beneath the sediment layer can overheat the steel tank bottom, causing premature metal fatigue, leaking, or tank failure.
The Flushing Process: Draining and flushing the tank clears out these mineral deposits, restoring full heat transfer efficiency and extending the overall lifespan of the unit.
Signs Your Water Heater Needs a Professional Check
Recognizing early warning signs helps you avoid a complete system failure right when hot water is needed most. If you notice any of these indicators, professional intervention is necessary.
Inconsistent Water Temperatures: Water that runs lukewarm quickly or fluctuates unpredictably often signals failing heating elements or heavy internal buildup.
Strange Rumbling or Banging Noises: Deep popping or rumbling sounds coming from the tank indicate trapped water boiling beneath thick sediment layers.
Discolored or Rusty Water: Brownish water suggests internal corrosion of the anode rod or tank lining, which requires immediate evaluation through a professional plumbing and water heater service page.
Check for Hidden Leaks Indoors
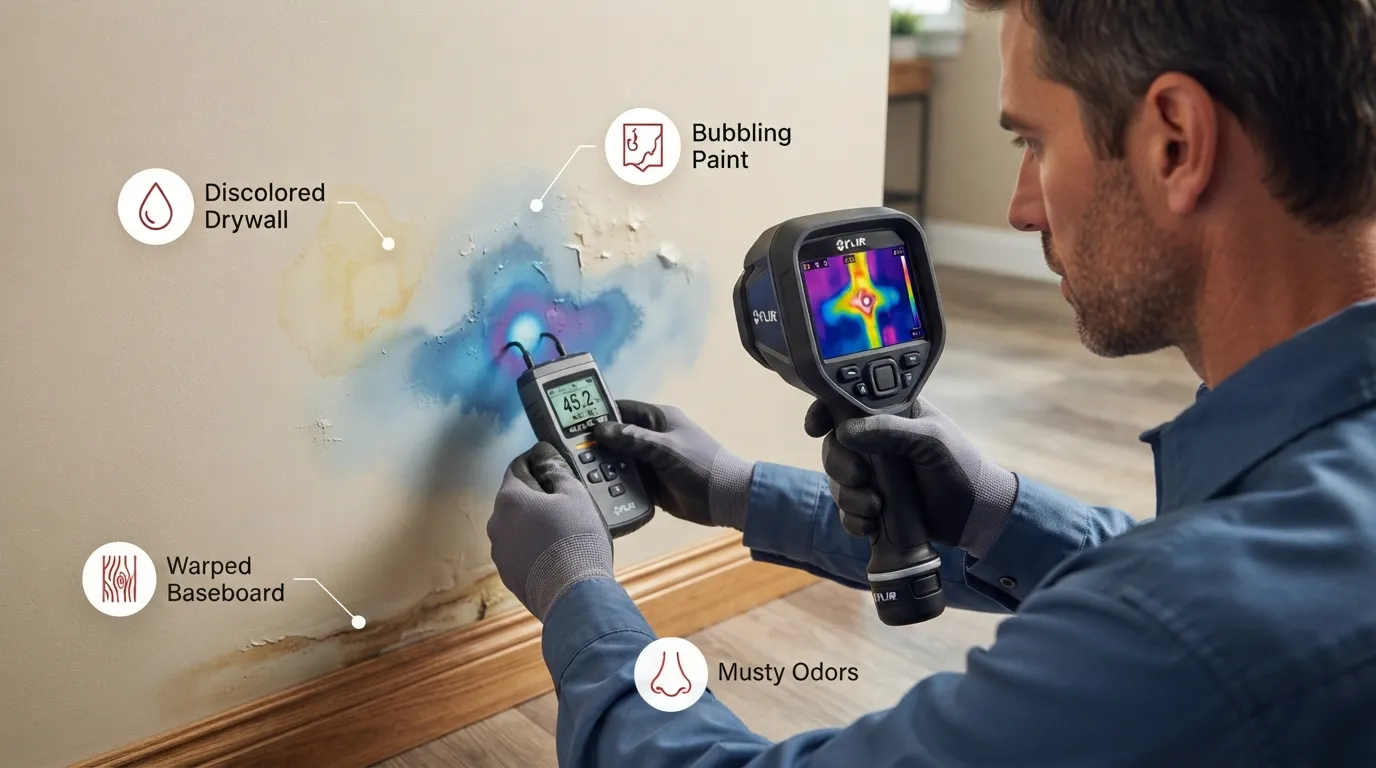
Prevent minor moisture issues from turning into major structural failures during a winter freeze by performing a thorough 10-minute indoor leak walkthrough and testing your home’s main water meter.
A 10-Minute Leak Walkthrough
Conducting a quick, systematic inspection of your home’s most vulnerable plumbing fixtures lets you catch slow drips and hidden corrosion before sub-freezing temperatures stress your pipes.
Under Sinks: Inspect vanity and kitchen sink cabinets for dampness, warped wood, or greenish corrosion buildup around fittings and shut-off valves.
Toilets: Listen for continuous running water and check the floor base for soft spots or unexpected moisture pooling.
Washing Machine Hoses: Examine rubber or braided stainless steel supply lines for bulging, cracking, or dampness near the wall connections.
Main Supply Lines: Walk along visible basement, garage, or utility room pipe runs to spot any glistening moisture or mineral crusting.
Signs of a Leak You Cannot See
Many leaks hide behind walls, beneath slabs, or under flooring, slowly damaging your home without an obvious puddle. Watch for these subtle warning indicators.
Unexplained Water Bill Spikes: A sudden increase in your monthly water usage without a change in habits often points to a hidden underground or behind-the-wall leak.
Musty Odors and Mold Growth: Persistent damp smells or peeling paint on drywall frequently reveal slow, undetected moisture intrusion.
The Water Meter Test: Turn off all taps inside and outside the home, then check your water meter dial. If the leak indicator triangle or flow dial is spinning, you have an active hidden leak requiring expert leak detection and repair services.
When a Small Drip Needs a Professional
While some minor washer replacements or loose compression nuts are simple weekend DIY fixes, certain plumbing issues demand immediate expert attention.
Corroded Shut-Off Valves: Old gate valves that drip when turned or refuse to seal completely can snap off under pressure, causing a full indoor flood.
Behind-the-Wall Seepage: Any moisture detected on drywall or near electrical outlets requires professional diagnosis to prevent structural rot and electrical hazards.
Test Your Sump Pump or Drainage
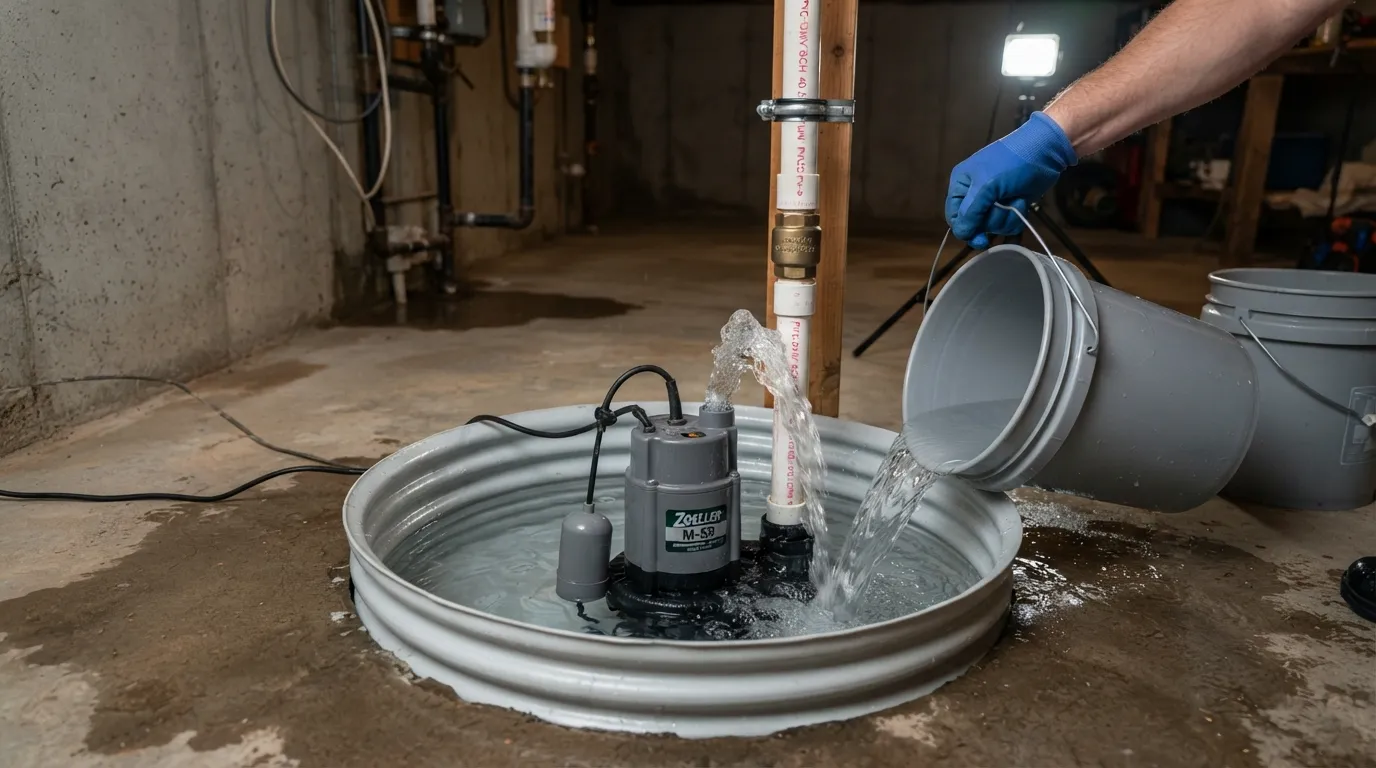
Ensure your property handles unexpected late-fall rain and rising water effectively by testing your sump pump’s mechanical float switch or clearing out outdoor surface drains and downspouts.
How to Test a Sump Pump
If your South Florida property utilizes a sump pit to manage heavy yard or subterranean water accumulation, testing the system before seasonal storms is critical. A malfunctioning pump can quickly lead to a flooded garage or crawl space.
1. Clear Debris from the Pit: Remove any leaves, dirt, or foreign objects from the sump pit chamber. Verification: Inspect the bottom of the basin to ensure the intake screen is entirely unobstructed.
2. Perform the Bucket Test: Slowly pour a 5-gallon bucket of water directly into the sump pit until the water level rises. Verification: Watch to see if the float switch triggers the pump automatically and drains the water down to a safe level.
3. Inspect the Discharge Line: Check the exterior termination point of the discharge pipe to verify water flows freely away from your foundation. Verification: Ensure the exit path is clear of mud, landscape fabric, or debris.
For comprehensive maintenance guidance, consult professional resources like a sump pump service and repair guide.
No Sump Pump? Check Outdoor Drains and Downspouts Instead
Many regional homes rely on gravity drainage rather than mechanical sump pumps, making surface-level water management essential during heavy autumn weather.
Clear Yard Catch Basins: Remove leaves, mulch, and soil buildup from surface drain grates to prevent standing water near your foundation. Verification: Pour water over the grate using a hose to confirm it drains rapidly without pooling.
Extend Downspouts: Direct roof runoff at least three to four feet away from exterior walls using splash blocks or downspout extensions. Verification: Inspect the discharge area during a light rain to ensure water flows cleanly away from the structure.
Address Stubborn Blockages: If exterior drains remain backed up or sluggish despite surface cleaning, professional intervention via professional drain cleaning services is recommended to clear underground line clogs.
Locate Your Main Shut-Off Valve and Make a Cold-Snap Plan
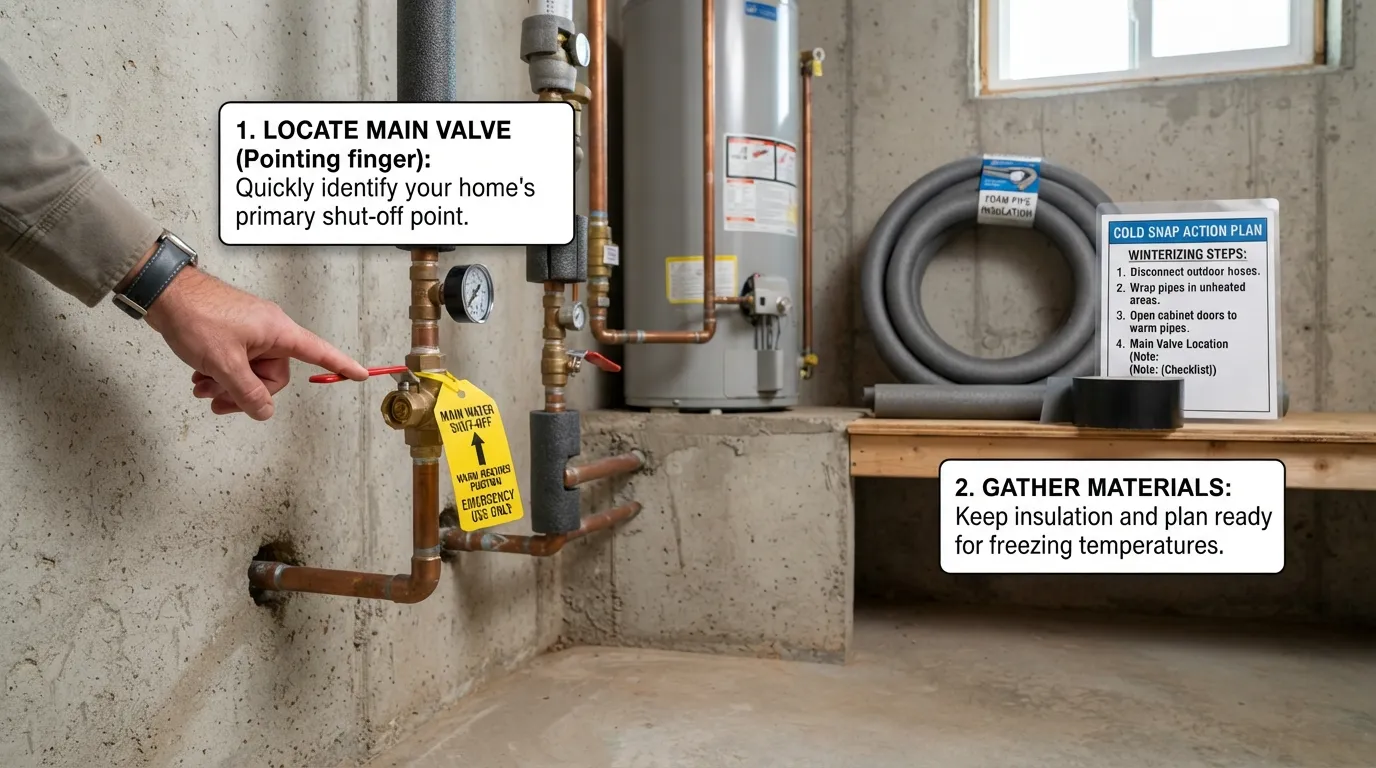
Prevent catastrophic water damage during a sudden freeze by locating your home’s main water shut-off valve ahead of time, practicing how to turn it off, and establishing a clear emergency response plan.
How to Find and Test Your Main Shut-Off Valve
In an emergency like a burst pipe, every single second counts. Knowing exactly where your main valve is located stops you from wasting precious minutes searching while water floods your home.
1. Locate the Valve: Look near the front perimeter of your house, inside the garage, near the water heater, or close to the street-side water meter inside an underground utility box. Verification: Confirm you can clearly see the valve handle without obstructions blocking your immediate physical reach.
2. Exercise the Valve: Turn the handle or lever completely clockwise to shut it off, then turn it counter-clockwise to reopen it. Verification: Turn on an indoor sink faucet to verify that the water flow stops completely when the valve is closed.
3. Clear the Access Area: Ensure the surrounding space is free of storage boxes, tools, or overgrown landscaping so anyone in the home can access it instantly. Verification: Check that the valve handle rotates smoothly with minimal effort.
What to Do in the First Minutes of a Burst Pipe
If a pipe does rupture during a severe cold snap, acting quickly minimizes structural damage and costly repairs.
Shut Off the Water Immediately: Twist the main water shut-off valve clockwise until it is completely closed to halt all water flowing into the home. Verification: Open the nearest faucet to ensure water pressure drops to zero and flow stops.
Turn Off Electricity if Needed: If leaking water is coming into contact with electrical outlets, appliances, or your breaker panel, shut off power at the main circuit breaker. Verification: Check that affected rooms or fixtures are completely unpowered.
Call a Professional Emergency Plumber: Reach out immediately to an experienced team through a reliable emergency plumbing service page to perform urgent pipe repairs before secondary water damage or mold sets in.
How Cold Is Too Cold for Your Pipes?
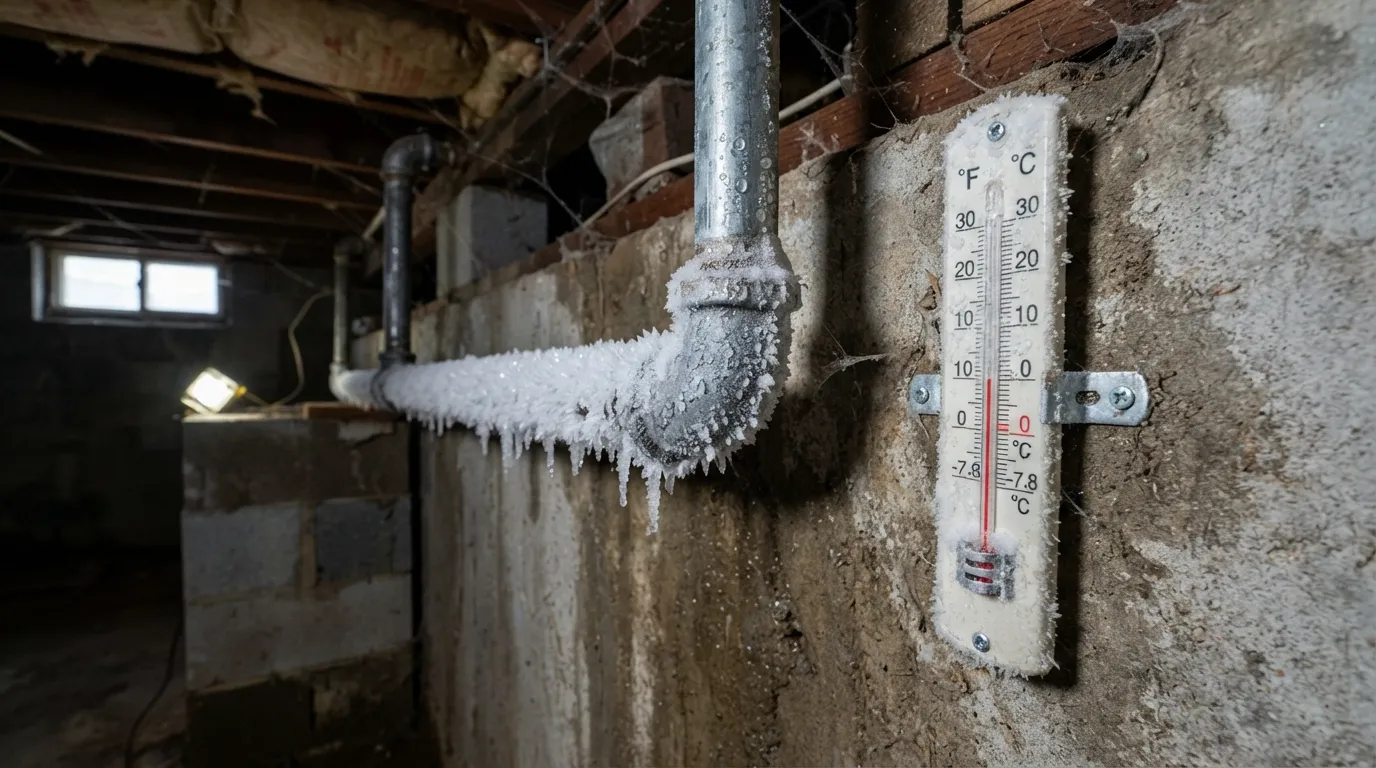
How Long Can Pipes Stay at Freezing Temperatures Before They Freeze?
Pipes do not instantly freeze the exact moment outdoor thermometers hit 32 degrees Fahrenheit. Typically, it requires a sustained period of sub-freezing weather—usually several consecutive hours or days with temperatures dropping below 20 degrees Fahrenheit (-6°C)—for water inside uninsulated or vulnerable areas to freeze solid and cause a catastrophic burst pipe.
The 32-Degree Myth: While 32 degrees Fahrenheit is the literal freezing point of water, indoor or crawlspace pipes have thermal mass and insulation protecting them.
Duration Matters: A brief overnight dip below freezing rarely causes immediate damage unless wind chills are severe.
Vulnerable Zones: Pipes located in uninsulated exterior walls, garages, and crawlspaces freeze much faster than interior lines.
For comprehensive emergency protocols, review the guidelines outlined in the American Red Cross Preventing and Thawing Frozen Pipes Guide.
At What Temperature Should You Let Faucets Drip?
You should begin letting your indoor faucets drip when local temperatures are forecasted to stay below 20 degrees Fahrenheit (-6°C) for a prolonged period. Maintaining a slight, continuous trickle relieves hydraulic pressure inside the system and prevents stationary water from reaching its freezing point.
Target Faucets: Prioritize faucets connected to supply lines running through exterior walls or unheated crawlspaces.
Flow Rate: A very small stream—about the thickness of a toothpick—is entirely sufficient to keep water moving.
Drainage: Ensure the sink drain is clear so water does not pool or overflow during extended freezing stretches.
What Is the Coldest You Should Let Your House Get?
You should never let your indoor home temperature drop below 55 degrees Fahrenheit during extreme winter weather. Keeping a steady thermostat setting both day and night ensures that ambient heat radiates into interior wall cavities where hidden supply lines run.
Constant Monitoring: Lowering the heat at night to save energy significantly increases vulnerability to frozen infrastructure.
Cabinet Circulation: Open kitchen and bathroom cabinet doors under sinks to allow warm indoor air to reach vulnerable plumbing.
Wind Chill Factor: High winds can drastically increase thermal loss on exposed pipes, making interior temperature buffers critical.
Cold-Snap Night Checklist: What to Do Before a Freeze
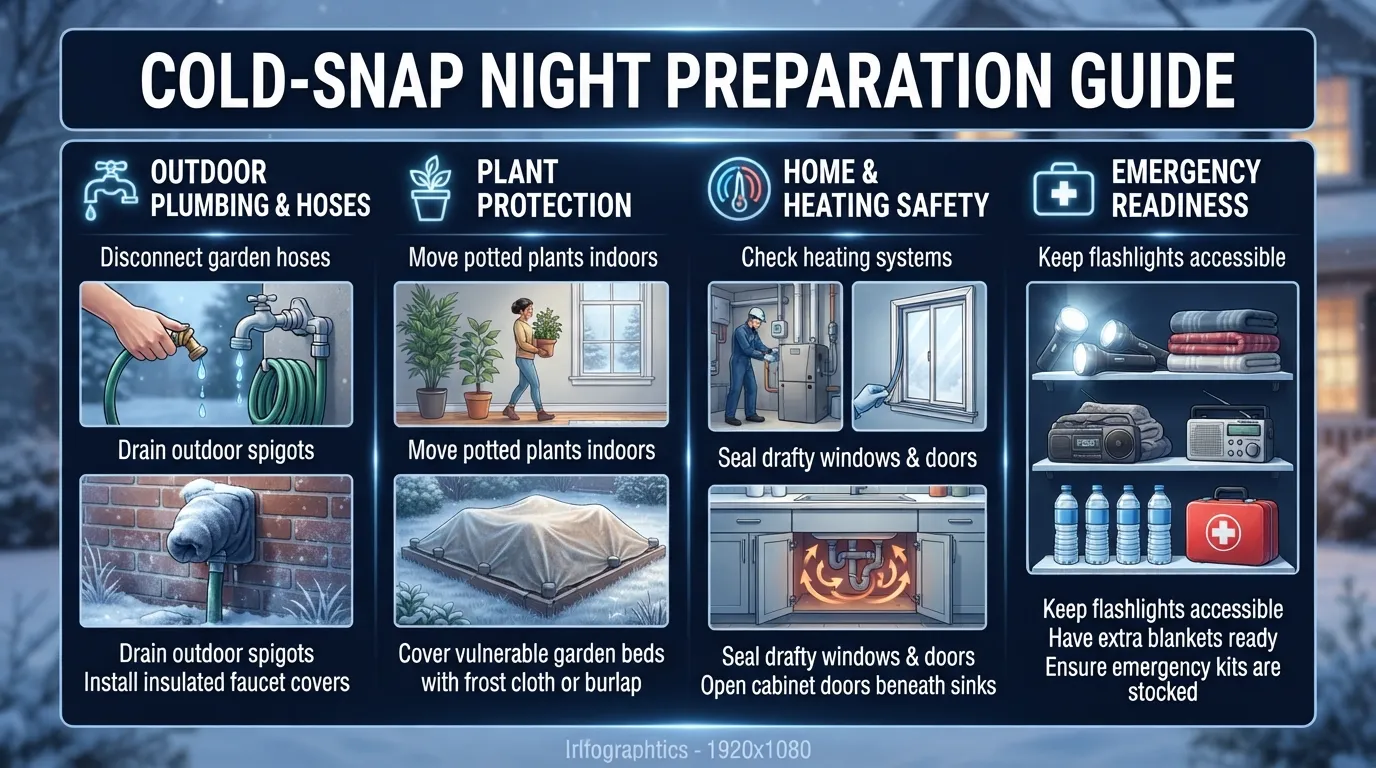
Open Cabinet Doors and Let Warm Air Reach Pipes
Open all kitchen and bathroom cabinet doors beneath sinks located along exterior walls to allow warm indoor air to circulate directly around the plumbing. This simple step prevents micro-climates inside enclosed spaces from dropping to dangerous, pipe-bursting temperatures during severe drops.
Target Zones: Focus primarily on sinks built against outer walls where insulation is typically thinner.
Remove Obstructions: Move cleaning supplies, chemicals, and bulky items away from the cabinet doors to maximize airflow.
Safety Precaution: If you have young children or pets, temporarily store harmful household chemicals out of reach before leaving doors open.
Drip Faucets and Keep the Thermostat Steady
Maintain a continuous, slow trickle from vulnerable faucets and keep your home’s thermostat set to a consistent temperature day and night. Keeping the heat steady ensures that ambient warmth permeates wall cavities, while moving water resists forming a solid freezing point plug.
Target Faucets: Run a trickle from both hot and cold handles on fixtures supplied by exposed pipes.
Thermostat Consistency: Avoid setting back your heating schedule during sub-freezing overnight hours.
Balanced Heat: Keep interior doors open throughout the home to promote uniform air distribution.
Traveling or Facing a Power Outage? Protect Your Plumbing First
If you are executing a vacation plan during a winter freeze or preparing for a potential power outage, shut off your home’s main water supply and drain the system entirely. Turning off the water prevents catastrophic indoor flooding if pipes do manage to freeze and split while you are away or lacking electricity.
Locate the Valve: Identify your main water shut-off valve beforehand so you can act quickly in an emergency.
Drain Lines: Open low-level faucets and flush toilets to drain residual water from the system after shutting off the main.
Auxiliary Heat: If staying home during an outage, use alternative space heater safety measures carefully, keeping heaters away from plumbing and combustible materials.
The 4 P’s of Cold Weather Prep
Review the essential 4 P’s framework—people, pets, plants, and pipes—to safeguard your household before severe winter weather hits. Addressing these four categories simultaneously protects vulnerable family members, living assets, and home infrastructure from cold-weather damage.
People: Dress in insulated layers, check on vulnerable neighbors, and prepare emergency indoor heating options.
Pets: Bring all outdoor animals indoors or provide heavily insulated, dry shelter with unfrozen water sources.
Plants: Cover sensitive outdoor vegetation or bring potted plants inside before temperatures plummet.
Pipes: Insulate exposed exterior lines and prepare indoor systems using your nightly freeze checklist.
Supplies to Have on Hand
Stock up on essential winter storm supplies well before a severe freeze isolates your home or knocks out local utilities. Having the right inventory ensures your household can manage minor plumbing emergencies and temporary utility outages comfortably.
Emergency Water: Store at least one gallon of drinking water per person per day for a minimum of three days.
Thawing Tools: Keep a safe hair dryer or portable heating pad accessible to gently warm minor frozen sections.
Insulation Materials: Have spare pipe wrap, duct tape, or heat tape on hand for quick emergency patches.
What to Do If a Pipe Freezes or Bursts
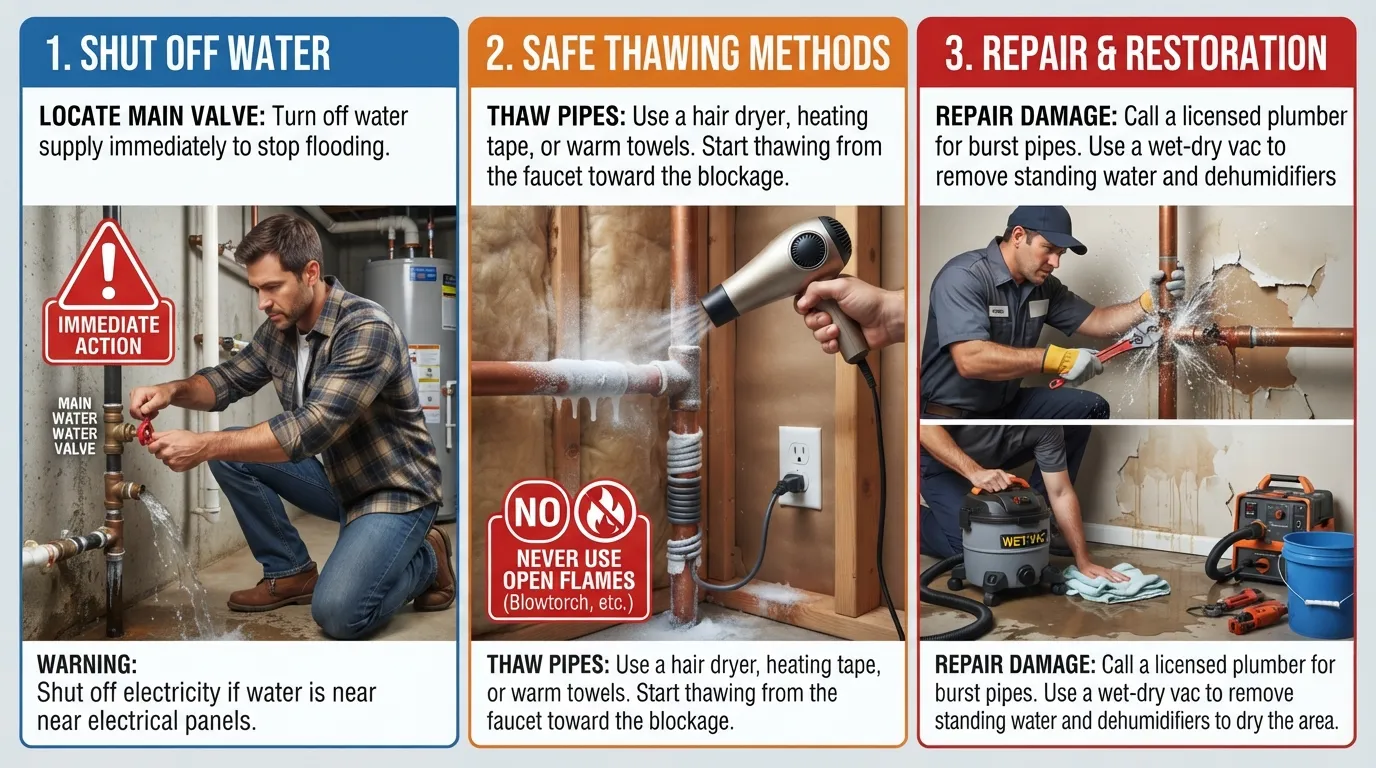
Signs a Pipe Is Frozen
Recognizing the early indicators of a frozen pipe allows you to intervene before pressure builds up and causes a catastrophic burst pipe. If left unaddressed, frozen sections quickly escalate into major water damage events throughout your home structure.
Zero Water Flow: A completely dry faucet or a mere trickle when turned on strongly indicates an ice blockage inside the supply line.
Visible Frost: Look for heavy frost or bulging frost formations on exposed pipes located in basements, crawlspaces, or exterior walls.
Strange Noises: Banging, clanking, or whistling sounds when you open a tap often signal trapped air or expanding ice within the plumbing network.
Safe Steps to Take Right Away
When you discover a frozen line, swift action can prevent structural failure. Locate your main shut-off valve immediately so you are ready to cut the water supply if the pipe begins to leak or split during the thaw process.
Locate the Main: Ensure all household members know how to operate the main water valve to stop flooding instantly.
Apply Gentle Heat: Use a hair dryer, heating pad, or warm towels wrapped around the pipe, working from the faucet toward the coldest section.
Keep the Tap Open: Leave the affected faucet open slightly to allow melted water and steam to escape as the ice thaws.
What Not to Do
Attempting fast shortcuts to warm frozen lines can easily start a structural fire or rupture fragile metal and plastic joints. Safety must remain your top priority when dealing with household utilities.
Never Use an Open Flame: Avoid blowtorches, propane torches, kerosene heaters, or charcoal grills to thaw pipes under any circumstances.
Avoid Excessive Heat: Never apply high-heat industrial tools that can warp PVC pipes or cause pressurized steam explosions inside sealed lines.
Do Not Ignore Leaks: Stop attempting DIY fixes immediately if you notice structural splitting; call a licensed emergency plumber or connect through our booking portal right away.
Are Frozen Pipes Covered by Insurance?
Navigating property damage claims requires understanding how your homeowner’s insurance policy handles cold-weather incidents. Insurance coverage for frozen or burst pipes typically depends on specific policy clauses, your deductible amount, and whether you maintained adequate heat in the structure.
Policy Review: Check your individual insurance contract or contact your agent directly to clarify winter-damage endorsements and exclusions.
Maintenance Duty: Most insurers require homeowners to take reasonable preventative steps, such as keeping the home heated during sub-freezing weather.
Documentation: Take clear photos of all impacted areas and damaged belongings before beginning any cleanup or repairs for your insurance claim.
DIY or Call a Plumber? A Quick Decision Table
Deciding whether to tackle winter preparation tasks yourself or call a licensed plumber depends on complexity, safety risks, and the presence of hidden warning signs. Use the breakdown below to guide your maintenance decisions safely and efficiently.
| Task | Safe to DIY? | Call a Plumber? | Why |
| Hoses and Spigots | Yes | If valve spins freely but leaks inside | Standard disconnect and insulated cover installation require no special tools, but faulty shut-offs demand professional replacement. |
| Pipe Insulation | Yes | If pipes are buried behind finished drywall | Foam sleeves and heat tape are designed for easy homeowner installation on exposed lines. |
| Sealing Drafts | Yes | If structural gaps compromise foundation integrity | Caulk and weatherstripping seal minor air leaks around crawlspace vents and windows effectively. |
| Water Heater Flush | Yes | If the unit is under 5 years old and well-maintained | Sediment removal is straightforward, but neglected older tanks risk valve failure and severe flooding. |
| Leak Check | Yes | If leaks are visible on surface joints | Visual inspections spot drips early, whereas damp drywall or high water bills suggest hidden underground breaks. |
| Sump Pump Test | Yes | If the unit turns on and clears water properly | Pouring a bucket of water into the pit tests basic operation; persistent electrical or motor failure requires a professional. |
| Main Shut-Off | Conditional | If the valve is stuck, corroded, or leaking | Testing the main valve is easy, but forcing a stuck or brittle old valve can cause it to snap completely. |
Frequently Asked Questions
Do Florida homes need to be winterized?
While Florida rarely experiences sustained sub-freezing northern winters, Florida homes still require cold-weather preparation during severe cold snap events, unheated vacation home vacancies, or sudden overnight freezes. Because southern construction often features thinner exterior walls, minimal insulation, and shallow utility lines running through garages or open crawlspaces, even short-duration freezes can catch homeowners off guard.
Unheated Spaces: Garages, outdoor utility closets, and screened lanais lack central heating and drop in temperature rapidly.
Vacant Properties: Unoccupied or seasonal homes left with disabled climate control are exceptionally high-risk targets for winter damage.
Proactive Measures: Disconnecting garden hoses and covering exposed backflow preventers protects vulnerable exterior fixtures during unexpected cold fronts.
Can pipes freeze if the water is turned off?
Yes, pipes can still freeze even after you shut off the main water supply if there is residual moisture trapped inside the lines. Shutting off the valve prevents active flooding and relieves pressure if a line splits, but it does not alter the ambient temperature surrounding the pipe.
Trapped Moisture: Any water remaining inside bends, traps, or low points of the plumbing network will turn to ice if exposed to sub-freezing air.
Structural Protection: Draining lines completely after shutting off the main supply eliminates this residual freezing hazard.
Continuous Heat: Maintain safe indoor heating levels or wrap vulnerable lines with heat tape to fully protect dry pipes from cracking.
What is the best way to prevent frozen or bursting pipes?
The most effective strategy for frozen pipes prevention and burst pipe prevention combines continuous heat regulation, physical insulation, and strategic water movement. Comprehensive preparation addresses both the indoor micro-climate and exposed exterior infrastructure before sub-freezing weather strikes.
Maintain Consistent Heat: Keep your thermostat set to at least 55 degrees Fahrenheit day and night during freezing weather.
Insulate Vulnerable Areas: Wrap exposed pipes in unheated basements, attics, and crawlspaces using foam sleeves or UL-listed heat tape.
Keep Water Flowing: Let vulnerable faucets drip slightly during severe temperature drops to relieve internal pressure and prevent ice blockages.
Conclusion and Book-a-Plumber CTA
Proactive cold-weather preparation and timely maintenance are the ultimate keys to protecting your home from costly winter damage. Review the essential takeaways below to keep your plumbing system secure through every freeze:
Insulate Vulnerable Lines: Wrap exposed pipes in unheated spaces with quality foam sleeves or heat tape.
Seal Air Leaks: Block drafts around crawlspace vents, windows, and doors to keep freezing air away from pipes.
Disconnect Garden Hoses: Remove and store outdoor hoses, then shut off and drain exterior spigots.
Maintain Consistent Heat: Keep your thermostat set to at least 55 degrees Fahrenheit day and night.
Open Cabinet Doors: Allow warm indoor air to reach plumbing running along exterior walls.
Drip Vulnerable Faucets: Let interior taps trickle slowly during severe overnight freezes to relieve internal pressure.
Know Your Shut-Off: Locate your main water valve so you can act instantly in an emergency.
Ready for complete peace of mind this winter? Schedule a comprehensive fall plumbing inspection today to ensure your system is fully protected against unexpected freezes.
Main Services
Related Posts
Need a Plumber in Miami?
Schedule service online or speak directly with the EZ Plumbing team.
Owner-Led Local Service
Know who is behind the business before you request service. The owners, contact line and Miami service pages are published clearly.
- Named business owners
- Direct phone and social channels
- Local Miami service information
Clear Help Before You Book
Review the relevant service page, contact the team directly and use the booking page when you are ready—without relying on vague claims.
- Service-specific information
- Direct questions before scheduling
- Clear online booking route