
Laundry Room Plumbing Tips and Maintenance: Prevent Leaks, Clogs and Water Damage
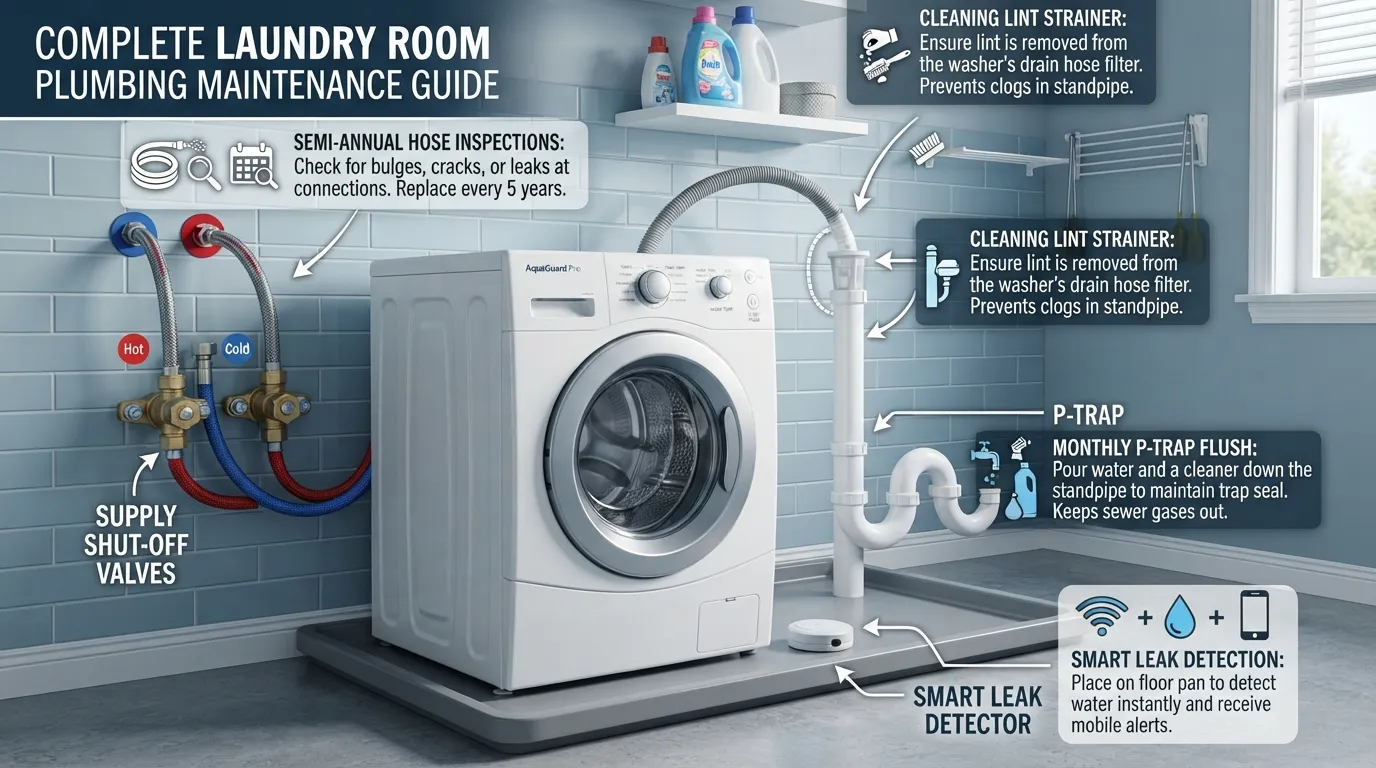
Laundry Room Plumbing Tips and Maintenance
Laundry room leaks are among the leading causes of hidden, costly residential water damage. By following this comprehensive maintenance guide, you will be able to proactively safeguard your home, extend the lifespan of your plumbing infrastructure, and prevent catastrophic appliance failures.
How Do You Maintain Laundry Room Plumbing?
Maintaining laundry room plumbing requires a proactive routine of inspecting washing machine hoses, testing shut-off valves, and managing debris buildup in standpipes and drains. By replacing standard rubber hoses with braided stainless steel lines, monitoring P-trap moisture, and installing smart leak detectors, you can completely eliminate the risk of unexpected water damage and protect your home’s structural integrity.
Inspect washing machine hoses monthly for cracks, blistering, or bulging.
Upgrade standard rubber hoses to burst-resistant braided stainless steel lines.
Test supply shut-off valves twice a year to ensure they close completely.
Use a lint strainer on discharge hoses to prevent stubborn clogs.
Never seal or obstruct the washing machine standpipe to avoid overflows.
Run water into floor drains monthly to keep P-trap seals from drying out.
Install an automatic water leak detector or smart shut-off valve near the floor.
Keep the water heater supplying the laundry at a safe 120 degrees Fahrenheit.
Who this guide is for: Homeowners, property managers, renters, and condo owners looking to protect their property from unexpected appliance leaks.
Reviewed and verified by licensed master plumbers with over 15 years of residential plumbing and property maintenance experience. Last updated: October 2026.
The Water Supply Side
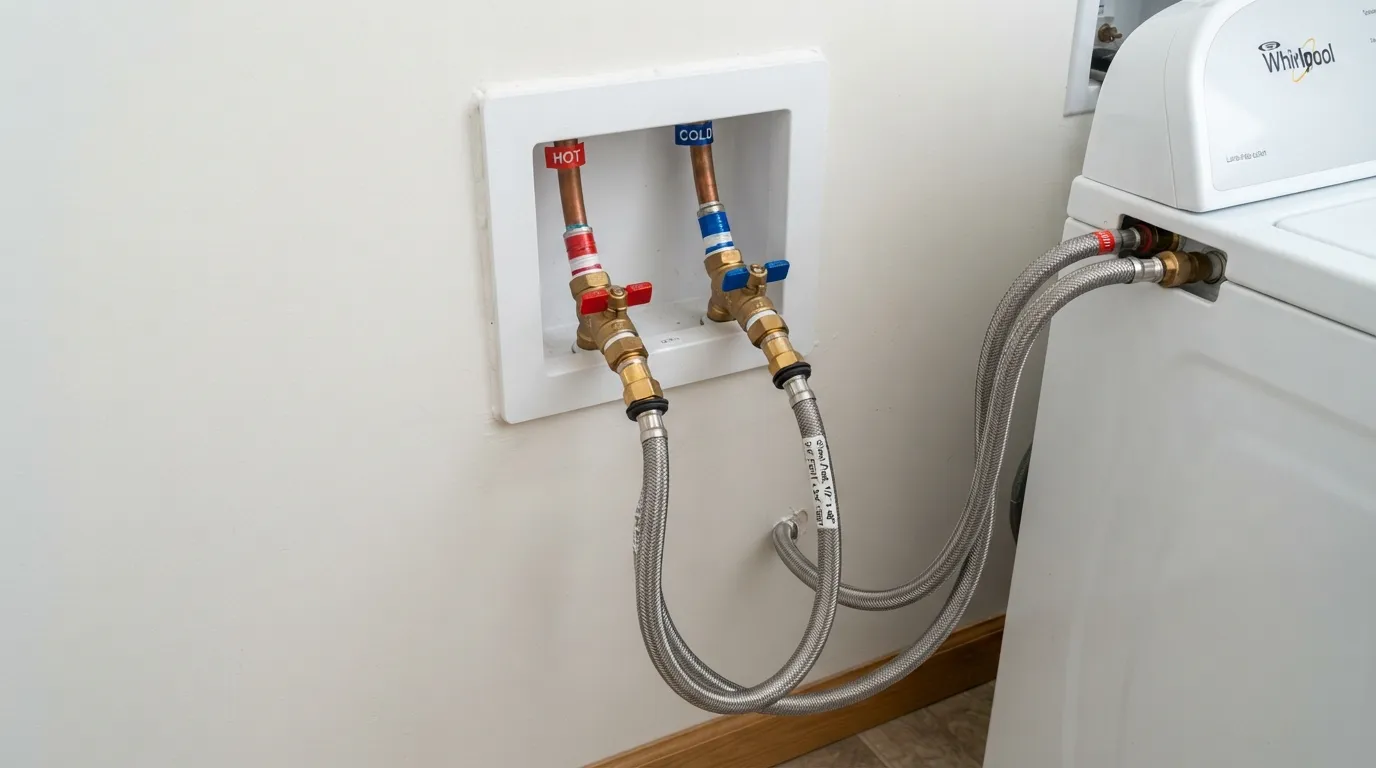
The water supply side delivers pressurized hot and cold water to your washing machine through heavy-duty fill hoses connected to wall-mounted shut-off valves. Understanding this pressurized network is essential for preventing catastrophic supply line bursts and controlling water flow during routine maintenance or emergencies.
Hot and Cold Shut-Off Valves: Wall-mounted brass or quarter-turn valves housed inside the washer outlet box that instantly cut off water supply in an emergency.
Supply Hoses (Fill Hoses): Flexible lines that bridge the wall valves to the appliance inlet valves, typically constructed from reinforced rubber or burst-resistant braided stainless steel.
Washer Inlet Valves: Internal electromagnetic valves located on the back of the washing machine that regulate hot and cold water intake for each wash cycle.
The Drain Side
The drain side safely removes used wastewater from the washing machine using gravity and pump pressure through a dedicated standpipe and P-trap system. This sanitary drainage network prevents sewer gases from entering your home while handling high-volume water discharge without backing up.
Washer Drain Hose: The flexible corrugated hose secured to the back of the washing machine that expels gray water during spin cycles.
Standpipe: A vertical PVC pipe (typically 30 to 40 inches high) that receives the discharge hose and temporarily holds surge water during peak pumping.
P-Trap: A curved U-bend located beneath the standpipe that retains a water barrier to block toxic sewer gases from entering the living space.
Vent Pipe: A vertical pipe extending through the roof that balances air pressure to ensure smooth, uninterrupted drainage flow.
Branch Drain: The horizontal piping network that carries wastewater from the laundry area to the main household sewer stack.
Optional Components
Auxiliary laundry room components enhance overall functionality and provide critical backup protection against overflows, chemical residue, and localized leaks. Integrating these elements creates a resilient, multi-layered defense system for your utility space.
Utility Sink: A deep basin used for pre-soaking clothes or hand-washing items, often sharing a common drainage line and vent with the washing machine.
Floor Drain: A low-point drain installed in the floor to safely capture accidental overflows, hose ruptures, or water heater leaks.
Drain Pan: A shallow plastic or metal tray placed directly beneath the washing machine to catch slow, unnoticeable leaks before they ruin subfloors.
Nearby Water Heater: Frequently located in or adjacent to the laundry room, requiring coordinated thermal expansion tank and temperature relief line monitoring.
Laundry Room Plumbing Diagram
A complete laundry room plumbing diagram maps out the interconnected pathways of supply lines, drain pipes, and venting systems. Reviewing this visual layout helps homeowners troubleshoot drainage bottlenecks, plan renovations, and locate critical emergency shut-offs instantly.
Figure 1: Comprehensive Laundry Room Plumbing Schematic Alt text: Diagram showing washing machine connected via fill hoses to wall shut-off valves in a washer outlet box, discharging wastewater down a vertical standpipe through a P-trap and branch drain.
Washer Outlet Box: Recessed wall cavity housing hot and cold shut-off valves and the drain opening.
Fill Hoses: High-pressure lines delivering regulated hot and cold water to the appliance.
Standpipe: Vertical drainage tube handling high-volume washer discharge safely.
P-Trap: Water-sealed pipe bend preventing harmful sewer gas intrusion.
Floor Drain: Emergency overflow safeguard positioned at floor level.
Plumber’s Field Note: Which Parts Fail First?
In real-world service calls, washing machine supply hoses and clogged drain lines account for over 85% of laundry room water damage emergencies. Standard rubber supply hoses degrade, dry-rot, and bulge within 5 to 7 years, while accumulated lint and laundry detergent residue steadily choke narrow P-traps and branch drains if not flushed regularly.
How to Inspect Washing Machine Hoses
Inspecting your washing machine fill hoses every few months prevents sudden high-pressure ruptures that can dump hundreds of gallons of water into your home. Check the entire length of each hot and cold supply line for surface cracks, rubber blistering, localized bulges, or rust around the threaded brass couplings [00:58].
Feel along the bottom of the hose loop for damp spots or mineral crust that indicate slow, weeping leaks.
Check the rubber washers and inlet screens inside the tap connections for debris, wear, or calcification [01:12].
Look for tight bends or sharp kinks where the hose rubs against the back panel of the washing machine or drywall.
Rubber vs. Braided Stainless Steel Hoses
Upgrading your supply lines is the single most effective defense against catastrophic hose failure. While standard rubber lines degrade rapidly under constant water pressure, braided stainless steel options provide industrial-grade protection and significantly longer service intervals.
| Feature | Standard Rubber Hoses | Braided Stainless Steel Hoses |
| Typical Lifespan | 3 to 5 years | 10 to 15 years |
| Burst Risk | High (degrades, dry-rots, and bulges) | Extremely Low (reinforced woven steel jacket) |
| Upfront Cost | Very low ($10 – $15) | Moderate ($25 – $40) |
| Recommended For | Temporary setups or constant monitoring | All modern homes, rentals, and multi-story units |
Manufacturer guidance typically mandates replacing standard rubber fill hoses every 5 years regardless of visual condition.
How to Connect Hoses Correctly
Proper installation prevents stripped threads, pinched washers, and premature leaks at both the wall shut-off valves and the washing machine inlet ports. Always follow the specific torque and gasket instructions provided in your appliance manufacturer manual.
Hand-tighten the hose couplings onto the valve threads to ensure the rubber gasket seats squarely without cross-threading.
Give the coupling an additional quarter to half turn using tongue-and-groove pliers, avoiding overtightening that can crack plastic or brass fittings.
Leave a minimum of 3 to 4 inches of clearance behind the washing machine to prevent the hoses from crimping against the wall.
How to Test and Maintain Shut-Off Valves
Testing your laundry room shut-off valves annually ensures they will operate reliably when you need to isolate the washer for emergency repairs or extended travel. Neglected valves often seize up or develop weeping leaks around the valve stem over time.
Turn each handle completely off and on once a year to keep internal components free of mineral buildup and calcification.
Check for water droplets weeping past the packing nut or handle stem while the valve is open.
If a gate valve seizes or fails to close completely, shut off the home’s main water supply and replace it with a modern quarter-turn ball valve.
Should You Turn the Water Off After Every Wash?
Turning off the supply valves after every laundry load eliminates continuous water pressure on the fill hoses, completely removing the risk of a burst line while you are away. However, frequent manual operation can accelerate mechanical wear on older gate valves.
Single-lever, quarter-turn ball valves make shutting off water effortless and experience far less mechanical wear than traditional multi-turn gate valves.
Weigh the trade-off: households with aging rubber lines or frequent travelers benefit greatly from turning supply valves off after each cycle.
If your machine is equipped with burst-resistant braided stainless steel lines and modern quarter-turn valves, routine daily shut-off is generally unnecessary.
Plumber’s Field Note: The Failed Hose & Seized Valve Scenario
In our daily service calls, ruptured black rubber hoses typically split at the sharp bend near the coupling after 6 to 8 years under constant municipal water pressure. Homeowners facing this emergency often rush to the wall, only to find an archaic brass gate valve that refuses to turn or snaps off in their hand. Upgrading to braided stainless steel lines and quarter-turn ball valves eliminates this nightmare before it happens.
Drain, Standpipe and P-Trap Maintenance
Maintaining your washing machine’s drain system is critical to preventing costly water damage, foul sewer gas odors, and premature pump failure. Proper installation and routine upkeep of the standpipe, drain hose, and P-trap ensure wastewater flows smoothly away from your home without creating hazardous backflow or pressure vacuums.
Why Your Washer Drain Hose Should Never Be Sealed Tight
A washing machine drain hose should never be sealed airtight inside the standpipe. Airtight connections create a dangerous vacuum effect that can siphon water directly out of the machine during the spin cycle or pull wastewater back into the appliance.
The Air Gap Requirement: Leaving an open space around the hose allows necessary airflow, preventing negative pressure and vacuum-induced siphoning.
Risk of Overflow: A sealed connection disrupts the required atmospheric pressure, frequently resulting in erratic drainage and messy overflows.
Plumber Insight: Improperly jamming a drain hose too far down or sealing it with tape is one of the most common installation errors. Plumbers frequently see this mistake lead to burnt-out drain pumps due to restricted airflow and back-pressure.
Standpipe Basics
The standpipe acts as the vertical conduit that safely channels high-volume wastewater from your washer drain pump into your home’s main drainage system. Exact dimensions and trap requirements are strictly regulated, though specific code numbers vary by local jurisdiction.
Standard Height: Most local plumbing codes require a standpipe height between 18 and 30 inches above the trap weir, with an overall minimum height of 34 inches from the floor to prevent wastewater overflow.
Diameter Requirements: Standard residential washing machine standpipes utilize a 2-inch diameter PVC pipe to safely handle the heavy surge of water expelled by modern high-efficiency washer pumps.
Trap Requirements: Every standpipe must connect to a properly vented P-trap located downstream to catch debris and block noxious sewer gases from entering the laundry room.
Watch video: Washing machine standpipe and drain hose setup
How to Keep the P-Trap Full
The P-trap relies on a standing pool of water to create an impenetrable liquid seal that blocks toxic sewer gases and foul odors from entering your living space. Rarely used laundry room floor drains or secondary fixtures can easily dry out and allow gas to escape if neglected.
Monthly Water Flush: Pour a bucket of water down your laundry room floor drains and infrequently used utility sinks once a month to replenish evaporated trap seals.
Sewer Gas Barrier: This simple standing water plug is your home’s primary mechanical defense against hazardous methane and sewer vapors.
Preventing Dry-Outs: Adding a few drops of mineral oil on top of the water in a rarely used floor trap significantly slows down evaporation rates.
How to Use Lint Strainers and Drain Filters
Washing machines discharge massive amounts of microscopic fabric lint, pet hair, and debris during every wash cycle. Installing external lint strainers and drain filters protects your household plumbing from slow clogs and expensive line backups.
Placement Options: Stainless steel mesh drain filters or disposable nylon lint traps attach securely to the discharge end of the washer drain hose before it enters the standpipe.
Maintenance Frequency: Inspect and clean your external lint trap or mesh filter every two to four weeks to ensure unobstructed water flow.
What to Buy: Opt for durable stainless steel or reinforced nylon mesh strainers with secure zip ties or clamp attachments to prevent them from slipping into the drain line.
Do You Need a Laundry Drain Pan?
A laundry drain pan sits directly underneath your washing machine to catch slow leaks, condensation, or catastrophic hose ruptures before they ruin your subfloor. Installing a drain pan is a high-value insurance policy, especially for high-risk installation areas.
When It Is Worth It: Drain pans are strongly recommended for any washing machine installed on an upper floor, in a multi-family condo, or above finished living spaces.
Pan Drain Line Mechanics: The pan itself features a dedicated side outlet connected to a PVC drain line that safely routes accumulated water outside the building or to a floor drain.
Mitigating Catastrophic Damage: Even a small pinhole leak in a washer hose can cause thousands of dollars in structural damage if left uncontained by a properly plumbed drain pan system.
How to Prevent Laundry Drain Clogs and What Plumbers Recommend Instead of Drano
Preventing laundry drain clogs requires understanding how fabric fibers and chemical residues accumulate inside your plumbing system. Unlike kitchen sinks that primarily handle grease, laundry lines trap a unique combination of dense lint, pet hair, and waxy soap residue that hardens over time.
What Actually Clogs a Laundry Drain
Laundry drain clogs rarely happen overnight; they form gradually as discharged particles catch on pipe imperfections and narrow bends.
Lint and Fabric Fibers: Microscopic threads shed from clothing slip past internal washer filters and mesh together into dense, felt-like masses inside the P-trap and branch lines.
Detergent and Softener Buildup: Liquid fabric softeners contain animal fats and waxes that do not fully dissolve in cold water, coating pipe walls with a sticky film.
Pet Hair and Small Objects: Pet blankets and heavily soiled items release high volumes of hair, which easily intertwines with lint to anchor larger clogs along with stray coins, buttons, or drawstrings.
Detergent and Softener Habits That Cause Buildup
Using incorrect washing habits or excess laundry products dramatically accelerates the buildup of gunk inside your drain lines.
Excess Detergent Overuse: Pouring more soap than recommended does not clean clothes better; it leaves sticky, unrinsed residue that coats the interior of your standpipe and drain hoses.
High-Efficiency (HE) Machine Requirements: Standard low-sudsing HE detergents must be used strictly according to dosage instructions to prevent excessive residue accumulation in low-water-volume drainage cycles.
Fabric Softener Residue: Liquid fabric softeners and dryer sheets leave chemical residues that line the drain pipes, turning loose lint into a cement-like trap for future debris.
What Do Plumbers Recommend to Keep Drains Clean?
Professional plumbers rely on preventive maintenance rather than reactive chemical fixes to keep laundry lines running smoothly.
Boiling or Hot Water Flushes: Flushing your standpipe with hot water once a month melts away accumulated soap scum and prevents minor buildup from hardening.
External Drain Strainers: Installing a stainless steel or nylon mesh lint trap on the discharge hose catches debris before it ever enters your household plumbing.
Monthly Enzyme Cleaners: Regular use of biological enzyme treatments breaks down organic matter, hair, and detergent films safely without pipe corrosion.
Occasional Mechanical Snaking: Running a lightweight manual drain snake through the line once a year clears out early-stage lint obstructions before they cause a backup.
What Do Plumbers Recommend Instead of Drano?
Harsh chemical drain openers like Drano are strongly discouraged by professional plumbers for laundry lines.
Enzyme and Biological Cleaners: These non-caustic formulas use live bacteria to naturally digest organic clogs over a few hours without harming PVC or older metal pipes.
Manual Drain Snake or Plunger: Physical removal using a hand-auger or a specialized toilet/drain plunger clears stubborn lint plugs safely and instantly.
Pipe and Safety Risks: Corrosive lye-based chemicals generate extreme heat that can warp PVC pipes, destroy rubber seals, and pose severe chemical burn hazards if a backup leaves standing water in the tub.
Do Baking Soda and Vinegar Really Work?
The classic baking soda and vinegar combination provides minor fizzing action, but it is largely ineffective against severe, compacted laundry lint clogs.
Honest Efficacy Assessment: While the chemical reaction creates a mild scrubbing effervescence, it lacks the grease-cutting power or mass displacement needed to dissolve dense wet lint balls.
Good for Light Maintenance: This method is safe and moderately effective for refreshing stale odors and clearing minor organic film in surface traps.
Weak Against Lint Clogs: Do not rely on baking soda and vinegar to clear a fully backed-up washing machine drain line; mechanical clearing or enzyme solutions are required.
Is Dawn Dish Soap, Salt or Zep Good for a Clogged Laundry Drain?
Home remedy ingredients and commercial chemical brands offer varying degrees of performance depending on the severity of the blockage.
Dawn Dish Soap: Excellent for cutting grease, but adding Dawn to a slow laundry drain provides minimal help against compacted fabric lint and hair masses.
Salt Solutions: Hot saltwater flushes help break down light soap scum, but salt has zero structural impact on solid lint blockages.
Zep vs. Green Gobbler: Between the two leading heavy-duty commercial lines, Green Gobbler is generally favored by professionals because it uses biodegradable liquefying agents rather than destructive, pipe-melting acids found in some aggressive Zep formulas.
When a Clog Needs Professional Drain Cleaning
Persistent drainage issues indicate a deep-seated obstruction or a venting failure that requires specialized plumbing intervention.
Repeated Backups and Gurgling: If your toilet gurgles when the washing machine drains, or if water repeatedly overflows the standpipe, the main branch line is deeply compromised.
Multiple Slow Fixtures: When a washer backup causes slow draining in nearby bathroom sinks or showers, the clog is located further down the main sewer line.
Professional Solutions: Plumbers resolve severe line blockages using mechanical augers or high-pressure professional cleaning techniques to completely scour the interior pipe walls.
Everyday Protection: Water Heater Temperature, Leak Detectors and Auto Shut-Off
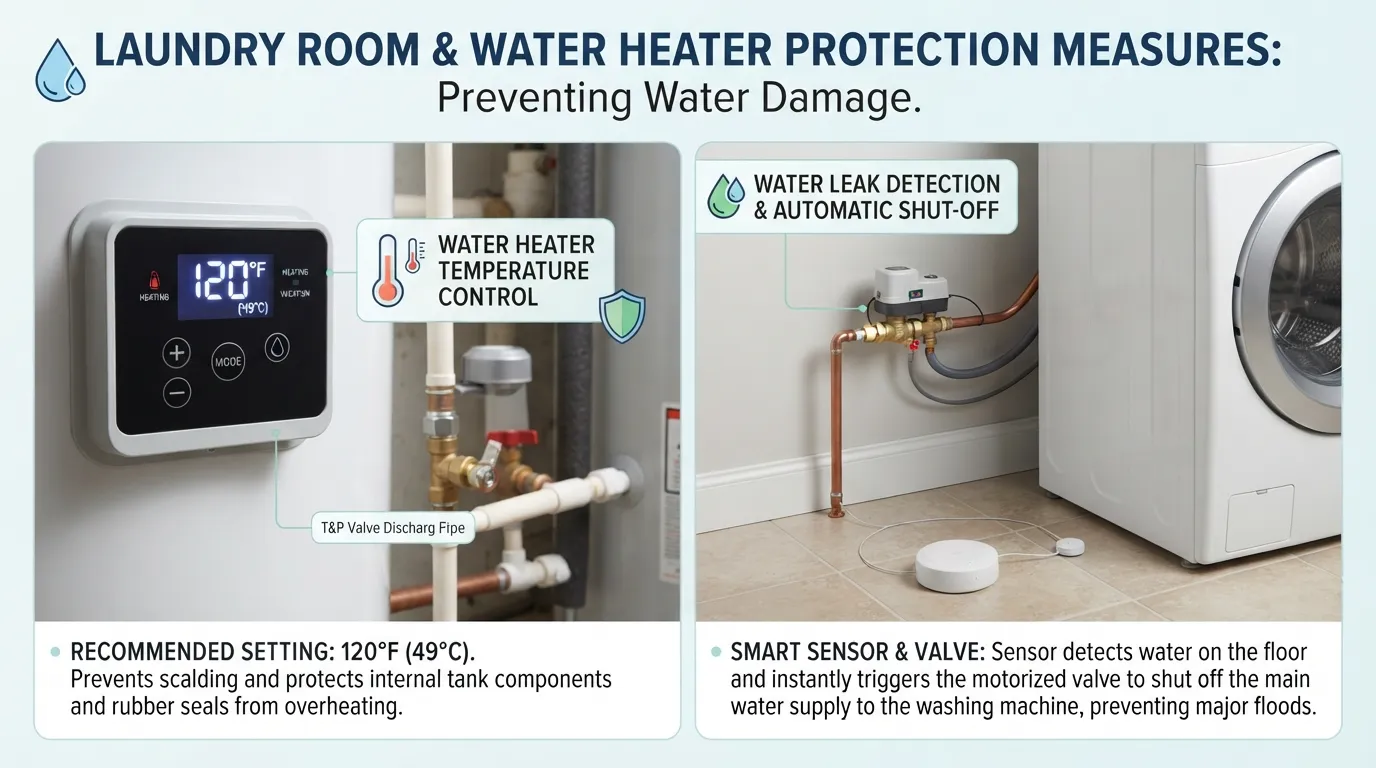
Protecting your home from water damage involves more than just maintaining drain lines; it requires proactive environmental controls around your laundry appliances. Implementing precise temperature settings, early-warning leak monitors, and automated shut-off safeguards prevents minor utility room anomalies from escalating into catastrophic household floods.
What Temperature Should the Water Heater Be Set To?
Setting your water heater to 120°F (49°C) is widely recommended for residential homes to prevent severe scald injuries and extend the lifespan of appliance rubber components. According to CDC research on tap water scald risk , lowering storage temperatures drastically cuts down emergency room hospitalizations for young children and elderly residents.
Protecting Rubber Seals: Operating at 120°F reduces thermal degradation on internal washer supply hoses and inlet valve gaskets, preventing premature cracking and leaks.
When Higher Settings Are Needed: Certain households require a higher tank storage temperature (such as 140°F to curb bacterial growth), which must be paired with a thermostatic mixing valve to safely temper output water.
Professional Evaluation: If your unit struggles to maintain temperature or your water setup is difficult to adjust, consult a professional for water heater service to evaluate your configuration.
Leak Detectors and Flood Alarms
Smart placement of low-cost leak detectors provides an invaluable early warning system against slow hose leaks or sudden fitting failures.
Battery Alarms vs. Wi-Fi Sensors: Basic battery-operated alarms emit a loud acoustic shriek when moisture bridges their floor contacts, while smart Wi-Fi sensors instantly push push-notifications and text alerts to your smartphone.
Optimal Placement Zones: Position sensors flat on the floor directly beside the washing machine base, tucked underneath adjacent utility sinks, or resting inside the lowest point of your laundry drain pan.
Real-World Impact: A homeowner discovered a weeping hot-water inlet connection within minutes simply because a $15 sensor sounded off before water could soak into the subfloor.
Automatic Water Shut-Off Valves and Smart Hose Systems
Automatic water shut-off systems take environmental protection a step further by actively cutting off the water supply the moment a leak is detected.
How They Work: These units feature motorized ball valves attached to your main supply lines that link wirelessly to floor sensors or flow-meter monitors.
Pros and Cons: While they completely eliminate catastrophic flooding risks and lower insurance premiums, they carry a higher upfront cost and require professional installation.
Cost Range: Complete automated shut-off systems typically range from $150 to $600 for hardware, plus standard plumbing labor fees.
Keep the Area Around the Washer Clear
Maintaining physical clearance around your washing machine ensures proper system operation and immediate access during an emergency.
Airflow and Humidity: Leaving adequate space around the appliance prevents trapped moisture and mold growth from degrading surrounding drywall and baseboards.
Emergency Shut-Off Access: You must be able to reach the manual hot and cold water supply valves instantly without moving hampers, detergent bottles, or boxes.
Laundry Room Plumbing Maintenance Schedule Checklist
Maintaining your laundry room plumbing requires a structured approach to catch minor wear before it causes major water damage. Implementing a reliable maintenance schedule protects your home, extends the lifespan of your washing machine, and ensures your drainage and supply systems operate at peak performance.
Monthly Checklist
Routine monthly maintenance focuses on basic hygiene and ensuring that your secondary drainage points remain fully functional.
Flush Floor Drain and P-Trap: Pour a bucket of water down your laundry room floor drain and utility sink P-trap to replenish evaporated seals and block sewer gas.
Clean Lint Strainer: Remove and wash out your external drain hose lint strainer or mesh filter to prevent accumulated fibers from entering the standpipe.
Quick Visual Inspection: Do a fast scan of the floor, wall connections, and baseboards for any unexpected damp spots, condensation, or weeping fittings.
Every 3 to 6 Months
Quarterly and semi-annual checks target mechanical performance and component safety around your washing machine.
Inspect Supply Hoses: Look closely at your hot and cold water lines for signs of bulging, cracking, stiffening, or corrosion at the metal crimp fittings.
Check Behind the Washer: Pull the machine forward slightly to examine the standpipe alignment, drain hose position, and rear wall connections.
Clean Drain Pump Filter: If your front-load washer features a front access panel, open the lower filter door and clear out trapped coins, hair, and debris.
Test Leak Sensor Batteries: Check the indicator lights or push the test button on your battery-operated floor leak detectors and flood alarms.
Yearly
Annual maintenance involves testing structural safety features and evaluating the overall room environment.
Test Shut-Off Valves: Open and close your manual hot and cold water supply valves completely a few times to prevent them from seizing up over time.
Check Standpipe and Drain Connections: Verify that the drain hose sits securely in the standpipe with proper air clearance and no signs of shifting or splashing.
Inspect Flooring and Caulking: Check the condition of the drain pan, floor caulking, and baseboards to ensure water is not silently pooling during heavy wash cycles.
Every Few Years
Long-term preventive replacements protect your home against sudden hose ruptures caused by material fatigue.
Replace Rubber Supply Hoses: Standard rubber washing machine hoses degrade from the inside out; replace them every 3 to 5 years, or upgrade to burst-resistant braided stainless steel lines.
Confirm Intervals with a Plumber: Consult a professional during routine home checkups to verify whether your specific household water pressure requires more frequent hardware overhauls.
Printable Checklist
Use this comprehensive table as a quick-reference guide or print it out to keep in your laundry utility area.
| Task | How Often | Time Needed | Tools | Pro Needed? |
| Flush Floor Drain & P-Trap | Monthly | 2 minutes | Bucket, water | No |
| Clean Lint Strainer | Monthly | 5 minutes | None | No |
| Inspect Supply Hoses | Every 3 to 6 Months | 5 minutes | Flashlight | No |
| Clean Drain Pump Filter | Every 3 to 6 Months | 10 minutes | Towel, shallow pan | No |
| Test Leak Sensor Battery | Every 3 to 6 Months | 1 minute | None | No |
| Test Shut-Off Valves | Yearly | 5 minutes | None | No |
| Check Standpipe & Drains | Yearly | 10 minutes | Flashlight | No |
| Replace Rubber Hoses | Every 3 to 5 Years | 30 minutes | Pliers, bucket | Optional |
Troubleshooting: Common Laundry Room Plumbing Problems and Fixes
Laundry room plumbing issues can quickly escalate from minor inconveniences to major property damage if left unaddressed. Understanding the root symptoms of everyday malfunctions allows homeowners to resolve minor blockages safely or know precisely when to call a licensed professional.
Quick Troubleshooting Table
Use this symptom-based guide to quickly diagnose common washing machine and utility room plumbing failures.
| Symptom | Likely Cause | DIY Fix | Call a Plumber If |
| Floor drain backing up | Clogged branch line or lint | Flush trap or clear line | Multiple home fixtures back up |
| Sewer smell in room | Dry P-trap or blocked vent | Pour water down the trap | Odor persists after filling trap |
| Slow draining standpipe | Lint clog or restricted hose | Use enzyme cleaner or snake | Water backs up past the standpipe |
| Banging pipes on fill | Water hammer pressure surge | Install water hammer arrestors | Banging persists after arrestors |
| Low water pressure | Clogged inlet filter screens | Clean screens at valve inlet | Pressure remains low after cleaning |
| Musty smell or high bill | Hidden behind-wall leak | Check visible connections | Soft flooring or wall stains appear |
Why Is My Laundry Room Floor Drain Backing Up?
A backing-up floor drain during a wash cycle typically indicates localized obstruction within the laundry branch line, though it can signal a wider system failure.
Lint and Soap Scum Accumulation: Accumulated fabric fibers and grease restrict water flow, forcing high-volume washer discharge out of the lowest opening—the floor drain.
Main Sewer Line Complications: If a washing machine discharge causes bubbling or wastewater backup in your toilets, showers, or tubs, the problem extends past the laundry room. Address widespread blockages promptly by investigating potential sewer line problems to prevent catastrophic sewage intrusion.
Plumber Insight: In service calls, technicians frequently pull massive felted balls of pet hair and detergent sludge out of branch lines that were neglected for years.
Why Does My Laundry Room Drain Smell?
Foul odors wafting from a laundry room drain are usually tied to compromised water seals or organic slime buildup inside the piping.
Dry P-Trap: Infrequently used floor drains lose their standing water barrier, allowing noxious sewer gas to enter the room freely.
Biofilm and Mold: Slimy bacterial growth thrives in damp drain lines, releasing musty, sulfur-like smells.
Step-by-Step Fix: Pour a gallon of hot water mixed with a cup of white vinegar down the drain, followed a few hours later by a bucket of clean water and a teaspoon of mineral oil to lock in the seal.
Washer Overflowing or Draining Slowly
When a washing machine cannot empty its tub fast enough, water spills out of the top of the standpipe, creating an immediate slip hazard.
Standpipe Clog: Lint and detergent restrictions slow the drainage rate below the washer pump’s high-speed output capacity.
Kinked Drain Hose: A pinched or improperly routed flexible drain hose restricts water exit velocity.
Drain Pump Failure: A failing internal pump or a jammed coin trap inside the machine will prevent proper water expulsion altogether.
Water Hammer (Banging Pipes) When the Washer Fills
Loud banging or shuddering noises in your walls when the washing machine abruptly shuts off its water supply are caused by hydraulic shock.
The Cause: Fast-closing electromagnetic inlet valves stop high-speed water instantly, sending a violent pressure wave slamming against the interior pipe walls.
Basic Fixes and Arrestors: Installing mechanical water hammer arrestors right at the hose connections cushions the shockwave and absorbs the sudden pressure spike.
Low Water Pressure to the Washer
If your washing machine takes an unusually long time to fill with water, the restriction is typically found at the supply connection points.
Clogged Inlet Screens: Tiny mesh filters inside the washing machine’s water inlet valves catch mineral scale, sand, and rust particles over time, cutting off flow.
Partly Closed Valves: Ensure that both the hot and cold wall supply handles are opened fully and have not slipped out of position.
Hidden Leaks: Signs You Cannot See
Not all plumbing failures announce themselves with a gushing flood; many destructive leaks occur silently behind walls or beneath flooring.
Warning Signs: Keep an eye out for unexplained spikes in your water bill, warped baseboards, persistent musty odors, or bubbling drywall paint.
Professional Intervention: If you suspect an invisible leak behind your laundry units, schedule professional leak detection to pinpoint the break using electronic acoustic and thermal imaging tools before structural rot sets in.
What to Do in a Laundry Room Plumbing Emergency
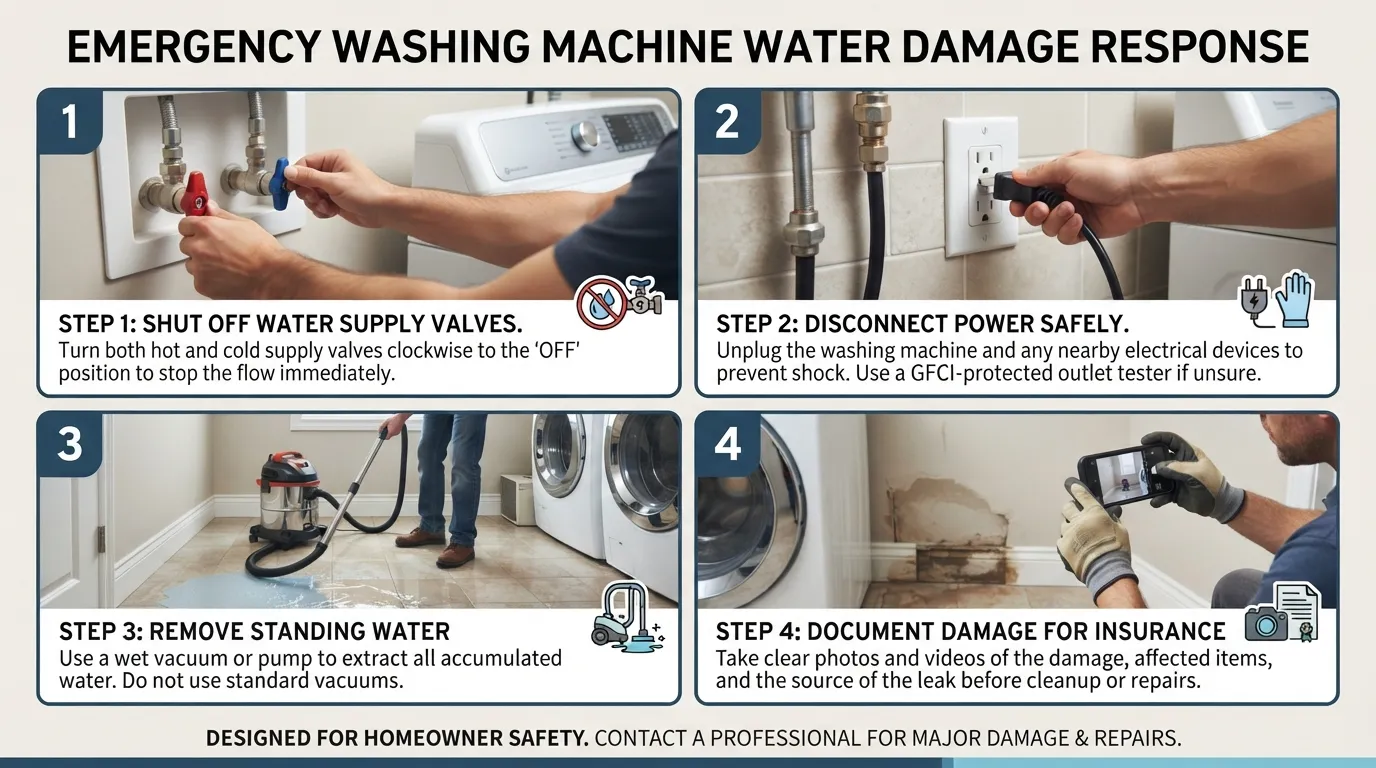
A sudden laundry room plumbing emergency—such as a burst supply hose or an overflowing standpipe—can cause thousands of dollars in water damage within minutes. Having a clear, calm action plan during the critical first five minutes minimizes structural damage and protects your family from electrical hazards.
Step-by-Step: A Hose Burst or Overflow
When water begins pouring onto your laundry room floor, swift, decisive action is necessary to halt the flooding and secure the area.
Shut Off the Water Supply: Immediately turn the hot and cold water supply valves behind the washing machine clockwise. If the valves are stuck or inaccessible, shut off your home’s main water supply valve right away.
Switch Off Power Safely: If it is safe to do so without stepping into standing water, turn off the circuit breaker supplying electricity to the laundry room and nearby outlets.
Stop the Water Source: If a hose has ruptured, disconnect it or ensure the machine’s internal cycle is canceled to prevent further discharge.
Remove Standing Water: Use a wet/dry shop vacuum, towels, or a mop to clear pooled water before it seeps into subflooring or baseboards.
Ventilate the Area: Open windows and doors to let fresh air circulate, and set up fans to begin the drying process immediately.
What Not to Do
Avoiding dangerous mistakes during an active water emergency keeps you safe and prevents secondary property damage.
Never Step into Water Near Live Outlets: Avoid walking in standing water if extension cords, power strips, or appliance plugs are submerged or at risk of short-circuiting.
Do Not Use Chemical Cleaners on Backed-Up Drains: Pouring caustic liquids like Drano into a flooded or slowly backing-up drain creates severe chemical splash hazards if water is standing in the tub or sink.
Document the Damage
Thorough documentation is essential for ensuring a smooth, hassle-free homeowners insurance claim after a major leak.
Take Photos and Video: Capture wide shots of the flooded room as well as close-up images of the failed hose, warped flooring, or damaged drywall.
Save Receipts: Keep invoices for emergency plumbing visits, equipment rentals, and any temporary repairs for your insurance adjuster.
Dry the Area to Prevent Mold
Mold can begin colonizing damp drywall, insulation, and wood framing within 24 to 48 hours, especially in humid climates.
Deploy High-Capacity Equipment: Set up heavy-duty box fans and a large dehumidifier immediately to extract deep moisture from building materials.
Plumber Insight: Technicians arrive on emergency calls expecting to find hidden moisture; the very first thing an experienced plumber checks upon arrival is whether water has traveled underneath baseboards or down into lower-level ceilings.
When to Call an Emergency Plumber
Some utility room disasters require immediate professional intervention rather than a DIY fix.
Uncontrollable Water Flow: Call for help if the main water supply valve fails to close or a broken pipe cannot be isolated.
Sewage Backups or Electrical Proximity: Contact a professional if wastewater backing up into your laundry fixtures contains sewage, or if standing water is dangerously close to electrical wiring.
Professional Support: Reach out to a licensed emergency plumber to safely isolate complex breaks, extract deep water lines, and restore safe utility operations.
Laundry Room Plumbing in Miami and South Florida Local Considerations
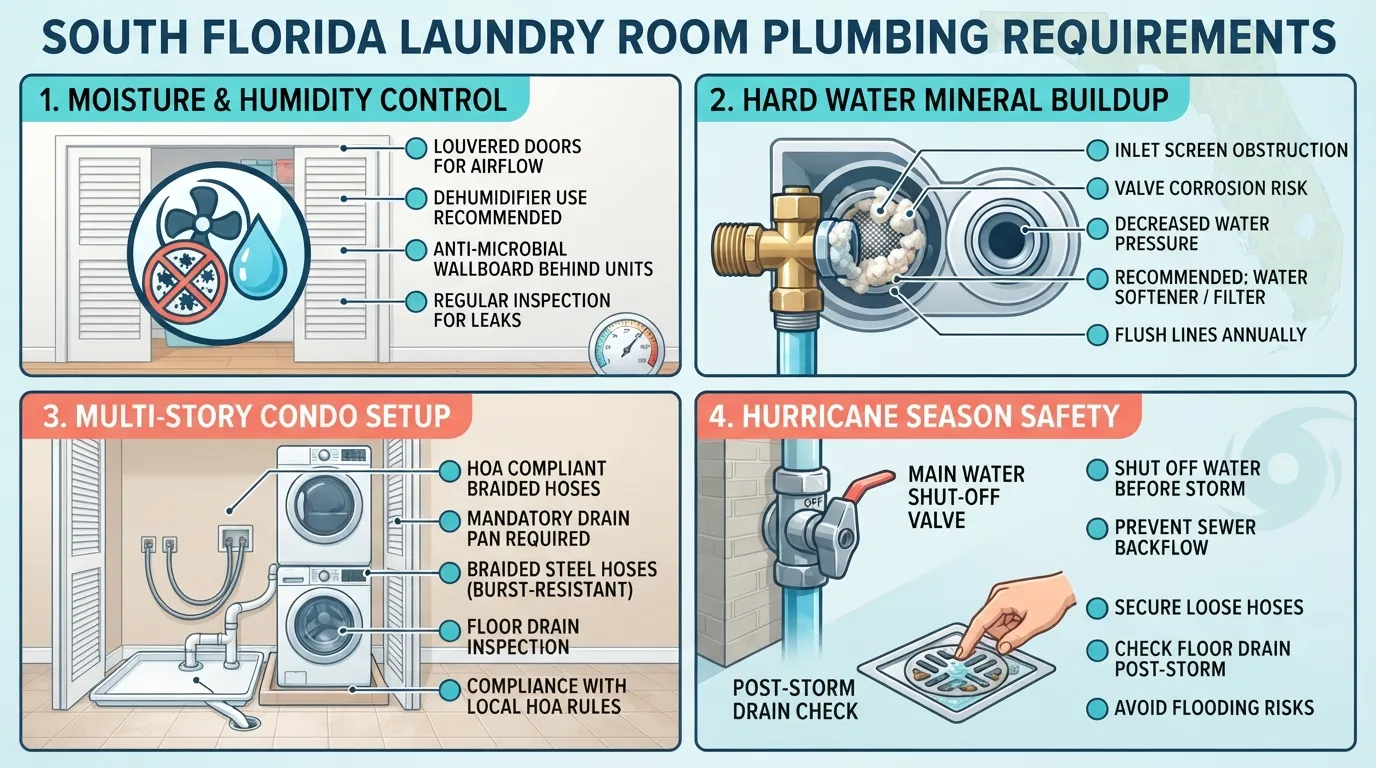
Operating a laundry room in Miami and South Florida presents unique environmental and structural challenges that national guides often overlook. High ambient humidity, regional water chemistry, community association rules, and tropical storm seasons demand targeted plumbing maintenance strategies to protect your home.
Humidity, Mold and Moisture Control
South Florida’s subtropical climate creates an environment where even minor moisture issues quickly turn into severe structural problems.
Accelerated Mold Growth: Because the region stays warm and humid year-round, hidden leaks or condensation around a washing machine can trigger active mold and mildew colonization within 24 to 48 hours.
Proactive Ventilation: Keep your laundry room well-ventilated by running air conditioning vents, keeping interior doors open after heavy wash cycles, or using a dedicated room dehumidifier.
Plumber Insight: Local service technicians frequently find that minor, unnoticed weeping from a washing machine hose has quietly rotted drywall and baseboards behind utility closets due to the trapped tropical humidity.
Hard Water and Mineral Buildup
While South Florida municipal water supplies are treated and safe to drink, local water reports from Miami-Dade Water and Sewer indicate varying mineral content levels (often hovering in the moderately hard to hard spectrum depending on the wellfield and blend).
Impact on Hoses and Valves: Dissolved calcium and magnesium precipitate out of water, forming crusty mineral scale inside supply valves, metal hose mesh, and internal washing machine inlet screens.
Restricted Flow: Over time, heavy mineral accumulation restricts water intake volume, causing extended wash cycles and premature wear on electronic water inlet solenoids.
Water Softener Options: Installing a whole-home water softener is an effective option if you want to eliminate mineral scaling entirely and protect all of your home’s water-using appliances.
Condos and Apartments: Laundry Closets and Upstairs Units
Many Miami homes are multi-story townhomes, high-rise condos, or apartments with compact laundry closets positioned on upper levels.
Risk to Units Below: An uncontrolled hose burst or overflowing standpipe on an upper floor can cascade through drywall and ceilings, causing expensive water damage to multiple floors below.
HOA and Building Regulations: Most condominium associations enforce strict rules regarding washing machine maintenance, mandatory braided stainless steel supply lines, and the use of approved drain pans. Always check your specific building bylaws and governing documents to stay compliant.
Hurricane Season and Power Outages
Tropical storm systems and hurricane season introduce unique utility hazards that require immediate precautionary steps.
Evacuation and Long Outages: If you evacuate for a hurricane or experience an extended power outage, turning off your manual hot and cold water supply valves relieves pressure on internal hoses while you are away.
Post-Storm Backups: Heavy torrential downpours can overwhelm municipal storm and sewer systems; always check your laundry room floor drains and standpipes after severe weather to ensure local street flooding hasn’t forced water backward into your home.
Laundry Room Plumbing Installation and Code Basics Rough-In
Planning a laundry room renovation or building a new utility space requires careful attention to rough-in plumbing standards. Getting the supply, drainage, and venting framework right from the start prevents chronic drainage issues, code violations, and costly teardowns down the road.
What Is Laundry Room Rough-In Plumbing?
Rough-in plumbing refers to the initial installation of all hidden water supply pipes, drain lines, and vent stacks before drywall and flooring are finished.
Supply Stubs: Hot and cold water pipes terminated with shut-off valves to feed the washing machine hoses.
Recessed Outlet Box: A standardized wall-mounted box that houses both the water supply valves and the top opening of the standpipe for clean organization.
Standpipe and P-Trap: A vertical drain pipe and a lower water-sealed trap designed to handle high-volume washer discharge safely.
Vent Stack: An essential vertical pipe that runs up through the roof to equalize air pressure and prevent siphoning.
Watch video: Laundry room plumbing rough-in explained
Basic Layout Considerations
Designing an efficient laundry layout ensures everyday usability while keeping your plumbing system safe and accessible.
Strategic Location: Position the washer close to existing main drain and water supply lines to minimize expensive framing and pipe-routing runs.
Access and Protection: Ensure shut-off valves remain entirely unobstructed, and plan for a drain pan if the washer sits above living space.
Venting Layout: The vent must connect properly to the drain line within regulated distance limits to ensure smooth wastewater evacuation.
Plumbing Code Basics
Plumbing codes dictate exact measurements, pipe sizing, and material standards to protect public health and structural integrity.
Jurisdictional Variations: Plumbing requirements vary significantly by state and municipality, governed locally by the Florida Building Code and specific Miami-Dade County amendments.
Permits and Compliance: Major laundry relocations or new rough-ins typically require pulling a local building permit and undergoing municipal inspections.
Professional Standards: Always verify local code compliance to ensure your installation passes inspection and maintains your homeowners insurance validity.
Renovation Tips and Hiring the Right Professional
Executing a flawless laundry room remodel requires balancing smart design choices with licensed plumbing expertise.
Questions to Ask Your Plumber: Inquire about their experience with local Miami-Dade code requirements, whether permits are included in the estimate, and how they handle waste line venting.
What to Include in a Quote: Ensure your project estimate clearly outlines labor, material grades (such as braided stainless steel lines), permit fees, and cleanup.
Why a Licensed Plumber Matters: Hiring a licensed professional guarantees that your rough-in meets structural and safety standards, protecting your home from hidden leaks and code fines. For comprehensive property updates, explore professional residential plumbing services to ensure your installation is done right.
Plumber Insight: In retrofit projects, local technicians frequently encounter major DIY installation mistakes—such as missing vent stacks causing trap siphoning, standpipes installed too low, or supply valves hidden behind drywall—that require complete restructuring to fix.
DIY or Call a Plumber? Costs and Decision Guide
Knowing when to tackle a laundry room maintenance task yourself versus when to call a licensed professional can save you time, money, and property damage. While routine upkeep is simple for most homeowners, plumbing alterations and complex repairs require expert knowledge to ensure safety and code compliance.
Safe DIY Tasks
Homeowners can easily handle non-invasive, preventive maintenance items that keep the laundry system running smoothly without risking water damage.
Hose Inspections: Regularly checking supply lines for bulging, cracking, or stiffness.
Strainer Cleaning: Removing and washing out external mesh lint traps every few weeks.
P-Trap Flushing: Pouring water down floor drains and utility sinks monthly to maintain the sewer gas barrier.
Leak Sensor Placement: Positioning battery-operated or smart Wi-Fi flood alarms in strategic zones around the washing machine.
Tasks for a Licensed Plumber
Any project involving pressurized water lines, structural drainage changes, or recurring system failures requires certified expertise.
Valve Replacement: Swapping out seized, leaking, or corroded hot and cold water supply shut-off valves.
Standpipe or Vent Modifications: Altering pipe heights, diameters, or venting layouts to meet building codes.
Repeated Clogs and Sewer Backups: Resolving deep branch line obstructions or main sewer line intrusions.
Hidden Leaks and New Installations: Pinpointing behind-the-wall leaks or completing full rough-in installations for a laundry room remodel.
Typical Cost Ranges
Understanding average pricing helps you budget effectively for routine plumbing repairs and maintenance services. (Note: These figures are general estimates and vary based on your specific location, plumbing configuration, and labor rates.)
Hose Replacement: Typically ranges from $50 to $150, depending on whether you upgrade to braided stainless steel lines.
Drain Cleaning: Standard mechanical snaking or clearing of a laundry branch line generally costs between $150 and $350.
Valve Replacement: Replacing old water supply shut-off valves usually runs from $150 to $300.
Professional Leak Detection: Specialized electronic acoustic and thermal imaging leak detection services range from $250 to $600+.
Quick Decision Table
Use this quick-reference matrix to evaluate whether a specific issue is safe for a DIY approach or requires professional intervention.
| Situation | DIY? | Call a Pro? |
| Cleaning external lint trap | Yes | No |
| Flushing a dry floor drain trap | Yes | No |
| Replacing washing machine hoses | Yes (if comfortable) | Optional |
| Replacing seized water supply valves | No | Yes |
| Floor drain or toilet backing up | No | Yes |
| Persistent musty smell or high water bill | No | Yes |
Ready to Book?
If you are dealing with a stubborn clog, a leaking valve, or need expert guidance on your laundry room plumbing setup, professional help is just a click away. When you are ready for reliable service and expert craftsmanship, you can book a plumber online to schedule an appointment at your convenience.
Frequently Asked Questions
How often should I check my washing machine hoses?
Inspect your washing machine supply hoses every 3 to 6 months. Look closely for signs of wear, including surface cracks, blistering, stiffness, bulging at the crimped metal ends, or dampness around the connection fittings to prevent unexpected ruptures and property flooding.
How long do washing machine hoses last?
Standard rubber washing machine hoses typically last between 3 to 5 years before material fatigue sets in. Manufacturers and plumbers recommend upgrading to burst-resistant, braided stainless steel supply lines, which generally last up to 10 years when properly installed and maintained.
Should I turn off the water to my washing machine after each use?
Turning off the water supply valves after every wash cycle provides maximum protection against catastrophic hose failures. While modern braided lines reduce risk, manually closing the valves when the appliance is idle relieves all continuous high pressure on internal inlet valves.
Why should a washer drain hose not be sealed in the standpipe?
An airtight seal inside the standpipe creates a dangerous vacuum effect during high-speed draining. This negative pressure can siphon water directly out of your machine prematurely or pull wastewater backward, leading to erratic drainage performance and messy utility room overflows.
How often should I pour water down my laundry floor drain?
Pour a bucket of water down your laundry room floor drain once a month. This routine monthly flush replenishes the standing water in the P-trap, maintaining an effective liquid barrier against foul sewer gases and insect intrusion.
Why does my laundry room drain smell?
Foul odors usually stem from a dried-out P-trap that allows sewer gas to escape into your home, or from organic biofilm and mold accumulating inside the pipe. Pouring clean water and a small amount of mineral oil down the drain fixes dry traps.
What do plumbers recommend to keep drains clean?
Plumbers recommend preventive maintenance rather than harsh chemicals. Best practices include flushing lines with hot water monthly, installing external stainless steel lint strainers on discharge hoses, using biological enzyme cleaners, and occasionally running a manual mechanical drain snake.
What do plumbers recommend instead of Drano?
Professionals strongly advise against using caustic chemical drain openers like Drano on laundry lines. Instead, plumbers recommend using biological enzyme cleaners to digest organic blockages safely, or clearing stubborn lint bundles using a manual drain snake or a standard plunger.
What temperature should the water heater be for laundry?
Water heaters are commonly set to 120°F (49°C) for most residential homes. This temperature balances effective cleaning and scald prevention while protecting rubber washing machine gaskets and inlet hoses from accelerated thermal degradation and premature cracking.
Do I need a drain pan under my washing machine?
A laundry drain pan is strongly recommended if your washing machine is installed on an upper floor, in a multi-family condo, or above finished living spaces. The pan catches slow leaks or hose failures and routes water safely to prevent structural damage.
How much does it cost to fix a laundry room leak?
Fixing a laundry room leak typically ranges from $50 for a simple replacement hose to $150 to $350 for professional drain clearing or shut-off valve replacement. Hidden behind-the-wall leak repairs and advanced electronic leak detection can range from $250 to $600+.
How do I plan a laundry room plumbing renovation?
Planning a renovation involves mapping out strategic supply line locations, ensuring proper standpipe and P-trap sizing, integrating a dedicated vent stack, and checking local building codes. Always consult a licensed contractor to secure necessary permits and ensure compliance.
Final Thoughts: Small Habits Prevent Big Water Damage
Mastering your laundry room plumbing maintenance requires little daily effort but delivers massive protection against devastating property damage. By consistently inspecting supply hoses, testing shut-off valves, keeping drain lines clear, installing smart leak sensors, and following a reliable maintenance schedule, you can keep your utility room running safely for years.
Ready to ensure your home is completely protected from hidden leaks and drainage failures? Take the proactive step today and book your plumbing inspection with our expert team to secure peace of mind.
About the Author
Author: Michael Rodriguez, Master Plumber (License #CFC1428590)
Experience: 18+ Years in Residential and Commercial Plumbing
Last Reviewed Date: October 2026
Main Services
Related Posts
Need a Plumber in Miami?
Schedule service online or speak directly with the EZ Plumbing team.
Owner-Led Local Service
Know who is behind the business before you request service. The owners, contact line and Miami service pages are published clearly.
- Named business owners
- Direct phone and social channels
- Local Miami service information
Clear Help Before You Book
Review the relevant service page, contact the team directly and use the booking page when you are ready—without relying on vague claims.
- Service-specific information
- Direct questions before scheduling
- Clear online booking route