
Sewer Inspection for Home Purchase: Complete 2026 Guide
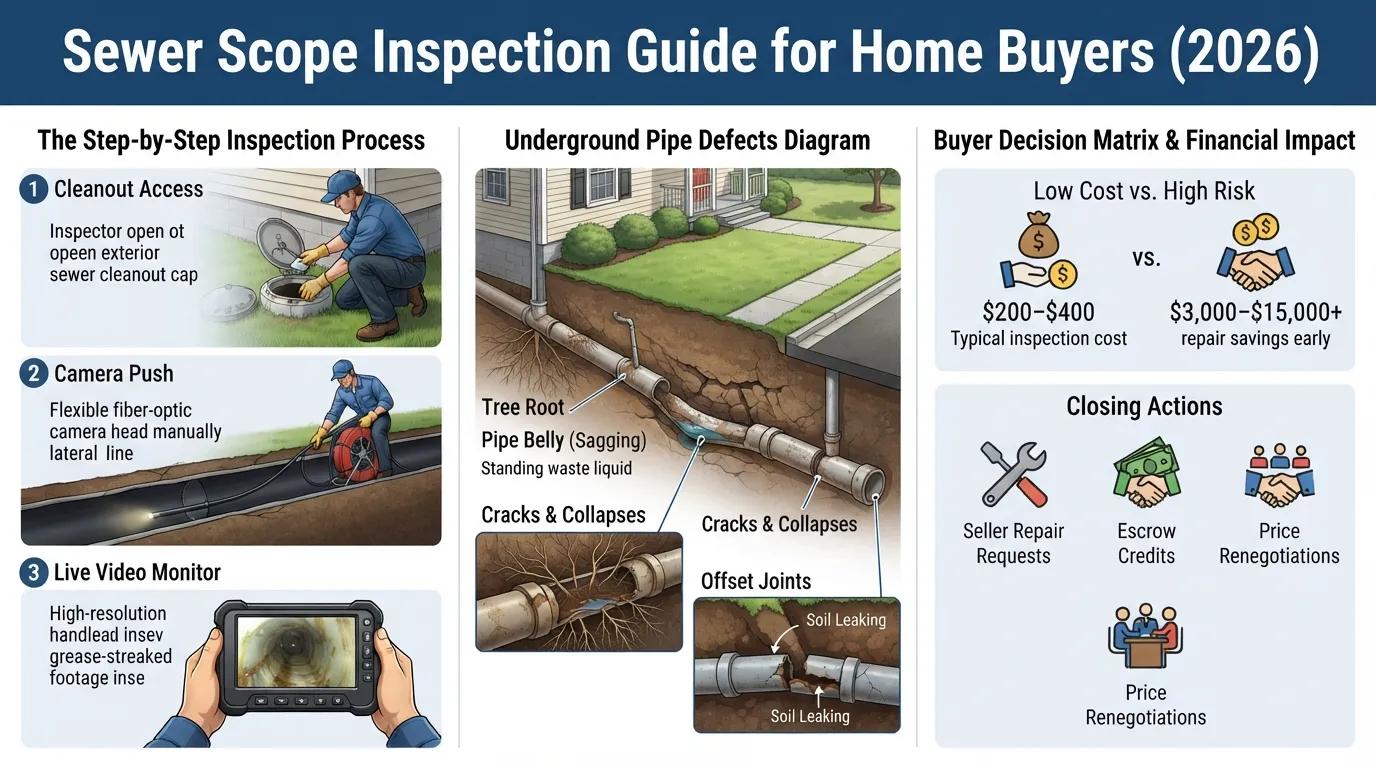
Sewer Scope Inspection Essentials
A sewer scope inspection is a specialized diagnostic service where a certified inspector runs a flexible, high-definition camera through a property’s main lateral drain line. This camera travels from the structure’s interior plumbing to the municipal main or private septic tank, revealing hidden structural failures, root intrusions, or blockages before you finalize a real estate transaction.
What Is a Sewer Scope Inspection?
A sewer scope inspection is a non-invasive evaluation of a home’s underground lateral sewer pipe using a fiber-optic camera attached to a flexible rod. The inspector feeds this specialized camera through a cleanout access point to record real-time video footage of the line’s internal condition.
Primary Purpose: Identifies structural defects, severe clogs, bellied (sagging) pipes, cracking, and offset joints.
Material Evaluation: Determines whether the lateral line consists of modern PVC, or aging materials like cast iron, clay, or orangeburg pipe.
Buyer Security: Serves as a critical risk-management step during the home buyer due diligence period to prevent unbudgeted emergency repairs post-closing.
Average Cost & Who Pays for It
The typical sewer scope inspection cost ranges between $200 and $400 when ordered as an add-on service to a standard home inspection, or up to $500 as a standalone service by a specialized provider.
Who Pays: The home buyer almost always pays for the inspection as part of their standard property acquisition due diligence.
Pricing Factors: Total cost varies based on geographical location, ease of cleanout access, and pipe length.
Professional Standards: Inspections should be conducted by a certified inspector or a licensed plumber specializing in lateral line video diagnostics.
Negotiation Leverage: If the video inspection reveals major defects, buyers frequently use the official report to request repair credits or seller concessions before closing.
Why a Sewer Inspection Matters Before You Buy
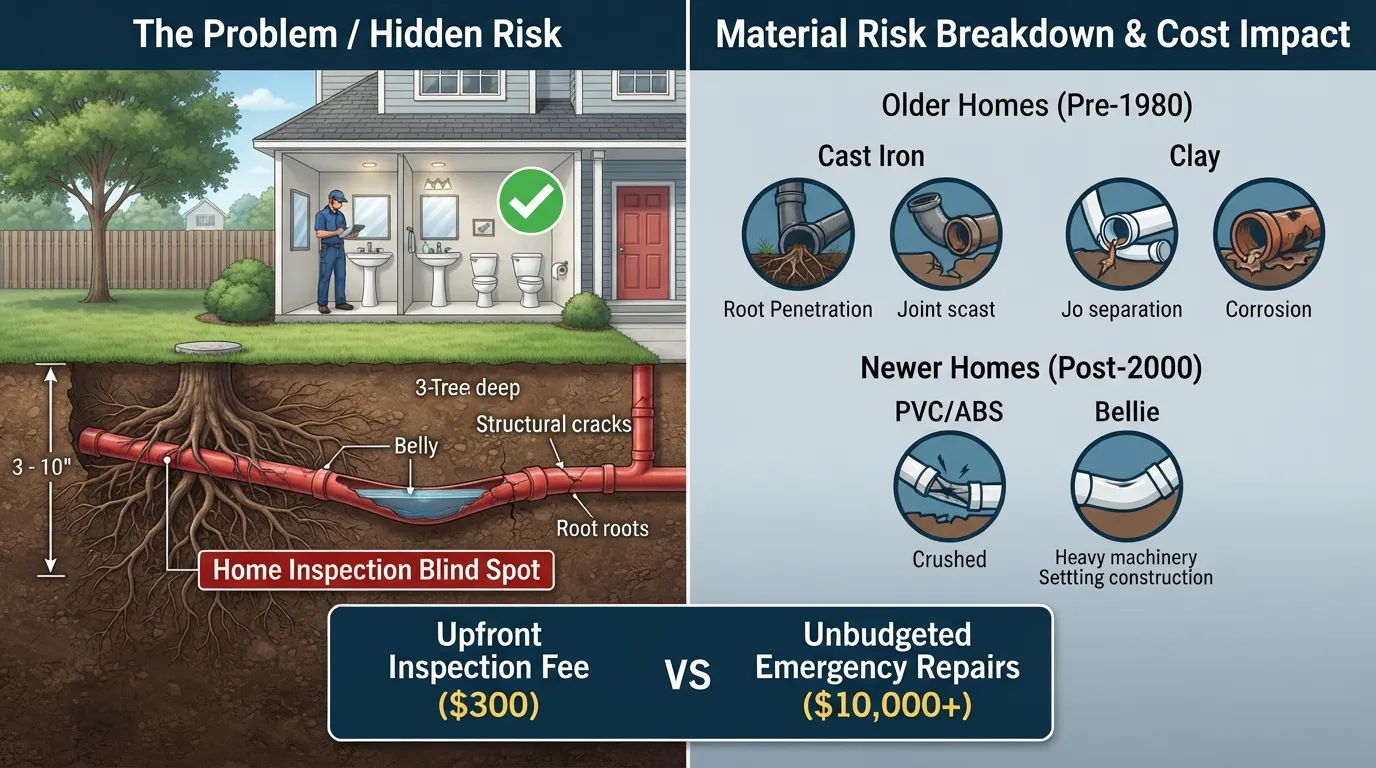
A sewer line inspection is widely considered one of the highest-roi specialty evaluations you can request during the home-buying process. While a standard visual home inspection covers visible plumbing, it completely bypasses the underground main lateral line—the single most expensive pipe system on any residential property.
Hidden Risks Standard Home Inspections Miss
Standard home inspectors only evaluate the functional drainage of visible fixtures, leaving underground infrastructure entirely unmonitored. Underground lateral lines run three to ten feet below ground, creating massive home inspection blind spots where severe structural failure can develop without immediate surface warnings.
Underground Structural Cracks: Standard home inspections miss fractured or crushed lines caused by soil shifting and ground settling.
Low-Volume Bellies: Sagging pipe sections collect standing water and debris, leading to recurring main line backups that functional flow tests miss.
Corroded Materials: Hidden plumbing damage inside aging underground lines remains completely invisible without direct fiber-optic video feeds.
Older Homes vs. Newer Homes: Why Age Matters
Property age dictates the material composition of the lateral line, directly influencing its vulnerability to failure. While older homes carry historical risks related to obsolete materials, newer construction is not immune to installation defects and ground movement.
Pre-1980 Properties: Frequently feature clay pipes, cast-iron pipes, or Orangeburg (bituminized fiber). Clay and cast iron degrade through joint separation, rusting, and severe tree root intrusion over several decades.
Post-2000 Properties: Typically built using modern PVC or ABS plastic. While immune to corrosion, newer lines frequently suffer from crushed sections, poor joint alignment, or belly installation mistakes caused by post-construction heavy machinery traffic.
Real Buyer Scenario: What a Root Intrusion Actually Costs
Consider a buyer purchasing a 1968 ranch-style home with mature oak trees in the front yard. A standard home inspection verified that sinks drained quickly and toilets flushed properly, giving no indication of underlying main line failure.
Initial Discovery: Three weeks after closing, wastewater backed up into the basement shower. An emergency call-out fee totaled $350.
Temporary Snaking: A plumber cleared the immediate blockage using an auger for $300, identifying a major tree root intrusion breaking through clay pipe joints.
Permanent Replacement: The root mass damaged 40 feet of line beyond repair. Trenchless pipe bursting required $7,500, plus $2,200 for lawn and driveway restoration.
Total Unforeseen Out-of-Pocket Expense: $10,350
Sewer Scope Investment Saved: A $300 upfront inspection during due diligence would have caught the issue early, allowing the buyer to negotiate a seller credit or request a full line replacement before closing.
How the Sewer Inspection Process Works
A professional sewer inspection uses advanced video diagnostic equipment to deliver an accurate, real-time assessment of your main lateral drain line. The entire evaluation is non-destructive, requiring no digging or wall disruption to analyze the line’s structural integrity.
1.Camera Insertion at the Main Cleanout:
The technician locates the main sewer cleanout, a dedicated threaded pipe opening usually situated near the building perimeter or in the basement. A specialized, self-leveling waterproof camera attached to a rigid yet flexible cable is carefully guided into the line, streaming live high-definition video back to a field monitor.
2.Video Mapping & Defect Detection:
As the flexible cable advances toward the municipal connection or septic tank, the technician inspects the interior pipe walls for structural compromise, obstructions, and flow restrictions.
Pipe Bellies: Low spots where ground settling causes the line to sag, creating areas of standing water that trap debris and cause recurring backups.
Structural Separation: Shifted or disconnected pipe joints where soil erosion or tree roots have pushed individual pipe sections out of alignment.
Cracks & Fractures: Stress fractures or crushed lines resulting from heavy surface traffic or physical ground shifts.
Blockages & Intrusion: Accumulations of grease, scale build-up, foreign objects, or aggressive root growth invading line connection points.
3.Radio-Frequency Locating for Exact Depth:
When the camera detects a defect, a built-in radio-frequency locator (sonde) emits a signal from the camera head. The inspector scans the ground above with an electronic receiver to pinpoint the exact location, surface position, and pipe depth of the problem area.
How Long Does the Inspection Take?
The overall inspection duration typically ranges between 30 to 60 minutes for a standard residential property. Access simplicity, pipe distance, and the presence of complex clogs or heavy root growth can influence the timeframe.
| Phase | Estimated Duration | Focus |
| Setup & Location | 10–15 Minutes | Finding cleanout access and staging monitor equipment. |
| Camera Feed Push | 15–30 Minutes | Recording video down the lateral line to the municipal main. |
| Locating & Marking | 10–15 Minutes | Mapping surface location and depth of detected defects. |
During the push, the inspector records the entire camera feed, capturing exact distance markers along the line. This documentation ensures you receive an actionable diagnostic report alongside raw video evidence to guide negotiations or future plumbing repairs.
How the Sewer Inspection Process Works
A video sewer inspection utilizes high-definition optical technology to evaluate the physical condition of underground pipes without requiring costly excavation. Professional inspectors follow a standardized protocol to locate access points, record live footage, and map out structural deficiencies in real time.
Step 1: Camera Insertion at the Main Cleanout
The process begins by locating a primary access point, typically a main sewer cleanout, roof vent, or pulled toilet fixture.
Equipment Setup: The technician introduces a self-leveling, waterproof camera attached to a long flexible cable into the pipe.
Lighting and Recording: Ultra-bright LED lights illuminate the interior while the camera transmits a high-definition video feed to a monitor.
Distance Tracking: An integrated mechanical wheel counter measures the exact linear footage traveled from the entry point to monitor line depth and location.
Step 2: What the Camera Detects
As the push rod navigates the system toward the municipal connection or septic tank, the technician inspects the inner walls for structural defects and flow obstructions.
Pipe Bellies: Depressions or sags where standing water and sediment accumulate due to improper grading or soil settling.
Structural Separation: Offsets or dislodged joints caused by ground movement that allow wastewater to leak into surrounding soil.
Cracks and Collapses: Fractures in cast-iron, clay, or PVC pipe material caused by age, pressure, or heavy soil loads.
Blockages and Intrusions: Thick tree root masses, grease accumulation, scale buildup, or foreign debris impeding wastewater flow.
Step 3: Radio-Frequency Locating for Exact Problem Depth
When a structural flaw is detected, the inspector pinpoints its exact position on the surface before retrieving the equipment.
Sonde Transmitters: A specialized radio-frequency locator sonde built into the camera head emits a 512 Hz signal through the pipe walls.
Surface Detection: The technician sweeps a receiver over the ground above to identify the precise coordinates of the line flaw.
Depth Calibration: The receiver measures signal intensity to calculate exact pipe depth beneath soil, concrete, or asphalt, minimizing future excavation costs.
How Long Does the Inspection Take?
A standard camera inspection generally takes 30 to 60 minutes from setup to completion.
Access Availability: Times vary depending on how easily the main cleanout can be accessed.
Pipe Length: Residential lateral runs typically range from 50 to 100 feet, which impacts the total scan duration.
Obstruction Checks: If heavy debris or root masses slow camera progression, additional time may be required to complete the diagnostic run.
For property owners dealing with suspected lateral line damage, scheduling a professional sewer line camera inspection ensures clear video proof and accurate location data before committing to expensive repairs.
City Sewer vs. Septic System — Know the Difference
Determining whether a property disposes of wastewater through a municipal utility or an on-site treatment system changes the scope, cost, and method of a sewer line evaluation. While a standard scope examines the lateral pipe to the street, off-grid properties require evaluating an entirely independent biological waste disposal system.
If the Home Is on a City Sewer Line
Homes connected to a city sewer connection rely on a single underground pipe—the lateral line—to carry household wastewater into the municipality’s public infrastructure.
Ownership Boundary: Property owners are legally responsible for maintaining and repairing the entire lateral line stretching from the house up to the municipal main junction, sidewalk, or curb (depending on local regulations).
Inspection Focus: Scope inspections concentrate on pipe integrity, slope, joint separation, and obstructions along this single continuous pipe run.
Ongoing Costs: Homeowners pay recurring municipal sewer usage fees, but the city handles the ultimate processing, treatment, and infrastructure maintenance beyond the main tie-in.
If the Home Is on a Septic System
Properties operating on a septic system process all household sewage on-site using a sealed septic tank and an underground soil absorption system (drain field).
System Mechanics: Wastewater flows from the home into a underground concrete or polyethylene tank where solids settle into sludge, scum floats to the top, and liquid effluent exits into a perforated pipe network called the drain field.
Inspection Scope: A standard camera scope only evaluates the single line leading from the home’s plumbing into the tank inlet. It does not evaluate the condition of the tank interior or the biological health of the drain field.
Specialized Testing: A full evaluation requires a dedicated septic inspection, which involves opening access risers, pumping the tank, inspecting baffle walls, and flow-testing the drain field to ensure proper effluent absorption.
What Can Fail a Septic Inspection?
Unlike city sewer lines that fail primarily due to pipe damage, a septic system fails when its biological absorption capacity or structural components breakdown.
Drain Field Soil Compaction or Biomat Clogging: Excessive solid waste escaping the tank seals the surrounding soil, leading to surface sewage pooling, foul odors, or water backing up into household drains.
Structural Tank Deterioration: Cracks, corrosion, or collapsed tank walls—often seen in older concrete tanks—allow groundwater intrusion or untreated sewage leaks into the local water table.
Broken or Missing Baffles: Damaged inlet or outlet baffles allow floating scum and heavy solids to escape the tank and permanently clog the drain field lines.
Hydraulic Overloading: Oversaturated soil from high water usage or improper surface runoff drainage prevents the ground from absorbing processed effluent.
Common Problems Found During a Sewer Line Inspection
A video evaluation reveals the exact structural condition of underground piping, identifying defects that impede flow or compromise system integrity. Identifying these issues early allows buyers and homeowners to prioritize repairs before total system failure occurs.
Tree Root Intrusion
Tree root intrusion is the leading cause of main line blockages in clay and cast-iron piping systems. Microscopic roots enter through tiny cracks or loose pipe joints in search of moisture, expanding over time into thick masses that trap solid waste and fracture pipe walls.
Pipe Bellies (Sagging Sections)
A pipe belly occurs when a section of the underground line sinks due to improper trench bedding, soil erosion, or ground settling.
Flow Disruption: Gravitational flow is disrupted, creating a low point where standing water and sediment collect.
Persistent Clogs: Solids and paper collect in the sagging area, creating recurring blockages even if the pipe walls remain structurally intact.
Cracked or Collapsed Pipes
Heavy surface loads, shifting soil, extreme freeze-thaw cycles, or advanced age can cause lateral lines to crack, split, or completely crush. A collapsed pipe completely blocks wastewater flow and causes immediate sewage backups into the home’s lowest plumbing fixtures.
Corroded Cast-Iron or Clay Pipes
Legacy pipe materials deteriorate predictably over several decades of exposure to harsh wastewater chemicals and moisture.
Cast-Iron Lines: Develop severe internal rusting and scaling (tuberculation), creating a rough surface that snags debris and narrows the inner pipe diameter.
Clay Lines: Highly brittle and vulnerable to joint separation, cracking under ground pressure and inviting root penetration.
Severity Levels: Minor vs. Major Defects
Not every issue discovered during a scope requires immediate replacement. Defects fall into distinct categories based on operational risk:
| Defect Severity | Visual Indicators | Recommended Action |
| Minor | Light scale buildup, hairline cracks, minor joint offsets | Annual monitoring; routine maintenance |
| Moderate | Localized tree root intrusion, partial grease accumulation, shallow pipe belly | High-pressure hydro-jetting or mechanical rodding |
| Major | Severe root intrusion, fractured or crushed pipe walls, complete structural separation | Trenchless pipe lining, pipe bursting, or open-trench excavation |
For recurring mainline blockages or severe drain issues, professional clearing methods such as hydro-jetting remove stubborn roots and heavy scale buildup to restore full pipe capacity.
How Much Do Sewer Line Repairs Cost?
Sewer line repair costs range from a few hundred dollars for routine maintenance to tens of thousands for structural pipe replacements. Understanding these pricing tiers gives home buyers and property owners clear financial metrics to negotiate repair credits, price reductions, or escrow holds before completing a purchase.
Minor Repairs (Hydro-Jetting, Clearing): Cost Range
Minor issues involve non-structural blockages where the pipe walls remain intact but wastewater movement is restricted by roots, grease, or heavy scale buildup.
Snaking and Mechanical Augering: Costs $150 to $450 to clear localized clogs or pierce soft obstructions to restore temporary flow.
Hydro-Jetting Cost: Ranges between $350 and $600 for standard residential lines. High-pressure water streams (up to 4,000 PSI) scour internal pipe walls, removing grease buildup and shearing off invasive tree roots.
Chemical Root Treatments: Cost $100 to $300 as a recurring preventative application to retard root growth following mechanical clearing.
Major Repairs (Excavation, Pipe Replacement): Cost Range
Major repairs are required when the main lateral line suffers structural failure, severe bellies, or complete collapse. Pricing depends primarily on the chosen repair technology, depth, and total linear footage.
Traditional Excavation Cost: Ranges from $50 to $250 per linear foot, bringing total replacement projects to $3,000–$12,000+. Open-trench digging requires heavy machinery to excavate landscape, driveways, or sidewalks, adding $1,000 to $5,000+ in surface restoration fees.
Trenchless Pipe Lining (CIPP): Costs $80 to $250 per linear foot ($4,000–$12,000 total). Cured-in-place pipe lining inserts an epoxy-saturated resin liner through an existing cleanout, creating a seamless new pipe inside the old one without trenching.
Trenchless Pipe Bursting: Costs $100 to $200 per linear foot ($3,500–$20,000 total). A hydraulic head fragments the old, damaged pipe while pulling a brand-new HDPE (high-density polyethylene) pipe into the existing void via two small access pits.
Cost Comparison Table: Minor vs. Major Issues
| Repair Type | Scope of Work | Average Cost | Duration | Disruption Level |
| Drain Snaking | Unclogging localized obstructions | $150 – $450 | 1 – 2 Hours | Minimal |
| Hydro-Jetting | Scouring full pipe length with high-pressure water | $350 – $600 | 1 – 3 Hours | Minimal |
| Pipe Lining (CIPP) | Structural resin liner installed inside existing pipe | $4,000 – $12,000 | 1 Day | Low (no excavation) |
| Pipe Bursting | Hydraulic replacement of pipe using access pits | $3,500 – $20,000 | 1 – 2 Days | Moderate (small entry/exit pits) |
| Open-Trench Excavation | Full open-air digging, removal, and pipe replacement | $3,000 – $12,000+ | 2 – 5 Days | High (heavy yard/hardscape damage) |
How to Use the Inspection Report to Negotiate
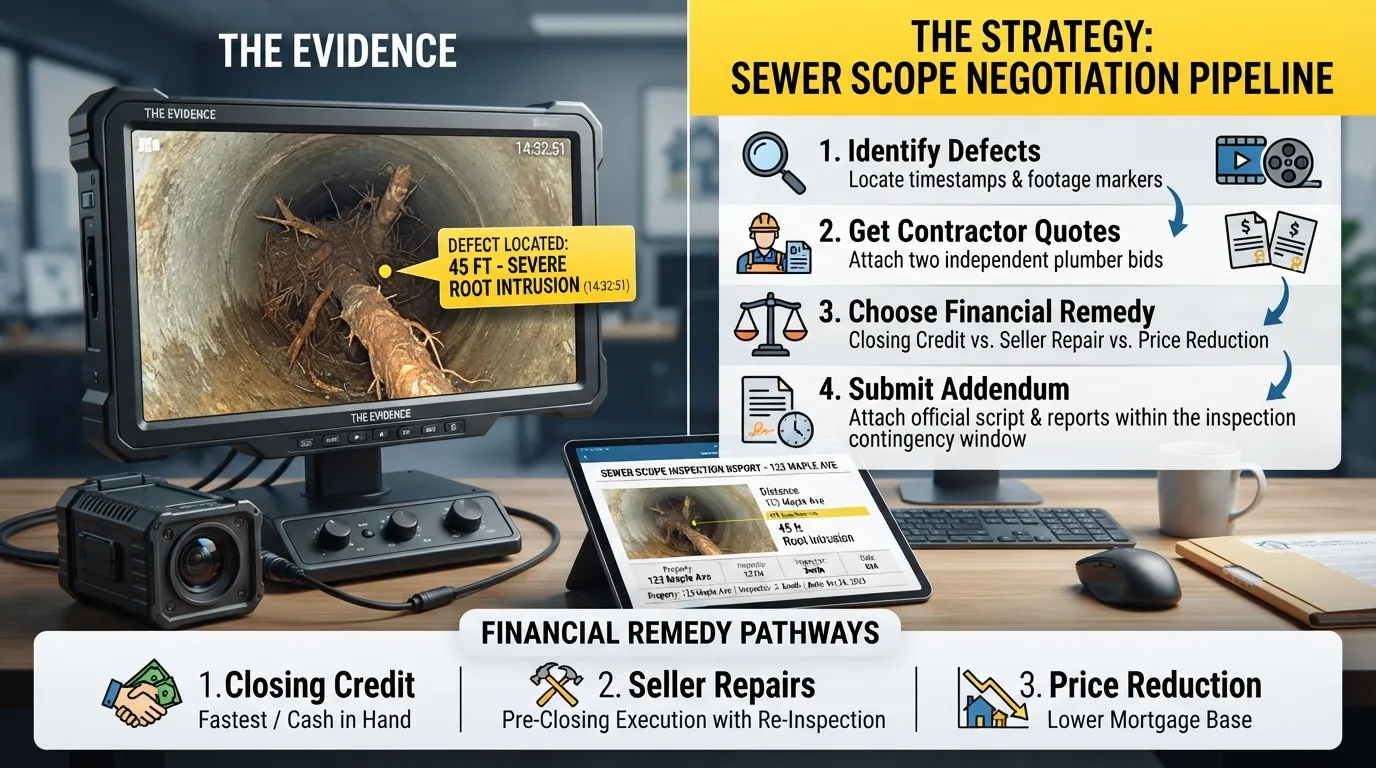
A sewer scope inspection report provides concrete, objective video evidence that transforms abstract repair estimates into hard negotiating leverage. Leveraging these findings within your inspection contingency window allows you to protect your capital through direct price adjustments, financial concessions, or required seller repairs prior to closing.
Reviewing the Video & Written Report
Begin by carefully examining both the written summary and the full-length video footage provided by your inspector.
Locate Key Timestamps: Identify exact footage markers showing structural defects, tree root intrusions, or sagging pipe bellies.
Confirm Distance & Depth: Verify the exact linear distance and depth measurements marked by the locator sonde to support accurate repair estimates.
Obtain Professional Quotes: Share the report and video feed with two independent, licensed plumbers to receive formal line-item repair bids.
Requesting a Closing Credit
Requesting a closing credit (seller concession) is often the cleanest financial remedy for sewer line repairs.
Capital Preservation: Funds are applied directly toward your closing costs or loan fees, leaving cash in your bank account to hire your own trusted contractor post-closing.
Quality Control: Prevents the seller from hiring the cheapest available contractor to perform temporary or substandard repair work.
Lender Limits: Ensure the requested seller concessions do not exceed maximum lender contribution caps for your specific loan type (e.g., conventional, FHA, or VA).
Requesting Repairs Before Closing
If closing credits are restricted by loan guidelines or you lack the cash reserves to manage construction after move-in, you can request that the seller complete repairs prior to closing.
Specify Licensed Professionals: Require in the addendum that all work must be completed by a licensed, bonded, and insured plumbing contractor.
Demand Permits and Warranties: Mandate that all necessary municipal permits be pulled and that transferable repair warranties be handed over at closing.
Re-Inspection Clause: Include a mandatory requirement for a secondary sewer scope inspection at the seller’s expense to verify proper repair execution before final walkthrough.
Asking for a Price Reduction
A purchase price reduction lowers the total agreed purchase price of the property, offering an effective strategy in high-interest-rate environments or competitive markets.
Long-Term Savings: Decreases your total mortgage loan amount and monthly payment over the life of the loan.
Simple Agreement: Requires a straightforward amendment to the purchase contract without complex escrow holdbacks or vendor coordination before closing.
Down Payment Impact: Note that a price reduction lowers the total purchase price but does not immediately put cash in hand for post-closing repairs.
Sample Negotiation Request Script
Share this actionable language with your real estate agent to draft a precise inspection contingency addendum:
Buyer Inspection Addendum Amendment:
“Pursuant to the sewer scope inspection report dated [Date] prepared by [Inspection Company Name], major structural pipe failure (including [e.g., severe tree root intrusion / pipe collapse] at [e.g., 45 feet from the main cleanout]) was identified in the main lateral line.
Buyer requests a seller closing credit of $[Amount, e.g., $6,500] applied toward buyer’s closing costs and prepaids at settlement. In the alternative, Seller shall, prior to settlement and at Seller’s sole expense, engage a licensed and insured plumbing contractor to fully repair/replace the damaged section per the attached written estimate from [Plumbing Company Name], pull all required municipal permits, and provide Buyer with a paid-in-full invoice, warranty documentation, and a clean re-inspection sewer scope video prior to final walkthrough.”
When to Walk Away From the Purchase
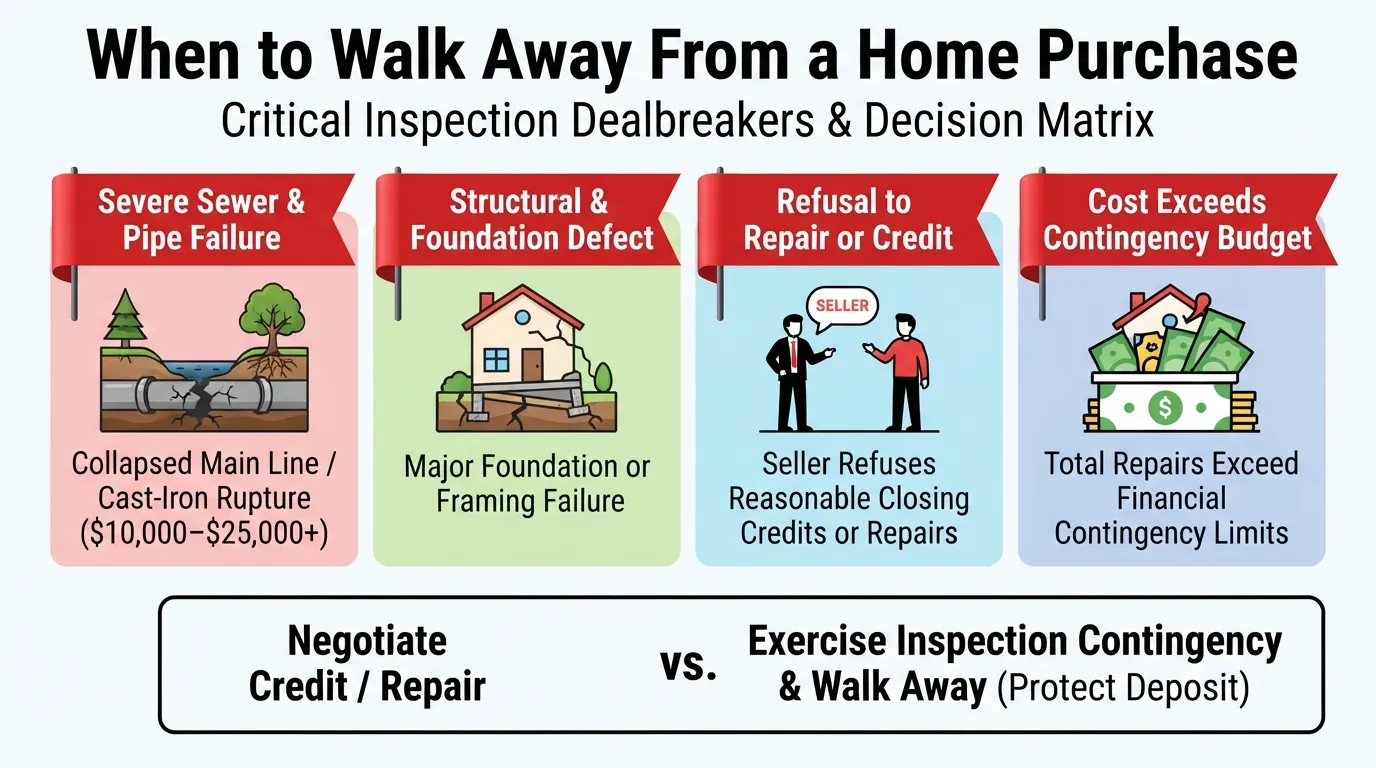
Not every property with a damaged main lateral line is worth fixing. Recognizing when an underground plumbing failure presents excessive financial risk, structural instability, or legal complexity empowers you to make an objective decision and step away from a problematic deal.
Signs the Sewer Line Is Beyond Repair
While most pipe defects can be remediated with sufficient funding, certain environmental and structural conditions make repairs practically unfeasible or financially ruinous.
Full Line Collapse Under Foundations: When a main line completely crushes directly beneath a load-bearing foundation, repair requires extensive slab cutting or tunneling that threatens the structural stability of the home.
Extensive Pitch and Environmental Obstacles: Severe, multi-point bellies across hundreds of feet of soil with negative pitch often require regrading the entire lot or installing expensive sewage ejector pump systems.
Complex Municipal Infrastructure Conflicts: Lateral lines running under neighboring private properties, retaining walls, or deep public roadways often require impossible municipal easements or six-figure excavation budgets.
Using Your Contract’s Inspection Escape Clause
Every standard residential purchase contract should contain an inspection contingency that acts as a legally protected escape clause for the buyer.
Timely Notification: You must deliver written notice of contract cancellation to the seller prior to the expiration of your contractual inspection contingency deadline.
Earnest Money Deposit Protection: Canceling within the contingency period based on professional inspection findings entitles you to a full refund of your earnest money deposit without penalty.
Objective Documentation: Attaching the inspector’s official written report and video findings provides clear documentation, preventing disputes over your right to terminate the contract.
What If the Seller Didn’t Disclose a Known Issue?
If evidence reveals that the seller was aware of a major sewer failure—such as recent plumbing invoices showing repeated emergency augering or previous scope reports—and failed to note it on mandatory property condition forms, legal recourse options open up.
Disclosure Violations: Failing to reveal known material defects on a seller disclosure statement constitutes a breach of statutory disclosure laws in most real estate jurisdictions.
Pre-Closing Rights: Uncovering unfiled disclosures during your due diligence period allows you to terminate the contract immediately, demand full earnest money release, and potentially seek reimbursement for third-party inspection costs.
Post-Closing Legal Recourse: If a undisclosed major failure surfaces shortly after closing and prior knowledge can be proven (e.g., through municipal records or former contractor receipts), buyers can consult a real estate attorney to pursue damages for fraud, misrepresentation, or repair costs.
Who Should Perform the Inspection?
Choosing the right professional to evaluate a property’s main lateral line directly impacts the accuracy of your diagnostic report and your leverage during real estate negotiations. Both specialized home inspectors and plumbing contractors possess video equipment, but their operational focus and potential conflicts of interest differ significantly.
Licensed Plumber vs. Certified Home Inspector
Selecting between a specialized inspector and a master plumber depends on whether you require an unbiased assessment or immediate repair capabilities.
Certified Inspector: Provides a completely unbiased evaluation because they do not perform plumbing repairs. Their sole focus is delivering a clear video recording and an objective assessment to meet standard transaction guidelines.
Licensed Plumber: A licensed plumber possesses the technical expertise to diagnose complex systemic issues and provide immediate repair estimates. However, because they also sell pipe replacement services, home buyers should ensure repair recommendations are backed by unambiguous video evidence.
What Credentials to Look For
To ensure your evaluation stands up during contingency negotiations, verify that your service provider holds industry-standard credentials and adheres to recognized testing protocols.
InterNACHI Certification: Ensure the inspector maintains dedicated sewer scope certification operating under InterNACHI standards, which dictate rigorous video documentation and safety guidelines.
Master Plumber License: If hiring a contractor, verify an active state master plumbing license with active liability insurance and worker’s compensation coverage.
Advanced Technology: Confirm the operator utilizes self-leveling HD cameras equipped with integrated 512 Hz locating sondes and digital distance counters for accurate surface mapping.
Who Typically Pays: Buyer or Seller?
The home buyer almost universally pays for the sewer scope evaluation as part of their voluntary due diligence process.
Buyer-Paid Inspection: The buyer pays out-of-pocket (typically $200–$400) to maintain independent control over the inspector’s selection and report findings.
Seller Coverage Exceptions: Sellers rarely pay for initial evaluations unless they are proactively providing a pre-listing inspection report to streamline a quick sale.
Re-Inspection Costs: If major defects are uncovered and subsequently repaired by the seller prior to closing, the seller typically pays for the follow-up re-inspection scope to confirm the fix.
First-Time Home Buyer FAQ
Below are direct, expert answers to common first-time home buyer questions regarding sewer scope evaluations and property inspection red flags.
Is a Sewer Line Inspection Worth It?
Yes, a sewer line inspection is always worth the investment. Spending $200 to $400 upfront during your due diligence period protects you against hidden, unbudgeted underground pipe failures that cost anywhere from $3,000 to over $15,000 to excavate and repair post-closing.
What Is the Biggest Red Flag in a Home Inspection?
Major structural defects, such as a cracked foundation or a collapsed main sewer line, represent the most severe red flags during a home inspection. Unlike cosmetic issues or minor maintenance tasks, structural failure jeopardizes the safety of the entire building and requires costly, invasive repairs.
Do They Flush Toilets During a Home Inspection?
Yes, home inspectors flush every toilet multiple times during a standard inspection to verify proper drainage, water pressure, and tank refilling. However, simple flushes only confirm functional flow inside the house; they do not reveal underground tree root intrusions, bellies, or structural cracks further down the lateral line.
What’s the Worst Thing a Home Inspector Can Find?
The worst discovery is an active, unmitigated hazard that compromises structural stability or poses immediate health risks. Primary examples include:
Severe foundation movement or structural collapse
Fully crushed or failed underground lateral plumbing lines
Toxic mold contamination caused by persistent, unaddressed water intrusion
Outdated, fire-hazardous electrical systems like knob-and-tube or aluminum branch wiring
What Are 5 Very Important Things Inspected in a Home Inspection?
A comprehensive evaluation focuses on the home’s critical structural and mechanical systems to ensure long-term safety and livability:
Roofing System: Shingle condition, flashing, gutters, and structural decking.
Foundation & Structure: Load-bearing walls, slab integrity, joists, and drainage grading.
Plumbing Infrastructure: Water heaters, supply lines, fixtures, and main drain lines.
Electrical Panel & Wiring: Amperage capacity, circuit breaker health, and wiring safety.
HVAC Systems: Heating and cooling performance, ductwork condition, and safety venting.
Related Plumbing Concerns to Check Before Buying
Evaluating the underground sewer main is a critical component of property due diligence, but internal plumbing failures can prove equally disruptive. Reviewing connected mechanicals and supply infrastructure protects home buyers against unexpected water damage and sudden system breakdowns after settlement.
Leak Detection Before Closing
Unchecked supply or drain leaks can cause hidden structural rot, foundational settling, and toxic mold growth behind finished walls.
Slab and Wall Inspections: Hidden water leaks inside concrete foundations or behind drywall often go unnoticed during casual walkthroughs.
Acoustic and Thermal Tracing: Utilizing professional leak detection technology pinpoints minor moisture breaches without invasive wall removals.
Meter Flow Tests: Verifying that the main water meter remains stationary when all fixtures are off confirms system pressure integrity.
Water Heater Condition Checks
Water heaters operate under constant thermal stress and high pressure, making them a common source of sudden household flooding.
Age and Tank Integrity: Storage tank units older than 10 to 12 years present an elevated risk of sudden bottom-plate rupture or severe internal sediment scaling.
Anode Rod Corrosion: Depleted sacrificial anode rods accelerate interior tank rusting, leading to discolored water and premature heating element failure.
Comprehensive Evaluation: Ordering a targeted water heater condition check ensures proper temperature-pressure relief (TPR) valve function, adequate venting, and leak-free connections prior to closing.
Emergency Plumbing Red Flags
Certain plumbing deficiencies present an immediate hazard that can transform a minor maintenance concern into an urgent crisis on move-in day.
Active Sewage Backups: Water pooling around basement floor drains or lower-level fixtures signals a compromised main line that requires immediate intervention.
Corroded Main Shut-off Valves: Stuck, frozen, or heavily corroded main water shut-off valves prevent homeowners from stopping sudden pipe bursts.
Immediate Mitigation: Recognizing an active emergency plumbing issue during your pre-closing walkthrough gives you immediate leverage to demand urgent seller repairs before taking possession.
Secure Your Investment Before You Close
A sewer scope evaluation provides crucial clarity regarding a property’s most expensive underground infrastructure. Verifying the physical integrity of the main lateral line ensures you enter closing with complete financial confidence and maximum negotiating leverage.
Key Takeaways Before You Close on a Home
Uncover Hidden Defects: Fiber-optic camera technology reveals root intrusions, pipe bellies, and structural breaks that standard home inspections miss.
Protect Your Budget: Spending $200 to $400 during due diligence prevents thousands of dollars in unexpected, post-closing excavation costs.
Maximize Negotiating Power: Detailed video footage and professional estimates allow you to secure closing credits, seller-paid repairs, or price reductions.
Verify System Boundaries: Confirming whether the property connects to municipal sewer lines or an on-site septic system dictates your long-term maintenance responsibilities.
Schedule a Professional Sewer Inspection
Do not let hidden underground pipe damage transform your home purchase into a costly financial burden. Protect your investment, safeguard your cash reserves, and gain total peace of mind throughout the closing process by booking a comprehensive camera evaluation today.
Ready to inspect your main lateral line before finalizing your contract? Schedule Your Professional Sewer Inspection Today to secure expert diagnostic video proof before move-in day.
Main Services
Related Posts
Need a Plumber in Miami?
Schedule service online or speak directly with the EZ Plumbing team.
Owner-Led Local Service
Know who is behind the business before you request service. The owners, contact line and Miami service pages are published clearly.
- Named business owners
- Direct phone and social channels
- Local Miami service information
Clear Help Before You Book
Review the relevant service page, contact the team directly and use the booking page when you are ready—without relying on vague claims.
- Service-specific information
- Direct questions before scheduling
- Clear online booking route