
How to Get Wax Out of the Sink Surface & Drain Fix
Why Wax Gets Stuck in Sinks & Drains
Pouring melted wax—whether from a broken candle or a grooming session—down the basin is a recipe for disaster. Because wastewater pipes are cold, liquid wax solidifies instantly upon contact, coating the interior walls and forming a stubborn barrier that traps hair, soap scum, and debris.
Understanding the root cause of this stubborn buildup is the first step toward choosing the right removal method and preventing costly plumbing repairs.
Candle Wax vs. Hair Removal Wax — Does It Matter?
The chemical composition of the wax dictates how it behaves inside your sink and how difficult it will be to remove. Paraffin, soy, and beeswax used in candles have different melting points and textures compared to the polymers found in hard or soft cosmetic hair removal waxes.
- Candle Wax: Typically harder and more brittle when cold. It tends to fracture into small pieces if scraped, but stubborn layers can form a solid sheet over porcelain or ceramic surfaces.
- Hair Removal Wax: Often formulated with resins, oils, and polymers designed to stay pliable. This makes it stickier, allowing it to grip pipe walls aggressively and entangle with organic waste in the P-trap.
- Melting Point Variances: Candle wax generally melts at lower temperatures (around 45°C to 60°C), whereas certain professional epilatory waxes require higher heat thresholds to break down safely.
Surface Wax vs. Drain-Clogged Wax (Quick Self-Diagnosis)
Before tackling the cleanup, you need to diagnose whether your problem is isolated to the sink basin or hidden deeper within the plumbing infrastructure. Pinpointing the location determines whether you need a simple scraper or specialized pipe-clearing techniques.
- Surface Wax Diagnosis:
- Hardened droplets or sheets are visible on the porcelain, acrylic, or stainless steel basin.
- Water still drains, but the wax is unsightly and slippery.
- Can be resolved using gentle physical scraping or thermal loosening methods directly in the basin.
- Drain-Clogged Wax Diagnosis:
- Water pools in the sink or drains sluggishly after a disposal accident.
- Gurgling sounds occur when other fixtures nearby are used.
- The blockage is likely concentrated further down in the sink’s P-trap or vertical tailpiece, requiring physical disassembly or targeted heat treatment.
Essential Action Summary
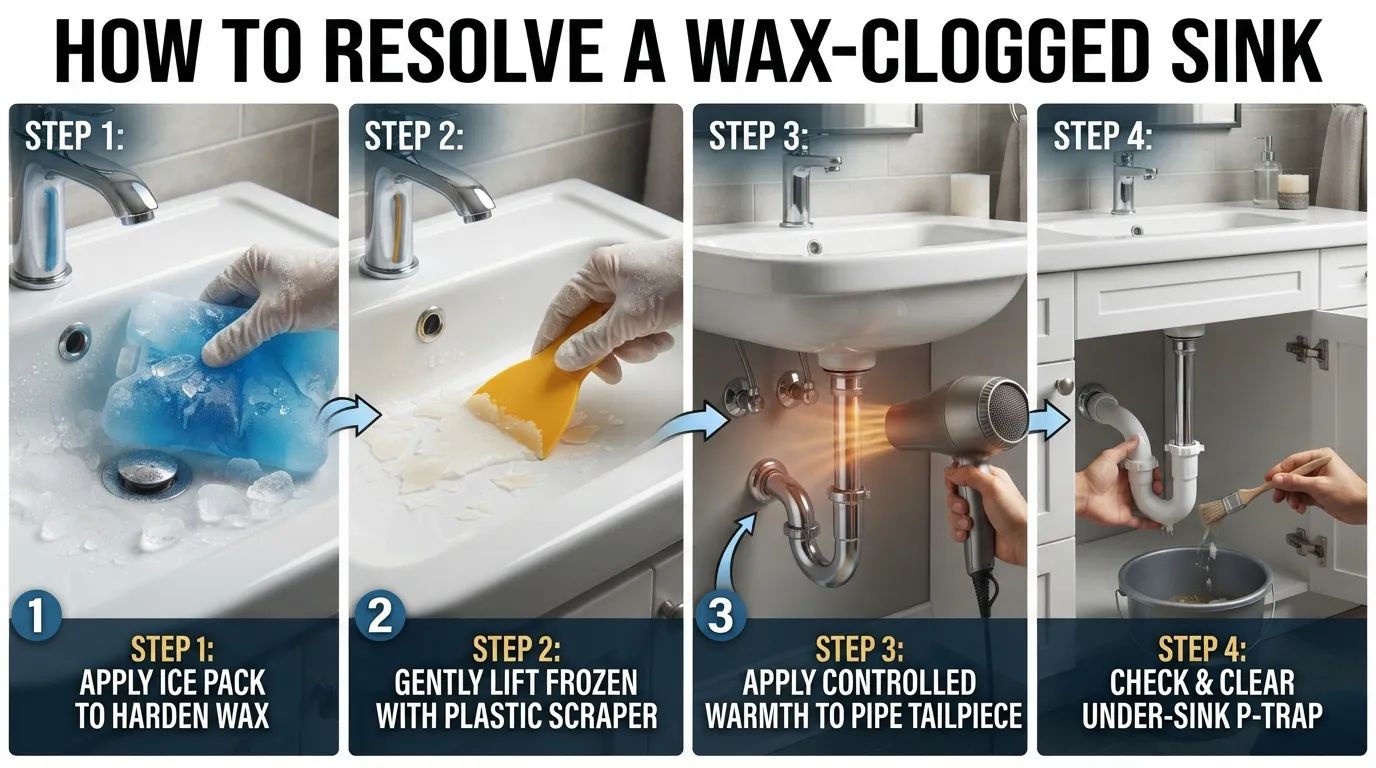
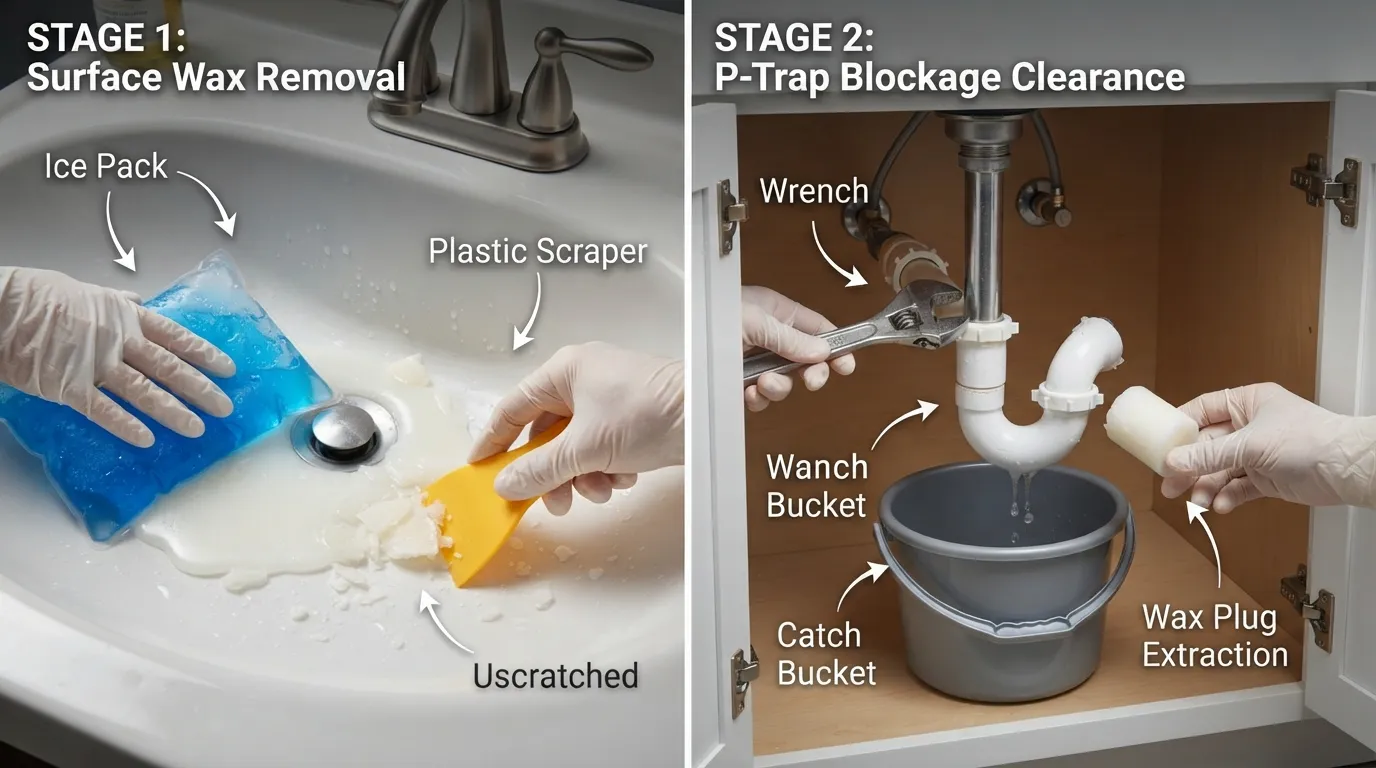
When wax clogs your sink or coats the basin, resolving the issue quickly prevents severe plumbing blockages. Follow these immediate steps to handle the problem safely:
Freeze Surface Spills: Place ice inside a plastic bag and press it against the wax to harden it completely.
Lift Carefully: Use a flexible plastic scraper to gently pop the brittle wax off the basin without scratching the surface.
Apply Targeted Heat: Use a hairdryer to warm the exterior tailpiece, or flush carefully with hot soapy water for minor buildup.
Clear the Trap: Disassemble and clean out the under-sink P-trap if the cold method or heat treatment does not restore water flow.
How to Remove Wax from the Sink Basin Surface
Removing spilled wax from the basin requires patience and the correct temperature management to avoid scratching ceramic, porcelain, or metal. Treating the wax properly ensures the surface remains undamaged while completely eliminating oily residues.
Step 1 — Let the Wax Harden Completely (Cold Method)
Allowing the wax to cool and harden fully is essential before attempting any removal. Never try to wipe or scrub liquid wax, as this only smears the residue deeper into microscopic pores.
Press a bag filled with ice cubes directly against the spill for a few minutes.
The drop in temperature causes the wax to contract, making it brittle and significantly easier to lift off the surface.
Step 2 — Scrape Gently Without Scratching the Surface
Once the wax is thoroughly chilled and solid, physical removal can begin safely. Using the wrong tool can permanently ruin the finish of your sink basin.
Use a flexible plastic scraper, an old credit card, or the rounded edge of a plastic spoon [00:16].
Gently wedge the edge underneath the hardened wax sheet to pop it away from the basin without gouging the material.
Step 3 — Use a Hairdryer to Lift Stubborn Residue
After peeling away the bulk of the solid wax, a thin greasy film or stubborn patch often remains. Applying gentle thermal energy releases its bond to the sink.
Switch a hairdryer to its warm setting and hold it a few inches away from the remaining wax residue [00:16].
As the wax softens slightly, wipe it away immediately using dry paper towels before it can re-solidify. Follow up by washing the area with warm water and dish soap to cut through any residual grease.
Source: DIY Wax Clogged Sink Repair [00:16]
Special Care for Porcelain vs. Stainless Steel Sinks
Different sink materials react uniquely to tools and cleaning agents, requiring tailored approaches to prevent cosmetic damage.
Porcelain Sinks: Highly susceptible to scratching and chipping. Avoid metal tools entirely; rely strictly on plastic scrapers and non-abrasive cloths.
Stainless Steel Sinks: More resilient against physical scraping, but vulnerable to harsh scouring pads that leave unsightly grain marks. Stick to soft microfiber towels and gentle motion following the metal’s grain.
How to Remove Wax from a Clogged Drain / P-Trap
When liquid wax enters a drain, the cold water trapped inside the plumbing immediately solidifies it into a dense plug. Chemical drain cleaners will not dissolve wax; physical removal or manual disassembly of the under-sink plumbing is the most reliable way to clear the blockage safely.
Tools You’ll Need Before You Start
Gathering the proper equipment beforehand prevents messy spills and speeds up the removal process under the sink cabinet.
Adjustable pliers or channel locks
Large bucket or catch basin
Flexible plastic scraper or blunt butter knife
Hot soapy water and liquid dish soap
Household bleach and a stiff cleaning brush
Rags or paper towels for cleanup
Step 1 — Place a Bucket Under the P-Trap
Before loosening any pipe connections, position a large bucket directly beneath the curved P-trap section. The trap holds standing water designed to block sewer gases, and this water will immediately spill out once the seals are broken.
Source: Removing a P-Trap to Clear Wax Clog
Step 2 — Unscrew the Slip Nuts
The curved U-bend pipe is held in place by two plastic or metal slip nuts located at either end of the assembly.
Turn the slip nuts counterclockwise by hand; most plastic plumbing nuts are designed for hand-tightening.
If the nuts are metal or locked tight due to mineral buildup, carefully apply adjustable pliers to break the initial seal without cracking the pipe walls.
Step 3 — Lower the Trap and Drain the Water
With both slip nuts unthreaded, carefully pull the P-trap straight down off the vertical tailpiece and horizontal wall extension.
Tilt the curved pipe downward to dump the trapped standing water and loose debris directly into your catch bucket.
Inspect both ends of the detached U-bend as well as the open end of the sink tailpiece to locate the primary concentration of the wax clog.
Step 4 — Scrape Out the Hardened Wax
Because wax adheres to pipe walls, you must physically break apart the obstruction to clear the airway completely.
Insert a blunt butter knife, wooden skewer, or flexible plastic scraper into the open ends of the pipe to dislodge hardened chunks.
Push the loosened wax plugs into your bucket—never wash solid wax pieces back down another house drain, as this will transfer the clog further into your main plumbing line.
Step 5 — Clean the Pipe and Reassemble
Once the bulk of the wax is removed, clean the interior surface to wash away any remaining slick residue or bacterial buildup.
Scrub the interior of the disassembled pipe sections using hot soapy water mixed with a small amount of bleach to degrease the walls and kill odor-causing bacteria.
Reattach the U-bend to the sink assembly, hand-tighten the slip nuts, and run cold water for two minutes to conduct a thorough leak check.
If physical disassembly fails to clear deep pipe obstructions beyond your under-sink area, scheduling professional drain cleaning will ensure your home’s main branch lines are restored without damaging the underlying pipework.
Plastic vs. Metal P-Trap — What Changes
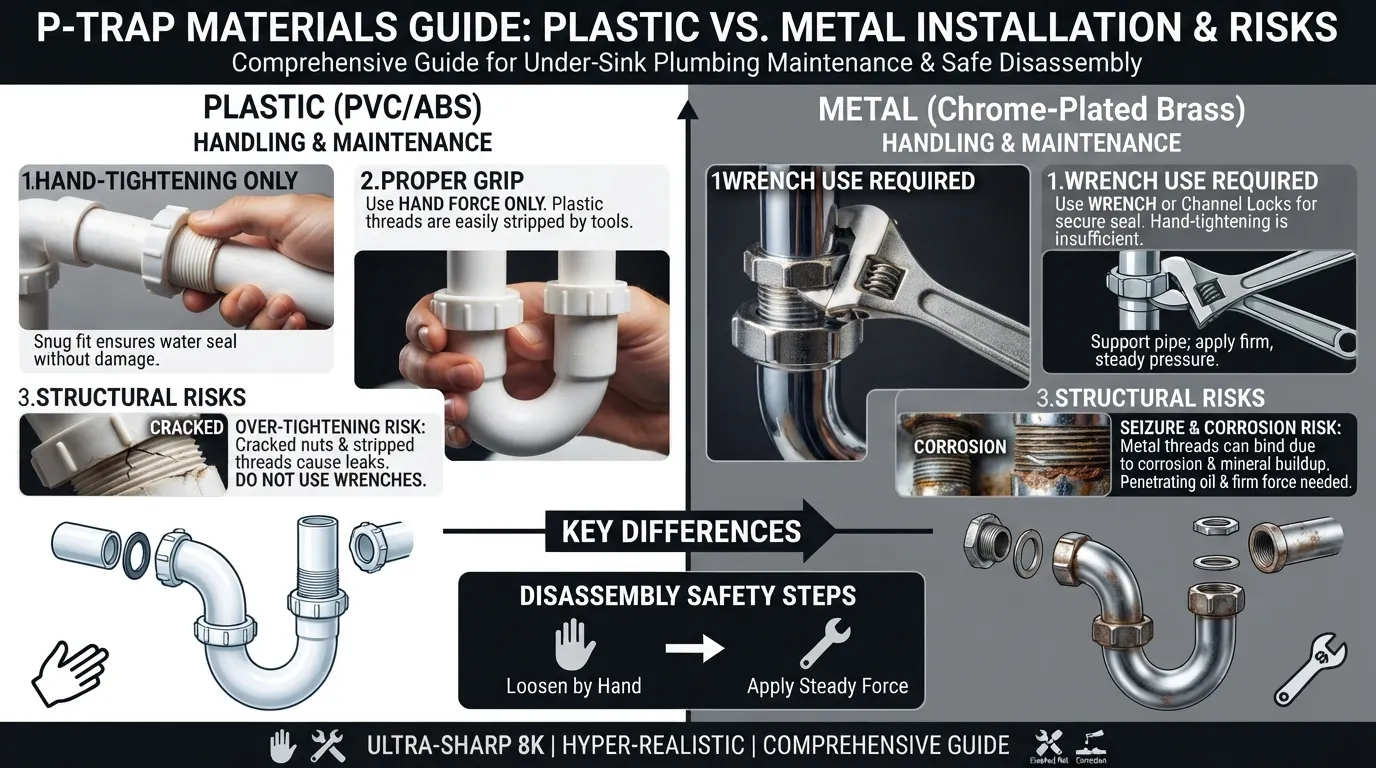
The material of your under-sink plumbing dictates how much physical force you can safely apply during disassembly. Recognizing whether you are working with a plastic P-trap or a metal P-trap prevents cracked fittings, stripped threads, and unexpected leaks during the wax removal process.
Working with a Plastic P-Trap Safely
Modern residential bathrooms and kitchens almost universally use PVC or ABS plastic drain assemblies. They are resistant to corrosion but require a gentle touch to avoid structural failure.
Hand-Tightening Standard: Slip nuts on a plastic P-trap are designed to be loosened and secured entirely by hand.
Tool Caution: Never use heavy wrenches on plastic nuts; gripping them with metal jaws will easily crush, warp, or crack the soft polymer fittings.
Gasket Inspection: Check the rubber slip washers inside each connection; if they are flattened or brittle, replace them before reassembly to maintain a watertight seal.
Working with a Metal P-trap Safely
Older homes or high-end architectural builds often feature chrome-plated brass or copper plumbing lines. While much more durable against physical impact, metal systems come with their own set of challenges.
Corrosion Resistance: Metal threads can seize together over time due to mineral deposits and oxidation, requiring a lubricant or penetrating oil to break free.
Controlled Leverage: Use a smooth-jawed adjustable wrench or channel locks, wrapping the metal nut in a cloth or tape first to protect the decorative chrome finish from scratching.
Gasket Sealing: Metal traps may rely on slip-joint washers or ground-joint slip rings; ensure they seat flush against the pipe collar to prevent slow weeping leaks.
Common Mistakes That Crack or Damage the Trap
Avoiding common plumbing blunders during a DIY repair saves you from emergency water damage and unexpected replacement costs.
Over-Tightening: Crushing plastic slip nuts past the point of hand-tight resistance causes the plastic to warp and leak immediately.
Forcing Metal Wrenches: Applying excessive torque with a pipe wrench on soft PVC threads will instantly strip or snap the connection collar.
Ignoring Alignment: Misaligning the vertical tailpiece and the horizontal wall tube before tightening creates uneven stress, leading to cracked pipe walls under pressure.
What NOT to Do — Common Mistakes That Make It Worse
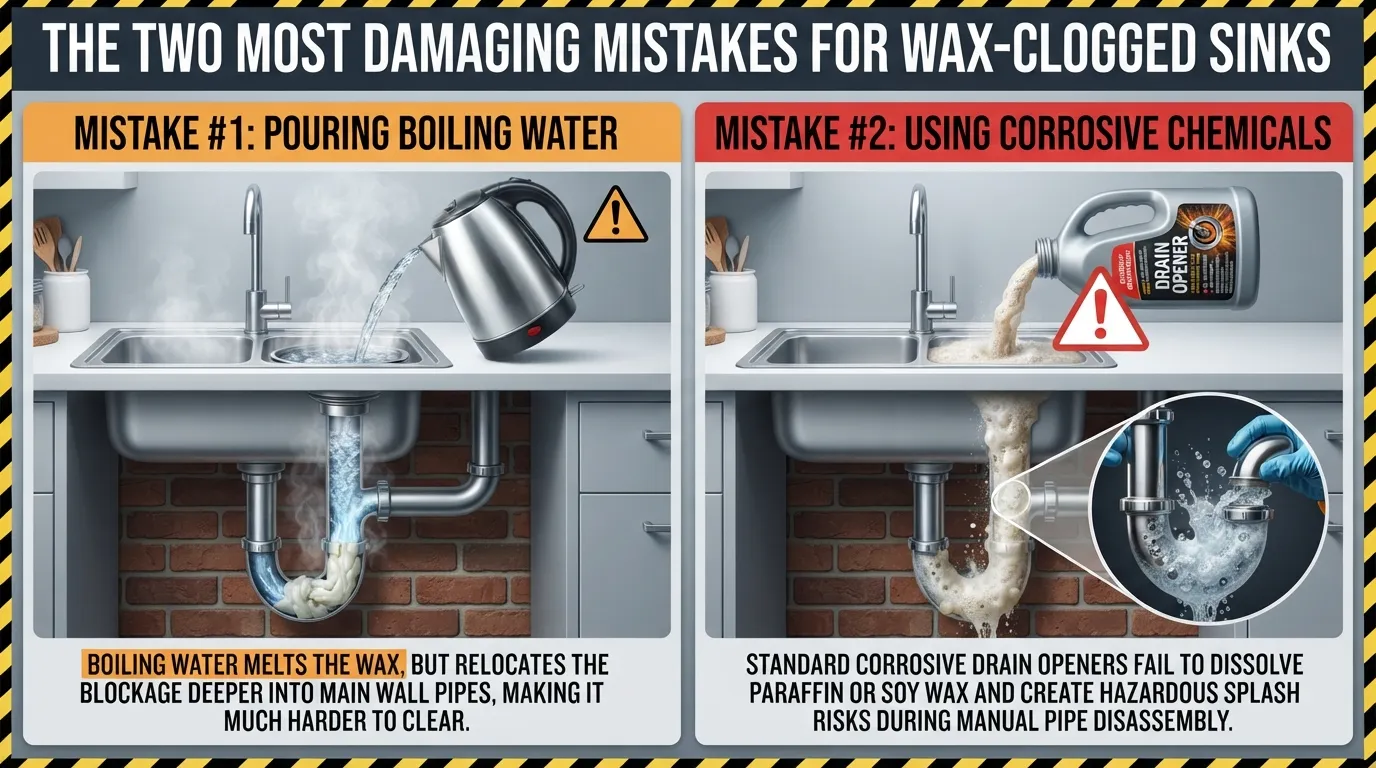
When faced with a stubborn wax clog, it is tempting to dump boiling water or harsh chemicals down the drain. However, these quick fixes often backfire, transforming a localized under-sink issue into an expensive plumbing emergency.
Why Boiling Water Can Make the Clog Worse
Pouring boiling water down a wax-filled drain seems logical, but fluid dynamics in plumbing work against you. Liquid wax melts at a relatively low temperature and floats on top of standing water.
Relocating the Blockage: Boiling water liquefies the solid wax plug, allowing it to flow past the easily accessible P-trap and further down into your home’s narrow main plumbing line.
Cooling and Re-solidifying: As the melted wax travels away from the hot water source and encounters cold drain pipes hidden inside your walls, it solidifies again.
Creating a Deep Obstruction: This creates a much larger, inaccessible blockage deep within your infrastructure that requires professional hydro-jetting to clear.
Why Chemical Drain Cleaners (Like Drano) Don’t Work on Wax
Commercial chemical drain cleaners are formulated to dissolve organic matter such as hair, grease, and soap scum, but they are entirely ineffective against petroleum- or plant-based waxes.
Incompatible Chemistry: Paraffin, soy, and cosmetic waxes do not react to the caustic sodium hydroxide or bleach solutions found in standard chemical drain openers like Drano.
Chemical Splash Hazards: Pouring a harsh chemical drain cleaner into a clogged sink often results in the liquid pooling on top of the wax. If you must later disassemble the pipes manually, trapped chemicals can splash back, causing severe skin and eye burns.
Pipe Degradation: Letting corrosive chemicals sit stagnant against a wax plug increases the risk of damaging older PVC seals or corroding metal pipe threading.
Best Cleaning Agents for Wax — What Actually Works
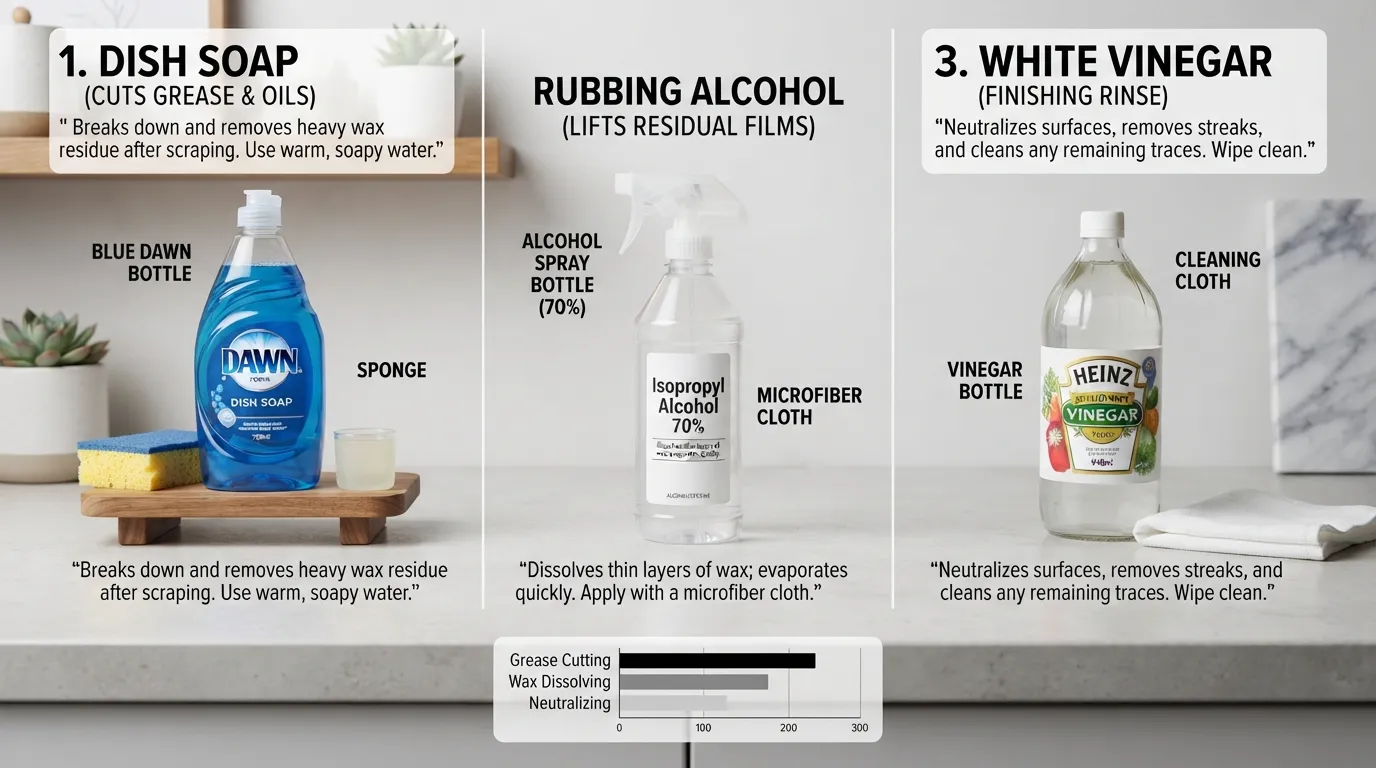
When cleaning up residual wax or tackling light grease films after a physical scrape, choosing the right solvent is critical. Because wax does not dissolve easily like salt or sugar, it requires targeted household agents to break its grip on surfaces.
Does Vinegar Dissolve Wax?
Vinegar is a staple household cleaner, but it has severe limitations when dealing with wax-based messes.
No Dissolving Power: Acetic acid cannot break down or dissolve paraffin, soy, or cosmetic waxes chemically.
Effective as a Finisher: While vinegar won’t melt or dissolve the wax itself, it works well as a final rinse to strip away soap scum and water spots once the bulk of the wax is physically removed.
Does Dawn Dish Soap Remove Candle Wax?
Dish soap alone will not dissolve solid wax chunks, but it plays a crucial role in the final cleaning stages.
Cuts Oily Residue: Formulas like Dawn dish soap are powerful surfactants designed to break down greasy, oily residues left behind after melting or scraping.
Post-Scrape Cleanup: Once you remove the solid wax block from your sink, washing the area with hot water and dish soap ensures no slippery film remains on the basin walls.
Does Rubbing Alcohol Remove Candle Wax?
Rubbing alcohol (isopropyl alcohol) is one of the best household solvents for cleaning up thin wax films or small wax droplets.
Softens and Lifts: Applying rubbing alcohol to a cotton ball or microfiber cloth helps loosen thin layers of wax stuck to countertops or sink rims.
Surface Safe: It evaporates quickly without leaving a residue, making it ideal for detailing smooth ceramic, porcelain, or stainless steel surfaces after manual scraping.
What Is the Fastest Way to Melt Candle Wax?
The fastest way to eliminate surface wax without damaging your fixtures is through controlled, direct thermal energy.
Targeted Heat: Using a hairdryer on a warm setting applies enough heat to soften the wax without warping plastic components or cracking porcelain.
Avoid Open Flames: Never use a heat gun or open flame to melt wax in a sink basin, as extreme temperature shocks will crack ceramic bowls and ignite plastic plumbing fittings.
Deep Clogs in the Wall Pipe — When to Call a Professional
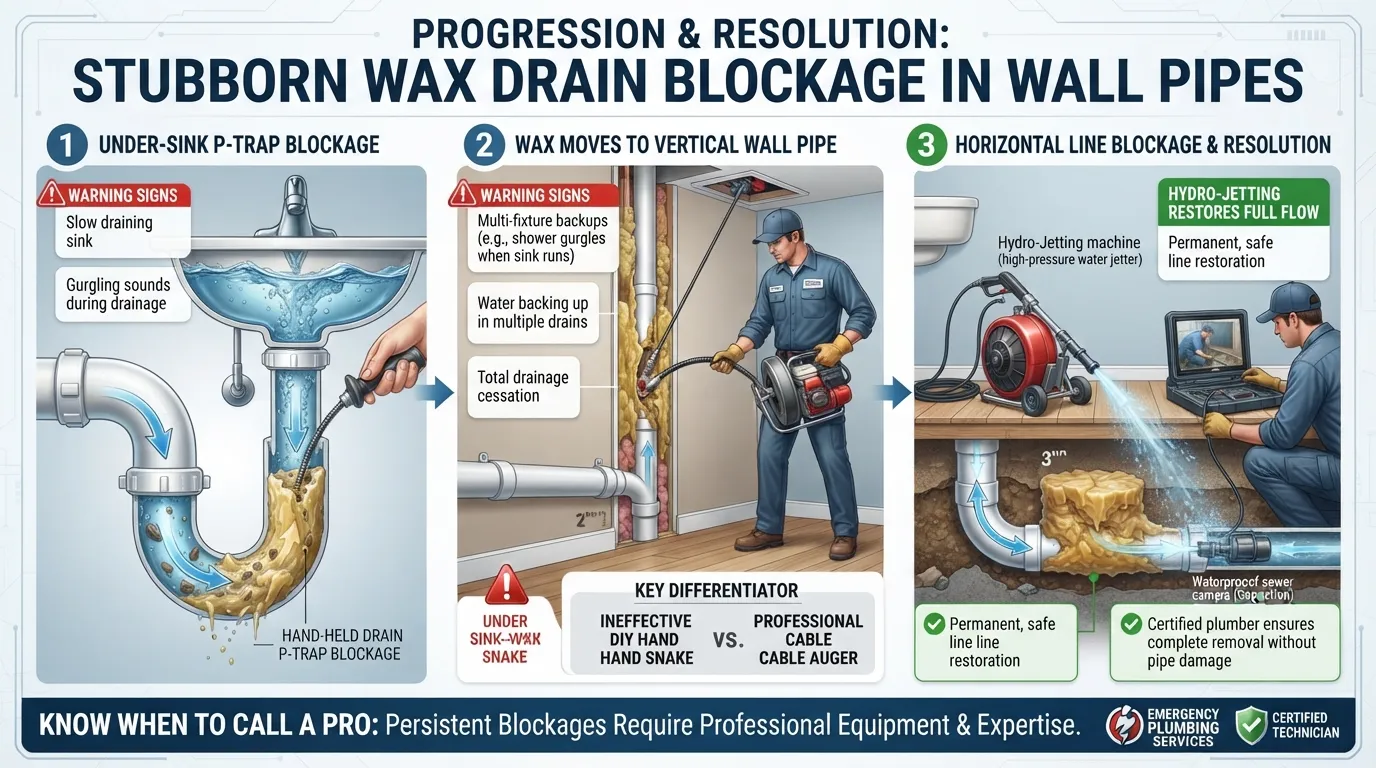
If clearing the under-sink P-trap does not restore normal drainage, your wax blockage has likely migrated deeper into the galvanized or PVC wall pipe. At this stage, standard DIY fixes are no longer effective, and attempting aggressive home remedies can rupture aged plumbing infrastructure.
Signs the Clog Is Beyond the P-Trap
Pinpointing the location of a persistent blockage helps you avoid wasting time on fixes that target the wrong area.
Persistent Backups: Water continues to back up into the sink basin immediately after reassembling a clean, wax-free P-trap.
Multi-Fixture Impact: Using nearby fixtures like a shower, toilet, or secondary bathroom sink causes gurgling or bubbling sounds in your primary sink.
Total Flow Cessation: No water drains at all, even though the tailpipe and U-bend are completely clear of physical debris.
Why DIY Tools Won’t Reach a Wall-Pipe Clog
Standard household troubleshooting methods are severely limited once a blockage extends past the immediate sink connections.
Drain Snake Limitations: A standard hand-cranked drain snake often punches a small hole right through a hardened wax plug instead of removing it, allowing water to flow temporarily before re-clogging.
Lack of Thermal Control: Homeowners lack the specialized thermal equipment required to safely melt and flush petroleum-based wax out of vertical stack lines.
Risk of Structural Damage: For detailed guidance on wax-related drain blockages , industry experts emphasize that deep line obstructions require specialized mechanical intervention.
When It’s Time to Call an Emergency Plumber
When a wax clog compromises your entire bathroom or kitchen drainage system, bringing in licensed specialists is the safest course of action.
Hydro-Jetting Power: Professionals utilize high-pressure water jetting equipment to thoroughly scour pipe walls, stripping away hardened wax without damaging home piping.
Preventing Water Damage: Contacting an experienced emergency plumber prevents catastrophic greywater backups from flooding your cabinets and subflooring.
Guaranteed Results: Booking a professional drain cleaning service ensures your main sewer line is cleared permanently.
Need Immediate Assistance? Don’t let a hardened wax blockage risk your home’s infrastructure. Book a plumber now for expert diagnosis and rapid pipe restoration.
How to Prevent Wax from Clogging Your Sink Again
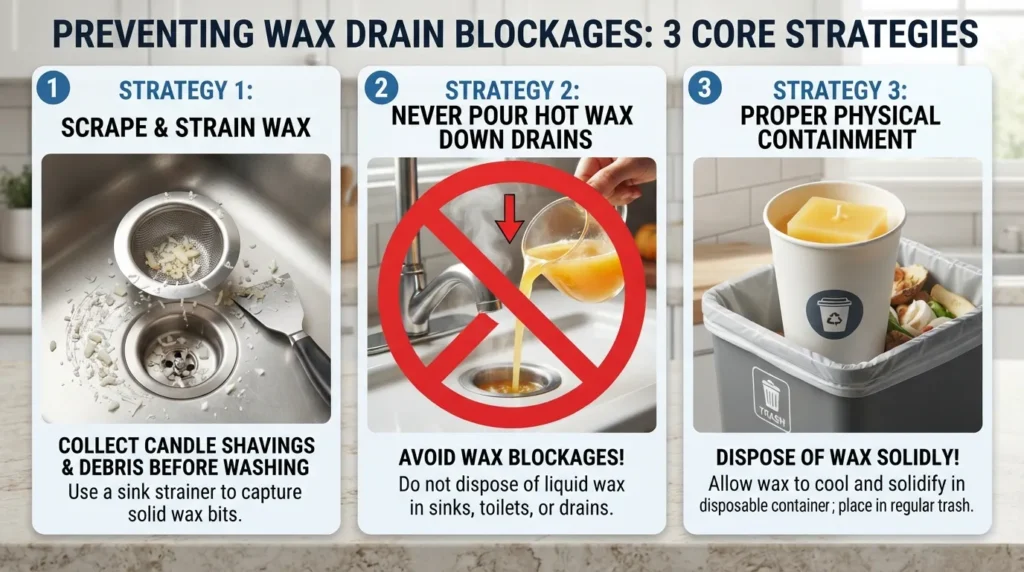
Preventing future wax blockages is far easier and less expensive than dealing with a plumbing emergency or disassembling under-sink pipes. Implementing a few simple cleanup and disposal habits protects your plumbing infrastructure from accidental buildup.
Use a Sink Strainer When Trimming or Cleaning Candles
Water running directly over loose candle shavings, wax chips, or cosmetic debris quickly carries those particles down the drain where they reform into clogs.
Catch Debris Early: Place a fine-mesh sink strainer over the drain opening whenever you scrape, carve, or clean wax containers in the bathroom or kitchen.
Empty into Trash: Shake the collected flakes and solid pieces directly into the garbage bin before turning on the faucet.
Never Pour Melted Wax Down the Drain
The golden rule of handling liquid wax is that it should never cross the threshold of any household basin or toilet.
Instant Solidification: Wastewater pipes are naturally cold, causing liquid wax to solidify in seconds and coat the interior pipe walls.
Compound Blockages: Even if the wax manages to pass through the immediate sink trap, it collects hair, grease, and soap scum further down, forming an impenetrable barrier.
Proper Wax Disposal (Can You Throw Candle Wax in the Garbage?)
Disposing of old or leftover wax safely requires containing it so it cannot melt or leak inside your waste bin.
Solid Waste Acceptance: Yes, cooled and hardened candle wax or hair removal wax is completely safe to throw into your regular household trash.
Containment Tips: Pour hot or melted wax into a disposable paper cup, an empty milk carton, or lined foil before letting it harden completely, then toss the entire container into the garbage.
Avoid Garbage Disposals: Never feed wax into a garbage disposal, as the grinding blades will only smear the waxy substance across the internal chambers and motor housing.
Related Wax Cleaning Scenarios Quick Referenc
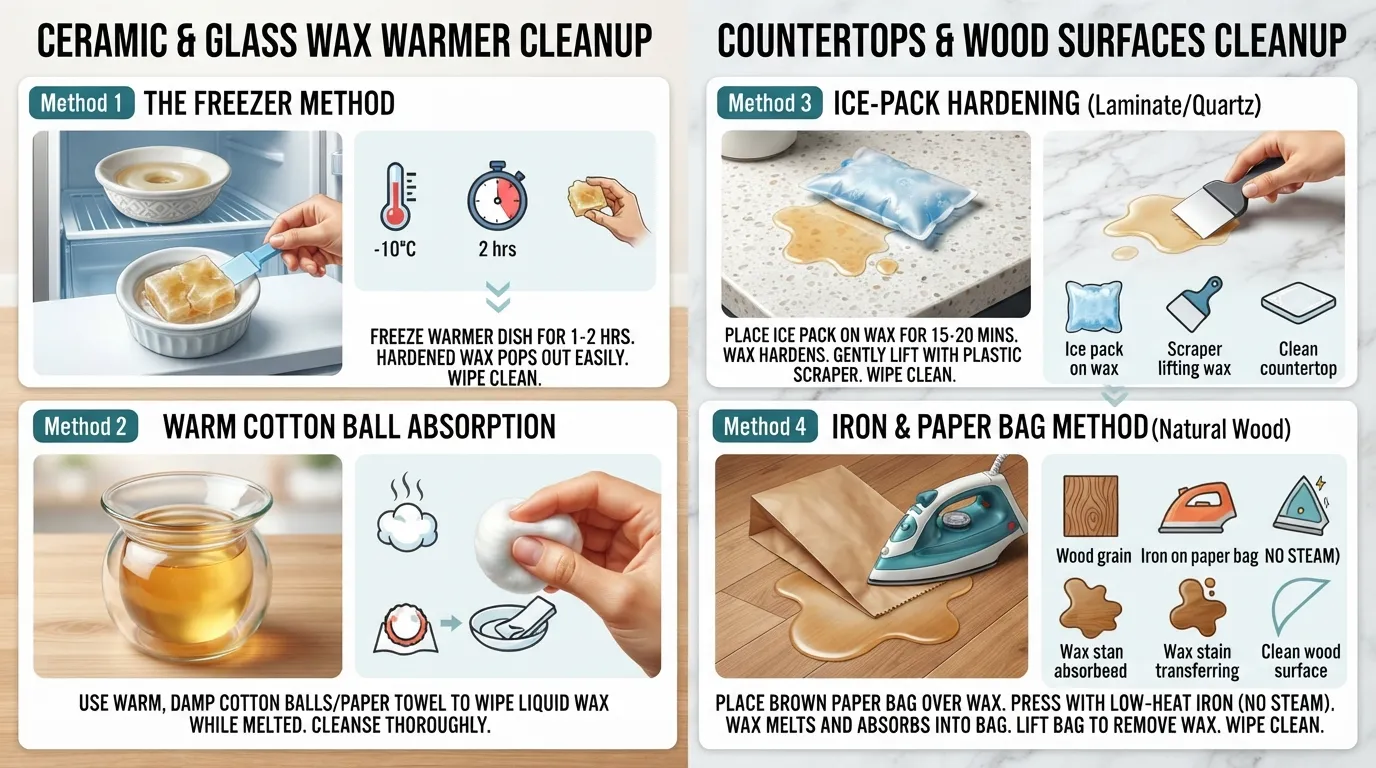
Spilled wax is rarely confined exclusively to sink basins. Whether you are dealing with a spilled warmer or an accidental desk drip, using the right technique protects surrounding household surfaces from lasting stains and physical damage.
Cleaning Wax Out of a Wax Warmer
Electric and tealight wax warmers accumulate hardened wax reservoirs that require safe removal without scratching the heating dish.
The Freezer Trick: Detach the removable ceramic or glass dish and place it in the freezer for ten to fifteen minutes; the wax will naturally shrink and pop out in one solid piece.
Warm Cotton Ball Absorption: If the dish cannot be removed, turn on the warmer for just a minute to slightly soften the bottom layer, then absorb the loosened wax using dry cotton balls or paper towels.
Removing Wax from Countertops or Wood Surfaces
Accidental wax spills on laminate, quartz, or natural wood require careful solvent management to avoid stripping protective finishes.
Countertop Care: Place an ice pack over the spill until hardened, lift the bulk with a plastic card, and wipe any remaining oily film using a soft microfiber cloth dampened with rubbing alcohol.
Wood Surface Protection: Never scrape wood directly with sharp metal objects; instead, lay a brown paper bag over the wax and press a household iron on a low, warm setting to melt the wax into the paper.
Frequently Asked Questions
What Will Dissolve Wax?
Petroleum-based and plant-based waxes do not dissolve easily like salt or sugar. Instead of chemical solvents, wax dissolving typically relies on thermal energy or physical removal methods. Rubbing alcohol can help break down thin residual films on smooth surfaces, but physical scraping or melting with controlled heat is required for solid blocks.
What Happens If Candle Wax Goes Down the Drain?
When liquid wax enters your plumbing, it contacts cold wastewater and solidifies instantly. This hardened wax coats the interior walls of your pipes, creating a sticky trap that catches hair, soap scum, and everyday debris, eventually resulting in a complete candle wax drain blockage.
Will Drano Melt Wax?
No, standard chemical drain openers like Drano are designed to break down organic matter such as hair, grease, and soap scum, but they have no chemical effect on paraffin, soy, or cosmetic waxes. Pouring harsh chemicals into a wax-clogged drain only creates a hazardous splash risk when you attempt to disassemble the plumbing later.
Can I Throw Candle Wax in the Garbage?
Yes, once candle wax or hair removal wax has cooled and hardened completely, it is safe to throw away. For easy disposal, let the melted wax harden inside a disposable container or foil lining before tossing the entire piece directly into your household trash, avoiding your garbage disposal entirely.
Does Wax Dissolve in Vinegar?
No, vinegar cannot break down, melt, or dissolve candle and cosmetic waxes because acetic acid lacks the necessary chemical properties. While vinegar is a fantastic household cleaner for stripping away mineral deposits and soap scum, it will have no effect on a solid wax blockage.
Conclusion & Next Steps
Dealing with wax in your sink or drain can feel overwhelming, but with the right methodical approach—whether freezing surface spills or manually clearing the P-trap—you can restore proper drainage safely. Patience and correct technique protect your plumbing infrastructure from accidental damage.
Surface Spills: Harden the wax using an ice pack, then gently lift it off ceramic or stainless steel using a plastic scraper.
Drain Blockages: Safely disassemble the under-sink P-trap to physically extract solid wax plugs instead of relying on ineffective chemical cleaners or boiling water.
Prevention: Always use a fine-mesh sink strainer and dispose of liquid wax securely in the trash rather than pouring it down any household drain.
Still Clogged? Get Professional Help
If the blockage extends deep into your home’s wall pipes or if your DIY attempts do not restore normal water flow, it is time to bring in qualified experts to prevent water damage.
Expert Intervention: A licensed professional plumber utilizes advanced commercial equipment like hydro-jetting to completely scour pipe interiors without risking structural breakage.
Guaranteed Flow: Scheduling a trusted drain cleaning service ensures your main lines are thoroughly cleared of stubborn build-up.
Need Immediate Assistance? Don’t let a stubborn wax clog risk your home’s plumbing system. Book Now for fast, reliable expert service and professional drain restoration.
Main Services
Related Posts
Need a Plumber in Miami?
Schedule service online or speak directly with the EZ Plumbing team.
Owner-Led Local Service
Know who is behind the business before you request service. The owners, contact line and Miami service pages are published clearly.
- Named business owners
- Direct phone and social channels
- Local Miami service information
Clear Help Before You Book
Review the relevant service page, contact the team directly and use the booking page when you are ready—without relying on vague claims.
- Service-specific information
- Direct questions before scheduling
- Clear online booking route