
Plunge a Sink the Right Way: Step-by-Step Guide
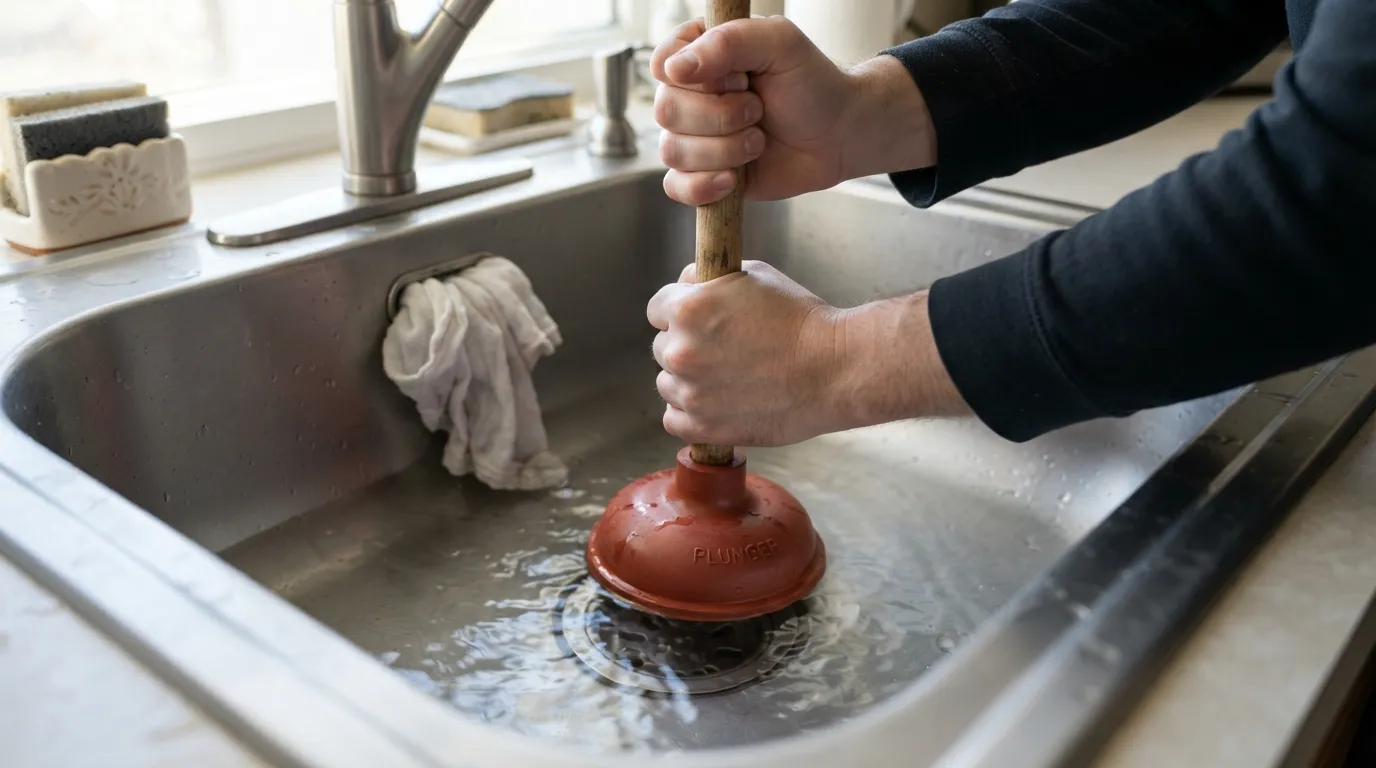
Can You Plunge a Sink? Yes
Yes, you can successfully plunge a standard sink drain to clear minor clogs using a traditional cup plunger. For the technique to work effectively, you must create an airtight seal over the drain opening and block any secondary overflow holes with a wet cloth to maintain proper pressure.
What You'll Need Before You Start
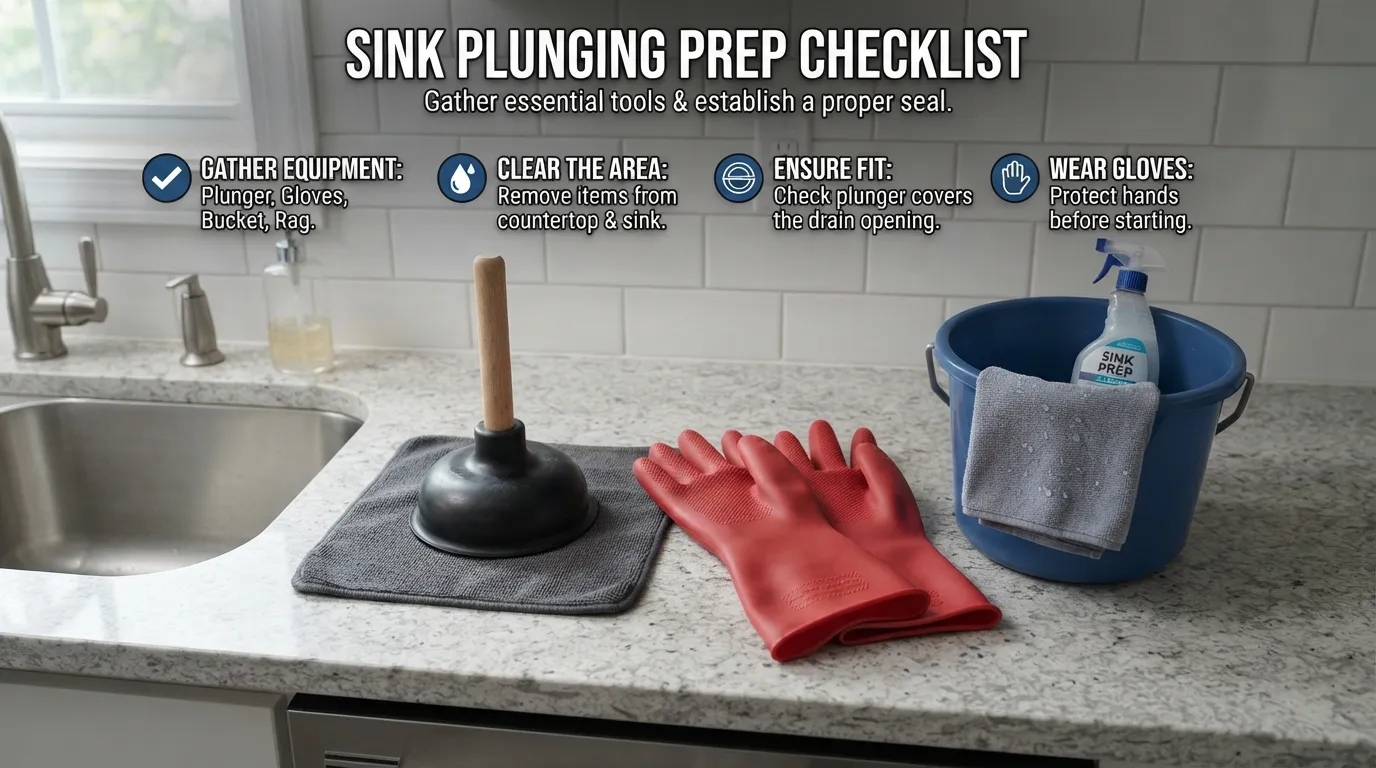
Gathering the correct tools and prepping your workspace prevents water damage and ensures a tight seal for clearing stubborn clogs. Taking two minutes to set up your supplies makes the entire plunging process faster, cleaner, and significantly more effective.
Required Tools (Cup Plunger vs. Flange Plunger)
Choosing the right plunger determines whether you can successfully build pressure inside your sink drain. While flange plungers are designed for toilets, standard flat-bottomed cup plungers are engineered specifically for smooth, flat sink surfaces.
Standard Cup Plunger: Features a flat rubber cup designed to create an airtight seal over flat drain openings like kitchen and bathroom basins.
Flange Plunger: While primarily built for toilets, models with a fold-out rubber flap can sometimes adapt, but a cup plunger is preferred for flat sinks.
Rubber Gloves: Protect your hands from stagnant wastewater, bacteria, and harsh chemical residues that might be trapped in the trap.
Old Towels or Rags: Place these around the base of the sink and floor to catch accidental splashes or overflowing dirty water.
Bucket: Useful for bailing out excess standing water if the sink is filled to the brim.
Prepping the Sink Area (Removing Debris, Removing the Stopper)
Proper preparation ensures that water pressure focuses entirely on the clog rather than escaping through side openings. Clearing visible surface debris and removing physical obstructions prevents secondary blockages.
Remove the Sink Stopper: Twist, lift, or unscrew the pop-up stopper assembly from the drain to allow direct, unhindered plunger placement.
Clear Surface Debris: Scoop out any visible food particles, hair, or gunk from the drain opening by hand wearing your rubber gloves.
Plug the Overflow Hole: Stuff a damp rag tightly into the sink’s overflow opening to prevent air and water from escaping during the plunge.
Bail Excess Water: If the sink is completely flooded, use a small container or bucket to remove excess water so it doesn’t spill over the edges.
How to Plunge a Sink Step by Step
Mastering the correct plunging technique clears most stubborn sink clogs within seconds without requiring chemical drain cleaners. Executing each step with precision ensures maximum water pressure is driven directly into the blockage.
Step 1 – Add Water to Cover the Plunger Cup (3–4 inches)
Adding a few inches of standing water creates a hydraulic seal that forces compressed air directly into the clog. Plunging dry air is largely ineffective because air compresses easily, whereas water transmits force directly against the blockage.
Fill the Basin: Pour or run enough water into the sink so that the rubber cup of the plunger is completely submerged by 3 to 4 inches of water.
Avoid Overfilling: Keep the water level moderate so it does not slosh over the rim of the basin during the vigorous up-and-down motion.
Step 2 – Seal the Overflow Hole
Most sinks feature an overflow opening near the top rim designed to prevent accidental flooding. Leaving this hole open allows air and pressure to escape, destroying the suction power needed to dislodge the clog.
Grab a Wet Rag: Take a clean cloth or old rag and thoroughly soak it under the tap to make it pliable and dense.
Block the Opening: Push the wet rag tightly into the overflow hole, pressing firmly so it forms an airtight block against escaping air.
Step 3 – Position the Plunger for a Full Seal
Correct placement directly over the drain opening guarantees that the force of your stroke targets the obstruction. Any gaps between the rubber rim and the basin surface will cause pressure to leak out.
Center the Cup: Place the flat rubber cup of the plunger directly over the sink drain opening, ensuring the entire perimeter makes contact with the porcelain or stainless steel.
Check the Seal: Press down gently once or twice to confirm that the rubber rim sits flush against the sink surface without folding awkwardly.
Step 4 – Plunge with Consistent Push-Pull Motion (20–30 seconds)
Maintaining a rhythmic, powerful push-pull motion creates both positive and negative pressure to break apart the debris. Working the clog continuously for 20 to 30 seconds weakens the structural integrity of the blockage.
Drive Downward Force: Push straight down firmly on the handle to compress the rubber cup, forcing water into the drain pipe.
Pull to Agitate: Pull back sharply—without breaking the seal—to draw the clog upward and loosen trapped material.
Repeat Continuously: Maintain a steady rhythm for roughly half a minute before lifting the plunger to check the results.
Step 5 – Test the Drain and Flush with Hot Water
Testing the drainage verifies whether the blockage has been completely dissolved or merely pushed further down the pipe. Flushing with hot water helps wash away lingering residue and grease buildup.
Remove the Plunger: Lift the plunger straight up and observe whether the standing water begins to drain rapidly down the pipe.
Run Hot Tap Water: Turn on the hot water tap and let it run for 1 to 2 minutes to clear away loosened particles.
Re-evaluate: If the water still drains slowly, repeat the plunging sequence or check for a blocked P-trap underneath the sink.
Plunging a Double Kitchen Sink Extra Step Most Guides Miss
Plunging a double kitchen sink requires an extra preparatory step that many homeowners overlook, leading to failed attempts. Because both basins share a common drainage pipe beneath the sink, air and water will simply escape through the open second drain instead of putting pressure on the clog.
Why You Must Seal the Second Drain
Ignoring the second drain in a double-basin setup prevents the plunger from building any meaningful hydraulic pressure. When you push down on the clogged side, the path of least resistance sends water and air shooting straight up out of the neighboring drain opening.
Shared Plumbing Design: Both sink basins connect to the same sanitary tee or waste arm under the cabinet.
Pressure Loss: Without blocking the second drain, the air compression you create dissipates instantly into the open air.
Messy Backflow: Unsealed secondary drains frequently allow dirty water to bubble up and spill onto the counter during plunging.
Using a Wet Rag for a Proper Seal
Blocking the second drain securely guarantees that every ounce of force you generate is channeled directly into the obstruction. A dense, wet cloth provides a tight, flexible seal that prevents air leakage.
Fold a Thick Towel: Take a heavy dish towel or cotton rag and fold it several times to create a dense, thick square.
Submerge and Wring Partially: Wet the folded cloth thoroughly so it becomes heavy and conforms easily to the contours of the drain opening.
Apply Downward Weight: Press the wet rag firmly over the second sink’s drain and hold it down securely—or have a second person hold it—while you plunge the primary basin.
Common Mistakes That Stop a Plunger from Working
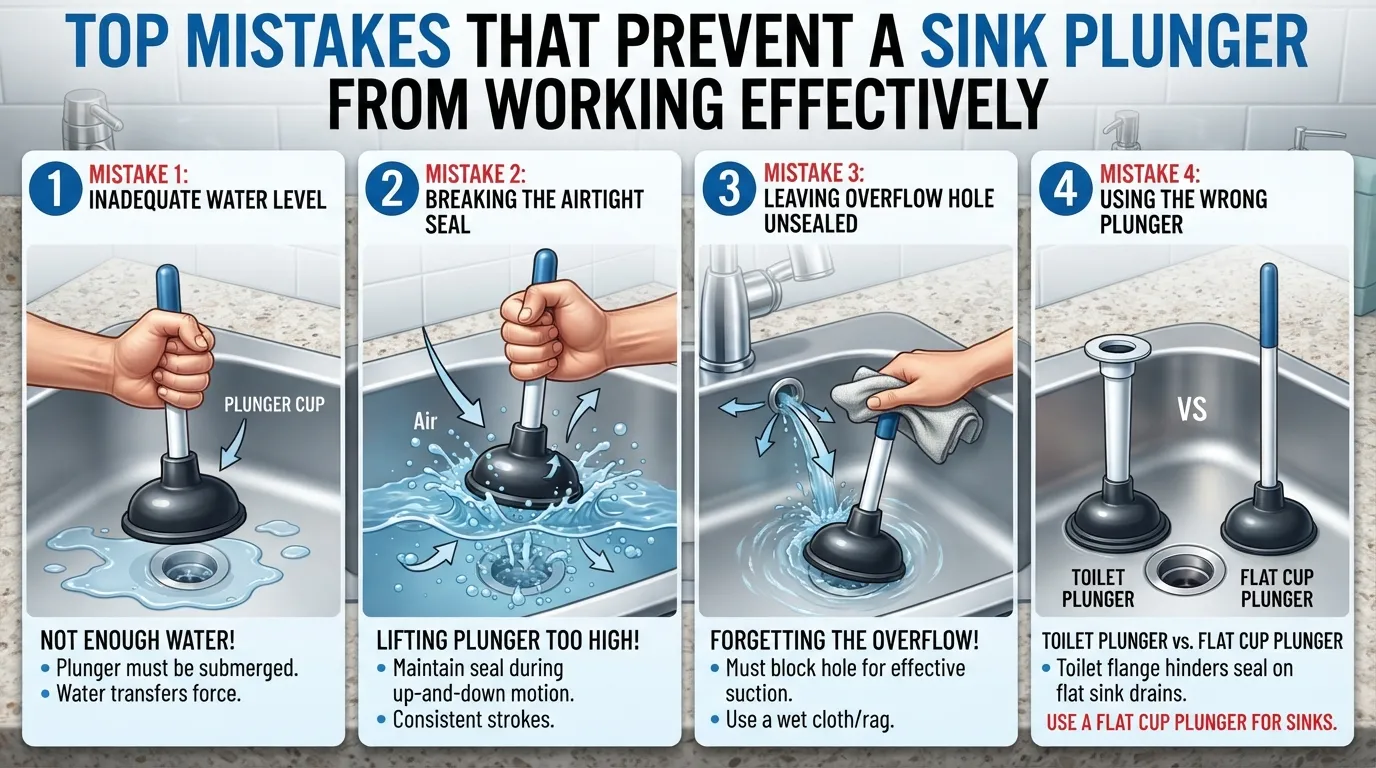
Making minor technique errors can completely stall your unblocking efforts, leaving you frustrated with a full sink. Recognizing these common pitfalls ensures your energy goes toward building effective hydraulic pressure rather than fighting against air leaks.
Not Enough Water in the Basin
Attempting to plunge a completely dry sink or one with only a tiny puddle severely limits your pressure output. Air compresses much too easily to force a stubborn blockage out of a drainpipe.
The Physics Problem: Water cannot be compressed, meaning it acts as a solid medium to transmit force directly onto the clog.
The Solution: Always ensure the rubber cup of the plunger is fully submerged beneath 3 to 4 inches of standing water before starting.
Breaking the Seal Mid-Plunge
Lifting the plunger cup entirely off the drain opening between pumps destroys the vacuum and negative pressure required to agitate the clog.
Lost Momentum: Breaking the seal allows air to rush back into the pipe, neutralizing the push-pull action.
The Solution: Keep the outer rim of the rubber cup in continuous contact with the basin surface throughout your entire set of pumps.
Using the Wrong Plunger Type
Using a narrow toilet flange plunger on a wide, flat kitchen sink basin makes it nearly impossible to form an airtight seal.
Shape Mismatch: Toilet plungers feature a narrow inner funnel designed for porcelain trapways, not flat surfaces.
The Solution: Always use a traditional flat-bottomed cup plunger for flat sink basins to maximize surface contact.
Forgetting to Cover the Overflow Hole
Failing to plug the sink’s built-in overflow outlet allows compressed air to escape freely through the upper channels.
Pressure Escape: The air pressure you generate will vent upward toward the counter rather than downward toward the blockage.
The Solution: Always stuff a soaked, heavy rag tightly into the overflow opening before applying your first plunge.
When Plunging a Sink Is Not Safe
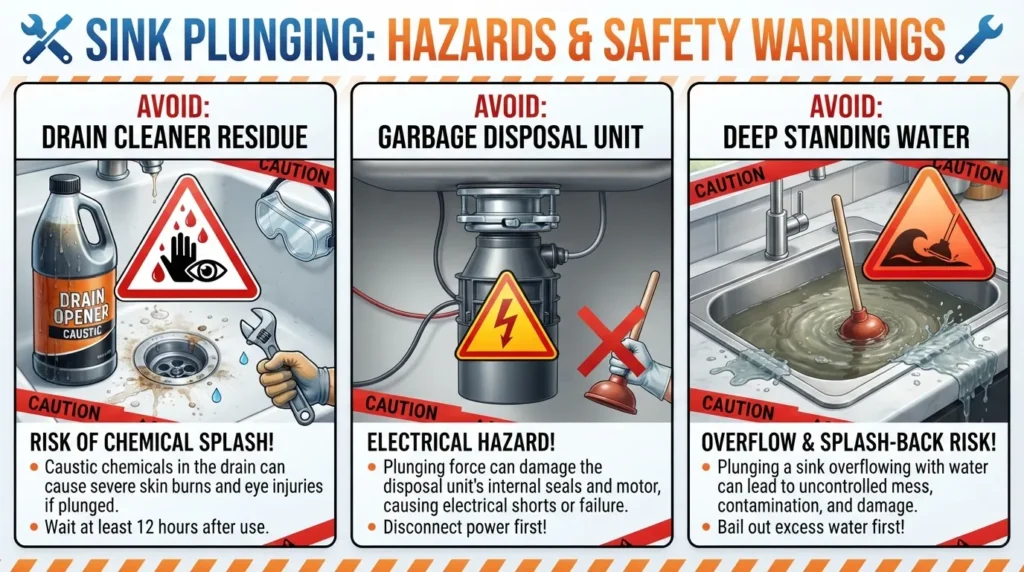
While plunging is a reliable mechanical fix for most clogs, certain conditions make using a plunger hazardous to your health or damaging to your plumbing. Recognizing these safety exceptions prevents dangerous chemical splashes, structural pipe failures, and personal injury.
If You’ve Already Used a Chemical Drain Cleaner
Never use a plunger if you have recently poured a commercial chemical unblocker into the sink basin. Mechanical plunging creates high-velocity air and water movement that can cause caustic liquids to spray violently outward, meaning chemical drain cleaners can cause skin and eye injury.
Splash-Back Risk: Pumping a plunger over standing chemical residue sends toxic droplets onto your skin, face, and countertops.
Fume Exposure: Agitating unreacted acids or lye releases irritating and hazardous vapors into your kitchen or bathroom air.
If the Sink Is Connected to a Garbage Disposal
Plunging a sink tied directly into an electric waste disposal unit requires extreme caution to avoid damaging internal rubber components or splashing contaminated debris.
Component Strain: The forceful vacuum and pressure waves can strain or tear the flexible rubber splash guard and mounting assembly.
Debris Traps: Food particles packed tightly inside the disposal grinding chamber can complicate the seal and worsen the blockage if forced sideways.
If There’s Standing Water from a Deeper Clog
If your sink is filled with murky water due to a severe blockage deep within the main branch line, aggressive plunging can backfire.
Overflow Hazard: Forcing a heavy volume of trapped water upward can cause dirty backup water to spill uncontrollably over the rim of the basin.
Ventilation Issues: If the clog originates in the main vent stack rather than the trap, pressure changes will fail to clear the blockage and may compromise sink seals.
Special Case: Sinks with a Garbage Disposal
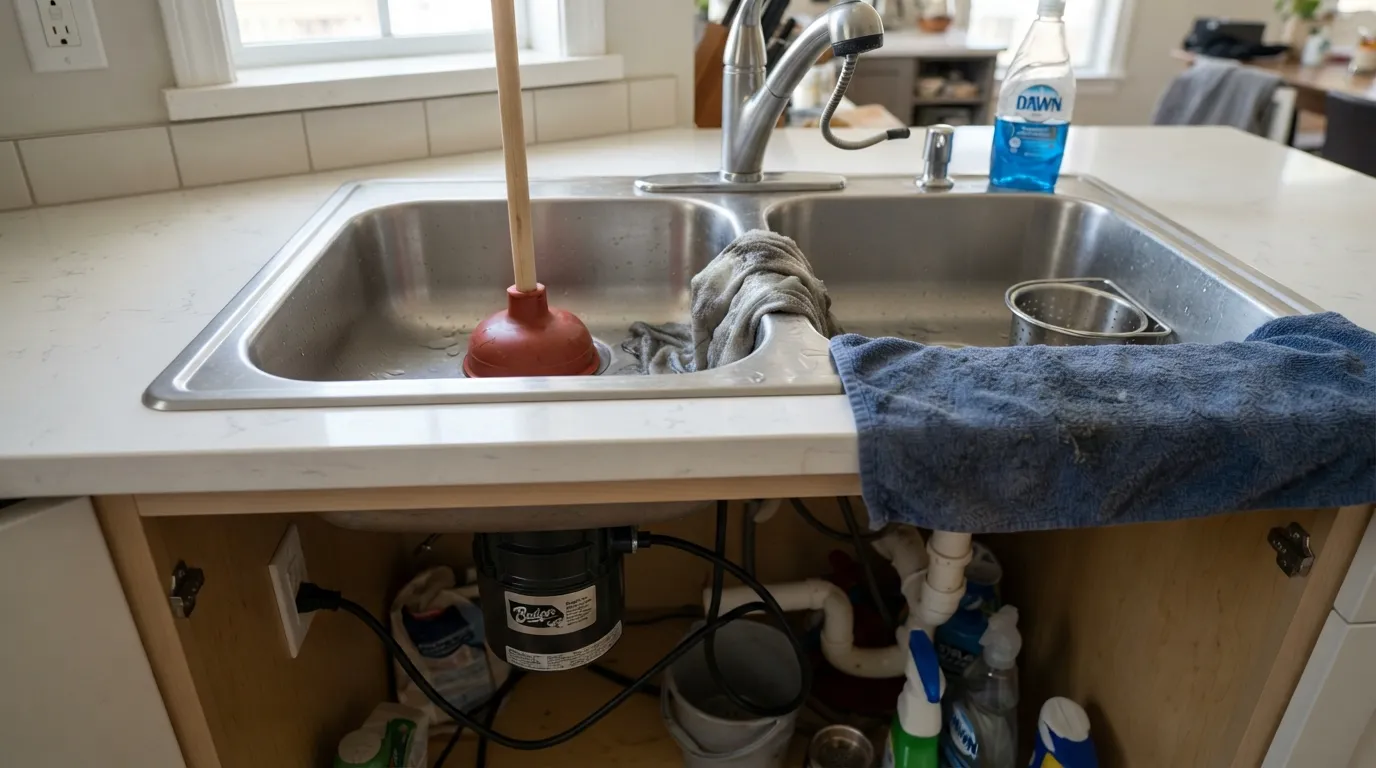
Plunging a kitchen sink equipped with a garbage disposal requires specific safety precautions that standard single basins do not. Ignoring the electrical and mechanical components of a disposal unit can lead to accidental injuries or damage to the internal grinding assembly.
Turn Off and Unplug the Disposal First
Safety is the absolute top priority whenever you work inside or around an electric waste disposal unit. Never place your hands or plunging tools near the drain opening without completely disconnecting the power source.
Kill the Power: Unplug the disposal cord from the electrical outlet underneath the sink cabinet to eliminate any risk of accidental activation.
Flip the Breaker: If the unit is hardwired directly into your home electrical system, switch off the corresponding circuit breaker in your electrical panel.
Extra Precautions Before Plunging
Disposal units contain heavy rubber splash guards and internal metal components that can interfere with normal suction and seal formation. Preparing the basin correctly protects your equipment and ensures effective pressure transfer.
Remove the Splash Guard: If your disposal’s removable rubber baffle is stiff or loose, pop it out temporarily so the plunger cup can form a direct seal over the drain opening.
Inspect for Foreign Objects: Look down into the chamber with a flashlight to ensure silverware, bottle caps, or hard debris are not jammed directly against the blades.
Keep Hands Clear: Never insert your fingers into the disposal chamber to clear a clog; always rely on the plunger or specialized tongs to dislodge trapped materials.
Sink Still Not Draining After Plunging? Here's What to Do Next
When vigorous plunging fails to clear a stubborn blockage, the clog is likely lodged deeper in the plumbing lines or composed of compacted grease. Moving past the plunger to targeted chemical-free remedies or physical pipe inspections will resolve the issue safely.
Try a Baking Soda and Vinegar Flush
A natural fizzing reaction between baking soda and vinegar helps break down organic grease, soap scum, and hair buildup without harsh chemicals. This effervescent action loosens stubborn residue clinging to the pipe walls.
Apply Baking Soda: Pour one-half cup of baking soda directly down the dry drain opening.
Pour Vinegar: Follow it immediately with one cup of white vinegar and cover the drain loosely to trap the fizzing reaction downward.
Rinse with Hot Water: Let the mixture sit for 15 minutes, then flush the drain thoroughly with boiling water.
Check and Clean the P-Trap
The curved section of pipe underneath your sink, known as the P-trap, catches heavy debris and small objects before they enter the main wall lines. Clearing this trap resolves blockages that a plunger cannot reach due to pipe bends.
Place a Bucket: Position a bucket directly beneath the P-trap to catch the trapped gray water inside the pipe.
Loosen Slip Nuts: Hand-unscrew or use tongue-and-groove pliers to loosen the threaded plastic nuts on both ends of the curved pipe.
Remove and Clear: Detach the trap, empty the trapped gunk into your bucket, and rinse the pipe clean before reassembling tightly.
Why Plunging Sometimes Makes It Worse (and How to Fix It)
Aggressive plunging can occasionally push a loose clump of hair or food deeper into the branch line where it compacts into a solid wall. If the water stops draining entirely after you plunge, the clog has likely migrated.
Locate the Migration: A deeper clog usually means the blockage has moved past the P-trap and into the horizontal wall arm.
Use a Drain Snake: Feed a quarter-inch manual hand auger into the pipe to break up or retrieve the compacted obstruction.
Know When to Call a Pro: If snaking fails or multiple fixtures in your home back up simultaneously, contact a licensed plumber to inspect the main sewer vent.
Can You Use a Toilet Plunger on a Sink?
Using a toilet plunger on a kitchen or bathroom sink introduces serious hygiene and cross-contamination risks that most homeowners overlook. While physically possible in an emergency, it is never recommended to use the same plunger for both fixtures due to harmful bacteria.
Why You Should Use Separate Plungers
Toilet bowls harbor a massive concentration of dangerous pathogens, fecal bacteria, and disease-causing microorganisms that you never want transferred to a food-preparation or hand-washing basin.
Cross-Contamination Risks: Pathogens like E. coli and salmonella trapped in porous rubber toilet plungers can easily transfer to your kitchen sink where you wash dishes and produce.
Sanitation Standards: Keeping designated, labeled plungers for bathroom and kitchen use ensures your family stays safe from preventable bacterial exposure.
Cup Plunger vs. Flange Plunger Explained
Each plunger design is engineered specifically to match the geometry and drainage requirements of different plumbing fixtures. Understanding their structural differences prevents wasted effort and failed repairs.
Cup Plungers: Feature a flat-bottomed rubber cup that creates a wide, airtight seal on flat surfaces like sinks, bathtubs, and shower drains.
Flange Plungers: Include an extra soft rubber funnel (the flange) that folds out to fit snugly inside irregular toilet bowl trapways, making them ill-suited for flat sink openings.
Don't Have a Plunger? Try This Instead
Finding yourself with a blocked drain and no traditional plunger in the house doesn’t mean you have to call a plumber immediately. Using common household items allows you to improvise effective suction tools or dissolve stubborn grease blockages safely.
Homemade Plunger Alternative (Plastic Bottle Method)
A rigid empty plastic bottle can replicate the hydraulic pushing power of a standard cup plunger in an emergency. The flexibility of the bottle walls allows you to force air and water directly into the drain opening.
Select the Right Bottle: Choose a clean 2-liter soda bottle with a sturdy neck and secure cap to serve as your makeshift plunger handle.
Cut the Bottom Off: Use utility scissors to slice off the bottom quarter of the bottle cleanly so water can flow inside freely.
Pump the Drain: Submerge the open bottom of the bottle over the drain opening and pump it up and down rapidly to force air through the pipe.
Hot Water + Dish Soap Method
Combining liquid dish soap and hot water provides an excellent non-mechanical solution for breaking up greasy kitchen sink clogs. Dish soap acts as a lubricant and surfactant that helps slide trapped residue down the line.
Add Dish Soap: Pour a generous amount of liquid dish soap directly into the standing water around the drain opening.
Boil Water: Heat a kettle or pot of water until it reaches near-boiling temperatures.
Pour and Wait: Carefully pour the hot water down the drain from a low height to avoid splashing, and let it sit for 10 minutes to dissolve grease.
Frequently Asked Questions About Plunging a Sink
What is the proper way to plunge a sink?
Submerge the plunger cup under 3 inches of water, block the overflow hole with a wet rag, and form an airtight seal over the drain. Apply a consistent push-pull motion for 20 to 30 seconds before testing the drainage with hot water.
What can I pour down a sink to unclog it?
Pour a half-cup of baking soda followed by one cup of white vinegar down the drain, let the mixture fizz for 15 minutes, and flush it with boiling water. Alternatively, pour liquid dish soap and hot water to dissolve grease buildup.
Is it okay to plunge a kitchen sink?
Yes, plunging a kitchen sink is entirely safe and effective for clearing minor food or grease blockages. Use a standard cup plunger rather than a toilet flange plunger to ensure an airtight seal over flat sink basins.
How do I know if I’m plunging correctly?
You are plunging correctly when the rubber cup maintains continuous contact with the basin surface without breaking suction. You should feel rhythmic water resistance against the handle rather than escaping air or splashing.
What are common plunger mistakes?
Common mistakes include using too little water in the basin, breaking the airtight seal between pumps, and failing to block the sink overflow hole. Using a toilet plunger on a flat sink basin is another frequent error.
When should you not use a plunger?
Avoid plunging if you have recently poured chemical drain cleaners into the basin, as toxic liquids can splash back and cause injuries. Never plunge if standing water results from a severe deep-line clog that could overflow.
Do I flush again after plunging?
Yes, always run hot tap water for 1 to 2 minutes after a successful plunge to wash away loosened debris. Flushing confirms that the blockage is completely gone and prevents residual particles from resettling.
Still Dealing with a Stubborn Clog?
If persistent clogs refuse to budge after trying these methods, the obstruction may be located deep within your main drainage lines. Skip the ongoing frustration and secure professional plumbing help to diagnose and resolve the issue quickly.
Book Same-Day Plumbing Service to get your kitchen or bathroom back in working order with guaranteed results.
Main Services
Related Posts
Need a Plumber in Miami?
Schedule service online or speak directly with the EZ Plumbing team.
Owner-Led Local Service
Know who is behind the business before you request service. The owners, contact line and Miami service pages are published clearly.
- Named business owners
- Direct phone and social channels
- Local Miami service information
Clear Help Before You Book
Review the relevant service page, contact the team directly and use the booking page when you are ready—without relying on vague claims.
- Service-specific information
- Direct questions before scheduling
- Clear online booking route