
Annual Home Plumbing Maintenance Tips: 10-Step Homeowner Checklist
Introduction — Why Annual Plumbing Maintenance Matters
Commit just one hour or more a year to annual home plumbing maintenance to safeguard your property and save thousands in emergency repairs [00:00]. Proactive care shifts your home infrastructure from a liability to a reliable system, ensuring total water damage prevention and peace of mind. By following a structured homeowner plumbing guide, you eliminate hidden faults before they escalate into structural disasters.
What Happens When You Skip Annual Plumbing Maintenance
Neglecting routine inspections allows minor mineral buildups, microscopic leaks, and hidden wear-and-tear to compound into catastrophic failures. Systems under constant pressure degrade silently over time without periodic checks.
Severe Structural Decay: Unchecked slow leaks behind drywall or beneath flooring cultivate aggressive mold colonies and rot framing timbers.
Premature Equipment Failure: Sediment accumulation inside water heaters forces heating elements to overheat and burn out years ahead of schedule.
Component Seizure: Isolation valves and angle stops left uncycled for years become completely immobile, trapping you unable to shut off water during an emergency.
Drainage Backups: Gradual hair and debris accumulation inside pipe runs eventually congeal into total blockages, causing sewage to back up into living spaces.
The Real Cost of Ignoring Small Plumbing Issues
Minor plumbing anomalies frequently translate into major financial burdens when left unattended. Ignoring a seemingly insignificant drip creates an expensive cascade of waste and destruction.
Escalating Utility Bills: A single running toilet or dripping faucet continuously dials up your monthly water consumption, wasting thousands of gallons annually.
Emergency Repair Premiums: After-hours emergency dispatch fees for burst washing machine hoses or major pipe ruptures cost exponentially more than scheduled maintenance.
Property Restoration Expenses: Professional water extraction, mold remediation, and drywall replacement run into thousands of dollars for incidents entirely preventable through basic checks.
Property Value Degradation: Deferred maintenance signals systemic neglect to potential buyers, heavily devaluing your home during real estate transactions.
Your 10-Point Annual Checklist
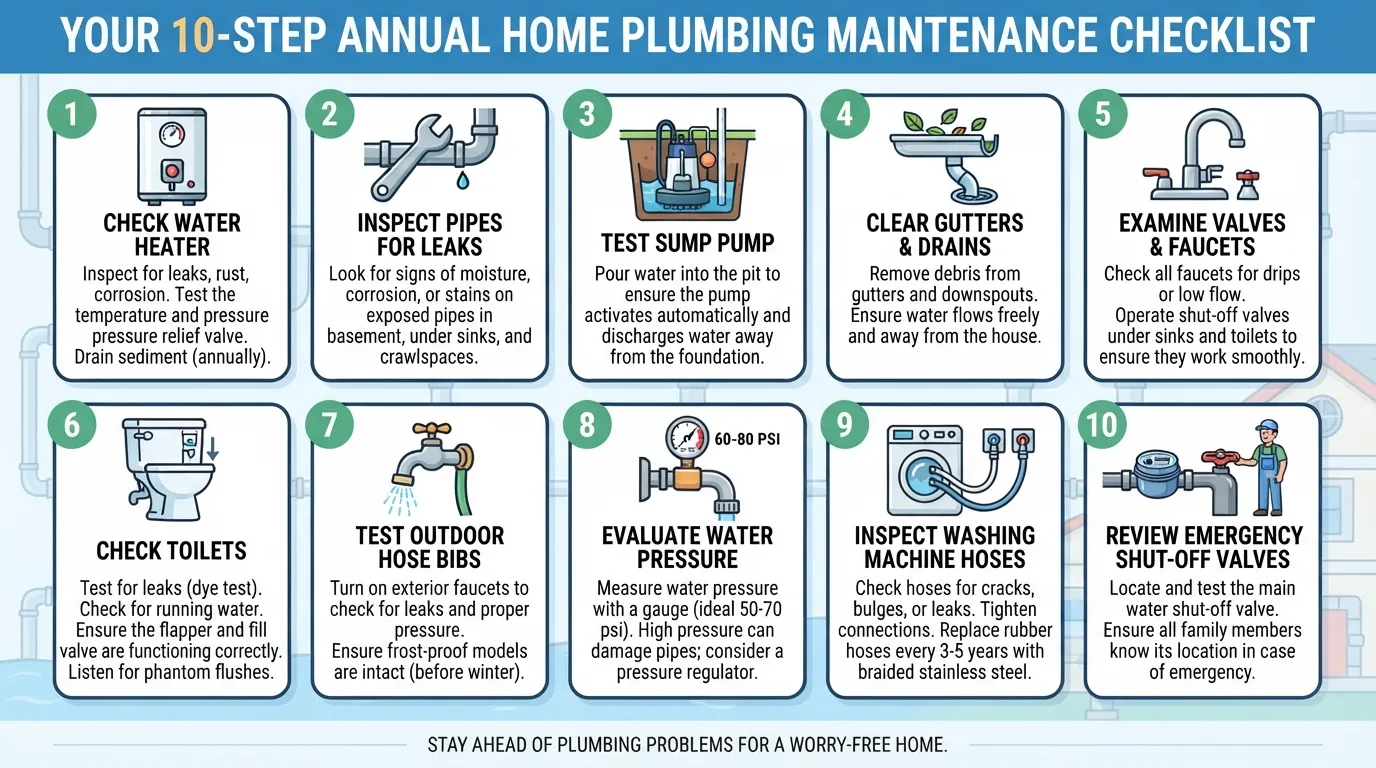
Executing a comprehensive plumbing checklist keeps your entire infrastructure running smoothly throughout the year. Below is a fast preview of the core systems you will evaluate and maintain:
Water Meter & Pressure Test: Check the meter for hidden flows and test pressure levels to identify silent leaks [00:42].
Water Heater Flushing: Clear out sediment buildup annually and check the anode rod to extend tank longevity [01:15].
Fixture Cleaning: Soak faucet aerators and showerheads to eliminate mineral scale and restore proper flow [01:47].
Drain Flow Inspection: Verify that showers and sinks drain rapidly without sluggish performance [02:26].
Toilet Flapper Testing: Use diagnostic dye tabs in the tank to catch silent leaks passing into the bowl [02:59].
Exterior Valve Care: Inspect hose bibs and detach garden hoses before freezing weather arrives [03:31].
Exposed Pipe Audit: Examine under-sink lines and visible runs for early signs of moisture [04:13].
Appliance Hose Replacement: Swap out rubber washing machine hoses every three to four years to prevent catastrophic ruptures [06:54].
Shut-Off Valve Cycling: Exercise main water shut-offs and fixture valves to guarantee operation during emergencies [06:16].
Filtration & Softener Check: Inspect salt levels and system timers to protect household appliances from hard water damage [05:21].
The 10 Tips at a Glance
Get a fast, high-level overview of the essential steps required to protect your home’s water system. Review this summary list to instantly grasp the 10 core maintenance tasks covered in this guide:
Leak Inspection: Conduct a thorough visual audit of all exposed pipes, fixtures, and your water meter to catch hidden drips early.
Water Heater Flush: Drain accumulated sediment from your water tank annually to preserve heating efficiency and prolong equipment life.
Water Pressure Test: Measure home water pressure with a gauge attached to a hose bib to spot hidden stress and closed-loop pressure drops.
Floor Drains & Traps: Pour water into infrequently used floor drains to replenish trap seals and block sewer gases from entering living areas.
Sump Pump Testing: Pour water into the sump basin to verify that the pump activates, clears the volume, and operates smoothly.
Outdoor Plumbing Check: Examine exterior hose bibs for damage and ensure garden hoses are disconnected before freezing temperatures hit.
Laundry Hose Replacement: Inspect flexible washing machine supply lines for bulging or cracking, replacing them every three to four years.
Unused Fixture Cycling: Turn faucets, angle stops, and infrequently used plumbing fixtures on and off to prevent mineral lock and valve seizure.
Shutoff Valve Verification: Locate, test, and clearly label your main water shutoff valve so every household member knows how to act in an emergency.
Professional Inspection: Schedule a comprehensive annual evaluation with a licensed plumber to assess main sewer lines, gas connections, and complex systems.
Tip 1 — Inspect for Hidden Leaks
Early leak detection is your primary defense against silent structural degradation, skyrocketing water bills, and aggressive mold growth. Conducting routine audits allows you to catch minor faults before they escalate into major crises. Partnering with professionals for professional leak detection ensures that invisible underground or behind-the-wall issues are diagnosed accurately.
Where to Check: Sinks, Toilets, and Exposed Pipes
Systematic visual checks throughout your home reveal slow moisture losses that often go completely unnoticed. Target these high-risk areas during your routine inspections:
Under Sinks: Open kitchen and bathroom vanity cabinets to check P-traps, supply lines, and angle stops for dampness or mineral crust [04:13].
Around Toilets: Inspect the base where the porcelain meets the floor and check connection hoses for subtle weeping or pooling [02:10].
Exposed Basement Lines: Walk along visible piping in unfinished basements or crawlspaces to spot slow condensation drips or pipe joint sweating.
The Food Coloring Toilet Leak Test (Step-by-Step)
A silent toilet leak wastes hundreds of gallons daily without making a single sound on your bathroom floor [02:10]. You can easily run a diagnostic dye test using common household supplies:
Remove the tank lid and drop a few tablets of food coloring into the water until it turns brightly tinted [02:25].
Leave the toilet undisturbed and do not flush for 15 to 20 minutes [02:25].
Check the water inside the toilet bowl; if the colored water has seeped down, you have a silent leak [02:29].
Install a standard flapper replacement or repair the flush valve assembly to instantly stop the continuous water waste [02:37].
Warning Signs: Water Stains and Musty Odors
Physical anomalies in your living space frequently point directly to hidden plumbing failures behind closed cavities. Watch and smell for these warning indicators:
Discolored Drywall: Brown rings, bubbling paint, or warped paneling signal active water leaks originating from overhead pipes or roof penetrations.
Persistent Musty Odors: Unexplained damp smells inside closets or lower hallways often indicate hidden mold blooms fed by continuous micro-leaks.
Unusual Sound Triggers: Faint running water sounds when all fixtures are completely closed point to a hidden break in your supply lines.
Flush and Inspect Your Water Heater
Commit to an annual water heater flush to remove destructive mineral deposits, boost daily energy efficiency, and dramatically extend your tank’s operational lifespan. Neglecting this crucial task forces your system to work significantly harder, which inevitably leads to premature equipment failure. Partnering with experts for professional water heater maintenance ensures that internal components like anode rods and heating elements are professionally evaluated.
Why Sediment Buildup Hurts Efficiency and Lifespan
As water enters your tank, dissolved minerals like calcium and magnesium settle at the bottom during the heating process. Over time, this thick layer of sediment creates a thermal barrier between the burner or lower heating element and the water.
Slower Heating Cycles: The heating mechanism must expend extra energy and run longer cycles just to heat water through the dense sediment layer.
Rumbling and Popping Noises: Trapped water pockets boiling underneath the sediment blanket cause audible rumbling, popping, or banging noises.
Accelerated Tank Corrosion: Overheating localized spots on the tank bottom damages the glass lining, eventually leading to structural cracks and catastrophic leaks.
Step-by-Step: How to Safely Flush a Water Heater
Flushing your traditional tank water heater takes roughly an hour and requires only basic tools like a standard garden hose. Follow these steps to clear out accumulated debris:
Turn off the power supply to an electric water heater at the breaker box, or switch gas models to the pilot setting.
Connect a garden hose to the drain valve near the bottom of the tank and route the other end to a safe outdoor drainage point.
Open a nearby hot water faucet inside your home to relieve vacuum pressure, then carefully open the tank drain valve.
Let the water run through the hose until it flows completely clear of sediment chunks, close the valve, and refill the tank fully before restoring power.
Testing the Pressure Relief Valve
The temperature and pressure relief (T&P) valve is a vital safety mechanism designed to prevent dangerous over-pressurization inside the tank. Testing it annually ensures it remains fully functional:
Place a bucket beneath the discharge pipe connected to the T&P valve to catch any test water.
Lift the valve’s test lever slightly and allow water to discharge for a few seconds, listening for a clear rush of water.
Snap the lever back down; if the valve continues to dribble or fails to seal tightly, replace the assembly immediately.
Safety Note: Gas vs Electric Units
Different fuel sources demand specific safety protocols before you begin any maintenance work on your water heater. Ignoring these precautions can result in severe injury or equipment damage:
Electric Units: Never turn the power back on until the tank is completely refilled with water, otherwise dry-firing will instantly burn out the upper and lower heating elements.
Gas Units: Always switch the gas control valve to pilot or off before draining to protect the combustion chamber from overheating risks.
Professional Backup: If your unit has not been serviced in several years and the drain valve appears heavily corroded or stuck, call a licensed plumber to prevent stripping the threads.
Test Your Water Pressure
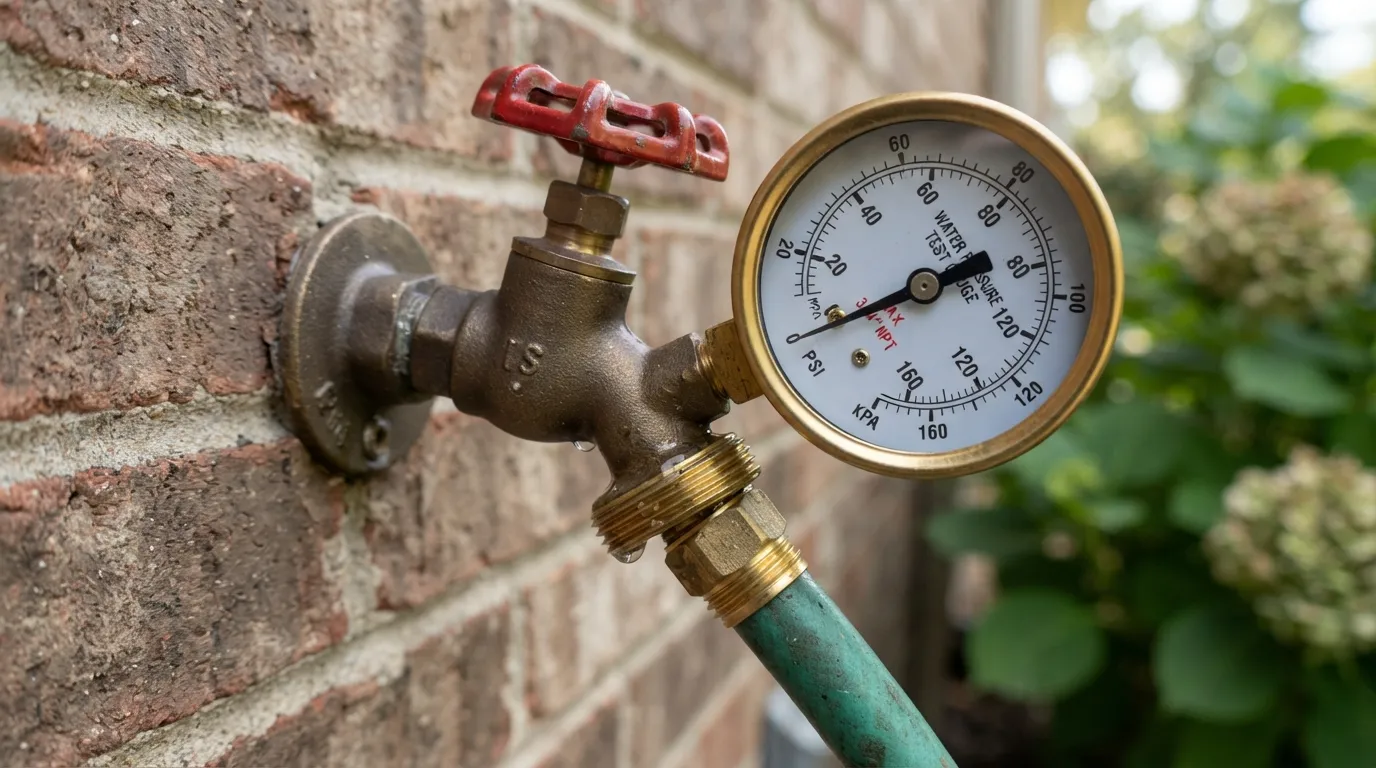
Measuring your home water pressure is a vital diagnostic step that most homeowners overlook until a catastrophic pipe failure occurs. High pressure places continuous, silent stress on your entire plumbing infrastructure, while low pressure indicates hidden blockages or municipal supply issues. Tracking this metric regularly ensures your system operates safely within safe engineering thresholds.
The Ideal PSI Range for Residential Homes (40–60 PSI)
Maintaining the correct pounds per square inch (PSI) level safeguards your fixtures, supply lines, and connected appliances from premature wear. Understanding the standard range helps you spot anomalies before they damage your home:
Optimal Operation (40 to 60 PSI): This balanced pressure range delivers strong, comfortable shower streams while protecting delicate appliance seals and washing machine hoses.
Marginal Warning (60 to 80 PSI): While still functional, pressure in this upper bracket accelerates mechanical wear on toilet fill valves, faucets, and ice maker lines.
Dangerous Threshold (Above 80 PSI): Code requirements mandate a pressure-reducing valve (PRV) when municipal lines exceed this limit, as extreme force stresses pipe joints to breaking point.
How to Use a Water Pressure Gauge (Practical Walkthrough)
You can easily test your home water pressure in minutes using an inexpensive screw-on gauge purchased from any hardware store. Follow these direct steps to measure your PSI accurately:
Locate an outdoor hose bib (spigot) near your main water entry point and ensure no other indoor faucets or water-using appliances are running.
Screw the water pressure gauge tightly onto the hose bib threading, making sure the rubber washer is seated correctly to prevent leaks.
Open the hose bib completely and read the static pressure needle on the gauge dial to determine your baseline PSI.
Turn on a sink inside the house to check for pressure drops, then close the spigot, release the pressure, and unscrew the gauge.
Risks of High Pressure Above 80 PSI
Unregulated high water pressure wreaks silent havoc throughout your plumbing network over time. Ignoring excessive force often leads to sudden, costly emergencies:
Solenoid Valve Failures: Dishwashers and washing machines experience internal valve ruptures because their internal components cannot withstand continuous high-force impact.
Premature Joint Seepage: Soldered copper joints and threaded plastic connectors slowly work loose under constant high-pressure vibration.
Constant Water Hammer: Turning off faucets quickly creates severe hydraulic shock waves, causing pipes to bang violently against framing and crack fittings.
Clean and Maintain Floor Drains
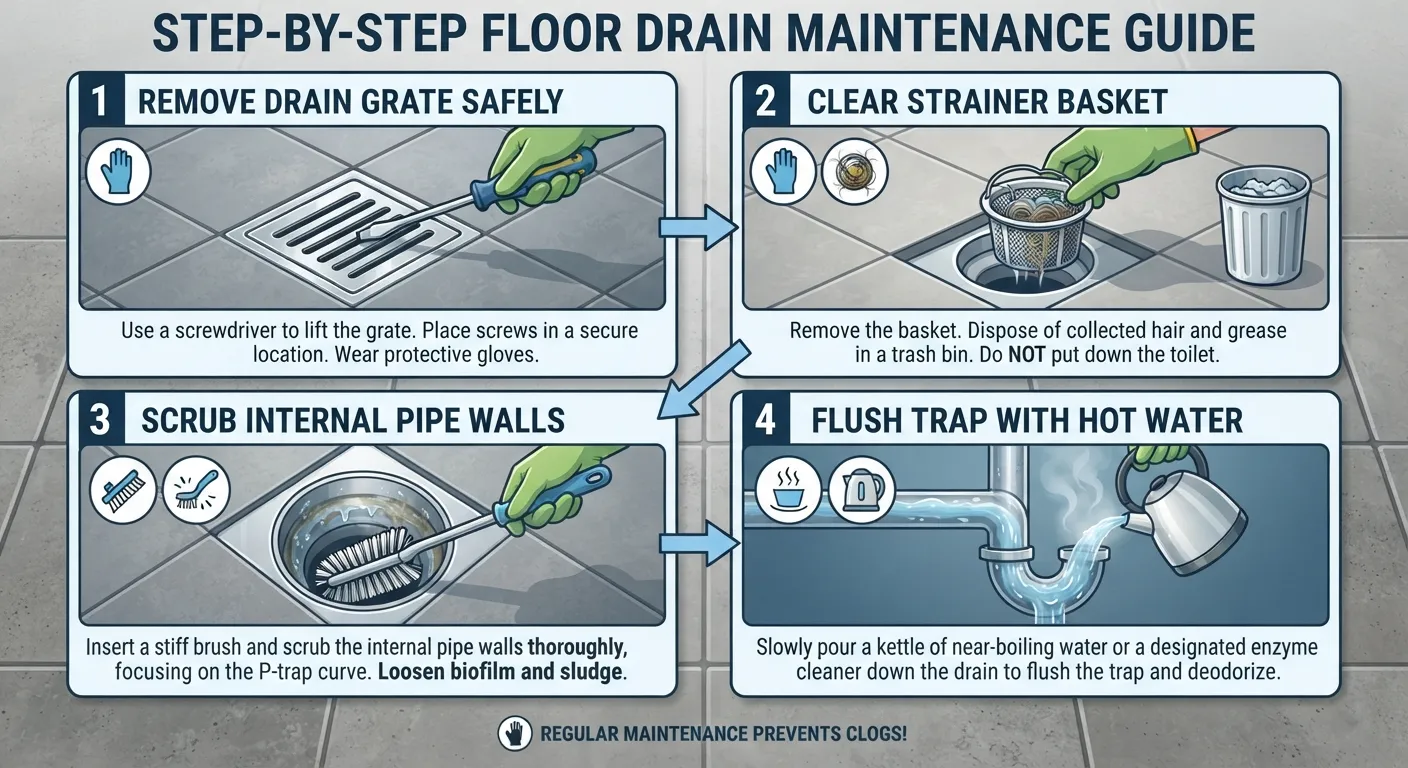
Inspect and maintain your home’s floor drains regularly to prevent unpleasant odors, pest intrusions, and catastrophic basement backups. Floor drains in utility rooms, basements, and laundry areas often sit neglected for months, allowing internal trap water to evaporate completely. Partnering with specialists for professional drain cleaning ensures stubborn line blockages are cleared thoroughly before causing damage.
Refilling Dry Traps to Block Sewer Gas
Every floor drain relies on a curved section of pipe called a P-trap that holds a standing barrier of water. This water barrier is your home’s only defense against toxic sewer gases entering living spaces.
Evaporation Risks: Infrequently used drains lose their water seal within weeks due to natural evaporation, opening a direct pathway for foul methane odors.
Simple Hydration Fix: Pour a full bucket of clean water down every basement and laundry room floor drain quarterly to instantly restore the trap seal.
Health and Safety: Maintaining full trap seals prevents harmful sewer gases from degrading indoor air quality and protects your household from health hazards.
Clearing Debris, Hair, and Soap Scum
Surface grime, pet hair, and organic debris frequently wash down floor and shower drains, accumulating into stubborn blockages over time. Regular cleaning keeps wastewater flowing freely through your drainage network:
Remove Strainer Covers: Unscrew or lift out the drain cover grate to access trapped hair bundles and slimy soap residue buildup near the opening.
Manual Extraction: Use a small flexible drain snake or a hooked wire tool to pull out tangled debris before pushing it deeper into the pipe.
Enzyme Flush Treatments: Pour an eco-friendly bio-enzymatic cleaner down the drain to break down organic slime without eroding older metal or PVC pipe walls.
The Mineral Oil Trick to Slow Evaporation
Basement and utility room floor drains exposed to dry indoor air or indoor heating lose their water seals much faster than normal. Applying a simple household trick stops evaporation in its tracks:
Add a Protective Layer: Pour a few tablespoons of mineral oil directly into the floor drain after filling the trap with water.
Create a Vapor Barrier: Because mineral oil floats on water and does not evaporate easily, it forms a thin film that seals the standing water underneath.
Extended Protection: This barrier lasts for many months, making it an ideal maintenance step for vacation homes or seasonal utility rooms.
Check Your Sump Pump
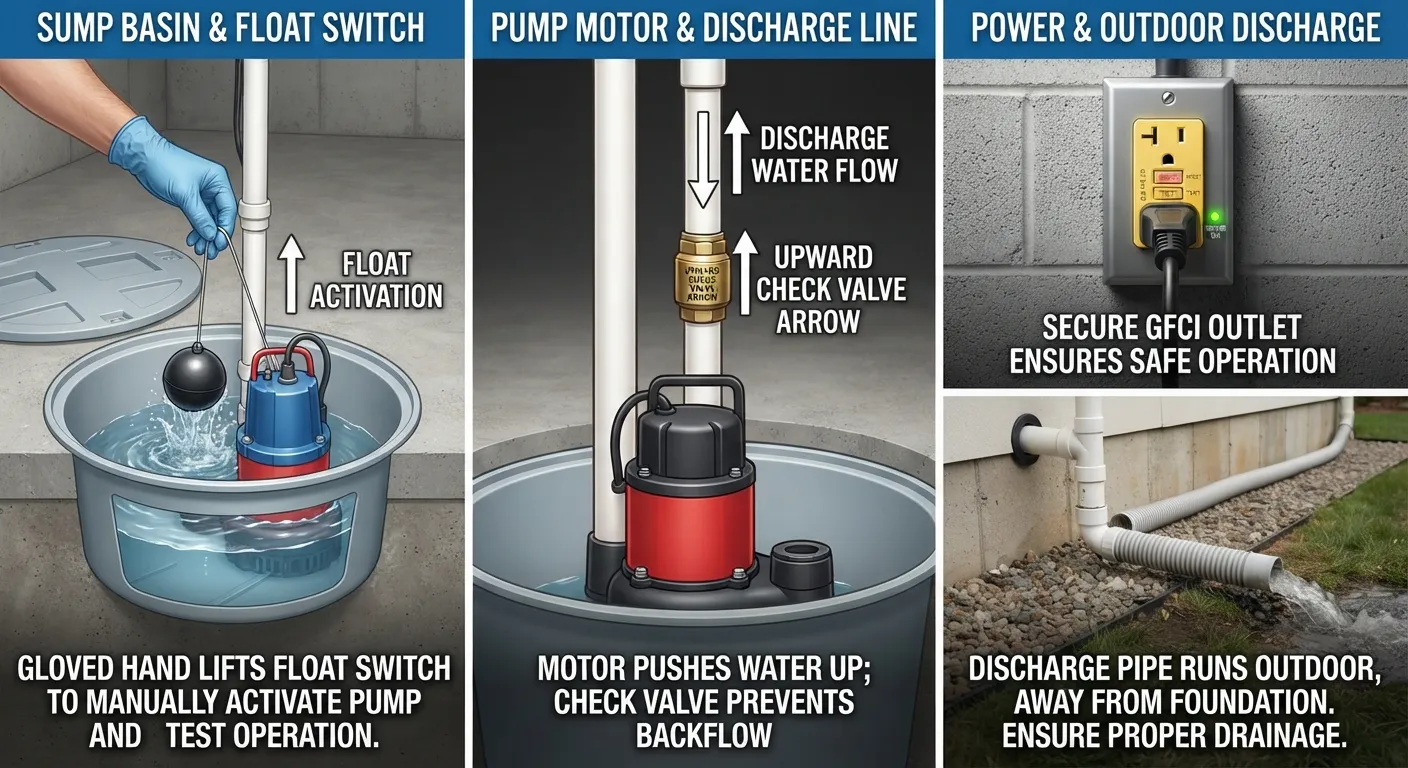
Test your sump pump annually to ensure your basement stays dry during heavy storms and unexpected heavy rainfall events. A malfunctioning pump can lead to catastrophic basement flooding within minutes, resulting in thousands of dollars in property damage. Partnering with professionals for sump pump installation and repair guarantees your system is ready for severe weather emergencies.
How to Test Automatic Activation
Verifying that your sump pump engages automatically takes less than five minutes and requires only a bucket of water. Follow these steps to confirm your float switch and motor operate correctly:
Clear the Basin: Remove any loose debris, gravel, or packaging materials from inside the sump pit to prevent interference with the pump intake.
Pour Water Carefully: Slowly pour a five-gallon bucket of water directly into the sump basin until the water level rises to trigger the float switch.
Confirm Operation: Listen for the motor to engage instantly, pump the water out rapidly, and shut off automatically once the basin clears.
Inspecting Exterior Discharge Lines
The water pumped out of your basement must travel far enough away from your foundation to prevent recycling back into the pit. Inspecting your discharge path prevents immediate re-entry:
Check the Exit Point: Walk out to where your discharge line terminates in your yard and ensure water flows freely away from the home structure.
Clear Winter Ice: In colder months, verify that discharge extensions are clear of ice blocks and snow buildup that can cause frozen backups.
Install Backflow Checks: Ensure a functional check valve is installed on the discharge pipe to prevent pumped water from falling back into the basin.
Backup Battery Systems: Why They Matter
Severe weather storms that knock out household power frequently bring the heaviest rainfall, rendering standard electric sump pumps useless. Installing a backup system protects your home when utility power fails:
Continuous Operation: A secondary battery-powered pump kicks on automatically during power outages to handle rising water levels seamlessly.
High-Water Alarms: Backup units often feature audible alarms that alert you immediately if the primary pump fails or water reaches critical heights.
Total Protection: Investing in a reliable backup battery system provides complete peace of mind during severe weather seasons.
Examine Outdoor Plumbing and Winterize Spigots
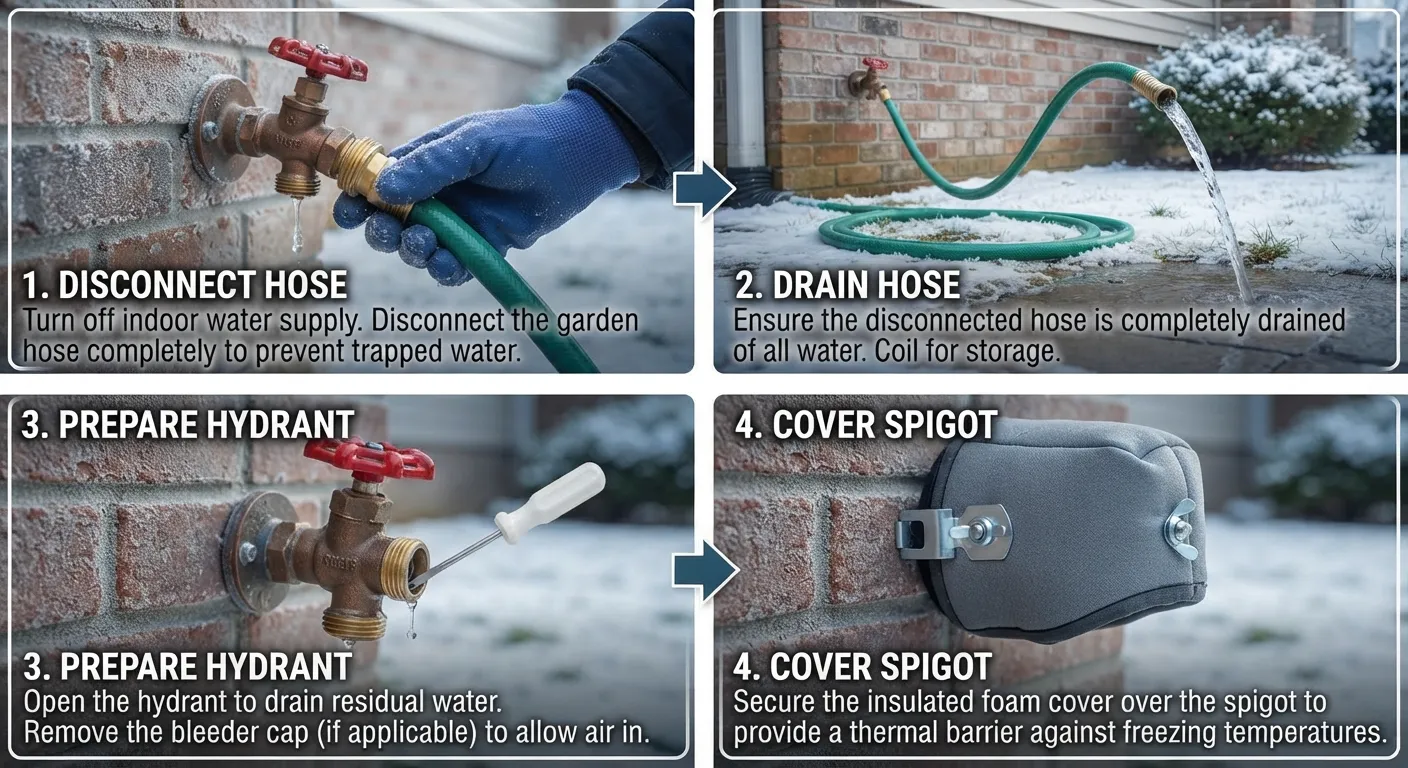
Inspect your outdoor plumbing annually and winterize your hose bibs to prevent frozen pipes and catastrophic indoor flooding during freezing weather. Exterior spigots exposed to dropping temperatures take the full brunt of winter weather, making proactive freeze protection an essential seasonal chore. Securing your outdoor network safeguards structural walls from bursting pipes.
Checking Exterior Faucets for Damage
Examine every exterior hose bib in early autumn to catch structural wear before sub-freezing temperatures arrive. Spotting minor cracks early prevents expensive repairs when water expands inside frozen valves.
Look for Seepage: Turn on each outdoor spigot and check around the packing nut and handle for slow water leaks or weeping threads.
Inspect Anti-Siphon Caps: Ensure vacuum breaker caps are intact and free of mineral buildup that can jam internal check mechanisms.
Test Handle Operation: Confirm that each valve turns off completely and securely without spinning loosely or leaking past the seat.
Disconnecting Hoses Before Freezing Weather
Leaving garden hoses attached to outdoor spigots during cold snaps is a leading cause of frozen, burst plumbing pipes. Trapped water inside connected hoses has nowhere to expand as it turns to ice.
Drain and Store Hoses: Unhook all garden hoses completely, drain any remaining standing water from inside the tubing, and coil them up for storage.
Prevent Pressure Backup: Removing hoses allows frost-free sill cocks to drain properly, keeping residual water safely away from freezing outdoor air.
Check Washer Seals: Inspect the rubber gaskets inside your hose connectors and replace worn washers to ensure leak-free operation next spring.
Shutting Off Indoor Supply Valves in Cold Climates
Homes located in regions prone to severe freezing winters require an extra layer of defense beyond simply disconnecting garden hoses. Shutting off the dedicated indoor isolation valves protects vulnerable exterior runs:
Locate Isolation Valves: Find the interior shut-off valves located along your basement or crawlspace ceiling that feed water directly to exterior hose bibs.
Drain the Stub Lines: Close the interior valve, then head outside and open the exterior spigot to bleed out all remaining water trapped in the pipe.
Leave Spigots Open: Keep the exterior valve cracked slightly open during winter so any slow seepage can escape without building destructive ice pressure.
Review Laundry Connections
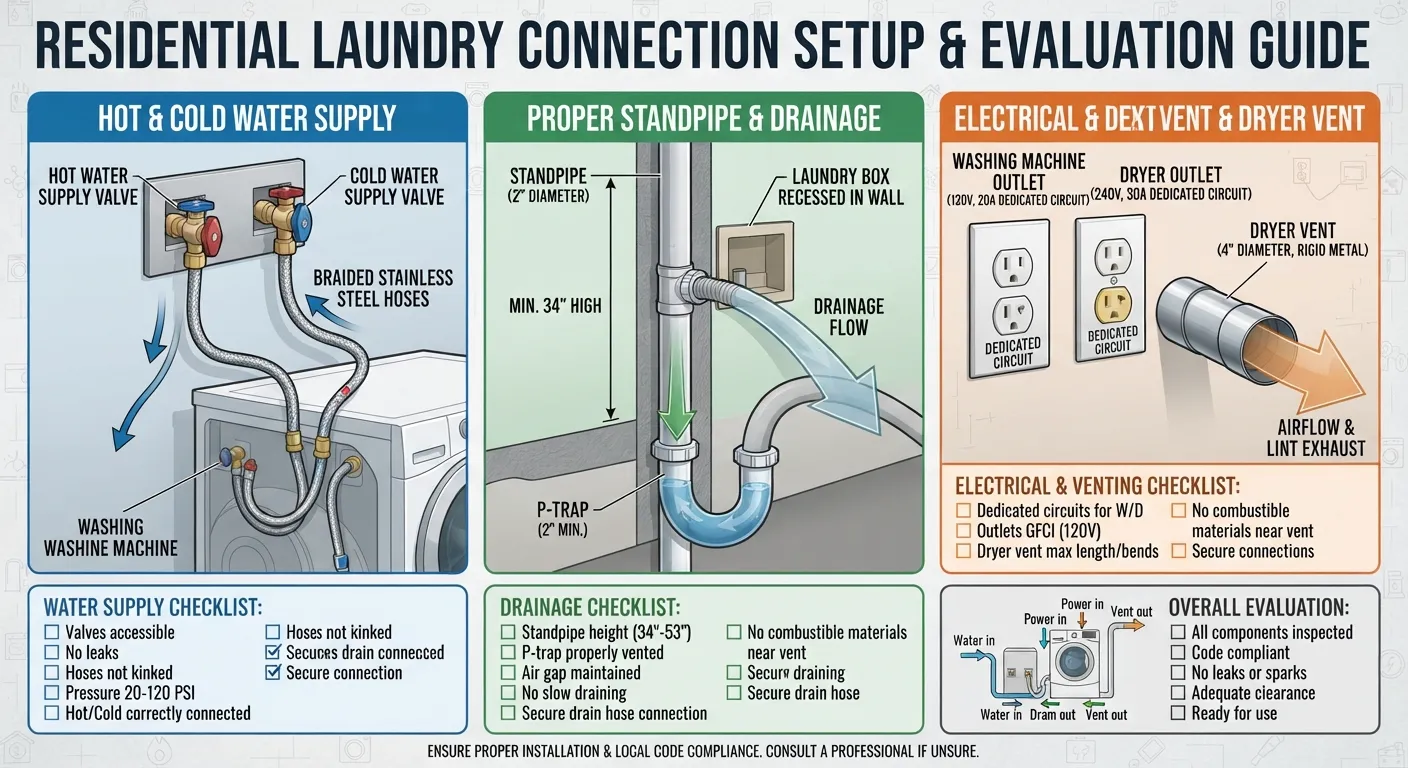
Inspect your washing machine supply lines regularly to mitigate severe water damage risks that routinely trigger expensive property claims. Because laundry hoses operate under constant municipal pressure and experience continuous mechanical vibrations, they represent one of the most vulnerable failure points in any home. Data from the Insurance Information Institute highlights that water damage and freezing issues account for roughly 28% of all homeowners insurance claims, with appliance-related supply line failures causing hundreds of millions of dollars in property destruction annually.
Rubber Hoses vs Braided Stainless Steel: Which Is Safer
The material composition of your washing machine hoses dictates how well they withstand daily pressure stress and aging. Upgrading your setup significantly reduces the probability of a catastrophic rupture:
Traditional Rubber Hoses: Plain rubber lines degrade silently from the inside out due to chemical breakdown and constant pressure, making them highly susceptible to unexpected blowouts.
Braided Stainless Steel Lines: These hoses feature an inner core protected by a woven metal jacket that prevents kinking, bursting, and outer shell expansion under high pressure.
Superior Protection: While braided steel models offer vastly superior durability, they are still subject to internal seal wear and require periodic monitoring.
When to Replace Washing Machine Hoses (3–5 Year Rule)
Even the highest-quality plumbing supply lines have a finite structural lifespan that demands proactive replacement schedules. Sticking to a strict timeline prevents unexpected disasters:
The 3 to 5 Year Window: Replace standard washing machine hoses every three to five years regardless of their apparent external condition.
Preventing Crimp Failures: Over time, the metal crimps securing the hose fittings lose their tight seal due to constant machine vibrations during spin cycles.
Preemptive Action: Swapping out lines proactively costs a fraction of the thousands of dollars required to repair flooded drywall, flooring, and warped subfloors.
Signs of Wear to Watch For
Routine visual audits of your laundry utility space help you catch failing supply lines before they burst under pressure. Watch closely for these physical warning signs:
Bulging or Blistering: Any localized swelling, bubbles, or soft spots along the length of a rubber hose indicate an imminent rupture point.
Corrosion Around Fittings: White mineral crust or rust stains on the brass threaded connections point to slow, chronic weeping at the valve interface.
Kinks and Sharp Bends: Hoses pushed too tightly against the wall can develop acute kinks that restrict water flow and stress the inner tubing material.
Run Water in Unused Fixtures
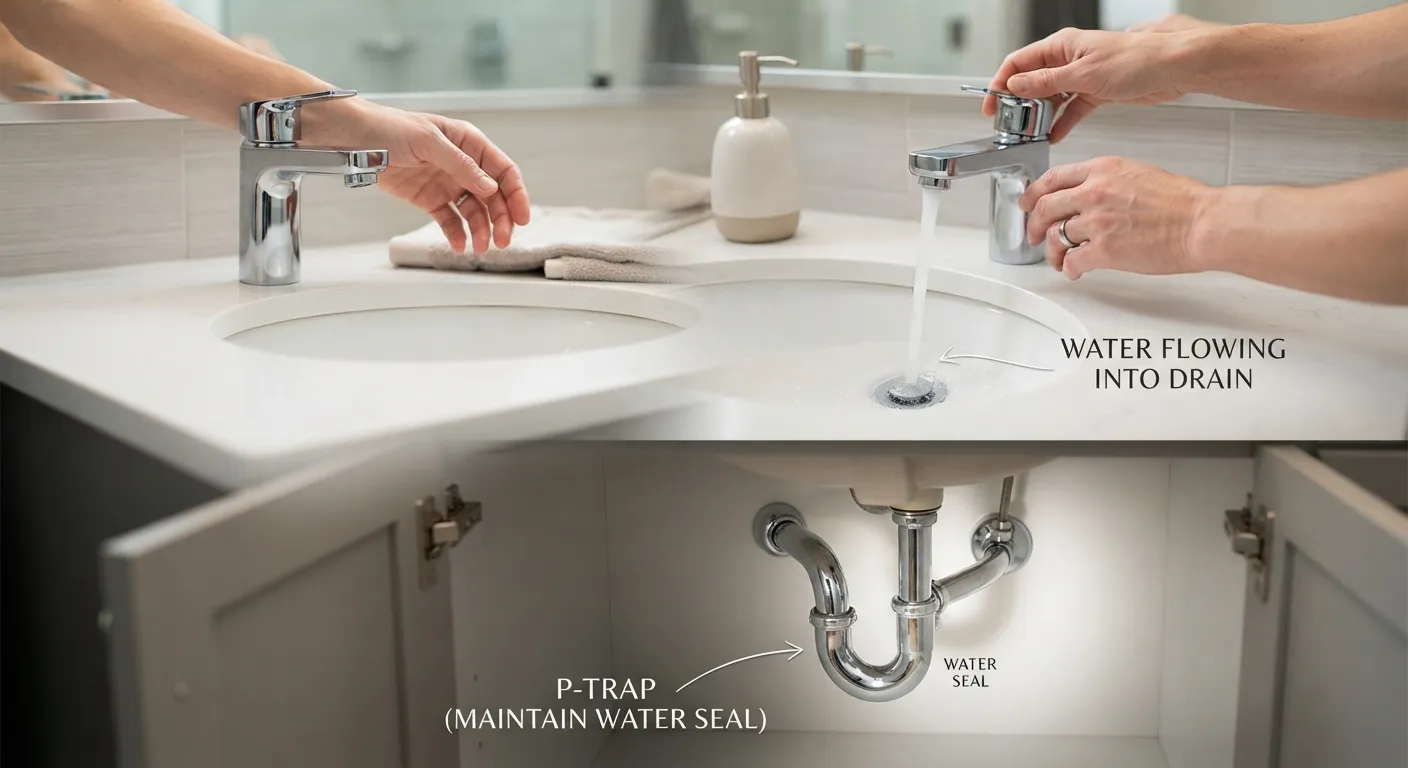
Run water through infrequently used sinks, tubs, and guest bathrooms monthly to maintain water seals and stop toxic sewer gases from entering your living spaces. P-traps in vacant rooms dry out quickly due to indoor evaporation, opening a direct pathway for foul methane odors. Partnering with professionals for sewer line inspection ensures your broader wastewater network remains clear and airtight.
Why Dry Traps Let Sewer Gas Into Your Home
Every plumbing fixture features a curved P-trap beneath the drain designed to hold a standing plug of water. This liquid barrier blocks sewer gases and pests from traveling up through your pipes.
Rapid Evaporation: In guest bathrooms or vacation properties, standing water in traps evaporates completely within a few weeks of non-use.
Toxic Air Intrusion: A dry trap eliminates the physical barrier, allowing noxious sewer gases to infiltrate your home freely and degrade indoor air quality.
Pest Incursions: Empty drain pipes also provide an open highway for insects and rodents to enter your living areas directly through the plumbing network.
The 30-Second Monthly Habit That Prevents It
Preventing dry traps requires minimal effort and takes only a few seconds out of your monthly schedule. Establish this simple habit to protect your home:
Turn on Every Faucet: Let the water run for 30 to 60 seconds in every sink, tub, and shower throughout your home, including guest suites.
Flush Toilets Regularly: Push the handle on unused or spare-room toilets monthly to refresh the bowl water and refill the internal trap.
Add Protective Oil: Pour a spoonful of mineral oil down guest drain openings if rooms will sit vacant for extended seasonal periods.
Inspect and Label Shutoff Valves
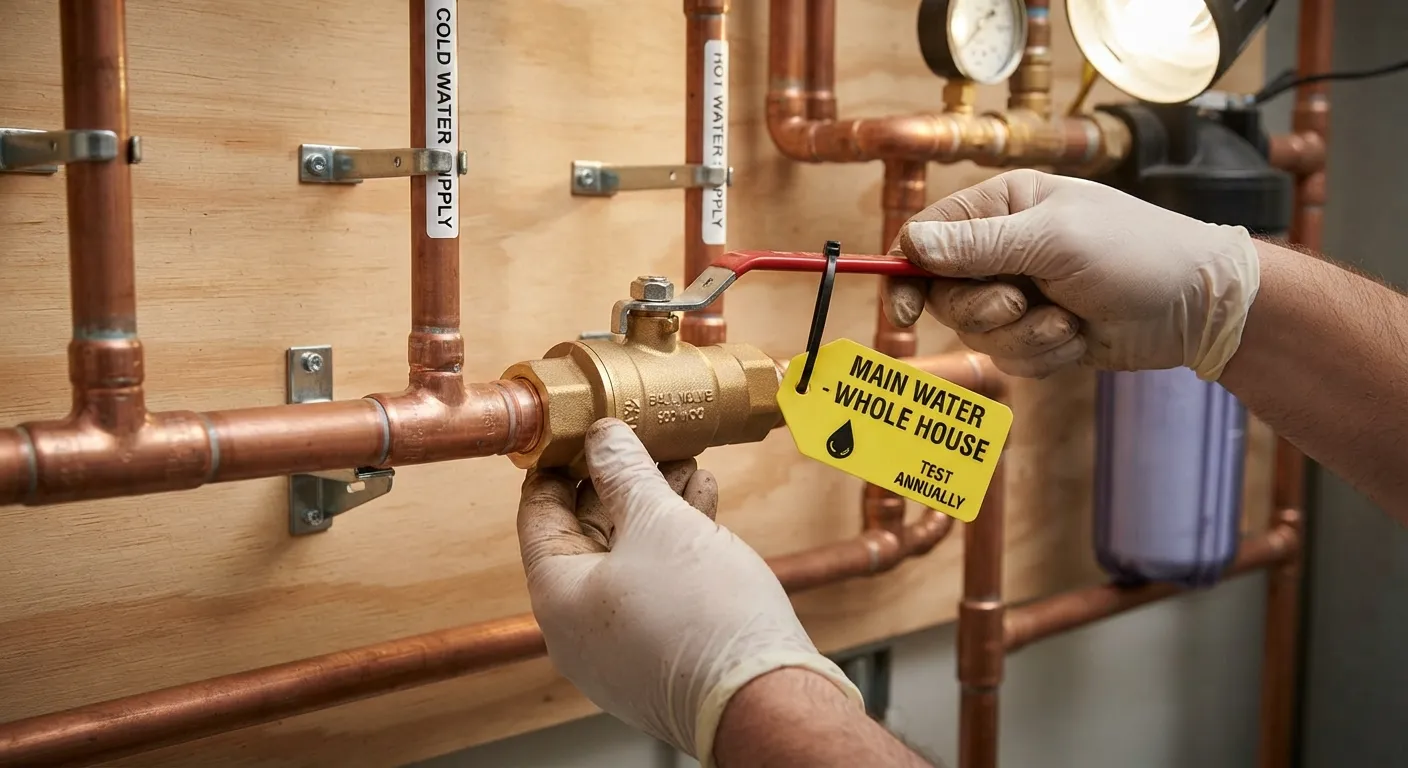
Locate, test, and clearly label your main water shutoff valve and individual fixture stops to prevent catastrophic flooding during a plumbing emergency. When a supply line bursts or a fitting fails, every second counts; knowing exactly how to cut off the water supply instantly minimizes structural damage. If a major valve fails completely under pressure, you can quickly call an emergency plumber to resolve the crisis safely.
Testing Main and Fixture Shutoff Valves
Routine valve maintenance ensures that your isolation controls do not seize up from mineral buildup over years of non-use. Follow these steps to verify your system operates smoothly:
Cycle Fixture Stops: Turn the angle stops under your sinks and behind toilets off and on once a year to keep internal washers and stems mobile.
Test the Main Supply: Locate your primary home shutoff valve—usually found near the water meter, garage, or utility room—and turn it gently to test its movement.
Avoid Aggressive Force: If a valve feels completely stuck, never force it aggressively with a wrench, as old stems can snap off and create an immediate leak.
Why Every Homeowner Should Label Their Main Valve
In high-stress emergency situations like a burst pipe or freezing rupture, panic often causes homeowners to forget where shutoff controls are located. Proper labeling keeps every family member prepared:
Clear Identification: Attach a bright, waterproof metal tag or brightly colored wristband directly to the main water shutoff handle for instant visibility.
Family Training: Show children and other household members where the tag is located and teach them how to turn the valve off in an emergency.
Speed Up Response Time: Eliminating hesitation during a plumbing leak prevents thousands of gallons of water from flooding your floors and walls.
What to Do If a Valve Is Stuck or Leaking
Discovering a stuck or weeping valve during routine maintenance requires calm, calculated steps to avoid worsening the problem. Handle valve issues safely with these guidelines:
Apply Penetrating Oil: Spray a small amount of household penetrating lubricant onto stiff valve stems and let it sit before attempting to turn them gently.
Replace Worn Packing Nuts: If a valve leaks around the stem when turned, tighten the packing nut slightly or replace the packing washer.
Call a Professional: If the main municipal curb stop or main house valve fails to seal completely, contact a licensed plumber to replace the faulty hardware.
Schedule a Professional Plumbing Inspection
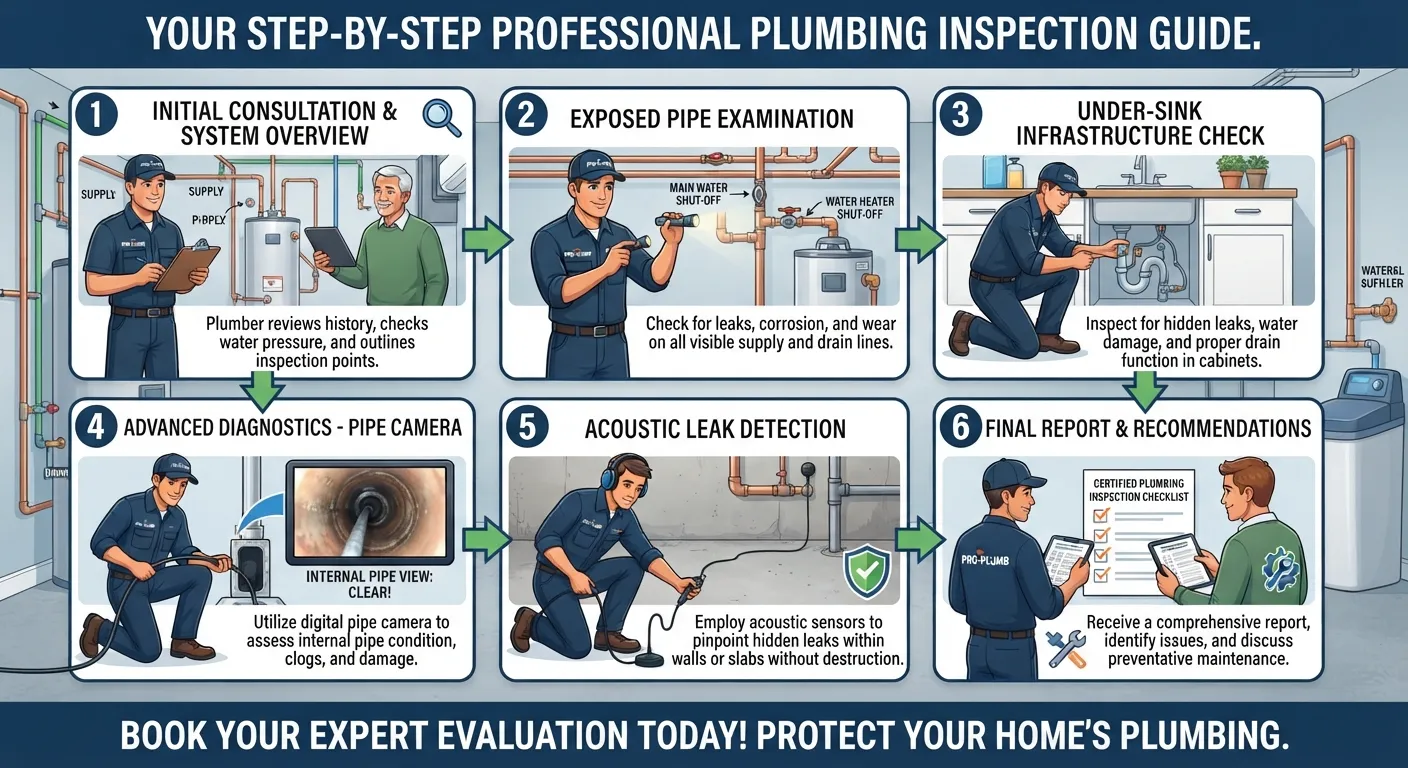
Schedule an annual evaluation with a licensed plumber to uncover hidden issues that standard DIY homeowner checklists inevitably miss. While routine self-audits catch surface-level drips and worn hoses, professional inspections utilize advanced diagnostic tools to evaluate the health of your entire underground and behind-the-wall infrastructure. Take proactive action today by choosing to schedule your professional plumbing inspection to safeguard your home against unexpected emergencies.
What a Licensed Plumber Checks That You Can’t
Professional plumbers bring specialized diagnostic equipment and years of technical training to evaluate complex systems far beyond standard homeowner capabilities. An expert inspection covers critical infrastructure components:
Sewer Camera Scans: High-resolution fiber-optic cameras travel through your main sewer line to inspect for root intrusion, bellied pipes, and structural cracks.
Gas Line Integrity Testing: Technicians pressure-test gas supply lines connected to water heaters and kitchen appliances to guarantee zero hazardous leaks.
Backflow Preventer Certification: Certified testing ensures that your irrigation and domestic water systems cannot siphon contaminants back into your drinking supply.
Detecting Hidden Corrosion and Pipe Wear
Internal pipe degradation often occurs silently inside walls and beneath concrete slabs long before visible symptoms appear on the surface. Professional diagnostics spot these vulnerabilities early:
Electrolysis and Galvanic Corrosion: Experts identify dissimilar metal connections that cause rapid pipe wall thinning and eventual pinhole leaks.
Age-Related Material Failure: Plumbers evaluate aging polybutylene or galvanized steel piping systems to recommend timely repiping before catastrophic bursts occur.
Water Quality Impact: Mineral and pH testing reveals whether aggressive water is actively chewing away at your copper joints from the inside out.
How Often You Really Need a Professional Visit
Establishing a consistent schedule for professional evaluations ensures your home plumbing network remains resilient year after year. Adhering to recommended service intervals prevents minor wear from turning into costly disasters:
Annual Baseline Visits: Schedule a comprehensive plumbing tune-up once a year to service water heaters, check pressures, and test safety valves.
Older Homes (Over 30 Years): Properties with mature plumbing infrastructure benefit from bi-annual professional inspections to catch deteriorating lines early.
Ready to Protect Your Home? Don’t wait for a minor fault to become an expensive emergency—schedule your professional plumbing inspection or book your appointment online today to secure expert peace of mind.
Seasonal Plumbing Maintenance Calendar
Organize your home care routine using a structured seasonal plumbing checklist to ensure your water and drainage systems operate reliably year-round. Breaking annual maintenance down by season prevents you from feeling overwhelmed while keeping your infrastructure fully protected against shifting weather patterns. Review the comprehensive seasonal schedule below to manage critical tasks at the exact right moment.
Spring Tasks
Spring is the ideal time to inspect your home for the residual impacts of winter weather and prepare outdoor systems for heavy warm-weather usage. Focus on thorough visual checks as outdoor temperatures rise:
Inspect Hose Bibs: Check exterior spigots for cracks or leaks caused by frost heave before hooking up garden hoses.
Test Sump Pumps: Pour water into the sump basin to verify that the pump and float switch activate properly ahead of spring rainstorms.
Flush Water Heaters: Clear out winter sediment buildup from your tank to maintain peak heating efficiency.
Summer Tasks
Summer brings peak water consumption and high humidity, making it crucial to monitor heavy-use indoor fixtures and appliances. Keep your plumbing running smoothly during hot months with these steps:
Check Laundry Hoses: Inspect washing machine supply lines for bulging or weeping connections under high daily demand.
Monitor Water Pressure: Measure your PSI levels with a gauge to ensure municipal supply surges are not stressing your system.
Test Toilet Flappers: Use dye tabs to catch silent, water-wasting leaks during peak household activity.
Fall Tasks
Fall preparation focuses heavily on insulating and shielding your plumbing network before sub-freezing temperatures arrive. Complete these vital steps before the first hard frost:
Disconnect Outdoor Hoses: Unhook garden hoses from all exterior spigots and store them safely inside.
Shut Off Exterior Lines: Close indoor isolation valves feeding outdoor hose bibs and bleed out remaining water.
Clean Floor Drains: Clear debris from basement drains and verify trap water seals are intact.
Winter Tasks
Winter requires vigilant monitoring to prevent sudden freezing emergencies and manage indoor heating stress on your plumbing. Stay proactive during the coldest months with these actions:
Run Unused Fixtures: Let water run briefly in guest bathrooms and vacant rooms to keep P-trap seals full.
Insulate Exposed Pipes: Check pipe insulation in unheated attics, crawlspaces, and exterior walls.
Locate Shutoff Valves: Ensure every household member knows how to operate the main water shutoff in an emergency.
| Season | Primary Focus Areas | Key Action Items |
| Spring | Post-winter recovery & outdoor prep | Test sump pumps, check hose bibs, flush water heaters |
| Summer | High-use appliances & indoor fixtures | Inspect laundry hoses, test pressure, check toilet flappers |
| Fall | Freeze protection & pipe winterization | Disconnect hoses, shut off exterior lines, clear drains |
| Winter | Emergency readiness & freeze prevention | Run unused fixtures, inspect insulation, verify shutoffs |
DIY vs. Calling a Professional — Decision Guide
Navigating the boundary between simple homeowner upkeep and complex technical repairs is essential to protecting your property and budget. Knowing when to tackle a task yourself versus when to hire a licensed specialist prevents minor maintenance issues from escalating into expensive structural disasters. Evaluating the complexity of each job ensures you stay safe while keeping your plumbing infrastructure fully optimized.
Tasks You Can Safely Do Yourself
Many routine home maintenance chores require basic tools, minimal plumbing knowledge, and very little risk when standard precautions are followed. You can safely handle these straightforward tasks on your own:
Clearing Minor Clogs: Using a hand snake or plunger to clear slow-running bathroom and kitchen sink drains.
Testing and Replacing Flappers: Dropping dye tablets into toilet tanks and completing simple toilet flapper/leak repair replacements.
Flushing Water Heaters: Attaching a garden hose to drain sediment from traditional tank water heaters annually.
Cleaning Aerators: Unscrewing and soaking faucet aerators and showerheads in vinegar to remove mineral scale.
Warning Signs That Need a Licensed Plumber
Certain plumbing complications involve high pressure, hazardous waste lines, or specialized tools that demand professional intervention. Always bring in an expert when you encounter these situations:
Sewer Line Backups: Multiple drains backing up simultaneously or foul odors indicating a main sewer line collapse.
Active Gas Line Leaks: Any suspicion of natural gas or propane line issues near water heaters or appliances.
Severe Pipe Bursts: Major pipe ruptures where you cannot safely close the main water supply valve.
Persistent Low Pressure: Unexplained overall pressure drops that persist after testing your system and checking municipal meters.
Why DIY Mistakes Often Cost More Long-Term
Attempting advanced plumbing repairs without proper training or specialized equipment frequently introduces hidden dangers. Improper fixes can quickly magnify your initial repair bills:
Hidden Water Damage: Incomplete seal replacements or overtightened fittings can cause slow micro-leaks that rot framing before you notice.
Code Violations: Unauthorized modifications to main supply lines or venting systems can fail home inspection during real estate sales.
Voided Warranties: Installing replacement parts incorrectly or skipping professional service requirements often voids manufacturer equipment warranties.
When to Call for Help: If a repair feels uncertain or involves major supply lines, it is always wise to call an emergency plumber to resolve the issue correctly.
| Maintenance Task / Scenario | Recommended Action | Why This Approach Matters |
| Simple Flapper Replacement | Safe for DIY | Inexpensive parts and easy access save service dispatch fees for minor leaks. |
| Routine Water Heater Flush | Safe for DIY | Standard annual maintenance boosts efficiency without risking structural pipe joints. |
| Stuck Main Shutoff Valve | Call a Professional | Forcing corroded or rigid main valves can snap stems and cause major flooding. |
| Sewer Main Backups | Call a Professional | Requires heavy camera diagnostics and specialized cable or jetting equipment. |
The Real Cost of Skipping Maintenance
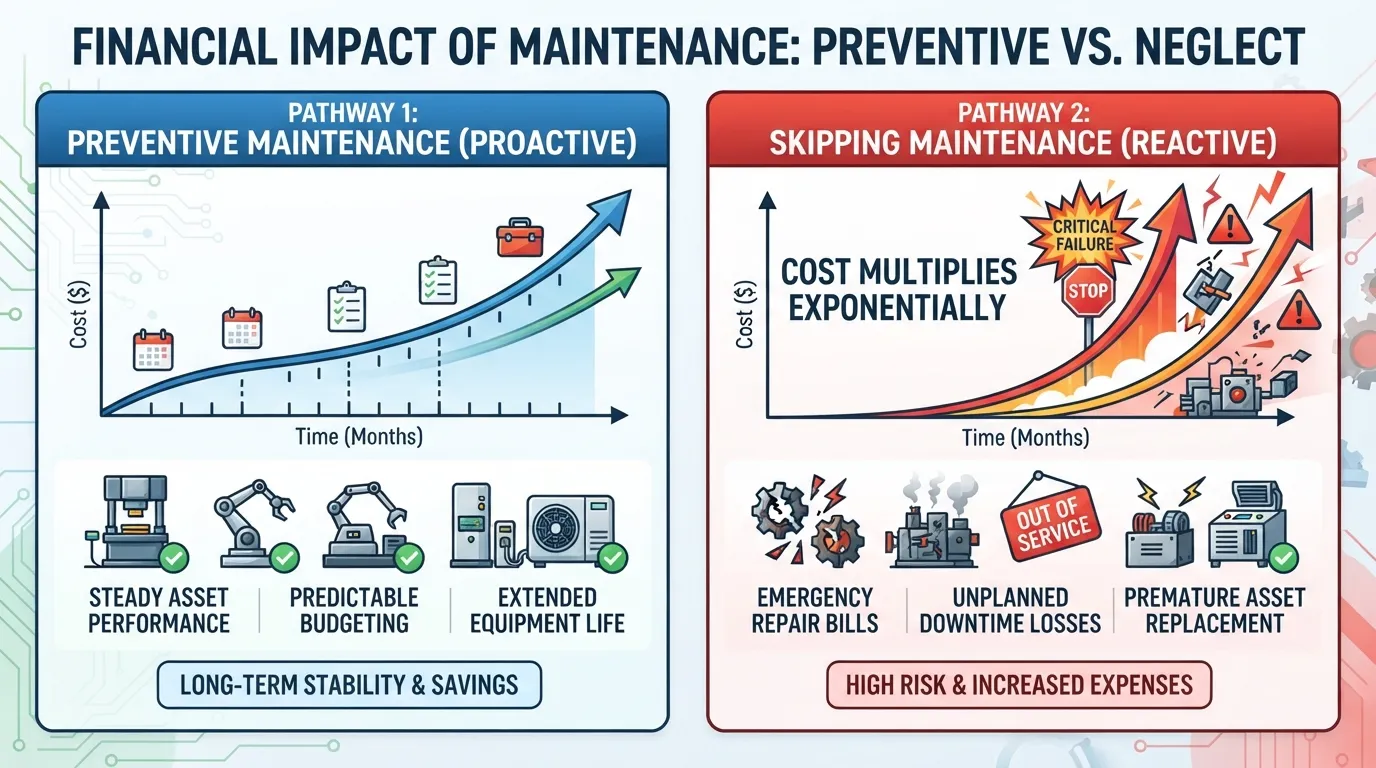
Framing home maintenance as an ongoing financial investment rather than a disposable chore is essential for preserving your long-term wealth. Deferring routine plumbing inspections frequently results in a compounding financial burden, turning inexpensive parts into multi-thousand-dollar emergency disasters. Understanding standard budgeting formulas helps you allocate funds effectively to protect your property value.
The 1% Rule: Budgeting for Home Maintenance
Financial and real estate experts widely recommend utilizing the 1% rule to calculate your baseline annual home upkeep budget. This reliable benchmark ensures you have dedicated funds available for both scheduled preventive care and unexpected repairs.
The Formula: Set aside 1% of your home’s total purchase price each year solely for maintenance and repair reserves.
Property Value Scaling: For a $400,000 home, the 1% rule allocates $4,000 annually, or roughly $333 per month, to cover systemic wear.
Older Home Adjustments: Properties older than 30 years often require bumping this budget closer to 1.5% or 2% to account for aging infrastructure.
Is $300 a Month Enough for Plumbing Upkeep?
Allocating around $300 per month fits neatly into standard maintenance models, but plumbing-specific expenses fluctuate based on the age of your system. Evaluating your monthly allocation clarifies its real-world purchasing power:
Routine Care vs. Overhaul: A $300 monthly budget provides ample funding for annual professional inspections, water heater flushes, and minor parts replacement.
Component Replacement Fund: Major structural updates, such as repiping or replacing failing sewer lines, draw heavily from accumulated reserve pools rather than monthly cash flow.
Proactive Savings: Regular contributions prevent you from relying on high-interest credit cards when sudden appliance or pipe failures occur.
Average Cost of Water Damage vs. Cost of Prevention
Comparing the minor expense of scheduled preventive maintenance to the catastrophic costs of water damage reveals why proactive care is invaluable. Prevention always costs a fraction of remediation:
Preventive Upkeep Costs: Routine checkups, replacement hoses, and professional tune-ups typically range from $150 to $500 per year.
Emergency Restoration Expenses: Professional water extraction, mold remediation, and structural drywall replacement often range from $3,000 to over $15,000 per incident.
Exponential Savings: Spending a few hours and dollars on annual checklists shields your household budget from devastating, avoidable financial loss.
New Homeowner Plumbing Essentials
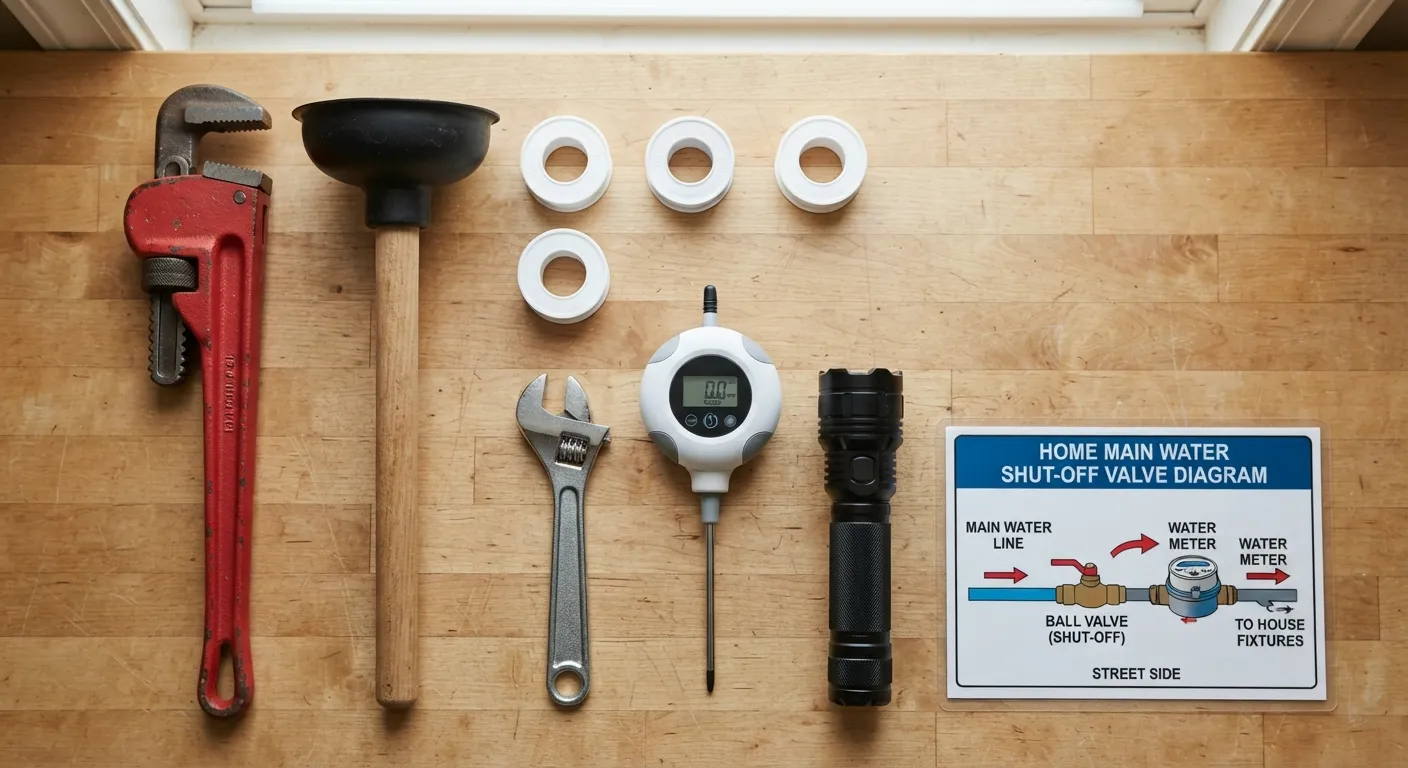
Mastering new homeowner plumbing tips during your first week in a property establishes a solid foundation for long-term homeownership. Moving into a new home brings excitement, but unfamiliar water systems can quickly become overwhelming if an emergency arises. Familiarizing yourself with key isolation points and basic maintenance routines protects your investment from day one.
5 Plumbing Basics Every First-Time Homeowner Should Know
Grasping a few foundational plumbing concepts empowers you to manage minor issues confidently and prevents unnecessary panic during unexpected situations. Keep these five essential rules in mind:
Locate Main Shutoffs Immediately: Identify your primary water entry point and test the main shutoff valve before unpacking boxes.
Know Your Water Heater Age: Check the manufacture date on your water heater tank to anticipate when replacement or heavy servicing might be required.
Inspect Supply Lines Regularly: Check washing machine hoses, sink connections, and toilet seals for signs of weeping or wear monthly.
Never Pour Grease Down Drains: Keep cooking oils and coffee grounds out of your kitchen sink to prevent stubborn grease blockages.
Establish a Maintenance Calendar: Set recurring reminders on your phone for annual tasks like water heater flushes and drain trap checks.
Where to Find Your Main Water Shutoff (First Week Priority)
Finding your main water shutoff valve is the single most critical task for any first-time homeowner during moving week. Knowing how to cut off water instantly can prevent thousands of dollars in flooding damage if a pipe bursts.
Common Interior Locations: Check the basement utility room, garage walls, crawlspace access points, or directly where the municipal water line enters the foundation.
Exterior Meter Boxes: If no interior valve exists, look for a buried meter box near the street or property boundary equipped with a specialty shutoff key.
Test and Tag: Turn the valve gently to confirm it operates smoothly, then attach a bright waterproof tag so every family member can find it instantly.
Building a Simple Plumbing Toolkit
Equipping yourself with a dedicated homeowner plumbing toolkit ensures you are always prepared to handle minor fixes without waiting for a service call. Stock your utility closet with these affordable, high-utility items:
Channel-Lock Pliers and Pipe Wrenches: Essential for gripping fittings, tightening supply nuts, and handling under-sink connections.
Plungers (Flange and Cup): Keep a heavy-duty flange plunger for toilets and a standard cup plunger for sinks and tubs.
Teflon (PTFE) Tape: Wrap threaded plumbing connections to create a watertight seal when installing new showerheads or supply lines.
Hand Auger (Drain Snake): A simple manual cable snake easily clears hair and soap clogs from bathtub and shower drains.
Frequently Asked Questions
Find direct answers to the most common questions homeowners ask about plumbing upkeep, maintenance budgeting, and preventive care. Review these expert explanations to clarify your routine care strategy and resolve technical uncertainties.
What Is the 135 Rule in Plumbing?
The 135 rule refers to basic sizing and layout guidelines used in residential drainage design to ensure proper waste flow and venting. While building codes rely on precise engineering standards for pipe slopes and fixture units, understanding fundamental spacing principles helps homeowners avoid severe clogs.
Drainage Slope: Horizontal drainage pipes typically require a minimum fall of one-quarter inch per foot to ensure solid waste travels smoothly without settling.
Ventilation Distances: Proper vent placement prevents siphon action from pulling water out of P-traps, maintaining a safe barrier against sewer gases.
Professional Compliance: Always consult a licensed plumber when altering pipe layouts to ensure local municipal building code compliance.
What Are the 10 Most Common Home Maintenance Issues?
Routine homeowner surveys reveal that certain infrastructure problems occur with high frequency across residential properties. Addressing these top issues proactively prevents costly emergency repairs:
Clogged or slow-running bathroom and kitchen drains
Silent water leaks in toilets and worn flapper valves
Sediment accumulation and rumbling in water heater tanks
Dripping outdoor hose bibs and damaged spigot washers
High water pressure exceeding safe structural limits
Deteriorating rubber washing machine supply lines
Evaporated P-trap water seals in unused guest bathrooms
Sticking or corroded main water shutoff valves
Gutter overflows causing foundation moisture issues
Clogged HVAC or furnace air filters restricting airflow
Do I Really Need to Flush My Water Heater Every Year?
Yes, flushing your traditional tank water heater annually is essential for clearing out mineral sediment and preserving heating efficiency. Neglecting this task creates a thermal barrier that forces the burner to overheat the tank bottom.
Extends Equipment Lifespan: Regular flushing prevents premature tank corrosion and component failure, helping your unit last years longer.
Lowers Utility Bills: Removing sediment allows water to heat faster, reducing daily energy consumption.
Simple DIY Process: Attaching a garden hose and draining the tank takes roughly an hour using basic tools.
What’s the Most Overlooked Home Maintenance Task?
Refilling dry floor drain traps and checking hidden utility room connections rank among the most frequently ignored home maintenance tasks. Homeowners often neglect these areas because they sit out of sight until a failure occurs.
Evaporated Drain Traps: Basements and laundry rooms feature floor drains that lose their water seals to evaporation, letting foul sewer gas inside.
Uninspected Hobbies/Hoses: Washing machine hoses and ice maker lines age silently behind appliances without regular visual audits.
Stuck Shutoff Valves: Main water valves left uncycled for years seize up completely, preventing emergency shutoffs.
What Are Some Useful Hacks for Home Maintenance?
Applying clever, low-cost maintenance hacks helps you protect your plumbing infrastructure with minimal time and effort. Incorporate these simple tricks into your routine:
Mineral Oil Vapor Barriers: Pour a spoonful of mineral oil into unused floor drains to stop standing water from evaporating.
Food Coloring Diagnostics: Drop tinted dye tablets into toilet tanks to instantly catch silent flapper leaks without guessing.
Phone Calendar Reminders: Set recurring seasonal alerts for HVAC filters, water heater flushes, and valve testing.
Is $300 a Good Monthly Maintenance Budget?
Allocating roughly $300 per month—or roughly 1% of a standard home’s value annually—provides a robust baseline for ongoing property upkeep. This funding level easily covers scheduled tune-ups, preventive parts, and minor repairs.
Covers Routine Care: Easily pays for professional inspections, water heater flushes, and routine filter replacements.
Builds Emergency Reserves: Accumulates cash over time to cushion against unexpected major repairs like sewer line replacements.
Protects Property Value: Consistent spending prevents deferred maintenance from devaluing your home.
Conclusion and Call-to-Action
Transforming your approach to home care through a structured annual plumbing checklist protects your family, safeguards your property value, and eliminates unexpected financial shocks. Adopting consistent preventive habits ensures your water and drainage infrastructure remains a silent, reliable asset rather than an unpredictable source of stress. By addressing minor anomalies early, you secure complete peace of mind throughout every season.
Recap: Building Your Annual Plumbing Habit
Maintaining a resilient plumbing system does not require complex technical expertise—it relies entirely on consistency and proactive observation. Integrate these core takeaways into your routine:
Commit to Regular Audits: Evaluate hose lines, check toilets, test water pressure, and clear floor drains on a structured seasonal schedule.
Keep Essential Supplies Ready: Stock replacement flappers, Teflon tape, and basic tools so you can resolve minor issues immediately.
Prioritize Safety First: Know the exact location of your main water shutoff valve and ensure every household member can operate it during an emergency.
When in Doubt, Call a Licensed Professional
While DIY checklists handle surface-level maintenance effectively, complex issues like main sewer backups, gas connections, and structural pipe failures demand expert intervention. Partnering with a licensed professional ensures your home’s hidden infrastructure remains fully compliant and structurally sound.
Ready to secure expert protection for your home? Book Your Annual Plumbing Inspection Today to let our certified specialists evaluate your system and prevent costly emergencies before they start.
Main Services
Related Posts
Need a Plumber in Miami?
Schedule service online or speak directly with the EZ Plumbing team.
Owner-Led Local Service
Know who is behind the business before you request service. The owners, contact line and Miami service pages are published clearly.
- Named business owners
- Direct phone and social channels
- Local Miami service information
Clear Help Before You Book
Review the relevant service page, contact the team directly and use the booking page when you are ready—without relying on vague claims.
- Service-specific information
- Direct questions before scheduling
- Clear online booking route