If you’re staring at a copper pipe wondering what tool you actually need, you’re not alone. Copper plumbing work isn’t complicated once you know which tool does what — but using the wrong one (or none at all) is how small jobs turn into bigger leaks. This guide walks you through every tool used to cut, shape, join, and repair copper pipe, plus what you can realistically do if you don’t have professional equipment on hand.
To cut, shape, and join copper pipe, you need a tubing cutter, a deburring tool, and a joining method — either a soldering torch or a press/crimping tool. Bending and swaging tools are optional and only needed for specific fittings. If you don’t have any of these, temporary patch materials like epoxy putty or a pipe repair clamp can hold a small leak until a proper repair is made.
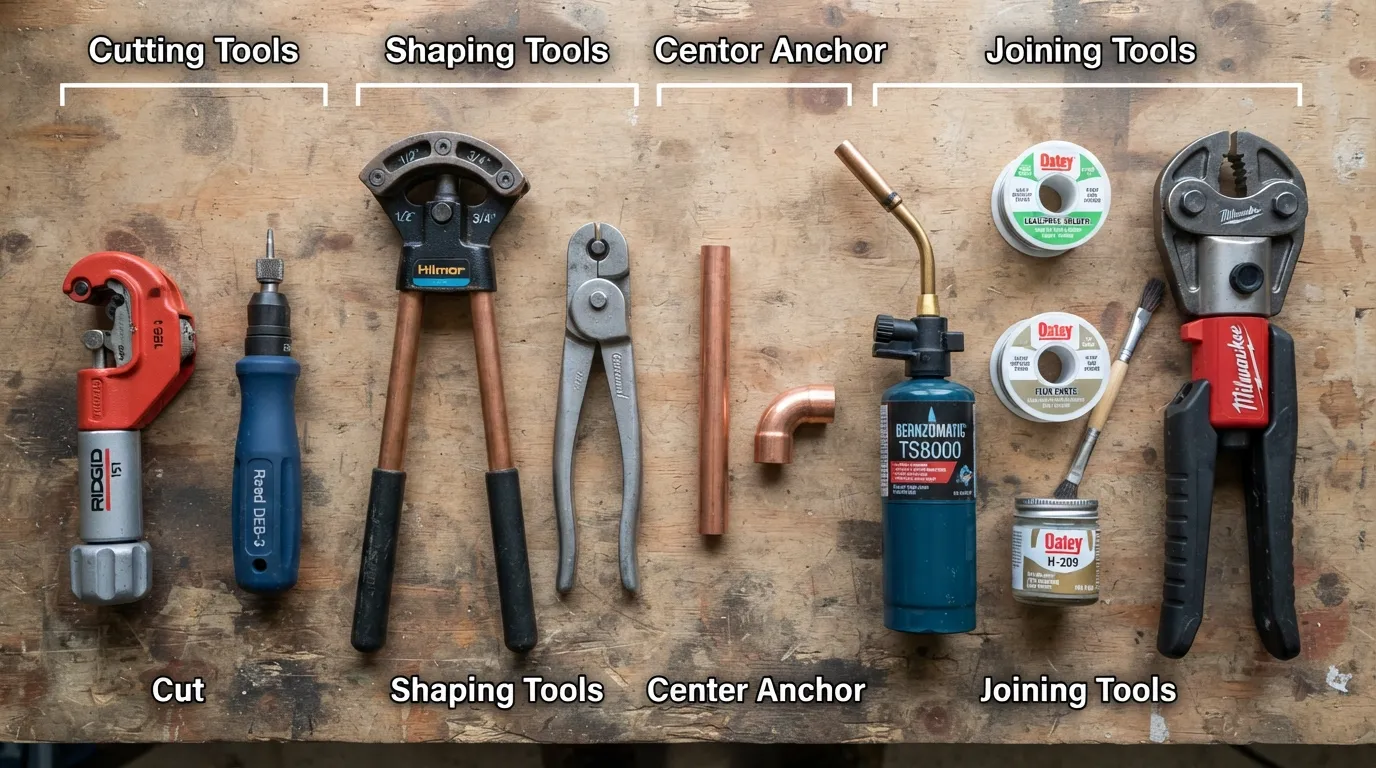
The Essential Copper Pipe Tools
Every copper pipe job breaks down into three stages: cutting and prepping the pipe, shaping it if needed, and joining it. Here’s what each stage requires.
1. Cutting & Preparation
- Tubing Cutter — Makes a clean, straight cut through copper tubing without leaving metal shavings inside the pipe. This is the tool most jobs start with.
- Deburring Tool — Removes the sharp, jagged edge (burr) left inside and outside the pipe after cutting. Skipping this step is a common reason joints leak later, since burrs stop fittings from seating properly.
2. Shaping & Sizing
- Swaging Tool — Expands the end of one copper pipe so a second pipe of the same size can slide inside it, which removes the need for a separate coupling fitting.
- Bending Tool (Bender) — Keeps the pipe from flattening or kinking when you need a smooth, angled bend instead of a fitting.
3. Joining & Fastening
- Soldering Torch — Heats the joint so solder can flow into the seam and create a watertight bond. This is the traditional method and still the most common for permanent copper joints.
- Copper Pipe Crimper / Press Tool — Compresses a press-fit fitting around the pipe to create a secure, leak-free connection without any open flame or solder. Increasingly popular for DIY and professional jobs where a torch isn’t practical.
- Shut-Off Tool — A heavy-duty clamp professionals use to safely squeeze and temporarily block water flow in a live line while a repair is in progress. Not something most homeowners need to own, but worth knowing exists.
Soldering vs. Press-Fit (Crimping): Which Should You Use?
This is the decision most people get stuck on. Both methods create a permanent, leak-free joint — the right one depends on your comfort level, budget, and where you’re working.
| Factor | Soldering | Press/Crimp Tool |
|---|---|---|
| Open flame required | Yes | No |
| Skill/learning curve | Higher — takes practice to avoid cold joints | Lower — tool does the sealing work |
| Upfront tool cost | Lower — torch and solder are inexpensive | Higher — press/crimp tools cost more, though rentals are available |
| Safe near tight/enclosed spaces | Riskier — open flame near wood framing or insulation | Safer — no flame involved |
| Best for | Open, ventilated work areas; traditional repairs | Tight spaces, occupied homes, fire-restricted areas |
Best Tool for Cutting Copper Pipe in Tight Spaces
Standard tubing cutters need room to rotate around the pipe, which isn’t always available behind walls, under sinks, or in crawl spaces. For these spots, a mini tubing cutter or a close-quarters cutter is the better choice — they’re built with a smaller cutting radius specifically for confined areas. A cordless crimping tool is also worth considering here, since it eliminates the need for a torch swing radius entirely.
Tools Needed for Soldering Copper Pipe
If you’re going the traditional soldering route, here’s the full kit:
- Propane or MAPP gas torch
- Lead-free solder (required for potable water lines)
- Flux and a flux brush
- Emery cloth or sandpaper to clean the pipe and fitting
- A heat-resistant shield or cloth to protect nearby framing and insulation
- A fire extinguisher within reach
Safety Note
Never solder near a gas line, inside a wall cavity without a heat shield, or in a space with poor ventilation. If you smell gas at any point, stop immediately and shut off the supply.
Buy or Rent a Copper Pipe Crimping Tool?
Hydraulic press and crimping tools aren’t cheap, and if you only need one for a single repair, renting from a local tool rental counter or hardware store is often the more practical option than buying. If you expect to do copper work more than once or twice a year, buying starts to make more sense. Either way, make sure the jaw size matches your pipe diameter (1/2″, 3/4″, or 1″ are the most common) before you cut anything.
What If You Don’t Have the Right Tools? Temporary Fixes for a Copper Pipe Leak
Sometimes a leak shows up and you don’t have a torch or crimping tool on hand. Here’s what actually works as a short-term fix, and what doesn’t hold up.
Can JB Weld fix a copper pipe leak?
A two-part epoxy putty like JB Weld can seal a small pinhole leak on a dry, cleaned section of pipe once the water supply is shut off. It’s a temporary measure, not a permanent repair — the pipe underneath is still corroded or damaged, and that section should be replaced or professionally repaired.
Can Flex Seal fix a leaky copper pipe?
Flex Seal and similar rubberized sealants can slow a leak temporarily on a shut-off, dry pipe, but they’re not rated for pressurized water lines long-term. Treat it as a stopgap until the pipe is properly repaired.
What tape can I use to fix a leaking copper pipe?
Self-fusing silicone repair tape (wrapped tightly, overlapping itself under tension) is the most effective option and can hold for a limited time on a shut-off pipe. Standard electrical or duct tape will not seal against water pressure and shouldn’t be relied on.
How to fix a hole in copper pipe without replacing it
A pipe repair clamp (a rubber sleeve with a metal band that tightens around the pipe) is the most reliable non-replacement fix for a hole or split. It’s sold pre-sized for standard copper diameters and requires no torch or crimping tool — just a screwdriver or wrench.
Key Takeaways
- A tubing cutter, deburring tool, and a joining method (torch or press tool) cover most copper pipe jobs.
- Press/crimp tools cost more upfront but are safer for tight or occupied spaces since there’s no open flame.
- JB Weld, Flex Seal, and repair tape can buy you time on a leak, but none of them replace a proper repair.
- A pipe repair clamp is the most reliable no-tool fix for a hole without replacing the section.
- If you’re not confident shutting off water or working near gas lines, that’s the point to call a licensed plumber.
DIY or Call a Plumber?
A temporary patch (clamp, epoxy, or tape) is reasonable to try yourself once the water is shut off. Call a licensed plumber if the leak is at a joint or valve, if the pipe is behind a wall or under a slab, if you’re unsure how to safely shut off the main supply, or if the corrosion looks widespread rather than a single pinhole. In older Miami homes especially, one visible leak can be a sign of broader corrosion in copper lines exposed to years of humidity and hard water.
If that’s the situation you’re in, our leak repair service can take it from there.
Watch: Copper Pipe Tools in Action
If you’d rather see these tools being used before you try one yourself, this walkthrough is a helpful reference:
Frequently Asked Questions
What tools do I need to repair a copper pipe?
At minimum, a tubing cutter and a joining method — either a soldering torch with solder and flux, or a press/crimping tool with the correct jaw size for your pipe diameter.
What is the best tool to cut copper pipe in tight spaces?
A mini or close-quarters tubing cutter, designed with a smaller turning radius for confined areas like behind walls or under sinks.
What tools are needed for soldering copper pipe?
A torch, lead-free solder, flux and brush, emery cloth to clean the joint, and a heat shield to protect surrounding materials.
What can I use to patch copper pipe?
A pipe repair clamp is the most reliable option. Epoxy putty, rubberized sealant, or self-fusing silicone tape can work as short-term patches once the water is shut off.
How to fix a copper pipe leak without soldering?
Use a press-fit fitting with a crimping tool, or a mechanical pipe repair clamp — both create a seal without any torch or solder involved.
Can JB Weld fix a copper pipe leak?
Temporarily, yes, on a small pinhole leak once the pipe is shut off and dried. It’s not a permanent fix — the underlying corrosion or damage still needs proper repair.
How to fix a hole in copper pipe without replacing it?
A pipe repair clamp tightened over the hole is the standard no-replacement fix, and it doesn’t require a torch or crimping tool.
What can I put on copper pipe to stop a leak?
A repair clamp, epoxy putty, or self-fusing silicone tape, applied to a shut-off and dried section of pipe.
Can Flex Seal fix a leaky copper pipe?
It can slow a leak temporarily on a dry, shut-off pipe, but it isn’t rated for long-term use on pressurized water lines.
What type of tape can I use to fix a leaking copper pipe?
Self-fusing silicone repair tape, wrapped tightly under tension. Regular electrical or duct tape won’t hold against water pressure.
Not sure if it’s a DIY fix or something bigger?
Our licensed plumbers handle copper pipe repairs and replacements across Miami. Call us and we’ll help you figure out the right next step.
Helpful Resources
If you’re looking to buy or compare specific copper pipe tools, these retailers carry a wide selection of cutters, press tools, and crimping equipment:
- Home Depot — Hydraulic Copper Press Tools
- Lowe’s — Copper Pipe Press Tools
- IWISS — Copper Pipe Tool Collection
For more on keeping your home’s plumbing in good shape, visit our water heater replacement guide, browse our full range of plumbing services, or head back to our homepage to learn more about our team.