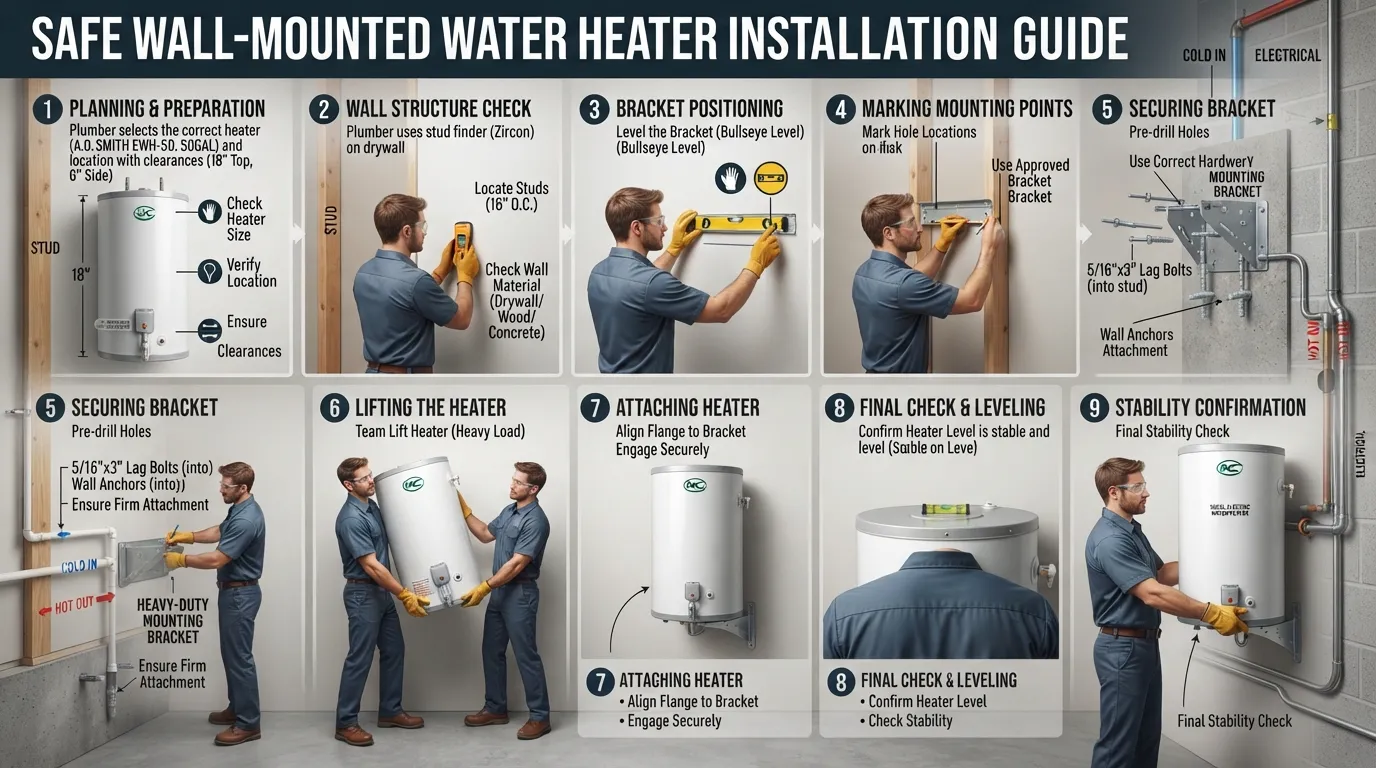
Mounting a water heater is more than putting a tank against a wall and tightening a few bolts. The wall, mounting system, water connections, electrical requirements, service access, and safety equipment all have to work together.
If you are researching water heater mounting, how to fit a water heater, or how to install a new water heater, this guide will help you understand what proper installation involves, what to check before mounting the unit, and when professional installation makes more sense.
A water heater should be mounted to a structure that can safely support the unit under its operating conditions, using the mounting method and hardware specified for that particular model. Proper installation also includes the water connections, required safety components, electrical or fuel connections where applicable, service access, and final testing. There is no single universal mounting method or anchor size that is correct for every water heater.
Important: Water heater installation can involve heavy equipment, pressurized water, electricity, gas, and hot water. Always follow the manufacturer’s installation manual and applicable local requirements. If the installation requires electrical, gas, structural, or plumbing work beyond your qualifications, use a qualified professional.
What Does Water Heater Mounting Actually Mean?
Water heater mounting is the process of securely supporting a water heater in its intended position. For a wall-mounted unit, that usually involves an approved bracket or mounting system attached to an appropriate structural surface.
But mounting is only one part of a complete water heater installation.
A properly installed system may also require:
- A suitable installation location
- A structurally adequate wall or support system
- The manufacturer’s approved mounting bracket or method
- Correctly selected fasteners and anchors
- Cold-water and hot-water connections
- Required pressure and temperature relief protection
- Drainage or leak-management provisions where applicable
- Electrical, gas, or other energy connections depending on the heater type
- Enough clearance for operation and future service
- Testing and inspection before the heater is placed into normal operation
That distinction matters because a heater can be physically attached to a wall and still have an incomplete or unsafe installation.
Before You Mount a Water Heater, Check These 7 Things
Before drilling anything, stop and evaluate the installation as a complete system.
1. Identify the Water Heater Type
Start by identifying exactly what you are installing.
Common types include:
- Electric storage water heaters
- Tankless water heaters
- Wall-mounted electric water heaters
- Under-sink water heaters
- Gas water heaters
The mounting requirements are not interchangeable. A compact tankless unit and a large storage tank can have very different support, clearance, plumbing, electrical, venting, or fuel requirements.
If you have an A. O. Smith, Takagi, or another specific brand and model, use that unit’s installation instructions rather than assuming a generic water heater setup applies.
2. Check the Wall or Supporting Structure
The most important question is not simply, “Can I drill into this wall?” It is:
Can this structure safely support the water heater using the manufacturer’s approved mounting method?
Possible wall and structural conditions include concrete, masonry, brick, wood framing, studs, drywall, and other construction types. The appropriate fastening method depends on the actual structure and the heater’s installation requirements.
Do not assume that drywall alone is adequate structural support for a heavy water heater. If the mounting point does not provide the required structural support, the correct solution may involve locating suitable framing or another approved support system rather than simply using a stronger-looking wall anchor.
3. Consider the Heater’s Operating Load
This is one of the easiest details to overlook.
A storage water heater is not normally operating at its empty shipping weight. Once filled, the tank contains water, so the support system needs to be appropriate for the unit under its intended operating conditions.
In other words, do not evaluate a mounting system based only on what the empty heater weighs while you are holding it during installation.
Mounting Rule to Remember
The mounting system must be suitable for the heater’s intended operating load and installation conditions, not merely its empty weight.
4. Read the Manufacturer’s Installation Instructions
Your water heater manual is not optional background reading. It is one of the most important sources of model-specific information.
It may specify:
- Approved mounting locations
- Bracket requirements
- Fastener or support requirements
- Clearances
- Water connection locations
- Electrical requirements
- Pressure and temperature relief requirements
- Drainage provisions
- Service access
- Installation limitations
This is also why there is no responsible universal answer such as “use this exact anchor size for every water heater.” The correct hardware depends on the heater, mounting system, structure, and manufacturer’s instructions.
5. Plan the Water Connections
Look at where the cold-water inlet and hot-water outlet are located before you decide where to mount the heater.
A simple way to visualize the basic flow is:
The exact connection arrangement and required safety components depend on the heater and installation requirements.
6. Plan for Service Access
A water heater should not be mounted simply because a particular spot is convenient today.
Think about what happens later when someone needs to inspect, service, repair, drain, or replace the unit.
A good location should provide appropriate access to the heater and its relevant components while maintaining the clearances specified by the manufacturer and applicable requirements.
7. Consider Water-Damage Protection
Think beyond the heater itself. A leaking water heater can affect walls, flooring, cabinets, equipment, and other property.
Depending on the installation, water-damage protection can involve appropriate location planning, drainage, a drain pan, leak-management measures, and other provisions required by the heater instructions or local requirements.
How to Mount a Water Heater Properly
The exact installation sequence varies by heater model, but the following framework explains the major stages of a proper wall-mounted installation.
Step 1: Confirm the Installation Location
Choose a location that satisfies the manufacturer’s requirements for clearance, access, connections, and support.
Before marking the wall, consider:
- Wall construction and structural support
- Heater dimensions
- Mounting bracket location
- Cold-water and hot-water connection positions
- Electrical or fuel connection requirements
- Pressure-relief and drainage requirements
- Access for future service
- Potential consequences of a leak
Step 2: Position and Level the Mounting System
Use the mounting points specified by the manufacturer. The bracket or support system should be positioned correctly and checked for level before the final fastening.
A level installation helps keep the unit correctly oriented and can make the subsequent connections easier to inspect and service.
Step 3: Match the Fastening Method to the Structure
This is where many generic water heater installation guides become too simplistic.
The correct fastening method depends on what is actually behind the mounting surface.
- Concrete or masonry: use a fastening system appropriate for the specific substrate and approved for the installation.
- Wood framing: fasteners should engage suitable structural framing as required by the mounting system.
- Drywall: do not treat the drywall surface itself as automatic structural support for a heavy unit.
- Uncertain construction: determine the actual structure before choosing the mounting method.
The goal is not to find the strongest-looking anchor. The goal is to create a mounting system that is appropriate for the heater, the structure, and the manufacturer’s requirements.
Step 4: Secure the Bracket or Mounting System
Install the manufacturer’s approved bracket or support system using the appropriate fastening method for the wall structure.
Before hanging the heater, verify that the support is secure and correctly positioned.
Do not improvise a mounting system if the heater requires a specific bracket or support arrangement.
Step 5: Position the Water Heater on the Mounting System
Heavy storage water heaters should be handled with appropriate assistance and lifting equipment when necessary. Avoid attempting to lift or position a heavy unit alone if doing so creates a risk of dropping the heater or injuring yourself.
Once positioned, confirm that the heater is properly engaged with the approved mounting system and that there is no unintended movement.
Step 6: Verify the Mounting Before Making Connections
Before connecting water or electrical services, inspect the physical installation.
- Is the unit correctly supported?
- Is it positioned as required by the manufacturer?
- Is the mounting system secure?
- Is the heater properly oriented?
- Is there adequate service access?
- Are the water and electrical connection areas accessible?
This is a useful point to stop and correct a mounting problem before it becomes a plumbing or electrical problem.
How to Connect a Water Heater to the Plumbing System
Once the heater is correctly mounted, the plumbing connections can be addressed according to the specific model and applicable requirements.
Cold-Water Inlet
The cold-water supply connects to the heater’s designated inlet. The exact connection method, valve arrangement, piping materials, and other components should follow the manufacturer’s instructions and applicable plumbing requirements.
Hot-Water Outlet
The hot-water outlet supplies heated water to the building’s fixtures. Verify that the hot and cold connections are correctly identified before completing the installation.
Pressure and Temperature Relief Protection
Storage water heaters commonly use safety devices designed to protect against excessive temperature or pressure. These components must be installed and configured according to the heater manufacturer’s instructions and applicable requirements.
Do not remove, bypass, cap, or improperly modify required safety devices simply to make a connection easier.
Drainage and Leak Management
Where required, the installation should provide an appropriate method for handling discharge from safety devices and managing water that could otherwise damage the surrounding area.
The exact arrangement should be based on the heater instructions and applicable local plumbing requirements.
What About Electric Water Heater Installation?
If you are installing an electric water heater, mounting the unit is only part of the job. The electrical system must also be compatible with the specific heater.
Depending on the model, installation considerations can include:
- Rated voltage
- Electrical load
- Circuit requirements
- Overcurrent protection
- Disconnecting means where required
- Grounding
- Manufacturer-specific wiring instructions
- Applicable electrical requirements
Electrical Safety
Do not assume that a generic 240V wiring diagram applies to every electric water heater. Use the electrical information supplied for the exact model and have electrical work performed by a qualified professional when you are not properly equipped or qualified to do it yourself.
This is especially important when a new circuit, breaker, wiring, disconnect, or other electrical work is required.
Water Heater Mounting vs. Complete Water Heater Installation
If your project involves replacing an old heater rather than simply securing an existing unit, you may also need a broader installation assessment. See our water heater replacement services for more information.
Storage Water Heater vs. Tankless Water Heater Mounting
Do not assume that instructions for one type of water heater apply to another.
Storage Water Heater
A storage heater contains a tank of water, so the support arrangement needs to account for the unit’s intended operating condition. Plumbing connections, relief protection, drainage, service access, and the manufacturer’s mounting instructions are all important.
Tankless Water Heater
Tankless units generally use a different mounting arrangement and have their own requirements. Depending on the model and energy source, installation may also involve electrical, gas, combustion-air, or venting considerations.
For either type, the exact model manual should take priority over generic online instructions.
How to Choose the Right Mounting Hardware
One of the most common questions is: “What size anchors or bolts do I need to mount a water heater?”
There is no single answer that safely applies to every installation.
The appropriate mounting hardware depends on:
- The heater’s design and mounting system
- The operating load
- The wall or structural material
- The manufacturer’s instructions
- The type of bracket being used
- The installation conditions
- Applicable requirements
For that reason, avoid choosing hardware based only on a generic internet recommendation. The correct question is not “Which bolt is strongest?” but “Which approved mounting system is appropriate for this heater and this structure?”
Common Water Heater Mounting Mistakes
1. Mounting to an Inadequate Surface
A wall may look solid while providing inadequate structural support at the actual fastening points.
2. Choosing Anchors Without Checking the Structure
An anchor designed for one substrate is not automatically suitable for another.
3. Ignoring the Manufacturer’s Bracket
If the heater is designed around a particular mounting system, replacing it with an improvised arrangement can create unnecessary risk.
4. Thinking Only About the Empty Heater
For storage tanks, the operating condition matters. The support must be appropriate for the heater as installed and used.
5. Letting Plumbing Carry the Weight
Water pipes and connectors should not be treated as a substitute for the heater’s required structural support.
6. Blocking Service Access
A location that looks convenient during installation may become a problem during future maintenance or replacement.
7. Using a Generic Wiring Diagram
Electrical requirements vary by model. Follow the exact heater documentation and applicable electrical requirements.
8. Forgetting Leak Protection
Think about what happens if a connection, relief device, or tank develops a leak. Installation location and drainage planning matter.
9. Treating Every Water Heater as the Same
Storage, tankless, electric, gas, under-sink, and wall-mounted systems can have substantially different requirements.
How Do You Know a Water Heater Is Properly Mounted?
A visual inspection should consider more than whether the heater “looks straight.”
Professional Mounting Check
- The approved mounting method has been followed.
- The supporting structure is appropriate for the installation.
- The unit is correctly positioned and oriented.
- The mounting system is secure with no unintended movement.
- The plumbing connections are accessible and are not being used to support the heater.
- Required clearances and service access are maintained.
- Safety and relief components are installed as required.
- Electrical or fuel connections match the heater’s requirements.
- The installation has been checked for leaks and proper operation before normal use.
If any of these points are uncertain, it is better to resolve the issue before putting the system into service.
When Should You Hire a Professional?
Water heater installation is one of those projects where the safest option is often to have the complete installation evaluated rather than trying to solve each part separately.
Professional help is especially appropriate when:
- You are unsure whether the wall can support the heater.
- The heater is heavy or difficult to position safely.
- A new electrical circuit or other electrical modification is required.
- Gas connections or venting are involved.
- Existing plumbing needs significant modification.
- The installation location has drainage or water-damage concerns.
- You are unsure which safety components are required.
- The manufacturer instructions are unclear.
- Local permit or inspection requirements need to be determined.
- You want the installation checked before putting the heater into service.
For Miami-Dade projects, plumbing permit requirements can vary according to the work being performed, so check the applicable local requirements before beginning regulated work.
If you need help from a local plumbing professional, you can speak with a water heater and plumbing specialist.
Water Heater Installation in Miami: Why Local Requirements Matter
A generic installation article from another country should not be treated as a substitute for local requirements.
Your water heater may need to satisfy manufacturer instructions as well as applicable plumbing, electrical, building, and safety requirements for the installation location.
This matters particularly when an online guide comes from a different region. For example, a UK installation guide may discuss requirements that are specific to UK homes, while a Singapore installation guide may use a completely different regulatory and construction context.
For a Miami-area installation, use the applicable local requirements together with the heater manufacturer’s instructions and the relevant professional guidance.
You can also explore our broader plumbing services if your water heater project involves additional plumbing work.
Water Heater Mounting FAQs
Can I mount a water heater directly to drywall?
Do not assume that drywall alone can provide the structural support required for a water heater. The mounting system needs to connect to an appropriate supporting structure according to the heater manufacturer’s requirements and the construction of the wall.
How do I know which anchor to use for a water heater?
The correct anchor or fastening system depends on the heater, mounting bracket, operating load, wall construction, and manufacturer requirements. There is no universal anchor that is appropriate for every water heater installation.
How do you mount a wall-mounted electric water heater?
Start by identifying the exact model and reviewing its mounting instructions. Confirm the wall structure, install the approved mounting system using suitable fasteners, securely position the heater, and then complete the required plumbing and electrical work according to the manufacturer’s instructions and applicable requirements.
Can a water heater be mounted on a brick or concrete wall?
A suitable masonry or concrete wall can potentially provide the required support, but the exact fastening method depends on the heater and the structure. The correct mounting hardware should be selected for the specific substrate and approved installation method.
Do I need a bracket for a wall-mounted water heater?
If the manufacturer specifies a bracket or mounting system, use it as instructed. The support arrangement should be appropriate for the exact heater rather than improvised from generic hardware.
What are the water heater inlet and outlet connections?
The cold-water inlet supplies water to the heater, while the hot-water outlet carries heated water to the building’s fixtures. The exact connection arrangement and required safety components vary by heater type and model.
Can I use a generic 240V wiring diagram for an electric water heater?
No. Electrical requirements can vary between models. Use the wiring information provided for the exact heater and follow applicable electrical requirements. If electrical work is outside your qualifications, use a qualified electrician.
Should a water heater be level?
The heater should be positioned and oriented according to the manufacturer’s installation requirements. For wall-mounted systems, correct positioning also helps ensure that the mounting system and connections are installed as intended.
Is mounting a water heater the same as installing one?
No. Mounting refers primarily to physically securing the unit. Complete installation can also include plumbing, electrical or fuel connections, safety devices, drainage, testing, commissioning, and other required work.
When should I replace a water heater instead of remounting it?
If the existing heater is damaged, unsuitable for the location, beyond practical repair, or being replaced as part of a larger plumbing project, replacement may make more sense than trying to remount the old unit. The correct decision depends on the condition and suitability of the existing system.
Final Water Heater Mounting Checklist
- Identify the exact water heater model and type.
- Read the manufacturer’s installation instructions.
- Confirm the wall or supporting structure is suitable.
- Consider the heater’s intended operating load.
- Use the manufacturer’s approved mounting system where specified.
- Select fastening methods appropriate for the actual wall structure.
- Confirm the unit is correctly positioned and supported.
- Plan cold-water and hot-water connections before final installation.
- Install required safety and relief components according to the applicable requirements.
- Confirm electrical, gas, or other energy requirements as applicable.
- Maintain appropriate service access and clearances.
- Consider drainage and protection from water damage.
- Inspect the mounting before completing the remaining connections.
- Test the completed installation before normal operation.
Need Professional Help With Water Heater Installation?
Get Help With Your Water Heater Project
If you’re not sure whether your wall, mounting system, plumbing connections, or electrical setup is appropriate, getting professional help can prevent a small installation question from becoming a costly safety or water-damage problem.
For additional plumbing needs, visit our professional plumbing services page. If you’re replacing an existing unit, our water heater replacement services can help you evaluate the next step.
Helpful Water Heater Installation Resources
When researching installation, prioritize the documentation for your exact heater model over generic instructions. Manufacturer manuals are particularly useful for model-specific mounting, connection, clearance, and safety requirements.
- Manufacturer installation manual: Check the documentation supplied with your exact water heater before installation.
- Local plumbing requirements: Confirm whether your project requires a permit or inspection before starting work.
- Professional installation: When structural, plumbing, electrical, gas, or safety requirements are uncertain, have the installation evaluated by an appropriately qualified professional.
Proper water heater mounting is not simply about drilling holes and hanging a tank. The best installation starts with the correct heater-specific mounting method, adequate structural support, proper plumbing and energy connections, required safety measures, service access, and a final inspection. When those pieces are planned together, you get a safer and more dependable water heater installation.