How to Find a Plumbing Leak: The Homeowner’s 2026 Detection & Repair Manual
The Ultimate Guide to Detecting and Fixing Plumbing Leaks
- A dripping faucet might be a minor annoyance, but the leaks you can’t see are often the most destructive forces in a modern home.
- According to data from the Environmental Protection Agency (EPA), the average household leak can waste nearly 10,000 gallons of water every year—the equivalent of the amount of water needed to wash 270 loads of laundry.
- While some leaks are obvious, such as a localized puddle under a kitchen sink, many occur silently behind drywall or beneath concrete slabs, slowly eroding your home’s structural integrity and inflating your utility bills.
The Hidden Threat: Beyond the Water Bill
- The most deceptive type of plumbing failure is the “pinhole leak.” Often caused by internal corrosion or high water pressure, these tiny breaches in copper or galvanized steel piping can go unnoticed for months.
- By the time a damp spot appears on your ceiling or your hardwood floors begin to warp, the damage is already extensive.
- Beyond the financial cost of wasted water, these leaks create a high-moisture environment that serves as a breeding ground for wood rot and pest infestations.
Why Speed Matters: The 48-Hour Window
- When it comes to plumbing leaks, time is your greatest enemy.
- Microbiologists and restoration experts warn that mold spores can begin to colonize damp building materials—like drywall, insulation, and carpeting—within just 24 to 48 hours of exposure to moisture.
- Once mold takes hold, the scope of the problem shifts from a simple plumbing repair to an expensive environmental remediation project.
- Identifying the source of the water and stopping the flow immediately is the only way to prevent respiratory health risks and permanent property damage.
The Goal of This Guide: From Suspicion to Solution
If you suspect your water meter is spinning faster than it should, or you’ve noticed a faint musty odor in the hallway, you are in the right place. This guide is designed to move you from uncertainty to decisive action. We will cover:
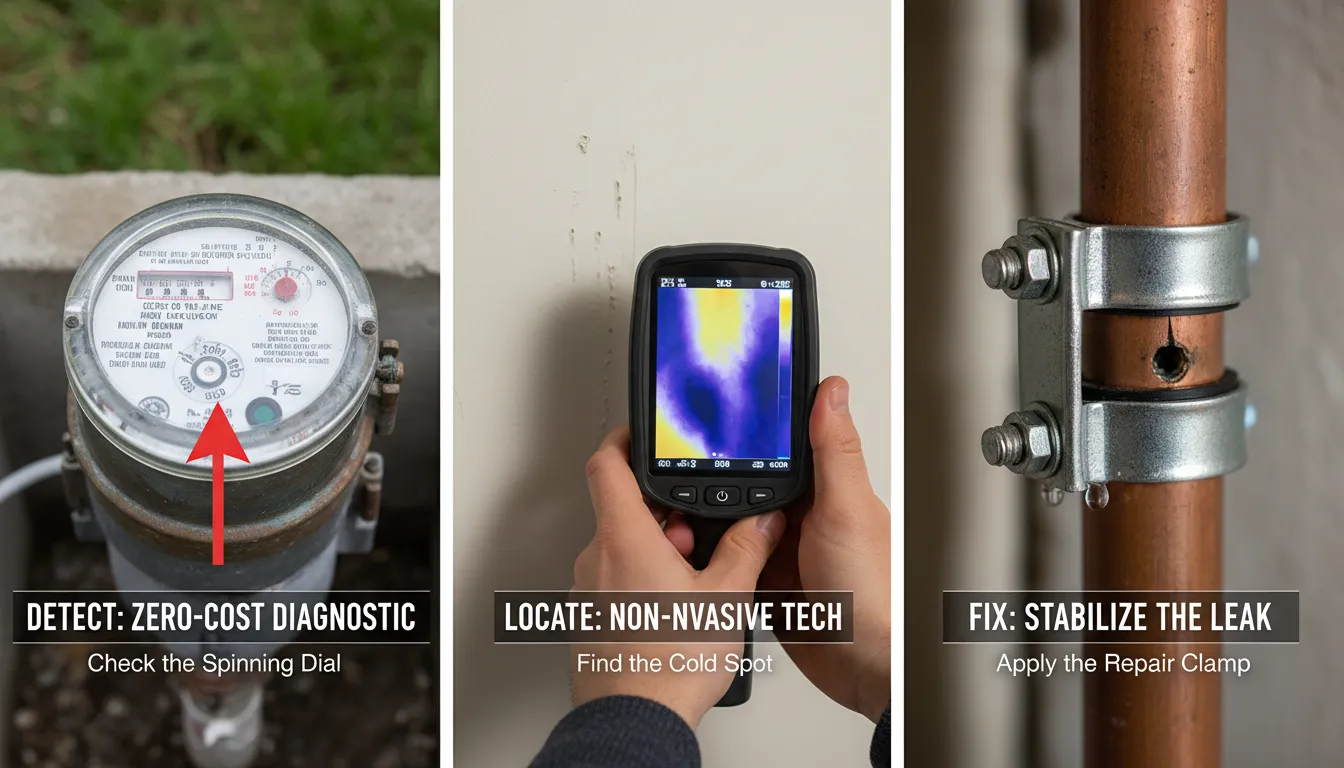
Detection: How to use your water meter and simple household tools to find “invisible” leaks.
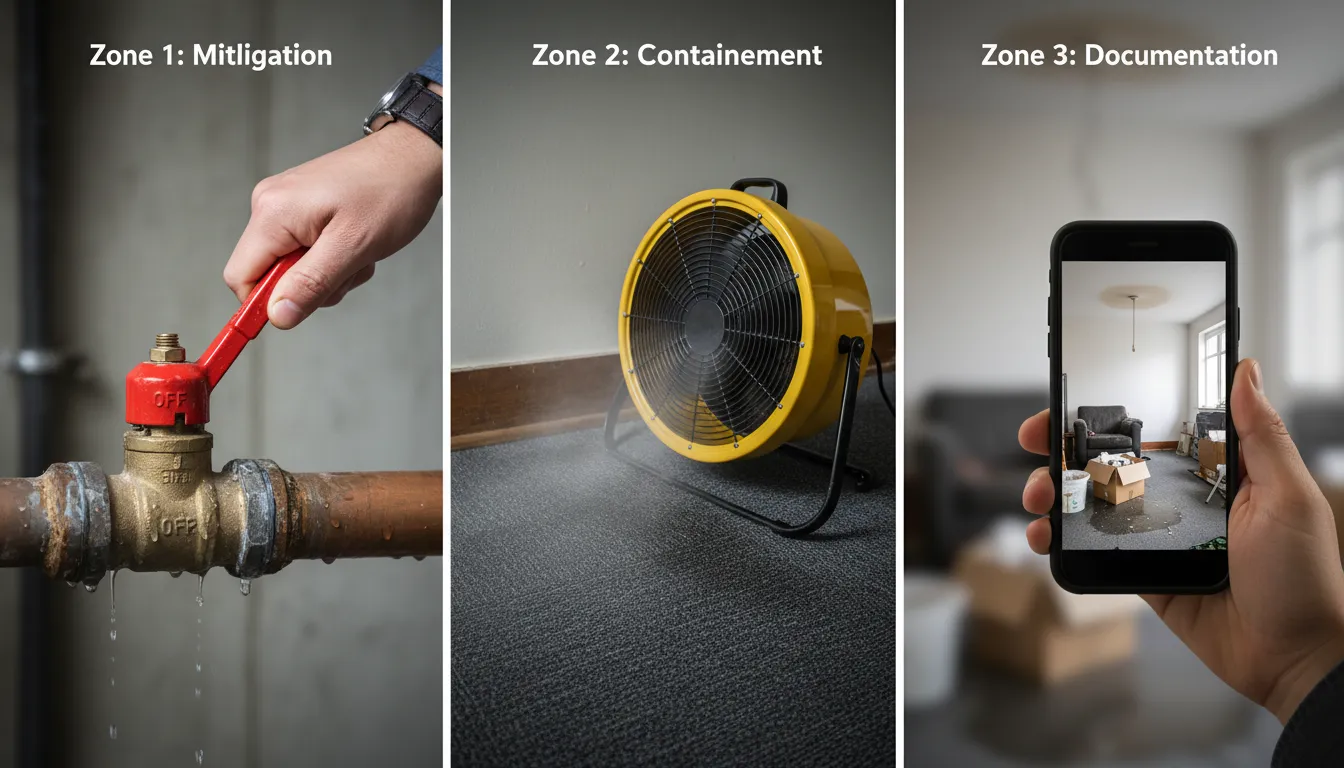
Containment: Immediate steps to take to minimize water damage.
Repair: Distinguishing between a DIY-friendly fix and a situation that requires a licensed professional.
By the end of this resource, you will have a clear, actionable plan to protect your home and your wallet from the devastating effects of a plumbing leak.
The “First Response” Protocol Immediate Action
- When you suspect a leak, the first 60 minutes are critical. Acting decisively can mean the difference between a minor repair and a total flooring replacement.
- This section outlines the immediate tactical steps every homeowner must take to stabilize the situation.
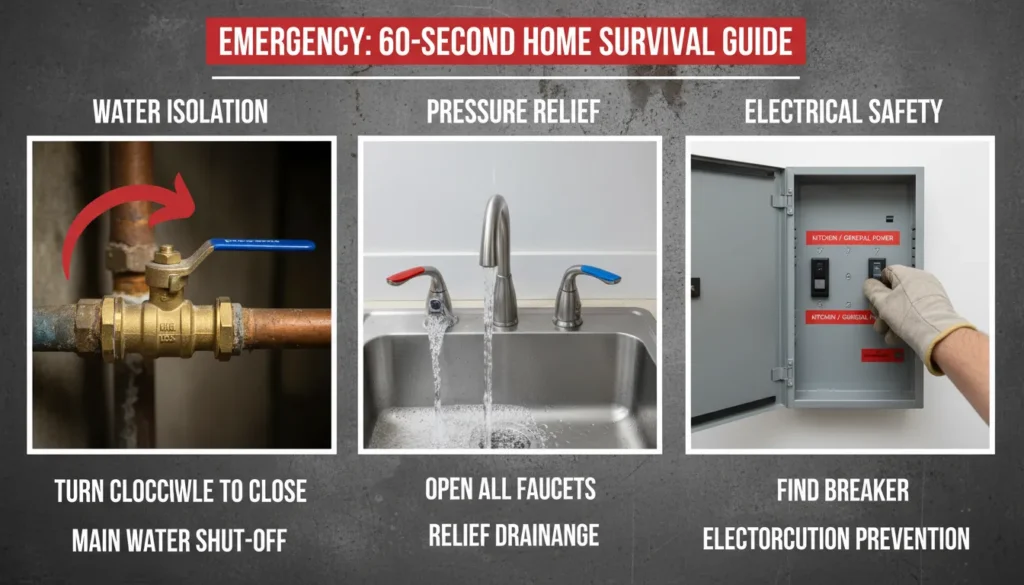
Locating and Operating the Main Shut-off Valve
- The most important piece of plumbing knowledge you can possess is the location of your Main Water Shut-off Valve.
- This valve stops the flow of water to the entire house, instantly depressurizing the system and halting the spread of a leak.
Where to find it:
Basements and Crawl Spaces:
- Look for the pipe entering the home near the front foundation wall. The valve is usually located within 3-5 feet of this entry point.
Near the Water Heater:
- In some climates, the main shut-off is located near the cold water inlet of the water heater.
The Curb Box Water Meter:
- If you cannot find an internal valve, your shut-off may be located outside in a concrete or plastic box near the street.
- You may need a “meter key” (available at hardware stores) to open the lid and turn the T-handle valve.
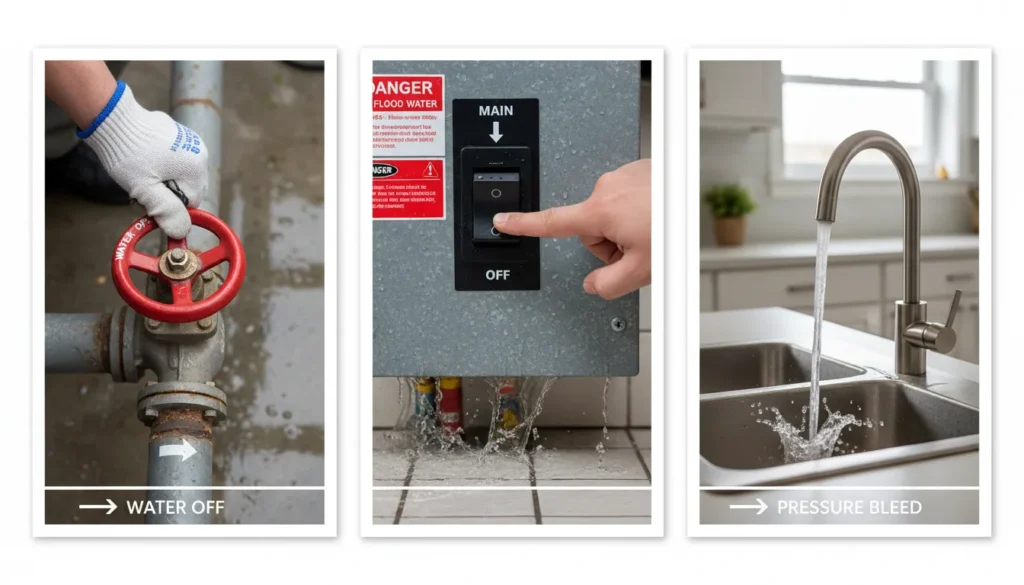
How to close it:
Ball Valves:
- These have a straight handle. Turn the handle 90 degrees so it is perpendicular to the pipe to shut it off.
Gate Valves:
- These look like a circular faucet handle. Follow the “Righty-Tighty” rule—rotate the handle clockwise until it can no longer turn.
Safety First: Water and Electricity
Before you go wading into a flooded area, you must assess the electrical risks. Water is an excellent conductor, and “hidden” leaks often travel along electrical conduit.
The “Ceiling Bubble”:
- If you see a sagging “bubble” of water in your ceiling paint, do not poke it if it is near a light fixture or ceiling fan. Turn off the circuit breaker for that room before draining the water.
Wall Leaks:
- If water is dripping from an electrical outlet or a light switch, do not touch the switch. Go directly to your electrical panel and shut off the main breaker or the specific branch circuit affecting that area.
The 2-Hour Meter Test: Quantifying the Leak
Once the immediate danger is stabilized, you need to confirm if a leak is active and how severe it is. The water meter is your most accurate diagnostic tool.
Step 1: Total Isolation
- Ensure all water-using appliances are off. This includes the dishwasher, washing machine, ice makers, and any irrigation systems. Do not flush the toilets during this test.
Step 2: Record the Baseline
- Locate your water meter and look at the face. Most digital and analog meters have a “leak indicator”—usually a small red, silver, or white triangle or a star-shaped wheel.
- If that triangle is spinning even slightly while all water is off, you have an active leak. Note the exact numerical reading on the odometer.
Step 3: The Waiting Period
- Wait exactly two hours without using a single drop of water. After the time has elapsed, check the meter again. If the numbers have changed, you have a verified leak.
A small change usually indicates a dripping faucet or a leaking toilet flapper.
A significant change suggests a major breach in a supply line or an underground pipe.
Visible vs. Hidden Leaks Symptoms & Identification
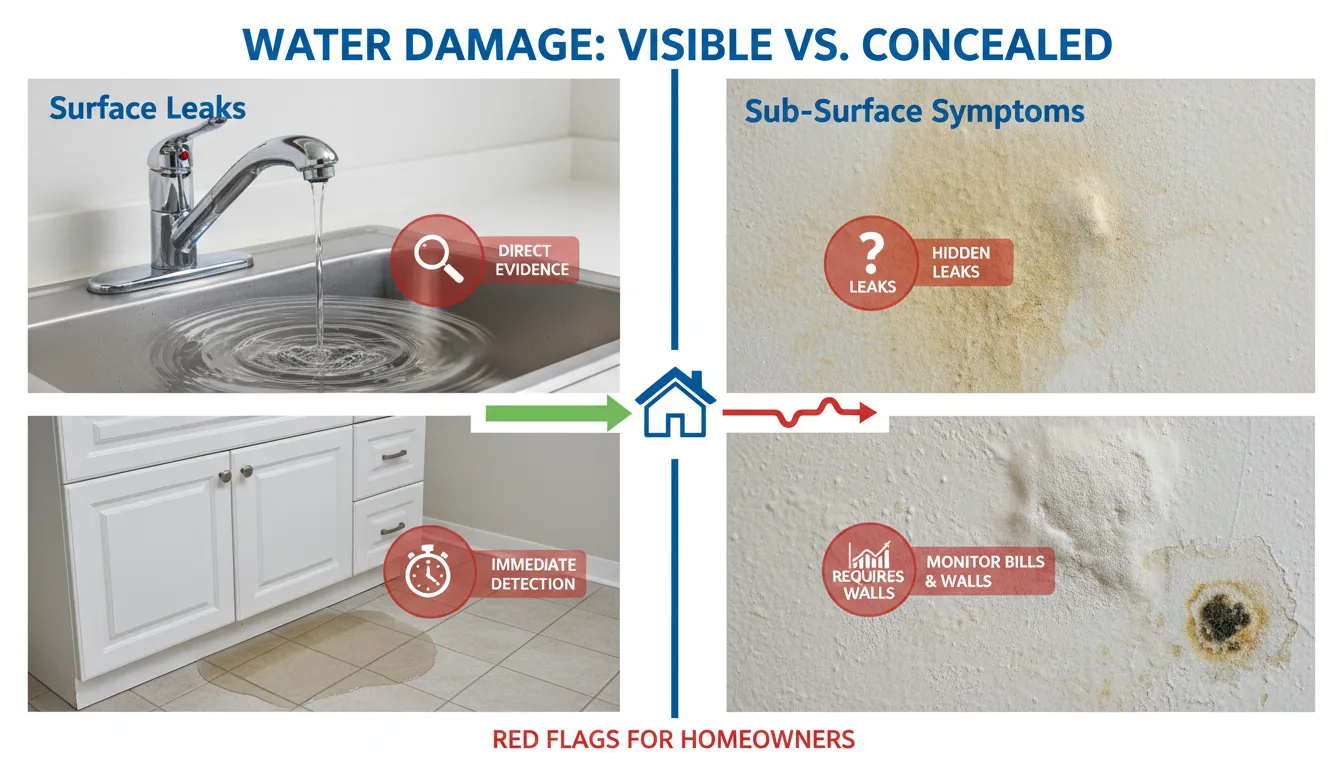
- Not all leaks announce themselves with a spray of water. Most plumbing failures are subtle, manifesting as gradual changes in your home’s environment.
- Distinguishing between a “surface leak” and a “structural leak” is the first step in determining whether you need a wrench or a jackhammer.
The “Easy” Fixes: Visual Inspection
Before assuming the worst, perform a tactical walkthrough of your high-moisture areas. Many common leaks occur at “connection points” where fixtures meet the plumbing system.
Under-Sink Diagnostics:
- Open your vanity and kitchen cabinets. Don’t just look for puddles; look for corrosion or “salt” buildup (mineral deposits) on the P-trap and supply lines.
- This white, crusty calcification is a “smoking gun” for a slow, evaporating leak that hasn’t hit the floor yet.
The Toilet Dye Test
- Toilets are the most frequent source of “silent” leaks. To test yours, remove the tank lid and drop 5–10 drops of dark food coloring into the water.
- Do not flush. Wait 15–20 minutes. If the colored water appears in the toilet bowl, your flapper valve is worn and allowing water to leak into the drain constantly.
The “Invisible” Killers: In-Wall & Ceiling Leaks
When a pipe fails inside a wall or between floors, the symptoms are atmospheric rather than liquid.
The “Musty Odor” and Bubbling Paint:
- If a room consistently smells like damp earth or a “wet basement,” but no water is visible, moisture is likely trapped behind the drywall.
- Look for efflorescence (bubbling paint) or wallpaper that is beginning to peel at the seams.
Gravity’s Path The Deflection Rule:
- It is a common mistake to assume a ceiling stain is directly below the leak. Water follows the path of least resistance.
- It may leak from a pipe, run 10 feet along a horizontal joist, and finally pool at a low point or a drywall seam.
Expert Tip:
- When inspecting a ceiling leak, always trace the “upstream” path of the joists to find the true source.
Underground & Slab Leaks
The most serious leaks occur beneath your home’s foundation or in the main service line buried in your yard. These “Slab Leaks” can compromise the structural integrity of your entire property.
Hot Spots:
- If you have a concrete slab foundation and feel a localized warm spot on the floor while walking barefoot, your hot water line has likely ruptured beneath the house.
Foundation Cracks:
- Unexpected cracks in your flooring or baseboards can indicate that leaking water is washing away the soil beneath your slab, causing the house to shift.
Lush Grass Patches:
- In your yard, look for a patch of grass that is significantly greener or faster-growing than the rest of the lawn.
- This “unusually lush” area often sits directly above a cracked main service line or a sewer pipe.
How Professionals Find What You Can’t
- When a leak is buried deep behind a tile shower wall or three feet under a concrete driveway, the “wait and see” approach is no longer viable.
- Modern plumbing has evolved beyond destructive “search and destroy” methods.
- Today, leak detection specialists utilize non-invasive technology to pinpoint the exact square inch of a failure, saving homeowners thousands in unnecessary demolition costs.
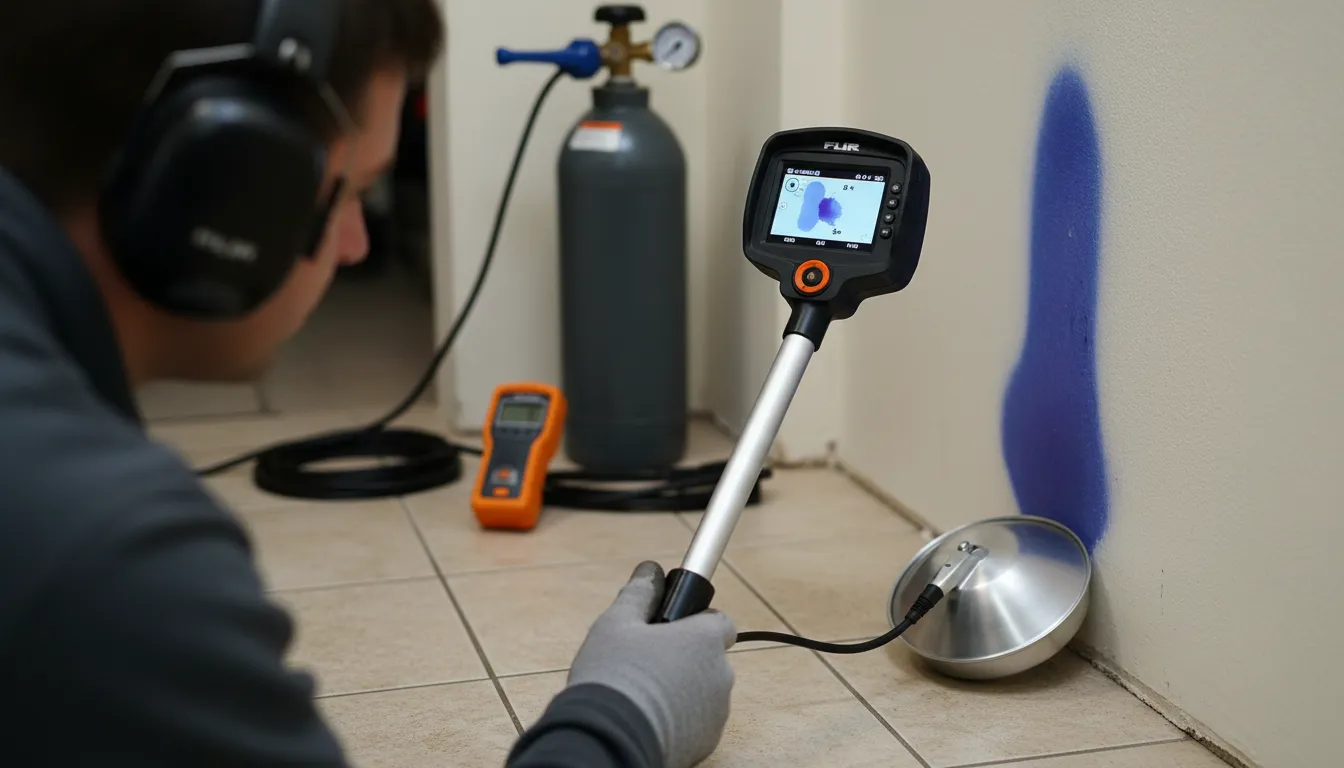
Acoustic Leak Detection: Listening to the Pipes
One of the most effective tools in a plumber’s arsenal is the acoustic leak detector. When water escapes a pressurized pipe, it creates a distinct mechanical vibration or “hissing” sound.
How it works:
- Professionals use high-sensitivity ground microphones or “listening discs” connected to an amplifier and noise-canceling headphones.
The Precision:
- By moving the sensors along the path of the pipes, the technician can identify the point where the sound frequency is at its highest decibel.
- This allows them to find leaks through several inches of concrete or thick layers of insulation without ever swinging a hammer.
Thermal Imaging Infrared: Seeing Through Walls
Thermal imaging has revolutionized the way we detect moisture behind finished surfaces like drywall and ceilings.
The Science of Heat Maps:
- Water has a different thermal mass than dry building materials. Even if a wall feels dry to the touch, an infrared (IR) camera can detect the evaporative cooling effect of hidden moisture.
Non-Destructive Diagnosis:
- On the camera’s screen, a leak typically appears as a dark, “cool” plume or anomaly against the warmer background of the dry wall.
- This allows the plumber to verify exactly where the water is pooling before they make a single precision cut to repair the pipe.
Tracer Gas & Video Inspection: Advanced Diagnostics
For the most stubborn or deeply buried leaks, professionals turn to specialized gas and optical tools.
Tracer Gas Detection:
- In this process, the water is drained from the suspected line and replaced with a safe, non-toxic mixture of nitrogen and hydrogen.
- Because these gas molecules are smaller than water, they escape through the leak and rise to the surface.
- A “sniffer” or gas detector then identifies the exact spot where the gas is venting.
Video Sewer Inspection:
- For drainage or sewer line issues, a waterproof, high-resolution camera is snaked through the pipes.
- The technician sees a real-time feed of the interior, identifying cracks, root intrusions, or collapsed sections that are impossible to see from the surface.
Expert Insight:
- Using these advanced technologies typically has a higher upfront cost (ranging from $200–$600), but it often pays for itself by preventing the destruction of expensive cabinetry or flooring.
DIY Temporary Fixes & Professional Solutions
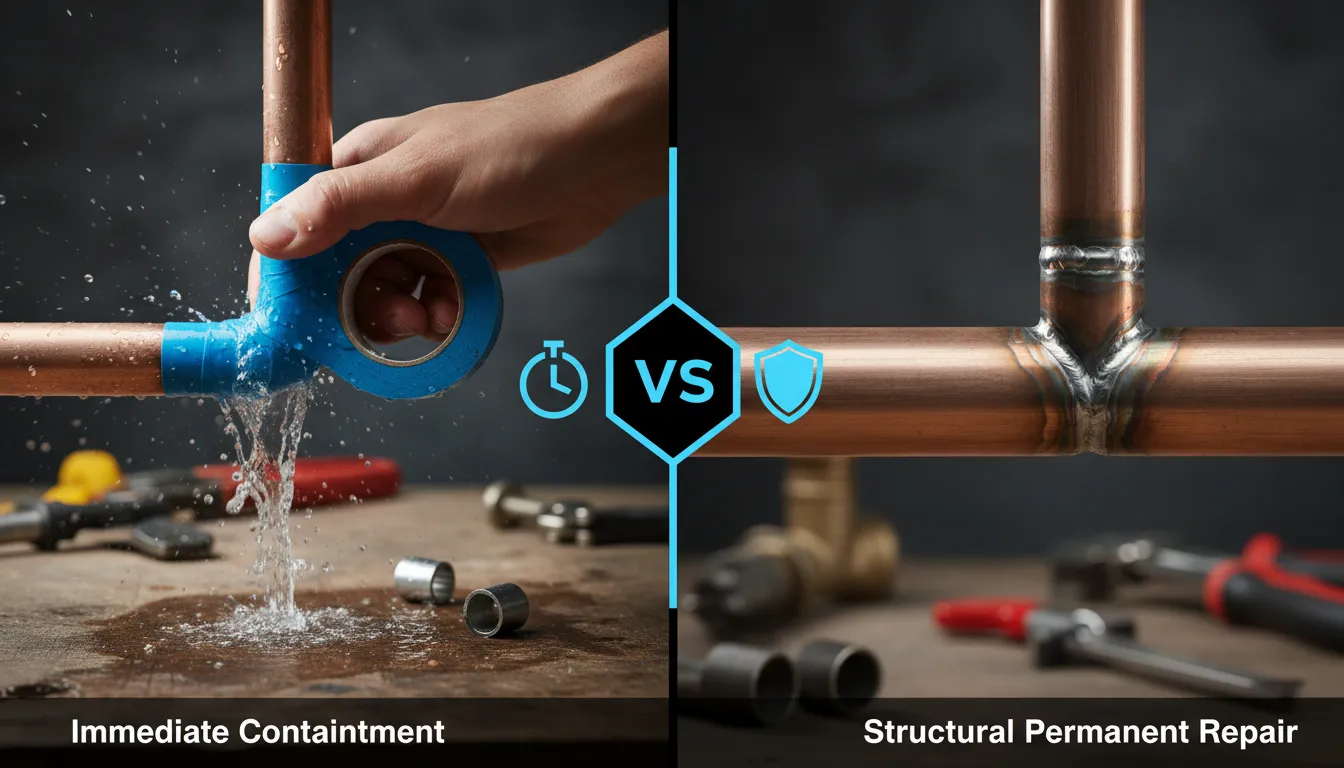
- Once a leak is located, the immediate priority shifts to containment.
- While some minor leaks can be managed with a trip to the local hardware store, it is vital to distinguish between a “stop-gap” repair and a permanent mechanical fix.
- Using the wrong product can lead to a false sense of security and eventual catastrophic failure.
The Stop-Gap Measures Emergency DIY
If you have shut off the water and need a temporary solution to keep the system functional while waiting for a professional, these methods are the industry standard for emergency stabilization.
Pipe Clamps & Rubber Gaskets:
- This is the most reliable temporary fix for pinhole leaks in copper or galvanized steel pipes. A sleeve-style clamp is placed over a thick rubber gasket that wraps around the leak site. When the bolts are tightened, the pressure of the clamp forces the rubber to seal the hole.
Two-Part Epoxy Putty:
- For leaks near joints or in areas where a clamp won’t fit, plumbing-grade epoxy putty is an excellent alternative.
How to Apply:
- You must first sand the pipe surface to remove oxidation and ensure it is completely dry. Knead the putty until the two colors blend, then wrap it firmly around the leak. It hardens into a steel-like consistency within 15–30 minutes.
Plumber’s Tape vs. Flex Seal:
- There is often confusion regarding these “miracle” fixes.
Plumber’s Tape Teflon/PTFE:
- This is not designed to wrap around the outside of a leaking pipe. Its only purpose is to lubricate and seal the threads of a connection.
Flex Seal/Spray Coatings:
- While popular in commercials, these are strictly “emergency-only” coatings. They lack the structural integrity to withstand the 40–80 PSI (pounds per square inch) of a typical residential water system for long periods.
When a Handyman Isn’t Enough
It may be tempting to call a general handyman for a lower rate, but specific scenarios legally and practically require a Licensed Master Plumber.
Slab & Main Line Leaks:
- Any leak occurring under the foundation or between the meter and the house involves complex excavation and high-pressure fittings.
- Licensed plumbers carry the necessary “Professional Liability” insurance to cover your home if things go wrong during these high-risk repairs.
Code Compliance & Insurance:
- If you have a major leak and attempt a DIY or unpermitted repair, your homeowner’s insurance provider may deny future claims for water damage.
- A licensed plumber provides a “Letter of Repair” or an official invoice, which serves as vital documentation for insurance adjusters to prove the home has been restored to code.
Warning:
- Never use a temporary fix as a permanent solution. Over time, the constant vibration of water (water hammer) will degrade adhesives and rubber gaskets, leading to a secondary burst that is often more severe than the first.
The Cost of Neglect Investment vs. Repair
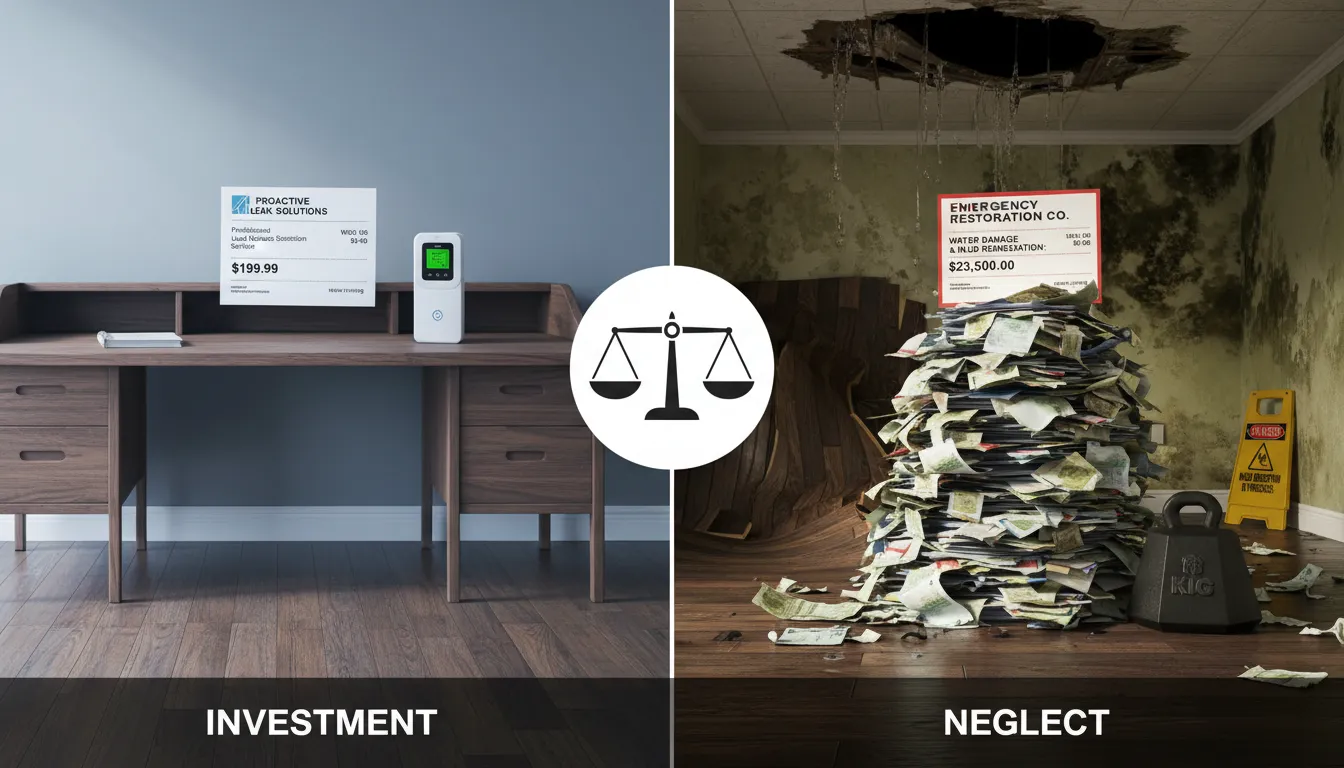
- Postponing a plumbing repair is rarely a neutral financial decision; it is an expensive gamble.
- While the “wait and see” approach might save you a service fee today, the compounding costs of water waste, structural rot, and decreased property value far outweigh the price of an early intervention.
Repair Price Points: What to Expect
Plumbing costs vary by region, but understanding the industry standard for specific repairs helps you budget effectively and avoid “sticker shock.”
Insurance Insights: The “Sudden vs. Gradual” Rule
One of the most common shocks for homeowners is finding out that their insurance claim has been denied. Insurance adjusters categorize water damage into two distinct groups, and knowing the difference is vital for your coverage.
1. “Sudden and Accidental” Usually Covered
- If a pipe unexpectedly bursts at 2:00 AM and floods your living room, most standard homeowners’ insurance policies will cover the cost of the water damage restoration and the damaged property. This is considered an unforeseen peril.
2. “Gradual Seepage” Often Denied
- If a leak has been dripping behind a wall for six months—evidenced by extensive rot, long-term mold growth, or rusted pipes—insurance companies often deny the claim.
- They view this as a maintenance issue. Their logic is that the homeowner had ample time to detect and fix the problem through routine inspection.
The ROI of Early Detection
- Investing in a $400 professional leak detection service may feel expensive, but compared to the $15,000+ cost of a full mold remediation and structural rebuild, it is a high-yield investment in your home’s longevity.
- Furthermore, a repaired leak can lower your monthly water bill by 10% to 15%, allowing the repair to eventually pay for itself.
Expert Video Walkthrough
Source: Northshore Utility District • Educational Series 2026
FAQs People Also Ask
Navigating a plumbing crisis often leads to more questions than answers. In this section, we address the most common queries homeowners have when dealing with the aftermath and logistics of a leak.
How long does it take for a water leak to cause mold?
- In ideal conditions—specifically in dark, humid environments with temperatures between 18°C and 30°C—mold spores can begin to colonize and grow within 24 to 48 hours after moisture exposure.
- Because building materials like drywall and wood provide the necessary organic “food” for mold, it is imperative to begin the drying process immediately with high-velocity fans and dehumidifiers.
Can I fix a leaky pipe without replacing the pipe?
Yes, in many cases, modern technology allows for “trenchless” or “no-dig” repairs.
Pipe Lining CIPP:
- A resin-saturated felt tube is inserted into the existing pipe and inflated. Once the resin cures, it creates a “pipe-within-a-pipe” that seals all leaks without the need for excavation.
Epoxy Coating:
- A liquid epoxy is blown through the piping system, coating the interior walls to seal pinhole leaks and prevent future corrosion.
- However, if the pipe has suffered structural collapse or severe “bellies” (sagging), a traditional replacement is usually the only permanent solution.
What is the most common water leak in a house?
- Statistically, toilet flapper leaks and worn faucet washers are the leading causes of residential water waste.
- A single leaking toilet flapper can waste up to 200 gallons of water per day. Because these leaks often go silent and don’t cause visible puddles, they are frequently overlooked until the monthly water bill arrives.
How much does a plumber charge per hour?
While rates vary significantly based on your geographic location and the time of day (emergency vs. scheduled), the typical range for a licensed plumber is between $75 and $200 per hour.
Service Fees:
- Many companies also charge a “trip fee” or “diagnostic fee” of $50 to $150, which may be waived if you agree to the repair.
Master Plumbers:
- Expect to pay on the higher end of the scale for Master Plumbers or specialized leak detection technicians who bring advanced diagnostic equipment to the job.
Related Topics People Also Search For
- As technology and home maintenance standards evolve, addressing a plumbing leak often involves more than just a wrench.
- This section explores modern prevention tools, the recovery process for damaged property, and how to recover some of your financial losses from the local municipality.
Smart Water Leak Detectors: The Future of Prevention
The most effective way to handle a plumbing leak is to stop it before it starts. Smart Water Leak Detectors have transitioned from luxury gadgets to essential home infrastructure.
Whole-Home Shut-off Systems e.g., Moen Flo, Phyn Plus:
- These devices are installed directly onto your main water line. Using ultrasonic sensors and AI, they monitor your home’s “water fingerprint.”
- If the system detects an unusual flow—like a burst pipe or a slow drip—it can automatically close the main valve and send an alert to your smartphone.
Point-of-Leak Sensors:
- For a more budget-friendly approach, Wi-Fi-enabled “puck” sensors can be placed under sinks, near water heaters, or behind washing machines.
- When the metal contacts on the bottom touch water, they trigger an audible alarm and a mobile notification.
Expert Tip:
- Many insurance companies offer a 5% to 10% discount on premiums if you have a professionally installed smart shut-off system.
Water Damage Restoration: Recovering Your Home
If you discovered the leak too late and the structure is compromised, the “plumbing” phase of the project is over, and the “restoration” phase begins.
Extraction: High-powered vacuums are used to remove standing water.
Dehumidification: Commercial-grade LGR (Low Grain Refrigerant) dehumidifiers are brought in to pull moisture out of the air and deep-seated wood.
Structural Assessment: Professionals will check for “dry rot”—a fungus that can destroy the load-bearing capacity of timber. If the wood is soft or crumbly, it must be replaced to ensure the home remains safe.
High Water Bill Disputes: Getting Your Money Back
A major leak can result in a water bill that is hundreds or even thousands of dollars higher than usual. Many homeowners don’t realize that cities and utility companies often have “Leak Adjustment” policies.
The Paper Trail:
- Keep every receipt from your plumber and photos of the damaged pipe.
The Request:
- Once the repair is complete, contact your utility provider to request a “Leak Credit.” You will typically need to fill out a form and provide proof that the leak was fixed by a professional.
What to Expect:
- Most cities will credit the difference between your “leaking” bill and your average usage, essentially “forgiving” the cost of the wasted water, provided you acted promptly to fix the issue.
Addressing a plumbing leak is not merely a repair task; it is an act of home preservation.
By understanding how to identify, contain, and professionally resolve water intrusion, you protect your property’s structural integrity and your family’s health.
The Proactive Path: Make Detection a Habit
- The most cost-effective way to manage your plumbing is to catch failures before they become emergencies.
- We recommend adopting the “2-Hour Meter Test” as a standard monthly home maintenance habit.
- Much like checking the batteries in your smoke detector, performing a periodic sweep of your water meter ensures that silent leaks—those occurring in slabs, crawl spaces, or guest bathrooms—don’t have the opportunity to cause long-term damage.
- Addressing a plumbing leak is not merely a repair task; it is an act of home preservation.
- By understanding how to identify, contain, and professionally resolve water intrusion, you protect your property’s structural integrity and your family’s health.
Final Advice: Listen, Watch, and Act
The takeaway for every homeowner is simple: Don’t wait for the puddle. * Listen to your walls: Strange hissing, gurgling, or dripping sounds are almost always a call for investigation.
Watch your bill:
- A sudden spike in usage is often the first and only warning sign of a major underground breach.
Act with speed:
- Remember the 48-hour mold window. A proactive inspection today is exponentially cheaper than a restoration project tomorrow.