How to Find a Plumbing Leak: Step-by-Step Detection Guide
What Is a Plumbing Leak and Why It Happens
A plumbing leak occurs when water escapes from your plumbing system where it shouldn’t. This can happen in supply lines that bring clean water into your home or in drain pipes that carry wastewater away. Even a small plumbing leak can quietly waste hundreds of gallons of water, increase utility bills, and cause serious structural damage over time.
Most plumbing leaks develop slowly due to aging materials, pressure buildup, or unnoticed wear inside pipes. Others appear suddenly because of frozen pipes, corrosion, or poor installation. Hidden leaks behind walls, under floors, or inside ceilings are especially dangerous because they often go unnoticed until water damage becomes visible.
Understanding how plumbing leaks start is the first step in detecting them early. When homeowners know what causes leaks, they can identify warning signs faster, prevent costly repairs, and take action before mold growth or structural damage occurs.
Common Causes of Plumbing Leaks
Plumbing leaks usually occur due to one or more of the following reasons:
Pipe corrosion: Older metal pipes can weaken and develop pinhole leaks over time.
High water pressure: Excessive pressure stresses joints and fittings, leading to cracks or bursts.
Aging plumbing systems: Worn seals, gaskets, and connections degrade naturally with age.
Temperature changes: Hot and cold expansion can cause pipes to crack or loosen.
Poor installation: Improper fittings or low-quality materials increase leak risk.
Clog buildup: Blockages can force water backward, stressing pipes and joints.
Recognizing these causes helps narrow down where a plumbing leak is most likely to occur.
Signs You May Have a Plumbing Leak
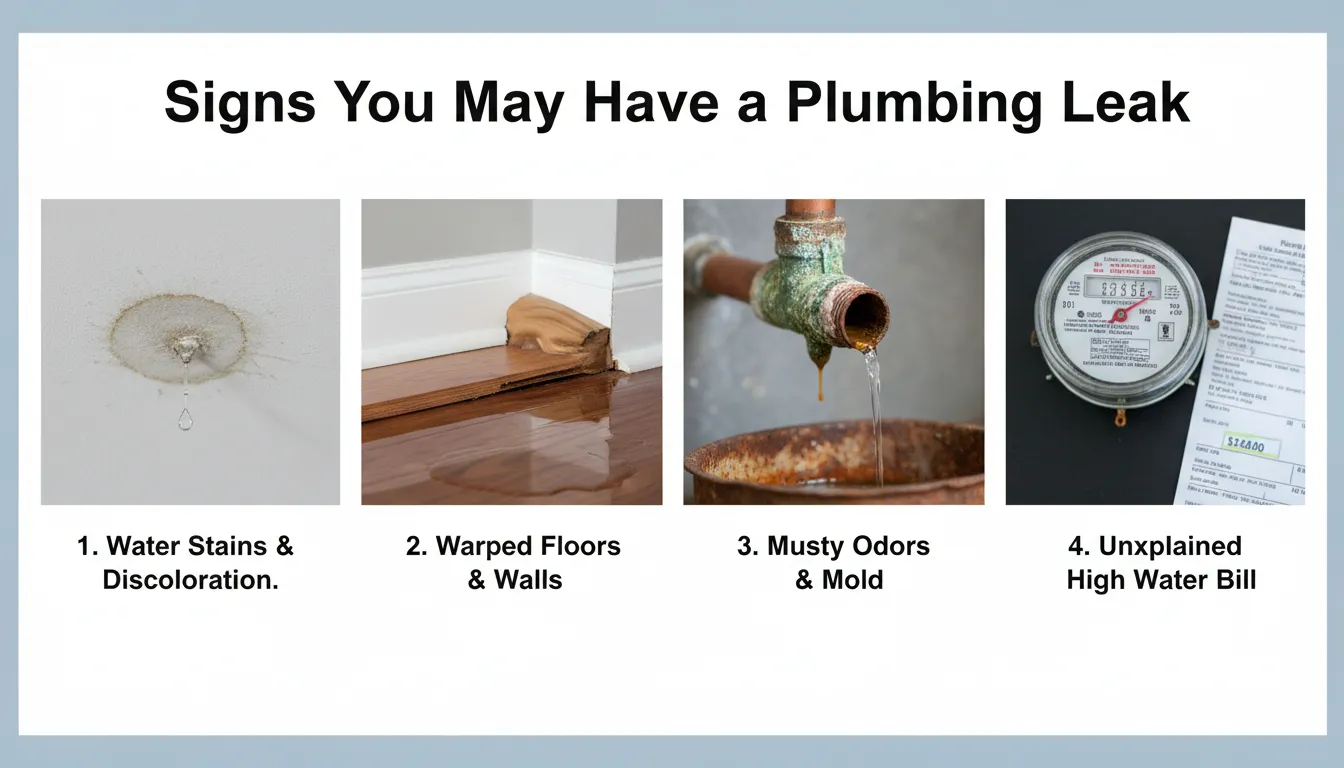
Plumbing leaks rarely appear without warning. In many cases, your home shows early signs long before major water damage occurs. The key is knowing what to look for and acting quickly when something feels unusual.
Some plumbing leaks are easy to notice, such as dripping water or visible moisture. Others remain hidden behind walls, under floors, or inside ceilings, quietly causing damage for weeks or even months. Ignoring these warning signs can lead to mold growth, structural issues, and costly repairs.
By understanding both visible and hidden leak indicators, homeowners can identify plumbing problems early and prevent small leaks from turning into plumbing emergencies.
Visible Signs of a Plumbing Leak
These signs are often the first indicators that something is wrong with your plumbing system:
Water stains on ceilings or walls – Yellow or brown discoloration usually signals ongoing moisture.
Dripping water – Constant drips under sinks, near pipes, or from fixtures should never be ignored.
Peeling paint or bubbling drywall – Moisture trapped behind surfaces causes materials to lift or blister.
Warped floors or soft spots – Wood, laminate, and vinyl flooring may swell when exposed to water.
Mold or mildew growth – Visible mold patches often indicate long-term hidden moisture.
If any of these signs appear, there is a strong chance a plumbing leak is already active.
Hidden Plumbing Leak Warning Signs
Hidden leaks are more dangerous because they often go unnoticed until serious damage occurs. Watch for these subtle clues:
Unexplained increase in water bills – A sudden spike without increased usage often means water is leaking continuously.
Musty or damp odors – Persistent smells usually indicate moisture trapped behind walls or under floors.
Reduced water pressure – Leaks in supply lines can lower pressure at faucets and showers.
Sounds of running water – Hearing water when no fixtures are in use may point to a hidden leak.
Warm or damp spots on floors – Especially common with slab or hot-water line leaks.
These warning signs should never be ignored, even if no visible water damage is present.
Where Plumbing Leaks Commonly Occur
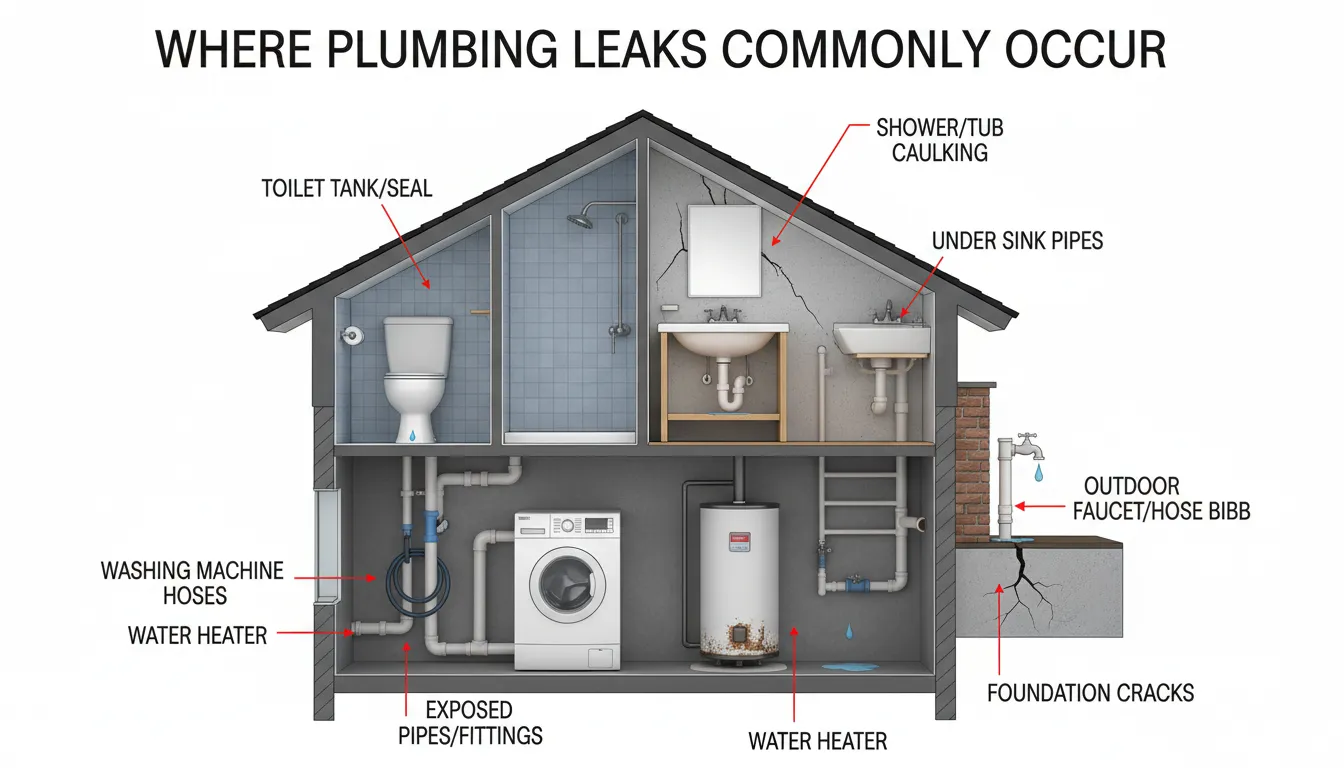
Plumbing leaks can develop in many areas of your home, but certain locations are more prone to problems due to constant water flow, pressure changes, and aging materials. Knowing where leaks commonly occur makes it easier to narrow down the source and begin inspection quickly.
Some leaks are visible and easy to access, while others form behind walls, beneath floors, or underground. Understanding these high-risk areas helps homeowners detect issues earlier and avoid unnecessary damage.
Under Sinks and Cabinets
Leaks under kitchen and bathroom sinks are among the most common. They often occur due to:
Loose supply line connections
Worn-out washers or seals
Corroded shut-off valves
Cracked drain traps
Signs include puddles inside cabinets, water stains on wood panels, or a persistent damp smell.
Behind Walls
Plumbing pipes frequently run through interior walls, making leaks difficult to detect. Wall leaks may result from:
Pinholes in copper pipes
Damaged PEX connections
Nail or screw punctures
Long-term corrosion
Common indicators include bubbling paint, peeling drywall, mold growth, or faint water sounds behind the wall.
In Ceilings
Ceiling leaks usually originate from plumbing fixtures located above, such as bathrooms, laundry rooms, or water heaters. These leaks often appear as:
Brown or yellow ceiling stains
Sagging or bulging drywall
Active dripping water
Ceiling leaks should be addressed quickly, as trapped water can weaken drywall and pose an electrical hazard.
Under Floors and Slab Foundations
Slab leaks occur beneath concrete foundations and are among the most serious plumbing issues. They may develop due to:
Pipe corrosion under concrete
Shifting soil
Abrasion from constant vibration
Warning signs include warm floor spots, unexplained moisture, low water pressure, or constantly running water sounds.
Main Water Line
The main water line connects your home to the municipal supply. Leaks here may cause:
Wet areas in the yard
Sinkholes or soft soil
Sudden pressure loss
Continuously running water meter
Because main line leaks occur underground, professional detection is often required.
Toilets and Bathrooms
Toilets are one of the most common sources of silent plumbing leaks. Typical causes include:
Faulty flappers
Cracked overflow tubes
Loose toilet base seals
Leaking supply valves
These leaks can waste hundreds of gallons daily without visible symptoms.
How to Find a Plumbing Leak Step by Step
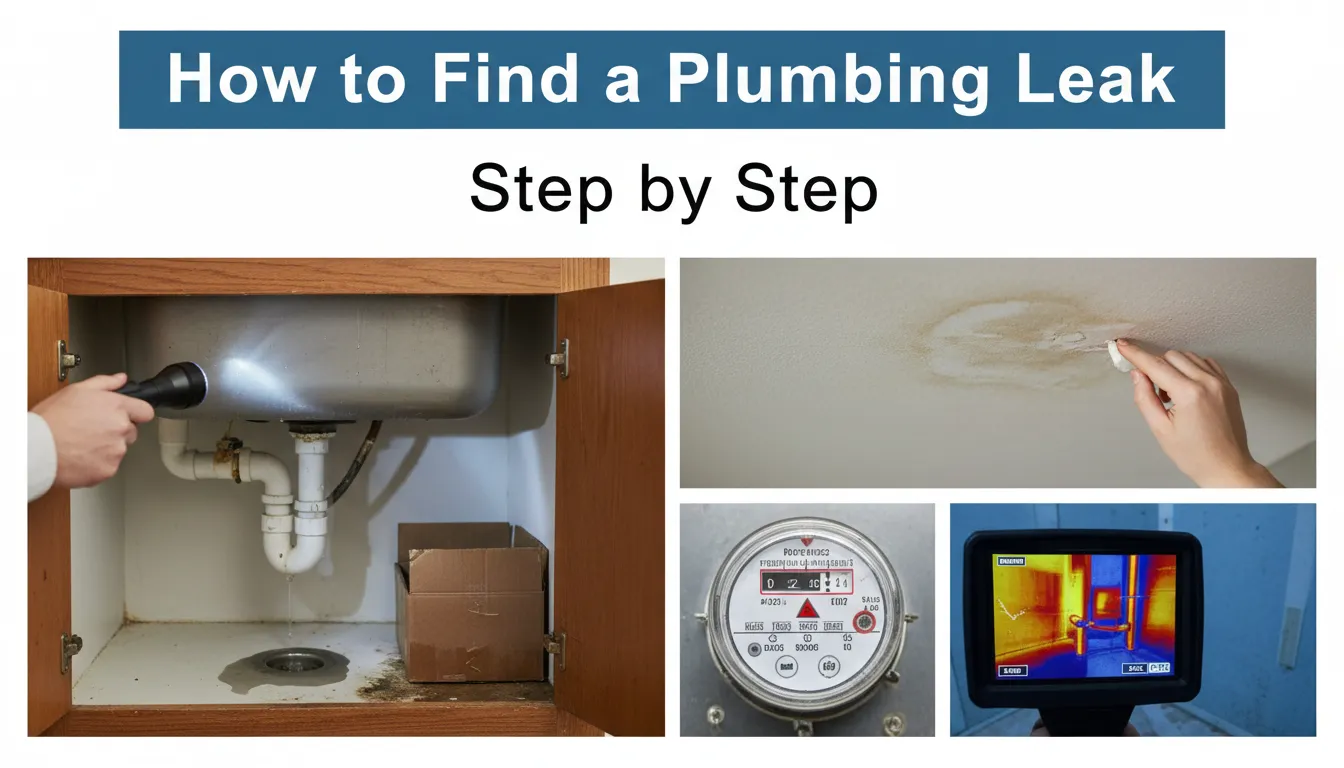
Finding a plumbing leak becomes much easier when you follow a logical inspection order instead of guessing randomly. These steps move from the simplest homeowner checks to more advanced detection methods, helping you locate both visible and hidden leaks efficiently.
Always begin with basic tests before assuming major pipe damage. In many cases, small issues like toilet leaks or loose fittings are the real cause.
Step 1 — Check Your Water Meter (Water Meter Leak Test)
The water meter test is one of the most reliable ways to confirm whether a leak exists.
How to do it:
Turn off all water fixtures inside and outside your home.
Make sure appliances like washing machines and dishwashers are not running.
Locate your water meter and note the reading.
Wait 1–2 hours without using any water.
Check the meter again.
If the meter reading changes or the flow indicator moves, water is escaping somewhere in your plumbing system.
Step 2 — Perform a Toilet Dye Test
Toilets are a major source of silent plumbing leaks.
How to test:
Add a few drops of food coloring into the toilet tank.
Do not flush for 20–30 minutes.
If colored water appears in the bowl, the toilet flapper is leaking.
This simple test can reveal leaks that waste hundreds of gallons per day.
Step 3 — Inspect Fixtures and Appliances
Check all water-using fixtures carefully, including:
Faucets and showerheads
Washing machine hoses
Dishwasher supply lines
Water heater connections
Look for dripping water, corrosion, mineral buildup, or damp flooring around appliances.
Step 4 — Listen for Running or Dripping Water
Hidden plumbing leaks often produce sound.
Turn off all background noise.
Listen near walls, ceilings, and floors.
Pay attention to hissing, dripping, or flowing sounds when no water is in use.
These noises often indicate leaks behind surfaces.
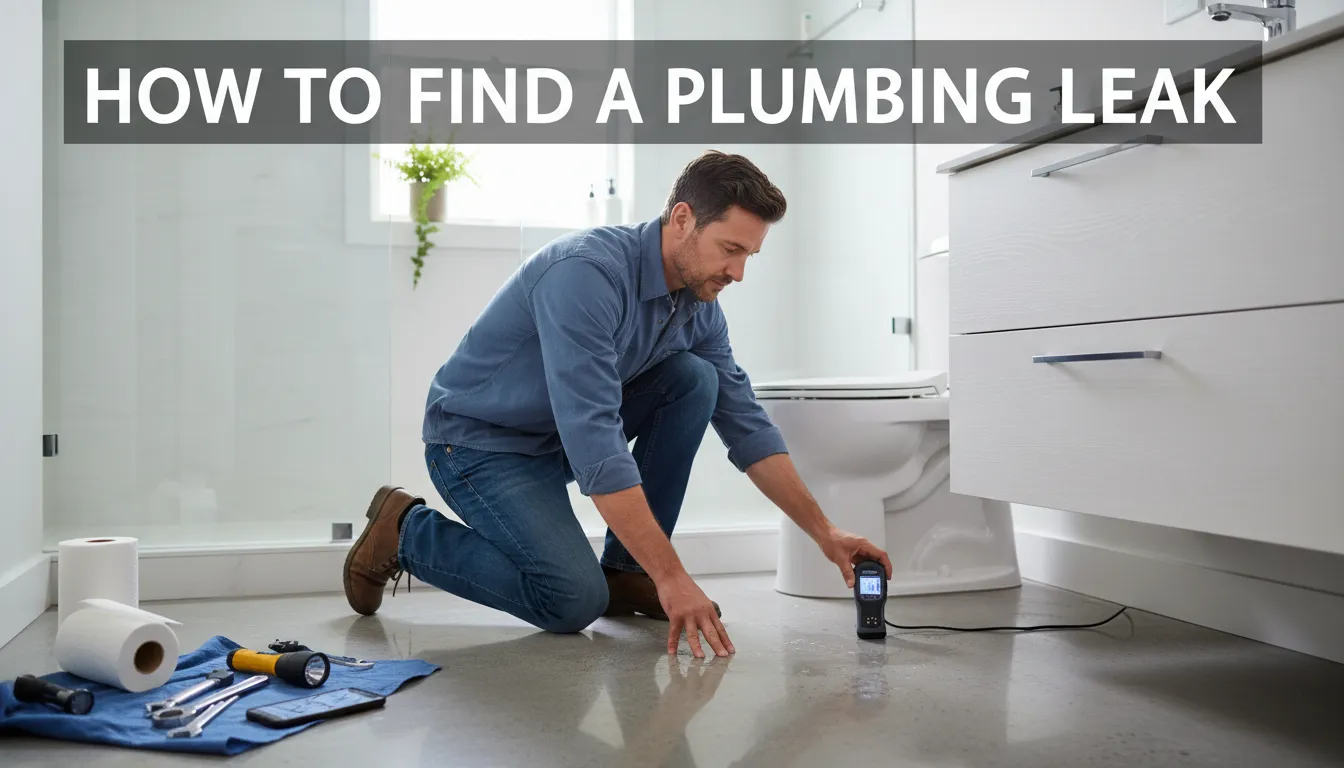
Step 5 — Check Walls, Ceilings, and Floors for Moisture
Carefully inspect areas where plumbing runs:
Look for discoloration or bubbling paint
Press gently for soft drywall
Check ceilings below bathrooms or laundry rooms
Inspect floors for warping or warmth
Moisture damage almost always points toward a hidden leak nearby.
Step 6 — Identify Hot vs Cold Water Line Leaks
This step helps narrow down the leak location.
Turn off the hot water supply only.
Monitor the water meter again.
Repeat the test with the cold water line.
If the meter stops when one line is off, the leak is likely within that system.
Step 7 — Isolate Plumbing Sections
Modern homes often have individual shut-off valves.
Turn off water to bathrooms or specific zones.
Monitor the meter after each shutoff.
This process helps pinpoint the leak area without cutting walls.
Isolation testing is one of the most effective homeowner diagnostic techniques.
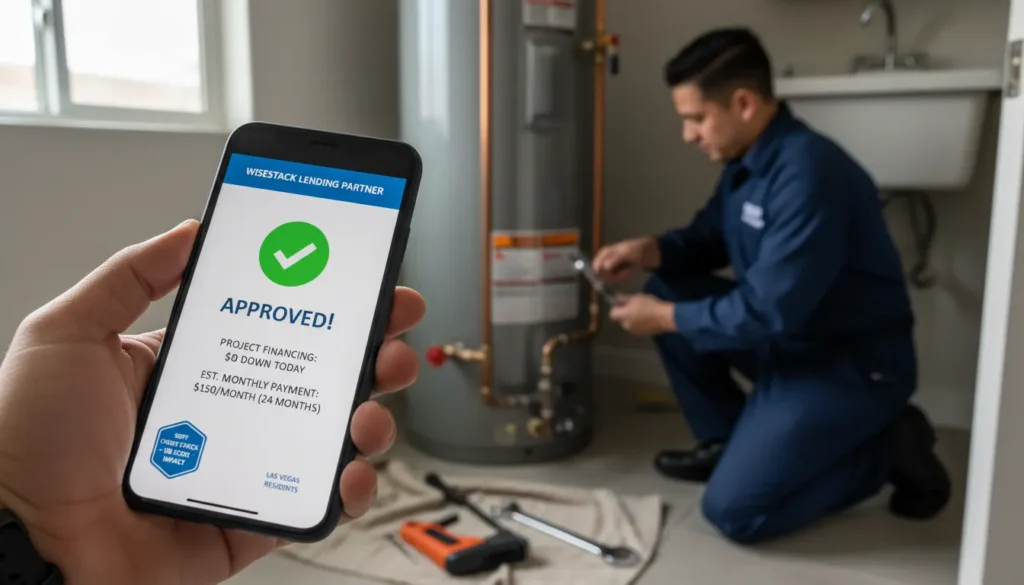
Can You Fix a Plumbing Leak Yourself?
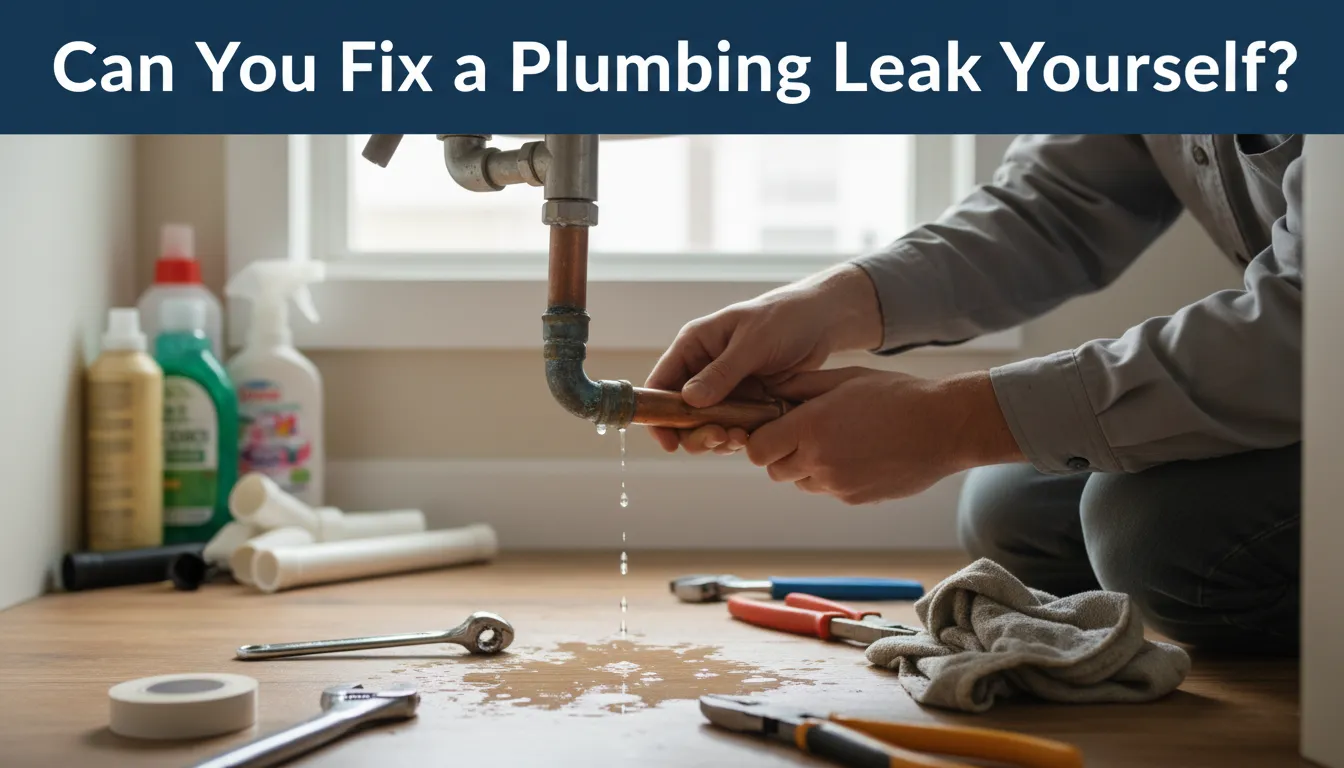
Not every plumbing leak requires professional repair, but not every leak should be handled without expert help either. Some leaks are minor and easy to fix, while others can quickly turn into expensive water damage if repaired incorrectly.
Understanding whether a plumbing leak is safe for DIY repair depends on its location, severity, and accessibility. Making the right decision at the right time can help you avoid unnecessary costs and protect your home from further damage.
When DIY Plumbing Leak Repair Is Safe
You may safely attempt a DIY repair if the leak meets the following conditions:
The leak is clearly visible and easy to reach
Water is slowly dripping, not spraying
The issue is limited to fixtures or exposed pipes
There is no water damage to walls, ceilings, or floors
Common plumbing leaks suitable for DIY repair include:
Dripping faucets
Loose sink supply lines
Worn toilet flappers
Showerhead leaks
Minor valve seepage
In many cases, tightening fittings or replacing inexpensive components is enough to stop the leak completely.
When You Must Call a Professional Plumber
Certain plumbing leaks require professional attention because they pose structural, safety, or long-term damage risks. You should contact a licensed plumber if the leak involves:
Pipes inside walls or ceilings
Slab foundation leaks
Main water line leaks
Sudden or continuous loss of water pressure
Repeated leaks that return after repair
Mold growth or moisture damage
Water near electrical wiring
Burst, cracked, or severely corroded pipes
Attempting DIY repairs in these situations can worsen the damage, increase repair costs, and may even affect insurance coverage.
DIY vs Professional Plumbing Leak Decision Table
| Leak Type | DIY Repair | Professional Plumber |
|---|---|---|
| Dripping faucet | ✅ | ❌ |
| Toilet flapper leak | ✅ | ❌ |
| Loose pipe connection | ✅ | ❌ |
| Showerhead leak | ✅ | ❌ |
| Pipe inside wall | ❌ | ✅ |
| Ceiling plumbing leak | ❌ | ✅ |
| Slab foundation leak | ❌ | ✅ |
| Main water line leak | ❌ | ✅ |
This decision framework helps homeowners choose the safest and most cost-effective solution without risking further damage.
How Plumbers Find Hidden Plumbing Leaks
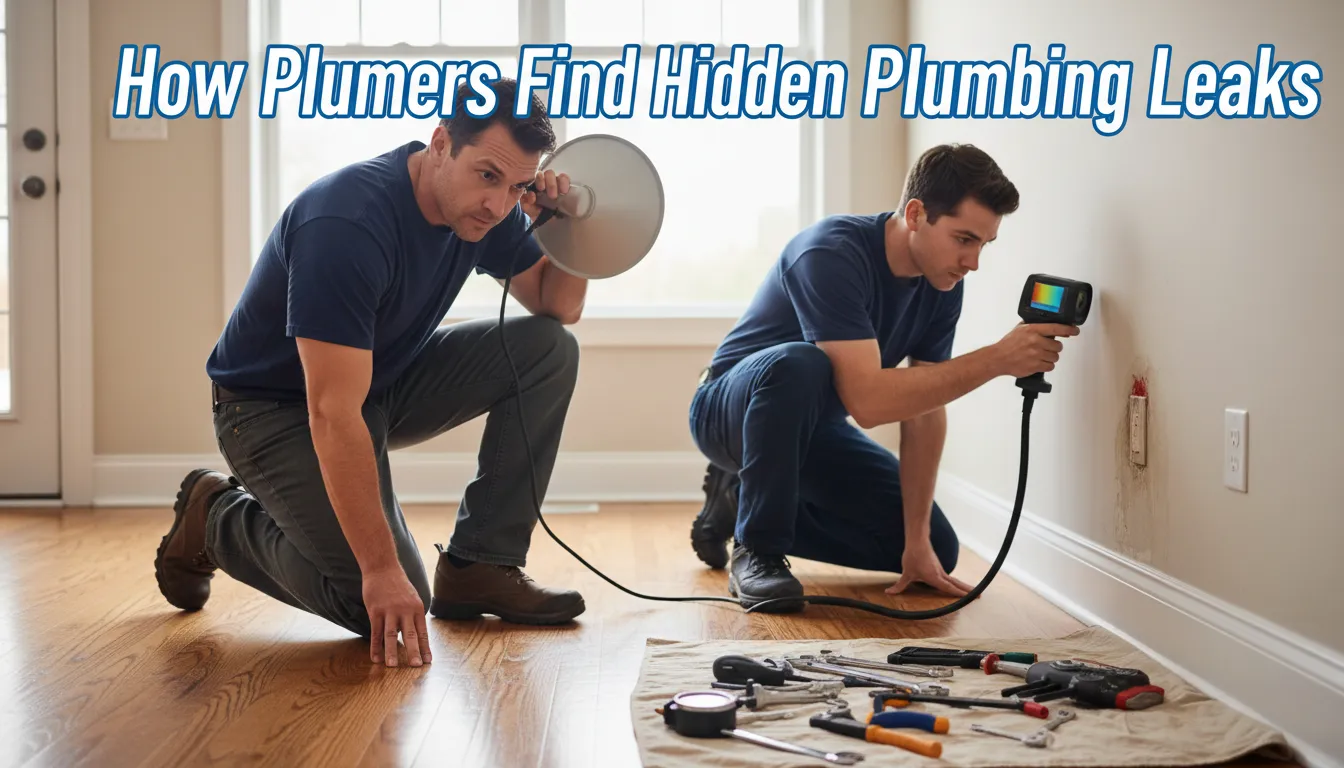
When a plumbing leak cannot be located using basic home inspection methods, professional plumbers rely on specialized leak-detection tools. These methods allow them to pinpoint the exact source of a leak without breaking walls, floors, or ceilings unnecessarily.
Professional leak detection focuses on accuracy, safety, and minimizing property damage while identifying both minor and major plumbing issues.
Thermal Imaging Cameras
Thermal imaging cameras detect temperature differences behind walls, floors, and ceilings. Since leaking water often changes surface temperature, these cameras can reveal hidden moisture paths that are invisible to the naked eye.
This method is especially effective for:
Hot water line leaks
Ceiling leaks
Slab foundation leaks
Acoustic Listening Devices
Acoustic leak detectors amplify the sound of water escaping from pipes. Even tiny leaks create vibrations that trained technicians can identify using sensitive listening equipment.
These tools are commonly used to locate:
Underground leaks
Slab leaks beneath concrete
Leaks behind thick walls
Moisture Meters
Moisture meters measure the level of dampness inside building materials such as drywall, wood, and concrete. Elevated moisture readings help plumbers map the spread of water and narrow down the leak’s origin.
They are ideal for confirming:
Wall leaks
Ceiling moisture
Long-term hidden water damage
Pipe Inspection Cameras
High-definition plumbing cameras are inserted directly into pipes to visually inspect the interior condition. These cameras help identify:
Cracks or breaks in pipes
Joint separation
Corrosion and buildup
Tree root intrusion in drain lines
This method provides visual confirmation before repairs begin.
Pressure Testing and Isolation Testing
Plumbers use pressure testing to detect leaks by isolating sections of the plumbing system and monitoring pressure levels. If pressure drops, it indicates an active leak within that section.
This technique is especially useful for:
Supply line leaks
Large residential plumbing systems
Complex pipe layouts
Electronic Leak Detection Equipment
Advanced electronic detectors combine acoustic, pressure, and vibration analysis to pinpoint exact leak locations with minimal disruption. These systems significantly reduce the need for invasive demolition.
Plumbing Leak Repair Cost vs Water Damage Cost
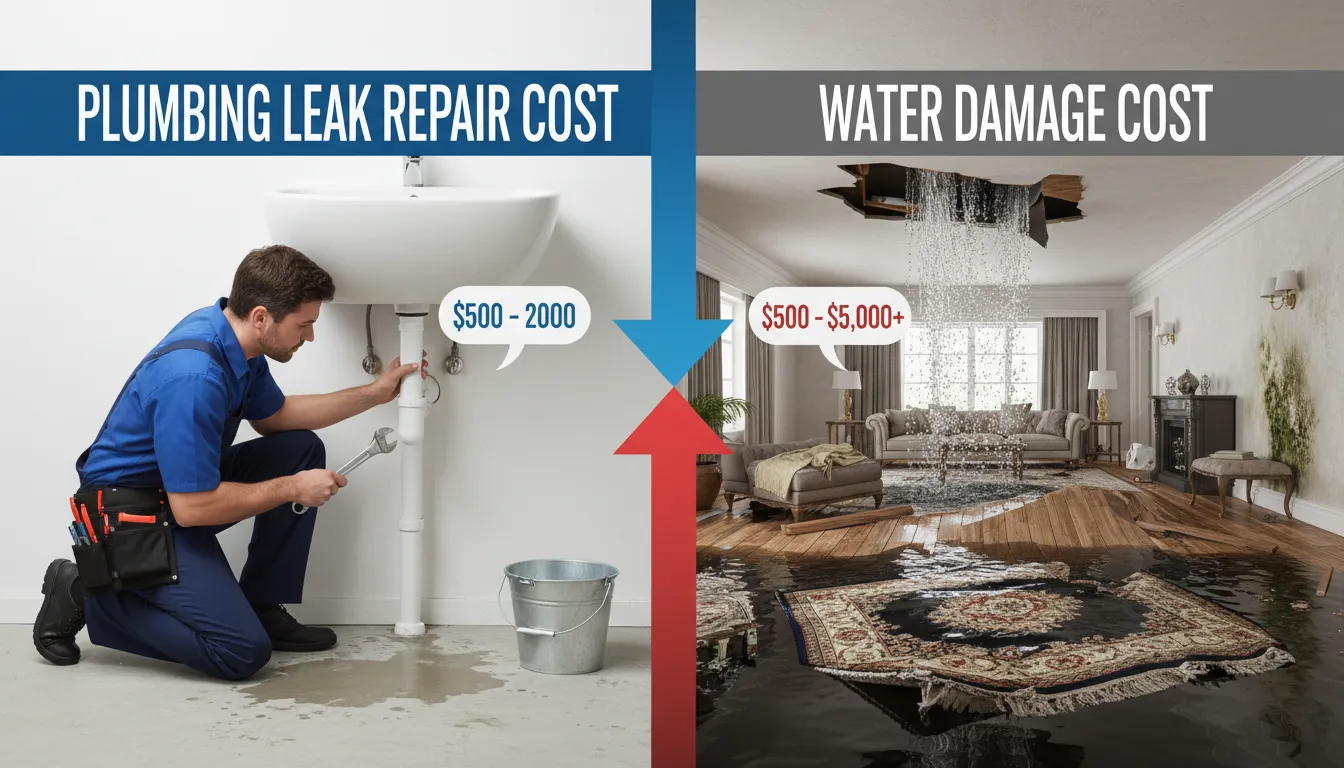
Many homeowners delay fixing plumbing leaks because they worry about repair costs. However, the cost of ignoring a leak is often far greater than the cost of repairing it early.
A small leak may seem harmless at first, but continuous water exposure can weaken structural materials, damage flooring, and lead to mold growth within days.
Understanding the financial comparison between early repair and delayed damage helps homeowners make smarter decisions.
Average Plumbing Leak Detection & Repair Costs
While prices vary by location and severity, typical cost ranges include:
Professional leak detection: $150 – $500
Minor plumbing repair: $150 – $400
Pipe replacement (localized): $400 – $1,500
Slab leak repair: $2,000 – $6,000+
Early detection usually keeps repairs on the lower end of these ranges.
Potential Water Damage Costs If Leaks Are Ignored
When leaks continue undetected, costs increase rapidly:
Drywall replacement: $500 – $2,000
Floor damage repair: $1,000 – $5,000
Mold remediation: $1,500 – $6,000+
Ceiling collapse repair: $2,000 – $8,000
Foundation damage: $5,000 – $15,000+
In many cases, homeowners insurance may deny coverage if the leak is considered long-term or neglected.
Repair Cost vs Damage Cost Comparison
| Scenario | Approximate Cost |
|---|---|
| Early leak detection | $150 – $300 |
| Minor pipe repair | $200 – $500 |
| Ignored hidden leak | $3,000 – $10,000+ |
| Severe structural damage | $15,000+ |
This comparison clearly shows that early action is always the most affordable option.
Why Early Leak Detection Saves Money
Prevents mold growth within 24–48 hours
Avoids structural weakening
Reduces insurance claim risk
Stops continuous water waste
Minimizes repair time and disruption
Even a slow drip can waste thousands of gallons per year, quietly increasing utility bills.
Is a Plumbing Leak an Emergency?
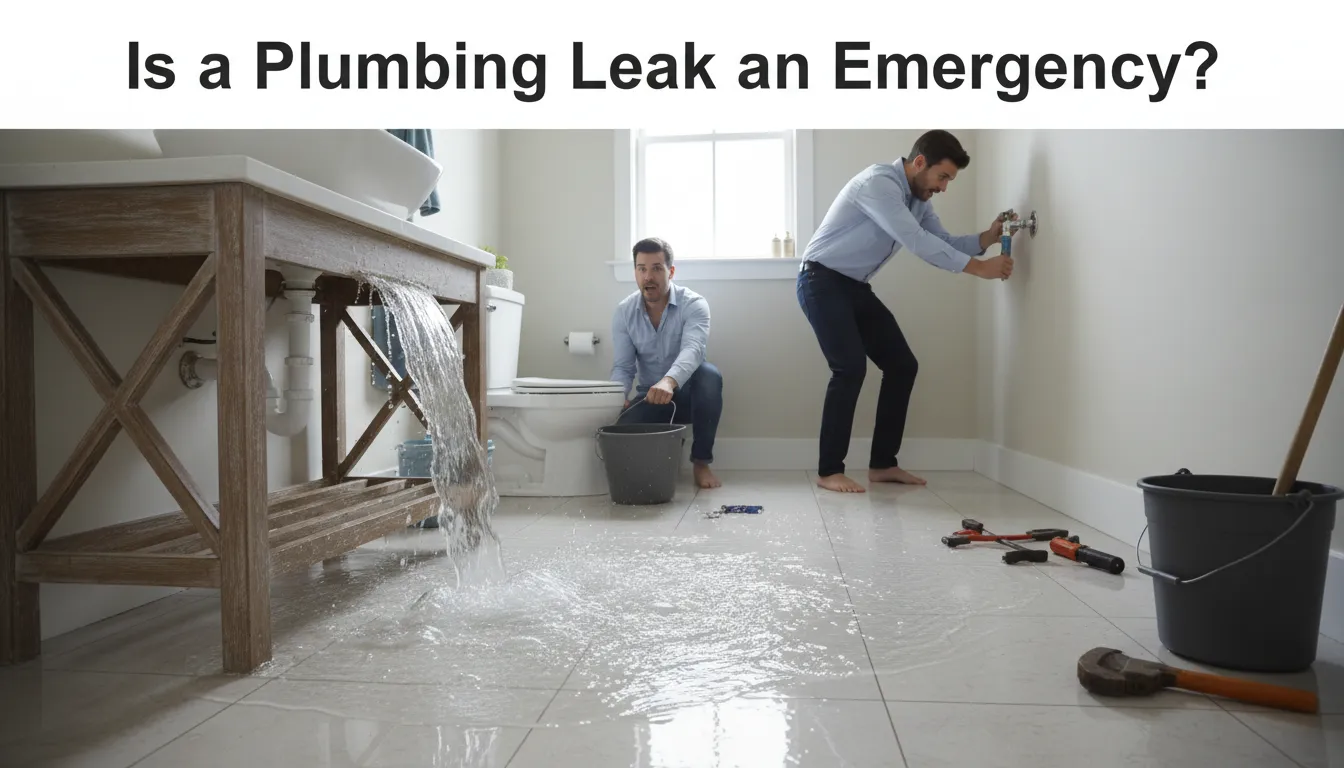
Not every plumbing leak is an immediate emergency, but some leaks require urgent action to prevent serious damage or safety risks. Knowing the difference can protect your home, your health, and your finances.
A slow drip under a sink may seem harmless, while a hidden leak inside a wall or ceiling can escalate rapidly. In certain situations, delaying repairs can result in mold growth, electrical hazards, or even structural failure.
When a Plumbing Leak Is an Emergency
You should treat a plumbing leak as an emergency if you notice:
Active water dripping from ceilings
Water pooling near electrical outlets or panels
Sudden loss of water pressure
Burst or cracked pipes
Rapidly spreading water stains
Ceiling bulging or sagging
Strong musty odors indicating mold
Uncontrollable water flow
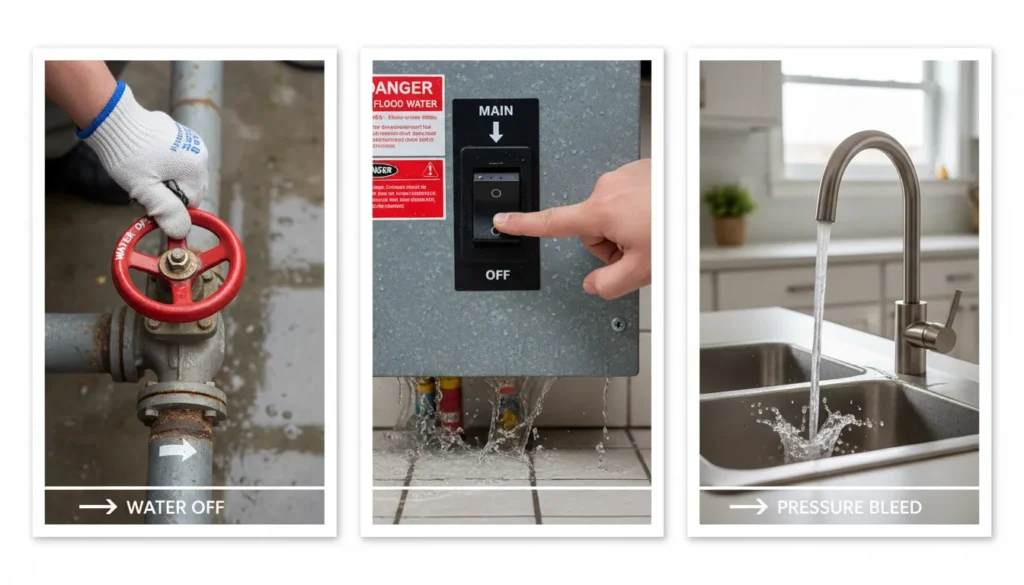
In these cases, immediately shut off the main water valve and contact a licensed plumber.
Electrical and Structural Safety Risks
Plumbing leaks can create serious hazards beyond water damage:
Electrical shock risk: Water near wiring can cause short circuits or fire hazards.
Ceiling collapse risk: Water-soaked drywall becomes heavy and unstable.
Mold exposure: Mold can begin forming within 24–48 hours of moisture exposure.
Foundation damage: Long-term leaks may weaken concrete and soil stability.
These risks make delayed action extremely dangerous.
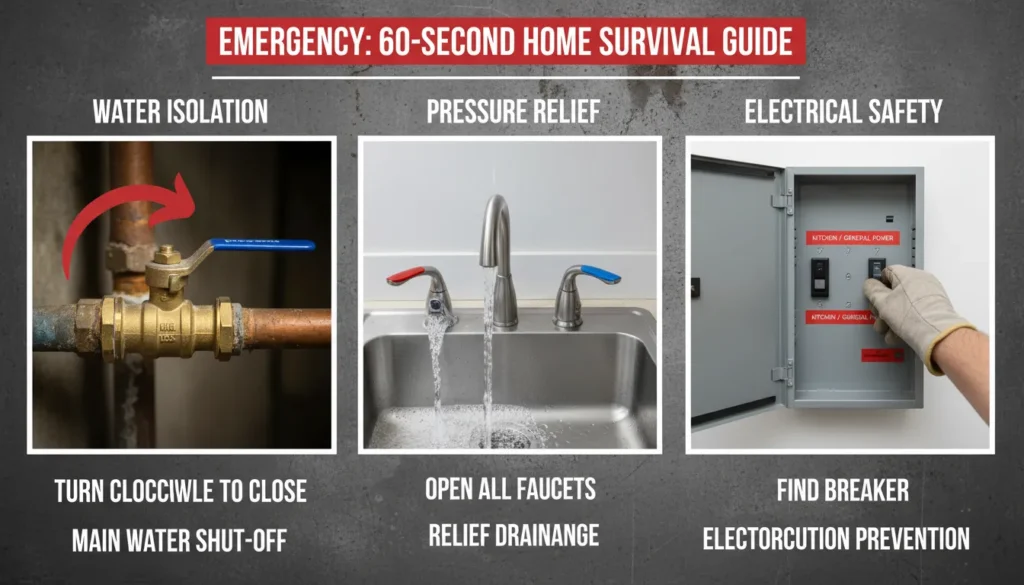
What to Do Immediately During a Plumbing Emergency
If a major leak occurs:
Turn off the main water supply.
Shut off electricity in affected areas if safe to do so.
Move valuables away from standing water.
Avoid using electrical devices near moisture.
Contact an emergency plumbing professional immediately.
Quick response can significantly reduce damage.
When a Leak Is Not an Immediate Emergency
Some leaks may not require urgent service but still need timely repair:
Dripping faucets
Slow toilet leaks
Minor valve seepage
Small appliance hose leaks
Even these should not be ignored, as prolonged moisture can still cause damage.
How to Prevent Plumbing Leaks in the Future
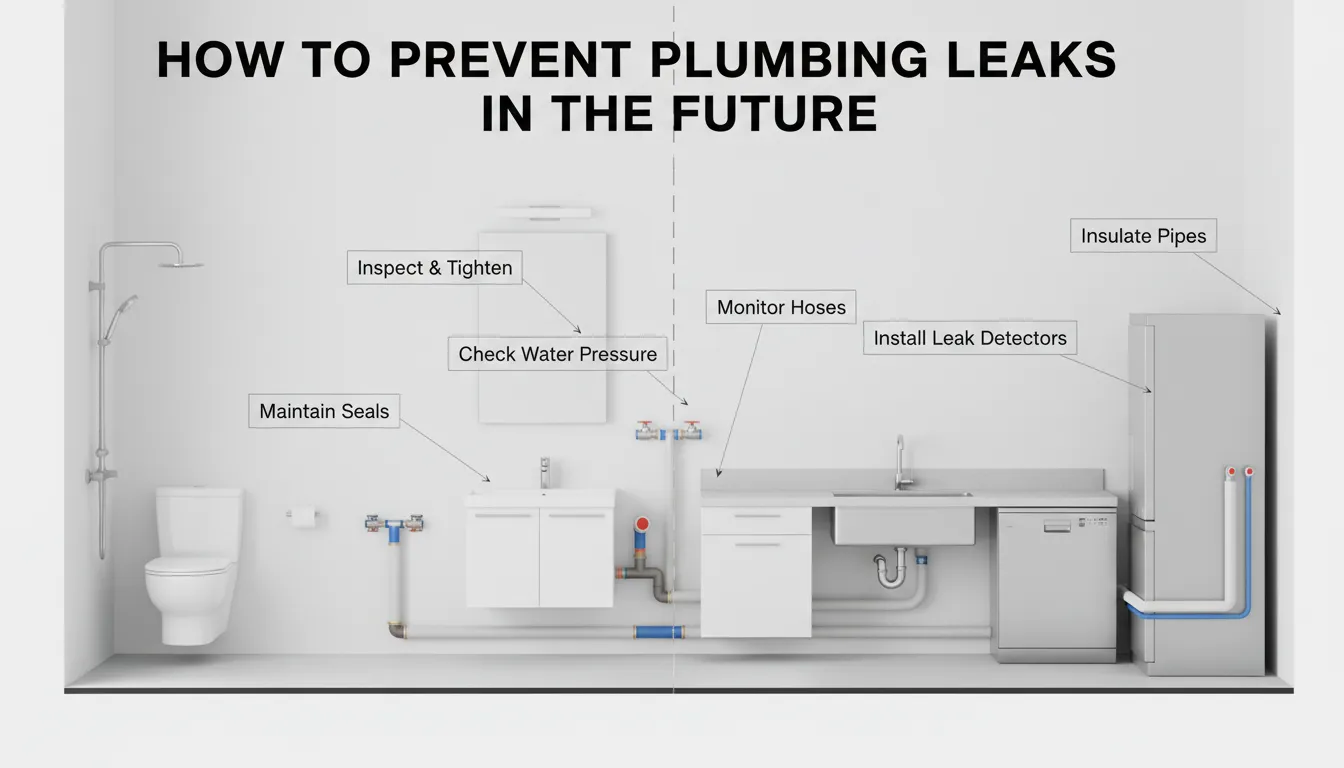
While plumbing leaks can never be eliminated completely, many can be prevented with regular maintenance and early awareness. Simple preventive steps can extend the life of your plumbing system, reduce repair costs, and protect your home from unexpected water damage.
Preventive plumbing care focuses on early detection, pressure control, and routine inspection of high-risk areas.
Schedule Regular Plumbing Inspections
Having your plumbing system professionally inspected at least once a year helps identify:
Weak pipe joints
Early corrosion
Pressure irregularities
Aging valves and seals
Routine inspections allow small issues to be repaired before they turn into major leaks.
Monitor Water Pressure
Excessively high water pressure puts constant stress on pipes and fittings. Ideal household water pressure typically ranges between 40–60 PSI.
Installing a pressure regulator helps:
Prevent burst pipes
Reduce wear on fixtures
Extend plumbing system lifespan
Insulate Exposed Pipes
Pipes located in attics, basements, crawl spaces, and exterior walls are vulnerable to temperature changes.
Pipe insulation helps:
Prevent freezing during cold weather
Reduce expansion and contraction stress
Minimize condensation buildup
Replace Aging Plumbing Components
Older homes often contain outdated plumbing materials such as galvanized steel or aging copper. Replacing worn components before failure can prevent sudden leaks.
Watch closely for:
Rust-colored water
Frequent pinhole leaks
Corrosion on visible pipes
Install Smart Water Leak Detectors
Modern leak detection devices can alert homeowners at the first sign of moisture. Some systems can even shut off the water automatically when leaks are detected.
These devices are especially useful near:
Water heaters
Washing machines
Sinks and toilets
Basements and laundry rooms
Check Appliances and Hoses Regularly
Inspect appliance hoses every few months for:
Cracks
Bulging
Corrosion
Loose connections
Replacing worn hoses every 3–5 years significantly reduces the risk of sudden failures.
Know Where Your Main Shut-Off Valve Is
In emergencies, knowing how to shut off your home’s water supply can prevent extensive damage. Make sure all household members know its location and operation.
Frequently Asked Questions About Plumbing Leaks
How do I find a plumbing leak in my wall?
You can detect a wall leak by looking for discoloration, bubbling paint, peeling drywall, or musty odors. Listening for dripping sounds and using a moisture meter can also help. If the leak remains hidden, a professional plumber may use thermal imaging or acoustic detection to locate it accurately.
Can a small plumbing leak cause major damage?
Yes. Even a slow leak can waste thousands of gallons of water over time. Continuous moisture can lead to mold growth within 24–48 hours and weaken drywall, flooring, and wooden framing if not repaired promptly.
How long can a plumbing leak go unnoticed?
Hidden plumbing leaks can remain undetected for weeks or even months, especially when they occur behind walls, under floors, or beneath slab foundations. Often, the first sign appears only after visible water damage has already developed.
How much does professional leak detection cost?
Professional leak detection typically costs between $150 and $500, depending on the complexity of the plumbing system and the tools required. Early detection usually saves money by preventing extensive repairs.
Do plumbers use cameras to find leaks?
Yes. Plumbers commonly use high-definition pipe inspection cameras to locate cracks, corrosion, joint failures, or blockages inside plumbing lines without damaging walls or floors.
Is a plumbing leak covered by homeowners insurance?
Insurance coverage depends on the cause of the leak. Sudden and accidental leaks are often covered, while long-term or neglected leaks may be denied. It’s important to address leaks quickly and document repairs.
When to Call a Licensed Plumber
While some plumbing leaks can be handled with basic DIY repairs, many require professional expertise to prevent serious damage. If you cannot locate the source of a leak, notice recurring moisture, or suspect hidden pipe damage, contacting a licensed plumber is the safest option.
Professional plumbers have the training and equipment needed to detect leaks accurately, minimize disruption, and restore your plumbing system properly. Early action not only protects your home but also saves money and reduces long-term risk.
If you suspect a plumbing leak and want peace of mind, schedule a professional inspection before minor moisture turns into costly water damage.