
How Much Attic Insulation Do You Need? Complete R-Value Guide
How Much Attic Insulation Do You Need?
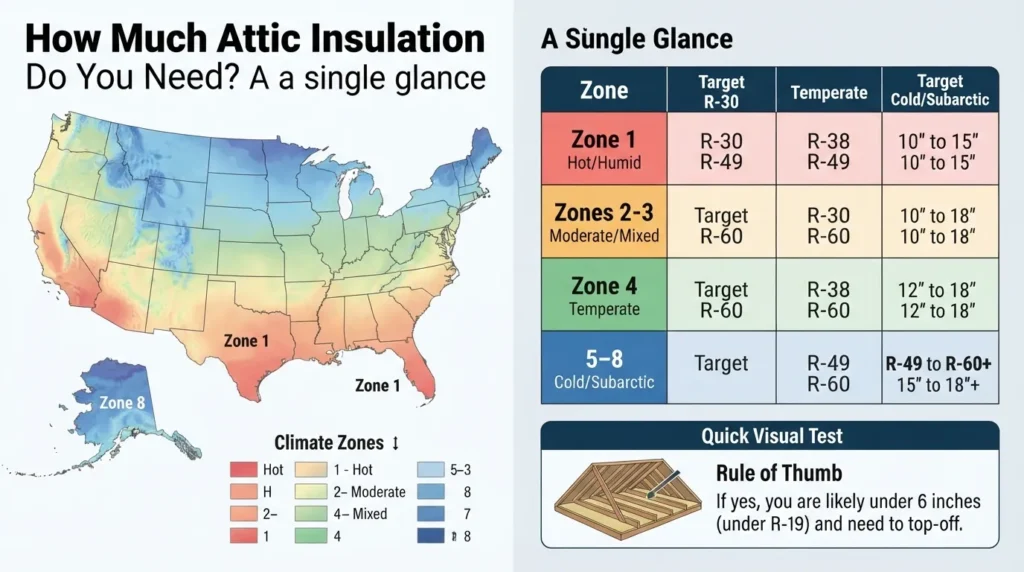
To determine how much attic insulation you need, you must look at your geographic climate zone. Most residential homes require an attic insulation level between R-30 and R-60. In hot, humid climates like Miami, Florida (Climate Zone 1), the standard recommendation is R-30 to R-49, which translates to roughly 10 to 15 inches of insulation depending on the material used.
If you are topping up existing insulation rather than starting from scratch, you can safely add enough material to reach these target values. Doubling your insulation thickness will double your R-value, but it does not double your energy savings due to diminishing financial returns.
Recommended Attic R-Values by Climate Zone
The table below breaks down the Department of Energy (DOE) and International Energy Conservation Code (IECC) insulation targets for U.S. climate zones.
Pro Tip from the Field: In South Florida, we deal with intense radiant heat and high humidity. While building codes require a minimum of R-30 for new ceilings, upgrading your attic to R-38 or R-49 can significantly reduce the workload on your air conditioning system, lower your monthly utility bills, and prevent humidity from migrating into your living spaces.
What Is R-Value? (Foundation)
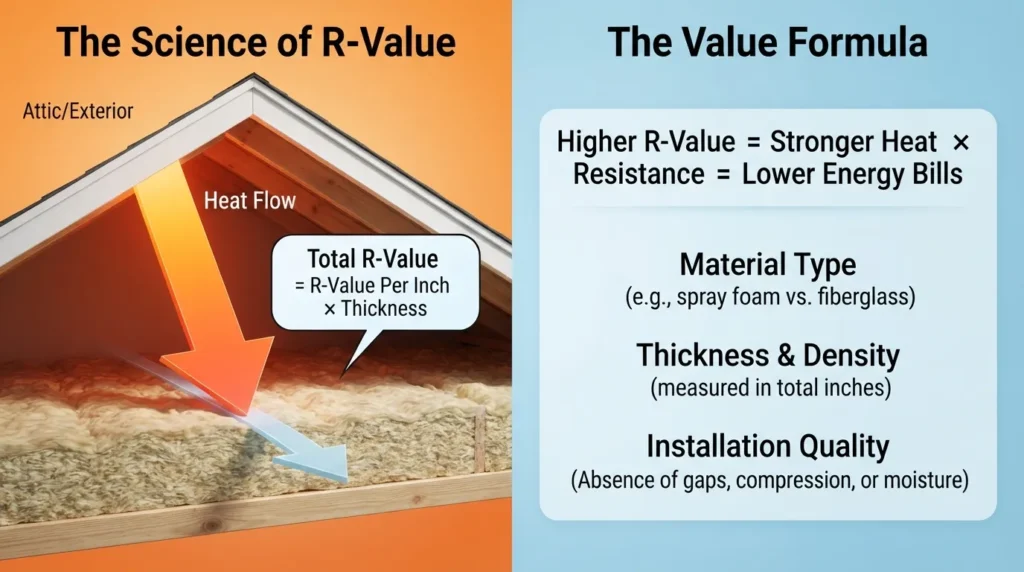
An R-value measures an insulation material’s resistance to heat flow. The higher the R-value, the greater the insulation’s effectiveness at preventing heat from entering or escaping your home. For homeowners, understanding this rating is the foundation of lower energy bills and a comfortable living space.
What Does R-Value Mean?
The “R” in R-value stands for thermal resistance. It is a standard scientific measurement calculated by determining how well a material resists conductive heat transfer. In simple terms, heat naturally moves from warmer areas to cooler areas. Insulation acts as a barrier to stop this movement, and the R-value tells you exactly how strong that barrier is.
Higher R-Value = Stronger Heat Resistance = Lower Energy Bills
A material’s R-value depends on three core factors:
The type of insulation material (fiberglass, cellulose, or spray foam)
The thickness and density of the material
The installation quality (gaps, compression, and moisture can severely lower real-world R-values)
Why R-Value Matters for Attics
In a climate like Miami, Florida, your attic is the primary battleground for heat control. Radiant heat from the sun bakes your roof, causing attic temperatures to soar up to 150°F on summer days. Without a proper R-value barrier, this intense heat transfers directly into your living spaces.
Having the correct attic R-value is crucial for several practical reasons:
Reduces HVAC Strain: When your attic blocks heat effectively, your air conditioner doesn’t have to work overtime, extending the lifespan of your system.
Lowers Energy Bills: Proper attic insulation can reduce cooling and heating costs by an average of 15%, according to the EPA’s Energy Star program.
Prevents Moisture Overload: High attic heat paired with intense Florida humidity creates a breeding ground for mold. The right insulation helps stabilize indoor humidity levels.
R-Value vs. Insulation Thickness (Not the Same Thing)
Thickness vs. Performance: The Golden Rule of Attic Insulation
Many homeowners assume that thicker insulation automatically means a higher R-value. That is a myth. While depth matters, your insulation’s actual strength depends entirely on the type of material installed.
To easily find your attic’s current or target protection strength, use this standard industry formula:
Total R-Value = (R-Value per Inch) multiplied by (Thickness in Inches)
Quick Material Thickness & R-Value Guide
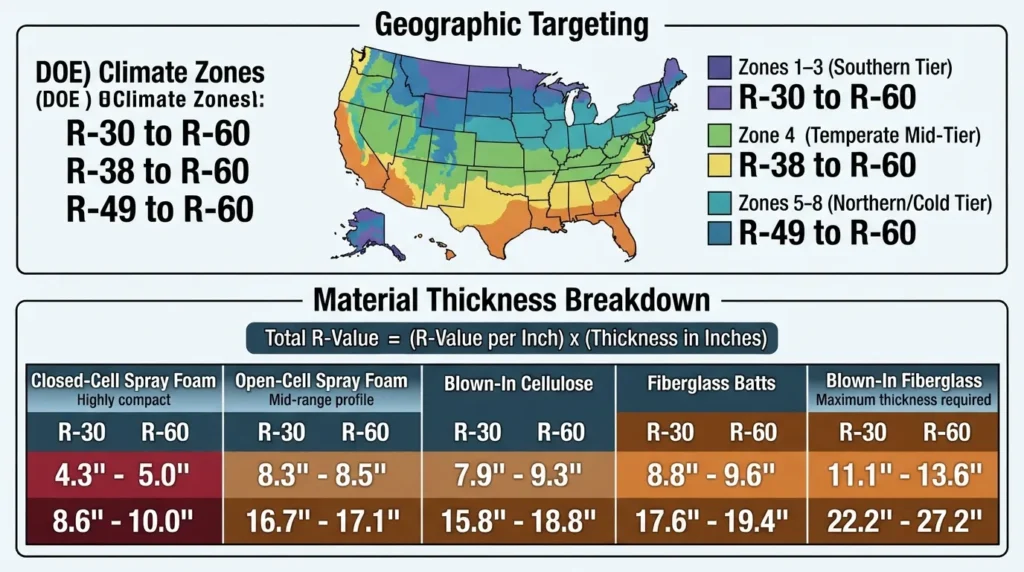
Different materials deliver different levels of thermal resistance per inch. Use our comparative chart below to see exactly how many inches of thickness you need to hit standard home efficiency targets:
| Insulation Material Type | Performance (R-Value per Inch) | Inches Needed for R-30 | Inches Needed for R-38 | Inches Needed for R-49 |
| 🚀 Closed-Cell Spray Foam | 6.0 – 7.0 | 4.3″ – 5.0″ | 5.4″ – 6.3″ | 7.0″ – 8.1″ |
| 💨 Open-Cell Spray Foam | 3.5 – 3.6 | 8.3″ – 8.5″ | 10.5″ – 10.8″ | 13.6″ – 14.0″ |
| 🪵 Blown-In Cellulose | 3.2 – 3.8 | 7.9″ – 9.3″ | 10.0″ – 11.8″ | 12.8″ – 15.3″ |
| 🧱 Fiberglass Batts | 3.1 – 3.4 | 8.8″ – 9.6″ | 11.1″ – 12.2″ | 14.4″ – 15.8″ |
| 🌪️ Blown-In Fiberglass | 2.2 – 2.7 | 11.1″ – 13.6″ | 14.0″ – 17.2″ | 18.1″ – 22.2″ |
🛠️ Expert Field Tip (The Visual Test):
Take a quick look into your attic floor. If the wooden floor joists (the beams) are completely visible to the naked eye, your insulation depth is likely under 6 inches (roughly R-19 or lower). To trap cool air inside and slash your monthly AC bills, your attic needs a fresh top-off to reach modern energy standards.
Recommended Attic R-Value by Climate Zone & ZIP Code
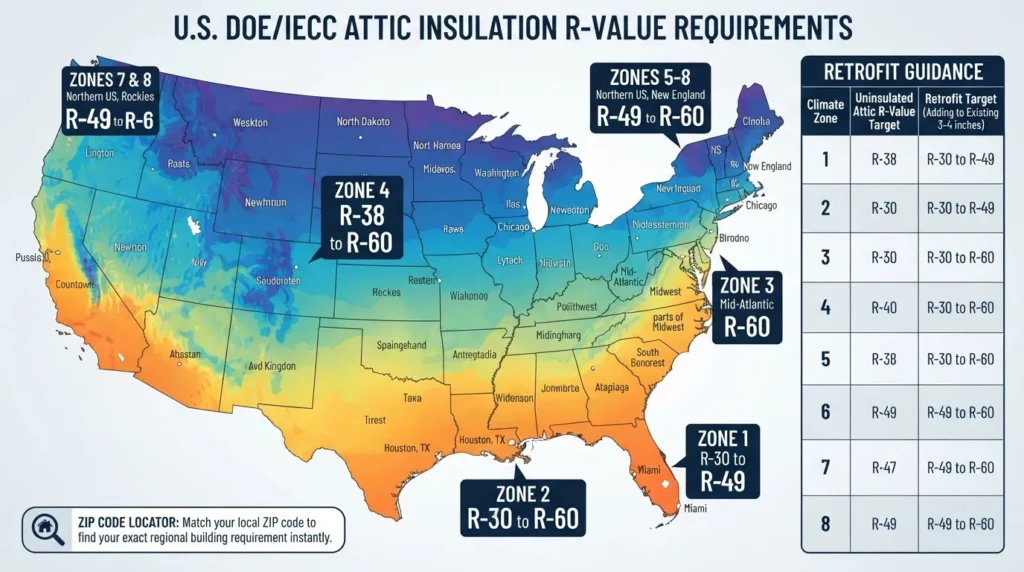
The Department of Energy (DOE) establishes specific recommended attic R-values based on your geographic location to maximize energy efficiency and household savings. Because a home in the freezing Northeast faces entirely different thermal challenges than a home in subtropical Florida, insulation requirements are divided across eight distinct national climate zones.
US Climate Zone Map
The International Energy Conservation Code (IECC) and the DOE map out the United States into distinct climate boundaries. Zone 1 represents the hottest, most humid tropical regions of the country, while Zone 8 encompasses subarctic territorial regions. As you move from the southern border up to the northern tier, the minimum thermal resistance threshold increases to combat extreme winter heat loss.
R-Value Table by Zone
To meet modern Energy Star standards, your attic’s target R-value depends heavily on whether you are insulating a completely bare attic floor or retrofitting an older home that already has a base layer of insulation.
The comprehensive table below outlines the current federal cost-effective R-value benchmarks for residential attics across all climate zones:
Find Your R-Value by ZIP Code
While looking at a broad national map gives you a general baseline, insulation needs are enforced at the local county or city level. To pinpoint your home’s exact requirement, match your ZIP code to the designated federal climate tiers:
Zone 1 (ZIP Codes 330xx – 334xx): Encompasses the southernmost tip of Florida, including all of Miami-Dade, Broward, Monroe, and Palm Beach counties.
Zone 2 (ZIP Codes 320xx – 329xx / 770xx): Covers central and northern Florida (Orlando, Jacksonville), southern Texas (Houston), and the immediate Gulf Coast region.
Zone 3 (ZIP Codes 303xx – 319xx): Spans the broader American Southeast, including Georgia, Alabama, and South Carolina.
Florida & Miami-Specific Recommendation (Local Authority)
As home service professionals operating directly in South Florida, we look beyond generic national charts to deliver practical, real-world advice for local structures. Miami is firmly inside Climate Zone 1.
While code minimums state that R-30 is acceptable for an uninsulated Zone 1 roof assembly, our hot-humid climate creates unique conditions that make a higher target a smart investment. On standard summer afternoons, local attic spaces routinely hit a blistering 150°F. This extreme thermal energy constantly pushes down against your ceiling, forcing your central air conditioner to work around the clock.
For true energy savings and indoor humidity management in Miami, we recommend upgrading your attic insulation to R-38 or R-49. Elevating your attic protection to this range forms an impenetrable barrier that significantly lowers your AC load and drops home energy consumption by up to 15%. Furthermore, pairing a higher R-value with an airtight radiant barrier or closed-cell spray foam helps mitigate the intense humidity loops that cause mold and structural rot in Florida homes.
R-Value Chart (Attic, Wall, Ceiling, Floor)
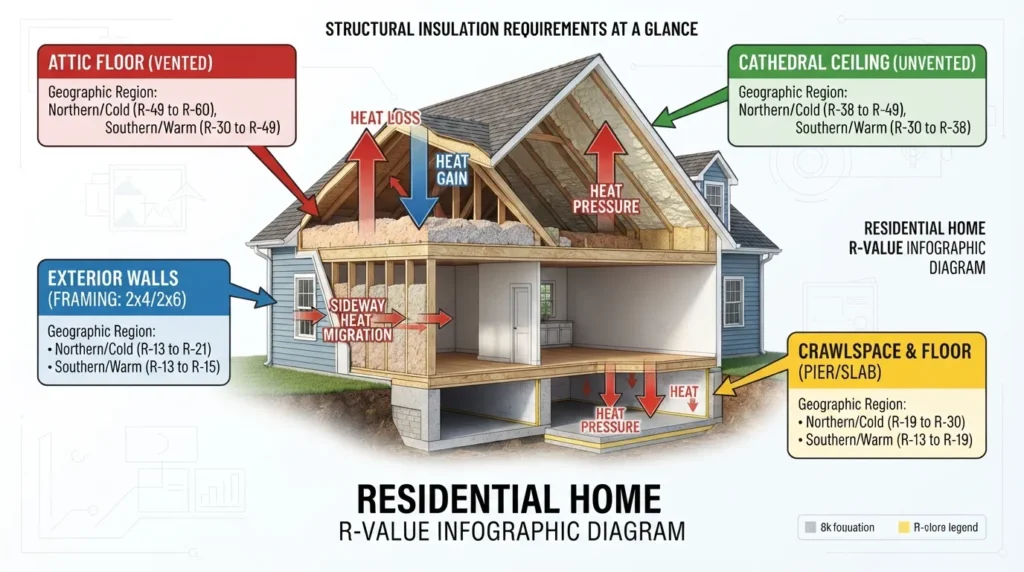
An R-value chart provides the target thermal resistance scores required for different areas of a home based on localized climate zones. For homeowners in hot, humid regions like Miami, Florida (located in Climate Zone 1), insulation requirements focus heavily on blocking radiant attic heat, while northern climates require comprehensive coverage across all surfaces to trap indoor warmth.
Attic R-Value Chart
Your attic requires the highest insulation rating in the entire house because roofs bear the brunt of solar radiation. According to the Department of Energy (DOE) and International Energy Conservation Code (IECC) standards, recommended attic R-values range from R-30 to R-60 depending entirely on your geographic location.
Wall R-Value Chart
Achieving a good R-value for exterior walls prevents heat from migrating sideways through your home’s siding. Because wall cavities are physically limited by the depth of standard framing studs ($2\times4$ or $2\times6$ lumber), hitting these targets often requires high-density materials like continuous rigid foam board or dense-pack insulation.
Ceiling R-Value Chart
A dedicated ceiling R-value applies specifically to flat upper surfaces underneath unconditioned areas, such as a drop ceiling below an open attic workspace or crawlspace. While standard uninsulated ceilings follow attic guidelines, specialized ceiling configurations require targeted thermal barriers to maintain balanced room temperatures.
Cathedral Ceilings (Sloped): Require a minimum of R-30 up to R-38 in southern states, and up to R-49 in northern zones. Because space for ventilation is tight between the drywall and the roof deck, continuous high-density spray foam is usually required.
Basement Ceilings (Floors Above): Require R-13 to R-19 in moderate climates to isolate damp basement air from the living spaces above.
Crawlspace Ceilings: Require R-19 to R-30 in northern zones to prevent cold floors, while southern crawlspaces generally benefit more from floor-level sealing and encapsulation.
Downloadable Printable R-Value Chart (PDF)
Save time and keep this structural data handy on your next home improvement project. Click the link below to view, save, or print a high-resolution, job-site ready version of our comprehensive insulation charts.
👉 [Download Our Free, Printable R-Value Chart PDF Here]
What’s Included in the PDF: This downloadable packet features a complete R-value by ZIP code look-up map, an expanded attic R-value chart, precise thickness specifications for fiberglass, cellulose, and spray foam, and an installation checklist to ensure your project fully meets local building codes.
How Thick Should Your Insulation Be?
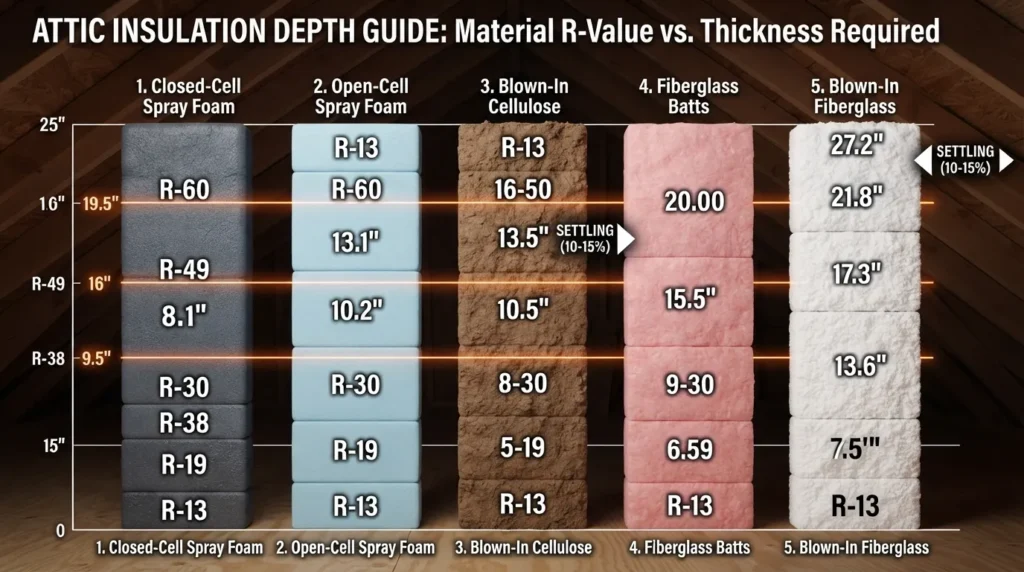
To determine how thick your insulation should be, you must match the physical depth of your specific material to the target R-value recommended for your climate zone. In Miami, Florida (Climate Zone 1), the absolute minimum standard is R-30, though upgrading to R-38 or R-49 provides maximum heat resistance and energy savings.
R30 Thickness Guide
An R30 thickness translates to a physical depth of 4.3 to 13.6 inches, depending entirely on the insulation material used. Because high-performance materials require fewer inches to achieve the same thermal barrier, the material type dictates the physical space needed in your attic floor.
Closed-Cell Spray Foam: Requires a highly efficient thickness of 4.3 to 5.0 inches.
Open-Cell Spray Foam: Requires a depth of 8.3 to 8.5 inches.
Blown-In Cellulose: Requires a settled depth of 7.9 to 9.3 inches.
Fiberglass Batts: Requires standard traditional layouts of 8.8 to 9.6 inches.
Blown-In Fiberglass: Requires a looser, deeper layout of 11.1 to 13.6 inches.
R38 Thickness Guide
An R38 thickness requires a physical insulation depth of 5.4 to 17.2 inches. Upgrading from R-30 to R-38 is highly recommended for South Florida homeowners looking to significantly reduce HVAC cycle times during peak summer months.
Closed-Cell Spray Foam: Provides a compact, high-efficiency layer at 5.4 to 6.3 inches.
Open-Cell Spray Foam: Requires a total depth of 10.5 to 10.8 inches.
Blown-In Cellulose: Requires an even spread of 10.0 to 11.8 inches.
Fiberglass Batts: Demands a physical thickness of 11.1 to 12.2 inches.
Blown-In Fiberglass: Requires a deep, fluffy blanket measuring 14.0 to 17.2 inches.
R49 & R60 Thickness Guide
Achieving an R49 or R60 thickness demands a heavy-duty physical depth ranging from 7.0 to 27.2 inches. While R-49 represents the high-efficiency ceiling for hot, humid coastal zones, R-60 is typically reserved for northern climates—though some local homeowners opt for it to completely isolate attic heat.
Closed-Cell Spray Foam: Achieves R-49 at 7.0 to 8.1 inches and R-60 at 8.6 to 10.0 inches.
Open-Cell Spray Foam: Requires 13.6 to 14.0 inches for R-49; R-60 requires an advanced 16.7 to 17.1 inches.
Blown-In Cellulose: Needs a settled depth of 12.8 to 15.3 inches for R-49 and 15.8 to 18.8 inches for R-60.
Fiberglass Batts: Requires 14.4 to 15.8 inches of depth for R-49 and a massive 17.6 to 19.4 inches for R-60.
Blown-In Fiberglass: Requires 18.1 to 22.2 inches to hit R-49 and an extreme 22.2 to 27.2 inches for R-60.
What R-Value Is 4-Inch Thick Insulation?
A 4-inch thick insulation layer provides an R-value between R-9 and R-28, depending entirely on the material installed. Four inches of low-density fiberglass delivers minimal protection, whereas four inches of premium closed-cell foam creates a highly effective thermal barrier.
Closed-Cell Spray Foam (4 inches): Delivers R-24 to R-28 (Nearly satisfies the code minimum on its own).
Open-Cell Spray Foam (4 inches): Delivers R-14 to R-14.4.
Blown-In Cellulose (4 inches): Delivers R-12.8 to R-15.2.
Fiberglass Batts (4 inches): Delivers R-12.4 to R-13.6.
Blown-In Fiberglass (4 inches): Delivers R-8.8 to R-10.8 (Severely under-insulated for an attic).
Thickness Comparison Table by Material
The reference chart below compares the exact physical depth in inches required to hit target efficiency numbers across the five major residential insulation types:
Pro Tip from the Field: When measuring blown-in insulation with a ruler, always measure from the lowest settled point. Blown-in materials naturally settle over their first 12 to 18 months, which can decrease your overall thickness by up to 10% to 15% from the day it was originally installed.
Common Insulation Rules & Myths Explained
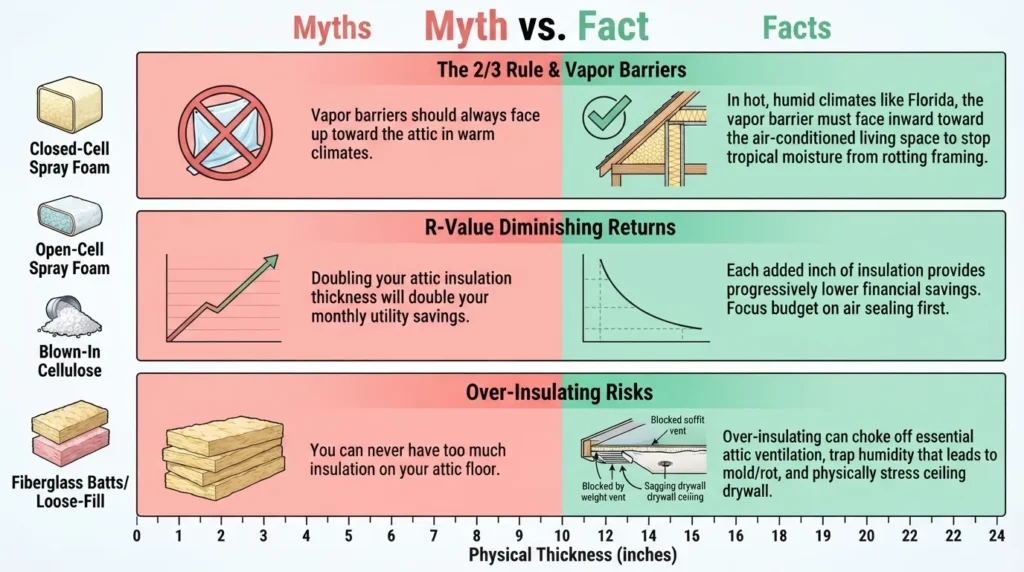
Navigating the technical guidelines of home energy efficiency often means sorting through conflicting advice, old contractor rules of thumb, and persistent urban legends. To achieve optimal energy savings and structural safety, homeowners need clear, fact-based answers to common insulation rules and myths.
What Is the 2/3 Rule of Insulation?
The 2/3 rule of insulation dictates that at least two-thirds of a wall or ceiling’s total thermal resistance (R-value) must be located on the exterior side of the building’s vapor barrier. This structural rule prevents moisture from condensing inside structural cavities.
In cold climates, this keeps the interior framing cavity warm enough to prevent water vapor from hitting its dew point. In hot, humid climates like Miami, Florida, the rule is effectively flipped in practice: building scientists ensure the vapor barrier faces the air-conditioned interior to prevent exterior tropical humidity from permeating inward and rotting the drywall.
Does Doubling Insulation Double the R-Value?
Here is the text format for that final formula, written out in plain, simple English that any homeowner can read and understand immediately:
Heat Flow Reduction Percentage = [1 minus (1 divided by the Total R-Value)] multiplied by 100
How to Use This in Plain English (With An Easy Example)
Think of this formula as a way to see exactly how much heat your insulation blocks from sneaking into your home.
Take the number 1 and divide it by your attic’s total R-Value. (For example, if you have R-20 insulation, 1 divided by 20 equals 0.05).
Subtract that result from 1. (Using our example: 1 minus 0.05 equals 0.95).
Multiply that final number by 100 to get your percentage. (0.95 multiplied by 100 equals 95%).
The Breakdown: This means an R-20 attic blocks 95% of heat flow. If you spent thousands of dollars to double that insulation to R-44, your home would block 97.7% of heat flow. You are only gaining an extra 2.7% of protection, which is why piling on too much insulation isn’t always worth the cash!
As shown above, upgrading from an uninsulated attic to R-10 stops 90% of heat loss or gain. Adding another layer to reach R-20 only stops an additional 5%. While higher R-values always improve thermal performance, each added layer saves less money than the one before it.
Can You Have Too Much R-Value Insulation?
Technically, you cannot have too much R-value in terms of thermal performance, but you absolutely can install too much physical insulation, leading to structural damage, diminished financial returns, and compromised home ventilation.
Over-insulating an attic introduces several serious risks:
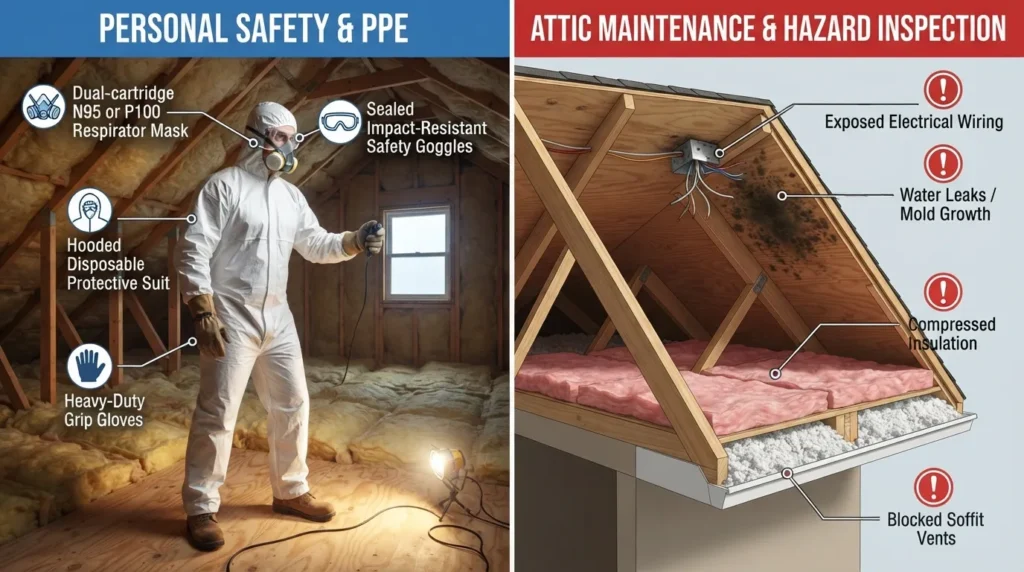
Blocked Soffit Vents: Packing loose-fill insulation tightly into the edges of an attic can block the soffit vents. This chokes off essential airflow, trapping extreme heat and humidity that can rot your roof deck.
Compressed Material: Squeezing thick insulation into tight spaces or under flooring flattens its built-in air pockets, which actually decreases its real-world R-value.
Structural Weight Stress: Standard drywall ceilings are not designed to hold unlimited weight. Piling heavy, thick layers of insulation past recommended limits can cause ceiling drywall to sag or pull away from the framing.
Is R60 Attic Insulation Worth It?
For most homeowners in warm southern climates (such as Department of Energy Climate Zone 1 and Zone 2, which includes Florida), R60 attic insulation is generally not worth the high upfront installation cost. The incremental energy savings it provides over standard targets will take decades to pay off.
The U.S. Department of Energy and Energy Star recommend an attic target of R-30 to R-45 for southern regions. Upgrading an attic from R-38 to R-60 requires roughly 7 to 9 additional inches of fiberglass or cellulose. As detailed in our diminishing returns chart, moving from R-40 to R-60 blocks less than 1% of additional heat transfer.
Pro Tip from the Field: Instead of spending extra money to push your attic insulation all the way to R-60, your budget is much better spent on professional air sealing. Sealing up hidden air leaks around light fixtures, plumbing pipes, and attic hatches before laying down an R-38 barrier will lower your AC bills far more than simply stacking up extra inches of insulatio
Cost to Insulate Your Attic
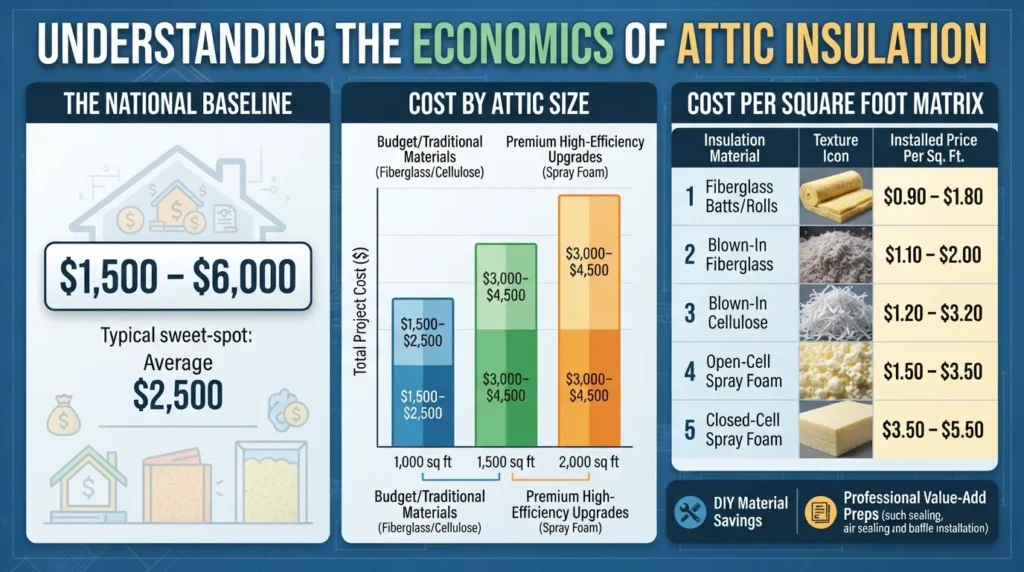
The average cost to insulate an attic typically ranges between $1,500 and $6,000, with most homeowners paying roughly $2,500 for a complete professional installation. Your final cost is driven primarily by the total square footage of your attic, the type of insulation material selected, labor complexity, and the target R-value required for your climate zone.
Cost for a 2000 Sq Ft Attic
For a large 2,000 sq ft attic, professional installation costs generally range from $3,000 to $10,000. If you are utilizing traditional loose-fill materials like fiberglass or cellulose to achieve standard baseline performance, costs stay on the lower end, averaging $3,000 to $5,500. However, if you choose high-efficiency spray foam encapsulation for a premium thermal barrier, a 2,000 sq ft attic will run between $6,500 and $10,000 due to specialized equipment and higher material costs.
Cost by Insulation Type
The material you select has the single biggest impact on your per-square-foot investment. Below is a breakdown of 2026 average material and professional installation costs:
Cost by R-Value Level
Higher R-values require thicker layers of material, directly increasing the total cost of the project. Insulating a standard attic space to a modest baseline level costs significantly less than stacking material to build a heavy-duty thermal block:
R-30 Coverage (approx. 8–11 inches deep): Costs $1.20 to $2.50 per sq. ft. installed. This is the typical target for warmer, southern climates.
R-38 Coverage (approx. 11–14 inches deep): Costs $1.60 to $3.50 per sq. ft. installed. This provides enhanced energy savings and a faster return on investment.
R-49 to R-60 Coverage (approx. 14–22 inches deep): Costs $2.50 to $6.00+ per sq. ft. installed. This heavy application is standard for freezing northern climates or high-end eco-friendly upgrades
DIY vs Professional Installation Cost
Opting for a DIY attic insulation project can save you $1,000 to $3,000 in professional labor costs, but it requires substantial physical effort and proper safety gear.
DIY Costs: A homeowner typically spends $600 to $1,500 on materials, safety respirators, protective suits, and a 24-hour insulation blower rental (often provided free by hardware stores if purchasing a minimum number of insulation bags).
Professional Costs: Hiring a licensed contractor brings the total to $1,500 – $6,000. However, professional crews have the capability to handle critical prep work—such as professional air sealing, installing modern attic baffles for proper ventilation, and maintaining safe clearances around hot recessed lighting fixtures—which prevents future structural damage and code violations.
Miami/Florida Specific Pricing
In the South Florida market, local environmental factors slightly adjust standard installation economics. Because Miami falls directly into Climate Zone 1, local building codes call for a minimum baseline of R-30 up to an energy-efficient R-38 for attic ceilings, keeping local material volumes lower than northern states that require R-60.
However, Miami homeowners should factor in specific tropical region variables that can add $500 to $2,000 to a standard baseline estimate:
Old Insulation Removal: Wet, moldy, or pest-damaged insulation caused by past roof leaks or high attic humidity costs an additional $1.00 to $2.00 per sq. ft. to safely extract and discard.
Radiant Heat Barriers: Because radiant sun exposure is intense in Florida, many homeowners add a reflective radiant barrier foil layer along the underside of the roof deck, adding $0.50 to $1.50 per sq. ft. to the total project cost.
Attic Encapsulation Pref: If choosing spray foam to create a sealed, conditioned attic space to protect sensitive HVAC ductwork from 150°F summer temperatures, strict moisture management and vapor preps are built directly into local professional labor rates.
Types of Attic Insulation (Which Is Best?)
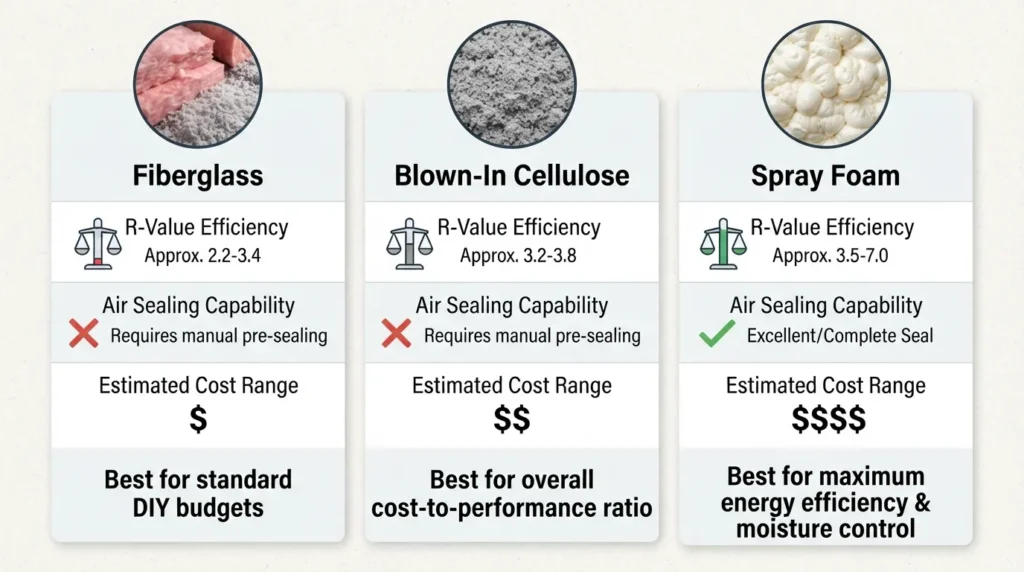
Choosing the right type of attic insulation depends on your home’s structure, your local climate, and your budget. The best attic insulation blocks extreme heat, manages moisture, and seals air leaks effectively. In hot, humid climates like Miami, Florida, choosing the wrong material can lead to high energy bills and hidden mold problems.
Fiberglass Batt Insulation
Fiberglass batt insulation consists of pre-cut blankets made from densely woven glass fibers. It is designed to fit snugly between standard wall studs and attic floor joists.
Average R-Value: 3.1 to 3.4 per inch
Best For: Standard, unobstructed attic floors with uniform joist spacing.
Pros: Affordable, DIY-friendly, widely available, and naturally fire-resistant.
Cons: Prone to gaps and air leaks if cut improperly around pipes, wiring, or electrical boxes. It loses thermal efficiency if compressed or exposed to high moisture.
Blown-In / Loose-Fill Insulation
Blown-in or loose-fill insulation uses a specialized machine to blow loose material through a hose into the attic. It fills the entire attic floor, covering joists and packing tightly into tight corners and hard-to-reach crevices.
Average R-Value: 2.2 to 2.7 per inch for fiberglass; 3.2 to 3.8 per inch for cellulose.
Best For: Unfinished attic floors, oddly shaped spaces, and topping off existing, older insulation layers.
Pros: Creates a seamless, monolithic thermal blanket without the gaps found in batts. Excellent for rapid installation.
Cons: Requires specialized blowing equipment. Loose-fill fiberglass can settle slightly over time, reducing its initial thickness.
Spray Foam Insulation
Spray foam insulation is a liquid polyurethane that expands rapidly upon application, filling cavities and creating an airtight seal. It is applied directly to the underside of the roof deck or into open joist spaces.
Average R-Value: 3.5 to 3.6 per inch for open-cell; 6.0 to 7.0 per inch for closed-cell.
Best For: Unvented attic hot-roof designs, cathedral ceilings, and homes requiring high-performance structural sealing.
Pros: Acts as both a powerful thermal barrier and an air barrier. Closed-cell spray foam completely blocks moisture and water vapor.
Cons: High upfront installation cost. Must be mixed and applied by certified professionals using specialized safety gear.
Best Type of Insulation for Attics (Verdict)
The best type of attic insulation for overall performance, longevity, and moisture control is closed-cell spray foam, closely followed by blown-in cellulose for standard budgets.
While spray foam carries a premium price tag, its built-in air and vapor barrier is ideal for tropical climates, completely keeping hot, humid air outside your living spaces. For traditional ventilated attics, blown-in cellulose provides the best cost-to-performance ratio by completely eliminating the common air gaps that weaken fiberglass batts.
Most Common Type of Attic Insulation
The most common type of attic insulation found in residential homes is blown-in fiberglass. Builders and contractors favor blown-in fiberglass because it is highly cost-effective, fast to install, and easily covers large, open attic footprints to meet local building energy codes quickly.
Faced vs Unfaced Insulation — Which to Use?
The choice between faced and unfaced insulation depends on whether your project requires a built-in vapor barrier.
Rule of Thumb: Use faced insulation if you are installing a brand-new layer directly against bare wood framing. Use unfaced insulation if you are adding a second layer over existing insulation; adding faced insulation on top of old insulation traps moisture between the layers, causing wood rot.
Which Way Should Insulation Face?
In hot, humid climates like Florida, the paper or foil facing on insulation must face downward toward the interior living space.
The vapor barrier must always face the conditioned, air-conditioned side of the home. Installing the paper side facing up toward a hot attic traps rising household humidity inside the ceiling joists, which leads to mold growth, water stains, and structural wood decay.
How Is Attic Insulation Installed? (DIY Step-by-Step)
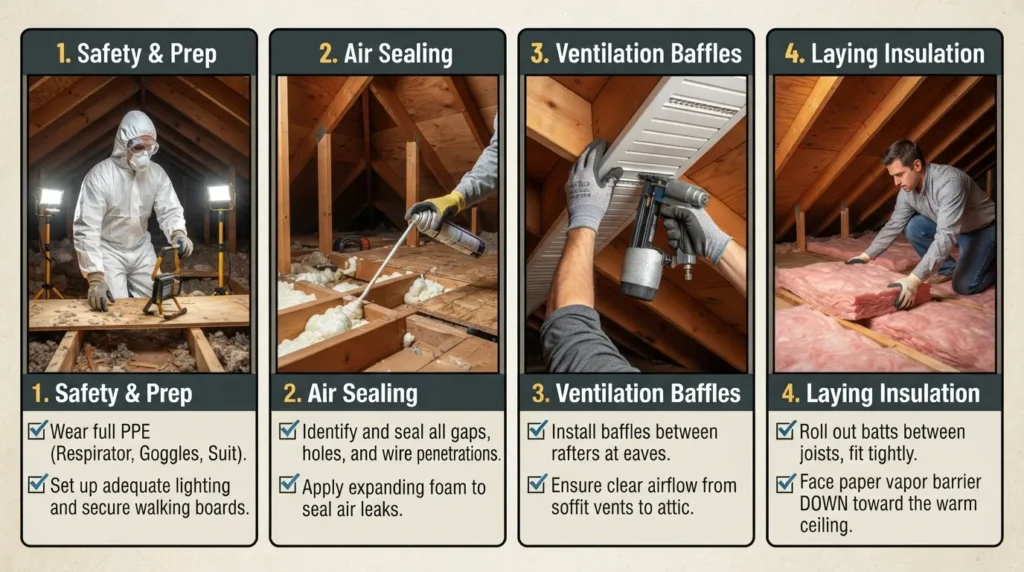
How attic insulation is installed depends heavily on whether you are using pre-cut fiberglass batts or loose-fill blowing machines. Proper installation requires thorough air-sealing of the attic floor beforehand, deploying proper safety gear, and avoiding the accidental blockage of vital roof ventilation channels.
Tools & Materials Needed
Gather all materials and safety gear before entering the attic to maintain a continuous, safe workflow:
Insulation Materials: Fiberglass batts/rolls or bags of loose-fill cellulose.
Safety Equipment: N95 respirator mask, sealed safety goggles, heavy gloves, and a hooded disposable coverall suit.
Hand Tools: Utility knife, tape measure, heavy-duty staple gun, and portable LED work lights.
Prep Materials: Expanding spray foam cans, silicone caulk, and plastic soffit baffles.
Specialized Gear: An insulation blower machine and flexible hose (for loose-fill applications).
Step-by-Step Installation Process (HowTo Schema)
Follow this structured process to install attic insulation and optimize your home’s thermal barrier:
Air-Seal the Floor: Move old insulation aside and seal all wire holes, plumbing stacks, and drywall gaps using expanding spray foam or silicone caulk.
Install Soffit Baffles: Staple plastic or cardboard baffles directly to the roof rafters over every soffit vent. This keeps the intake air vents clear.
Lay the Base Layer: Fit faced fiberglass batts snugly between the floor joists with the paper vapor barrier facing down toward the living space. Do not compress the material.
Blow in Loose-Fill (If Applicable): Start at the furthest corners of the attic and blow loose-fill fiberglass or cellulose evenly, working backward toward your exit hatch.
Cross-Layer for Maximum R-Value: Lay a second layer of unfaced insulation perpendicular (at a 90-degree angle) across the joists to eliminate thermal bridging and reach your R-30 or R-38 target.
How to Access Tight/Hard-to-Reach Attic Areas
The biggest challenge during DIY installation is physically reaching low-pitched roof eaves and tight outer perimeters where the roofline slants down to meet the floor joists.
To safely fully insulate these cramped, restricted areas, use these field-tested strategies:
The Extension Pole Technique: Securely duct-tape your blowing hose to a rigid, 6-to-8-foot PVC pipe or telescoping extension pole. This allows you to slide the insulation stream directly into narrow perimeter eaves without crawling into the dangerous drop-off zone.
Deploy Mobile Crawl Boards: Never step onto bare drywall ceilings. Lay down two or three pieces of 3/4-inch thick plywood (at least 2×4 feet) across the joists to create a safe, stable rolling platform for navigating low-clearance areas.
The Batt-Poking Method: When installing fiberglass blankets in tight edges, use a clean broom handle or wooden scrap strip to gently slide the batt into place without crimping or ripping the material
Safety Precautions
Attic spaces present unique physical hazards, particularly in hot, humid climates like Miami, Florida, where internal attic temperatures can instantly surge past 140°F.
Prevent Heat Strain: Work exclusively during early morning hours. Limit your continuous time in the attic to 15-minute intervals and stay highly hydrated.
Respiratory Defense: Woven glass fibers and loose cellulose release fine airborne particulates that irritate skin and lungs. Wear a fitted N95 respirator and goggles at all times.
Verify Footing: One misstep off a structural wooden joist will send you falling through your home’s ceiling drywall. Always keep your weight centered on joists or crawl boards.
When to Call a Professional
While rolling out simple fiberglass batts is an accessible project, you should call a licensed contractor if your attic contains older vermiculite insulation, which may contain hazardous asbestos. Furthermore, if your home has active roof leaks, mold issues, or requires a specialized closed-cell spray foam application, a professional team is required to ensure proper air balancing, ventilation protection, and building code compliance.
Attic Ventilation & Insulation — Why Both Matter
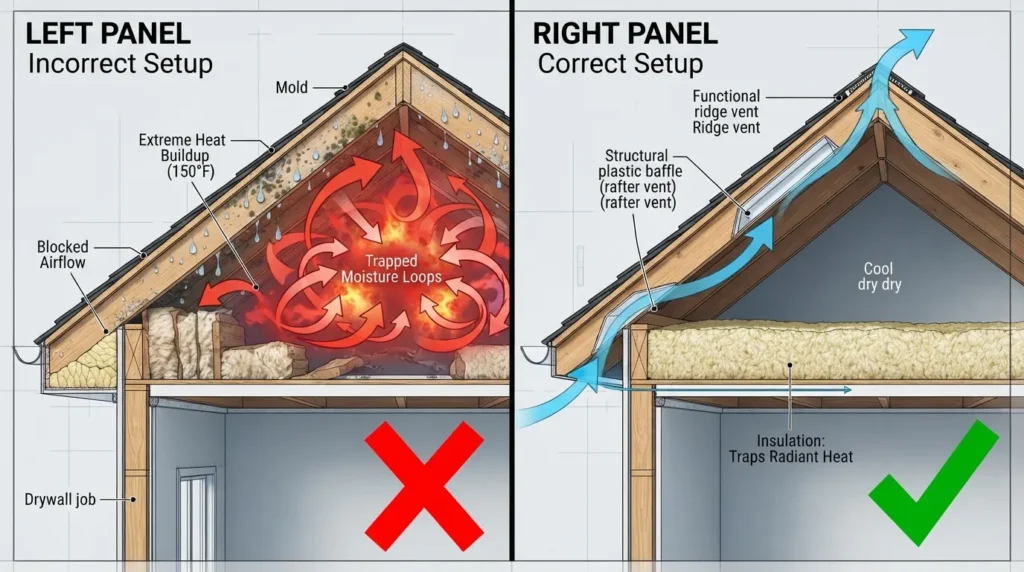
What Is Attic Ventilation?
Attic ventilation is a structural system of intake and exhaust vents that continuously circulates fresh outdoor air through your attic space to balance indoor and outdoor temperatures. A properly engineered system relies on natural convection and wind pressure to draw cool air in through lower soffit or fascia vents and push hot, moist air out through ridge or gable vents. According to the Federal Housing Administration (FHA), a well-balanced attic ventilation system requires a minimum ratio of 1 square foot of net free ventilating area for every 150 square feet of attic floor space.
How Ventilation and Insulation Work Together
Attic insulation and ventilation act as a dynamic duo to stabilize your home’s climate, prevent structural damage, and reduce monthly energy expenses. While high-performance insulation traps conditioned air inside your living spaces, ventilation actively clears out the radiant heat and moisture that penetrates the attic floor.
Without this cooperative system, your home faces severe efficiency drops and physical degradation:
Summer Heat Buildup: When outside temperatures hit a warm 90°F (32°C), unvented attic spaces trap air, skyrocketing temperatures past a scorching 150°F (66°C). This massive heat load pushes down through your ceilings, forcing your air conditioning to work 15% harder just to keep up.
Winter Ice Damming: In freezing conditions, warm trapped air melts the snow on your roof. The meltwater runs down to the cold eaves, freezes into ice dams, and backs up under shingles, causing costly water damage.
Moisture and Mold: A typical family of four generates roughly 2 to 4 gallons of water vapor daily through cooking, bathing, and laundry. Unvented, this moisture migrates to the attic, condensing on wood framing and fueling toxic mold growth.
Signs of Poor Ventilation Despite Good Insulation
Even if your attic features a high R-value of fiberglass or blow-in cellulose insulation, blocked airflow will compromise your home’s integrity. Look out for these critical warning signs that indicate your ventilation system is failing:
Roof Health Assessment
Direct Cause: Trapped moisture softens plywood
Long-Term Risk: Eventual structural collapse
Direct Cause: Condensation accumulating on cold metal
Long-Term Risk: Wood rot and compromised air quality
Direct Cause: Extreme under-shingle heat baking the roof
Long-Term Risk: Shorter shingle lifespan by 10–15 years
Direct Cause: Overheated attic radiating down into the home
Long-Term Risk: HVAC system strain and premature burnout
Insulation Safety & Maintenance
Do Rodents Like Foam Board Insulation?
Rodents do not eat foam board insulation for food, but they frequently chew, nest, and tunnel through it because its soft structure makes an ideal habitat. While rigid foam products like Expanded Polystyrene (EPS) or Extruded Polystyrene (XPS) offer zero nutritional value to pests, mice and rats can easily shred these materials to build nests. According to structural pest management studies, un-faced rigid foam installed near ground levels or in unsealed attics faces a high risk of infestation, reducing its thermal effectiveness (R-value) by up to 30% to 40% due to physical tunneling and moisture damage.
Signs Your Insulation Needs Replacing
Even high-quality insulation degrades over time or loses its effectiveness due to external environmental factors. Regular inspection helps prevent high energy bills and indoor structural issues. Watch for these definitive indicators that your attic material has failed:
Pest Contamination: Look for rodent droppings, urine stains, chewed tunneling paths, or a distinct musty odor. Contaminated material must be completely abated to avoid airborne hantavirus risks.
Water Damage and Compression: Wet insulation loses its trapping ability completely. If fiberglass or cellulose looks matted, compressed, or shows dark water stains from roof leaks, it cannot insulate effectively.
Persistent Indoor Drafts: If your HVAC system runs constantly and indoor temperatures fluctuate drastically between rooms despite a running thermostat, your insulation has likely degraded or shifted.
How Long Does Attic Insulation Last?
Under perfect conditions, attic insulation can last between 20 to 100 years, depending heavily on the material type used, installation quality, and moisture exposure. However, real-world issues like roof leaks, pests, and natural settling often cut these lifespans short.
Insulation Types & Lifespan
Average Lifespan: 80 to 100 Years
Primary Degradation Factor: Gravity settling and moisture compression
Average Lifespan: 20 to 30 Years
Primary Degradation Factor: Decomposes faster if exposed to high attic humidity
Average Lifespan: 80+ Years
Primary Degradation Factor: Structural shifting or direct UV light exposure
Attic Access & Conversion — The Complete Guide
Can You Convert Your Attic?
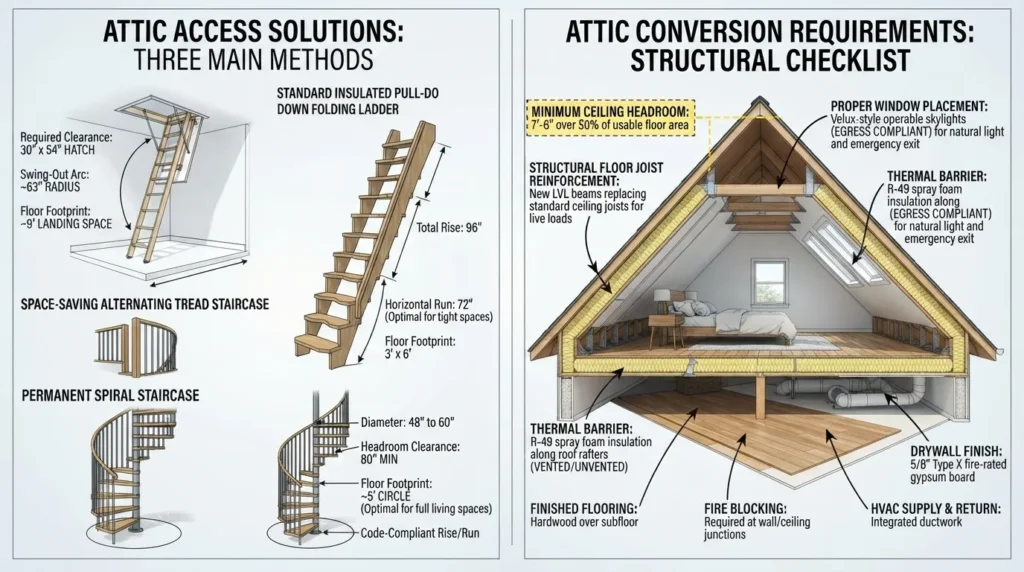
You can convert your attic if your home features traditional rafter framing rather than W-shaped trusses, and the space meets local building codes for habitable rooms. According to the International Residential Code (IRC), a legal attic conversion requires a minimum ceiling height of 7 feet over at least 50% of the usable floor area, a floor that can support a live load of 30 pounds per square foot, and a permanent staircase.
Converted Room vs. Regular Attic — Difference
The core difference between a converted room and a regular attic lies in structural engineering, climate control, and legal use.
Regular Attic: Primarily designed for structural support, insulation, and deep storage. It features unfinished floor joists intended only for dead loads (storing light boxes) and lacks dedicated heating, cooling, or finished walls.
Converted Room: A fully integrated living space engineered for live loads (people and heavy furniture). It must feature finished drywall, permanent flooring, code-compliant emergency exits (egress windows), and structural modifications to support ongoing daily activity.
Best Fixed Attic Ladder Options
If a full staircase won’t fit, upgrading to a high-capacity fixed or pull-down ladder is essential for safe access. The three best options include:
Heavy-Duty Aluminum Pull-Downs: Aluminum is lightweight, resists warping from humidity, and models like the Werner AH series offer up to a 375-pound duty rating.
Concertina / Telescoping Ladders: Best for tight landing spaces, these compact metal designs fold vertically into the ceiling opening without extending outward into the hallway.
Space-Saving Alternating Tread Stairs: A permanent, ultra-compact fixed staircase designed at a steeper angle to fit small floor footprints while maintaining code compliance for access.
How to Make a Scuttle Access
A scuttle hole is a basic overhead hatch used to access unconditioned attic spaces. To build or expand one safely:
Step 1: Locate a spot between two ceiling joists, ensuring there is no hidden electrical wiring or plumbing overhead.
Step 2: Cut a rough opening matching standard dimensions—typically 22 inches by 30 inches to meet minimum IRC code requirements.
Step 3: Install a wooden header frame between the cut joists to maintain structural stability.
Step 4: Finish the opening with casing trim and cut a piece of matching plywood or MDF for the hatch lid.
Step 5: Crucial SEO/Energy Step: Glue thick rigid foam insulation to the top of the lid and install weatherstripping around the frame rim to eliminate energy-wasting draft leaks.
Cost to Convert an Attic
The national average cost to convert an attic into a finished room ranges from $30,000 to $70,000, depending on your existing roof structure and material choices.
Project Conversion Cost Assessment
Average Cost Range: $15,000 – $25,000
Primary Cost Drivers: Flooring, drywall, paint, lighting
Average Cost Range: $35,000 – $55,000
Primary Cost Drivers: Staircase installation, framing modifications
Average Cost Range: $60,000 – $90,000+
Primary Cost Drivers: Plumbing tie-ins, high-end fixtures, HVAC zoning
Does Finishing an Attic Add Home Value?
Finishing an attic adds significant market value, yielding an average return on investment (ROI) of 53% to 65% according to historical data from Remodeling Magazine’s Cost vs. Value Report. Beyond the immediate monetary equity, converting this unused space into a bedroom, home office, or guest suite increases your home’s official usable square footage. This makes your property highly competitive and attractive to modern home buyers who prioritize multi-generational living spaces.
Why Don't More Homes Have Enough Attic Insulation?
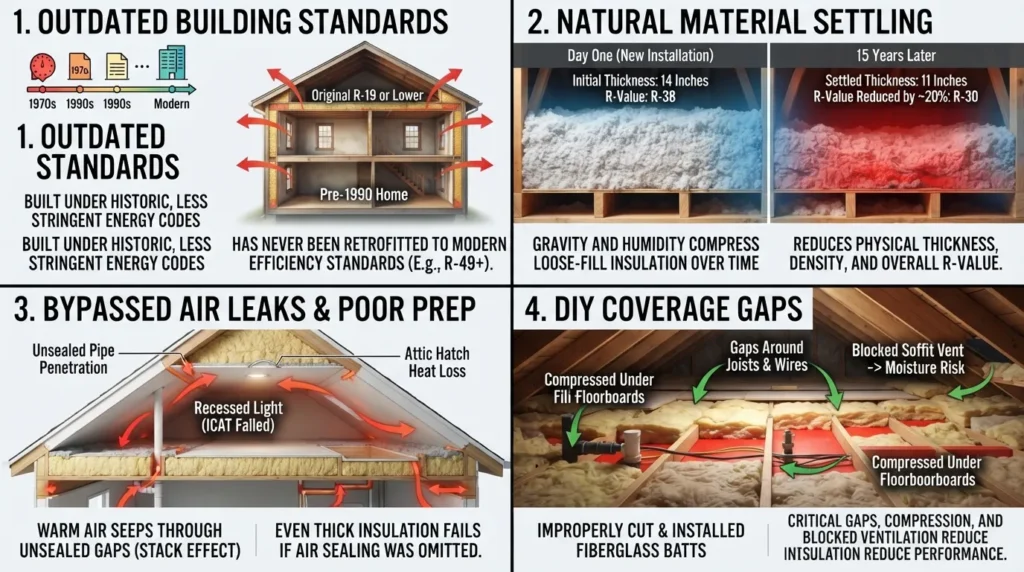
Most homes lack sufficient attic insulation because builders frequently install only the minimum code requirements at the time of construction to cut upfront costs. Over time, older insulation materials naturally settle, degrade, or suffer compressed structural volume from pests and foot traffic, drastically reducing their original thermal resistance. According to the North American Insulation Manufacturers Association (NAIMA), roughly 90% of existing single-family homes in the U.S. are under-insulated, leading to unnecessary energy waste and high utility bills.
Common Reasons Homes Are Under-Insulated
Beyond original builder shortcuts, several recurring issues prevent homeowners from maintaining proper thermal barriers:
The “Out of Sight, Out of Mind” Reality: Unlike a leaking roof or a broken furnace, low insulation levels do not present immediate visual emergencies, causing homeowners to overlook attic spaces for decades.
Outdated Building Codes: A home built in the 1990s was likely insulated to an R-value of R-19 or R-30. Current Department of Energy guidelines now recommend up to R-60 for optimal efficiency in northern climates.
Material Degradation: Traditional fiberglass batts and loose-fill cellulose settle naturally over a 15-to-20-year period, losing significant pockets of trapped air that provide actual thermal resistance.
Unprofessional DIY Work: Many homeowners add extra layers over old insulation without addressing hidden air leaks, completely bypassing vital air-sealing steps around pipes and light fixtures.
How to Check Your Current Insulation Level (DIY Inspection)
You can easily evaluate your attic’s insulation sufficiency with a quick visual inspection using a standard tape measure. Grab a flashlight, safely access your attic, and use the criteria below to judge your current levels:
Insulation Level Observation
Measured Depth: Less than 7 inches (18 cm)
Estimated R-Value: R-19 or lower
Action Required: Critical: Major under-insulation. Immediate top-up needed.
Measured Depth: 7 to 11 inches (18 to 28 cm)
Estimated R-Value: R-22 to R-30
Action Required: Moderate: Below current standard recommendations.
Measured Depth: 12 to 19 inches (30 to 48 cm)
Estimated R-Value: R-38 to R-60
Action Required: Optimal: High efficiency. No immediate action required.
Visual Guide: Attic Insulation Zones & Depth Charts
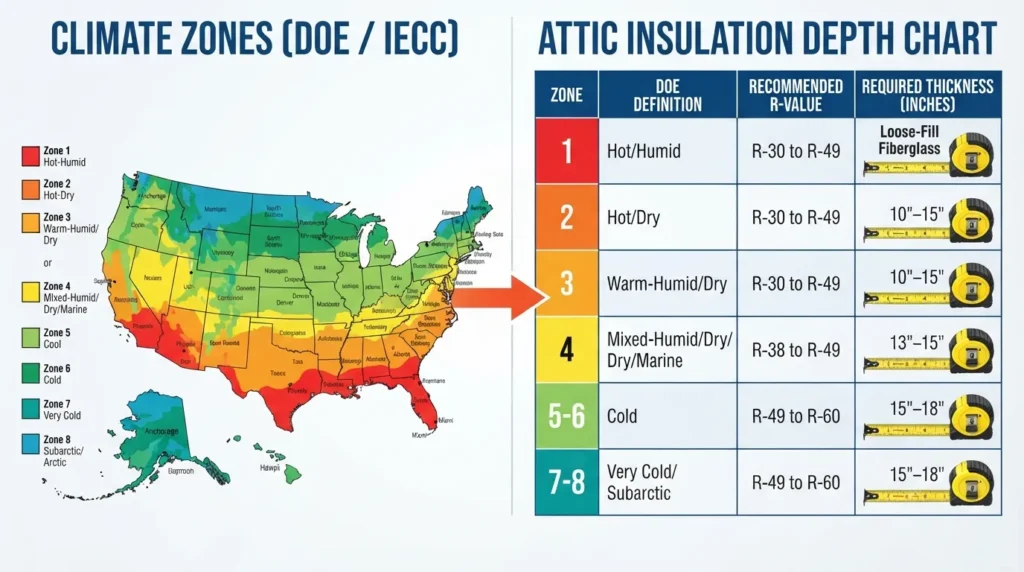
To achieve maximum energy efficiency, your home’s attic insulation must match your specific geographic climate zone and be installed to the correct physical thickness. According to the U.S. Department of Energy, installing the proper depth of insulation can lower your heating and cooling costs by an average of 15%.
Below is the definitive visual breakdown of regional insulation requirements and material thickness targets required to optimize your home.
Do You Have Enough Insulation? (Video Guide)
Before reviewing the charts below, watch this step-by-step video to learn how to quickly measure your current attic insulation levels using a standard tape measure:
🎥 VIDEO EMBED POINT: Insert “How to Measure Attic Insulation Depth & Check R-Value” YouTube Video Here
U.S. Climate Zones & Recommended R-Values
The insulation capacity of a material is measured by its R-value—its resistance to heat flow. Higher numbers mean better insulating power. Find your region on the map below to determine your target attic R-value:
📊 INFOGRAPHIC EMBED POINT 1: Insert U.S. Map Color-Coded by Climate Zones 1 through 7 Here
Recommended Attic Insulation by Climate Zone
Geographic Region: Tip of Florida, Hawaii, Puerto Rico
Recommended R-Value: R-30 to R-49
Geographic Region: Coastal Texas, Florida, Southern Georgia
Recommended R-Value: R-30 to R-60
Geographic Region: American Southwest, Deep South, Carolinas
Recommended R-Value: R-30 to R-60
Geographic Region: Mid-Atlantic, Lower Midwest, Pacific Northwest
Recommended R-Value: R-38 to R-60
Geographic Region: Northeast, Upper Midwest, Northern Plains, Alaska
Recommended R-Value: R-49 to R-60
Insulation Material Thickness Comparison Chart
R-value is directly tied to the total thickness (in inches) of the material installed. If your attic floor joists are visible, your insulation is likely below R-19 and needs an upgrade.
Use this visual breakdown to see exactly how many inches of material you need to reach standard performance targets:
📊 INFOGRAPHIC EMBED POINT 2: Insert Side-by-Side Comparison Profile of Fiberglass vs. Cellulose vs. Spray Foam Thickness Here
Fiberglass Blown-In (R-2.2 to R-2.7 per inch): Requires a depth of 14 to 18 inches to achieve a northern standard of R-49.
Cellulose Blown-In (R-3.2 to R-3.8 per inch): Requires a depth of 13 to 15 inches to achieve R-49.
Fiberglass Batts / Rolls (R-2.9 to R-3.8 per inch): Requires a depth of 13 to 17 inches to achieve R-49.
Open-Cell Spray Foam (R-3.5 to R-3.8 per inch): Requires a depth of 13 to 14 inches to achieve R-49.
Closed-Cell Spray Foam (R-6.0 to R-7.0 per inch): Requires a depth of only 7 to 8 inches to achieve R-49 due to its high density.
Frequently Asked Questions
1. What is the recommended R-value for attic insulation?
The ideal attic R-value depends entirely on your location. The U.S. Department of Energy recommends a rating between R-30 and R-49 for warm southern climates, while cold northern regions require a higher rating between R-49 and R-60 to maximize thermal efficiency.
2. How many inches of attic insulation do I need?
To meet the standard R-49 requirement, you need approximately 14 to 18 inches of blown-in fiberglass, 13 to 15 inches of blown-in cellulose, or 7 to 8 inches of high-density closed-cell spray foam. If you can see your floor joists, your depth is insufficient.
3. What are the signs of poor attic ventilation?
The most common warning signs include fluctuating indoor temperatures, ice dams during winter, rusted roof nails, mold growth on rafters, or sagging roof decking. Additionally, a sudden spike in your monthly heating and cooling bills often points directly to compromised airflow.
4. Can you have too much insulation in an attic?
Yes, over-insulating can be detrimental if it covers your soffit or fascia vents. Blocking these essential intake pathways restricts air circulation, which traps moisture, bakes your roof shingles during summer heat, and creates a breeding ground for wood rot and mold.
5. Does attic insulation help reduce energy bills?
Upgrading your attic insulation can reduce your annual heating and cooling expenses by an average of 15%, according to the U.S. Department of Energy. It acts as a protective barrier that prevents conditioned air from escaping your primary living spaces.
6. Is cellulose or fiberglass better for attic insulation?
Cellulose offers a higher R-value per inch (R-3.2 to R-3.8) compared to standard blown-in fiberglass (R-2.2 to R-2.7) and resists air movement better. However, fiberglass is naturally non-combustible and maintains superior moisture resistance in high-humidity environments.
7. How often should attic insulation be replaced?
High-quality attic insulation generally lasts between 20 to 30 years under optimal conditions. However, you should inspect and replace it immediately if it becomes compressed, water-damaged by roof leaks, or disturbed by household pests and wildlife.
8. What is the difference between insulation and ventilation?
Insulation traps conditioned air inside your home to resist heat transfer, while ventilation continuously circulates fresh outdoor air through the attic space to control moisture and balance temperatures. Both systems must operate together to preserve your roof’s structural integrity.
9. What causes ice dams on a roof?
Ice dams occur when poor attic ventilation allows warm air to rise and melt snow on the upper sections of your roof. The runoff water flows down to the cold, uninsulated eaves, refreezes into ice, and forces water upward under your shingles.
10. Does a family create water vapor in an attic?
A typical family of four generates roughly 2 to 4 gallons of water vapor every day from cooking, bathing, and laundry. Without adequate attic ventilation, this moisture rises, condenses on cold wood framing, and leads to severe structural decay.
11. Can poor ventilation ruin roof shingles?
Extreme under-shingle heat caused by stagnant attic air can bake and blister your roofing materials. This accelerated thermal degradation can shorten the lifespan of your architectural shingles by 10 to 15 years, voiding many manufacturer warranties.
12. How do I calculate my attic's ventilation needs?
The Federal Housing Administration requires a minimum ratio of 1 square foot of net free ventilating area for every 150 square feet of attic floor space. This total area must be split evenly between intake vents and exhaust vents.
13. Should I remove old attic insulation before adding new?
You do not need to remove old insulation unless it is contaminated by mold, animal droppings, or severe water damage. If the existing material is dry and structurally sound, you can safely layer new blown-in insulation directly on top.
Final Verdict — What R-Value Do You Actually Need?
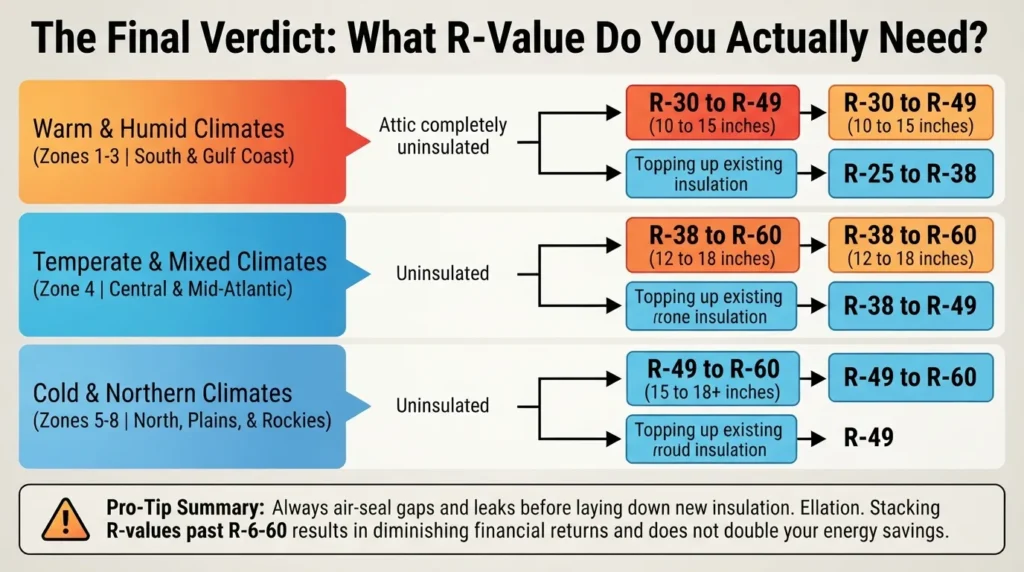
To determine the exact insulation level required for your home, you must balance your local climate requirements with your project budget and long-term energy goals. While minimizing upfront costs is a common priority, investing in the right thermal depth yields the highest return on investment through permanently lowered utility bills.
The table below serves as your definitive decision matrix, combining U.S. climate zones, material costs, and regional efficiency standards to help you select your ideal target.
Insulation Selection Matrix (Zone, Budget & Climate)
Climate Insulation Options & Budget Tiers
U.S. Climate Zones: Zones 1 - 2
Recommended R-Value: R-30
Best Material: Blown-in Fiberglass
Primary Benefit: Minimal upfront cost; stops basic radiant heat transfer.
U.S. Climate Zones: Zones 1 - 2
Recommended R-Value: R-49 to R-60
Best Material: Blown-in Cellulose
Primary Benefit: Maximum radiant heat blockage; lightens heavy summer A/C loads.
U.S. Climate Zones: Zones 3 - 4
Recommended R-Value: R-38
Best Material: Fiberglass Batts
Primary Benefit: Economical DIY option; meets baseline code requirements.
U.S. Climate Zones: Zones 3 - 4
Recommended R-Value: R-49 to R-60
Best Material: Hybrid (Cellulose + Spray Foam)
Primary Benefit: Eliminates hidden air leaks; seals against seasonal humidity swings.
U.S. Climate Zones: Zones 5 - 7
Recommended R-Value: R-49
Best Material: Blown-in Cellulose
Primary Benefit: Cost-effective thickness; highly effective at stopping winter heat loss.
U.S. Climate Zones: Zones 5 - 7
Recommended R-Value: R-60
Best Material: Closed-Cell Spray Foam
Primary Benefit: Maximum performance; provides ultimate protection against ice dams.
If you are working with a tight budget in a mild climate, R-38 is generally the sweet spot for comfort and cost. However, if you live in a region with freezing winters or scorching summers, upgrading to R-49 or R-60 is highly recommended. This optimal depth prevents structural moisture damage, stops ice damming before it starts, and cuts your heating and cooling demands by up to 15%.