Check Plumbing Before Home Renovation: The Ultimate Guide for Homeowners
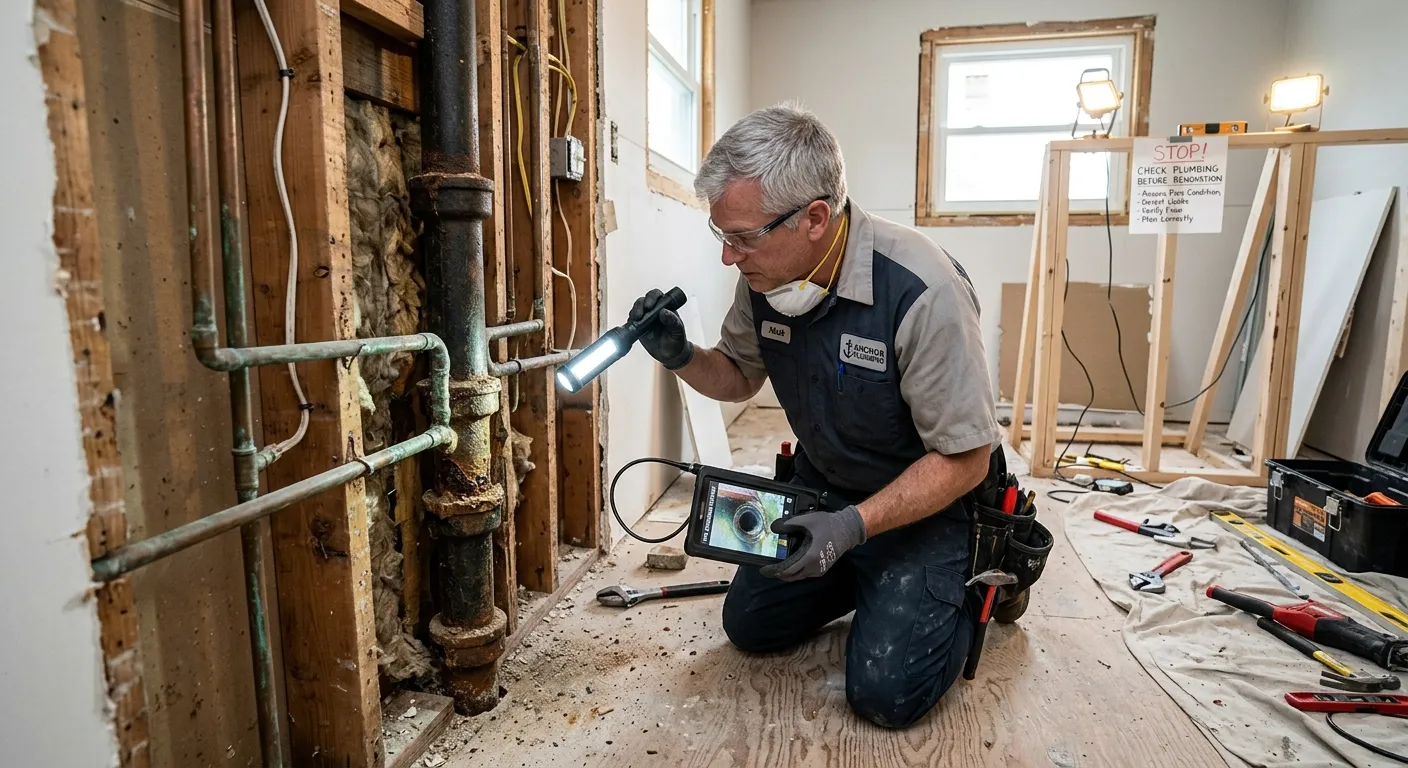
When organizing your overall home improvement strategy through Home Improvement Nest, few milestones match the sheer excitement of launching a kitchen or bathroom remodel. Yet, diving straight into construction without evaluating your underlying plumbing infrastructure invites catastrophic financial risk. Discovering a corroded pipe or silent leak after new drywall, paint, and custom cabinetry are finished turns an exciting upgrade into an absolute disaster.
The Excitement of Remodeling vs. The Reality Behind the Walls
Homeowners naturally focus on visual upgrades, modern color palettes, and luxury fixtures, frequently ignoring the aging pipes hidden out of sight. This surface-level focus leaves critical structural vulnerabilities unaddressed, setting the stage for sudden water failures the moment daily use resumes.
Key infrastructure factors often missed during initial planning include:
Corroded galvanized steel or cast iron lines buckling under increased daily usage.
Undetected micro-leaks silently rotting subflooring and underlying structural studs.
Outdated drain configurations entirely incompatible with high-flow modern fixtures.
Why a Pre-Demo Plumbing Check Isn’t Optional
A rigorous pre-demo plumbing check acts as the ultimate safety net for your entire renovation, ensuring that hidden infrastructure issues are resolved before the hammer swings. Conducting this foundational audit upfront protects your budget and prevents demoralizing project delays.
Ignoring pre-renovation diagnostics exposes you to severe setbacks, including:
Exploding Budgets: Ripping out newly finished tile work to fix an old, burst pipe drains financial resources instantly.
Severe Delays: Unplanned plumbing repairs halt contractor schedules and stall overall construction momentum.
Compromised Investment: Brand-new kitchen and bathroom upgrades cannot perform reliably when built on failing, outdated supply lines.
What Is a Pre-Renovation Plumbing Inspection? (And Why Most Homeowners Skip It)
For foundational insights on home upkeep, exploring dedicated plumbing resources can prevent costly surprises before construction begins. A pre-renovation plumbing inspection is a comprehensive evaluation of your existing water supply lines, drainage networks, and shut-off valves prior to any demolition work. Unlike a standard home purchase check, this targeted assessment specifically determines how your current structural infrastructure will support upgraded layouts, heavy appliances, and modern fixtures.
Defining the Pre-Remodel Plumbing Evaluation
A pre-remodel plumbing evaluation is a systematic diagnostic process that examines the physical condition, flow capacity, and age of your home’s hidden pipes. Professional contractors use visual assessments and pressure diagnostics to map out what lies behind your walls before drywall comes down.
Key elements evaluated during this assessment include:
The structural integrity and material composition of main water supply lines.
The operational readiness and physical location of emergency shut-off valves.
The pitch and diameter of drainage lines to ensure optimal wastewater flow.
The Dangerous Myth: “New Fixtures Fix Old Pipes”
Many homeowners mistakenly believe that installing luxury faucets, high-flow showerheads, or brand-new sinks automatically upgrades the aging plumbing infrastructure behind them. In reality, attaching modern fixtures to deteriorated, corroded lines dramatically increases water pressure stress and accelerates pipe failure.
Core reasons this misconception leads to disaster include:
Legacy pipes (such as old galvanized steel) suffer from internal mineral buildup that high-flow fixtures push to a breaking point.
Increased water demand from modern appliances frequently blows out weak, rusted joints hidden inside walls.
Upgrading surface aesthetics without fixing underlying infrastructure guarantees premature water damage.
Common Renovation Mistakes Involving Plumbing Systems
Overlooking critical mechanical details during a home upgrade leads to severe structural assessment failures and expensive emergency repairs. Avoiding typical renovation mistakes requires understanding how layout changes impact water pressure, venting, and accessibility.
The most frequent plumbing missteps during remodels involve:
Burying Shut-Off Valves: Sealing secondary or main control valves behind permanent drywall, making emergency water shut-off impossible.
Ignoring Pipe Material Mismatch: Joining incompatible metals (like copper and galvanized steel) without dielectric unions, triggering rapid electrochemical corrosion.
Neglecting Vent Stack Capacity: Adding high-capacity bathrooms or kitchens without verifying that existing roof vents can handle the extra air displacement.
The Hidden Dangers of Pipe Age, Corroded Materials, and Silent Leaks
Evaluating Pipe Materials: Galvanized Steel, Cast Iron, and Polybutylene
Legacy pipe materials act as structural liabilities during home renovations. Outdated lines like galvanized steel pipes, aging cast iron, and fragile polybutylene frequently fail under increased operating pressure, destroying freshly finished surfaces if they are not identified and replaced during the pre-demo phase.
Understanding the specific vulnerabilities of each legacy material prevents catastrophic failures:
Galvanized Steel Pipes: These zinc-coated lines suffer from severe interior mineral scale accumulation over decades, drastically reducing water flow and causing sudden joint ruptures.
Cast Iron Drains: Long-term exposure to wastewater and acidic environments causes interior rust scale, leading to structural cracking, root intrusion, and severe blockages.
Polybutylene Systems: Frequently used in past decades, these flexible plastic pipes and their plastic fittings become exceptionally brittle over time, making them prone to sudden, catastrophic splitting.
The Modern Standard (PEX Tubing): Upgrading older infrastructure to cross-linked polyethylene (PEX tubing) provides superior freeze resistance, flexibility, and longevity compared to rigid legacy alternatives.
The Cost of Silent Leaks: Mold, Warped Subflooring, and Rot
Silent water leaks behind drywall or beneath flooring can persist for months undetected, wreaking invisible structural havoc. When continuous moisture feeds aggressive mold growth and rots framing lumber, finishing a remodel without addressing these hazards guarantees structural failure and soaring remediation bills.
Mitigating hidden moisture risks requires recognizing early warning signs before major construction begins:
Subfloor Water Damage: Slow weeping joints soften plywood and hardwood subfloors, causing expensive sagging and structural instability under new flooring installations.
Mold Growth: Undetected leaks create the ideal microclimate for toxic mold propagation within 24 to 48 hours, posing serious indoor air quality and health risks.
Structural Timber Rot: Ongoing pipe corrosion and dripping water degrade wall studs and joists, compromising the foundational load-bearing capacity of the room.
The Essential Plumbing Contingency Budget Rule (15%–20% Buffer)
Smart project planning always accounts for the unexpected by reserving a dedicated financial buffer. Allocating 15% to 20% of your total renovation budget exclusively for underlying plumbing surprises ensures you can replace failing infrastructure without derailing the entire project timeline or forcing compromises on your finishes.
Implementing a strict contingency strategy safeguards your investment against unforeseen structural hurdles:
Financial Risk Mitigation: Having a cash reserve prevents emergency work stoppages when a contractor uncovers severely corroded lines behind a wall.
Whole-System Upgrading: A dedicated buffer makes it financially viable to upgrade problematic branch lines proactively rather than patching over old infrastructure.
Eliminating Stress: Knowing your budget absorbs potential plumbing liabilities allows you to approach your home upgrade with absolute confidence.
Room-by-Room Pre-Demo Risk Matrix: Kitchens vs. Bathrooms
Kitchen Remodel Hazards: Grease Traps, Dishwasher Drainage, and Gas Line Sizing
Kitchen remodeling projects present distinct hidden hazards that extend far beyond simple cabinet updates. Failing to verify grease management capacity, high-demand dishwasher discharge connections, and proper gas line sizing before demolition can cause severe drainage clogs, code violations, and appliance performance failures right after your renovation is complete.
Addressing these critical kitchen infrastructure points before construction starts protects your investment:
Grease Management: High-volume cooking demands robust grease trap solutions to prevent thick fat buildup from choking narrow main waste branches.
Dishwasher Drainage: Modern high-efficiency dishwashers require dedicated air gaps or high loop configurations to prevent dirty wastewater from backflowing into the unit.
Gas Line Sizing: Upgrading to a professional-grade commercial cooktop or range requires verifying that existing black iron gas pipes can deliver sufficient British Thermal Unit (BTU) volume.
Bathroom Upgrade Risks: Toilet Flanges, Shower Pan Slopes, and Drain Fall Requirements
A bathroom upgrade demands precise structural alignment to prevent chronic leaks and slow drainage. Verifying subfloor toilet flange height, structural shower pan slopes, and proper horizontal drain-line slope ensures wastewater flows freely and waterproofing failures do not ruin your newly tiled floors.
Evaluating specific bathroom vulnerabilities avoids costly post-installation tear-outs:
Toilet Flanges: Setting a new tile or hardwood floor alters finished floor height, requiring adjustable or shimmed toilet flanges to prevent hidden base leaks.
Shower Pan Slopes: Building code mandates a precise drain-line slope and pan grade (typically one-quarter inch per foot) to prevent standing water and tile degradation.
Drain Fall Requirements: Moving a vanity or bathtub requires calculating exact drain-line slope percentages; inadequate fall causes continuous clogs and foul odors.
Verifying Layout Compatibility and Water Heater Capacity
Expanding your living space or adding luxury plumbing features directly impacts your home’s total utility load. Evaluating layout compatibility and existing water heater capacity prior to construction prevents frustrating low water pressure and ensures your water heating system can supply multiple high-flow fixtures simultaneously.
Ensuring systemic harmony across your home layout involves critical evaluations:
Water Heater Capacity: Traditional tank and modern tankless systems must be evaluated to ensure hot water supply matches the higher demands of expanded master baths or multi-head shower systems.
Layout Compatibility: Relocating major wet rooms far from the main vertical stack introduces venting friction and heavy structural framing cuts that require professional engineering sign-off.
Flow Rate Balances: Adding heavy-draw fixtures to older branch lines can starve existing appliances of adequate pressure, ruining overall household water performance.
Advanced Diagnostic Tools: How Pros Test Plumbing Before Construction
Video Camera Line Inspections: Seeing Beneath the Slab
Professional video camera inspections eliminate guesswork by threading high-definition waterproof scopes through your main sewer line to visually identify cracks, root intrusions, and hidden offsets before remodeling begins. Threading a specialized fiber-optic camera through cleanouts reveals the exact interior condition of underground pipes. This proactive diagnostic prevents catastrophic slab leaks and expensive post-demo sewer failures.
Key diagnostic benefits of camera line scoping include:
Tree Root Intrusion: Spotting aggressive root networks cracking old clay or cast-iron lines underground.
Pipe Offset Detection: Locating shifted joints that cause chronic backups and slow drainage.
Slab Leak Identification: Pinpointing precise structural breaks beneath concrete foundations prior to flooring installation.
Hydrostatic Pressure Testing to Catch Micro-Leaks
Hydrostatic pressure testing isolates your water supply and drain systems to measure pressure retention, ensuring hidden pinhole leaks or failing pipe joints are exposed and repaired before new construction seals them away. Plumbers plug system access points and pressurize the lines with water or air to monitor gauge stability. Any pressure drop indicates an underlying breach that demands immediate attention.
Critical advantages of hydrostatic testing involve:
Supply Line Isolation: Pressurizing hot and cold lines to catch slow weeping fittings behind finished walls.
DWV System Testing: Filling drain, waste, and vent stacks to verify that vertical and horizontal joints hold water perfectly.
Preventing Structural Ruptures: Eliminating high-pressure blowouts that would otherwise destroy newly installed custom cabinetry.
Thermal Imaging for Hidden Moisture Behind Walls
Advanced infrared thermal imaging detects invisible temperature variations behind finished surfaces, allowing specialists to map active moisture pockets, hidden pipe leaks, and insulation gaps without tearing down drywall. Infrared cameras translate surface heat differentials into distinct color maps. This non-invasive diagnostic technique uncovers long-standing leaks that standard visual checks completely miss.
Core applications of thermal moisture scanning include:
Non-Invasive Scans: Scanning entire room perimeters instantly without causing aesthetic damage to existing walls.
Moisture Mapping: Identifying active saturation zones that foster hidden mold colonies and wood rot.
Pre-Demo Verification: Confirming that target renovation zones are completely dry and structurally sound before remodeling commences.
DIY Visual Check vs. Professional Audit: Drawing the Line
What Homeowners Can Safely Check Today (Valves, Faucets, and Meter Dials)
Homeowners can perform an effective visual plumbing check right now using basic tests like monitoring water meter dials and verifying main shut-off valve operation. These simple, non-invasive steps isolate household water flow, detect silent leaks, and establish a clear baseline before any construction begins.
Executing a thorough initial homeowner audit involves specific, practical steps:
The Water Meter Test: Turn off all indoor and outdoor faucets, then check the low-flow indicator dial on your water meter. If the needle or gear is moving, an active leak exists somewhere in the system.
Shut-Off Valve Inspection: Locate and manually test your main water shut-off valve to ensure it turns completely and stops flow instantly.
Fixture Supply Checks: Examine the flexible supply lines beneath kitchen and bathroom sinks for signs of green corrosion, rust spots, or damp mineral deposits.
When to Hire a Licensed Plumber with Specialized Scopes
Bringing in a licensed contractor is essential when pre-demo evaluations reveal legacy pipe materials, sluggish main drains, or unexplained pressure drops. Specialized diagnostic equipment and advanced inspection protocols require certified professional expertise to accurately interpret complex sub-slab vulnerabilities.
Knowing when to transition from DIY oversight to professional intervention prevents catastrophic oversights:
Outdated Infrastructure: Homes built decades ago using polybutylene or galvanized steel require professional assessment before adding modern high-flow fixtures.
Main Drain Anomalies: Slow drains, gurgling toilets, or sewer odors indicate mainline blockages that demand a professional video camera inspection.
Persistent Pressure Drops: Unexplained loss of water pressure requires hydrostatic pressure testing equipment that only licensed professionals operate.
Questions to Ask Your Contractor Before Demolition Begins
Protecting your renovation budget requires establishing a strict inspection protocol and asking precise technical questions before any demolition hammer swings. Direct dialogue with your lead builder ensures all hidden plumbing liabilities are fully documented and accounted for in the contract.
Essential questions to include in your pre-demo checklist consist of:
Infrastructure Assessment: Have you inspected and verified the condition of the branch supply and waste lines hidden behind the target demolition walls?
Contingency Planning: Does the project estimate include a financial and timeline buffer for updating non-compliant or aged piping discovered mid-project?
Code Compliance: Will all modified supply and drainage configurations meet current municipal building codes and secure proper local permits?
Conclusion & The Ultimate Pre-Remodel Plumbing Checklist
Safeguarding your home renovation investment begins with a thorough pre-renovation checklist before any demolition starts. Evaluating aging pipes, hidden leaks, and layout compatibility early ensures your beautiful new kitchen or bathroom remains fully protected against unexpected water disasters and costly structural damage.
Summary: Protect Your Investment Before the Hammer Swings
Committing to a comprehensive plumbing audit summary before swinging a hammer eliminates the financial panic of mid-project pipe failures. Taking proactive steps today ensures that your hard-earned remodeling budget is spent on luxury finishes rather than emergency structural repairs, guaranteeing ultimate remodel protection.
Key takeaways for securing your project include:
Budget Integrity: Allocating a clear contingency buffer prevents unexpected infrastructure failures from halting construction momentum.
Long-Term Confidence: Replacing compromised legacy pipes guarantees your brand-new fixtures perform reliably for decades.
Stress-Free Remodeling: Transforming hidden liabilities into managed assets gives you absolute peace of mind throughout construction.
Your Quick-Reference Pre-Renovation Plumbing Action Checklist
Executing a systematic final review of your home’s water supply and drainage systems guarantees zero hidden surprises once construction begins. Use this definitive pre-renovation checklist to verify every critical plumbing element before your contractor steps on-site.
Follow these essential verification steps before construction starts:
Conduct the Meter Test: Shut off all household water sources and verify that your main water meter dial remains completely stationary to rule out hidden leaks.
Test Main Shut-Off Valves: Locate and manually operate your primary water shut-off valve to ensure instant emergency response capability when needed.
Inspect Exposed Piping: Check visible supply lines and drain connections beneath sinks for signs of rust, green corrosion, or slow weeping.
Schedule Professional Diagnostics: Hire a licensed plumber for video camera line scoping and hydrostatic pressure tests if your home features legacy pipe materials.
Verify Layout & Capacity: Confirm that your water heater capacity and drain-line slope fully support your new kitchen or bathroom appliance loads.