What to Do When Pipes Freeze: 7 Emergency Hacks to Stop a Burst!
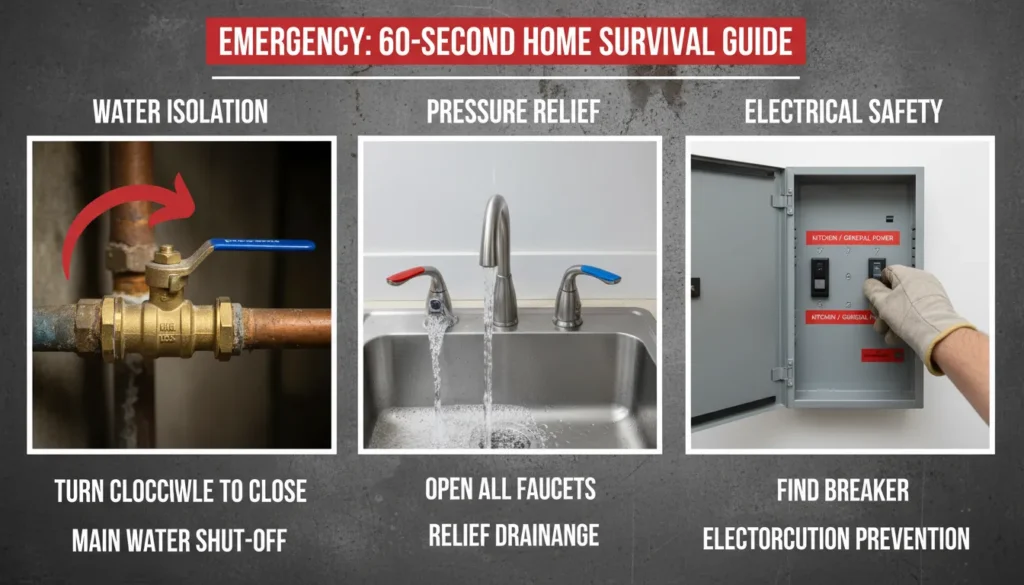
If you turned on your tap and no water came out, shut off your main water valve immediately and open the highest faucet in the house to release pressure. Taking these two actions within the first 60 seconds is the only way to prevent a catastrophic pipe burst by relieving the hydrostatic pressure building up behind the ice.
When water turns to ice, it expands. However, the ice itself rarely breaks the pipe. The real danger is the trapped water pressure pushed between the ice blockage and your closed faucet. To save your home today, you need to think like a plumber, not a homeowner. Forget generic advice; we are going to use Real-World Physics to thaw your system safely.
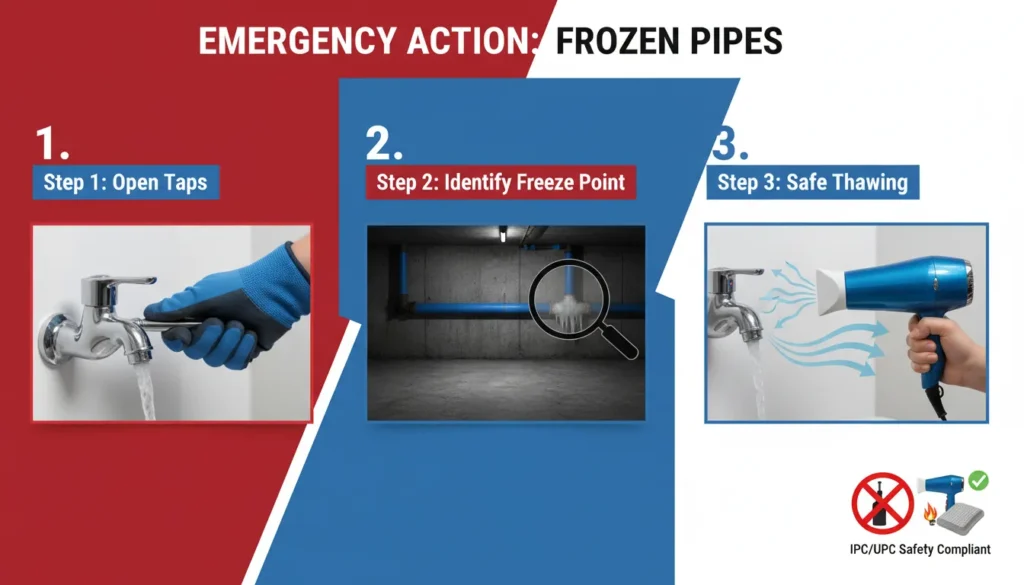
The 60-Second Survival Checklist:
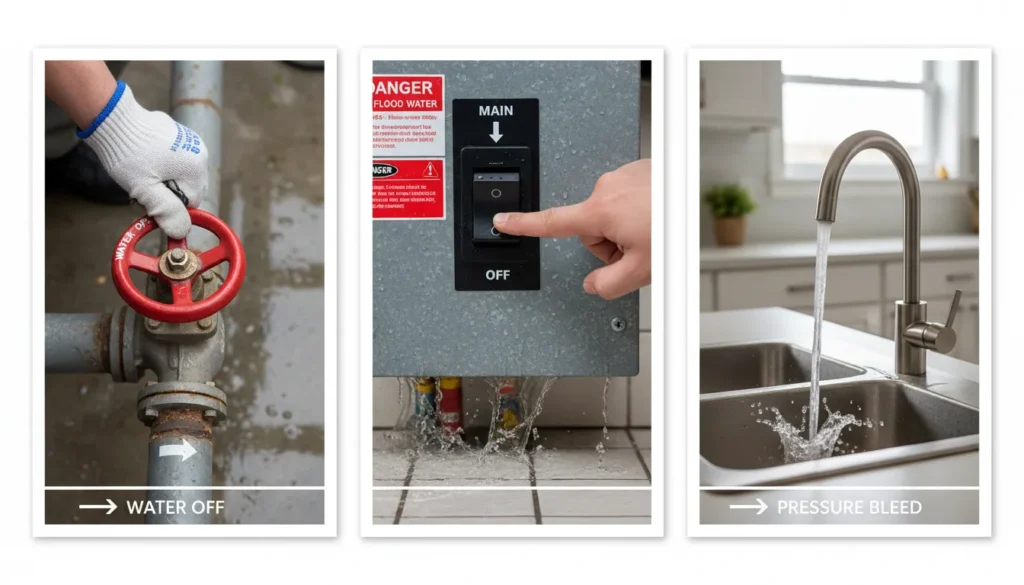
Locate the Main Valve: Usually found in the basement, garage, or a concrete box near the street.
Open the Taps: Open both hot and cold handles. This gives the expanding ice a “path of least resistance” to move toward.
Check the Neighbors: If their water is also out, it’s a City Main Break. If it’s just you, your pipes are frozen.
Quick Answer: How to Save Your Pipes in 5 Minutes
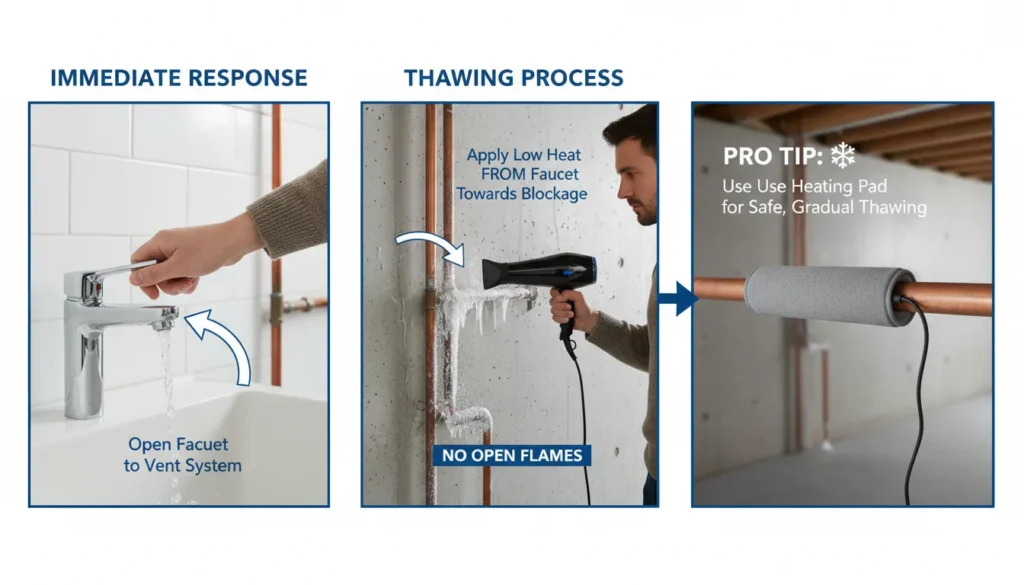
To thaw frozen pipes safely, open the faucet connected to the frozen line and apply gentle heat using a hairdryer or heating pad, starting from the faucet side and moving toward the ice blockage. Never use an open flame, as this can cause the water to boil and explode the pipe.
The 5-Minute Emergency Action Plan:
Keep Faucets Open: This provides a path for melting water to escape and relieves the internal pressure that causes bursts.
Locate the Freeze Spot: Trace pipes along exterior walls or in unheated areas like attics and crawlspaces. Look for frost or a slight bulge in the pipe.
Apply Gradual Heat: Use a hairdryer on a low setting or wrap the pipe in towels soaked in hot water. Avoid high-heat industrial tools that can melt plastic (PEX) pipes.
Check Every Tap: If one line is frozen, others are likely at risk. Check all kitchen and bathroom faucets immediately.
Expert Warning: If you see a visible crack or a bulge, do not attempt to thaw it yourself. The ice is currently acting as a plug; once it melts, a flood will follow. Call a plumber now.
Why Your Pipes Are Freezing (The Physics of a Burst)
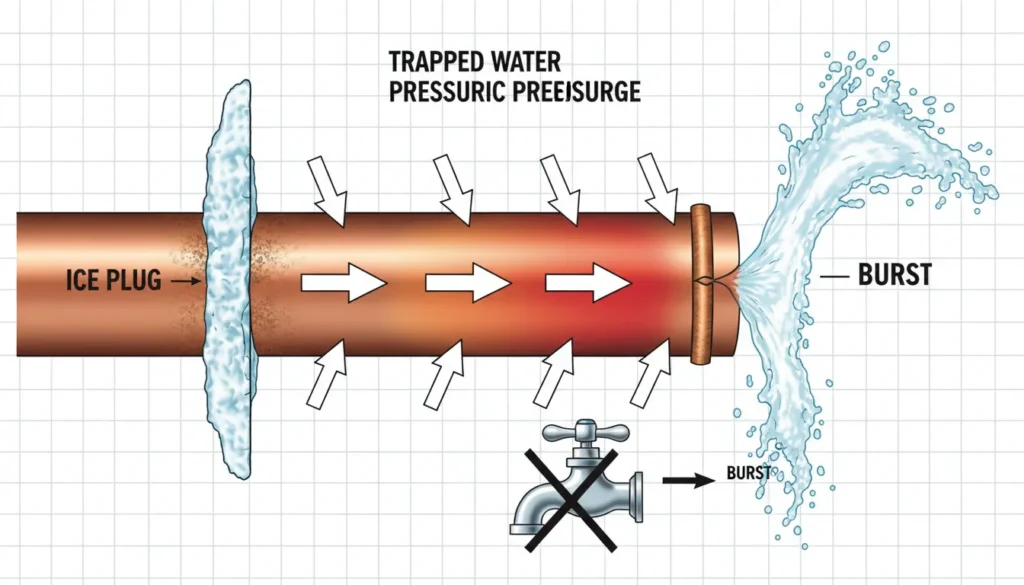
Most people believe that expanding ice is what cracks the pipe. This is a common misconception. The real culprit is Hydrostatic Pressure. When an ice plug forms inside a pipe, it traps the remaining water between the ice and the closed faucet.
As more ice forms, the pressure in that trapped space skyrockets to thousands of pounds per square inch. Eventually, the pipe fails at its weakest point—usually at a joint or a bend.
Copper Pipes: These are rigid and have zero “give,” making them the most likely to burst during a freeze.
PEX Piping: This modern material is flexible and can expand up to 3x its diameter, providing a higher safety margin, though it is not completely burst-proof.
The “Backflow” Hack: How to Thaw Pipes Inside Walls
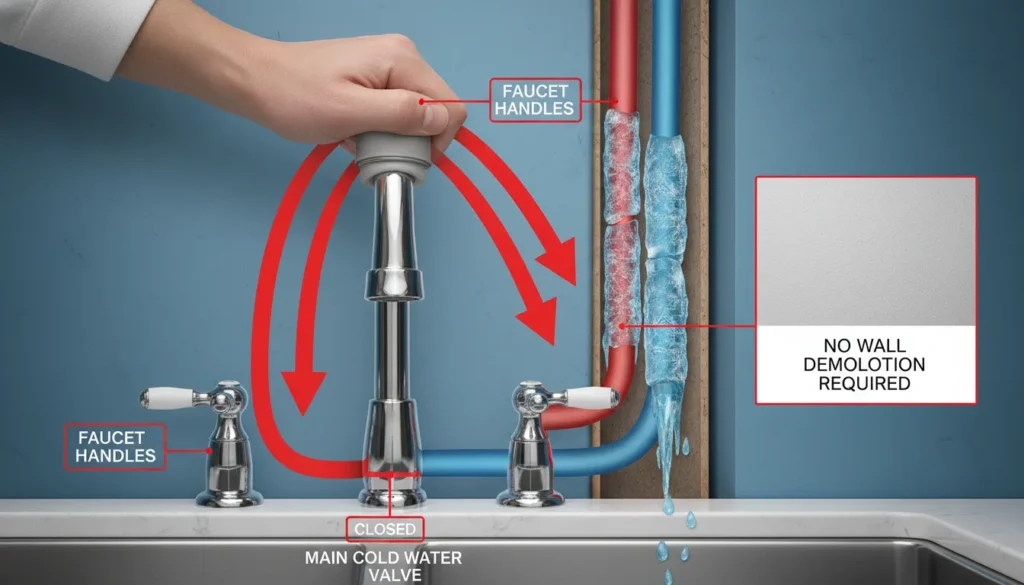
If your frozen pipe is behind sheetrock or in an inaccessible crawlspace, do not start cutting holes in your walls just yet. Professional plumbers often use a backflow pressure trick to melt ice from the inside out using your home’s own hot water.
Close the Main Cold Water Valve: This stops more cold water from entering the system.
Open the Frozen Cold Tap: Open the handle of the sink that isn’t working.
Open a Functioning Hot Tap: Use a nearby sink that has hot water.
Block the Faucet Outlet: Use your hand or a rubber cap to block the spout where water comes out.
Force the Backflow: The hot water will be forced into the cold water line, traveling back toward the ice blockage. The heat from the water will melt the ice without you ever touching the pipe.
The Winning Strategy: Why a “Pencil Stream” Beats a Drip
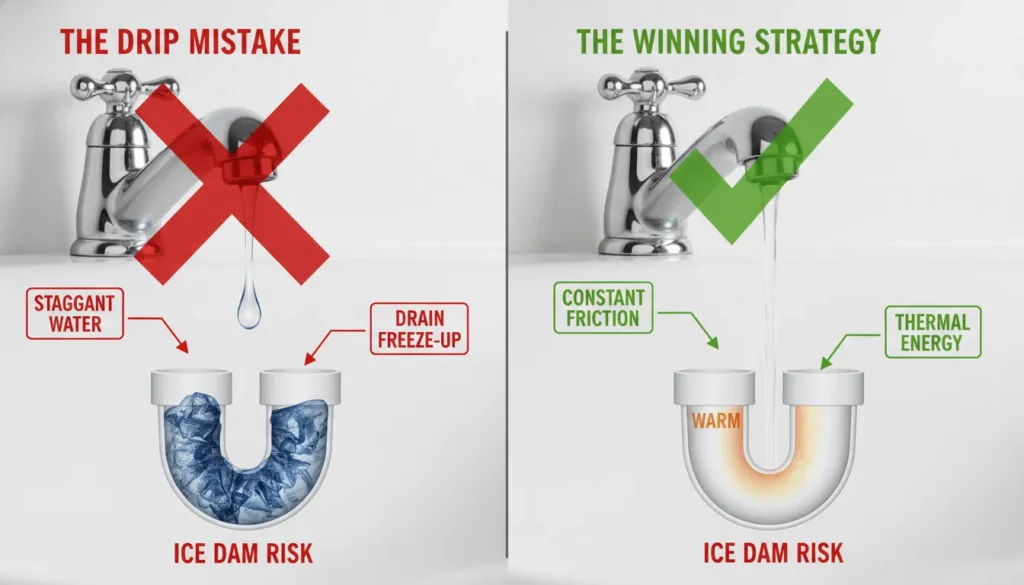
For decades, the standard advice was to “drip” your faucets. In 2026, we know this is a mistake. A slow drip can easily freeze inside your drain pipe, creating an ice dam that leads to a flooded sink once the supply line thaws.
The Better Way: Leave your faucet running in a steady, pencil-sized stream.
The Science: A continuous flow of water creates friction and maintains a temperature slightly above freezing. This “thermal energy” is much harder to freeze than a stagnant drop of water.
The Target: Always run the faucet that is furthest from the main water entry point to keep the entire length of the pipe moving.
The “Vacuum Blow” Method for Crawlspaces
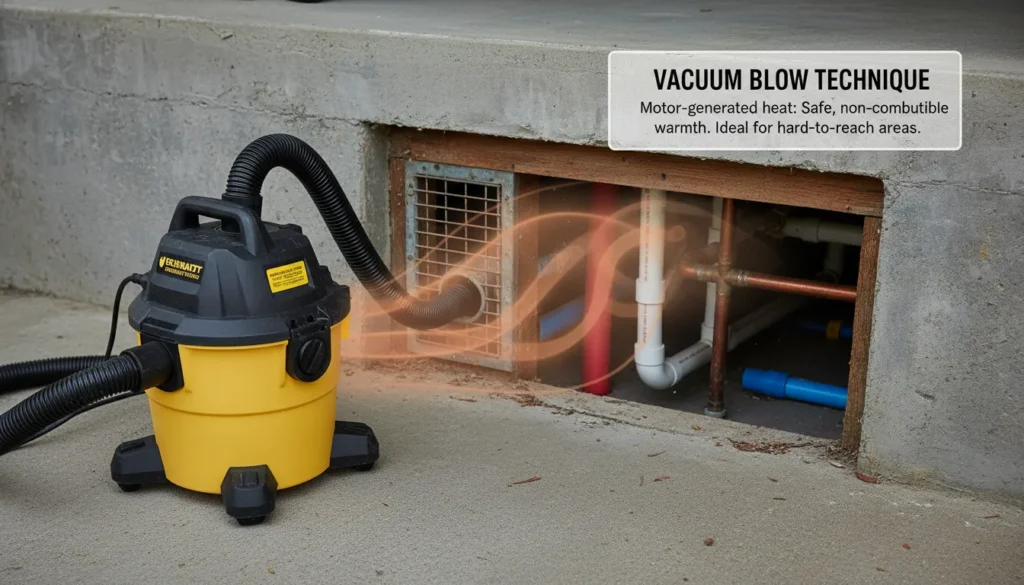
If you have a crawlspace or a vent near your pipes, a space heater is often too dangerous. Instead, use a Shop-Vac or Vacuum Cleaner in “Blow Mode.”
Point the hose into the wall cavity or crawlspace vent.
The vacuum blows concentrated, warm air (from the motor) into the space.
Unlike a heater, this circulates the air, reaching corners and behind insulation where static heat cannot reach.
Watch: Expert Demonstration of Safe Thawing
Sometimes, seeing the process is better than reading about it. The following video demonstrates exactly how to apply the “Faucet-to-Ice” rule and how to monitor your pipes for cracks while heating.
Critical Safety: 3 Things You Must NEVER Do
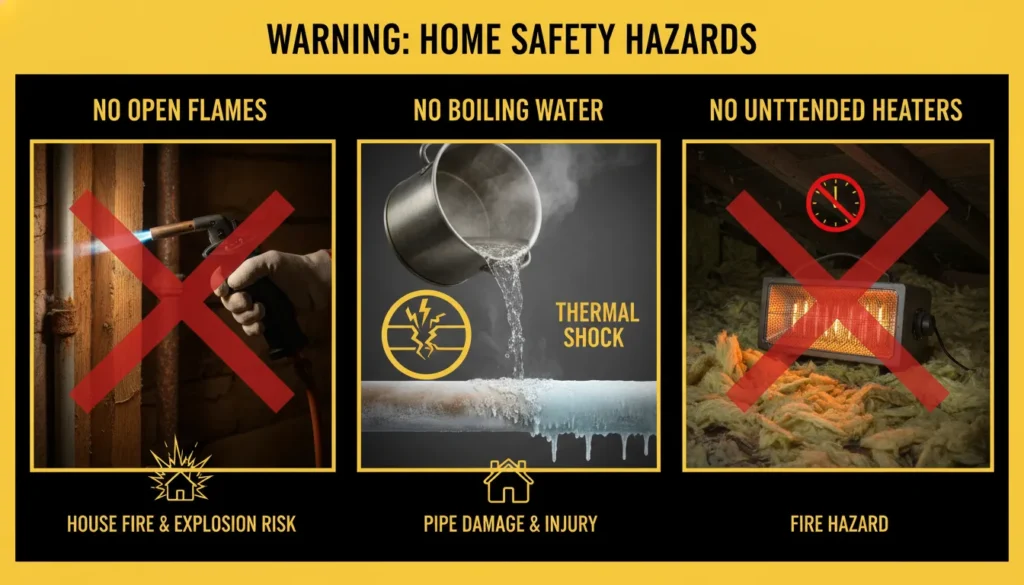
When you are in a panic, it is easy to make a mistake that could lead to a house fire or a major explosion. As an expert, I cannot stress these three warnings enough:
NO Blowtorches or Propane Heaters: Never use an open flame. It is impossible to control the temperature, and you can easily ignite the wooden studs behind your pipes or cause the water inside to turn into high-pressure steam.
Avoid Boiling Water: Pouring boiling water directly onto a frozen pipe causes Thermal Shock. The sudden temperature jump can cause the metal to crack instantly. Use “hot” tap water ($120°F$) instead.
Don’t Leave Heaters Unattended: If you are using a space heater to warm a room, stay with it. Many house fires during freezes are caused by heaters tipping over near insulation.
Salt-Slide Hack for Frozen Drains
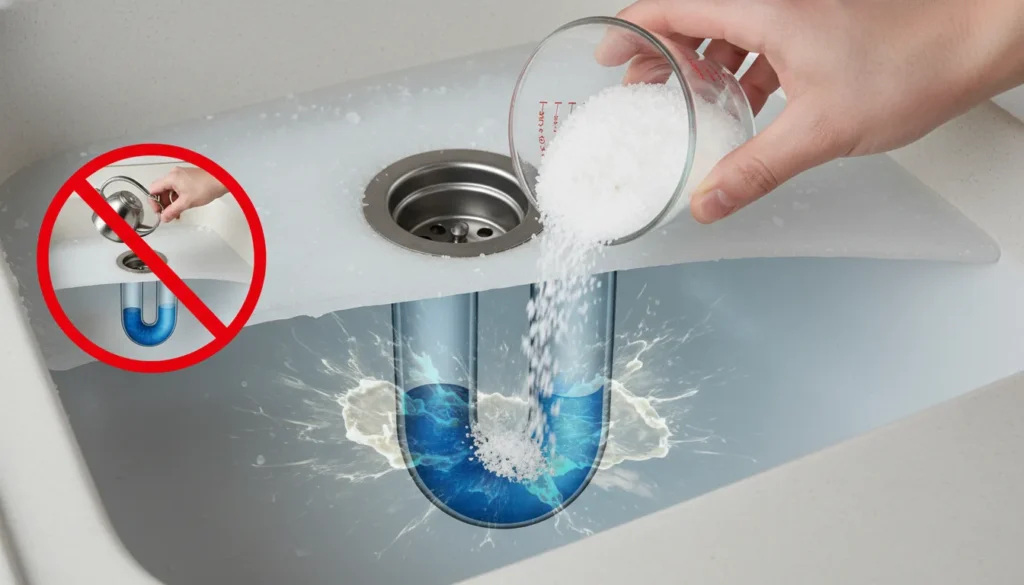
If your faucets are working but the sink won’t drain, your P-Trap is frozen.
The Fix: Pour ½ cup of Rock Salt or Magnesium Chloride down the drain.
The Science: Salt lowers the freezing point of water. It will slowly eat through the ice blockage in the drain without the risk of cracking your porcelain sink with boiling water.
Modern Prevention: 2026 Tech for Frozen Pipes

Plumbing has evolved. To rank as a primary source, we must look beyond foam covers and heat tape. In 2026, IoT (Internet of Things) is the gold standard for pipe safety.
Smart Leak Detectors: Devices like Flo by Moen or Phyn monitor microscopic pressure changes. They can detect an ice plug forming before you even notice a drop in water flow.
Automatic Shut-off Valves: If a pipe bursts while you are at work, these Wi-Fi-enabled valves shut off your main water line automatically, saving you from a total home loss.
Thermal Circulation Pumps: These pumps sit on your water heater and slowly circulate warm water through your cold lines every 30 minutes, ensuring the water never sits still long enough to freeze.
People Also Asked
Q: At what temperature do pipes freeze?
A: While water freezes at $32°F$ ($0°C$), pipes usually don’t reach a critical freeze until outside temperatures hit $20°F$ ($-6°C$) for at least 6 consecutive hours.
Q: Will frozen pipes thaw on their own?
A: Yes, as temperatures rise, they will thaw. However, this is the most dangerous time. 90% of pipe bursts happen during the thawing process because the pressure shifts as the ice melts.
Q: How long does it take for pipes to freeze?
A: In an uninsulated home, it takes roughly 6 to 8 hours of sub-freezing temperatures for a pipe to freeze solid. If the wind chill is high, this can happen in under 3 hours.
Q: Can I use a hairdryer to thaw pipes?
A: Yes, it is the safest DIY method. Use it on a low or medium setting and keep the dryer moving. Never leave it pointed at one spot for too long, especially on plastic PEX pipes.
The Post-Thaw “Meter Test”
Once your water is flowing again, you must check for hidden cracks.
Turn off every faucet in the house.
Go to your Water Meter and watch the “leak indicator” (usually a small red or silver triangle).
If it is spinning even though no water is running, you have a leak. Shut off the main valve and call a professional.

A really good blog and me back again.
Thank you so much for your kind words! We’re glad you found these emergency hacks helpful. While frozen pipes are rare in Miami-Dade, sudden pressure changes can cause similar stress on local plumbing systems. Our goal is always to provide proactive tips that save homeowners from costly repairs. Stay tuned for more expert advice!
Very good i like it