10 Professional Bathtub Plumbing Diagrams: The Only Guide You Need for 2026
Installing or repairing a tub fails without a precise bathtub plumbing diagram to guide your measurements. Most DIY mistakes happen because of incorrect P-trap placement or poor drain slope—errors that lead to slow drainage and costly leaks.
This guide provides 10 expert blueprints based on IPC and UPC standards. Whether you are retrofitting 60-year-old galvanized pipes or installing a modern whirlpool tub, these diagrams ensure your plumbing is leak-proof and code-compliant.
What is the Standard Bathtub Plumbing Layout?
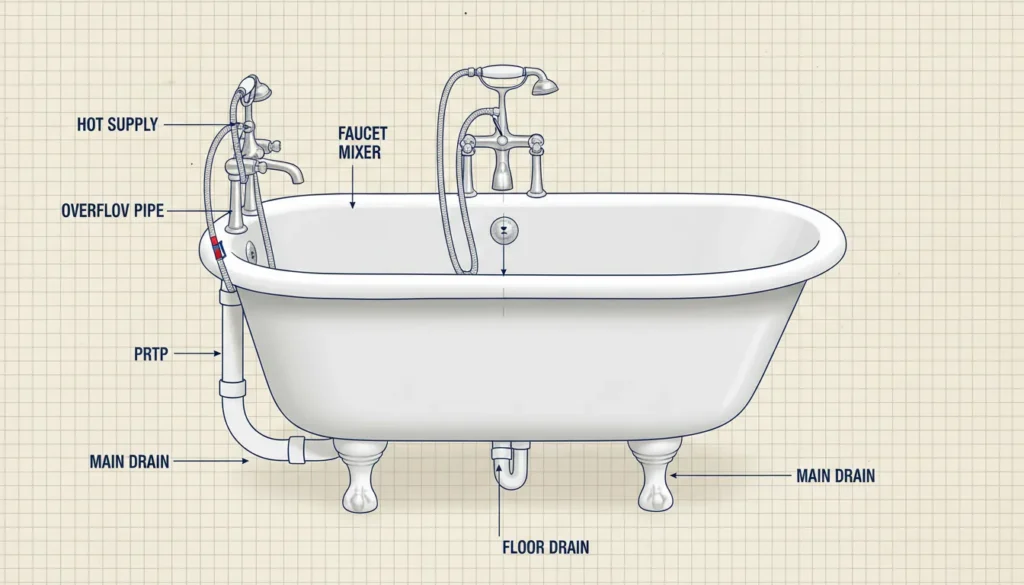
A standard bathtub setup requires a 1.5-inch drain pipe, a P-trap to block sewer gases, and a waste and overflow assembly. To ensure proper flow, the trap arm length should not exceed 6 feet before connecting to the main vent stack.
Key Components in a Pro Diagram:
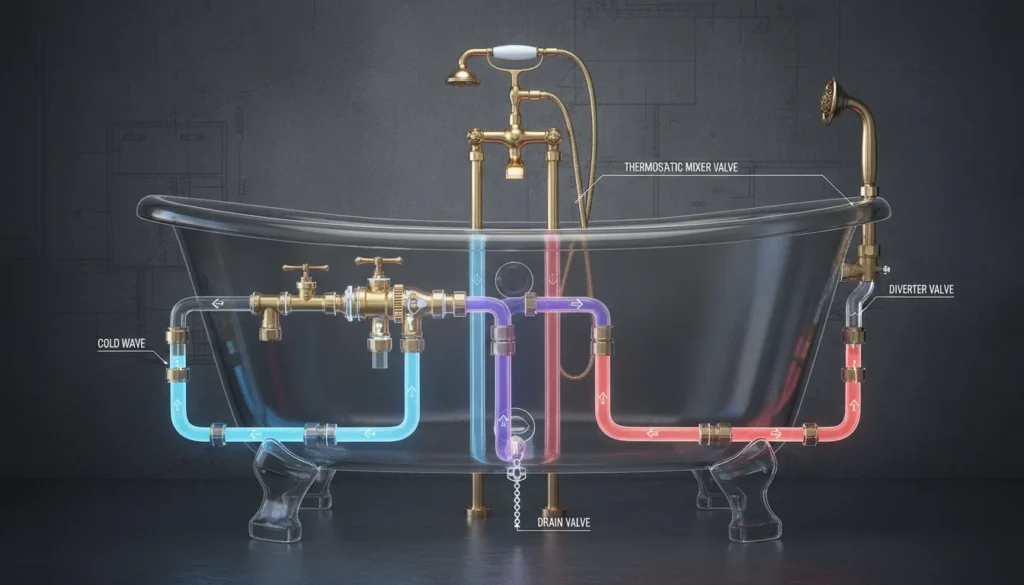
Water Supply Lines: Hot and cold pipes feeding the mixing valve.
Mixing Valve: The heart of the system that controls temperature and flow.
Tub Spout & Diverter: Directs water between the tub and showerhead.
Waste & Overflow: Prevents accidental flooding by redirecting excess water.
P-Trap: Holds a water seal to keep toxic sewer smells out of your home.
The Anatomy of Action: Understanding Your Bathtub Plumbing Diagram
Understanding a bathtub plumbing diagram is about more than identifying parts; it is about mastering water flow. Every component must work in harmony to deliver pressurized water and remove waste without letting sewer gases into your home.
When you flip the trip lever or turn the handle, a mechanical chain reaction occurs inside your walls. If one measurement is off by even half an inch, you risk standing water or a “gurgling” drain.
Key Components and Their Functions
The Mixing Valve: This is where hot and cold water merge. Modern valves include pressure-balancing technology to prevent scalding when someone flushes a toilet elsewhere.
The Trip Lever & Linkage: Located inside the overflow pipe, this rod-and-plunger system opens or seals the drain.
The P-Trap Water Seal: This “U” shaped pipe stays filled with water. This water seal acts as a physical barrier against methane and other dangerous gases.
The Vent Stack: Often called the “plumbing’s lungs,” it provides the air pressure needed to push water down the drain smoothly.
Pro-Expert Tip: Always check your rough-in specification sheet before cutting into the subfloor. Standard tubs usually require the drain hole to be exactly 8 to 12 inches from the side wall, depending on the model.
Master the Rough-in: Exact Bathtub Plumbing Measurements (IPC & UPC Standards)

To pass inspection and ensure a perfect fit, you must follow specific rough-in dimensions. A bathtub plumbing diagram is only useful if the measurements align with your local building codes, such as the IPC (International Plumbing Code).
The “rough-in” refers to the stage where pipes are installed before the walls and floor are closed. If your pipes are off by even an inch, the tub won’t sit level, and the drain flange won’t seal.
Standard Bathtub Rough-in Dimensions
| Feature | Standard Measurement | SEO Logic / Code Requirement |
| Drain Pipe Diameter | 1.5 inches (Min) | Required by UPC for standard tubs. |
| P-Trap Depth | 2 to 4 inches | Maintains the critical water seal. |
| Trap Arm Length | Max 42 to 72 inches | Depends on pipe size (1.5″ vs 2″). |
| Drain Slope | 1/4 inch per foot | Ensures “water flows downhill” properly. |
| Valve Height | 28 to 32 inches | Measured from the finished floor. |
Critical “Code” Rules to Remember
The 2-Inch Rule: If you are installing a high-flow whirlpool tub, many pros recommend upgrading to a 2-inch drain to prevent overflow.
Slope Precision: Never exceed a 1/4 inch per foot slope. If the slope is too steep, the water flows too fast and leaves solids behind, causing clogs.
Access Panel: Always leave a 12″x18″ access panel behind the mixing valve. As seen in our competitor analysis, homeowners without panels often have to rip out kitchen ceilings to fix simple leaks.
How to Plumb a Bathtub: Step-by-Step Installation Secrets
Plumbing a tub is a high-stakes task. If you don’t secure the drain assembly or test the overflow tee correctly, you’ll end up with water damage behind your tiles. Follow this professional sequence used by expert bathtub plumbers.
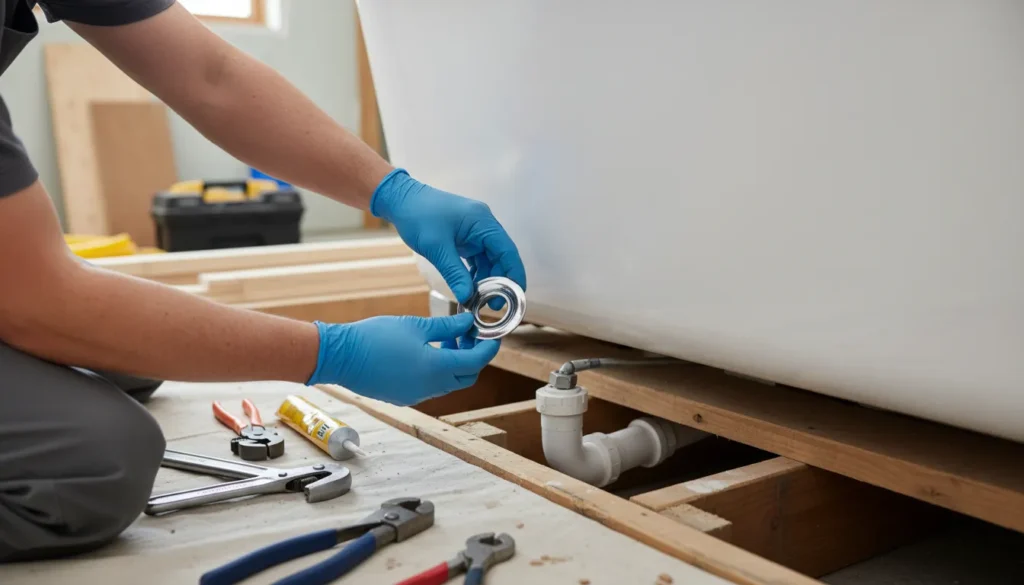
Step 1: Install the Waste and Overflow Kit
Start by dry-fitting your drain flange and overflow plate. Use a generous bead of plumber’s putty under the flange for metal drains, or silicone for plastic/fiberglass tubs.
Pro Tip: Tighten the drain with a tub wrench (dumbell wrench) to prevent cross-threading the thin-walled pipes.
Step 2: Connecting to the P-Trap
Your bathtub plumbing diagram shows the drain horizontal to the P-trap. Ensure the trap is perfectly level.
The Slope Rule: Maintain a 1/4-inch per foot dhalan (slope).
Transition Logic: If connecting old galvanized pipe to new PVC, use a Fernco coupling (rubber shielded hub) for a leak-proof transition.
Step 3: Setting the Mixing Valve
Secure the valve to a 2×4 “stringer” (wooden support) between the studs.
Heat Warning: If soldering copper, remove the plastic internal cartridge first. The heat from your torch will melt the rubber seals, causing a permanent drip.
Step 4: The Leak Test (Crucial)
Before closing the wall, fill the tub to the overflow level. Let it sit for 20 minutes and check the P-trap and sanitary tee connections with a dry tissue. Even a single drop means the joint needs tightening.
Bathtub Plumbing Layout in Action
To help you visualize the “Path of Least Resistance” and avoid common venting mistakes, watch this detailed breakdown of the internal assembly.
Video Guide: Mastering the Drain & Vent Layout
Watch closely at to see how the barrel plunger seals the drain effectively.
Bathtub Plumbing for Tight Spaces: Moving Drains & Avoiding Joists
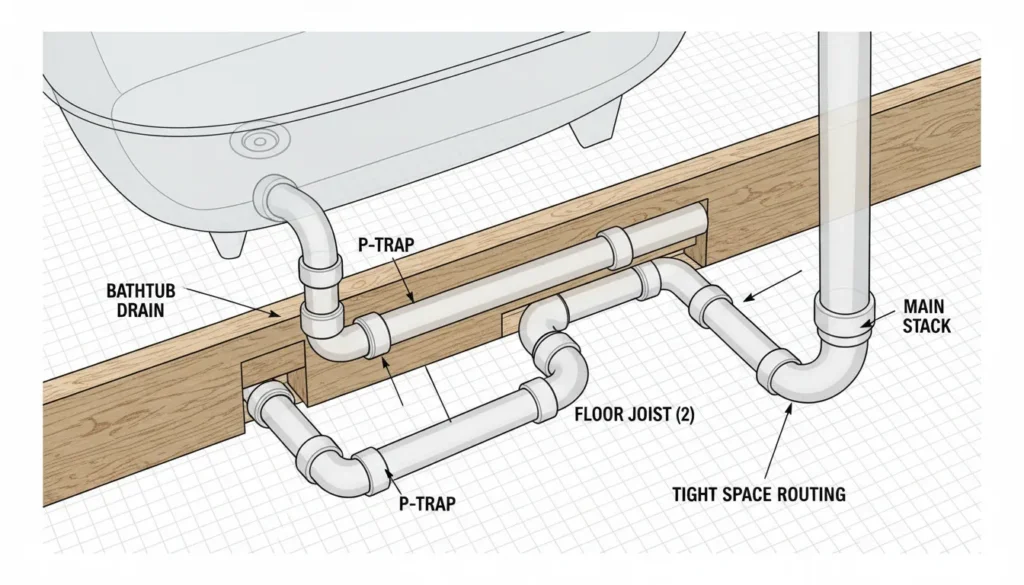
When remodeling, you often find that a floor joist is exactly where your new drain needs to go. This is a common issue in pre-manufactured homes or basement renovations. Instead of cutting through structural wood, you must adapt your bathtub plumbing diagram to navigate these obstacles.
Navigating Obstacles with 45-Degree Elbows
If a joist is in the way, never use a 90-degree turn to bypass it; this creates a high risk for clogs. Instead, use two 45-degree elbows to create an “offset.” This maintains smooth water flow while shifting the pipe to the next available joist cavity.
Modern Venting: The Air Admittance Valve (AAV)
In tight spaces or island tubs where running a vent pipe through the roof is impossible, an Air Admittance Valve (AAV)—often called a Studor Vent—is a lifesaver.
How it works: It allows air into the system to break the vacuum but seals shut to prevent sewer gases from escaping.
Pro Rule: The AAV must be installed at least 4 inches above the trap arm and remain accessible for future replacement.
Whirlpool & Luxury Tub Considerations
Standard diagrams don’t always work for whirlpool tubs. Because these tubs have heavy motors, your plumbing layout must include:
Dedicated Motor Access: You cannot bury the pump behind a finished wall.
Vibration Clearance: Ensure pipes aren’t touching the motor, or you’ll hear a loud rattling noise every time you bathe.
Safety Warning: If you are working in a basement, be aware of Hydrostatic Pressure. Ensure your floor slab is properly sealed around the new “Rough-in” hole to prevent groundwater from seeping up into your bathroom.
Common DIY Mistakes: Why Your Bathtub Drain Still Leaks
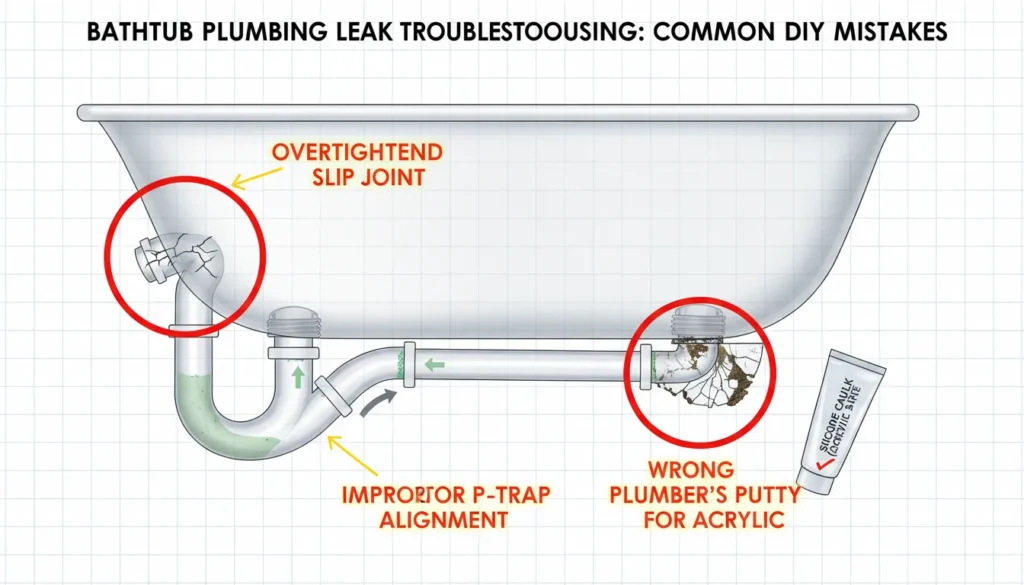
Even with a perfect bathtub plumbing diagram, small errors during installation can lead to major water damage. Many homeowners follow generic advice and end up calling a bathtub plumber to fix expensive mistakes.
Here is what usually goes wrong and how you can avoid it:
1. The “Too Much Slope” Trap
It sounds logical: a steeper pipe should drain faster, right? Wrong. If your drain slope is more than 1/4 inch per foot, the water moves too quickly, leaving hair and soap scum behind. This eventually creates a solid clog that a plunger won’t fix.
2. Using the Wrong Sealant
Plumber’s Putty: Best for metal-to-metal or metal-to-stone connections.
Silicone: Mandatory for plastic, fiberglass, or acrylic tubs. Mistake: Using putty on a plastic tub can actually degrade the material over time, leading to a hairline crack around the drain flange.
3. Overtightening Slip Joints
Most tub plumbing kits use plastic slip-joint nuts. If you tighten these with heavy wrenches, you will crack the plastic or “oval” the pipe. Hand-tight plus a quarter turn with pliers is all you need for a leak-proof seal.
Troubleshooting Your Layout
If you encounter a stubborn clog, the issue might be your vent. Watch how air pressure affects drainage in this expert breakdown:
Video Guide: Why Plunging Fails (Vent Issues)
Fast forward to to see the “Path of Least Resistance” theory explained.
4. Forgetting the Water Seal
If you smell rotten eggs (methane) in your bathroom, your P-trap has lost its water seal. This happens if the vent is blocked or the trap is installed at a weird angle. Always ensure the “U” portion of the trap sits perfectly level to hold water.
Frequently Asked Questions (People Also Asked)
Understanding a bathtub plumbing diagram often leads to specific technical questions. Based on common plumbing challenges and IPC code standards, here are the expert answers you need.
1. Can I use a 1.5-inch drain for a bathtub?
Yes, 1.5-inch piping is the industry standard for most residential bathtubs. However, for large-capacity whirlpool tubs or soaking tubs that hold more than 60 gallons, many professional plumbers recommend upgrading to a 2-inch drain to allow for faster drainage and to prevent overflow.
2. How far can a bathtub P-trap be from the vent?
According to the International Plumbing Code (IPC), the maximum distance (trap arm length) for a 1.5-inch pipe is 6 feet. If you exceed this distance without a vent, the water can create a siphon effect, sucking the water out of your P-trap and allowing sewer gases to enter your home.
3. Is silicone better than plumber’s putty for tub drains?
It depends on your tub material. Plumber’s putty is excellent for cast iron or steel tubs. However, if you have an acrylic or fiberglass tub, you must use 100% silicone. The oils in plumber’s putty can break down plastic materials and cause the tub to crack over time.
4. What is the standard rough-in height for a tub faucet?
The standard height for a tub-only faucet is typically 28 to 32 inches above the finished floor. If you are installing a tub/shower combo, the showerhead is usually placed at 72 to 80 inches. Always verify these heights with your specific rough-in specification sheet.