Burst Pipe in House? Immediate Emergency Actions & 2026 Repair Cost Analysis
Immediate Response for a Burst Pipe in House
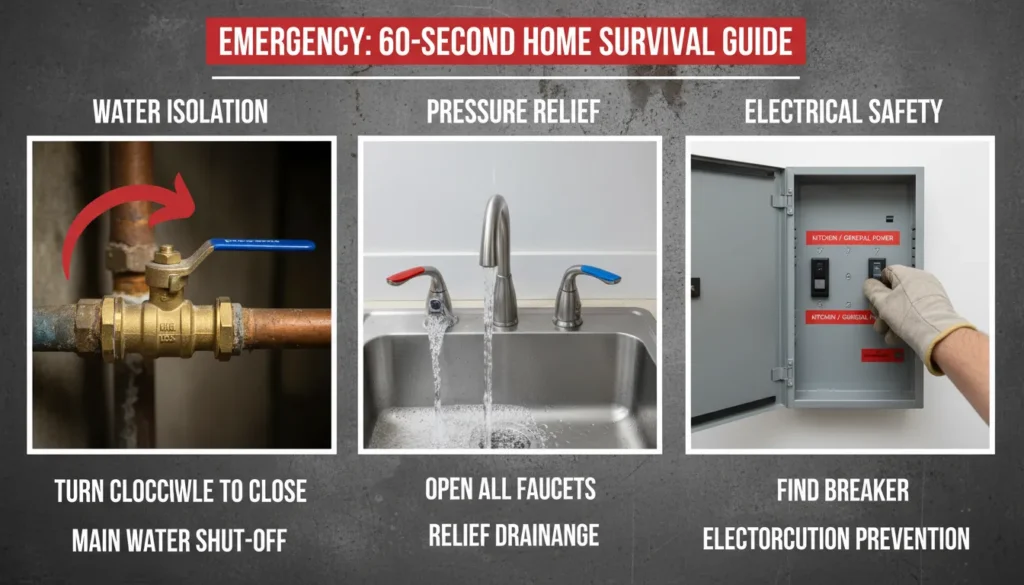
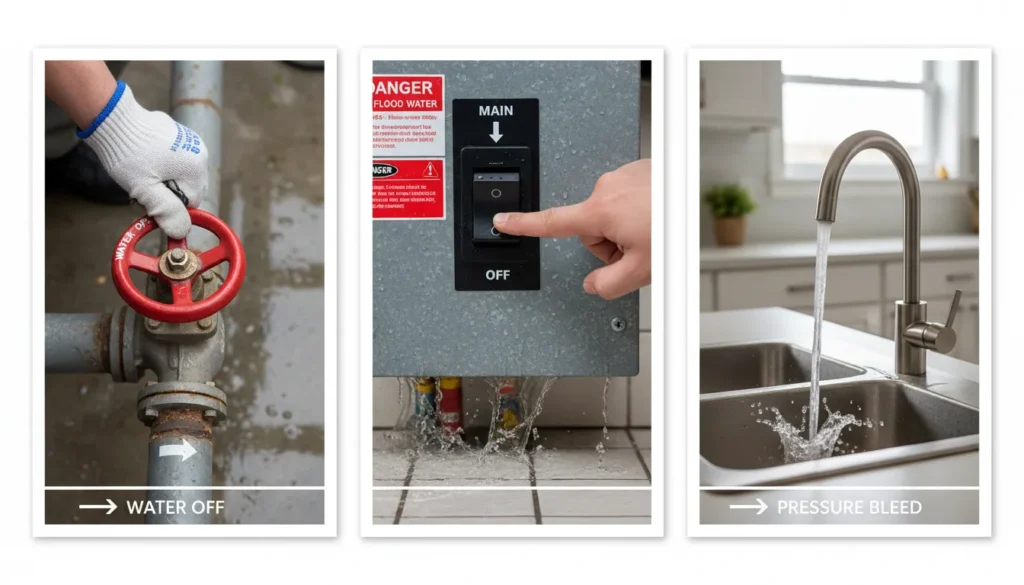
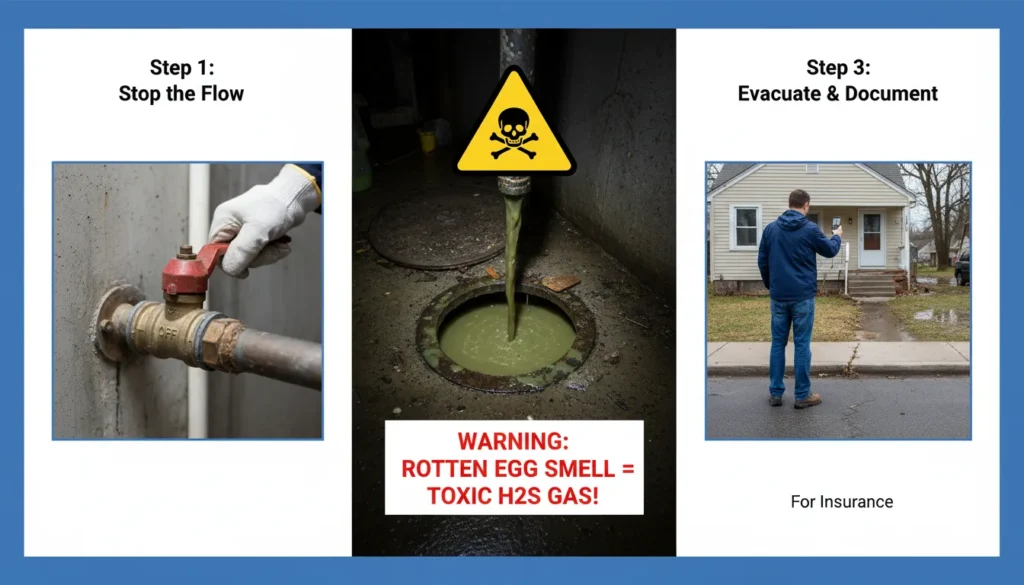
A burst pipe in house is the ultimate plumbing crisis because it can release hundreds of gallons of water in under an hour, leading to rapid structural rot. To stop the flooding, you must locate your main water shut-off valve (usually found in the basement or near the water meter) and turn it clockwise until it stops. Once the flow is killed, immediately turn on every faucet in the home to relieve built-up pressure and drain the remaining water sitting in the lines.
Critical Safety and Flooding Containment
Electrical Hazard Management: If a water pipe burst inside house occurs near appliances or light fixtures, do not touch any switches. Head straight to your breaker panel and shut off power to the affected rooms to eliminate the risk of electrocution, which is the most dangerous aspect of what-is-considered-a-plumbing-emergency.
Documentation for Claims: Before you begin mopping up the mess, take high-quality photos and videos of the busted pipe in house and all damaged property. This visual evidence is the primary requirement for a successful insurance claim, proving that the event was sudden rather than a result of long-term neglect.
The Hidden Trap: Why Simple Shut-Offs Often Fail
While most homeowners know to turn off the water, they often forget the “Relief Drainage” step. Even with the main valve off, several gallons of water remain trapped in the pipes of your upper floors. If you don’t open the lowest-level faucets (like a basement utility sink), gravity will continue to push that trapped “slug” of water out through the break, causing continued damage for 10–15 minutes after you thought you had stopped it.
Identifying Subsurface and Structural Water Leaks

Knowing how to tell if a pipe burst underground requires a simple mechanical test: shut off every faucet in your home and check the water meter. If the triangular flow indicator or the digital read-out is still moving, water is escaping somewhere beneath your foundation or lawn. Unlike indoor floods, these ruptures are often silent, making the meter your most reliable witness for detecting a subsurface break.
Diagnostic Signs Within Walls and Landscapes
Structural Visuals and Acoustics: When investigating how to tell if a pipe burst in the wall, look for yellow or brown staining, sagging paint, or bubbling drywall. Even if you cannot see the water, a constant “hissing” or “rushing” sound behind the studs—despite all fixtures being off—is a definitive indicator of a pressurized line failure.
External Yard Failures: A burst water pipe outside house usually manifests as an unexplained puddle or an unnaturally bright green, soggy patch of grass during dry weather. For drainage systems, how do you tell if a drain pipe is broken often involves checking the basement for musty odors or a sudden influx of sewer gas smells, which indicates the waste line’s integrity is compromised.
The Silent Leak: Why “Sound Diagnosis” is Your Best Tool
The most overlooked indicator of a rupture is “Sound Diagnosis.” Many homeowners wait for a wet spot to appear, but water can travel along floor joists or concrete slabs for dozens of feet before surfacing. If you hear a distant whistling or the sound of water running when the house is silent, you likely have a burst that hasn’t hit the drywall yet. According to the Environmental Protection Agency, even small, hidden leaks can waste thousands of gallons, making early acoustic detection vital.
The Meter Limitation: When Testing Might Deceive You
The water meter test is foolproof for pressurized supply lines, but it will not help you identify a broken drain or sewer pipe. Because drain lines are not under constant pressure, the meter won’t move when they leak. In these cases, you must rely on the “Musty Odor” test or observe how quickly your sinks drain to spot a failure in the waste system.
Critical Thresholds: The Pipe-Burst-Temperature-Guide
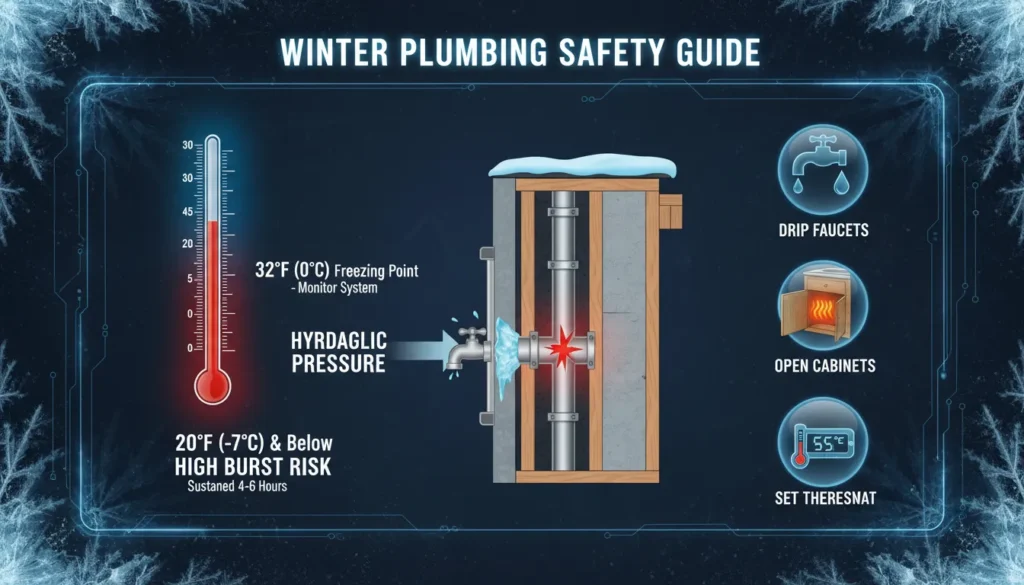
According to the pipe-burst-temperature-guide, the danger begins when outdoor temperatures hit the freezing mark of 32°F (0°C). However, the most acute risk of a catastrophic rupture occurs when the mercury drops to 20°F (-7°C) or lower for a continuous period of 4 to 6 hours. During these deep freezes, monitoring your home for a sudden loss of water or significantly low pressure is the primary way to determine if a line has already frozen internally.
Proactive Winter Defense and Thermal Management
Thermostat and Airflow Settings: To successfully prevent frozen pipes from bursting, never let your indoor temperature dip below 55°F (13°C), even if the house is vacant. In kitchen and bathroom areas, leave cabinet doors wide open; this simple move allows the home’s ambient heat to reach plumbing hidden behind wood panels, keeping the surrounding air just warm enough to avoid ice formation.
The Running Water Strategy: When extreme cold is forecasted, leave your faucets running slightly. A steady drip ensures that water is constantly moving, which makes it much harder for a solid ice plug to form and block the channel.
The Hydraulic Trap: Why Pipes Actually Snap
A common misconception is that expanding ice directly “cracks” the metal or plastic. In reality, the burst usually happens because of Hydraulic Pressure. When an ice blockage forms, it traps a column of water between the ice and the closed faucet. As the ice expands, it pushes that trapped water toward the faucet, creating massive pressure levels that the pipe wall eventually cannot contain. This is exactly why a dripping faucet prevents a burst—it provides a “relief valve” for that intense pressure to escape.
The Wind Chill Variance: When 30°F Is Dangerous
While 20°F is the general danger zone, pipes located in drafty crawlspaces or poorly insulated exterior walls can burst even at 30°F if there is high wind. Wind chill forces cold air through small cracks in your home’s siding, hitting the pipes directly and causing them to freeze much faster than the official outdoor temperature would suggest.
Evaluating the Pipe Burst Repair Cost and Coverage
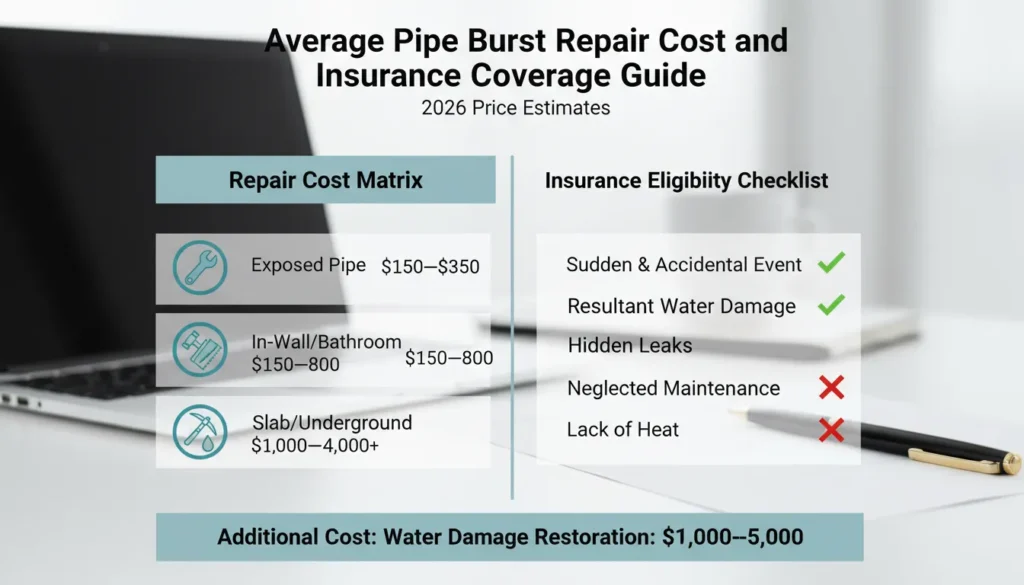
Budgeting for a plumbing failure involves more than just fixing a leak; it requires understanding the national pipe burst repair cost trends. A standard, accessible repair generally fluctuates between $200 and $1,000. However, if the rupture is buried deep within a concrete slab or hidden behind structural walls, the technical difficulty pushes these expenses into the $2,000 to $4,000+ range.
Insurance Eligibility and Restoration Expenses
Homeowners Policy Specifics: A common question is, is a pipe burst covered by homeowners insurance? The answer is typically yes, provided the failure was “sudden and accidental” rather than a result of long-term wear or neglect. It is vital to check your policy limits, as the cost of water damage restoration following a break can independently run between $1,000 and $5,000, depending on the volume of water released.
Material Price Gaps: In the 2026 market, copper line fixes have become significantly more expensive than modern alternatives. Because copper requires a “Hot Work” permit for open-flame soldering and specialized labor, these repairs are often 40% pricier than PEX installations, which are faster and require fewer safety clearances.
The Material Premium: Copper vs. PEX Logic
The 40% price hike for copper isn’t just about the metal’s market value; it’s about the technical environment. Many insurance carriers and local codes now demand fire-watch personnel when soldering in multi-family dwellings or older wooden structures. If your home has copper plumbing, your pipe burst repair cost will naturally be higher due to these mandatory safety protocols and the high level of skill required for a leak-proof solder joint.
The Maintenance Clause: When Claims Get Denied
Insurance is designed for accidents, not avoidable decay. If an adjuster determines the pipe burst because the home was left unheated during a freeze or because a visible leak was ignored for months, they may deny the claim under a “failure to maintain” clause. Always keep records of your home’s thermostat settings and previous plumbing inspections to prove you exercised due diligence.
Technical Restoration: Executing a Burst-Pipe-House-Fix
When you need an immediate burst-pipe-house-fix to protect your foundation, temporary mechanical seals are your first line of defense. Utilizing specialized plumbing repair clamps or self-fusing silicone tape can bridge the gap until a professional arrives. These emergency supplies are readily available at major retailers like The Home Depot and are engineered to withstand standard residential water pressure for a short duration.
From Emergency Patches to Permanent Solutions
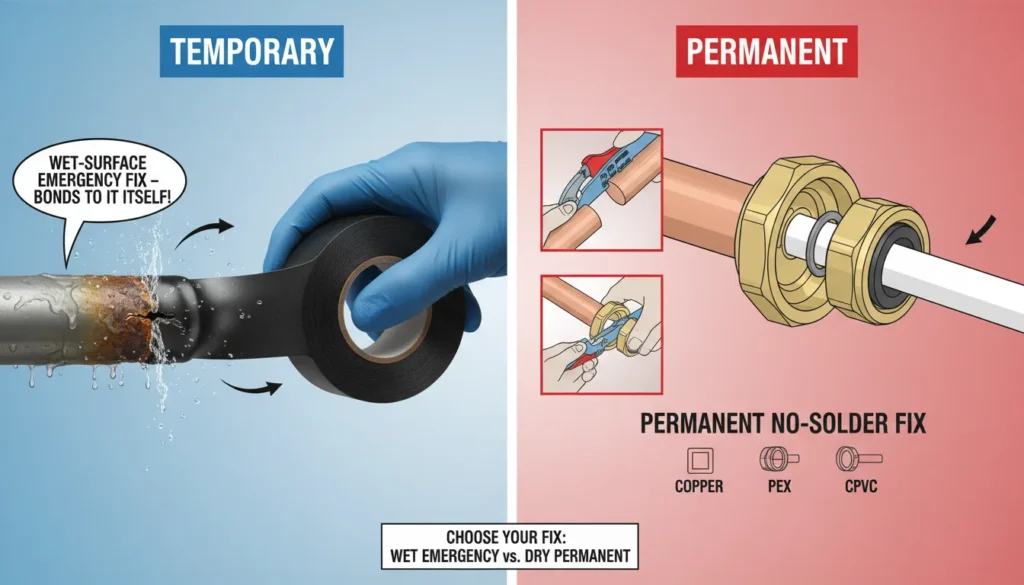
The No-Solder Advantage: For a long-term, professional-grade repair without the fire hazard of a torch, push-to-connect (SharkBite) couplings are the industry standard. These fittings allow you to cut out the damaged section and simply push the connector onto the clean pipe ends, making it significantly cheaper to replace or repair pipes yourself. They are fully compatible with diverse materials including copper, CPVC, and PEX.
Surface-Specific Bonding: Choosing the right sealant depends entirely on the pipe’s condition. While epoxy putty is excellent for structural strength on bone-dry surfaces, it will fail to bond if there is any moisture. In contrast, self-fusing silicone tape is designed specifically to work on “wet” surfaces, creating a tight mechanical seal even while the pipe is still damp.
The Adhesive Trap: Why Epoxy Putty Fails on Wet Lines
A critical detail often missed by DIYers is that epoxy putty requires a completely dry environment to cure and adhere. If the main valve is leaking slightly and the pipe remains wet, the putty will simply slide off. For active dampness, self-fusing silicone tape is the only viable emergency choice because it bonds to itself rather than the pipe, creating a high-tension wrap that constricts around the leak.
The SharkBite Limitation: Proper Squaring and Deburring
While push-to-connect fittings are a permanent “no-solder” miracle, they are prone to failure if the pipe is not cut perfectly square or if the edges are left jagged. A burr on the edge of a copper pipe can slice the internal O-ring of the fitting, leading to a slow, hidden leak inside your walls months later. Always use a proper deburring tool to ensure the seal remains airtight for the life of the plumbing system.