
Attic Insulation Cost Guide 2026: Complete Pricing, Types & Installation Guide
How Much Does Attic Insulation Cost?
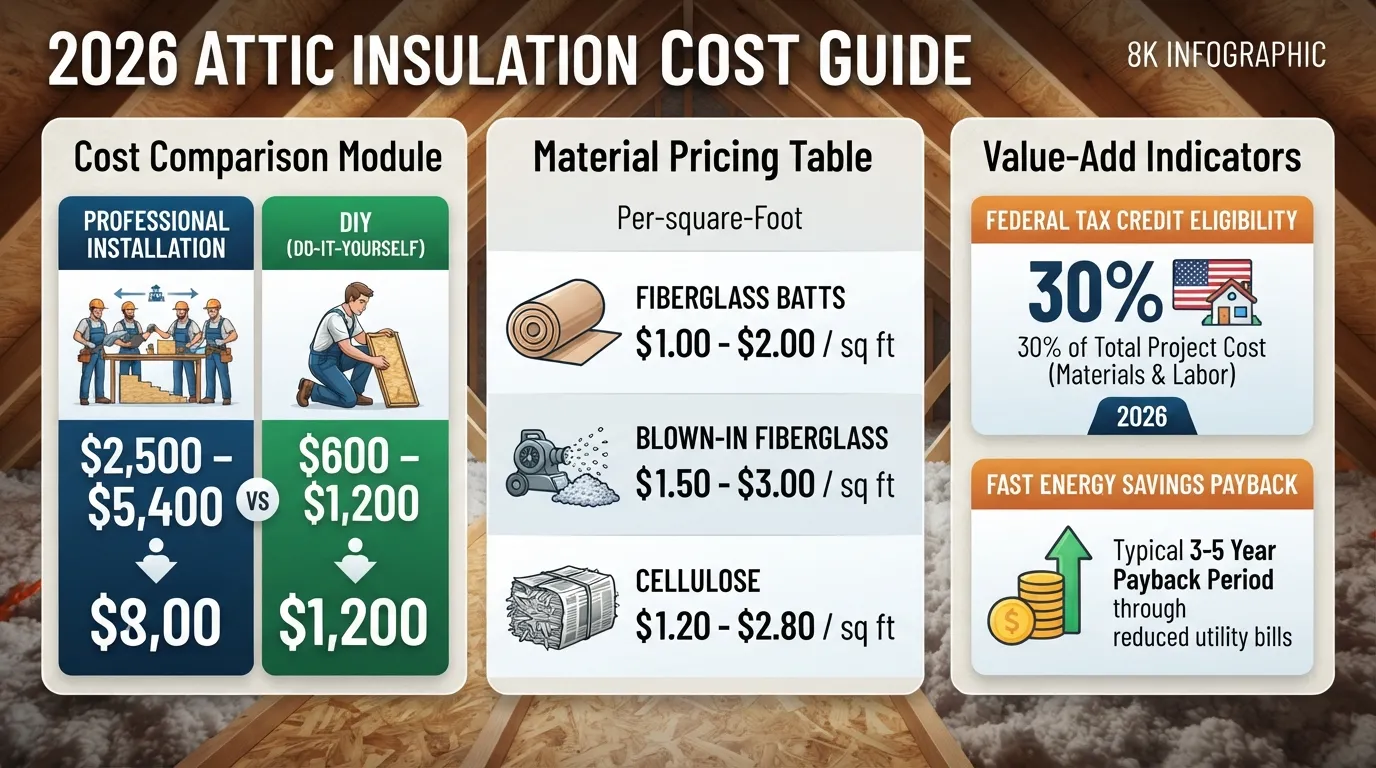
In 2026, the average cost to professionally insulate an attic in Florida typically ranges from $1,500 to $4,500. Most homeowners pay between $1.00 and $3.50 per square foot for installed insulation, though prices vary based on your choice of material, the required R-value for your specific region, and whether old insulation removal is required.
Average Cost Per Square Foot
The total price per square foot depends heavily on the thermal performance of the material you select. In Florida’s hot, humid climate, choosing the right insulation is critical to reducing your HVAC load and energy bills.
Blown-in Fiberglass: $1.00 – $1.50 per sq. ft. (Cost-effective for filling gaps).
Cellulose: $1.20 – $2.50 per sq. ft. (Eco-friendly, dense, and effective for soundproofing).
Spray Foam (Open-cell): $1.50 – $4.00 per sq. ft. (Superior air-sealing for Florida attics).
Spray Foam (Closed-cell): $3.50 – $7.00 per sq. ft. (Maximum moisture resistance and R-value).
Cost by Attic Size
Total project costs scale with your home’s square footage. The table below estimates professional installation costs, assuming a standard attic configuration.
| Attic Size (sq. ft.) | Estimated Cost Range |
|---|---|
| 500 sq. ft. | $500 – $1,750 |
| 1,000 sq. ft. | $1,000 – $3,500 |
| 1,500 sq. ft. | $1,500 – $5,250 |
| 2,000 sq. ft. | $2,000 – $7,000 |
Note: Costs increase if you need to remove old, damaged insulation, which typically adds $1.00 – $2.00 per sq. ft. to your final invoice.
Labor vs. Material Cost Breakdown
When budgeting, understand that professional installation involves more than just the cost of materials.
Materials (50% – 70% of total): This covers the insulation product itself. High-performance materials like spray foam command higher prices but offer better energy-saving ROI.
Labor (30% – 50% of total): Professionals typically charge $0.50 – $1.50 per square foot for labor. This includes prep work, air-sealing existing gaps, safety equipment, and post-installation cleanup.
Expert Pro-Tip: Don’t forget the Federal Energy Efficient Home Improvement Credit. Under the Inflation Reduction Act, you can claim a 30% tax credit on the cost of insulation materials, up to $1,200 per year. Keep your manufacturer’s certification statement and final invoice to file with IRS Form 5695.
Ready to calculate your exact investment? Our next section dives deep into the specific materials best suited for Florida’s unique climate.
Attic Insulation Cost by Type (Which Is Best)
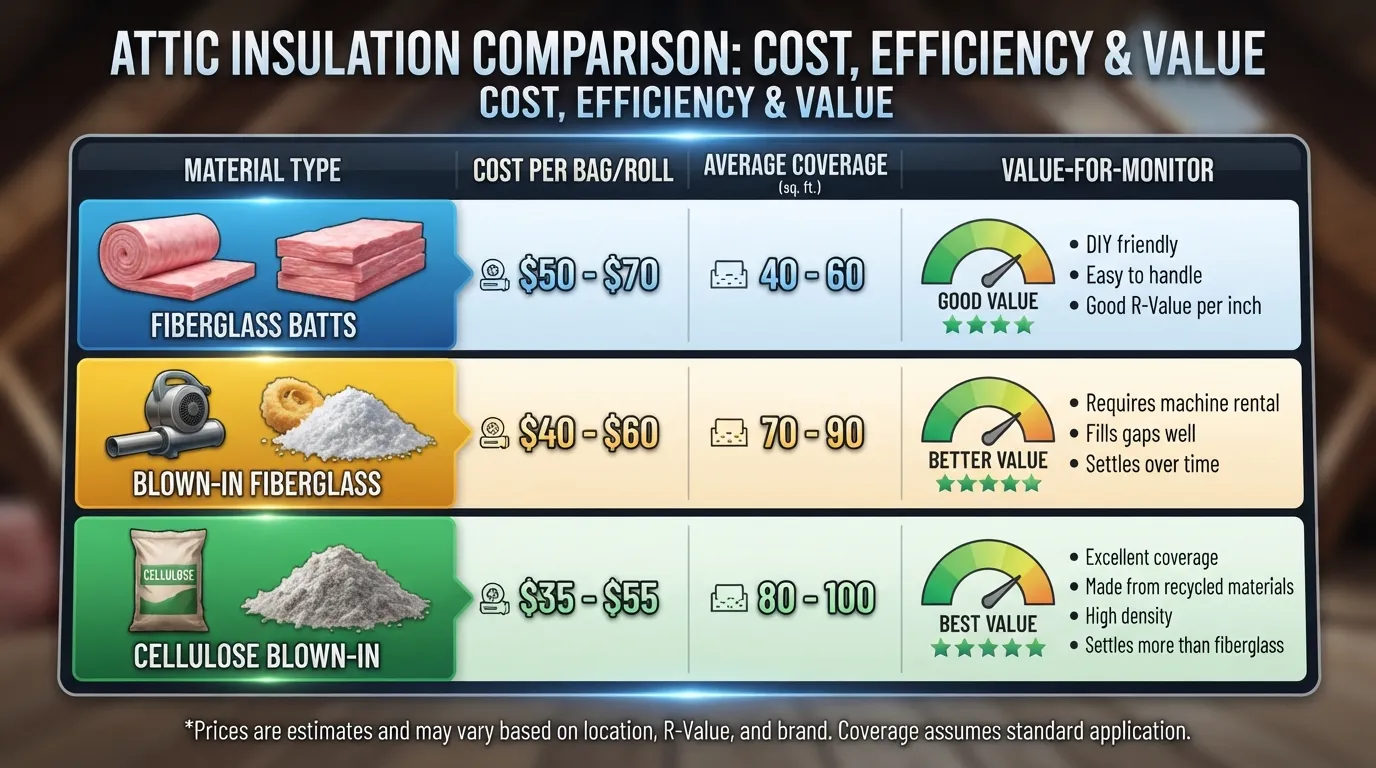
Choosing the right insulation type for your Florida attic is the most critical decision for balancing energy efficiency with long-term cost. In the Sunshine State’s humid climate, Spray Foam is the superior choice for high-performance sealing, while Blown-in Cellulose offers the best balance between affordability and thermal resistance.
Blown-In (Cellulose/Fiberglass) Cost
Blown-in insulation is the most common retrofitting choice because it easily fills irregular gaps and covers joists.
Fiberglass Blown-in: Costs $1.00 – $2.80 per sq. ft. installed. It is lightweight and moisture-resistant but can settle over time, slightly reducing its R-value.
Cellulose Blown-in: Costs $1.20 – $2.80 per sq. ft. installed. Made from recycled paper, it offers better R-value per inch than fiberglass and provides superior sound dampening.
Batt/Rolled Insulation Cost
Batt insulation comes in pre-cut blankets, making it a popular DIY choice for standard attic joists.
Average Cost: $0.80 – $2.60 per sq. ft. installed.
Performance: While affordable, fiberglass batts are notoriously difficult to install perfectly around corners, pipes, and light fixtures. Even a 1% gap in coverage can reduce your attic’s overall thermal effectiveness by up to 30%, making it less efficient than spray or blown-in options.
Spray Foam Insulation Cost
Spray foam acts as both an insulator and a continuous air barrier, making it the gold standard for Florida’s unvented attic designs.
Open-Cell Foam: $1.50 – $3.50 per sq. ft. Ideal for soundproofing and moderate thermal control.
Closed-Cell Foam: $2.00 – $4.75 per sq. ft. Offers the highest R-value and acts as a vapor barrier, essential for preventing mold in high-humidity zones.
Comparison Table: Which Type is Best?
| Blown-in Cellulose | $1.20 – $2.80 | Retrofits | Excellent |
| Fiberglass Batts | $0.80 – $2.60 | DIY | Fair |
| Spray Foam | $1.50 – $4.75 | Sealed | Superior |
The Verdict: For most Florida homeowners, blown-in cellulose provides the best ROI for standard vented attics. However, if you are converting to a sealed “hot roof” attic design to protect your HVAC ductwork from extreme heat, closed-cell spray foam is the best investment despite the higher upfront cost.
Expert Pro-Tip: If you choose blown-in insulation, ensure your installer uses a “ruler depth check” across at least five different areas of the attic to verify the material is blown to the correct depth for your target R-value—don’t just trust the bag count.
Now that you know which material fits your budget and climate needs, let’s look at the critical step of installing it correctly to avoid common pitfalls.
Cost by R-Value (R30, R38, R49, R60)
In Florida, the Department of Energy generally recommends an R-value between R30 and R49 for attic insulation to maintain optimal energy efficiency. While costs fluctuate based on material density, expect to pay approximately $1.20 – $3.20 per square foot to reach these target R-values, with higher R-values requiring thicker applications of insulation material.
Recommended R-Value for Florida Climate
Florida’s humid, subtropical climate demands insulation that resists heat gain rather than just heat loss.
Standard Recommendation: R30 is the absolute minimum for older Florida homes to meet basic building codes.
Optimal Performance: R38 is the “sweet spot” for most residential attics in Central and South Florida to significantly reduce HVAC cycle times.
High-Efficiency: R49 to R60 is reserved for homes with unsealed attics or those aiming for net-zero energy efficiency, providing a massive thermal buffer against the intense Florida sun.
R30 vs R60 — Real Benefits & ROI
Is upgrading from R30 to R60 worth the extra investment? For most Florida homeowners, the answer depends on your long-term energy goals.
| R-Value | Cost | Best For | Verdict |
|---|---|---|---|
| R30 | $1.00 – $1.80 | Min code | Basic |
| R38 | $1.40 – $2.20 | Standard | Recommended |
| R49 | $1.80 – $2.80 | High-perf | Best ROI |
| R60 | $2.40 – $3.50 | Extreme | Diminishing |
Upgrading to R60 provides an additional 5–8% reduction in heat gain compared to R38, but the higher material costs often result in a longer payback period (typically 12+ years).
The 2/3 Rule of Insulation Explained
Most competitors miss this crucial professional installer detail: the 2/3 Rule of Insulation. If you have existing insulation, you must assess its current depth.
If your current insulation is less than 2/3 of the manufacturer’s recommended depth, it has likely settled or lost its thermal effectiveness.
Instead of “topping off” with a different material, which can trap moisture and cause mold in Florida’s climate, the best practice is to remove and replace or match the existing material perfectly to ensure a consistent, monolithic thermal barrier.
Pro-Tip: Always install soffit baffles before increasing your R-value; even the highest R-value insulation is useless if it blocks your roof’s intake ventilation and traps heat in the attic.
Now that you understand the R-value requirements for your Florida home, let’s examine the hidden labor costs and DIY risks that can impact your total project budget.
Home Depot Attic Insulation Cost (Brand-Specific)
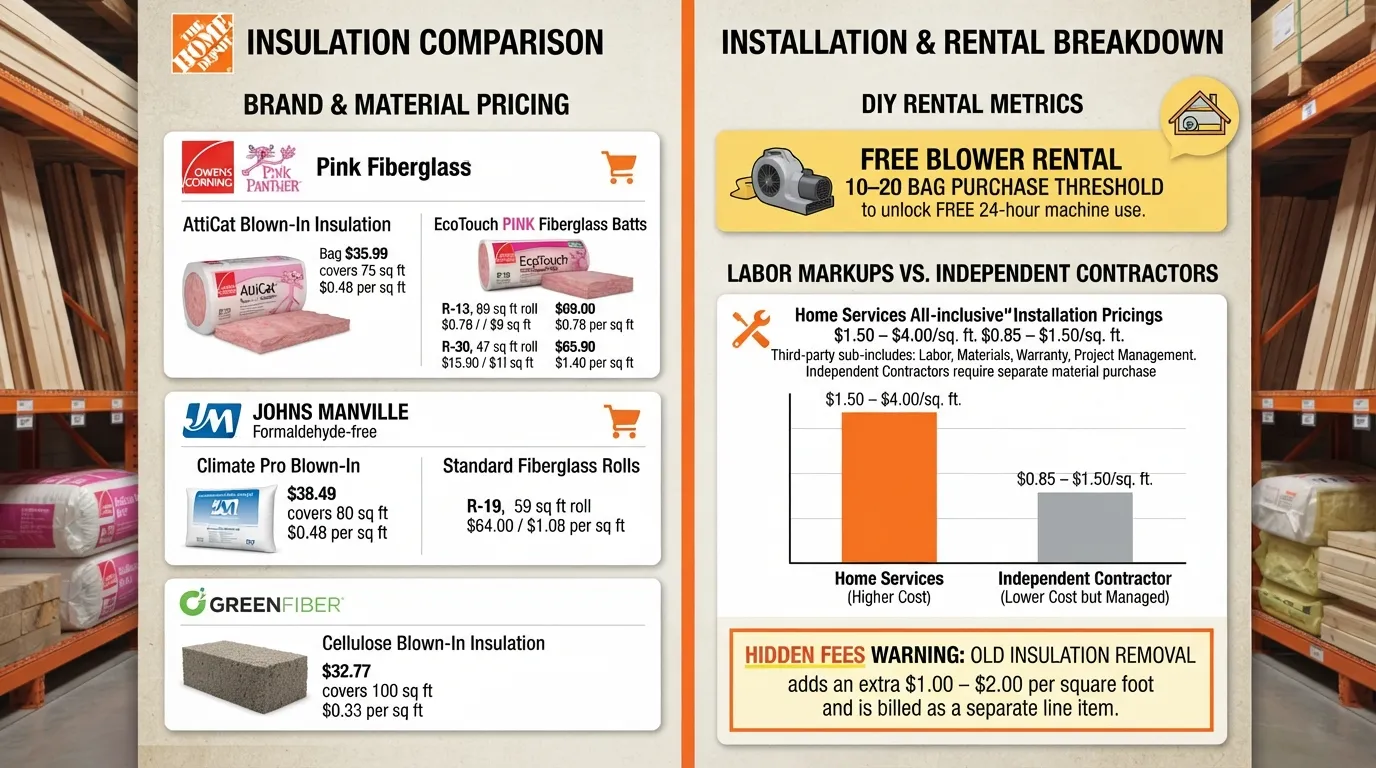
Home Depot’s attic insulation installation service typically ranges from $1.50 to $4.00 per square foot, depending on the material type and existing attic conditions. While many homeowners choose Home Depot for the convenience of store-brand materials like Owens Corning, professional installation costs are often higher than independent contractors due to third-party sub-contracting markups.
Home Depot Installation Pricing
When you book insulation through Home Depot’s “Home Services” program, your pricing is generally all-inclusive of materials and labor.
Blown-in Fiberglass: Expect to pay $1.50 – $2.80 per sq. ft. for standard installs.
Spray Foam: Generally starts at $3.00 – $4.50 per sq. ft. and is often managed through specialized local partners.
The “Hidden” Fee: Be aware that “old insulation removal” is almost always quoted as a separate line item, often adding $1.00 – $2.00 per sq. ft. to your final project price.
Free Blower Rental Program (How Many Bags?)
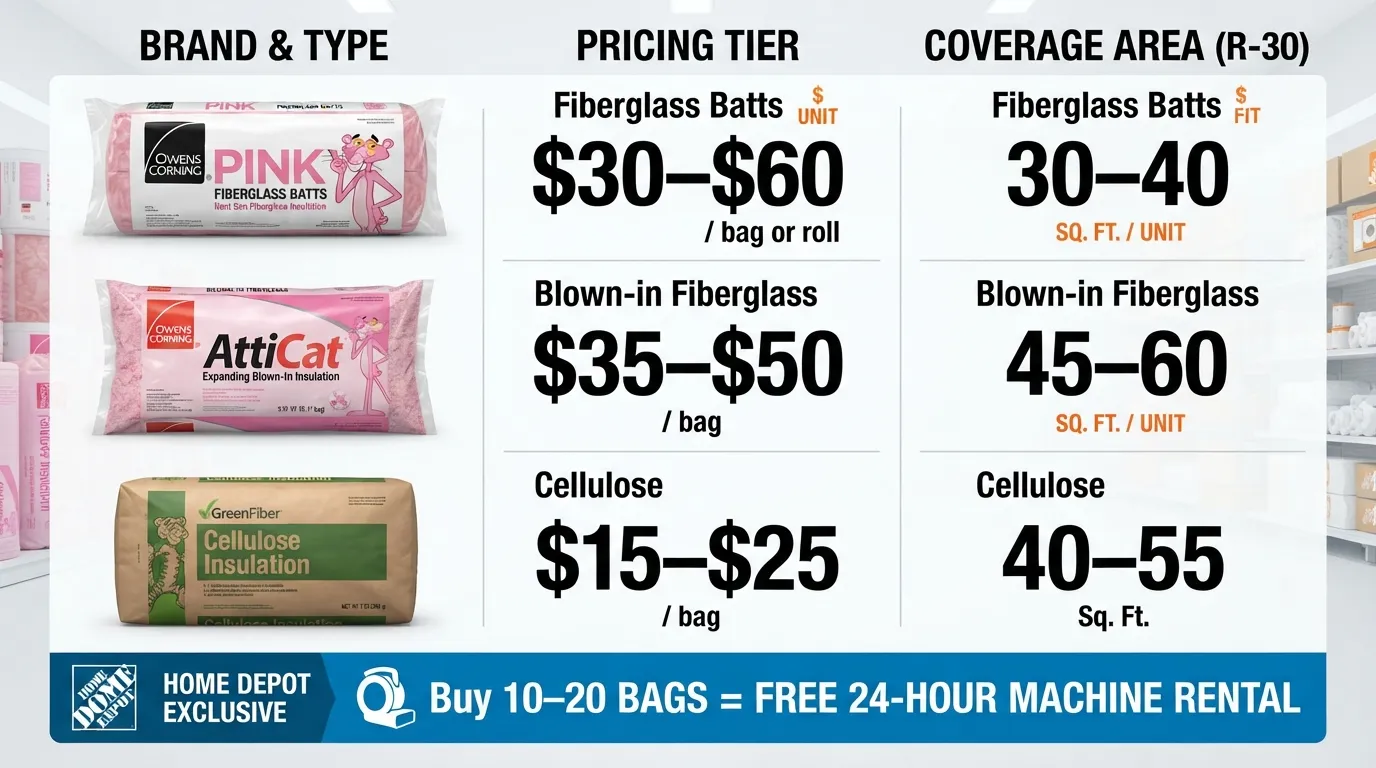
Home Depot provides a free one-day rental of a professional-grade insulation blowing machine when you purchase at least 10–20 bags of qualified insulation (like Owens Corning AttiCat).
Coverage Calculation: One bag of fiberglass typically covers 25–35 sq. ft. at an R-30 depth.
Bag Estimate: For a 1,000 sq. ft. attic needing R-30, you will likely need to purchase 30–40 bags to ensure proper density.
Pro-Tip: Always buy 2 extra bags beyond your calculation. Running out of material halfway through the job is a major frustration, and returning unopened bags is much easier than making a second trip to the store.
DIY Materials Cost at Home Depot
If you choose the DIY route, you can save 40% – 60% on labor, provided you have the right safety equipment.
| Material Type | Cost per Bag/Roll | Avg. Coverage |
|---|---|---|
| Fiberglass Batts | $30 – $60 | 40 – 60 sq. ft. |
| Blown-in Fiberglass | $35 – $50 | 30 – 40 sq. ft. |
| Cellulose Blown-in | $15 – $25 | 35 – 45 sq. ft. |
Practical Expert Tip: If you are blowing insulation yourself, the “attic ruler” is your best friend. Many DIYers mistakenly blow too much in one area and not enough in another. Before you start, staple a few cardboard rulers (available at the paint or flooring desk) to your rafters. This gives you a visual guide to ensure a perfectly level, even depth across the entire attic, which is the secret to true thermal efficiency.
Now that you know your material costs, let’s talk about the common “gotchas” in local permits and inspections that could stall your project.
DIY vs Professional Installation — Real Cost Comparison
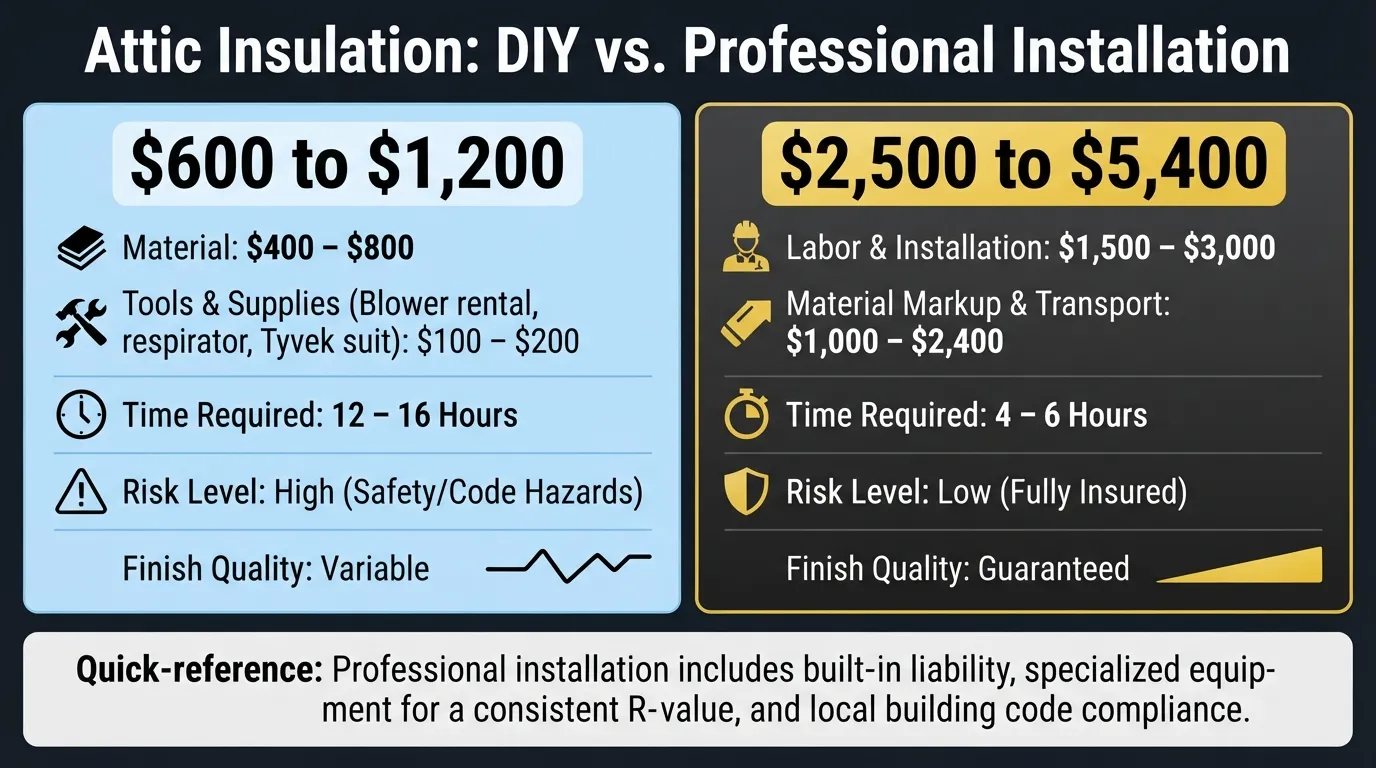
The total cost to insulate an attic depends on your chosen path: a DIY approach typically ranges from $600 to $1,200 for a standard 1,000 sq. ft. attic, while professional installation typically costs $2,500 to $5,400. While DIY offers significant upfront savings, professional services include liability coverage, building code compliance, and specialized equipment that ensures a more consistent R-value.
DIY Cost Breakdown
When tackling this as a weekend project, your budget must cover more than just insulation bags.
Insulation Material: $400 – $800 (depending on material density).
Tool Rentals & Supplies: $100 – $200 (blower machine, respirator, Tyvek suit).
Time Investment: 12 – 16 hours of labor for an average homeowner.
Professional Install Cost Breakdown
Professional services account for the hidden costs of expertise and safety.
Labor & Installation: $1,500 – $3,000 (includes professional crew time).
Material Markup & Transport: $1,000 – $2,400.
Safety & Liability: Built-in costs for insurance, workers’ compensation, and disposal fees for old materials.
Comparison Table: DIY vs. Pro
| Feature | DIY Installation | Professional Installation |
|---|---|---|
| Total Cost | $600 – $1,200 | $2,500 – $5,400 |
| Time Required | 12 – 16 hours | 4 – 6 hours |
| Risk Level | High (Safety/Code) | Low (Insured) |
| Finish Quality | Variable | Guaranteed |
Step-by-Step DIY Process & Safety Tips
Achieving professional-level results requires attention to detail.
Install Baffles: Staple plastic baffles at the eaves to maintain airflow from soffit vents; this prevents roof rot and moisture buildup.
PVC Extension Trick: If your blower hose is too short, attach a 10-foot PVC pipe to the end to reach deep, cramped corners of the attic without crawling through the insulation.
PPE Essentials: Always wear a N95 or P100 respirator and long-sleeved coveralls. Fiberglass dust is a major respiratory irritant.
When DIY Makes Sense vs. When to Hire a Pro
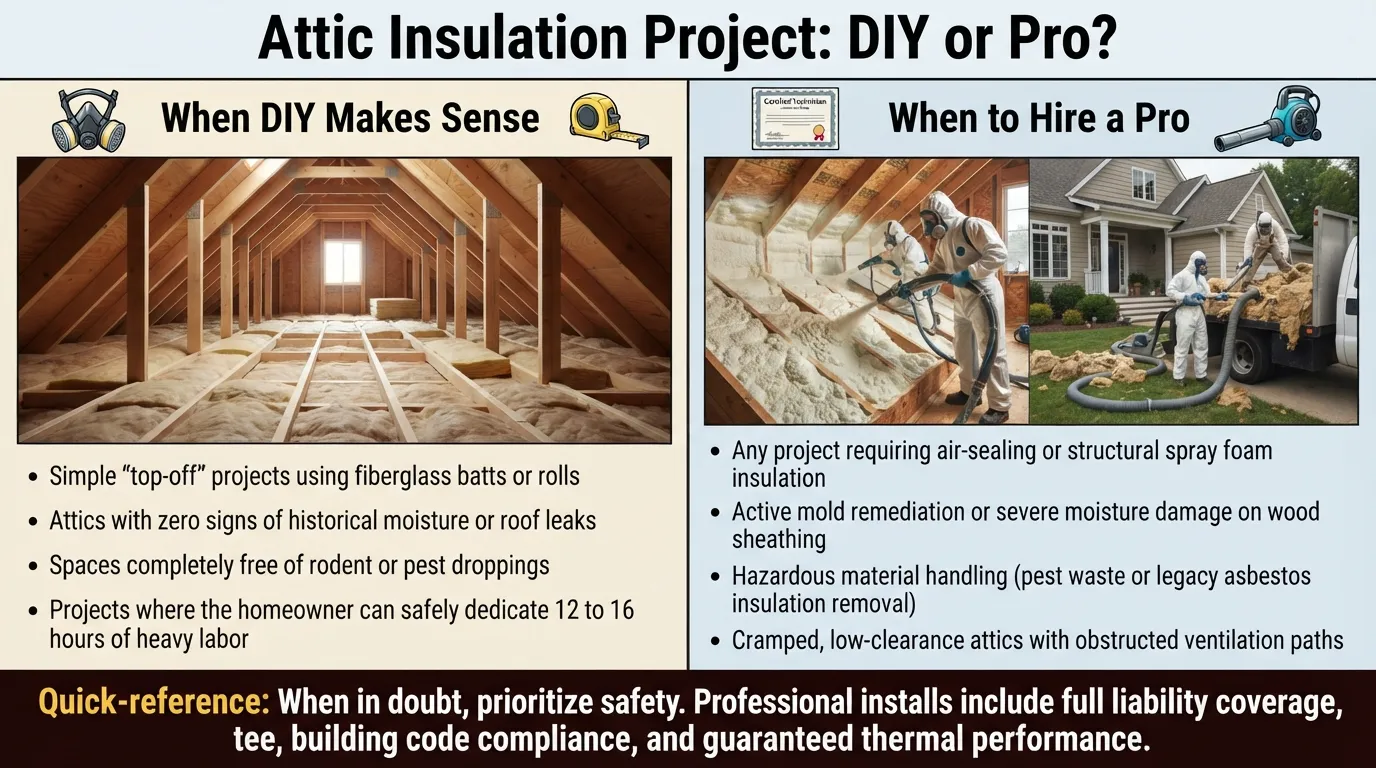
DIY is suitable if your attic has clear, accessible joists and no active moisture issues. However, you should hire a professional if your attic requires air sealing (using spray foam), has evidence of mold, or if you need to remove old, hazardous insulation that could contain asbestos or pest waste.
Now that you can weigh the financial trade-offs of DIY, let’s look at the necessary permits and inspections that ensure your attic project stays compliant with local Florida building codes.
DIY vs Professional Installation — Real Cost Comparison
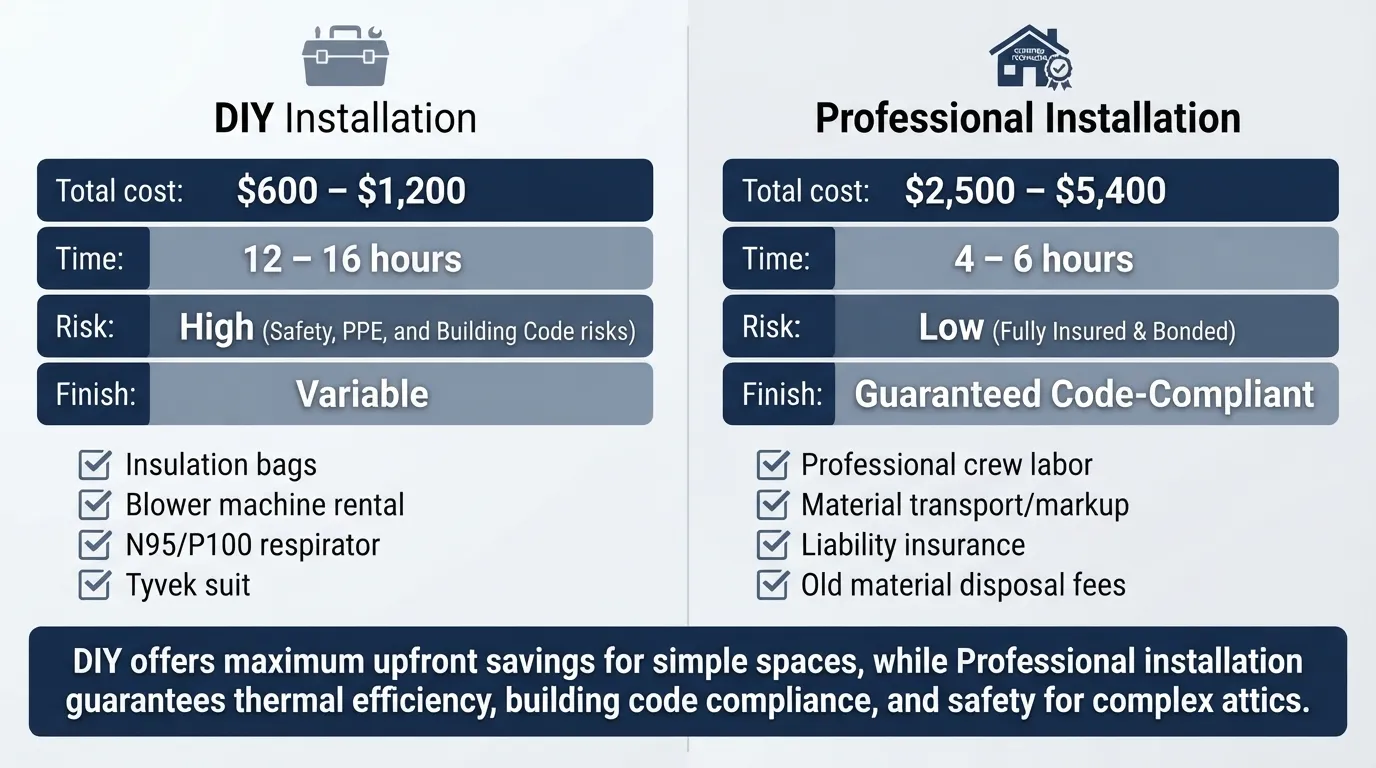
The total cost to insulate an attic depends on your chosen path: a DIY approach typically ranges from $600 to $1,200 for a standard 1,000 sq. ft. attic, while professional installation typically costs $2,500 to $5,400. While DIY offers significant upfront savings, professional services include liability coverage, building code compliance, and specialized equipment that ensures a more consistent R-value.
DIY Cost Breakdown
When tackling this as a weekend project, your budget must cover more than just insulation bags:
Insulation Material: $400 – $800 (depending on material density).
Tool Rentals & Supplies: $100 – $200 (blower machine, respirator, Tyvek suit).
Time Investment: 12 – 16 hours of labor for an average homeowner.
Professional Install Cost Breakdown
Professional services account for the hidden costs of expertise and safety:
Labor & Installation: $1,500 – $3,000 (includes professional crew time).
Material Markup & Transport: $1,000 – $2,400.
Safety & Liability: Built-in costs for insurance, workers’ compensation, and disposal fees for old materials.
Comparison Table: DIY vs. Pro
| Feature | DIY Installation | Professional Installation |
|---|---|---|
| Total Cost | $600 – $1,200 | $2,500 – $5,400 |
| Time Required | 12 – 16 hours | 4 – 6 hours |
| Risk Level | High (Safety/Code) | Low (Insured) |
| Finish Quality | Variable | Guaranteed |
Attic Insulation Cost Calculator
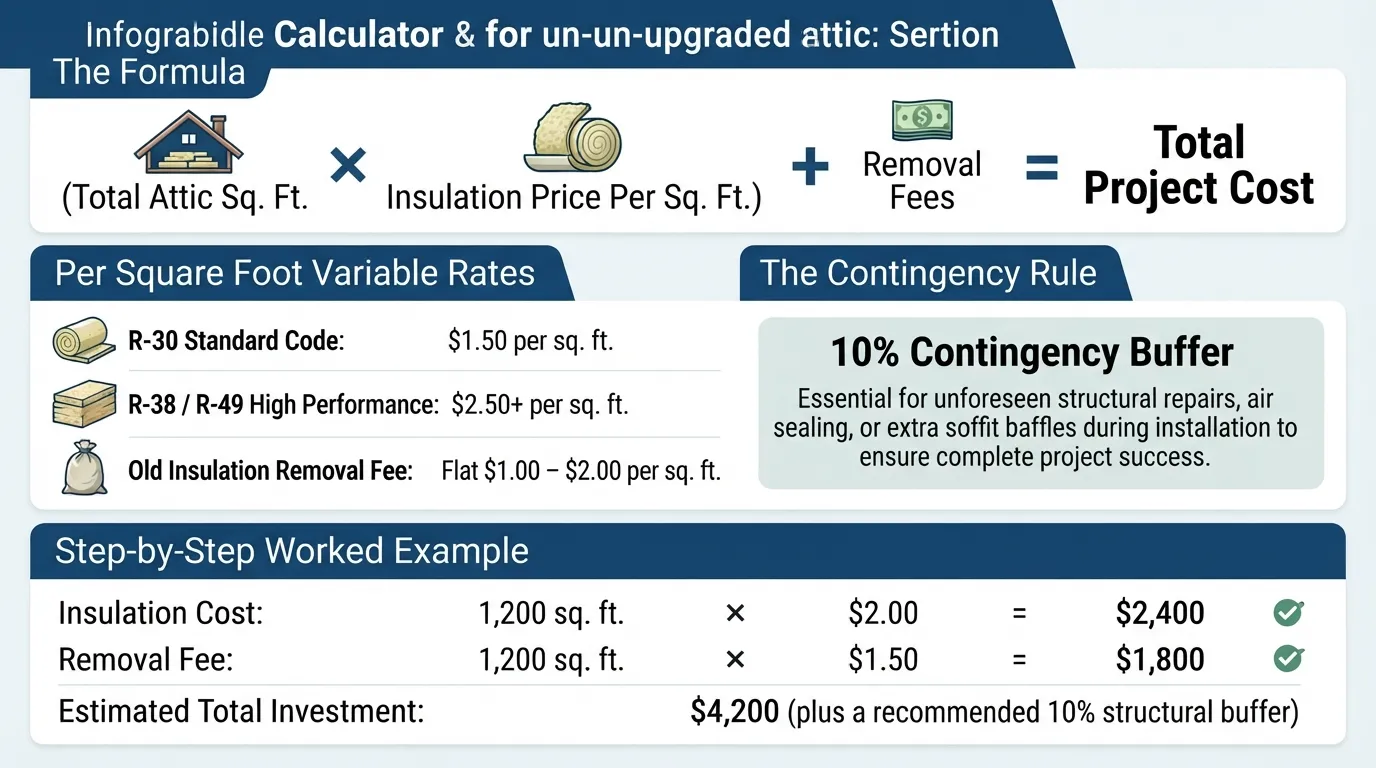
To determine your specific project budget, use this straightforward formula: (Total Attic Square Footage × Insulation Price per Sq. Ft.) + Removal Fees = Total Project Cost. Most Florida attics require roughly $1.20 – $3.20 per square foot for material and labor, depending on the R-value chosen.
Formula to Calculate Your Cost
Measure Area: Multiply the length by the width of your attic floor (e.g., 30 ft × 40 ft = 1,200 sq. ft.).
Select R-Value Price: Use $1.50 for basic R-30 or $2.50+ for high-performance R-49/R-60.
Add Removal: If old insulation is present, add a flat $1.00 – $2.00 per sq. ft. for professional removal and disposal.
Example Calculation (Step by Step)
For a 1,200 sq. ft. attic requiring R-38 insulation with existing insulation removal:
Insulation Cost: 1,200 sq. ft. × $2.00 = $2,400.
Removal Fee: 1,200 sq. ft. × $1.50 = $1,800.
Total Estimate: $4,200.
Pro-Tip: Always add a 10% contingency buffer to your final number to account for unforeseen structural repairs or extra baffles required during installation.
Now that you can calculate your estimated project cost, let’s look at the necessary permits and inspections that ensure your attic project stays compliant with local building codes.
When to Replace Attic Insulation (Signs & Frequency)
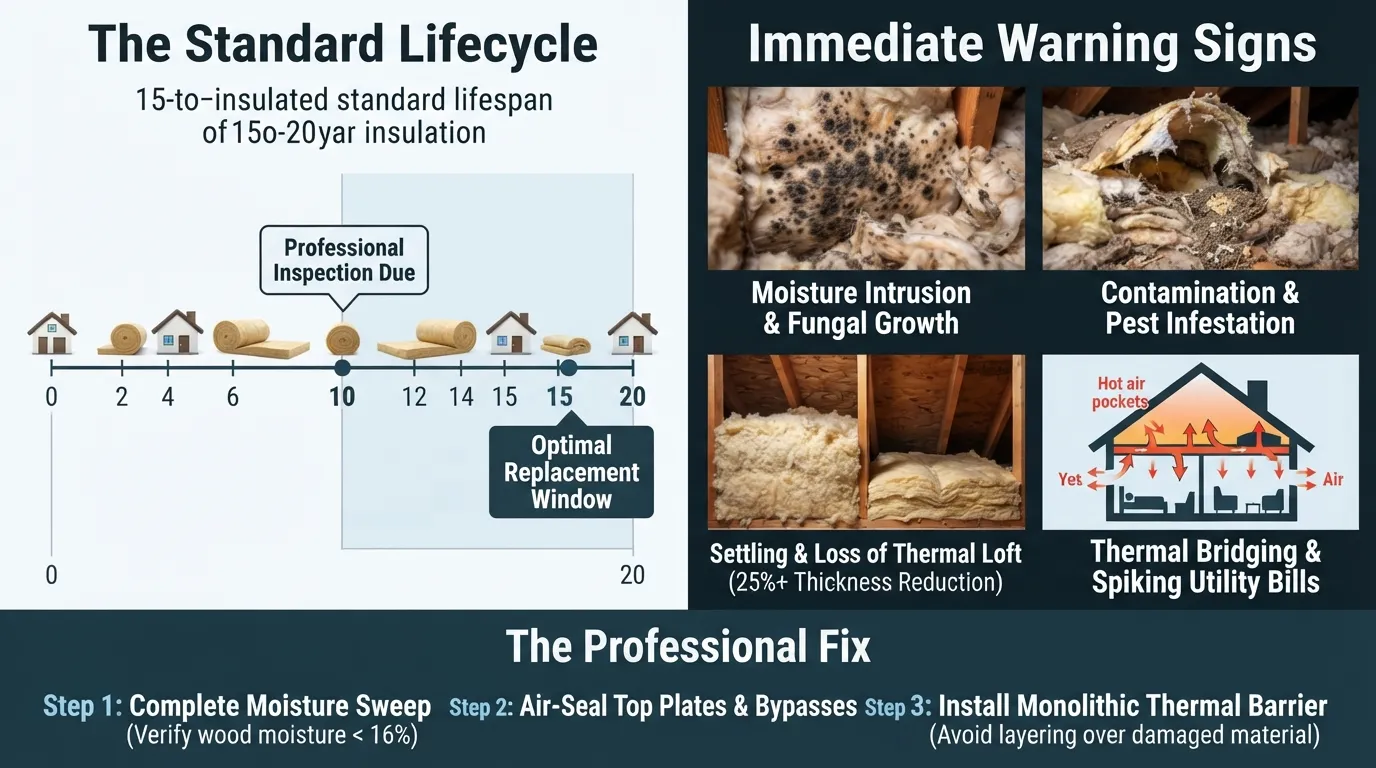
You should typically replace your attic insulation every 15 to 20 years to ensure maximum energy efficiency and home comfort. However, immediate replacement is necessary if you notice signs of water damage, pest infestation, or if the material has settled more than 25% below its original installed depth, as this significantly degrades the R-value and increases your monthly utility bills.
How Often Should You Replace It
While many materials like fiberglass are rated to last 30+ years, the performance of insulation in Florida’s climate often declines much faster.
Standard Lifecycle: Plan for an inspection every 10 years and a potential upgrade or replacement between year 15 and 20.
Climate Factor: High humidity and extreme heat cycles can cause material to clump or lose its “loft,” requiring premature replacement to maintain thermal resistance.
Signs of Damaged/Insufficient Insulation
Do not wait for your energy bills to skyrocket; watch for these physical indicators that your insulation is failing:
Visible Mold or Mildew: Dark spots on the insulation or attic floor indicate chronic moisture issues.
Pest Activity: Fecal droppings, chewed wires, or nesting materials are clear signs that insulation is contaminated and poses health risks.
Settling: If your insulation no longer reaches the ceiling joists or appears compressed, it is no longer providing the R-value you paid for.
Uneven Temperatures: Noticeable drafts or rooms that stay hot even when the AC is running suggest a “thermal bridge” where insulation is either missing or severely damaged.
How to Fix Incorrectly Installed Insulation
Incorrect installation is the number one cause of failed insulation performance. Here is how to correct common mistakes:
| Problem | Professional Fix |
| Blocked Soffit Vents | Install soffit baffles to create an air channel from the eaves. |
| Compressed Insulation | Remove debris and “fluff” or top-up with new material to restore depth. |
| Air Leaks (Bypass) | Use spray foam to seal gaps around plumbing stacks and recessed lighting. |
| Moisture Trapping | Install a vapor barrier or improve attic ventilation (ridge vents). |
Practical Tip: Don’t just layer new insulation over old, damp material. That is a recipe for mold growth. Always perform a “moisture sweep” using a humidity meter; if the wood decking in your attic reads above 16% moisture content, solve the ventilation issue before adding a single inch of new material.
Now that you know when replacement is critical, let’s look at the legal and safety requirements for building permits and professional inspections in Florida.
Attic Insulation Removal Cost
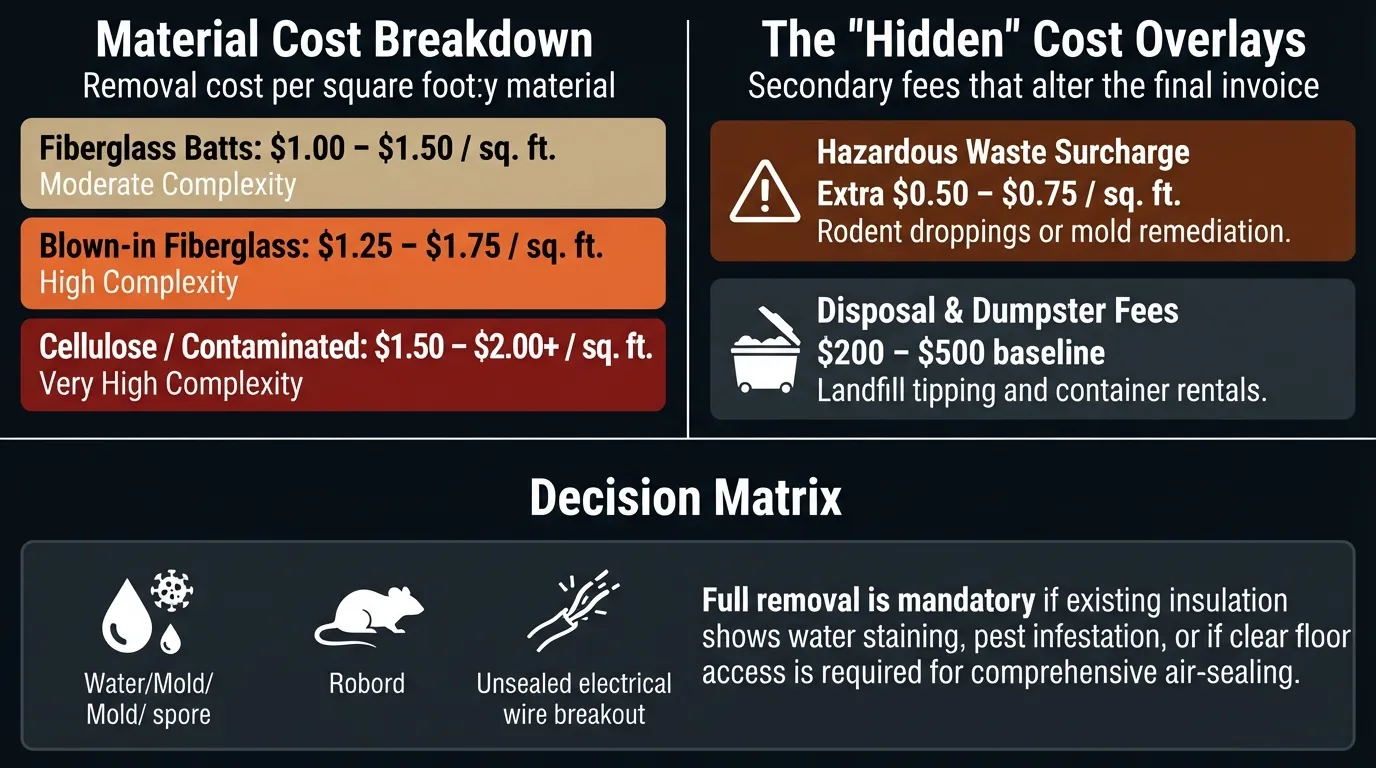
Professional attic insulation removal typically costs between $1.00 and $2.00 per square foot, depending on the material type, attic accessibility, and the level of contamination. For an average 1,000 square foot attic, homeowners should budget between $1,000 and $2,000 for complete removal and proper hazardous waste disposal. This service is essential when existing insulation is damaged by moisture, mold, pests, or smoke, as “topping off” over contaminated material can trap pollutants and compromise your home’s air quality.
Removal Cost Per Sq Ft
Costs vary significantly based on the complexity of the extraction process and the volume of material to be removed.
| Insulation Type | Cost (per sq. ft.) | Complexity |
|---|---|---|
| Fiberglass Batts | $1.00 – $1.50 | Moderate |
| Blown-in Fiberglass | $1.25 – $1.75 | High |
| Cellulose/Contaminated | $1.50 – $2.00+ | Very High |
Hazardous Waste Surcharge: If the insulation is contaminated by rodent droppings or mold, expect an additional $0.50 – $0.75 per sq. ft. for specialized cleaning and sanitization.
Disposal Fees: Ensure your quote explicitly includes dumpster rental and landfill tipping fees, which can add $200 – $500 to the total project cost if billed separately.
When Removal Is Necessary vs. Just Adding More
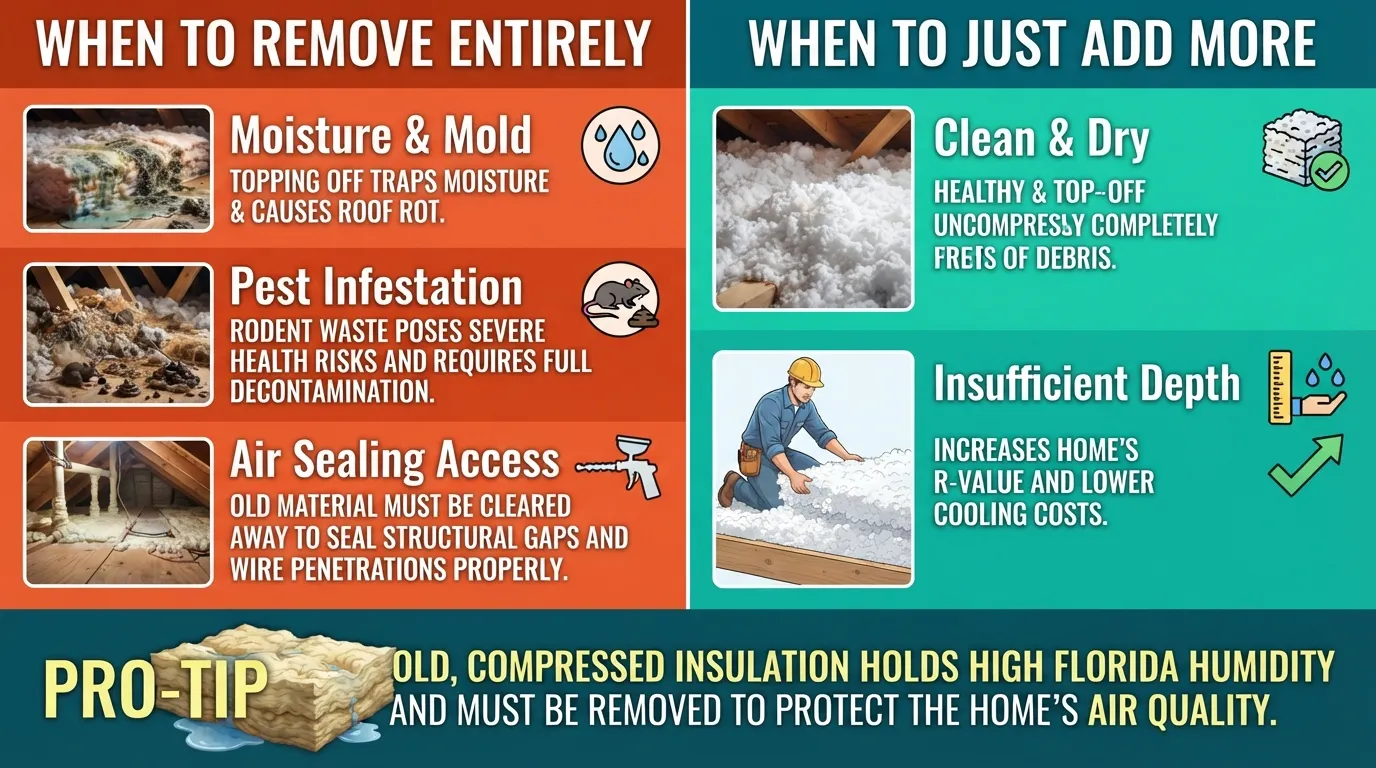
It is tempting to simply layer new insulation over old, but this is often a mistake. You should choose full removal if:
Moisture or Mold Damage: If the existing material shows signs of water staining or fungal growth, it must be removed. Adding new material will only feed the mold and trap moisture, causing structural roof rot.
Pest Infestation: Insulation that has been used as a nesting ground for rodents or insects contains hazardous waste that poses severe health risks. It should be removed entirely, followed by a professional attic decontamination.
Air Sealing Access: If your attic has significant air leaks at the top plates, electrical penetrations, or around recessed lighting, you must remove the old insulation to properly seal these gaps with foam. You cannot achieve an effective air-tight seal without a clear, accessible surface.
Pro-Tip: If your existing fiberglass has “settled” more than 50% of its original thickness, its R-value is compromised. In Florida’s high-humidity climate, old, matted insulation acts like a sponge, holding humidity and significantly increasing your cooling costs.
Now that you have accounted for removal and disposal, let’s explore the final project stage: necessary permits and local inspections to finalize your attic upgrade.
Attic Insulation Tax Credits & Rebates (2026)
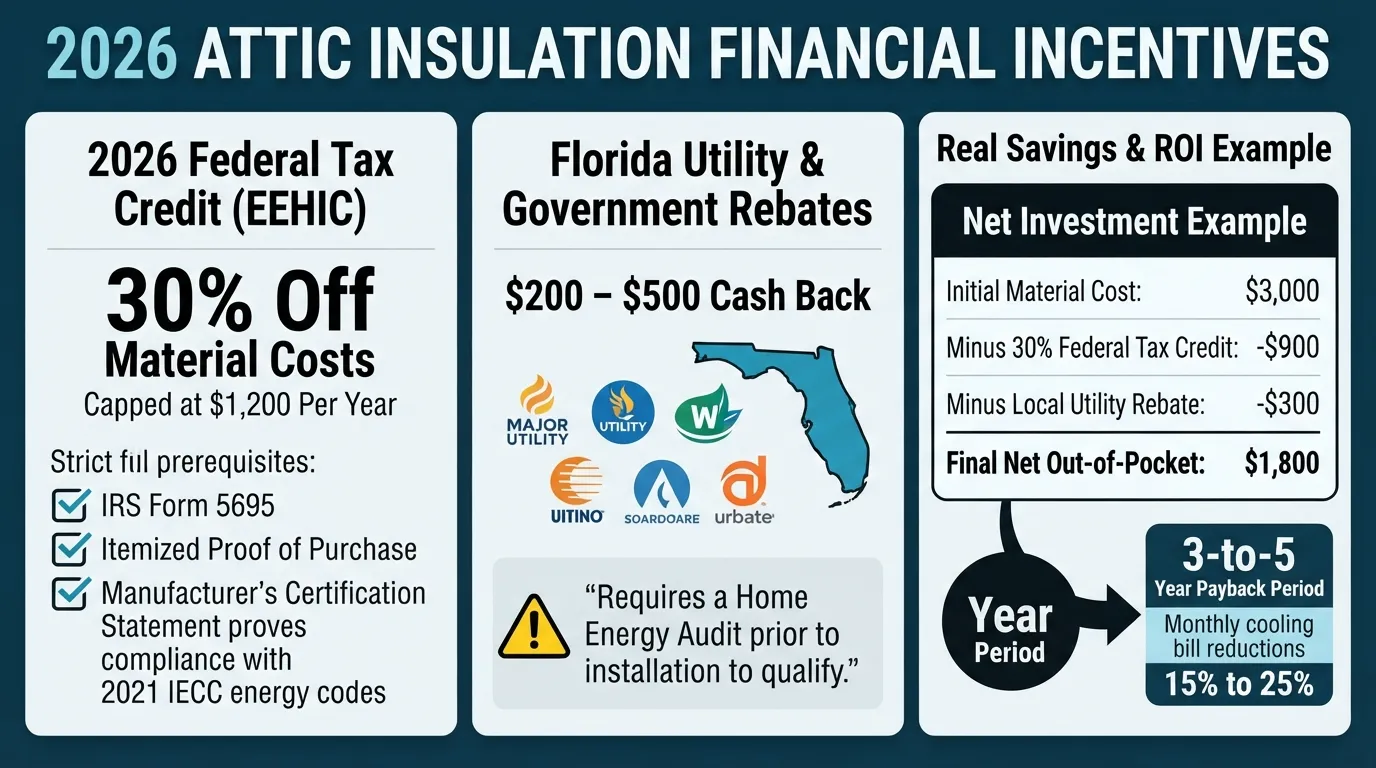
Under the Inflation Reduction Act, homeowners can claim a federal tax credit equal to 30% of material costs for attic insulation projects, capped at $1,200 annually. To qualify, the insulation must meet the 2021 International Energy Conservation Code (IECC) standards for your specific climate zone. Unlike a rebate, this is a non-refundable tax credit, meaning it directly reduces the amount of federal income tax you owe dollar-for-dollar, providing a significant offset to your total project investment.
Federal Tax Credit Eligibility
To successfully claim the Energy Efficient Home Improvement Credit (EEHIC), you must follow strict documentation requirements:
Manufacturer’s Certification Statement: You must obtain this document from the manufacturer confirming the product meets the required R-value and energy efficiency standards.
Qualified Products: Only materials designed specifically to reduce heat loss or gain (like fiberglass, cellulose, or spray foam) are eligible; installation labor costs do not qualify for the credit.
Proof of Purchase: Keep your itemized receipts and the installation contract, as you will need to file IRS Form 5695 with your annual tax return.
Florida-Specific Energy Rebates
Beyond federal credits, Florida homeowners may access localized incentives through utility-sponsored programs.
| Rebate Source | Typical Benefit | Best For |
|---|---|---|
| Utility Rebate | $200 – $500 | High-efficiency |
| Government Grants | Varies | Low-income |
| PACE Financing | $0 Down | Upfront cost |
Utility Tip: Before starting, check your specific utility provider’s website (e.g., FPL, Duke Energy). Many offer “Home Energy Audits” that are often a mandatory prerequisite to unlock these specific rebates.
Real Savings Example (Payback Period)
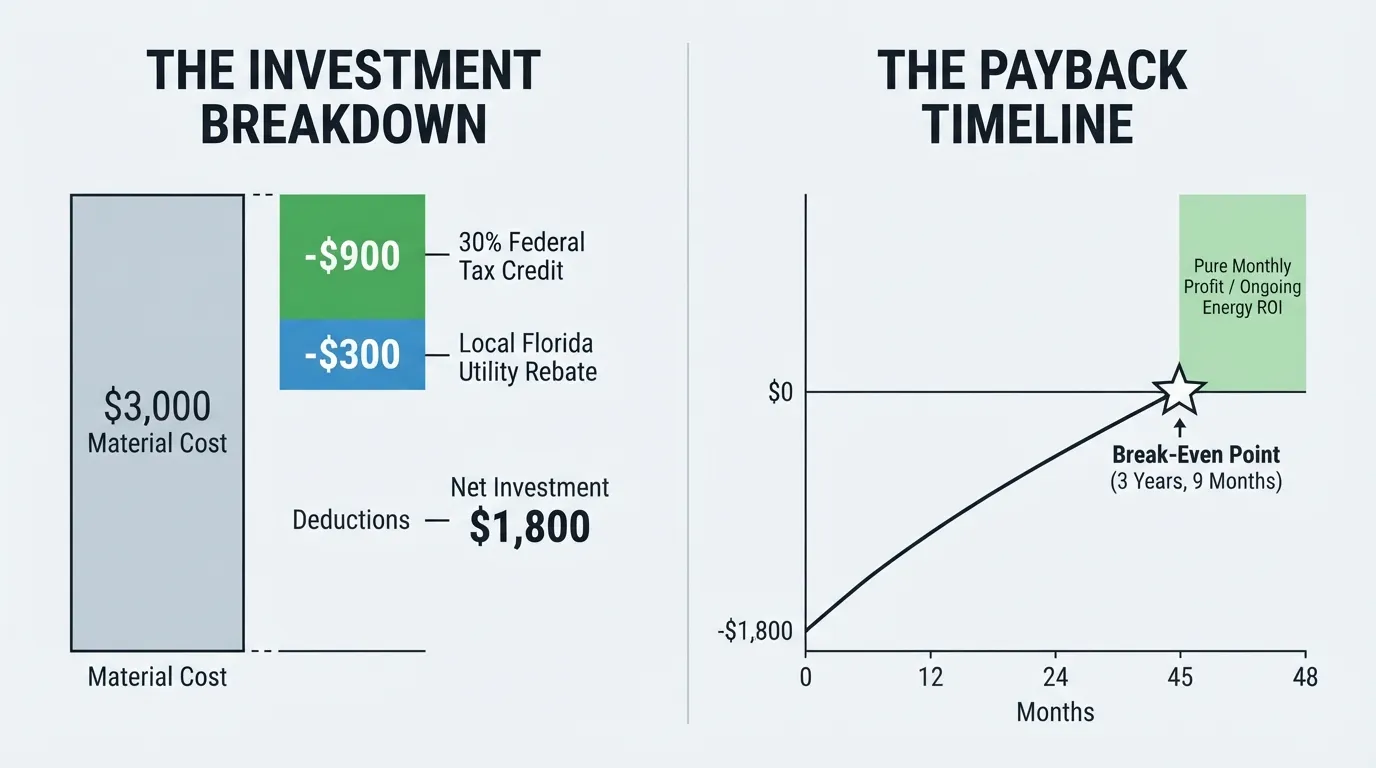
If you spend $3,000 on qualified insulation materials for a Florida home:
Federal Tax Credit (30%): You will receive $900 back as a reduction on your federal income taxes.
Utility Rebate: If your local provider offers a $300 rebate, your net investment drops to $1,800.
Payback Period: If your energy savings average $40 per month on cooling costs, your project achieves a full “break-even” point in just 45 months (under 4 years).
Pro-Tip: Always verify that your installer is licensed and insured, as utility rebates often require a copy of the installer’s license and a post-installation verification inspection to process your check.
Now that you have optimized your investment with tax credits, let’s wrap up with a summary of the most common mistakes to avoid to ensure your attic project delivers long-term comfort.
Frequently asked questions (FAQs)
Do Mice Like Blown-In Insulation?
- While insulation isn’t food, it is a premier nesting material.
- Fiberglass: Less attractive, but mice will tunnel through it easily.
- Cellulose: Often treated with borates (a natural fire retardant), which serves as a mild pest deterrent.
- Pro-Tip: Mice don’t just “get in”; they follow air currents. Air-sealing (using expanding foam to block wire penetrations, plumbing stacks, and top plates) is 10 times more effective at keeping rodents out than simply adding thick insulation.
Can You Put Too Much Insulation in an Attic?
- Yes, you can over-insulate to the point of creating a “trap.”
If you block your roof’s ventilation (soffits) with too much material, you will cause moisture buildup, leading to roof deck rot and mold.
Always ensure you have at least 1 inch of air gap between the insulation and the underside of the roof sheathing using baffle vents.
Vapor Barrier: Warm Side or Cold Side?
- The rule is simple: the vapor barrier must always face the warm side of the insulation (the conditioned living space).
In Florida (Hot/Humid): You generally do not want a vapor barrier on the attic floor, as it traps moisture inside the home’s structure.
Recommendation: Use “unfaced” insulation to allow the material to breathe, or consult a local HVAC pro regarding your specific home’s humidity control.
How Do You Insulate Attic Rafters?
- Insulating rafters (creating a “hot roof” system) is a specialized task.
Material: You must use closed-cell spray foam to provide both insulation and a vapor barrier.
Warning: Never use fiberglass batts between rafters without professional expertise; it will almost certainly lead to trapped condensation and structural damage in a humid climate like Florida.
- Now that you have clarity on these technical FAQs, you are ready to finalize your planning and move forward with a high-performance attic insulation project.
Attic Insulation Cost in Florida/Miami
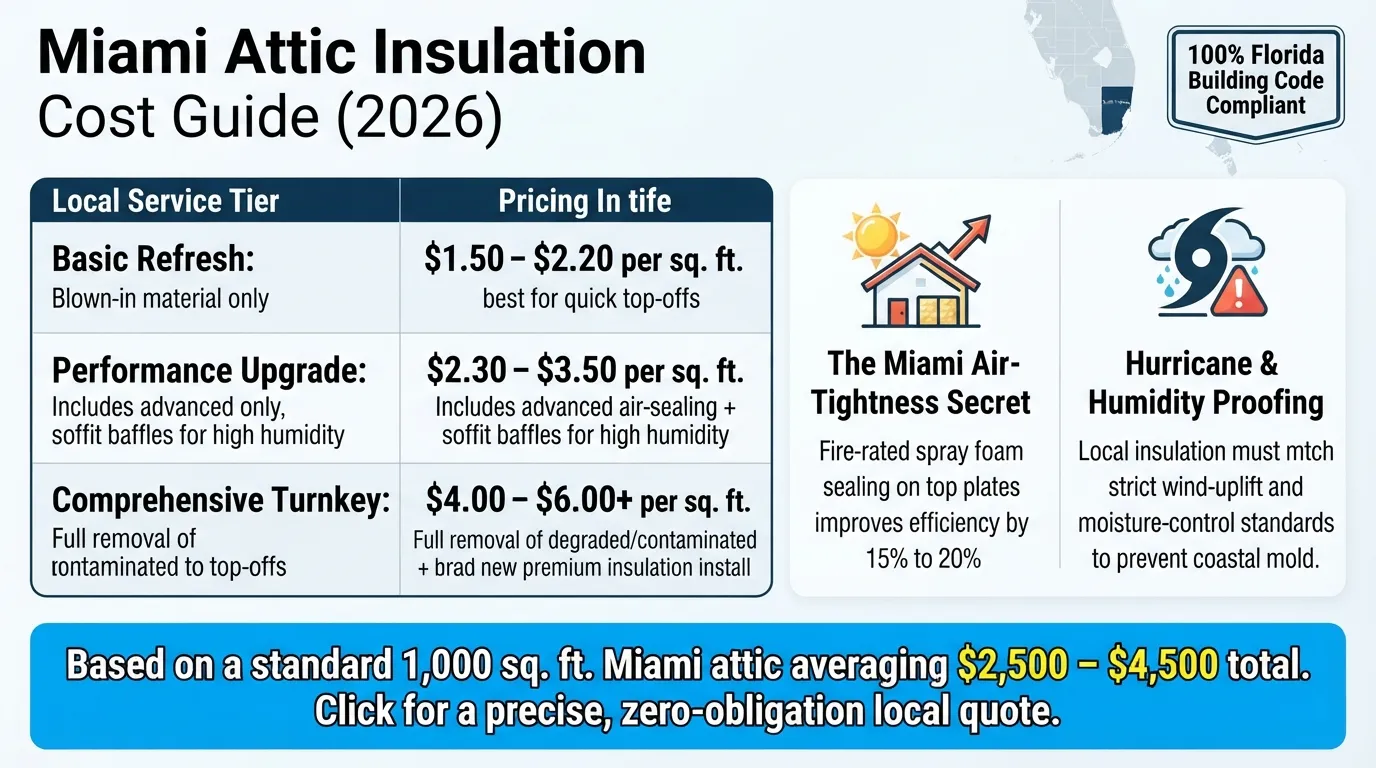
The average cost for attic insulation in Miami and South Florida ranges from $1.80 to $3.50 per square foot for a professional, code-compliant installation. This pricing typically includes professional material selection, labor, and compliance with the Florida Building Code, which mandates higher thermal resistance than northern states. Factors such as attic accessibility, the necessity of removing degraded insulation, and the integration of air sealing significantly influence the final project cost, with a standard 1,000 sq. ft. Miami attic project averaging $2,500 to $4,500.
Why Florida Attics Need Special Consideration
Florida’s unique environment demands more than standard insulation practices; your attic must be treated as a dynamic thermal system.
Intense Heat & Humidity: Unlike northern climates focused on retaining heat, Florida attics must resist intense radiant heat gain and manage moisture to prevent mold growth.
Hurricane Building Codes: Recent updates require that all attic insulation and venting systems meet strict wind-uplift and moisture-control standards to withstand Florida’s extreme weather.
Venting is Crucial: Without proper soffit ventilation, even the highest R-value insulation will fail. You must ensure your installation includes professional-grade baffles to keep intake vents clear.
Average Cost in Miami/South Florida
| Service Type | Cost (sq. ft.) | Features |
|---|---|---|
| Basic Refresh | $1.50 – $2.20 | Blown-in only |
| Performance Upgrade | $2.30 – $3.50 | Sealing + Baffles |
| Comprehensive | $4.00 – $6.00+ | Removal + New Install |
Pro-Tip (The Miami Air-Tightness Secret): Most Miami contractors skip air sealing. Before blowing in new insulation, ensure your technician seals the top plates and electrical penetrations using fire-rated spray foam. This single step can improve your attic’s thermal performance by an additional 15% – 20% compared to insulation alone.
Local Material Choice: In South Florida, prefer borate-treated cellulose or high-density fiberglass, as these materials offer better resistance to the high-humidity, pest-prone environment found in coastal Miami.
Get a Free Local Quote
Don’t settle for generic national pricing. As a locally-owned Miami service provider, we understand the specific attic challenges of South Florida homes—from moisture-laden attics to outdated building code compliance. [Click here to request your free, on-site Miami attic insulation inspection and local quote today.]
Now that you understand the specific requirements for Florida attics, you are fully prepared to select the best insulation path for your home’s long-term efficiency and comfort.
Final Verdict — Is Attic Insulation Worth the Cost?
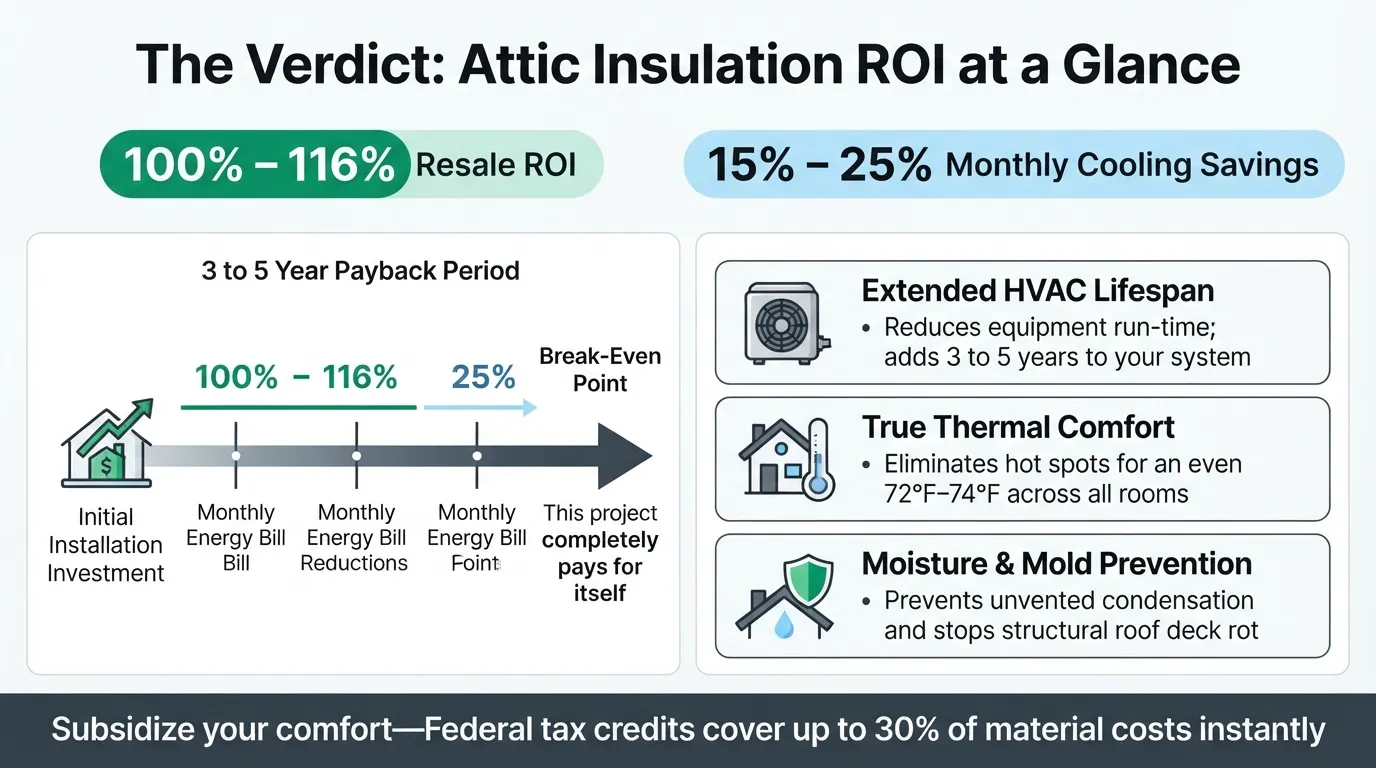
Yes, attic insulation is objectively one of the most profitable home improvements you can make, typically offering a return on investment (ROI) of 100% to 116% upon home resale while slashing monthly cooling costs by 15% to 25%. For the average Florida homeowner, a properly insulated attic pays for itself in energy savings within 3 to 5 years, transforming your home from an energy-leaking liability into a high-performance, comfortable living environment.
The Bottom Line: Does the Math Work?
When you balance the upfront installation investment against long-term energy savings and tax benefits, the financial case becomes clear.
| Benefit Metric | Annual Impact | Value Impact |
|---|---|---|
| Cooling Cost | 15% – 25% | Resale appeal |
| Energy Consumption | 20% Lower | Reduces carbon |
| Tax Credit | 30% (Up to $1,200) | Cost offset |
Why This Is Your Smartest Investment
Beyond the immediate cash flow improvements, upgrading your insulation solves structural problems that most homeowners ignore until they become expensive:
Extended HVAC Lifespan: By reducing the heat load in your attic, your air conditioner runs shorter, less frequent cycles. This can extend the life of your expensive HVAC unit by 3 to 5 years.
True Thermal Comfort: Insulation isn’t just about utility bills; it eliminates “hot spots” in your home, ensuring a consistent 72°F – 74°F across every room in your house.
Mold & Rot Prevention: Properly installed insulation combined with effective air sealing prevents the condensation that leads to structural roof deck rot, potentially saving you $5,000+ in future roof repair costs.
Pro-Tip (The Resale Multiplier): When selling your home, an “Energy Efficiency Report” showing upgraded R-value insulation acts as a massive competitive advantage. Realtors report that energy-efficient homes in Florida stay on the market 15% – 20% shorter than un-upgraded counterparts.
If you are tired of high electric bills and an uneven climate in your home, the time to act is now. With federal tax credits covering 30% of your material costs and energy savings mounting every month, your attic upgrade is effectively subsidized.